Kubernetes is a complicated piece of machinery that consists of multiple different tiny components. If you were missing even one of these components, the cluster would not function properly, and you might even experience severe downtime for your applications. Imagine applying a deployment manifest, but your pods get stuck in a pending state. You try to debug what’s going on but the pod is not even generating any events even after a few minutes have passed.
Whenever you create a pod in Kubernetes, there are a few things that happen behind the scenes. First, the pod is assigned to a particular node in the cluster. After the pod has been assigned to a suitable node, the pod is created, and the containers within it are started. The two components responsible for the above process are the kube scheduler and the kubelet respectively.
A pod runs on a node within the Kubernetes cluster, and the node contains the kubelet and system resources that are required for running the pod. However, when assigning a pod to any node, it must be ensured that the node has sufficient resources to run the pod or you may face an OOMKilled error or degraded application performance due to a lack of sufficient CPU/Memory resources. By default, the kube-schedulers filter and select the appropriate node for scheduling the pod.
Within this blog, you will learn about scheduling in Kubernetes, how the Kubernetes Scheduler assigns pods to nodes, and what are some of the methods that are used for scheduling in Kubernetes.
How Does the Kubernetes Scheduler Work
When a pod is created in Kubernetes, it will always go into a pending state, until it knows where the pod should run. Before the kubelet of any node can go and create the pod, it needs to be placed on a node. The kube-scheduler is responsible for evaluating the nodes, and placing the pod on a node with sufficient system resources i.e. CPU, memory, and storage, or any specific constraints that are set by the user.
Once the scheduler places the pod on a node, the kubelet will create the pod and spin up the containers within it. When the scheduler tries to schedule a pod to any node, there are a few different stages that the scheduler goes through.
- Node Filtering: During the filtering stage, the scheduler checks the nodes where it is possible to schedule the pod. For example, the scheduler will check if the node has sufficient system resources for running the pod. Advanced filtering can be assigned by using some of the techniques discussed later in this blog.
- Node Scoring: After the nodes have been filtered, the available nodes are assigned a score. This score is assigned based on how well the node fits the requirements of the pod such as available system resources and resource requirements of the pod, certain scheduling rules, etc. The goal of scoring the nodes is to find a node that is best suited to run the given pod.
- Node Selection: After the nodes have been scored, the node with the highest score will be selected to schedule the pod. This selected node will be able to run the pod in the best possible way. For instance, the node has sufficient resources or has specific resources like a GPU, etc.
- Pod Binding: Finally, once a node is selected, the information of the selected node is queried back to the API server. The API server then updates the pod’s manifest and adds the nodeName. This then binds the pod to the particular node. Once this is done, the kubelet takes over and starts creating the pod and the containers.
You can use certain rules while creating pods to ensure that they are scheduled only on nodes that meet the constraints that are set within the pod. If no rules are defined in the pod manifest, the scheduler will assign the pod to a schedulable node and have the maximum number of available resources.
Methods for Scheduling Pods
You can set additional filter conditions with the help of labels and selectors. There are a few different ways that can be used for scheduling a pod to nodes. Let’s explore all the methods that are available for scheduling the pods.
Node Name
The nodeName field specifies the exact Node where the pod should run. With this method of scheduling, a pod bypasses the kube-scheduler. It can also be considered as manually scheduling the pod on a particular node. You only need to ensure that you enter the correct Node Name and that the node exists.
Here’s an example of scheduling a pod on a node named node01:
apiVersion: v1
kind: Pod
metadata:
  name: pod
spec:
  containers:
  - image: nginx
    name: pod
  nodeName: node01
In the above manifest, the pod will run on node01 without considering any of the other nodes that exist in the cluster.
Node Selector
The nodeSelector field provides a way to schedule pods to any particular node using labels. It is a much more efficient way of scheduling pods as compared to using nodeName. The nodeName method of scheduling relies on the existence of a Node with the exact name. This can become tricky in a cloud environment where Nodes are provisioned and destroyed at will.
Node Selector on the other hand only expects that a particular node will have the appropriate labels assigned to it. Node Selector ensures that the node has all the labels that are defined within the nodeSelector field in the pod’s manifest file.
Let’s use the nodeSelector field to schedule a pod to a specific node. Let’s assume that we have a workload with a lot of sensitive processes and it needs to run on a Node called secure-node which has been hardened for running all security-related pods. First, we will need to label the node so that it can be identified. We will assign it two labels i.e. workload=sensetive and env=prod. You can either edit the node and add the labels, or run the below imperative command.
kubectl label node secure-node workload=sensetive env=prodNow the node has the appropriate labels that can be used to configure the scheduling rules. All that remains is to reference the labels within the pod’s manifest file. In the below manifest, you can see that we have included both labels in the nodeSelector field.
apiVersion: v1
kind: Pod
metadata:
  name: secure-pod
spec:
  containers:
  - name: secure-container
    image: busybox
  nodeSelector:
    workload: sensitive
    env: prod
Now the kube-scheduler will try to match the labels mentioned in the pod’s manifest with a node that has all of the mentioned labels. If a node has only one label, the pod will stay pending until the scheduler finds a node that matches all of the labels.
Taints & Tolerations
One of the more advanced techniques for scheduling workloads to nodes includes setting up taints on a node and adding tolerations to the pods. You can think of taints as a lock to restrict access to the node. A toleration is the key to the lock. Unless a particular pod has the correct key (toleration), it cannot open the lock (taint) placed on the node.
Essentially, taints and tolerations allow you to control which pods get placed on the specific node. They can also be used to disable scheduling completely, which is useful during tasks such as cluster upgrades or maintenance.
Taints are applied to Nodes in the form of key-value pairs. Let’s look at a simple example to see how taints & tolerations in actions. Let’s assume that we have a few nodes that are reserved for running AI-related workloads. We can configure the taints and toleration such that only those particular nodes will run the workloads.
Let’s first add a taint to the node that is dedicated for running the AI workload. Taints are added in the form of key-value pairs followed by the effect that the taint should have. The following command can be used to add a taint to the node
kubectl taint node-ai workload:ai:NoScheduleNow that the Node is tainted, pods will not be scheduled on this node unless they have the appropriate toleration. You can use the below manifest to create a pod that runs the OLLAMA image and schedule it on the node.
apiVersion: v1
kind: Pod
metadata:
  name: ollama-pod
spec:
  containers:
  - name: ollama
    image: ollama/ollama
  tolerations:
  - key: "workload"
    operator: "Equal"
    value: “ai”
    effect: "NoSchedule"
This will ensure that the ollama pod will only run on the nodes that have the taint workload=ai.
Check out in-depth about taint and tolerations and how it works.
Affinity & Anti-affinity
Earlier in this blog, you learned about the nodeSelector field for scheduling workloads. Kubernetes has the concepts of Affinity and Anti-Affinity that expand on the basic constraints provided by the nodeSelector. Affinity and anti-affinity allow you to define more advanced scheduling rules.
While nodeSelector looks for a node with every single label, Affinity, and anti-affinity allows you to better control the selection logic of the nodes. It also lets you define hard and soft rules i.e. based on how you configure the rules, the pod may still get scheduled on a node even if all the constraints are not met.
Let’s understand the two types of Affinity and Anti-Affinity that can be used for configuring the scheduling rules.
Node Affinity
As mentioned earlier, Node Affinity is very similar to the nodeSelector field, with the key difference being that Node Affinity is more descriptive i.e., the scheduling conditions can be more fine-grained.
There are two ways to schedule a pod using Node Affinity.
requiredDuringSchedulingIgnoredDuringExecution
- This is a hard rule set when scheduling a pod. The scheduler will only place the pod on the node if the criteria are met. If no nodes meet the required criteria, the pod will remain pending.
- It is interesting to note that if the node’s condition changes after the pod is scheduled, it will still stay running on the node. The pod will continue to run on that particular node until deleted.
preferredDuringSchedulingIgnoredDuringExecution
- This is a soft rule for scheduling the pod. When using this rule, the scheduler will try to find a node that meets the defined criteria, but if such a node does not exist, the pod will still be scheduled on an available node even though it does not meet the preferences.
- Similar to the
requiredtype, changes to the node after the pod is scheduled, will not affect the pod’s placement.
Node Anti-Affinity
Unlike Node Affinity which is used to attract pods to node, Node Anti Affinity is the opposite. It is used to repel pods from particular nodes.
While Affinity is used to determine which pods to place on the node, Anti affinity is used to determine which pods should not be placed on the node. This is particularly useful when you want to avoid placing specific workloads on certain nodes, such as keeping workloads that do not require a GPU away from nodes that have a GPU.
Pod Affinity & Anti-Affinity
When using Pod affinity & Anti-Affinity, the scheduler compares the labels of the existing pods that are running on the nodes. When we talk about Node Affinity, the scheduler compares the labels on the actual node itself.
- Pod Affinity
Pod affinity is useful when you want to schedule certain pods to be scheduled on the same node, or close to other pods that meet the specific requirements. This is useful when you have applications that need low latency between its services.
- Pod Anti Affinity
Pod anti-affinity is used to make sure that pods do not run near each other and run across the available nodes. For example, you might want to increase the availability of a particular application. To achieve this, you would use pod anti-affinity rules so that the pods are spread out across all the nodes in the cluster. This helps you achieve high availability for applications as even if one node goes down, there are other pods of the same application scheduled on different nodes.
Pod Topology Spread Constraints
When you create a Kubernetes cluster that is intended to run for production workloads, you want to ensure that the cluster is highly available i.e, even if one node fails, there are other nodes to schedule workloads on so that the user experience is not degraded. To enable this high-availability cluster, the nodes of a cluster are spread across different availability zones and regions.
Pod Topology spread constraints are an advanced scheduling method that helps you distribute pods among different failure domains i.e different availability zones, regions, and other user-defined constraints. Having nodes in different availability zones also ensures that your users have a smooth experience and experience minimal latency no matter their location.
When you schedule a workload in this cluster, you want to ensure that the pods are evenly distributed among all the nodes and availability zones. However, when the workloads scale up or down, it can get difficult to spread them out evenly across all the pods. Let’s say that you have a total of 10 nodes, and the pod has only 5 replicas. The Pod Topology Spread Constraints can be used to find the best way to schedule these 5 pods so that they are available across all availability zones.
Let’s say that you have an EKS cluster running with 3 nodes and you want to evenly distribute the pods of an application across the 3 different nodes. You can use the below YAML file to evenly distribute the pods among the nodes.
kind: Pod
apiVersion: v1
metadata:
  name: prod-app-pod
  labels:
    application: prod
spec:
  topologySpreadConstraints:
  - maxSkew: 1
    topologyKey: zone
    whenUnsatisfiable: DoNotSchedule
    labelSelector:
      matchLabels:
        application: prod
  containers:
  - name: nginx
    image: nginx
When the above manifest is applied, Kubernetes will try to schedule the pods evenly across the nodes, using the parameters defined in the topologySpreadConstraints. The important fields in the parameters are as follows:
- maxSkew: MaxSkew determines how unevenly the pods can be spread across nodes. For example, if there are two nodes and five pods, Node1 will have 3 pods and Node2 will be 2 pods
- topologyKey: This defines the spread constraints that will apply only to nodes that have this key in their labels. For example, in the above example, the key is zone. So Kubernetes will only consider the nodes which have the zone key.
- whenUnsatisfiable: This defines the behavior that should occur when the spread conditions are not met. It can either be DoNotSchedule to prevent scheduling, or ScheduleAnyway which will schedule the pods even if the constraints are not met.
The YAML that is defined above only creates a single pod. However, when we create more pods with the same parameters in the topologySpreadConstraints field, the pods will be distributed across the nodes. This can also be defined in the pod spec in a Deployment object's manifest file.
Use cases for different scheduling methods
So far, we have seen four different methods that can be used for scheduling pods on a Kubernetes cluster. Now you may be wondering, when so many methods exist, which one should be used? Let’s try and understand the pros and cons of each scheduled method, and when would be the best scenario to use which.
NodeName
It is not recommended to use NodeName for scheduling pods especially if you are running workloads in a production cluster. As it is a manual scheduling process, you need to know the exact name of the node. However, when the node goes down, the pod will not be evicted and scheduled on a different node. As this method bypasses the scheduler, the pod doesn’t adapt to the changes within the cluster.
If you want to test if a pod works well with a particular node, in that case, you might want to consider using NodeName for scheduling the pod. Compared to using NodeName, using NodeSelector would be a better choice as the scheduler takes node resources into account, whereas with NodeName, all these considerations are completely ignored.
Node Selector
Node Selector is the preferred mode of scheduling when you don’t have any complex scheduling rules to follow. As it follows a simple label-matching mechanism, as long as the particular Node matches the labels mentioned within the selector, the pod will be scheduled on the Node. Even if the node goes down, the pod will get rescheduled on a different Node having the same labels.
As long as your scheduling needs are simple, Node Selector will be a good option for your requirements. However, if you have an advanced requirement, for example, nodes belonging to multiple availability zones, or applications that require very low latencies, using node affinity might be a better choice.
Taints & Tolerations
When you want to block scheduling workloads on a particular node or restrict the workloads that can be scheduled on a node, you will want to use Taints & Tolerations. As an example, if you are upgrading the cluster nodes, you will want to make sure that no pods can get scheduled on the node during the upgrade process to avoid service disruptions and loss of data.
You might also want to restrict production workloads from being scheduled on critical nodes such as the control plane node, or from nodes that are less reliable. Using Taint’s and Tolerations in combination with Node Selectors can give you granular control over how to schedule your workloads.
Affinity & Anti-Affinity
When you want to define complex scheduling strategies and schedule workloads based on certain attributes that the node or pods have, using Affinities might be a good option for you. As Affinity allows you to set rules based on Nodes as well as Pods, you can determine how workloads should be scheduled to particular nodes, or how they should be scheduled in relation to other pods.
For example, Node Affinity and Anti-Affinity can be used to schedule workloads on a node belonging to a particular data center, or having specific hardware specifications. Pod Affinity and Anti-Affintiy on the other hand can be used to schedule pods close to each other to ensure minimal latency or spread them across different nodes to achieve high availability and reliability.
Combining Scheduling Methods
All of the scheduling methods that we have discussed in this blog are not limited to using just one at a time. The different methods can be combined in a variety of ways to achieve the exact scheduling constraints that you want for your particular workload. While the combination of these scheduling methods satisfies a majority of the use cases, if there is a scheduling rule that you are unable to create using these methods, you can write your custom scheduler.
Below we have explored a few of the different scheduling combinations that can be used when creating scheduling rules for workloads for specific scenarios. Apart from the ones mentioned below, several different scheduling combinations can be created to fit different requirements.
Taints & Tolerations with Node Selectors
Let’s say that you want to schedule a GPU-intensive workload on a node that has the label gpu=true. Additionally, the node is running critical workloads so you must ensure that only critical workloads are getting scheduled to this node and nothing else.
You can use Node Selectors to select the particular label for scheduling the pod to. Additionally, the node will have a taint on it to prevent non-critical workloads from being scheduled on it. Hence, the pods that have the label selector for the node with the GPU, along with the toleration for the critical workloads will get scheduled on this node.
Affinity with Taints & Tolerations
Imagine that the nodes within your cluster are spread across multiple availability zones, and you have multiple different types of nodes in the cluster. A production pod has to be placed in the different availability zones on the nodes that have high reliability.
You can use Affinity to spread the pods across the different availability zones and use taints with appropriate tolerations to ensure that the pod gets scheduled on the node meant for high reliability.
Scheduling made Easier with Devtron
So far we've seen all the different methods of how you can schedule workloads on Kubernetes. All the different techniques can be combined together to create unique scheduling rules to place your pods on specific Nodes. Spreading the pods across the different nodes and availability zones also ensures that the deployed application is always available.
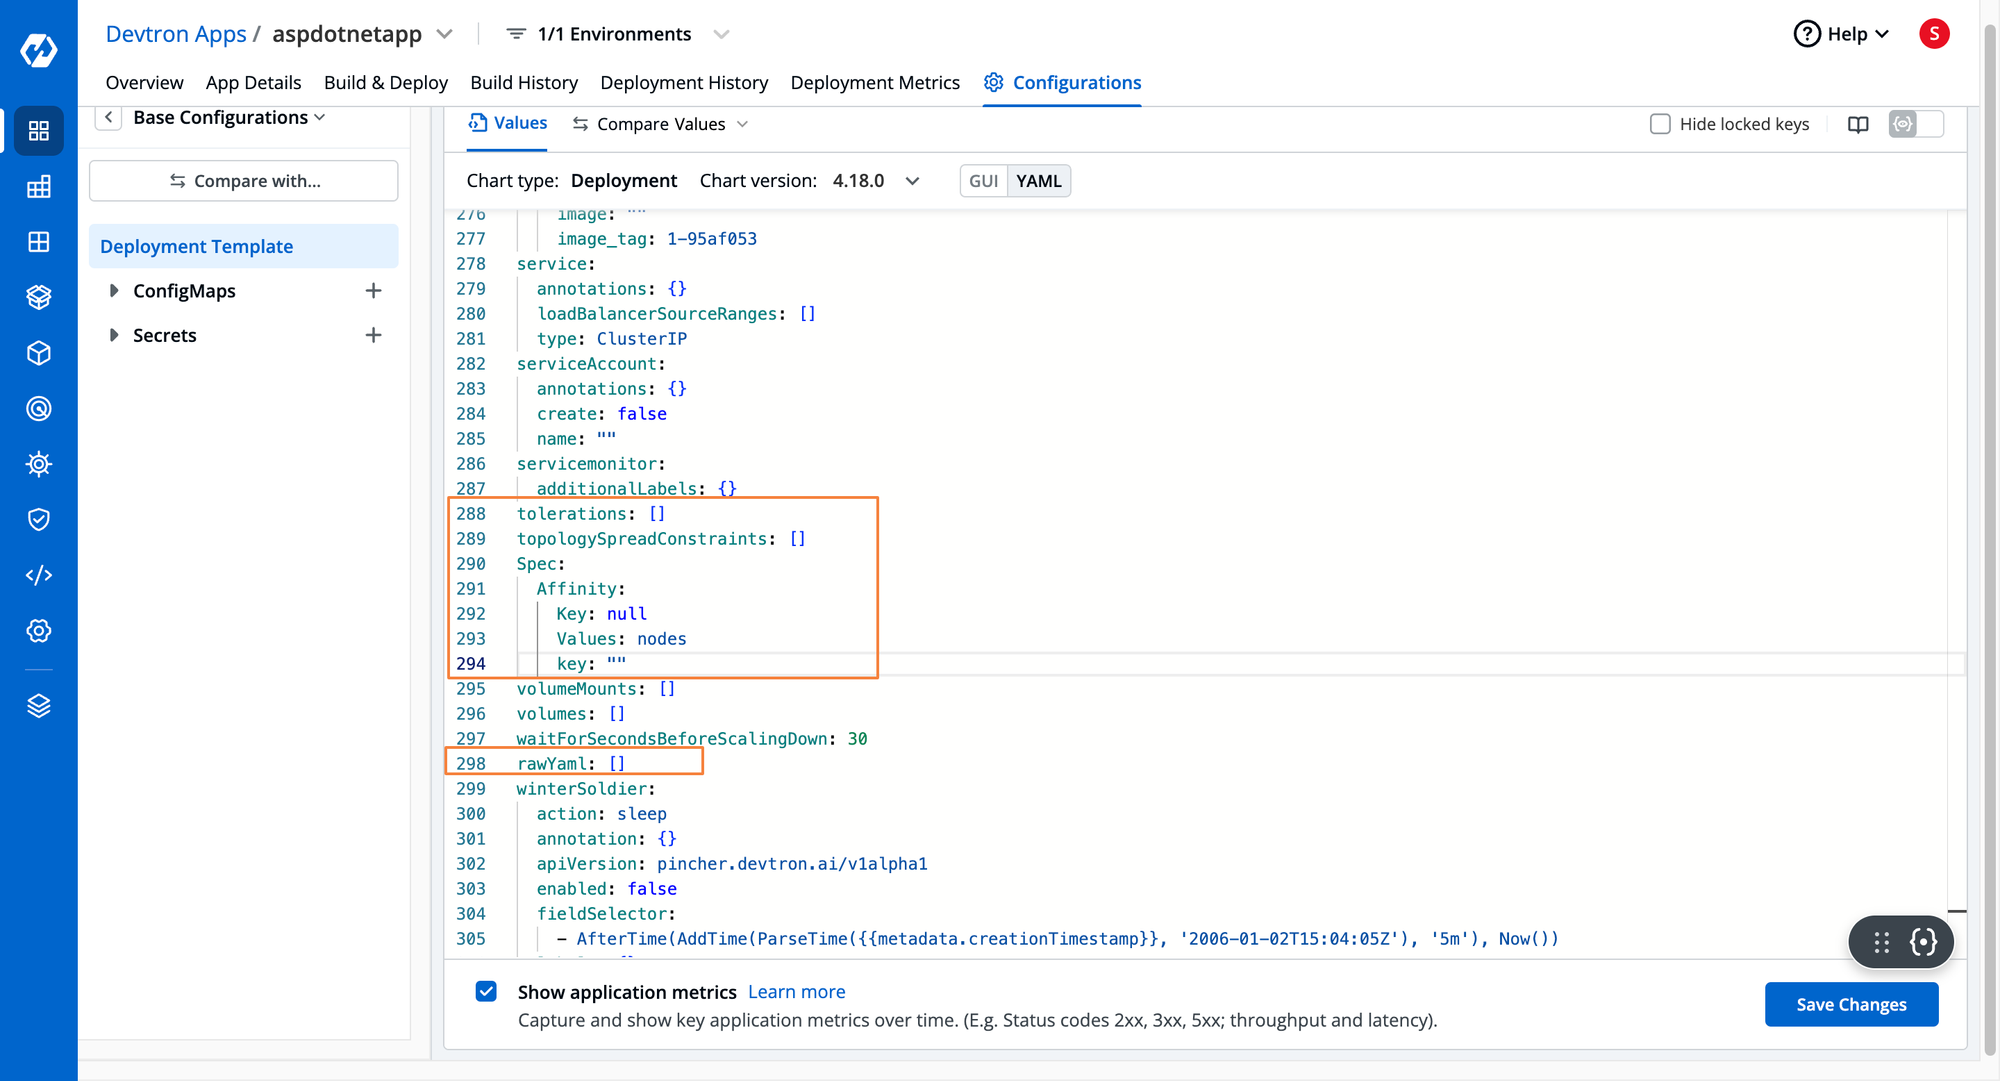
Devtron is a complete end-to-end Kubernetes Management platform which helps ease out the operations lifecycle from containerization to deploying and handling Day 2 Kubernetes operations. It provides a dedicated deployment template, which contains a lot of major K8s configurations such as scheduling rules. All you have to do is plug in the correct values. If you wish to pass in some custom configurations, Devtron also has the rawYAML field where you can directly pass in YAML configurations while deploying the application
To learn more about what Devtron does, and how it is simplifying the challenges with Kubernetes, please check out this blog.
Conclusion
There are multiple nodes that run within a Kubernetes cluster, and there needs to be specific rules about how pods are scheduled on the different nodes. The kube-scheduler is one of the core Kubernetes components that analyzes and evaluates the nodes and decides on which node should a pod be scheduled.
Apart from its default scheduling considerations, there are several different methods that can help configure the behavior of the kube-scheduler. For manually scheduling pods to a specific node, the Node Name field can be used within the pod manifest file. However, Node Name bypasses the kube scheduler which can lead to problems in the future. For example, if the node is destroyed, it will not get scheduled to a different available node.
Node Selector allows nodes to be selected based on the labels that are assigned to the node. It will schedule the pod onto the node that matches all the labels mentioned within the Node Selector field. To restrict the scheduling of pods to a node, you can taint the node which is like a lock. To open the lock, and allow scheduling certain pods on the node, tolerations have to be added to the pod.
Finally, there is Affinity and Anti-Affinity that allows for defining quite complicated scheduling constraints. It can be applied to nodes as well as pods. Affinity determines how pods are attracted to nodes or other pods, whereas anti-affinity does the opposite i.e. repels pods from certain nodes or other pods based on how it has been configured. You can also set soft scheduling rules within Affinity to ensure that the pod will be scheduled regardless of whether conditions are met.