In today's world of containerized applications, it's really important to keep your apps secure. Containers package not just your app but also parts of the operating system. So, finding and fixing any weaknesses in your container images is crucial. Trivy is a great tool for doing this. It can be easily used with the Devtron platform to improve security further and harden your application.
In this blog post, we'll show you how to use Trivy on Devtron to scan your container images for vulnerabilities. This will help you ensure your app deployment process is strong and secure.
Understanding Trivy and Devtron
Trivy is an open-source vulnerability scanner specifically designed for containers. It can quickly identify vulnerabilities within container images by analyzing their components, including operating system packages and application dependencies.
On the other hand, Devtron is a comprehensive Kubernetes-native continuous delivery platform that simplifies application deployment and management.
By combining the capabilities of Trivy and Devtron, you can seamlessly integrate vulnerability scanning into your Devtron CI pipeline and automate security checks throughout the deployment process.
Benefits of Integrating Trivy on Devtron
Integrating Trivy on Devtron brings several advantages to your containerized application deployment workflow:
Early Detection of Vulnerabilities
By incorporating Trivy into your CI pipeline on Devtron, you can scan container images for vulnerabilities early in the development cycle. This allows you to identify and address security issues before they become potential risks in production.
Streamlined Scanning Process
Devtron simplifies the process of integrating Trivy by providing seamless integration and easy configuration options. You can easily set up Trivy scanning as part of your build pipeline, ensuring that vulnerability checks are performed consistently and efficiently.
Automated Vulnerability Assessment
Devtron's integration with Trivy enables automatic vulnerability assessment of container images. You don't have to initiate scans or track vulnerabilities separately manually. Devtron takes care of running Trivy scans and provides comprehensive reports within the platform itself.
Enhanced Security Governance
By integrating Trivy with Devtron, you can establish robust security governance by defining security policies. This integration enables you to configure Devtron to prevent the deployment of container images based on the severity of vulnerabilities, categorized as Critical, Moderate, or Low. As a result, this implementation guarantees that only secure images can be deployed within the cluster, significantly enhancing overall security protocols.
How to Scan Vulnerabilities with Trivy on Devtron?
Follow these steps to integrate Trivy vulnerability scanning into your Devtron CI pipelines
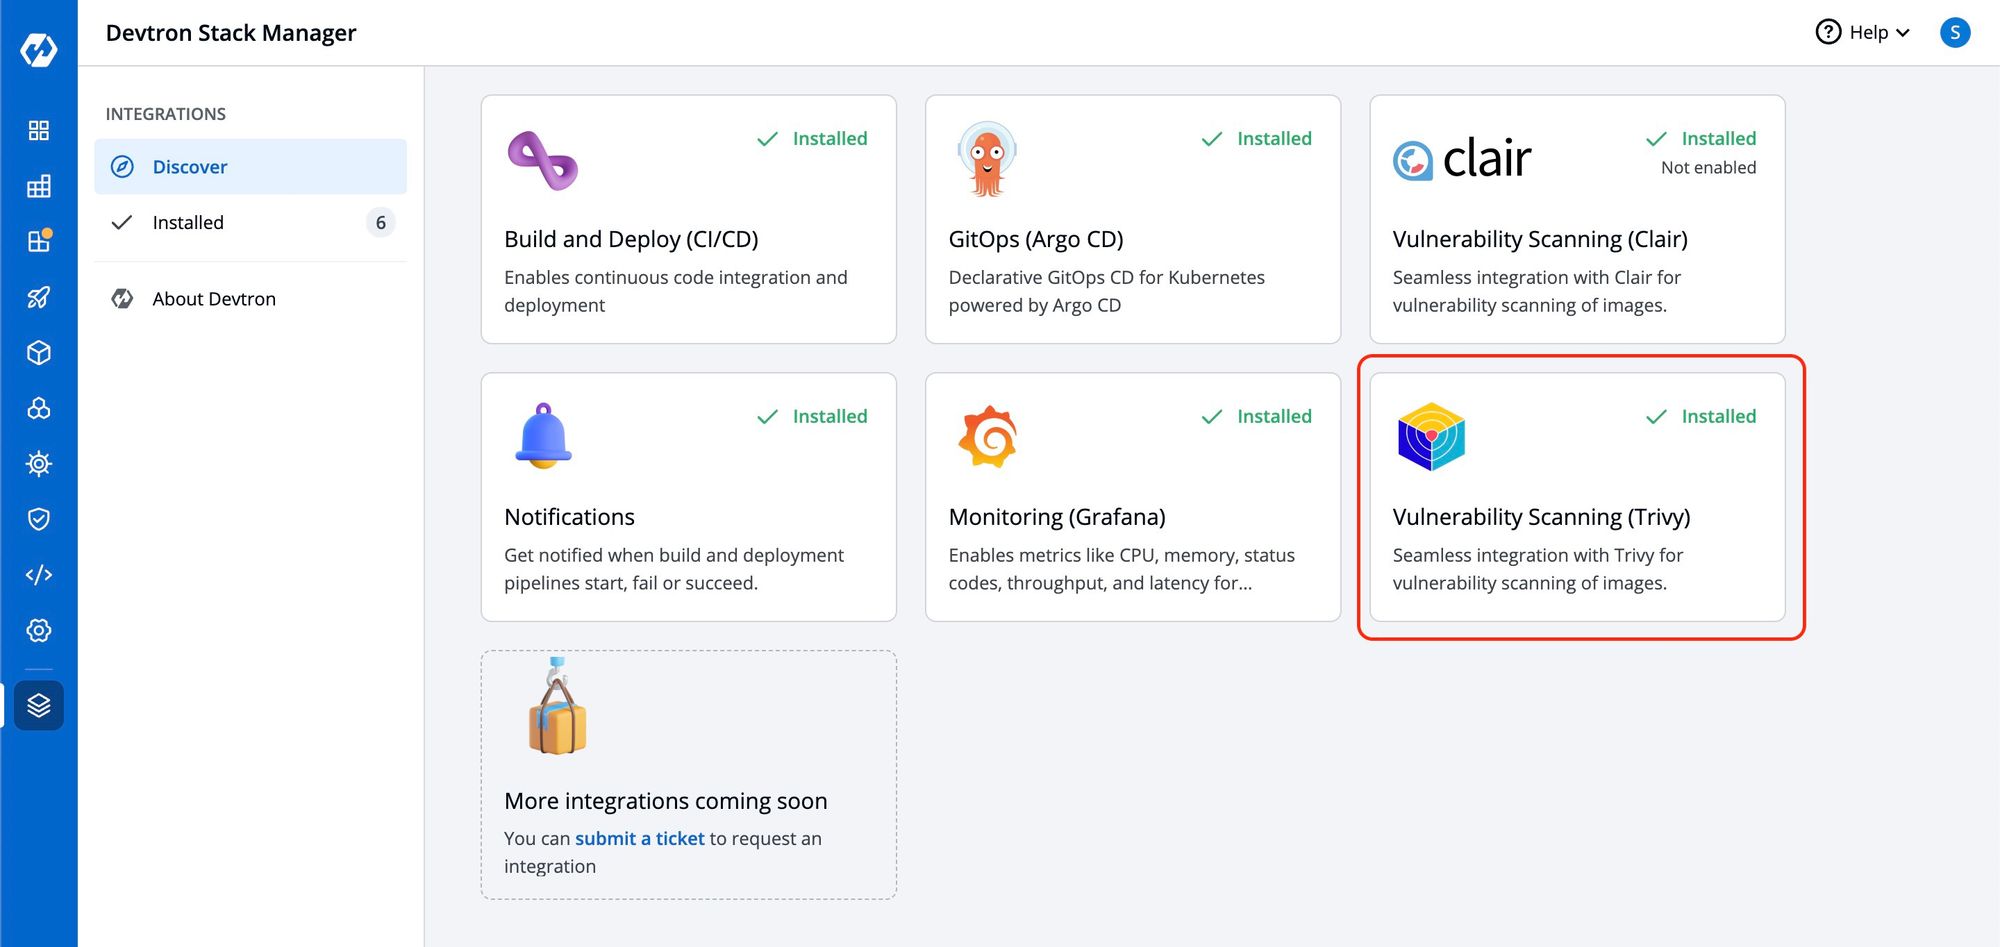
Step 1: Go to the stack manager and install Trivy integration.
There are multiple integrations available in the Devtron stack manager. To integrate Trivy with Devtron, the first step is to install the Trivy integration from the Devtron stack manager.
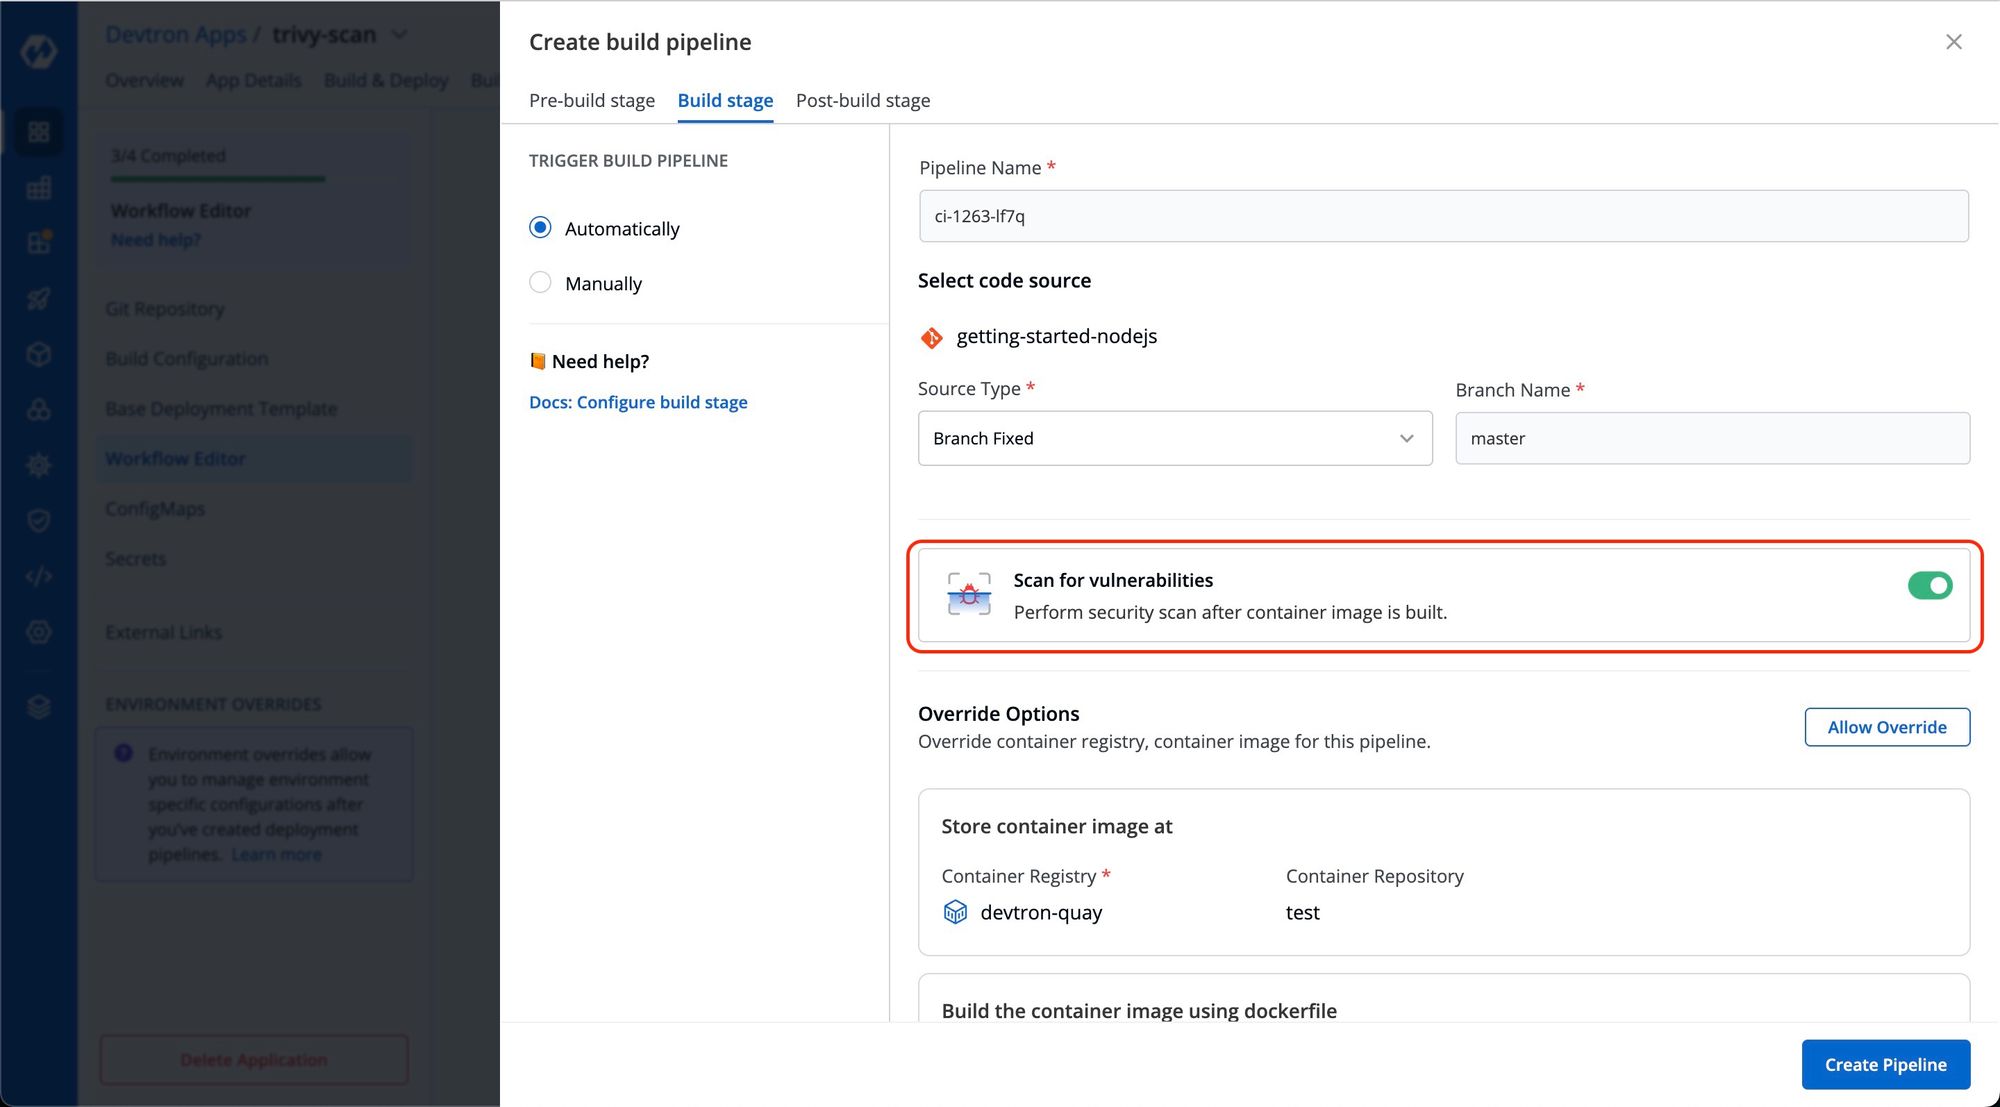
Step 2: Enable Scan for Vulnerabilities the option from the build pipeline of the application.
For scanning vulnerabilities, we need to enable an option scan for vulnerabilities. For this, go to the application you want to enable image scanning and then navigate to the workflow editor. Click on the build pipeline and enable the toggle button for ‘scan for vulnerabilities’ and update the pipeline.
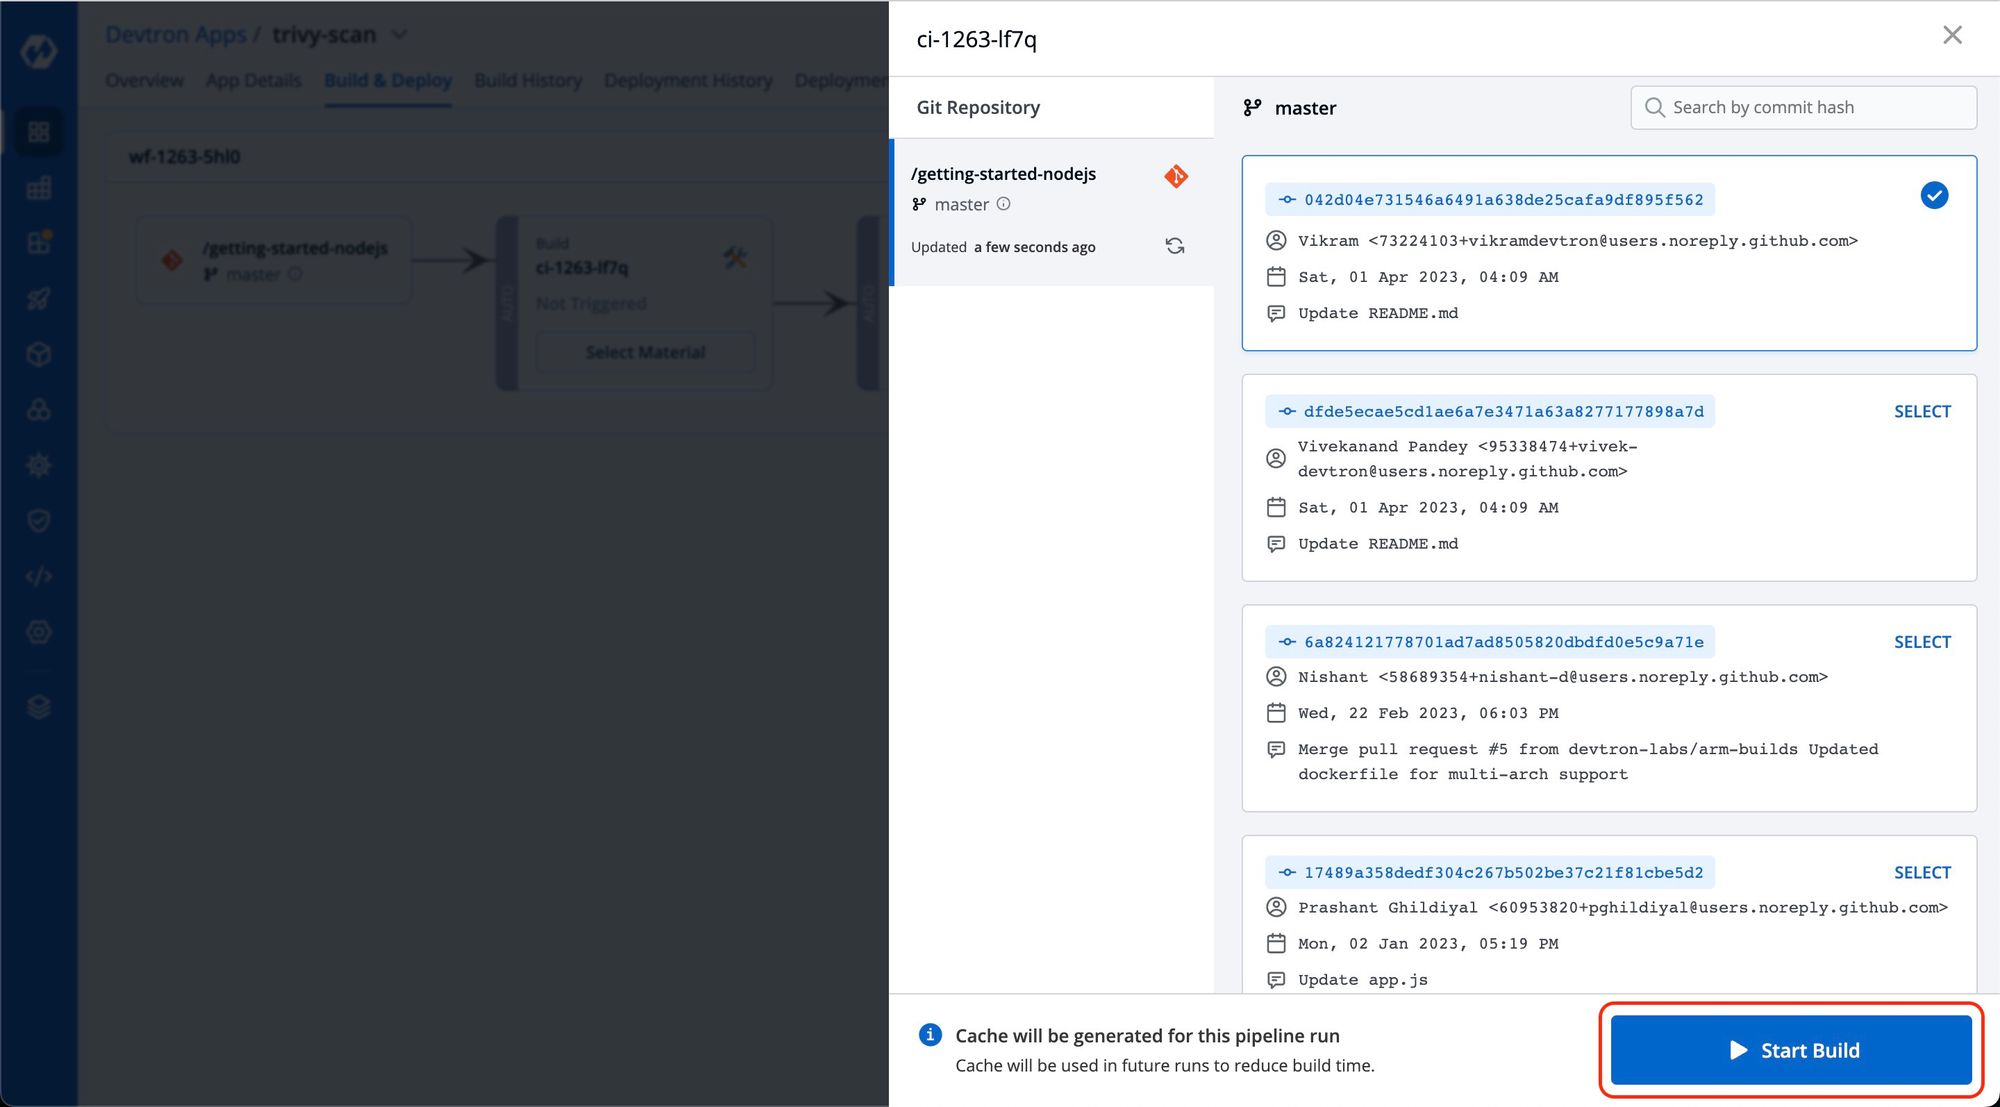
Step 3: Build new images to scan vulnerabilities.
To initiate vulnerability scanning, it is necessary to build new images. Once the image is built, Trivy will conduct a thorough scan of the image and generate a corresponding scan report. Navigate to the Build and Deploy tab to proceed with image building. From there, select the appropriate materials, including the desired commit, and click Start Build to begin the building process.
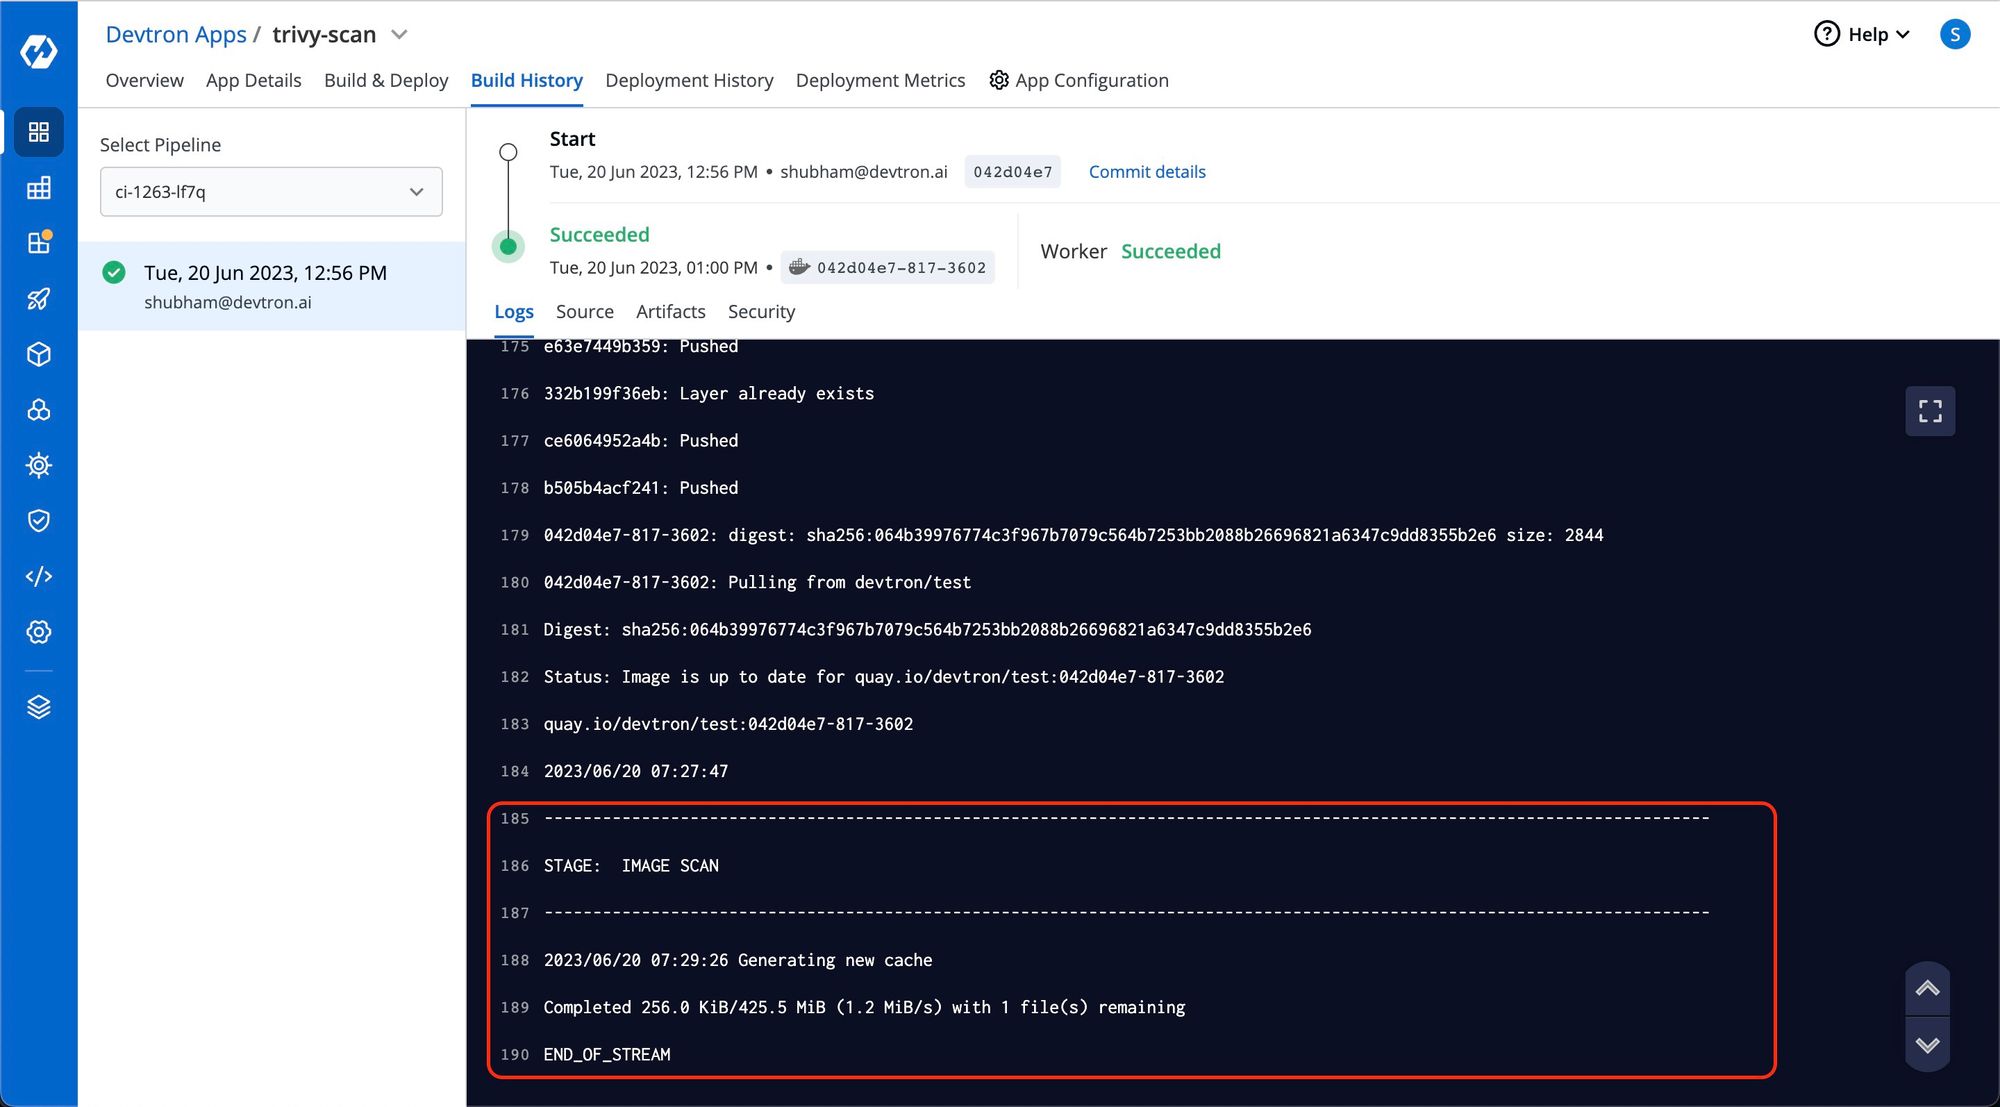
Step 4: Wait until the IMAGE SCAN stage gets completed
After completing the build process, Trivy scans the images at the IMAGE SCAN stage. You can verify this by reviewing the build logs.
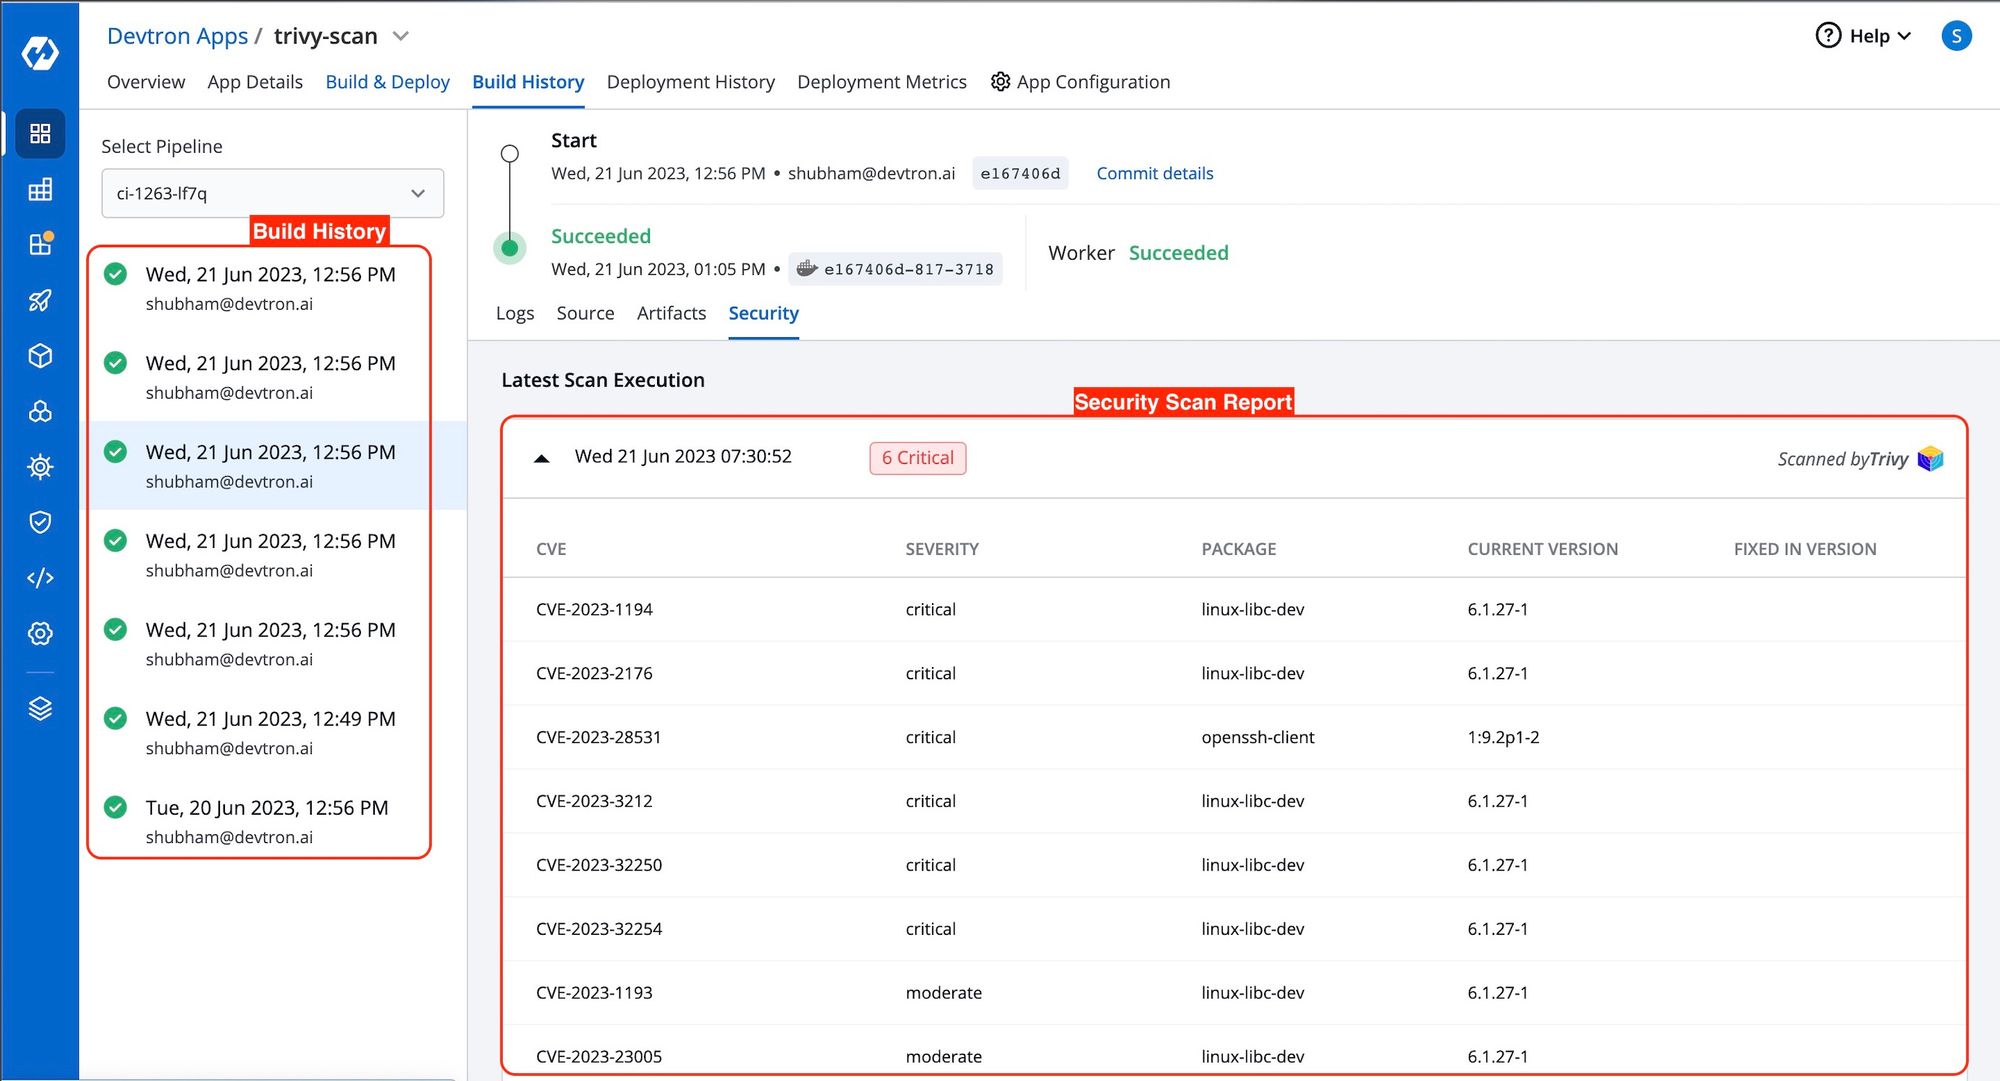
To access the scan report of all builds with enabled vulnerability scans, simply navigate to the Security tab on the dashboard. You can conveniently view the build history and all the vulnerabilities found in the build image there.
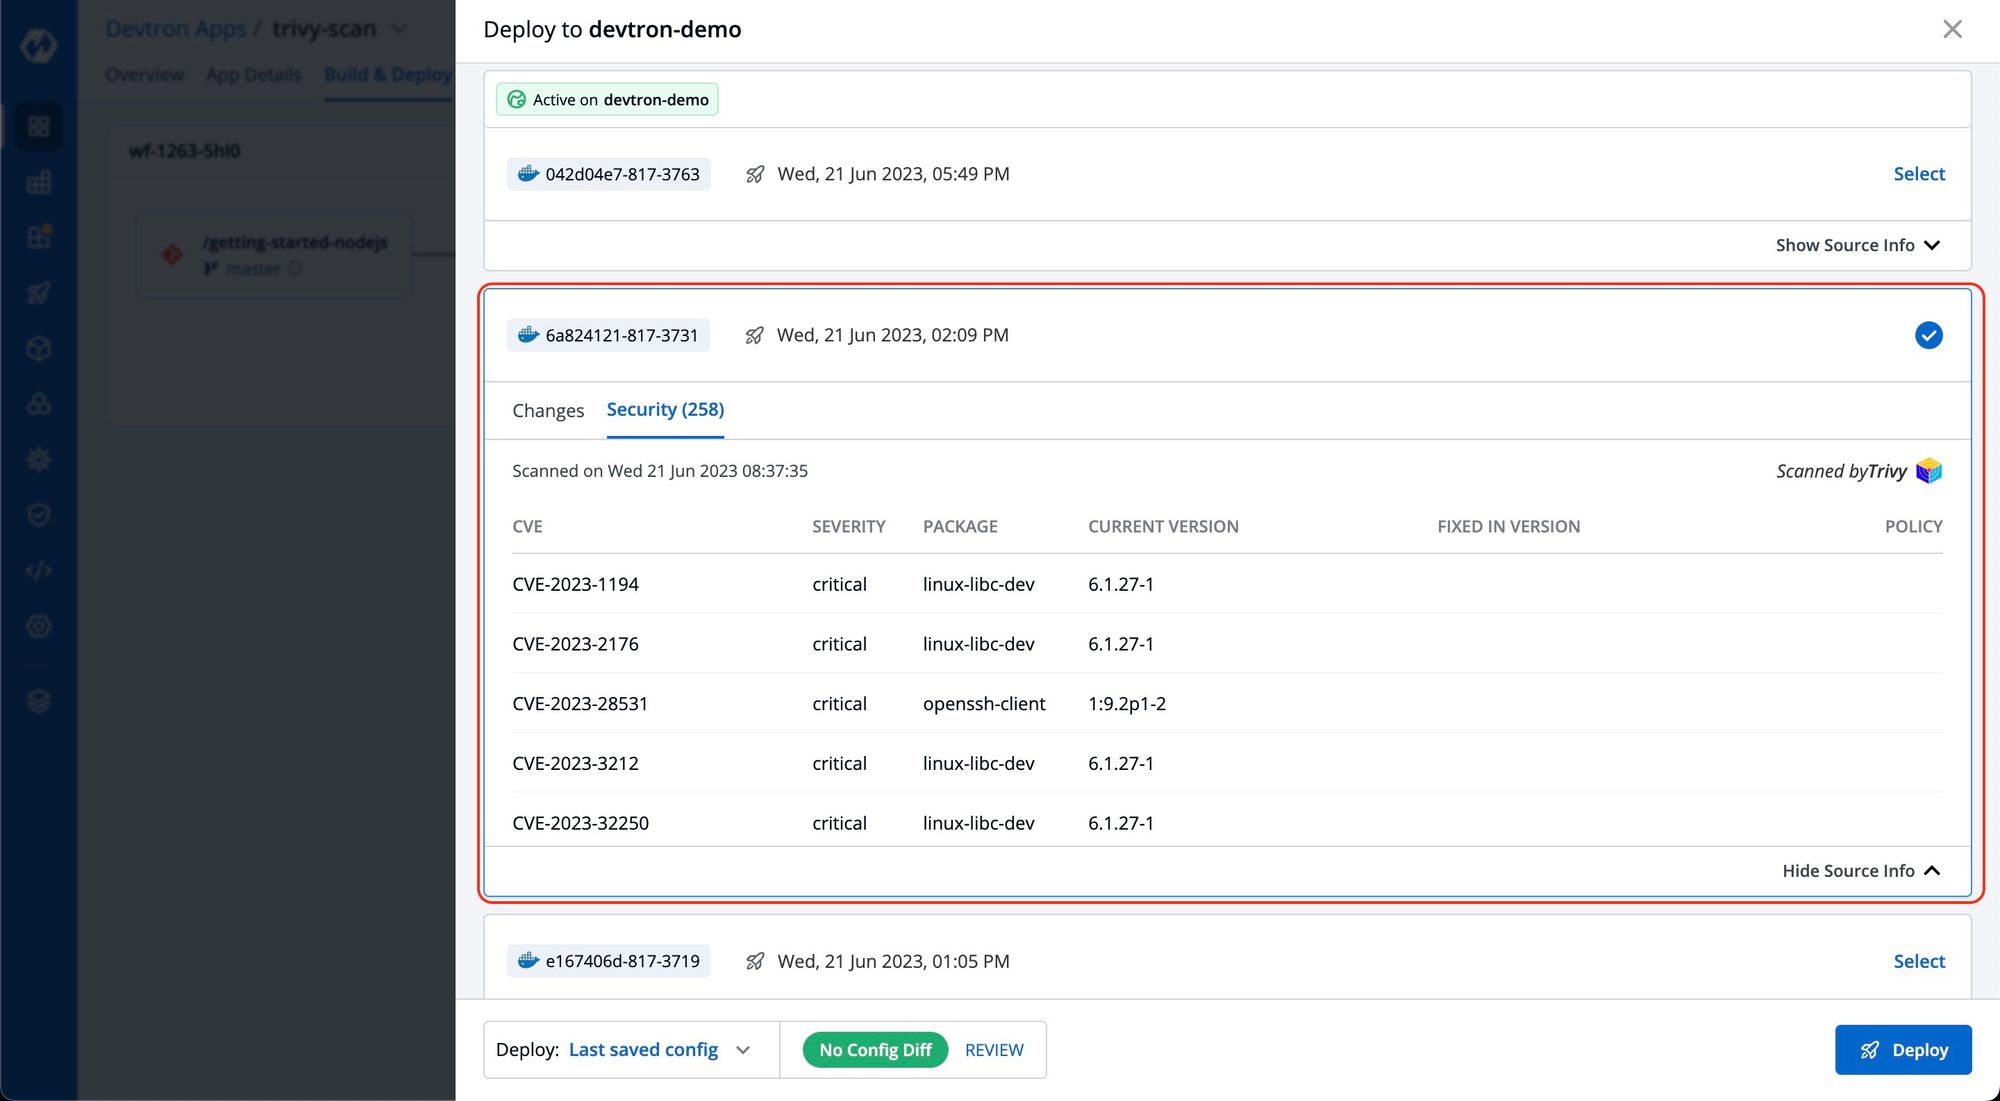
You can also view these vulnerabilities before deploying the image on the same CD pipeline. To access this report on the CD pipeline, click on 'show source info' during the deployment process and navigate to the 'security' tab. Here, you can view the security vulnerability details associated with the image.
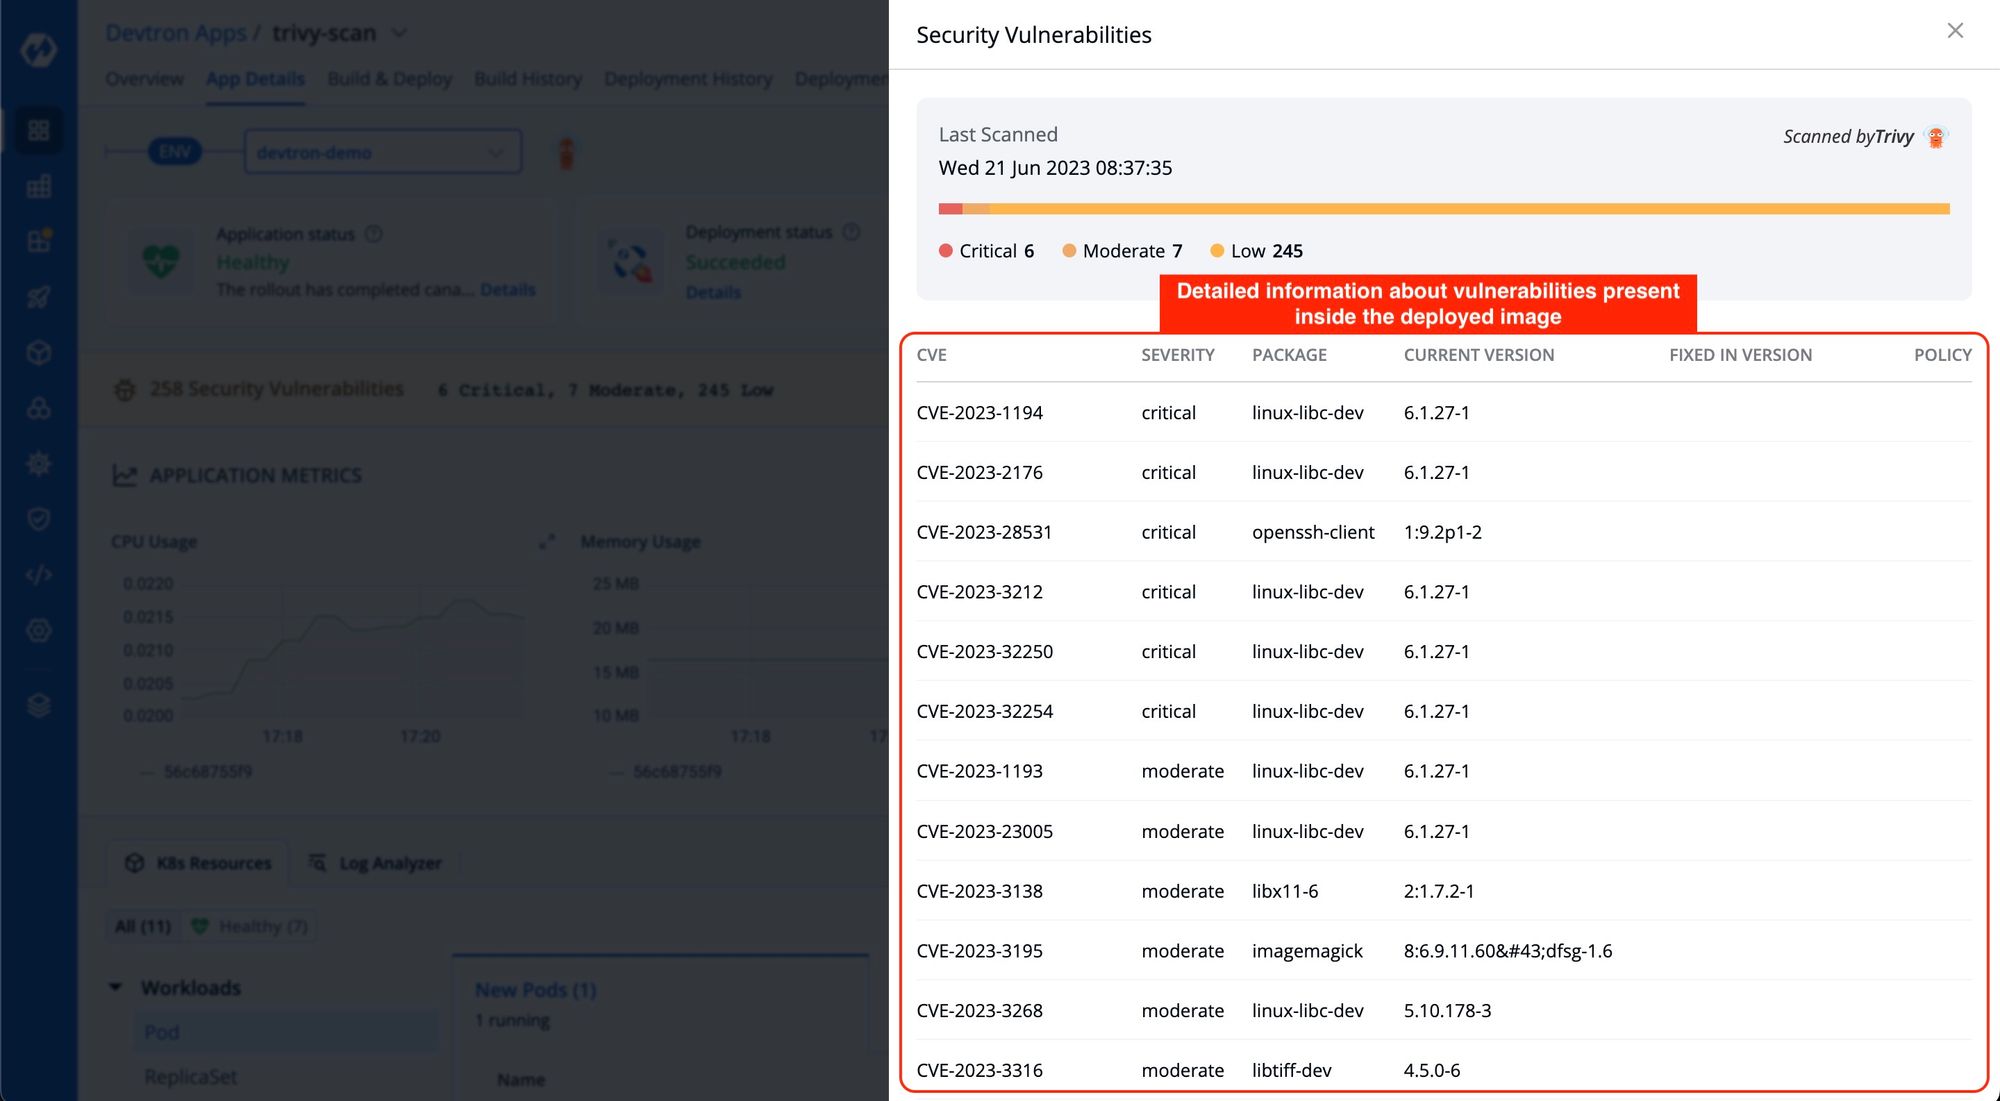
Each vulnerability is identified by a CVE ID and categorized based on Severity, Package, Current Version, and Fixed In Version.
- CVE ID refers to the Common Vulnerability ID assigned to each vulnerability.
- Severity indicates the severity of the vulnerability and can be classified as Critical, Medium, or Low.
- The Package column contains metadata associated with the vulnerability. The current Version refers to the specific version of the vulnerability.
- The Fixed In Version column displays the version name if the vulnerability has been addressed in a subsequent release; otherwise, it remains blank.
Use Case Scenarios for Vulnerability Scanning
The Devtron Platform with Trivy integrated can offer the users additional resources to perform further granular security checks throughout the application's software delivery lifecycle.
Use Case 1: Comprehensive Security Scan
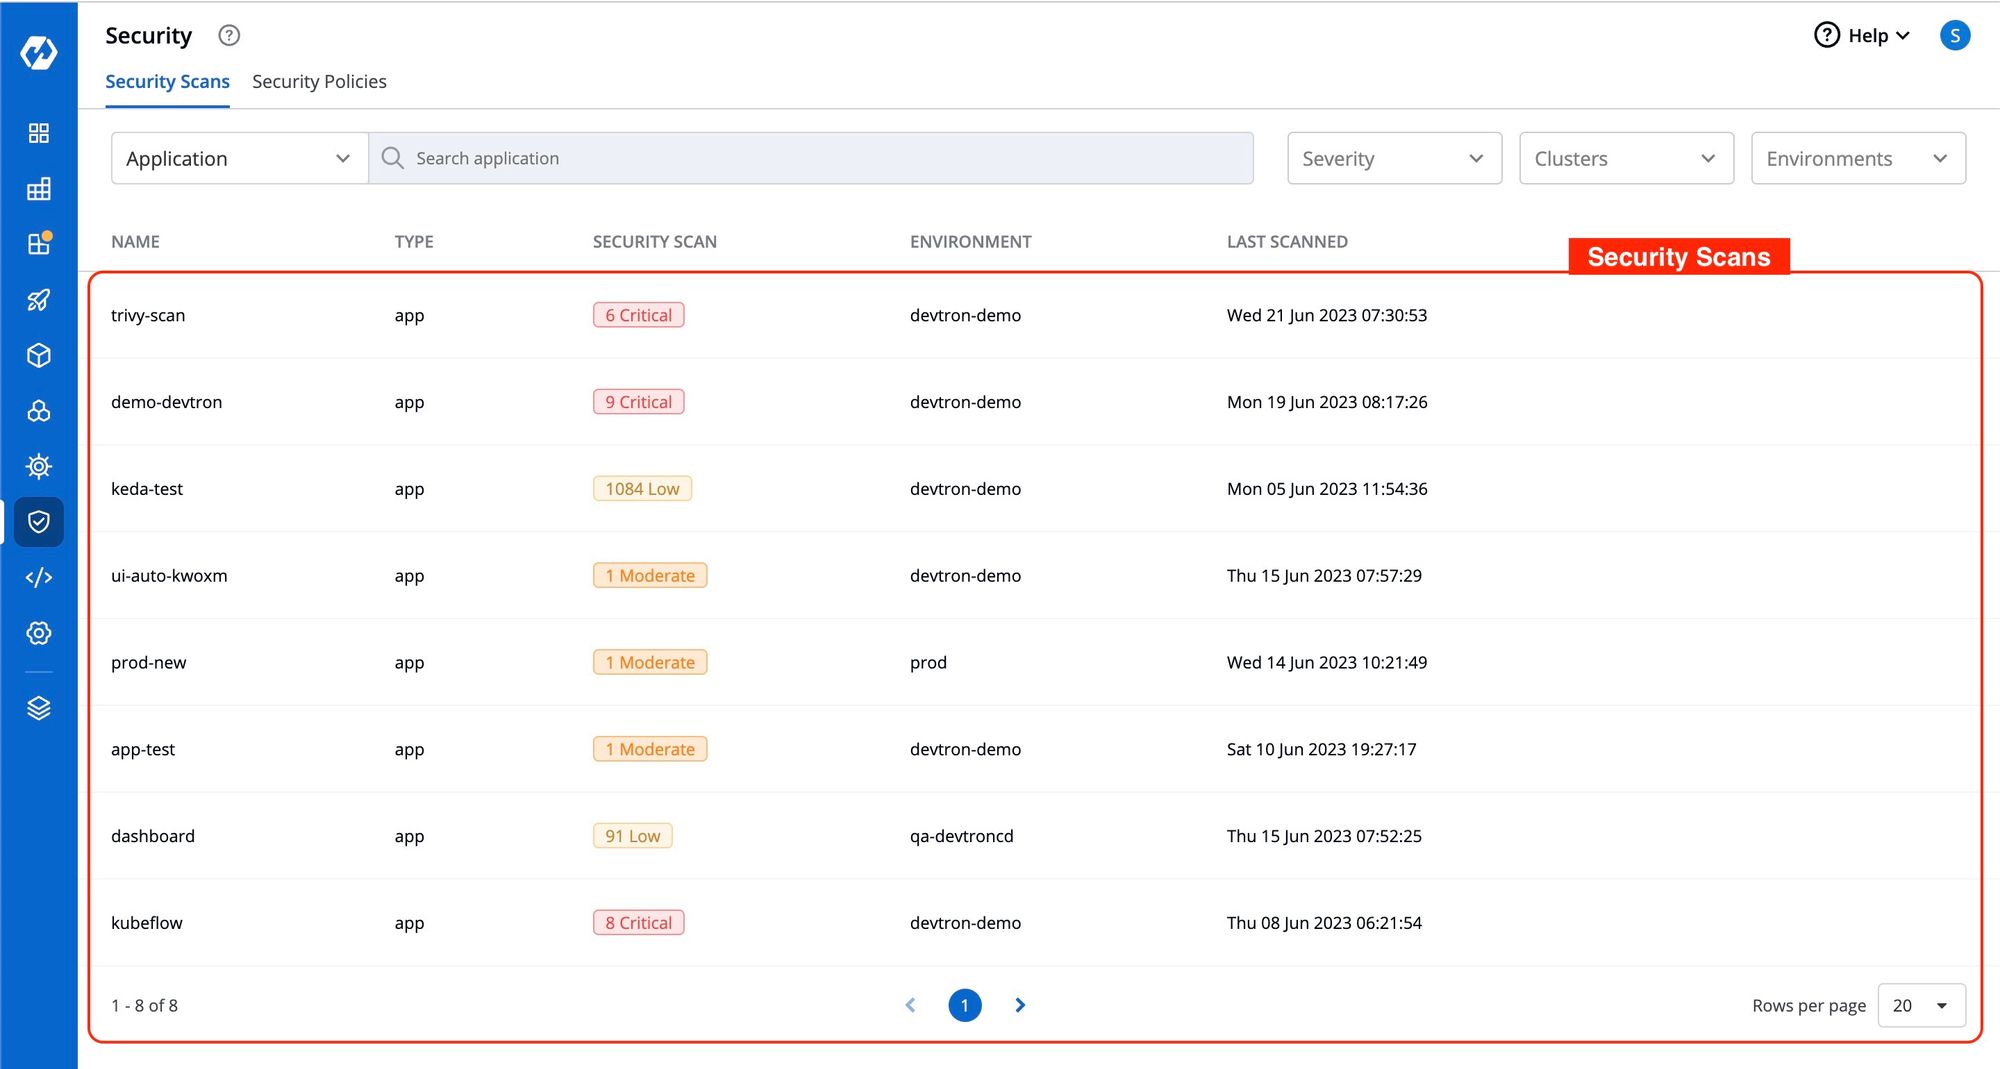
Scenario: Instead of individually checking each application with security scan enabled, you can conveniently access the image scanning reports for all applications on a single page. You can view the comprehensive image scanning report by simply clicking on the application name, allowing for easy and efficient monitoring of security vulnerabilities across multiple applications.
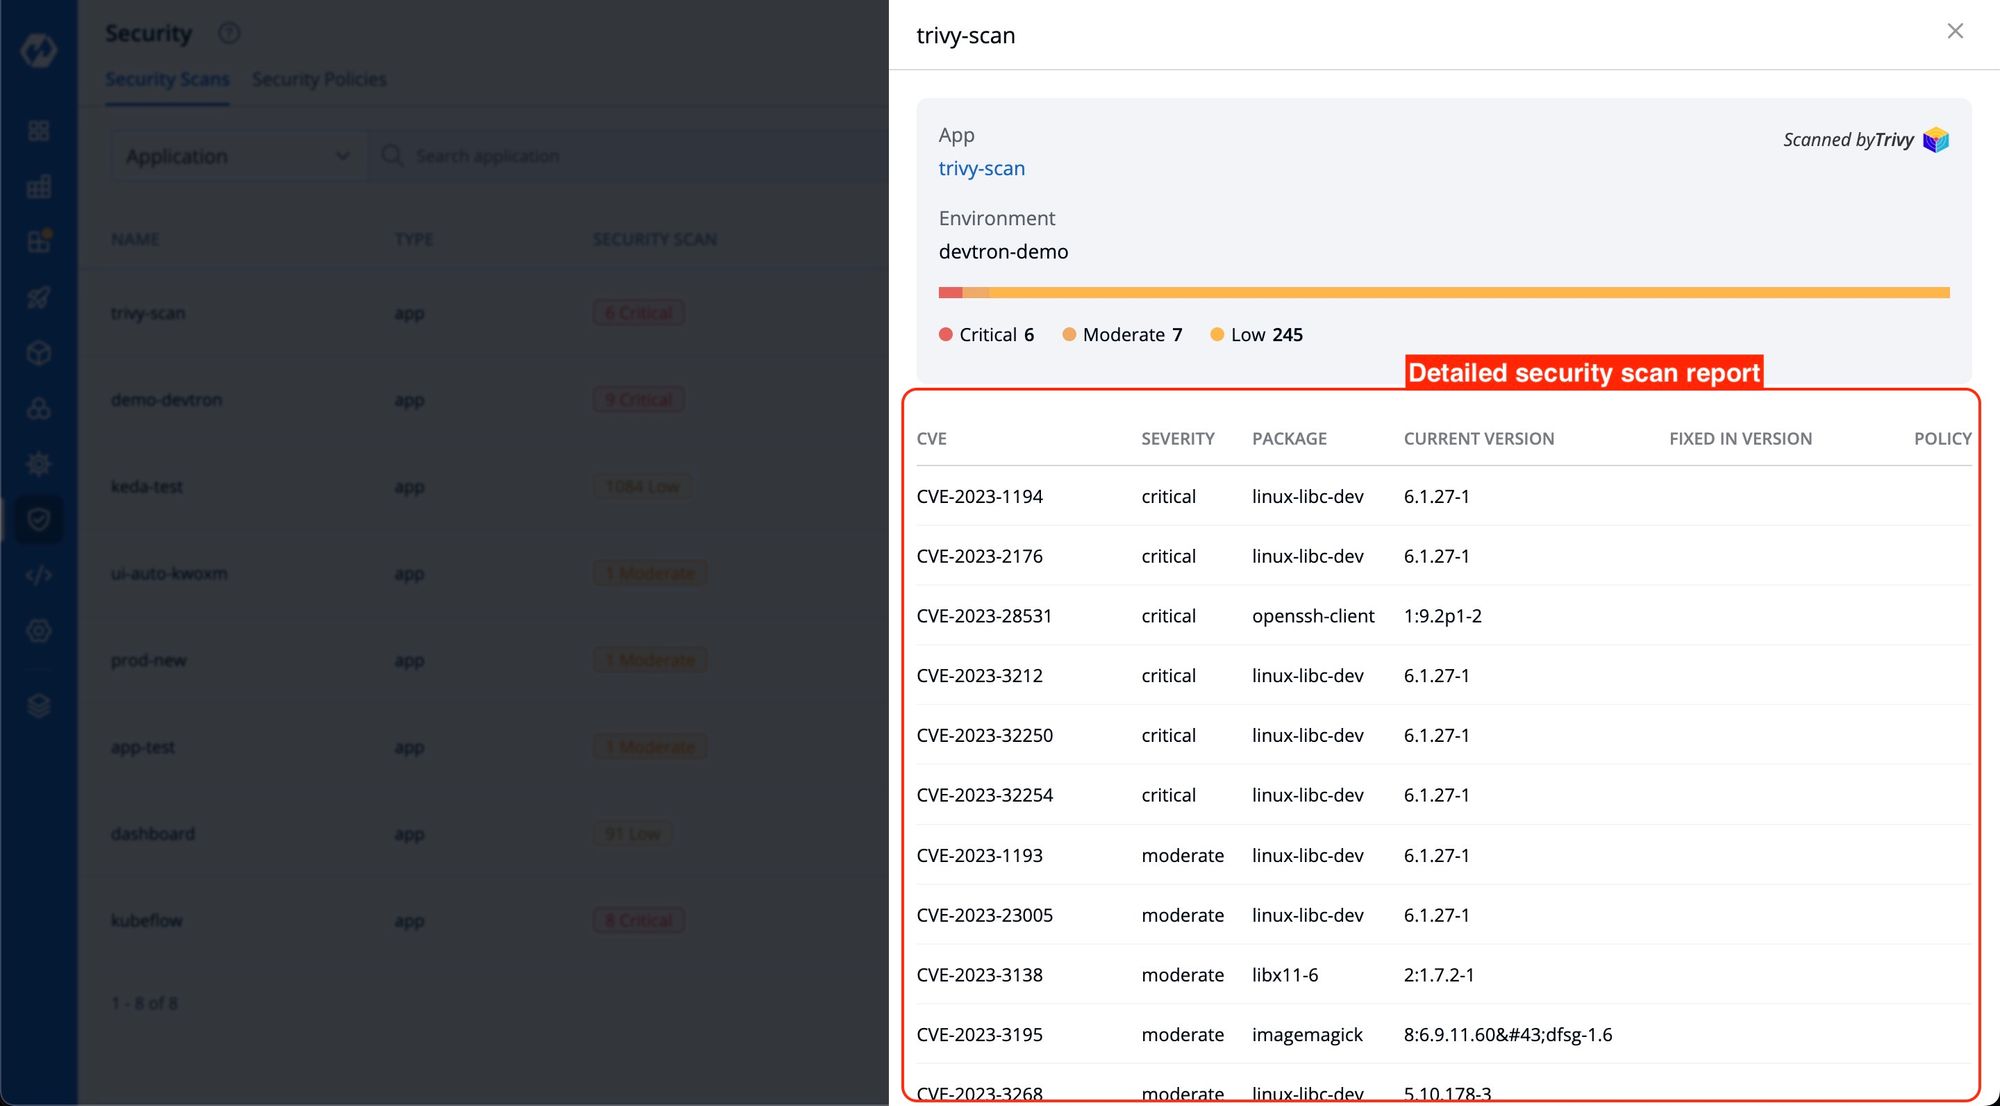
For a comprehensive security scan report, navigate to the ‘Security’ tab from the left pane and click on any of the desired Applications for which you want to see the detailed security report.
This action will provide detailed information regarding the security scan of the application, including the CVE, Severity of the identified vulnerabilities, as you can see in the image below.
Use Case 2: Pre-Deployment Vulnerability Assessment
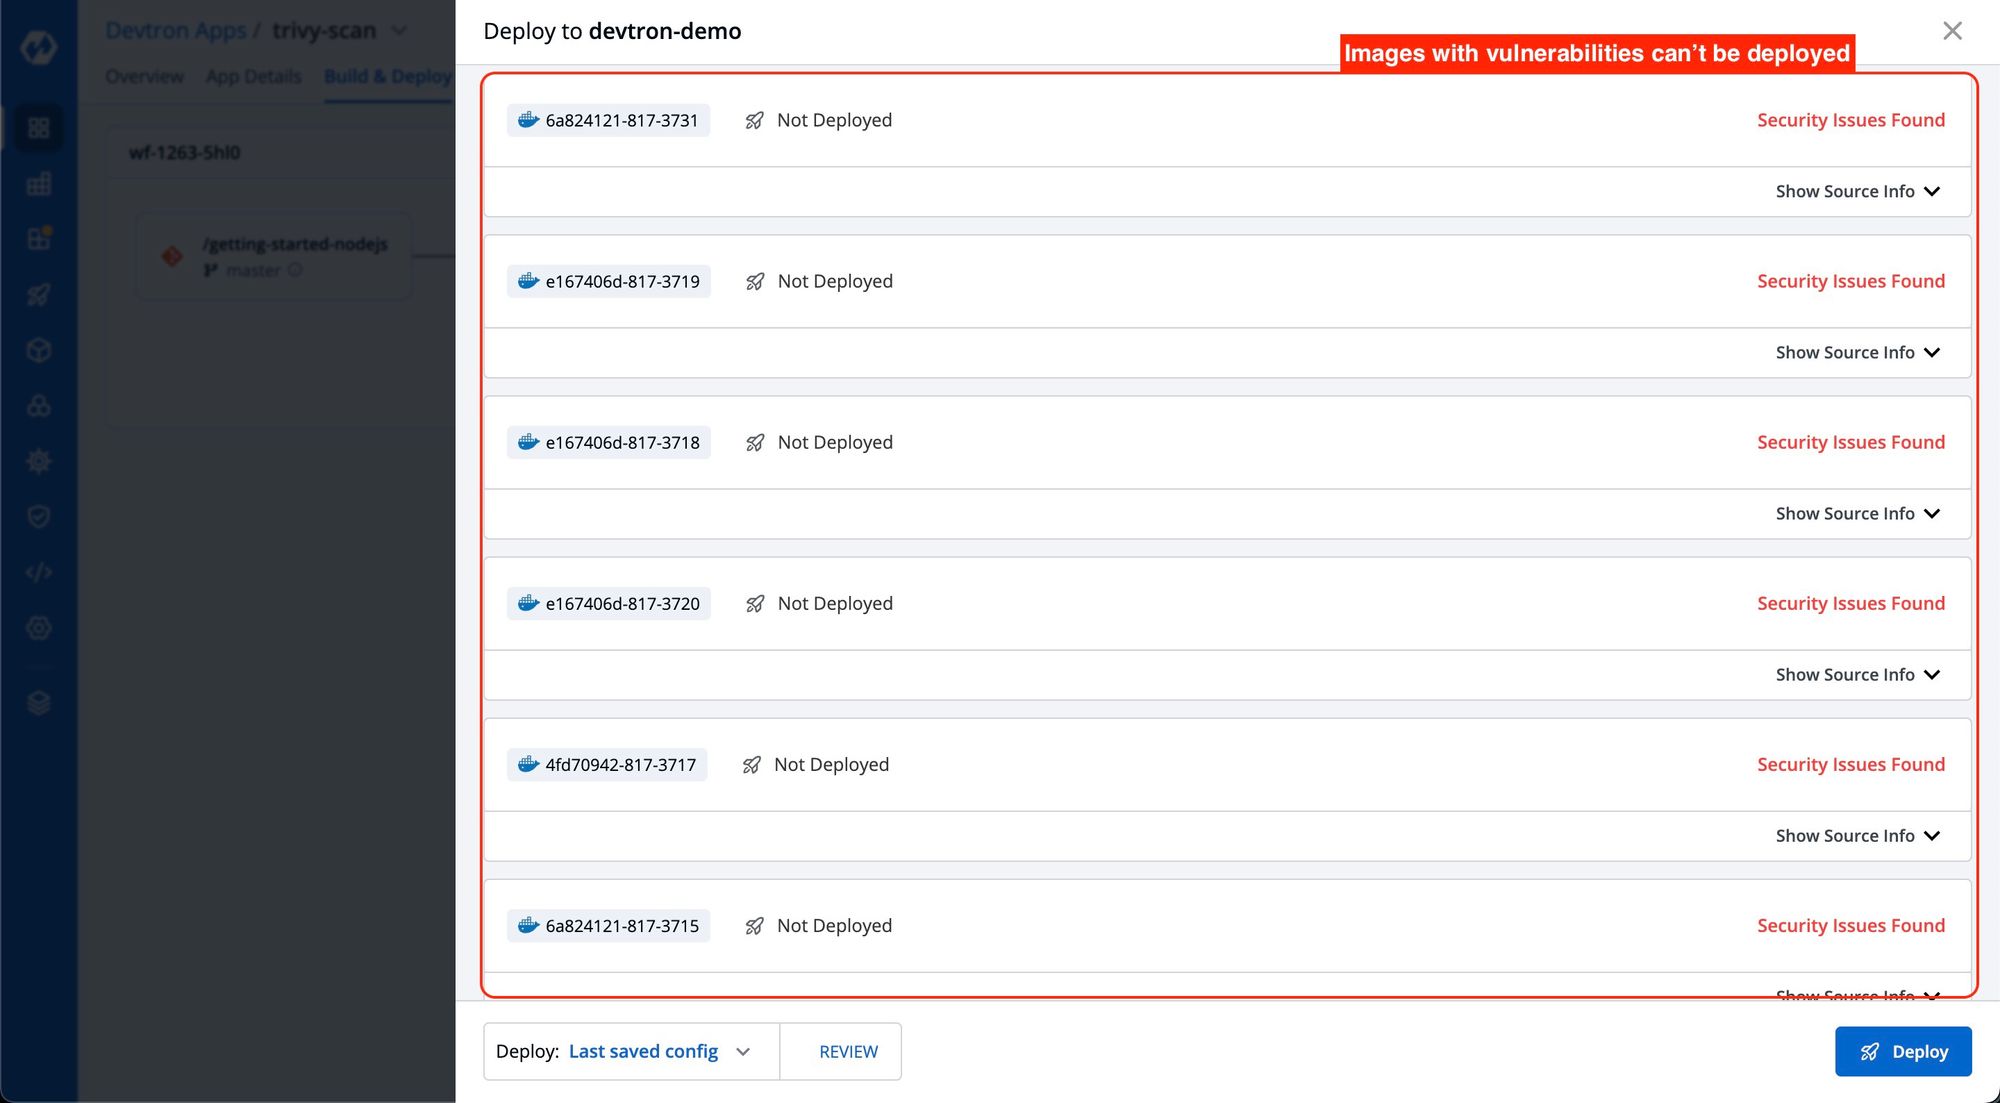
Scenario: Devtron also allows you to identify vulnerabilities before image deployment at the CD pipeline
To access this information, you only need to click on 'show source info' for the desired image at the time of image deployment and then navigate to the 'security' tab. Here, you will find the security vulnerability details associated with the image. You’ll be unable to see any vulnerabilities here if a vulnerability scan is not enabled for this image.

Use Case 3: Post-Deployment Vulnerabilities Assessment
Scenario: Devtron also allows you to identify vulnerabilities after an image is deployed.
Though Devtron allows users to view vulnerabilities post deployments on the app details page, it is essential to ensure that the image deployed was built with vulnerability scanning enabled to access this information. If image scanning is not enabled for the deployed image, this information will not be visible on the app details page.
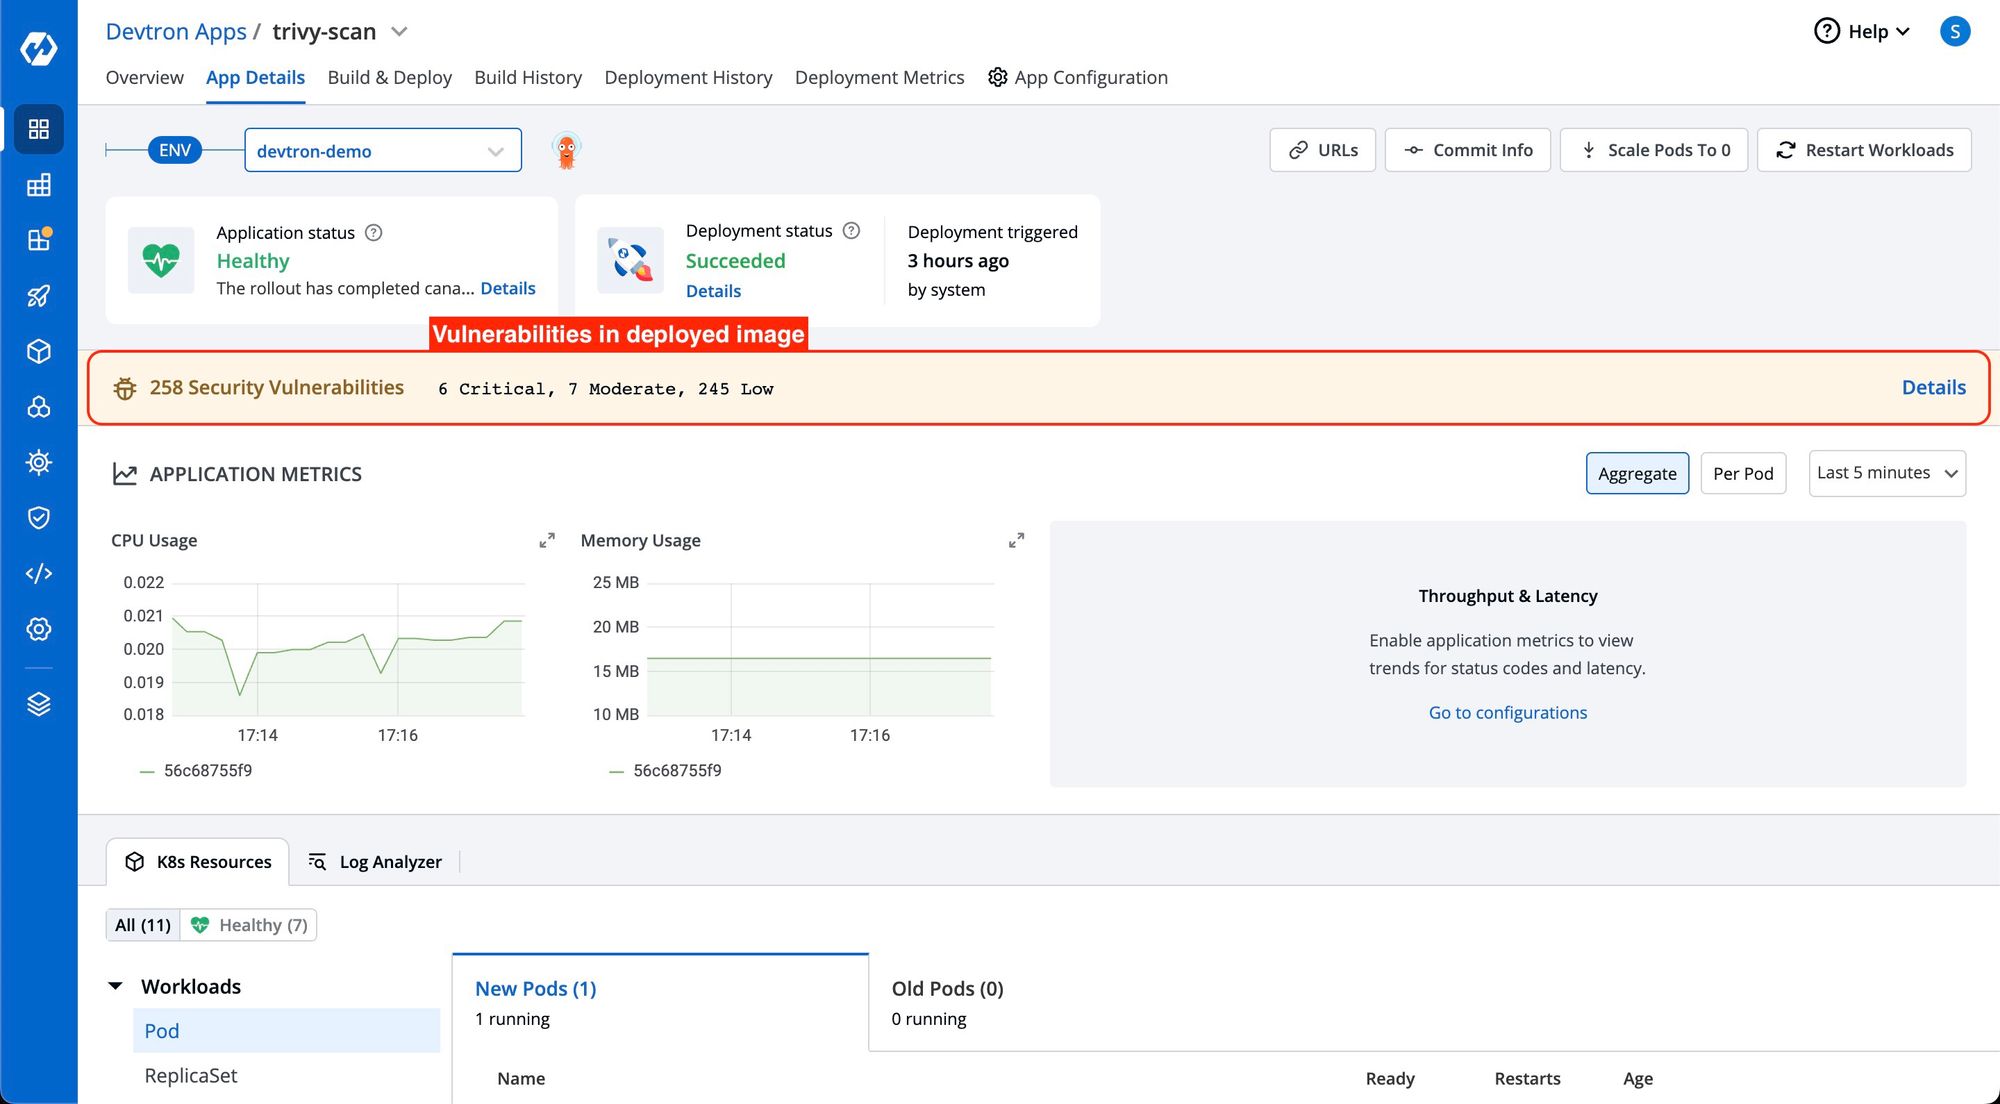
By clicking on the 'Details' link in the security vulnerabilities report, you can access detailed information about the security vulnerabilities present inside the deployed image.
Note: It is recommended to use security policies provided by Devtron to ensure any critical vulnerabilities are not getting deployed
Establishing Security Policies for Your Pipeline.
You can establish security policies for their vulnerabilities through the Security Policies tab, which can be accessed from the Home Page by navigating to Security and selecting Security Policies. Policies can be defined at different levels, including:
- Global
- Cluster
- Environment, and
- Application
Policies are implemented in a hierarchical order, following a specific sequence. The order in which the policies are applied is as follows: Global policies are applied first, followed by Cluster policies, then Environment policies, and finally, Application policies. This sequential approach ensures that policies defined at higher levels take precedence over those at lower levels, allowing for systematic and structured enforcement of security measures.
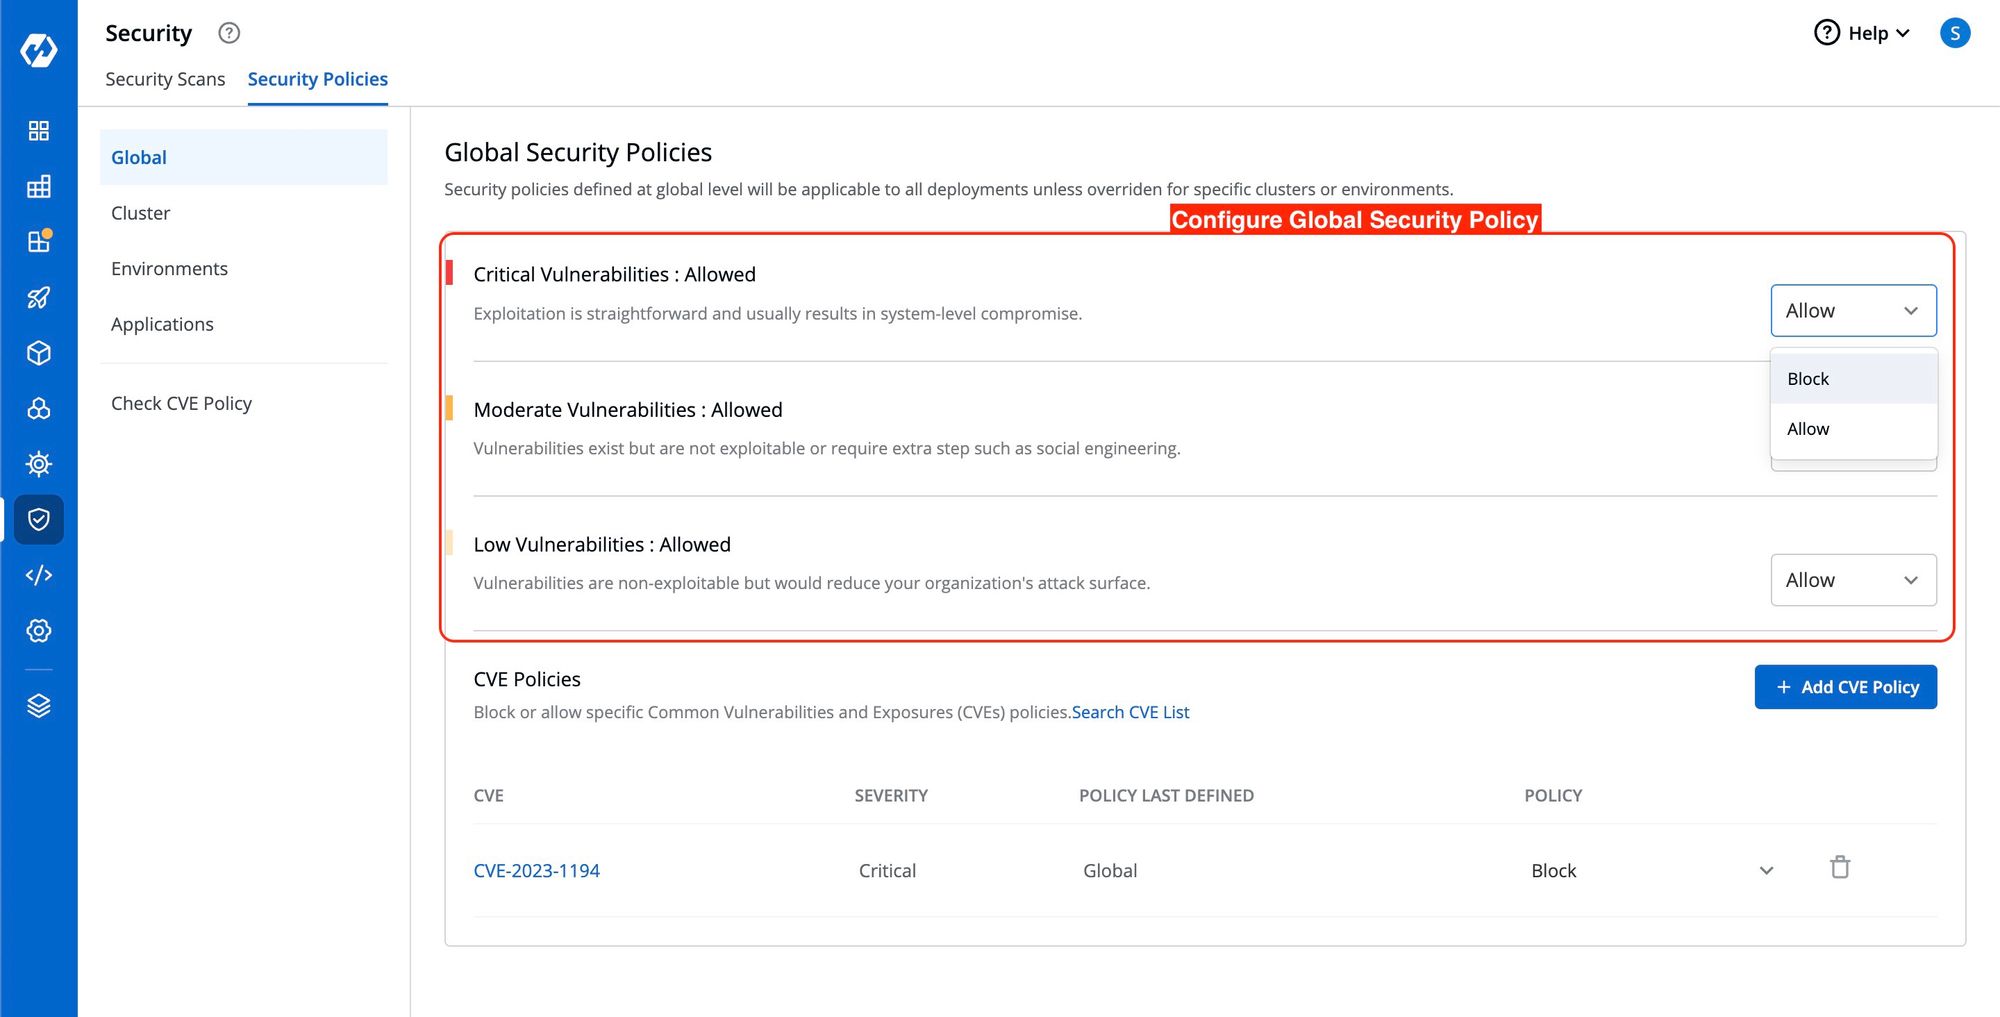
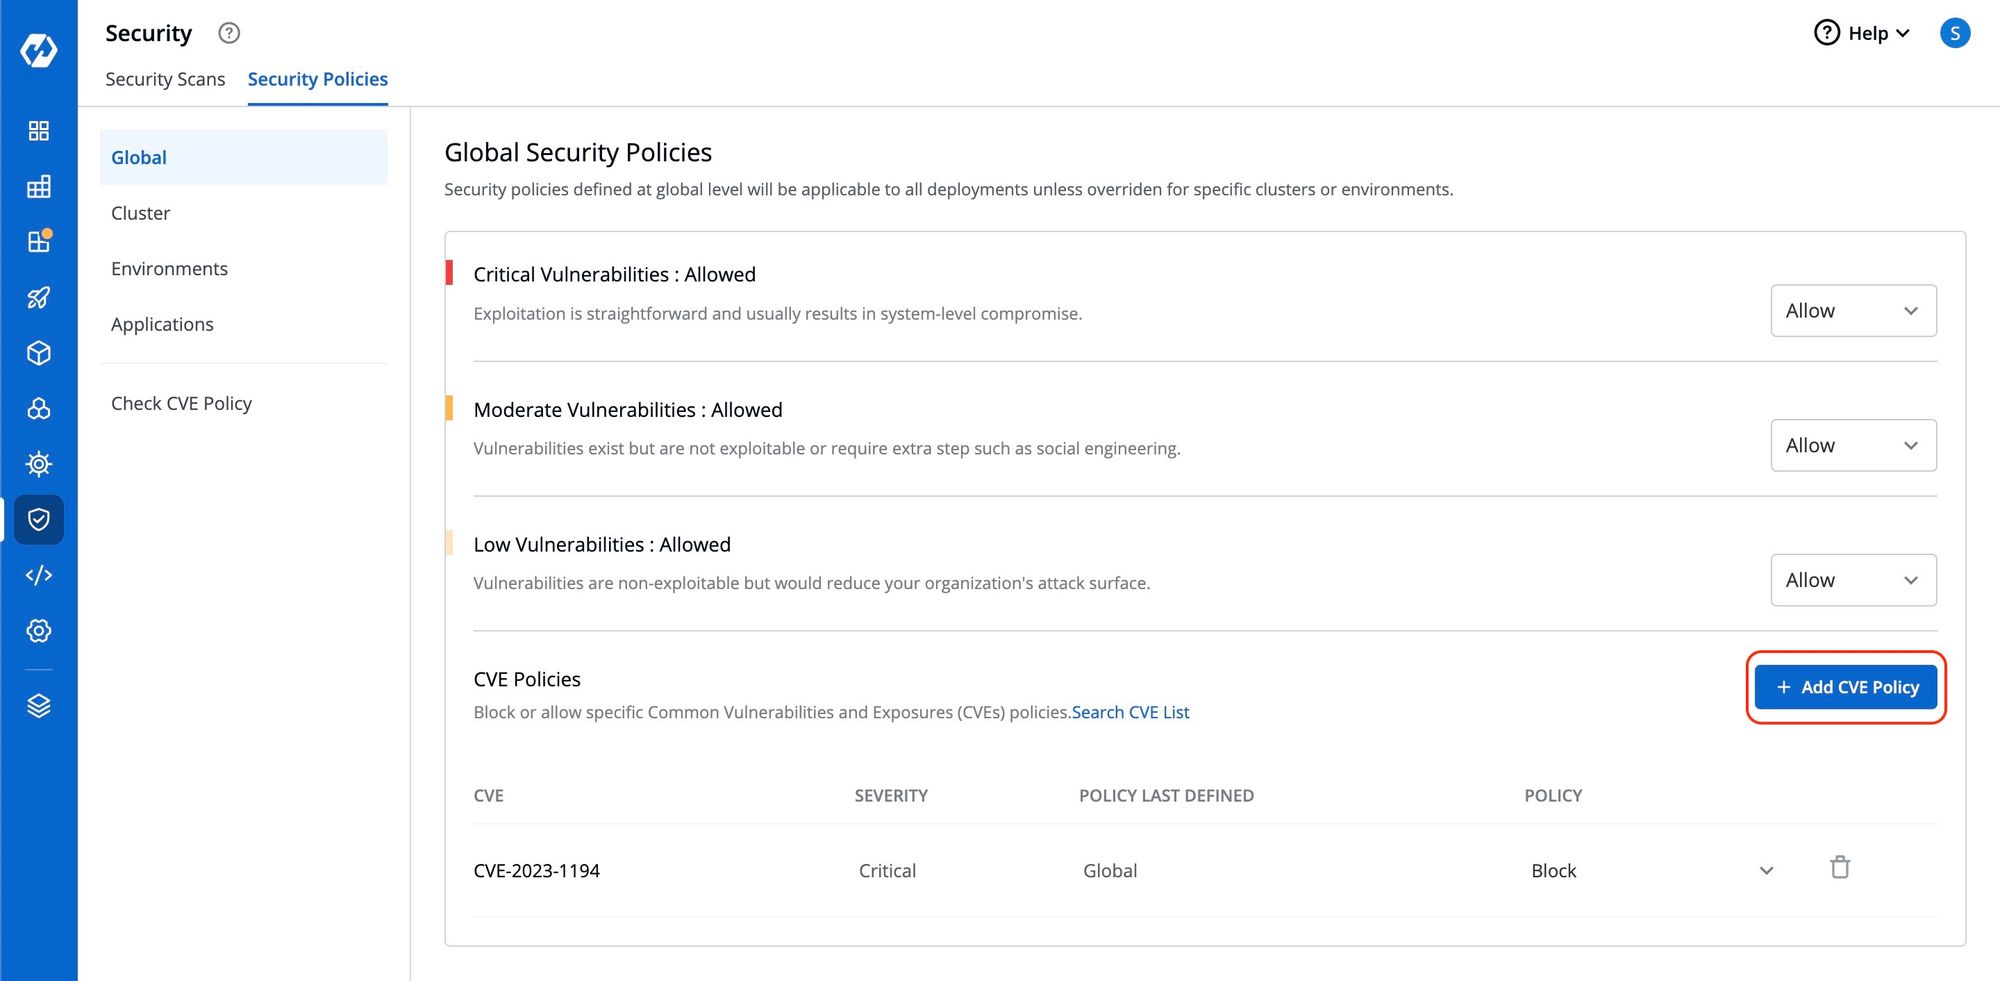
Configure Global Security Policy
In Global Security Policies, there are two options: Block and Allow. For example, if critical severity levels are blocked in the Global Security Policy, they will also be blocked in the Cluster Security Policy. If the critical policy is changed globally to allow it, it will also be allowed in Cluster Security Policies. Explicit changes to these policies can be made if desired.
To block Critical Vulnerabilities in Global Security Policies but allow them in specific clusters, select the desired cluster and change the critical drop-down to allow. This change will only affect the policy of the selected cluster, without impacting other clusters or the global policy.
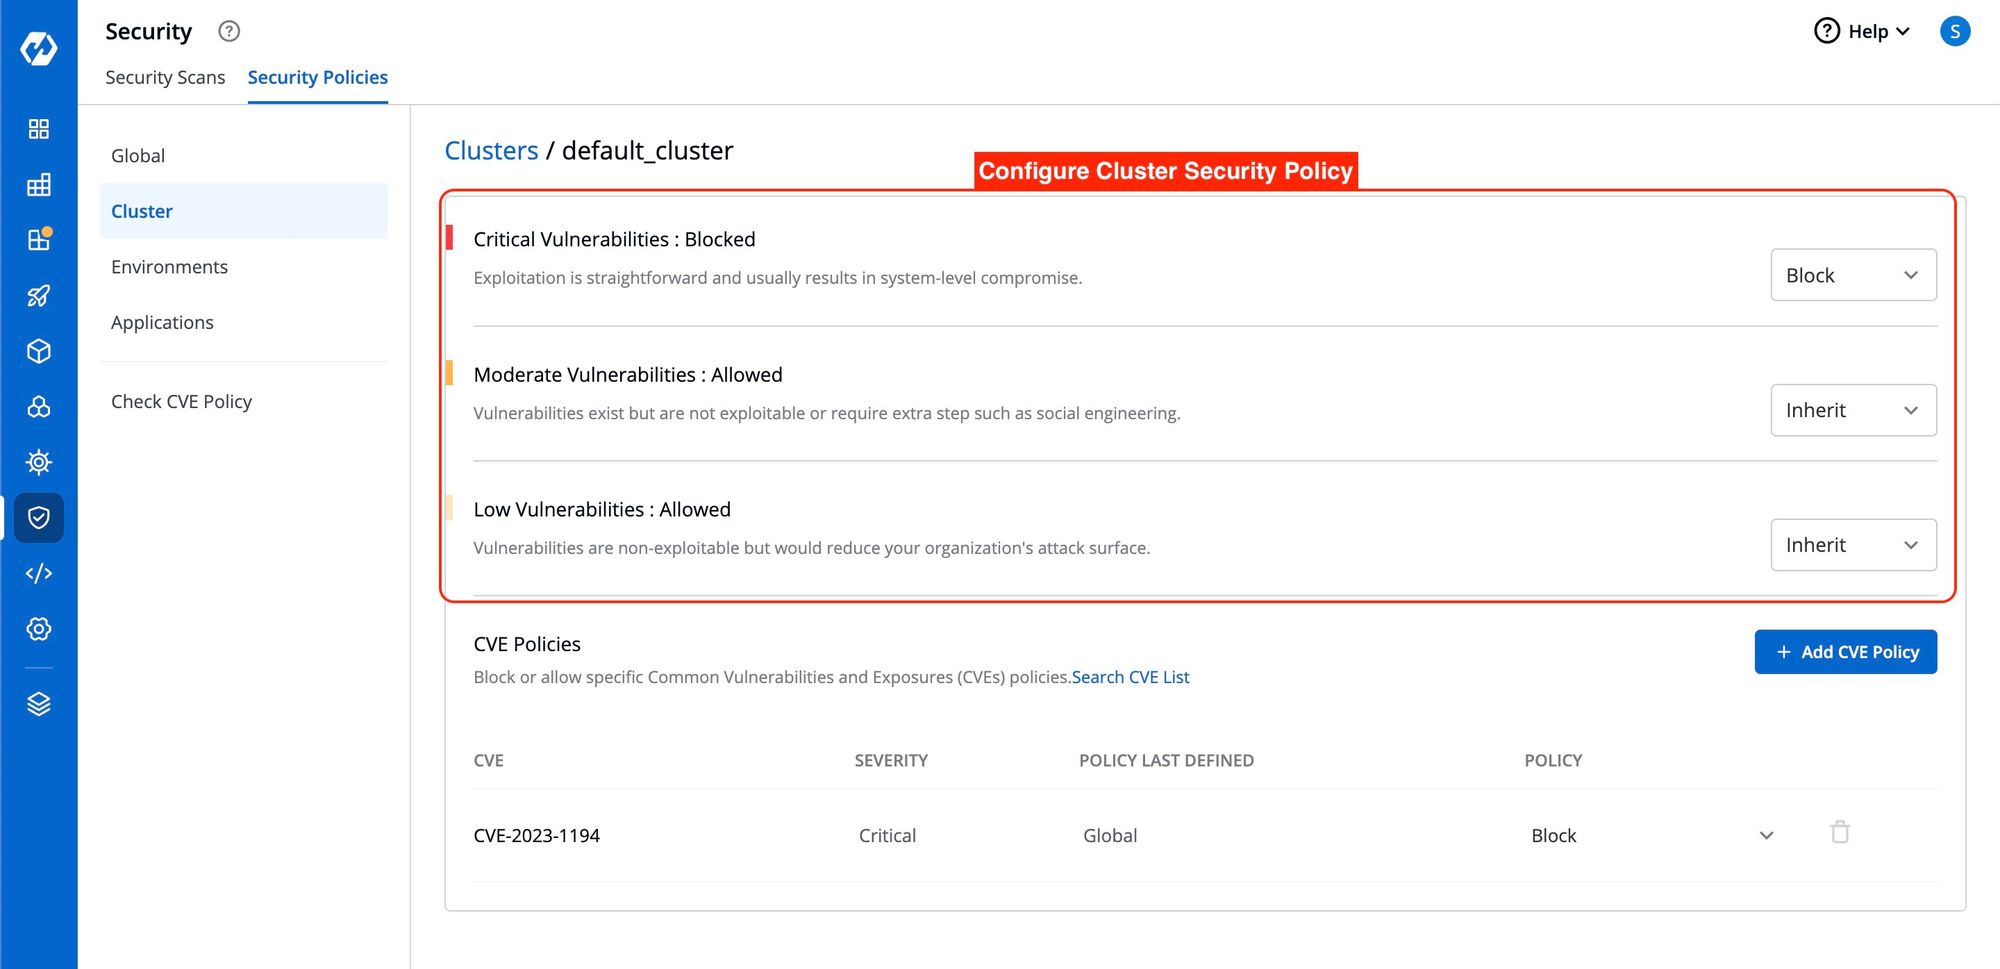
Configure Cluster Security Policy
In Global Security Policies, there are two options: Block and Allow. In Cluster Security Policy, there is an extra option called Inherit.
When selecting Inherit, the policy adopts the settings from higher-level options. For example, if critical severity levels are blocked in the Global Security Policy, they will also be blocked in the Cluster Security Policy. If the global policy is changed to allow critical levels, it will also be allowed in Cluster Security Policies. However, you can explicitly change these policies.
To block Critical Vulnerabilities in Global Security Policies but allow them in specific clusters, select the desired cluster and change the critical setting to allow. This change will only affect the policy of the selected cluster and will not impact other clusters or the global policy.
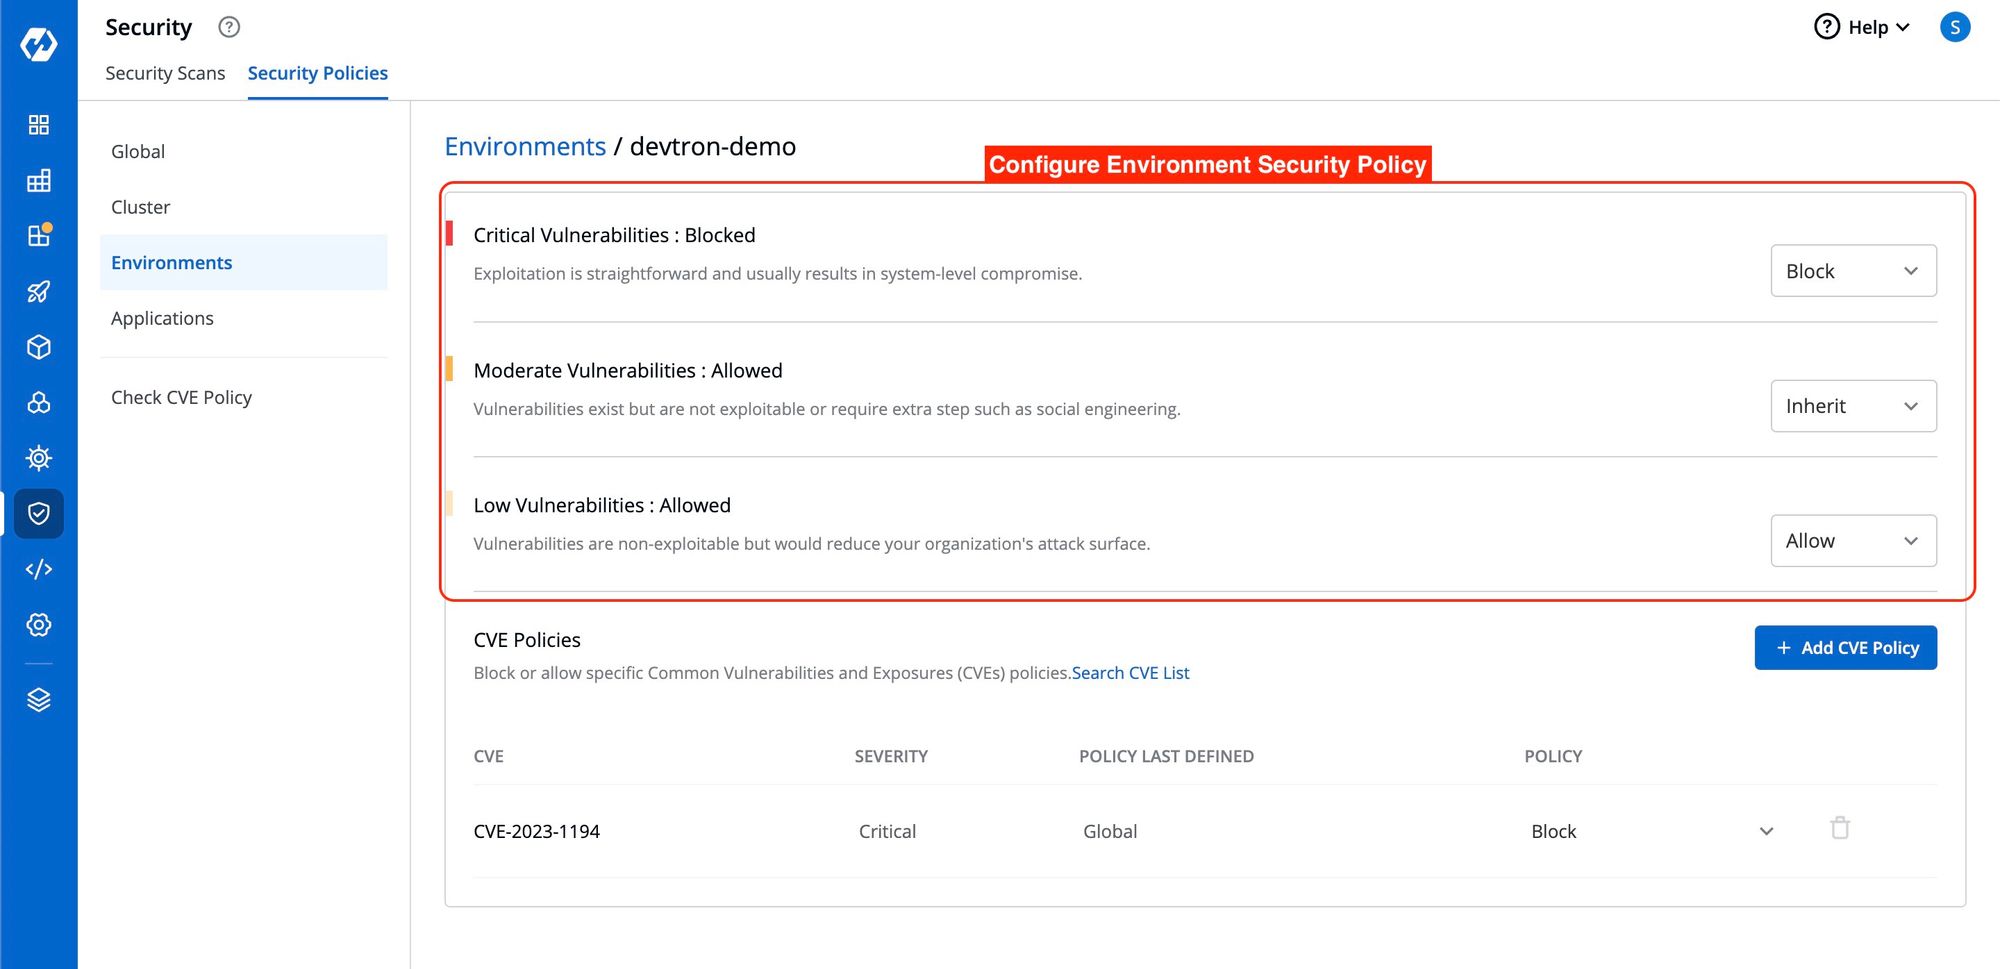
Configure Environment Security Policy
Similar to Cluster Security Policy, you have three options to define Environment Security Policy: Block, Allow, and Inherit.
Environment Security Policy inherits the policy from the Cluster Security Policy. Each level inherits the policy of its upper level.
When you select an environment, you will notice that it inherits the policy of the Cluster.
For example, suppose you have blocked critical-level vulnerabilities in the Global Security Policy but allowed them in the Cluster Security Policy. The Environment Security Policy will inherit the Cluster's policy in that case. Therefore, critical-level vulnerabilities will be allowed in the Environment Security Policy.
However, you have the flexibility to explicitly change the policy if needed.
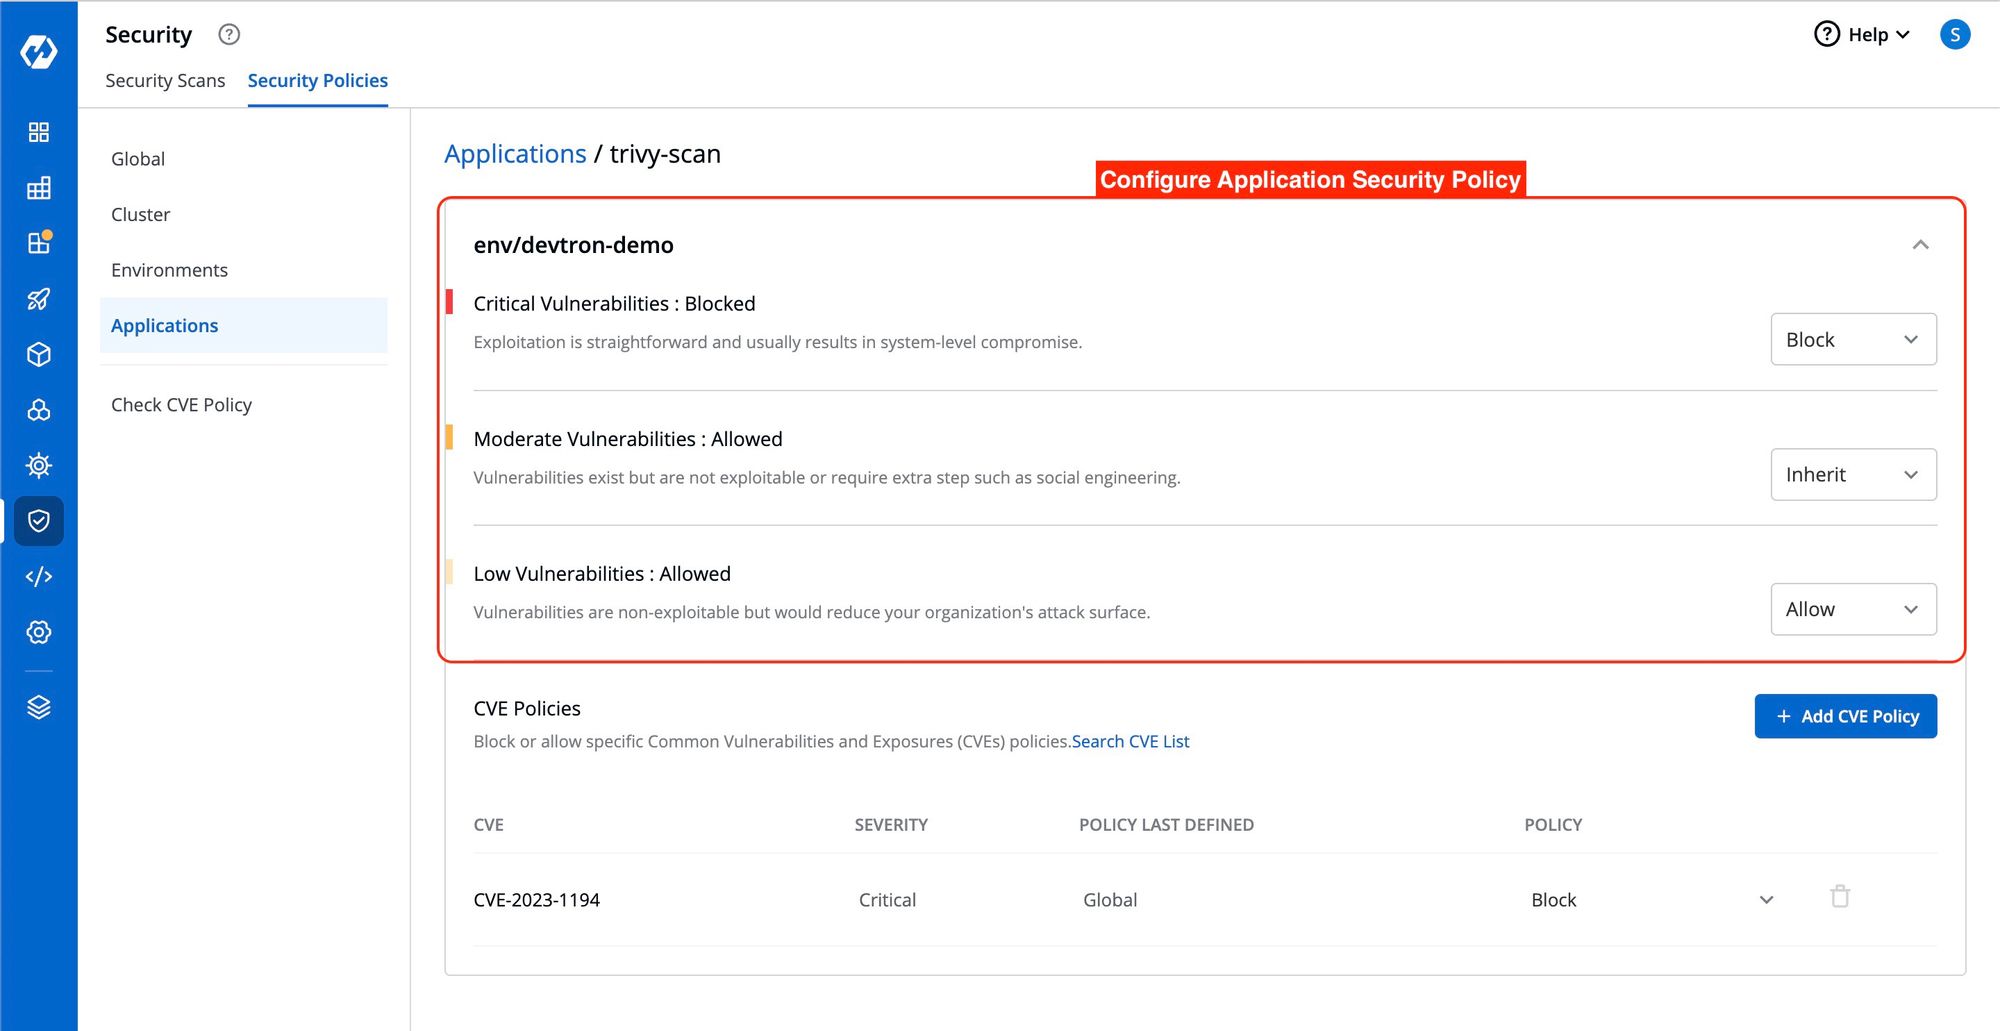
Configure Application Security Policy
Similarly, the Application Security Policy follows the same principle. However, in the Application Security Policy, the policy is determined by the combination of the Environment option and the Application option.
If you modify the policy in a development environment, it will be applied to all the applications within that specific development environment.
Block or allow specific CVE Policies.
To block or allow specific Common Vulnerabilities and Exposures (CVE) policies, simply click on "Add CVE Policy".
A window will appear where you can enter the CVE ID and select whether to Allow or Block it.
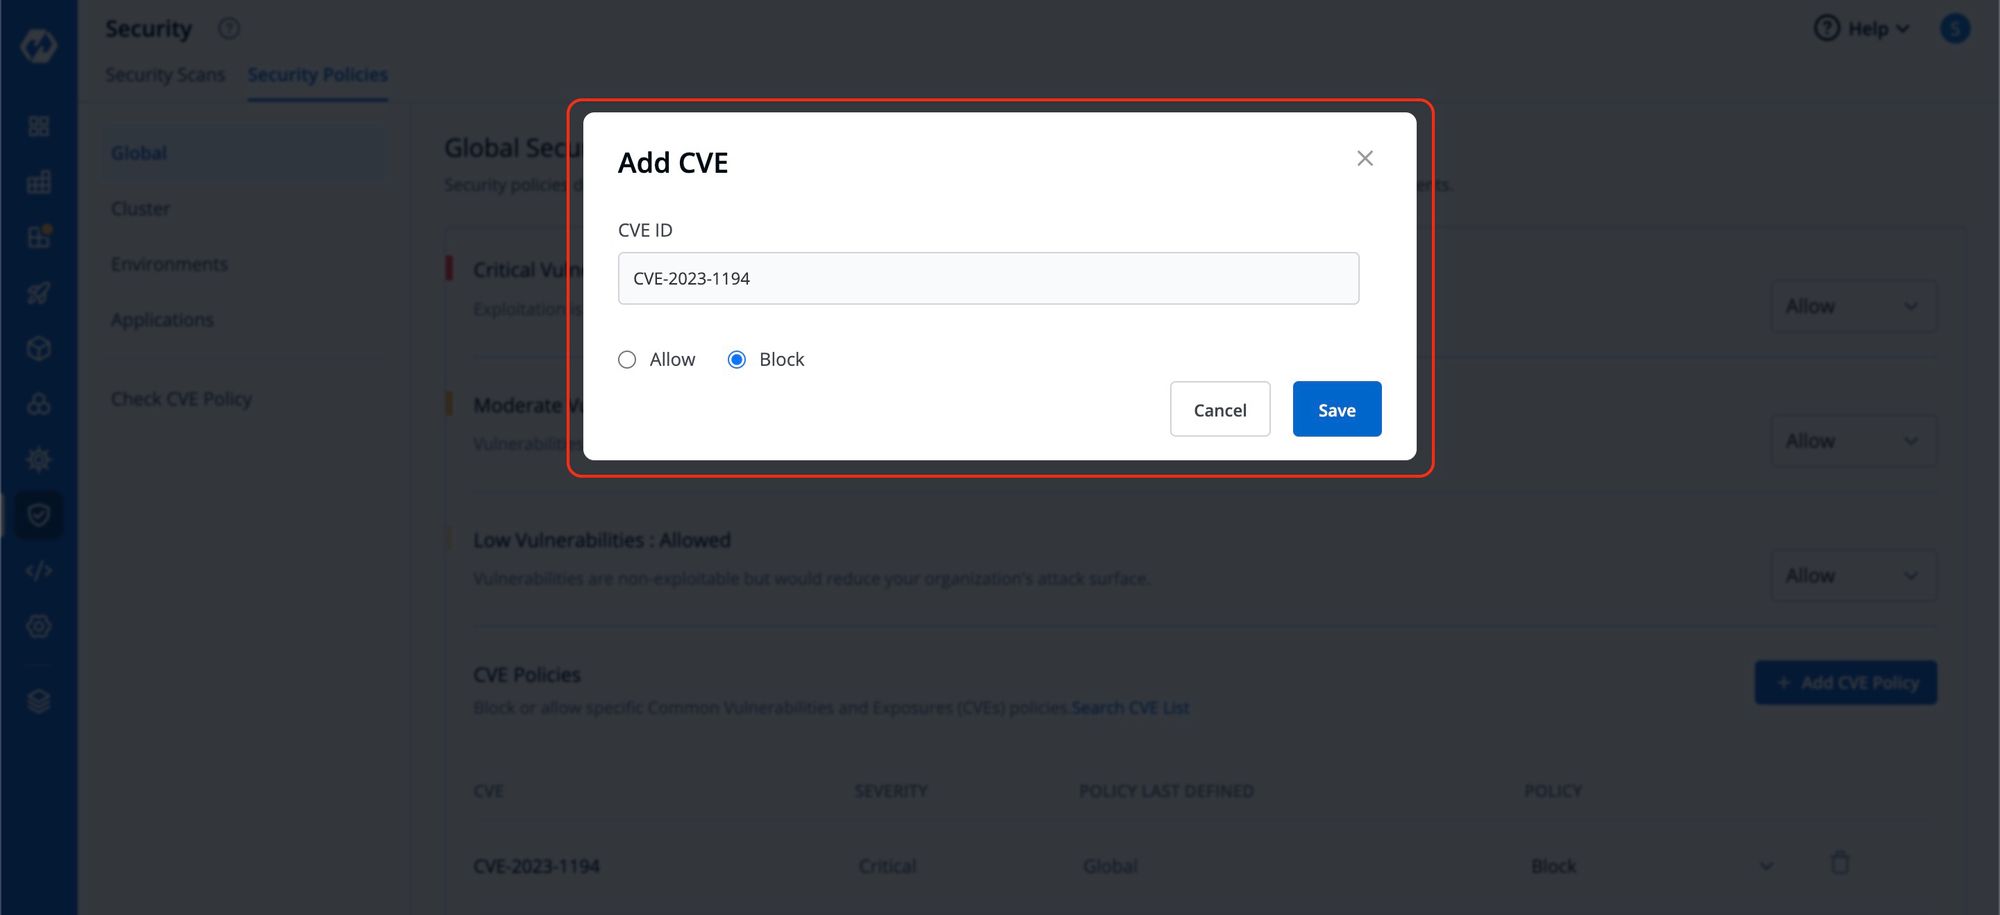
This action will determine whether image deployment is allowed or blocked based on the presence of vulnerabilities matching that particular CVE ID. Any other deployment decisions will be made according to the policies set previously.
Here are some examples of how policies can be defined:
Blocking Critical Vulnerabilities: You can define a policy to block deploying images containing critical vulnerabilities. This ensures that only images with moderate and low vulnerabilities can be deployed, reducing the risk of severe security breaches during the deployment process.
Blocking All Vulnerabilities: An alternative policy can be set up to block the deployment of images with any severity-level vulnerabilities. This approach ensures that only secure images without any vulnerabilities are allowed for deployment, maintaining high system integrity.
Differential Vulnerability Blocking: You can create specific policies for different applications during deployment. For example, one policy can be configured to block the deployment of images with any vulnerabilities for a particular application, ensuring strict security measures. Meanwhile, another policy can block only critical vulnerabilities for other applications, allowing for more lenient deployment restrictions while prioritizing critical security concerns.
These examples demonstrate how policies can be tailored to control and manage the deployment of images with varying vulnerability levels, providing flexibility and security for different applications and deployment scenarios.
Conclusion
Integrating Trivy vulnerability scanning into your Devtron CI pipeline empowers you to proactively identify and address security risks in container images. By automating the scanning process, establishing vulnerability policies, and enforcing secure deployments, you can significantly enhance the security of your containerized applications. With the seamless integration of Trivy on Devtron, you can streamline vulnerability management and confidently deliver secure applications in your containerized environment.
Keep growing your knowledge: Learn how to make Kubernetes access managament a simple task.