GitHub Actions CI/CD Pipeline enables teams to automate build, test, and deployment workflows directly from their GitHub repositories. In Kubernetes environments, it simplifies the software delivery lifecycle by integrating testing, containerization, and cluster deployment into a unified pipeline.
What are GitHub Actions?
GitHub Actions is a GitHub-native CI/CD pipeline that facilitates automated build, test, and deployment of applications. It's ideal for ensuring new code changes don't negatively impact existing applications by running tests on every pull request. Its strength lies in extensive integrations for tasks like dependency tracking, security scanning, and code quality analysis, many of which are pre-configured or customizable. Being native to GitHub, it offers faster pipeline execution and enhanced developer velocity, with flexible trigger conditions such as pushes, commits, PRs, or issue creation.
How do GitHub actions work?
GitHub Actions workflows are triggered by events within a repository (e.g., a PR being opened). These workflows consist of jobs, which are sets of specific tasks executed on isolated environments called Runners (virtual machines or containers). Jobs can run sequentially or in parallel, offering flexibility in workflow efficiency.
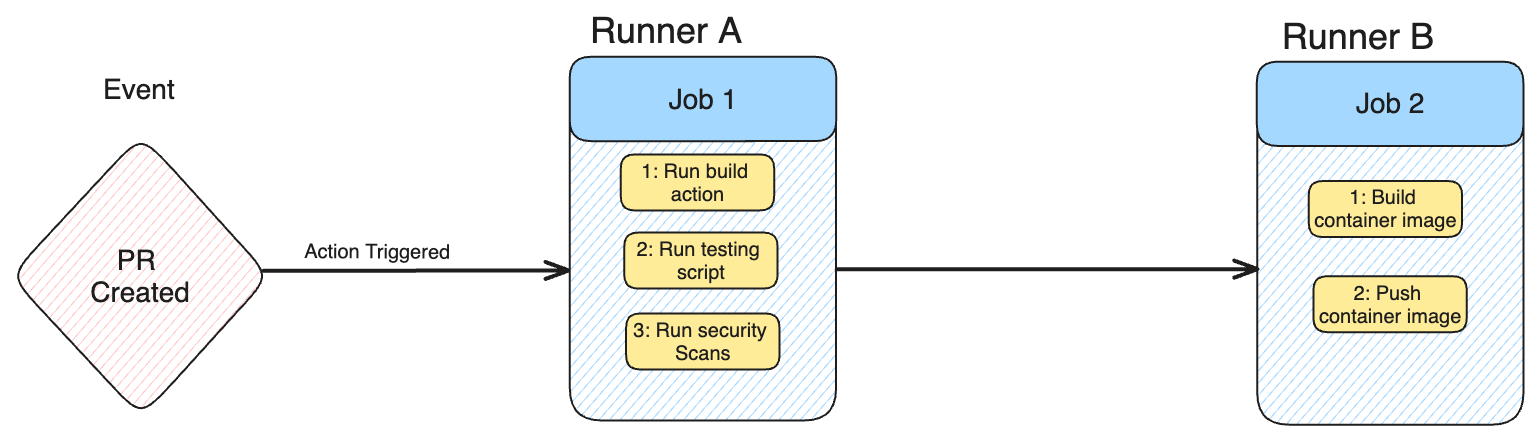
You can have multiple jobs within your workflow, which either trigger sequentially or run in parallel to each other, which allows for a lot of flexibility in the speed and efficiency of workflows. Each runner runs one job.
Key components of any GitHub Actions workflow include:
- Workflows: The complete pipeline, defined in YAML files located in the .github/workflows directory.
- Events: Specific repository activities that trigger a workflow run (e.g., push, pull_request).
- Runners: The virtual machines or containers where jobs are executed. GitHub provides hosted runners, and users can also configure self-hosted runners.
- Jobs: A collection of steps that run on the same runner. Steps execute in a defined order and can be custom shell scripts or pre-defined actions.
- Actions: Reusable units of code that perform complex or repetitive tasks, such as building an application or pushing container images. They reduce the need for writing extensive custom scripts.
Key Benefits of GitHub Actions CI/CD for Kubernetes
- Easily integrates with tools like Devtron for advanced CD.
- Speeds up container deployment to Kubernetes clusters.
- Reduces manual errors with reliable CI pipelines.
- Automates build, test, security, and deploy workflows from GitHub.
Enhance your Kubernetes CI/CD pipelines with GitHub Actions
- Automated Testing and Security Scanning: Employ continuous integration pipelines which test and scan your codebase automatically for secure and strong apps.
- Seamless Containerization and Deployment: Use GitHub Actions for the creation of container images and deployment into Kubernetes clusters and automate your continuous deployment.
- Integration with Devtron for Enhanced Operations: Integrate GitHub Actions with Devtron for simplifying post-deployment operations and Day 2 operations with a seamless Kubernetes experience.
Streamline your DevOps process with GitHub Actions integrated into your CI/CD pipelines within Kubernetes.
Creating a GitHub CI/CD Workflow for Kubernetes: A Practical Example
This guide demonstrates building a CI/CD pipeline for a Go-based key-value store, deploying it to a Kubernetes cluster. Workflows are defined in YAML files within the .github/workflows directory.
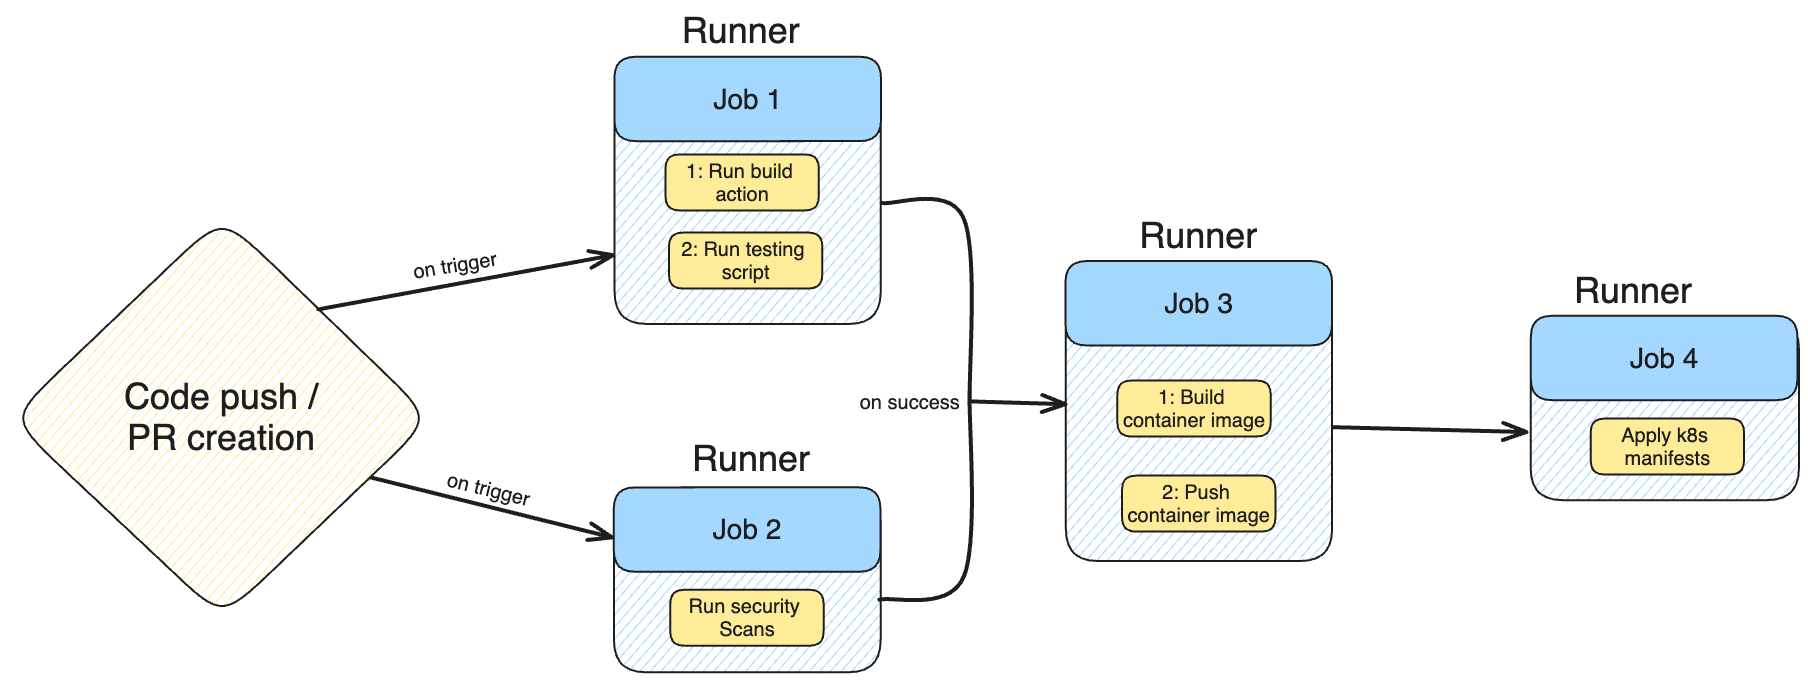
The pipeline stages include:
- Building and testing the code.
- Performing security scans (e.g., with CodeQL).
- Creating a Docker image and pushing it to DockerHub.
- Deploying the application on a Kubernetes cluster.
This pipeline combines both parallel and sequential jobs. Build and test, along with security scanning, run sequentially. Once successful, the container image is built, pushed, and deployed to Kubernetes.
Prerequisites and Setup:
- Create the .github/workflows directory in your repository root.
- Secrets Management: Securely store sensitive information like DockerHub credentials (
DOCKER_USERNAME, DOCKER_PASSWORD) in GitHub repository secrets to prevent leaks.
1. Creating the Build and Test Workflow
The first stage of our CI pipeline focuses on verifying code quality through building and testing.
Goal: Compile the Go application and run its unit tests whenever code is pushed to main or a pull request targets main.
File: .github/workflows/build-and-test.yaml
name: Build and Test

on:
  push:
    branches: [ "main" ]
  pull_request:
    branches: [ "main" ]

jobs:
  build:
    runs-on: ubuntu-latest # Using a GitHub-hosted Linux runner
    steps:
    - name: Checkout Repository
      uses: actions/checkout@v4 # Action to check out your repository code

    - name: Set up Go
      uses: actions/setup-go@v4 # Action to set up Go environment
      with:
        go-version: '1.21.3' # Specify your Go version

    - name: Build Application
      run: go build -v ./ # Command to build the Go executable

    - name: Run Unit Tests
      run: go test -v ./ # Command to execute Go unit tests
Explanation:
- Trigger (
on): The workflow activates onpushto themainbranch orpull_requesttargetingmain. This ensures every significant code change is validated. - Runner (
runs-on):ubuntu-latestspecifies a GitHub-hosted virtual machine running the latest Ubuntu OS. GitHub provides various runners (Windows, macOS) to suit different needs. - Steps:
actions/checkout@v4: This essential action checks out your repository's code, making it available to subsequent steps.actions/setup-go@v4: Configures the Go environment, simplifying dependency management for Go projects.go build -v ./: Compiles your Go application.go test -v ./: Executes your Go unit tests. For other languages or testing frameworks (e.g., Playwright), this command would be adapted accordingly.
2. Implementing Security Scanning with CodeQL
Integrating static code analysis early in the pipeline is a security best practice. CodeQL is a powerful tool for finding vulnerabilities.
Goal: Automatically scan the codebase for security vulnerabilities using GitHub's CodeQL.
File: .github/workflows/codeql-analysis.yaml (Typically generated via GitHub UI)
# This workflow is typically generated and pre-configured by GitHub.
# For illustration, a simplified structure is shown.
name: CodeQL

on:
  push:
    branches: [ "main" ]
  pull_request:
    branches: [ "main" ]

jobs:
  analyze:
    name: Analyze
    runs-on: ubuntu-latest
    permissions:
      security-events: write # Required for uploading SARIF results
      contents: read # Required for checking out code
    steps:
    - name: Checkout Repository
      uses: actions/checkout@v4

    - name: Initialize CodeQL
      uses: github/codeql-action/init@v3
      with:
        languages: go # Specify the language(s) to scan

    - name: Autobuild
      uses: github/codeql-action/autobuild@v3 # Automatically builds compiled languages for analysis

    - name: Perform CodeQL Analysis
      uses: github/codeql-action/analyze@v3 # Performs the actual analysis
Explanation:
- Ease of Use: GitHub provides pre-defined actions like
github/codeql-actionthat are designed to work out-of-the-box, simplifying the integration of complex tools. - Permissions: For security scanning, specific permissions (
security-events: write,contents: read) are crucial for CodeQL to upload its findings and access the codebase. - Trigger: We set the trigger conditions identical to the
build-and-testworkflow to ensure security scans run in parallel with the initial build and test.
This Devtron blog post covers the creation of a comprehensive CI/CD pipeline using GitHub Actions, including build, test, security scanning, image building, and deployment to Kubernetes. To optimize it for search engines and AI Overviews, we need to:
- Improve Structure and Readability: Use more headings, subheadings, bullet points, and bold text for key terms.
- Add a Strong Introduction: Clearly state what the reader will learn and the value proposition.
- Enhance Explanations: Provide more context for why certain steps or choices are made (e.g., why
workflow_runis used, security best practices for PATs). - Incorporate Best Practices: Weave in security best practices for GitHub Actions secrets, PATs, and runner permissions.
- Summarize Key Takeaways: A concise conclusion that reinforces the main points.
- Use AI-friendly language: Employ clear, concise sentences that directly answer potential "how-to" queries.
3. Creating the Build and Push Docker Image Workflow
Once the code is built, tested, and scanned, the next step is to create a container image and push it to a registry.
Goal: Build a Docker image of the application and push it to Docker Hub, but only after successful build, test, and security scans.
File: .github/workflows/build-and-push.yaml
A. Managing Secrets Securely:
Before creating the workflow, you must configure Docker Hub credentials as GitHub Secrets. Secrets are encrypted environment variables that allow you to store sensitive information securely within your repository.
- Navigate to your GitHub repository Settings > Secrets and variables > Actions.
- Click New repository secret.
- Create two secrets:
DOCKER_USERNAME: Your Docker Hub username.DOCKER_PASSWORD: Your Docker Hub API token (recommended over password for security).- Best Practice: Always use API tokens for automated access and adhere to the principle of least privilege by granting only necessary permissions to the token. Rotate tokens regularly.
B. Workflow YAML:
name: Build and Push Docker Image

on:
  workflow_run:
    workflows: ["Build and Test", "CodeQL"] # Triggers after these workflows complete
    types:
      - completed # Triggers only when the specified workflows complete successfully

jobs:
  release-docker:
    name: Release Docker Image
    if: "!contains(github.event.head_commit.message, '[skip ci]')" # Optional: Skip if commit message contains '[skip ci]'
    runs-on: ubuntu-latest
    steps:
      - name: Check out the repo
        uses: actions/checkout@v4

      - name: Log in to Docker Hub
        uses: docker/login-action@v3 # Use v3 for improved security and features
        with:
          username: ${{ secrets.DOCKER_USERNAME }}
          password: ${{ secrets.DOCKER_PASSWORD }}

      - name: Build and push Docker image
        uses: docker/build-push-action@v5 # Use v5 for latest features and security
        with:
          context: . # Path to the Dockerfile context (current directory)
          tags: your_dockerhub_username/gin-kv:latest # Replace with your image tag
          push: true
This Devtron blog post covers the creation of a comprehensive CI/CD pipeline using GitHub Actions, including build, test, security scanning, image building, and deployment to Kubernetes. To optimize it for search engines and AI Overviews, we need to:
- Improve Structure and Readability: Use more headings, subheadings, bullet points, and bold text for key terms.
- Add a Strong Introduction: Clearly state what the reader will learn and the value proposition.
- Enhance Explanations: Provide more context for why certain steps or choices are made (e.g., why
workflow_runis used, security best practices for PATs). - Incorporate Best Practices: Weave in security best practices for GitHub Actions secrets, PATs, and runner permissions.
- Summarize Key Takeaways: A concise conclusion that reinforces the main points.
- Use AI-friendly language: Employ clear, concise sentences that directly answer potential "how-to" queries.
4. Deploying the Application to Kubernetes (CD Pipeline)
The final stage is Continuous Deployment, where the newly built Docker image is deployed to your Kubernetes cluster.
Goal: Apply Kubernetes manifest files to deploy the application, using a self-hosted GitHub Actions runner in the target cluster for secure direct access.
File: .github/workflows/kubernetes-deployment.yaml
A. Choosing a Deployment Strategy:
GitHub Actions offers various ways to deploy to Kubernetes:
- Official Actions:
azure/aks-deploy,google-github-actions/deploy-gke,aws-actions/amazon-eks-deployfor cloud-specific clusters. kubectlGitHub Action: A generic action forkubectlcommands.- Custom Script: Direct
kubectlcommands in arunstep. - Self-Hosted Runner (Recommended for Direct Cluster Access): Deploying a GitHub Actions runner directly within your Kubernetes cluster simplifies authentication and network access. This guide focuses on this approach for improved security and direct control.
B. Setting Up a Custom GitHub Runner in Kubernetes:
Running a self-hosted runner within your Kubernetes cluster is ideal for deploying applications. It allows the runner to directly interact with the Kubernetes API, bypassing external kubeconfig management or complex network configurations.
- Install Cert-Manager (Dependency for Actions Runner Controller): Cert-Manager handles TLS certificates and is a prerequisite for the Actions Runner Controller.
helm repo add jetstack https://charts.jetstack.io
helm repo update
helm install cert-manager jetstack/cert-manager \
  --namespace cert-manager \
  --create-namespace \
  --version v1.15.1 \
  --set crds.enabled=true
Ensure Helm is installed in your target environment.
- Generate a GitHub Personal Access Token (PAT): This PAT will allow the Actions Runner Controller to authenticate with GitHub and register the runner.
- Go to GitHub Settings > Developer Settings > Personal Access Tokens > Tokens (classic).
- Generate a new token with
reposcope permissions (full control of private repositories) to ensure the runner has sufficient access to the target repository. - Security Best Practice: For production, consider using GitHub Apps with fine-grained permissions or OpenID Connect (OIDC) for more granular and ephemeral credentials instead of PATs.
- Deploy Actions Runner Controller (ARC): ARC is a Kubernetes operator that manages self-hosted runners.
- Deploy Actions Runner Controller (ARC): ARC is a Kubernetes operator that manages self-hosted runners.
helm repo add actions-runner-controller https://actions-runner-controller.github.io/actions-runner-controller
helm repo update
helm upgrade --install --namespace actions-runner-system --create-namespace \
  --set=authSecret.create=true \
  --set=authSecret.github_token="REPLACE_YOUR_PAT_HERE" \
  --wait actions-runner-controller actions-runner-controller/actions-runner-controller
Replace REPLACE_YOUR_PAT_HERE with the PAT you generated.
- Create a RunnerDeployment Resource: This Custom Resource Definition (CRD) provided by ARC defines the specifications for your runner.
apiVersion: actions.summerwind.dev/v1alpha1
kind: RunnerDeployment
metadata:
  name: kubernetes-runner
spec:
  replicas: 1
  template:
    spec:
      serviceAccountName: runner-sa # This ServiceAccount needs permissions
      repository: your_github_username/your-repository-name # Update to your target repo (e.g., siddhant-khisty/key-store-gin)
      labels:
        - "kubernetes-runner" # Label to target this runner in your workflow
Update repository to your actual GitHub repository (e.g., siddhant-khisty/key-store-gin).
- Configure Runner Permissions (Service Account, ClusterRole, ClusterRoleBinding): The runner needs Kubernetes permissions to deploy resources. We'll create a Service Account, a ClusterRole with necessary permissions, and a ClusterRoleBinding to link them.
kubectl create sa runner-sa -n actions-runner-system # Create service account in the ARC namespace
kubectl create clusterrole runner --verb=get,list,watch,create,delete,patch,update --resource=* # Grant broad permissions (adjust for least privilege in production)
kubectl create clusterrolebinding runnerbinding --clusterrole=runner --serviceaccount=actions-runner-system:runner-sa # Bind SA to ClusterRole
Note: Granting --resource=* provides extensive permissions. For production, apply the principle of least privilege and restrict resources and verbs to only what's necessary for deployment.
C. Deployment Workflow YAML:
name: Kubernetes Deployment

on:
  workflow_run:
    workflows: ["Build and Push Docker Image"] # Triggers after the image is built and pushed
    types:
      - completed

jobs:
  deploy:
    name: Create K8s Deployment
    runs-on: kubernetes-runner # Target our self-hosted runner with this label
    steps:
      - name: Check out the repository
        uses: actions/checkout@v4

      # Kubectl is typically pre-installed on standard GitHub-hosted runners.
      # For custom runners, ensure it's available or install it like this:
      - name: Download Kubectl binaries
        run: curl -LO "https://dl.k8s.io/release/$(curl -L -s https://dl.k8s.io/release/stable.txt)/bin/linux/amd64/kubectl"

      - name: Install Kubectl
        run: sudo install -o root -g root -m 0755 kubectl /usr/local/bin/kubectl

      - name: Deploy the application to Kubernetes
        run: |
          kubectl apply -f https://raw.githubusercontent.com/siddhant-khisty/key-store-gin/main/Kubernetes/svc.yaml
          kubectl apply -f https://raw.githubusercontent.com/siddhant-khisty/key-store-gin/main/Kubernetes/deply.yaml
          kubectl apply -f https://raw.githubusercontent.com/siddhant-khisty/key-store-gin/main/Kubernetes/ingress.yaml
Explanation:
- Trigger (
workflow_run): This workflow is configured to run only after the "Build and Push Docker Image" workflow hascompleted, establishing a robust CI/CD chain. - Runner (
runs-on):kubernetes-runnertells GitHub Actions to execute this job on our self-hosted runner labeled "kubernetes-runner" that we configured in the previous step. - Kubectl Setup: Since the custom runner might not have
kubectlpre-installed, steps are included to download and install it. - Deployment Commands:
kubectl apply -f ...commands apply the Kubernetes manifest files directly from your repository, deploying the application. Because the runner is inside the cluster and uses therunner-saservice account, it has the necessary permissions to interact with the Kubernetes API without needing a separatekubeconfig.
Verifying Your CI/CD Pipeline
After configuring all workflows, every commit to the main branch (or pull request targeting it) will trigger the entire pipeline:
- Build and Test (runs in parallel with CodeQL)
- CodeQL Security Scan (runs in parallel with Build and Test)
- Upon successful completion of both, Build and Push Docker Image triggers.
- Upon successful completion of the image build, Kubernetes Deployment triggers.
You can monitor the progress and status of your workflows by navigating to the "Actions" tab in your GitHub repository. The visual graph will display the workflow dependencies and the status of each job.
GitHub Actions for CI vs. CD in Kubernetes: Considerations
While GitHub Actions excels at Continuous Integration (CI), providing robust features for automated builds, tests, and security scans, it presents certain challenges when used as a sole solution for Continuous Deployment (CD) in complex Kubernetes environments.
Challenges for CD with GitHub Actions:
- Advanced Rollback and Recovery: Lacks native robust rollback strategies or disaster recovery features.
- Advanced Deployment Strategies: Limited out-of-the-box support for strategies like canary, blue-green, or advanced canary with Istio and Flagger.
- Limited RBAC: May not offer the granular role-based access control needed for large teams compared to dedicated CD platforms.
- Limited Visualization: Does not provide visual deployment pipelines or user-friendly dashboards found in other tools.
- DORA Metrics: No out-of-the-box solutions for tracking DORA metrics.
- Configuration Drifts: Difficult to analyze configuration drifts or view historical deployment releases, complicating troubleshooting.
While GitHub Actions is powerful for CI, for a comprehensive CD ecosystem and efficient Day 2 operations in Kubernetes, integrating with specialized tools like Devtron is recommended. Devtron, an open-source software delivery workflow for Kubernetes, complements GitHub Actions by offering robust CD pipelines, post-deployment task simplification, tool integrations, and debugging capabilities.
Why Use Devtron with GitHub Actions?
- Simplifies debugging, observability, and rollback strategies.
- Adds visual dashboards and progressive delivery support.Helps manage multi-cluster deployments.
Conclusion
CI/CD pipelines are essential for faster, more reliable software releases. GitHub Actions offers a powerful, secure, and user-friendly platform for automation. Its extensive pre-built actions accelerate setup for builds, tests, and security scans. While GitHub Actions can manage full CI/CD, it also integrates seamlessly for Continuous Integration (CI) with advanced Continuous Delivery (CD) tools like ArgoCD, FluxCD, or Devtron for Kubernetes.
FAQ
1. What is a GitHub Actions CI/CD Pipeline?
A GitHub Actions CI/CD Pipeline is a set of automated workflows within GitHub that trigger builds, tests, and deployments based on repository events like commits or pull requests.
2. Can GitHub Actions deploy to Kubernetes?
Yes, GitHub Actions can deploy to Kubernetes by creating workflows that build Docker images, push them to a registry, and apply manifests to a Kubernetes cluster using kubectl.
3. Is GitHub Actions suitable for production CD in Kubernetes?
While it supports basic CD tasks, GitHub Actions lacks advanced CD features like rollback, progressive delivery, and RBAC. Tools like Devtron are recommended to complement it for production-grade deployments.