As you go down the Platform Engineering journey, your goal is to make the lives of all engineers and developers as efficient as possible, but how about your life? The goal is to also remove as much cognitive load from yourself as possible.
One way to do that is by ensuring a repeatable process when deploying applications and ensuring that the current state of an application is the desired state.
In this blog post, you’ll learn how to implement ArgoCD and CI/CD using Devtron.
Prerequisites
To follow along with this blog post, you should have the following:
- A Kubernetes cluster, that can be as small as k3s/microk8s or even a cloud-managed cluster like AWS EKS, GKE, AKS, etc.
- Knowledge of deploying Devtron. Please follow along with the well-maintained devtron documentation for deploying Devtron in your cluster.
Why App Deployments with Devtron
One of the biggest goals when an engineer implements a new tool in today’s world is to ensure that it makes their life easier in some way, shape, or form. There are far too many implementations, new ways of doing things, and processes regarding new vendors and tooling implementations. It leaves engineers wondering why it made their lives easier in one aspect but brought on a whole new load of problems at the same time.
With a tool like Devtron, you don’t have to worry about a new way of doing GitOps, deploying applications, or managing Kubernetes. You can do it the same way you’ve been doing it, the only difference being that it’s in one central platform, streamlining the entire software delivery process with CI, CD, Monitoring, and much more.
The entire goal is to use the tools, practices, and implementations you’ve been using. Devtron just simplifies the entire process. Let's build and deploy an application using Devtron.
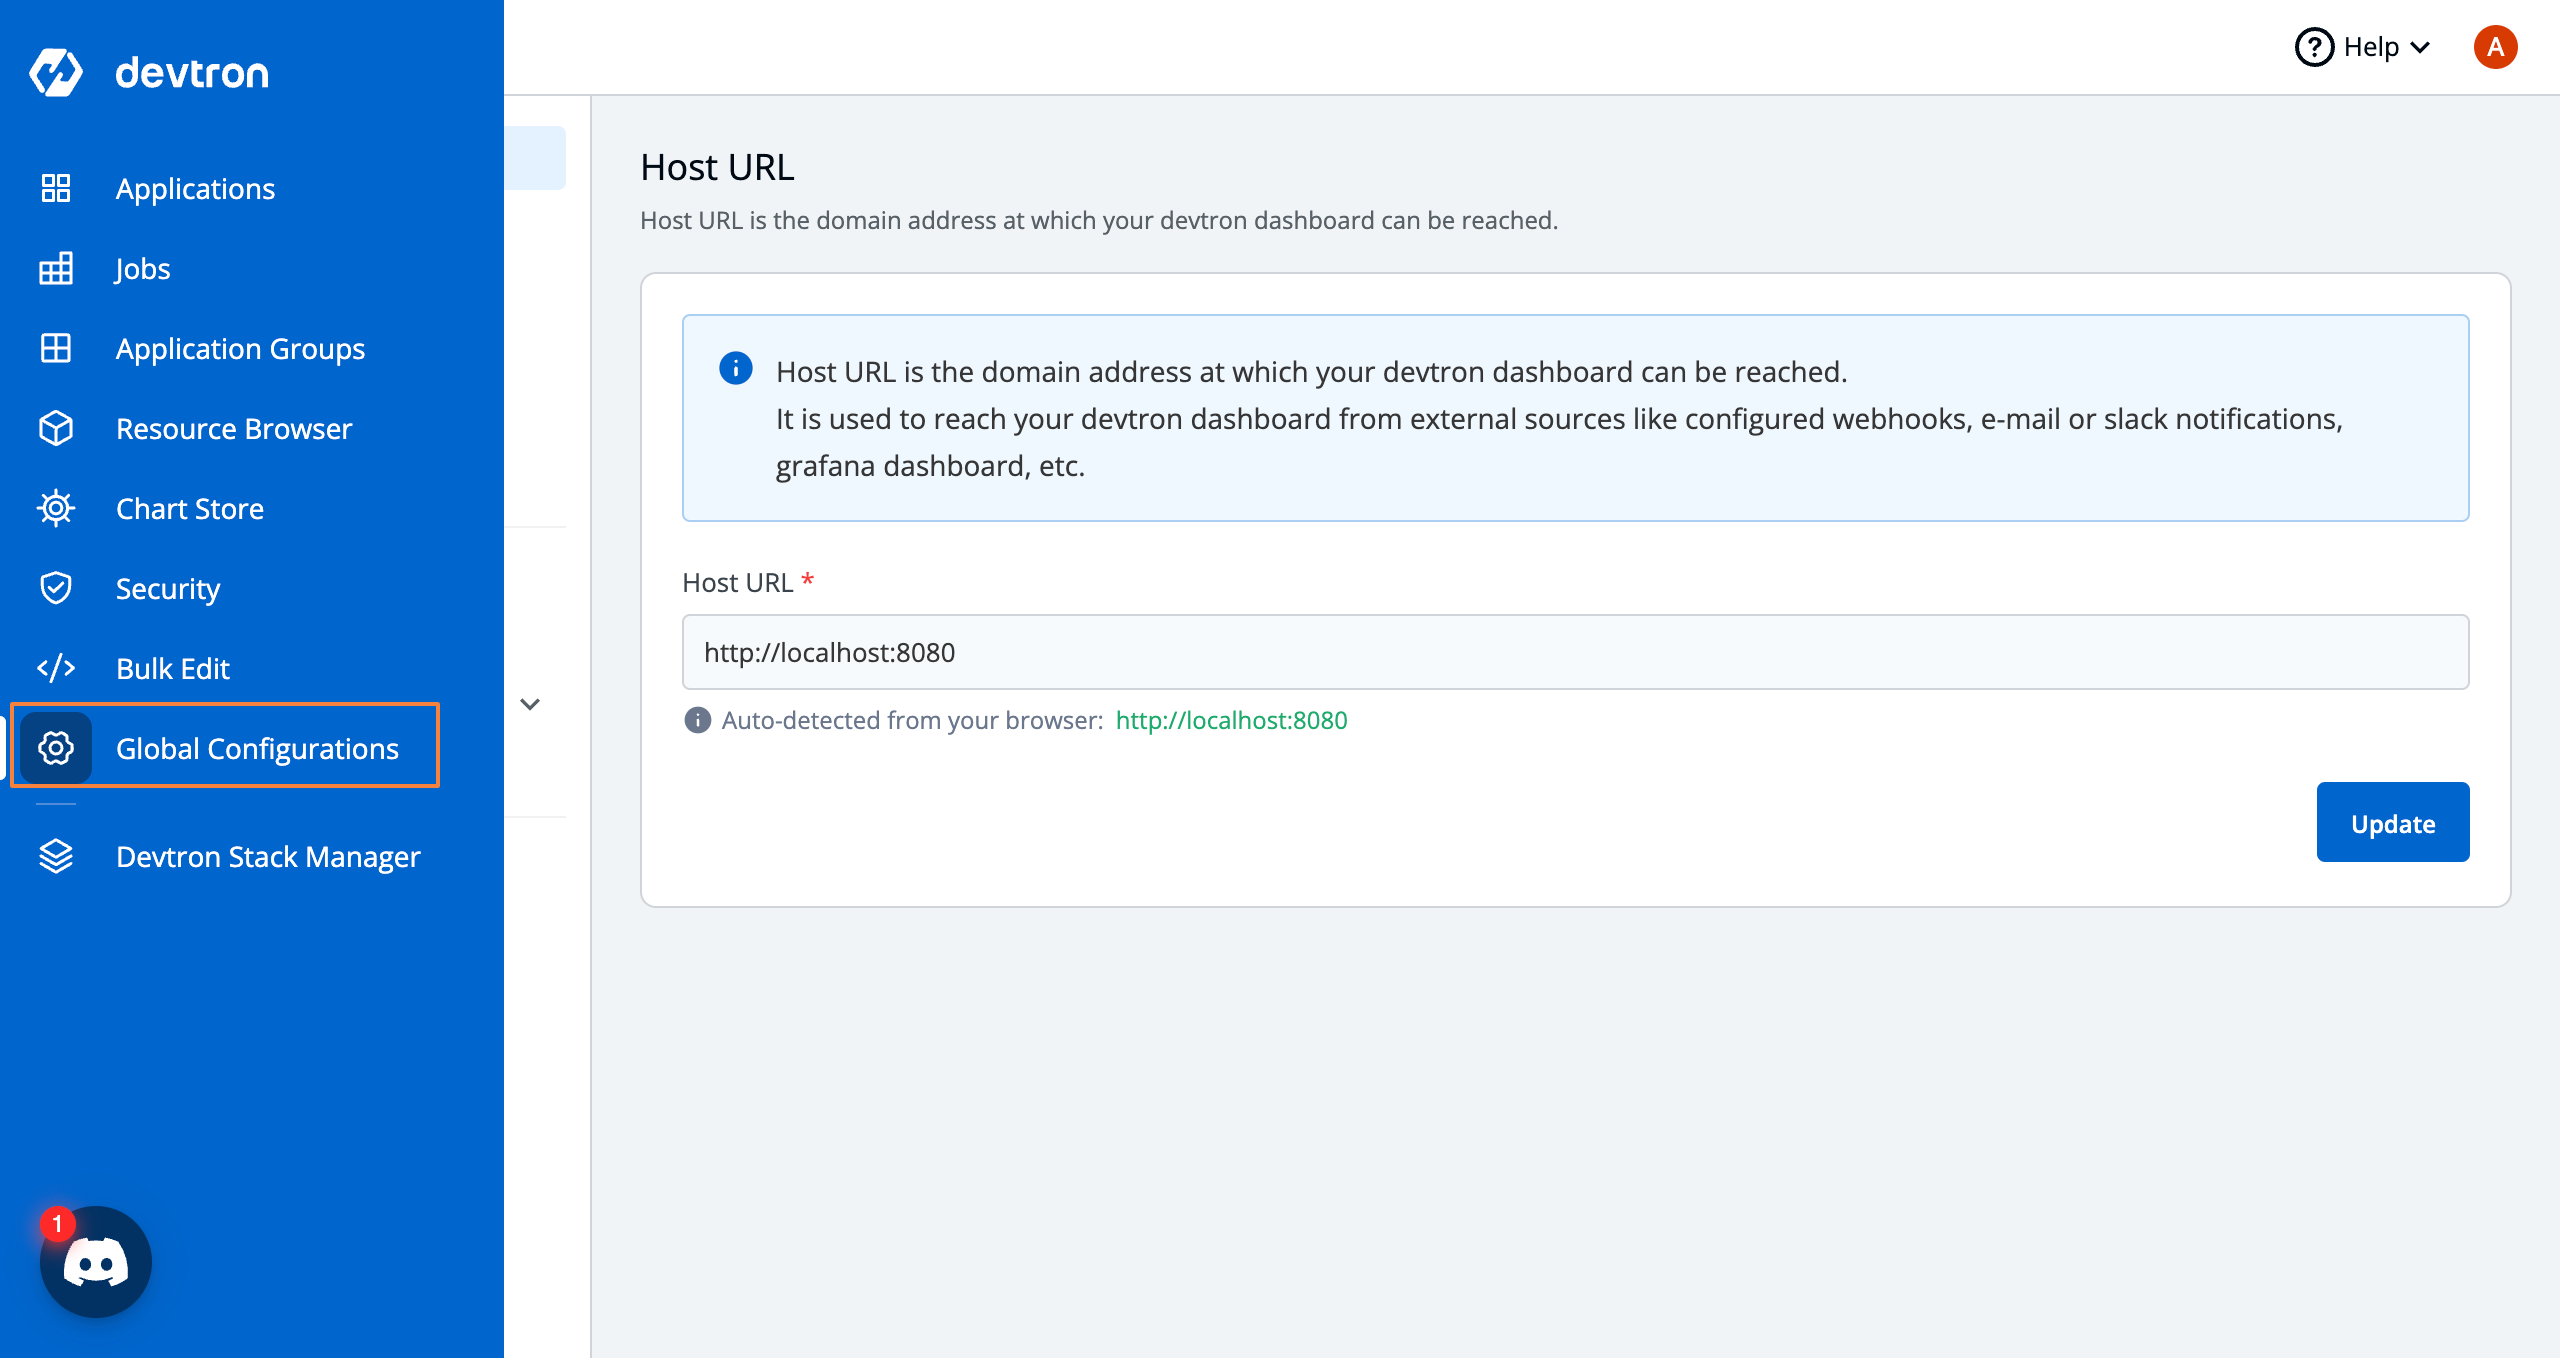
Global Configurations
At Devtron, configurations that are required for application deployment and to access the Devtron dashboard are configured through Global Configurations. The basic minimal configuration required for deploying an app with GitOps is configured below.
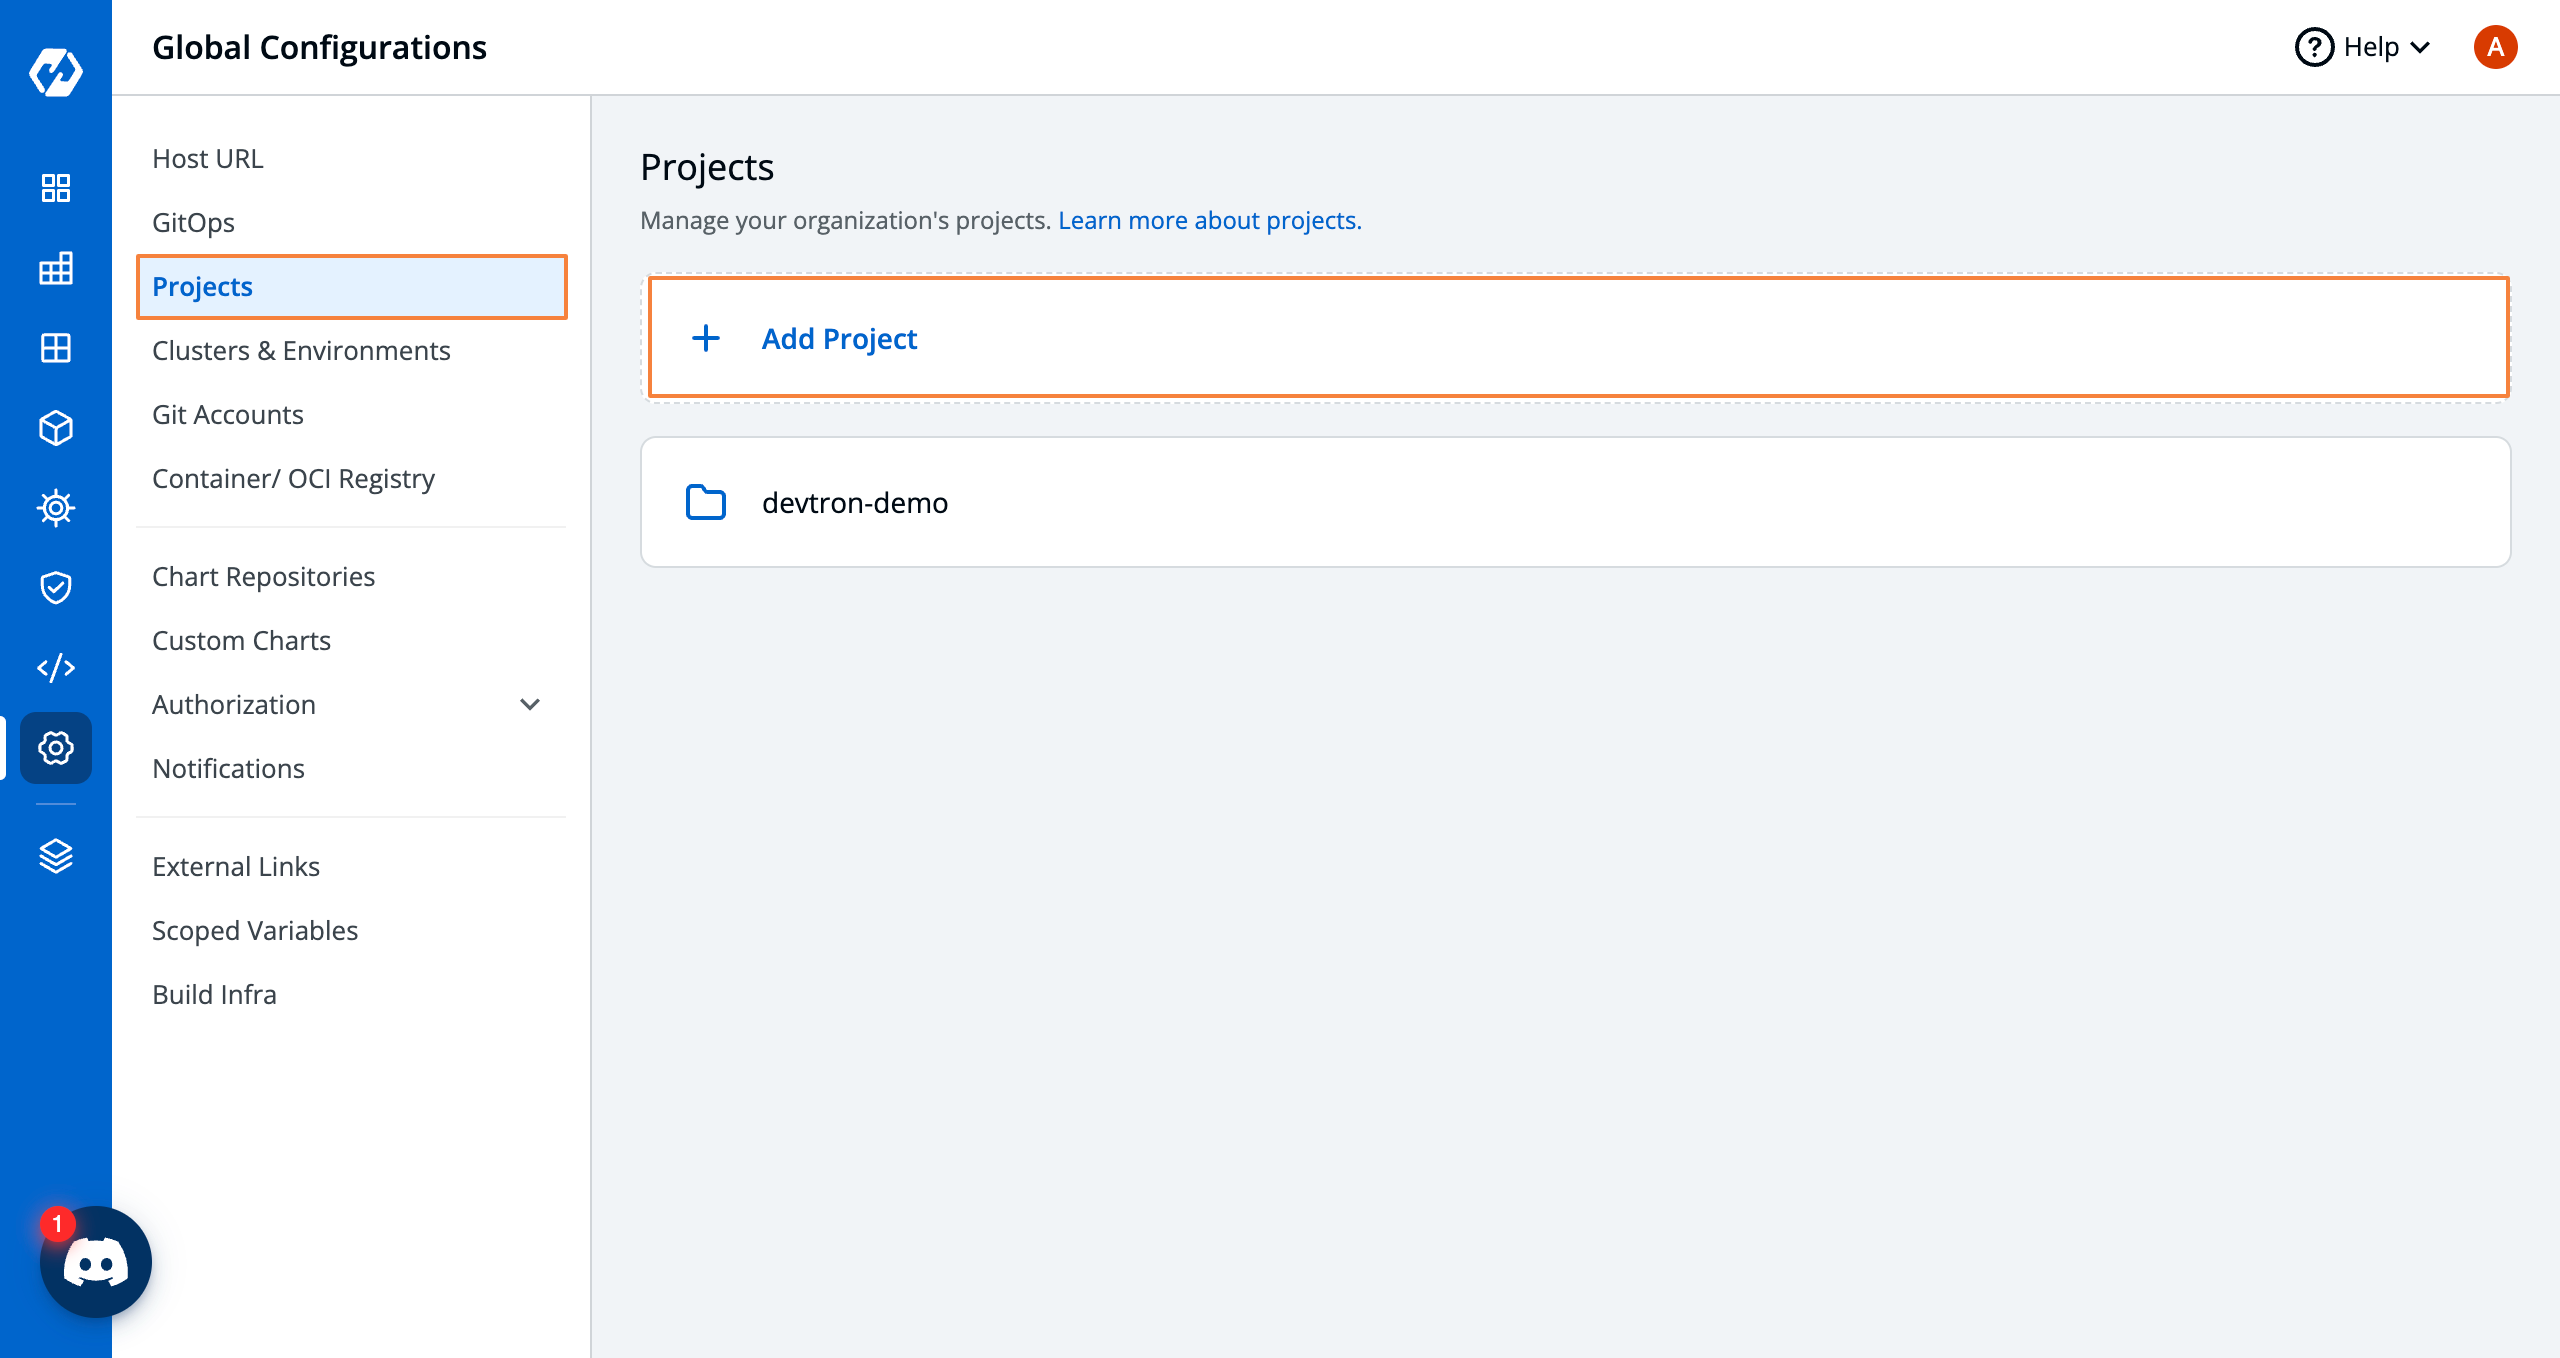
Creating a Project
The first step in ensuring a successful application deployment via Devtron is to create a Project. A project is the segregation of multiple different micro-services on which different teams work. Further, it can also be used to control the access of users, for specific projects and teams.
First, in the Devtron dashboard, click the Global Configurations button.
Within the Global Configurations, click on Projects the button. Click the blue + Add Project button.
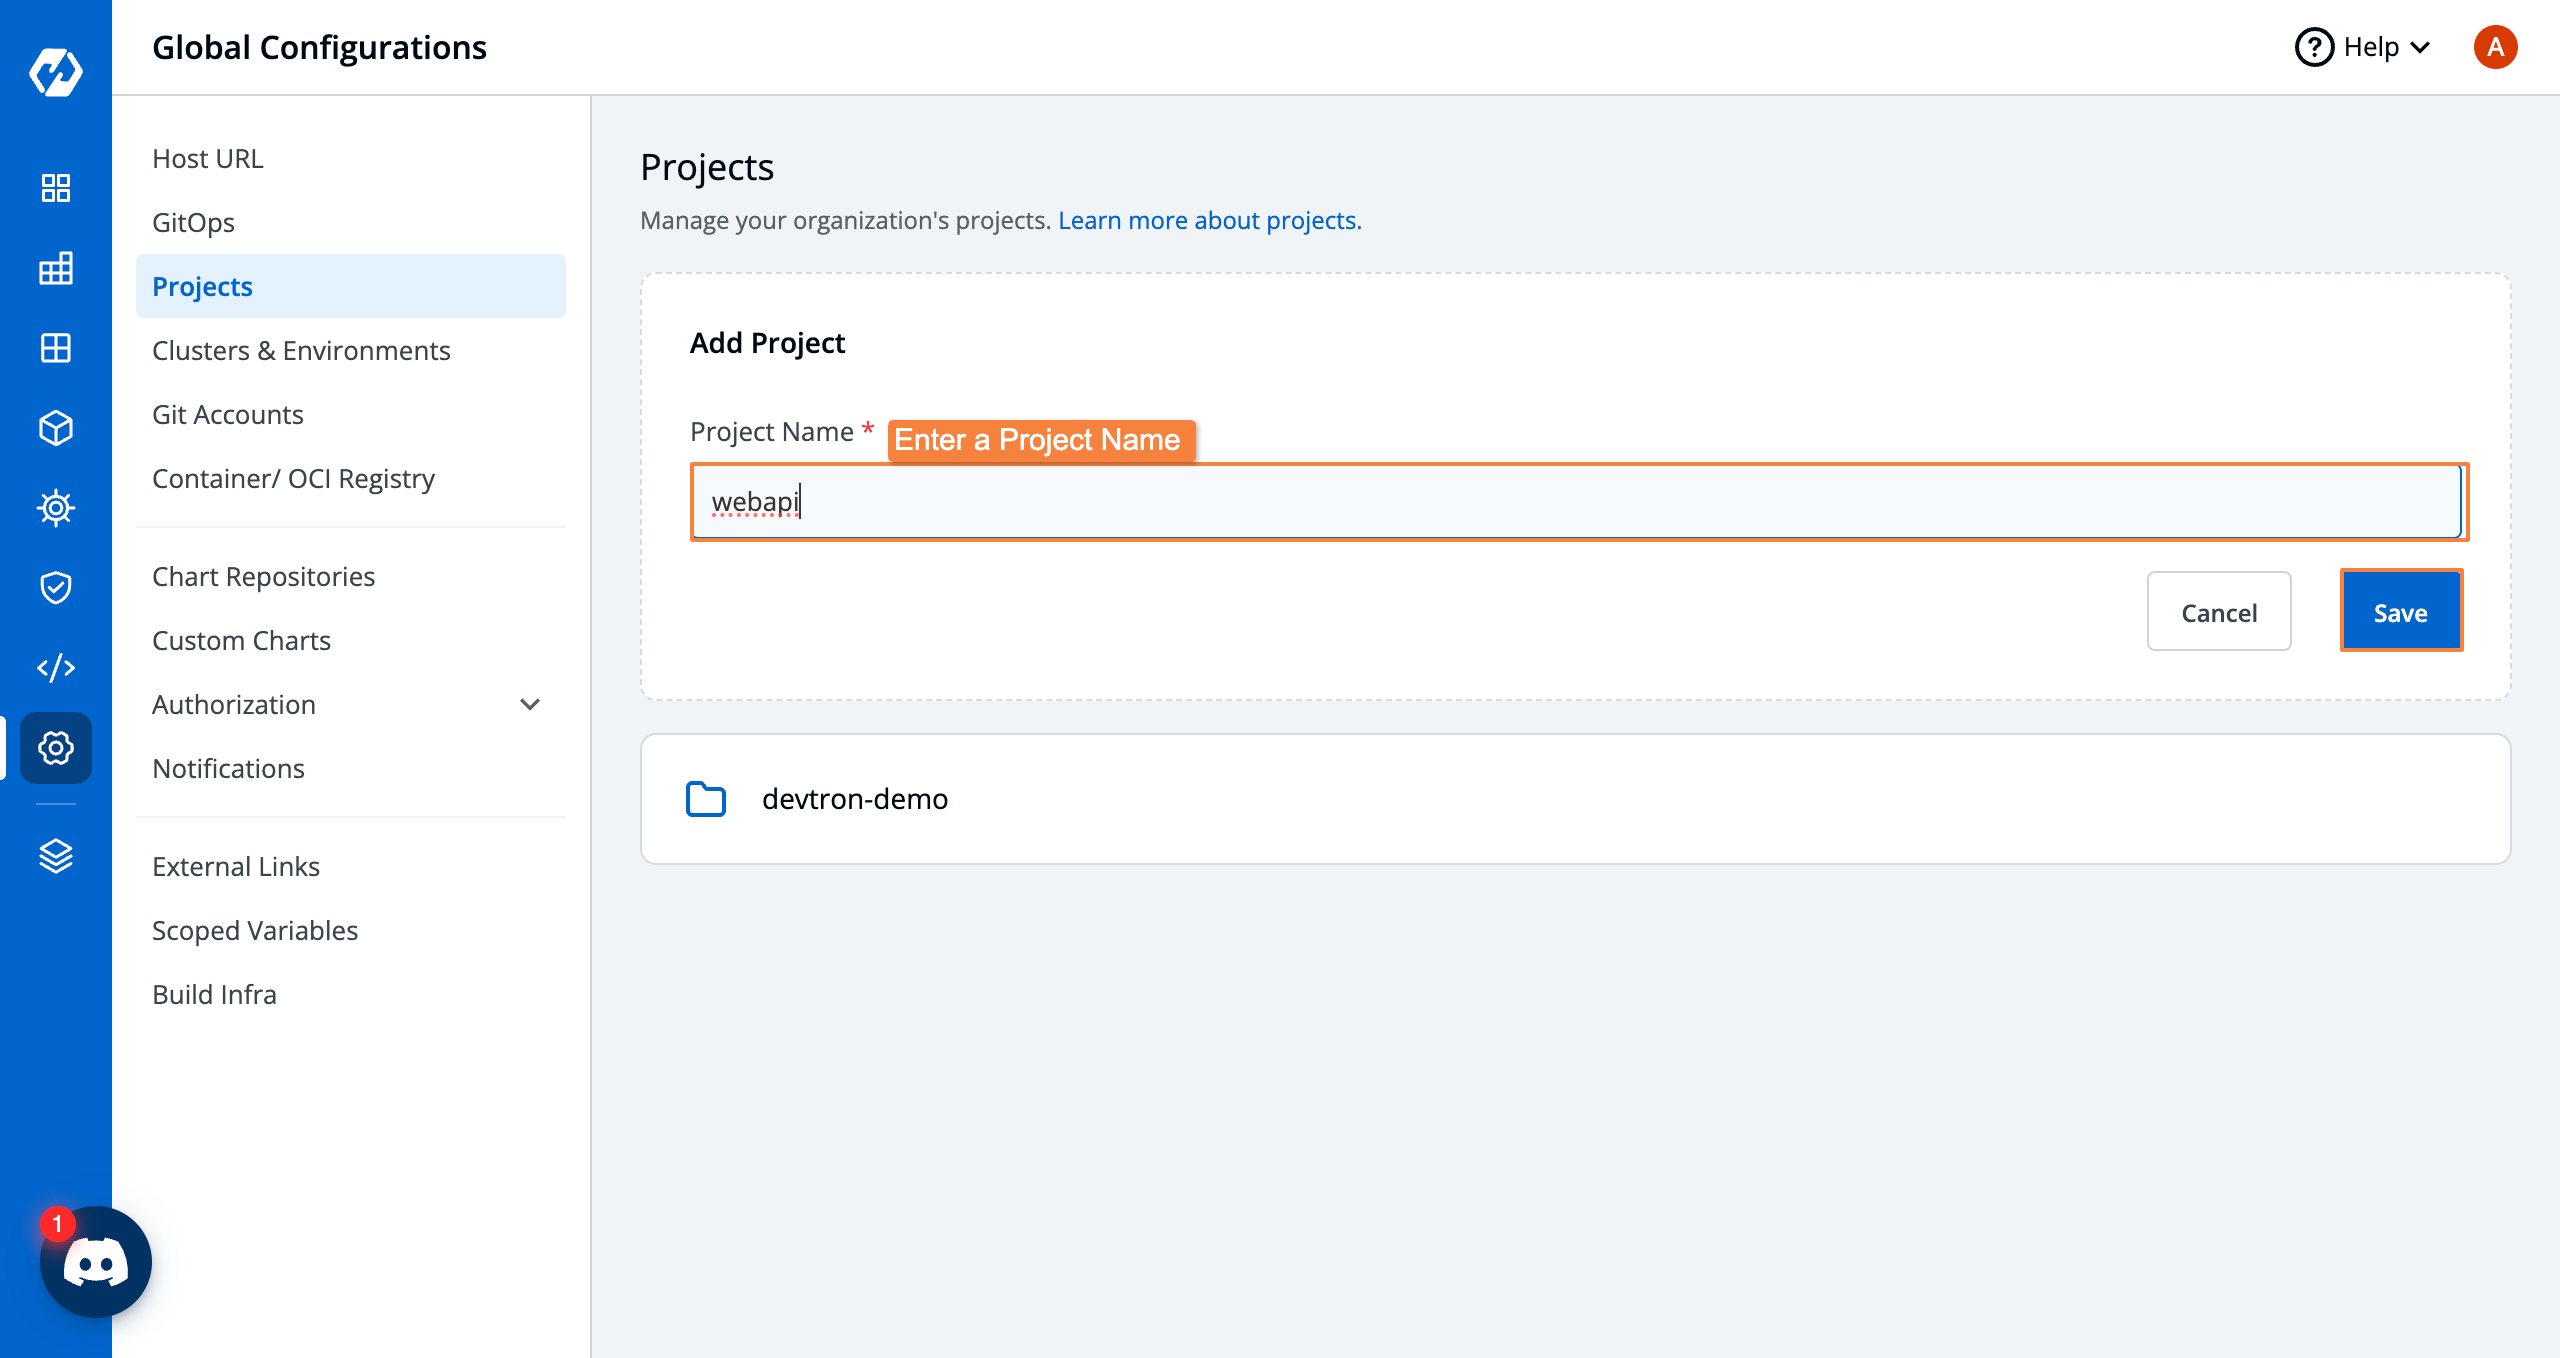
Give your project a name. In the case of this deployment, the demo app used is a part of web API project, so let's add a project called webapi. All corresponding to web apis, can be added in this project.
Now that the project is created, you can connect to source control.
Configuring GitOps
For storing all your Kubernetes configurations, you need to configure GitOps where you can add any version control such as GitHub, GitLab, Azure, and Bitbucket Cloud. Once configured, all the k8s configurations will be automatically pushed to the respective version control, making sure the configurations are in synced state.
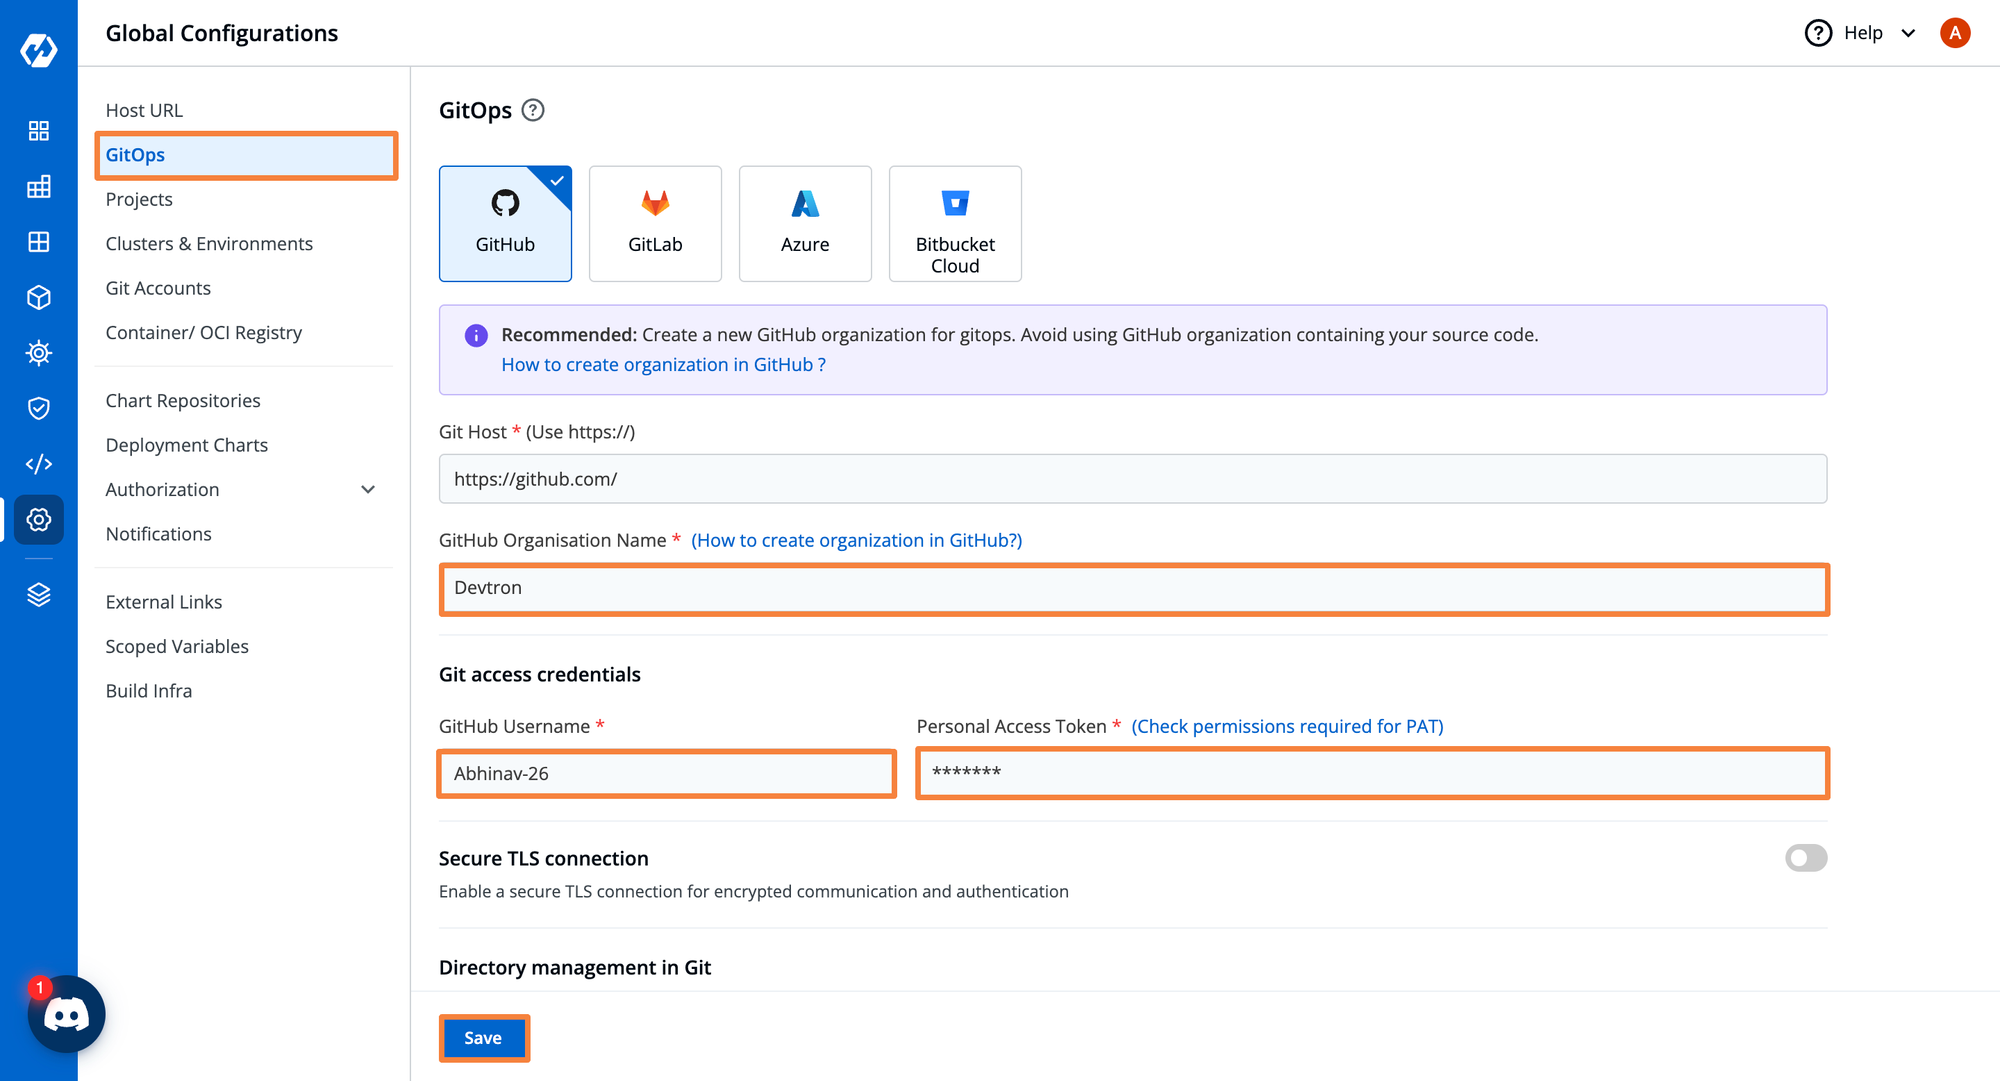
If you’re unsure how to generate a Personal Access Token for GitHub, follow these instructions: https://docs.github.com/en/authentication/keeping-your-account-and-data-secure/managing-your-personal-access-tokens
Once all information is added, click the blue Update button.
Connecting to Version Control
Before you start deploying your applications, you need to connect your git version control where all source code is hosted. There are three primary ways to connect to version control.
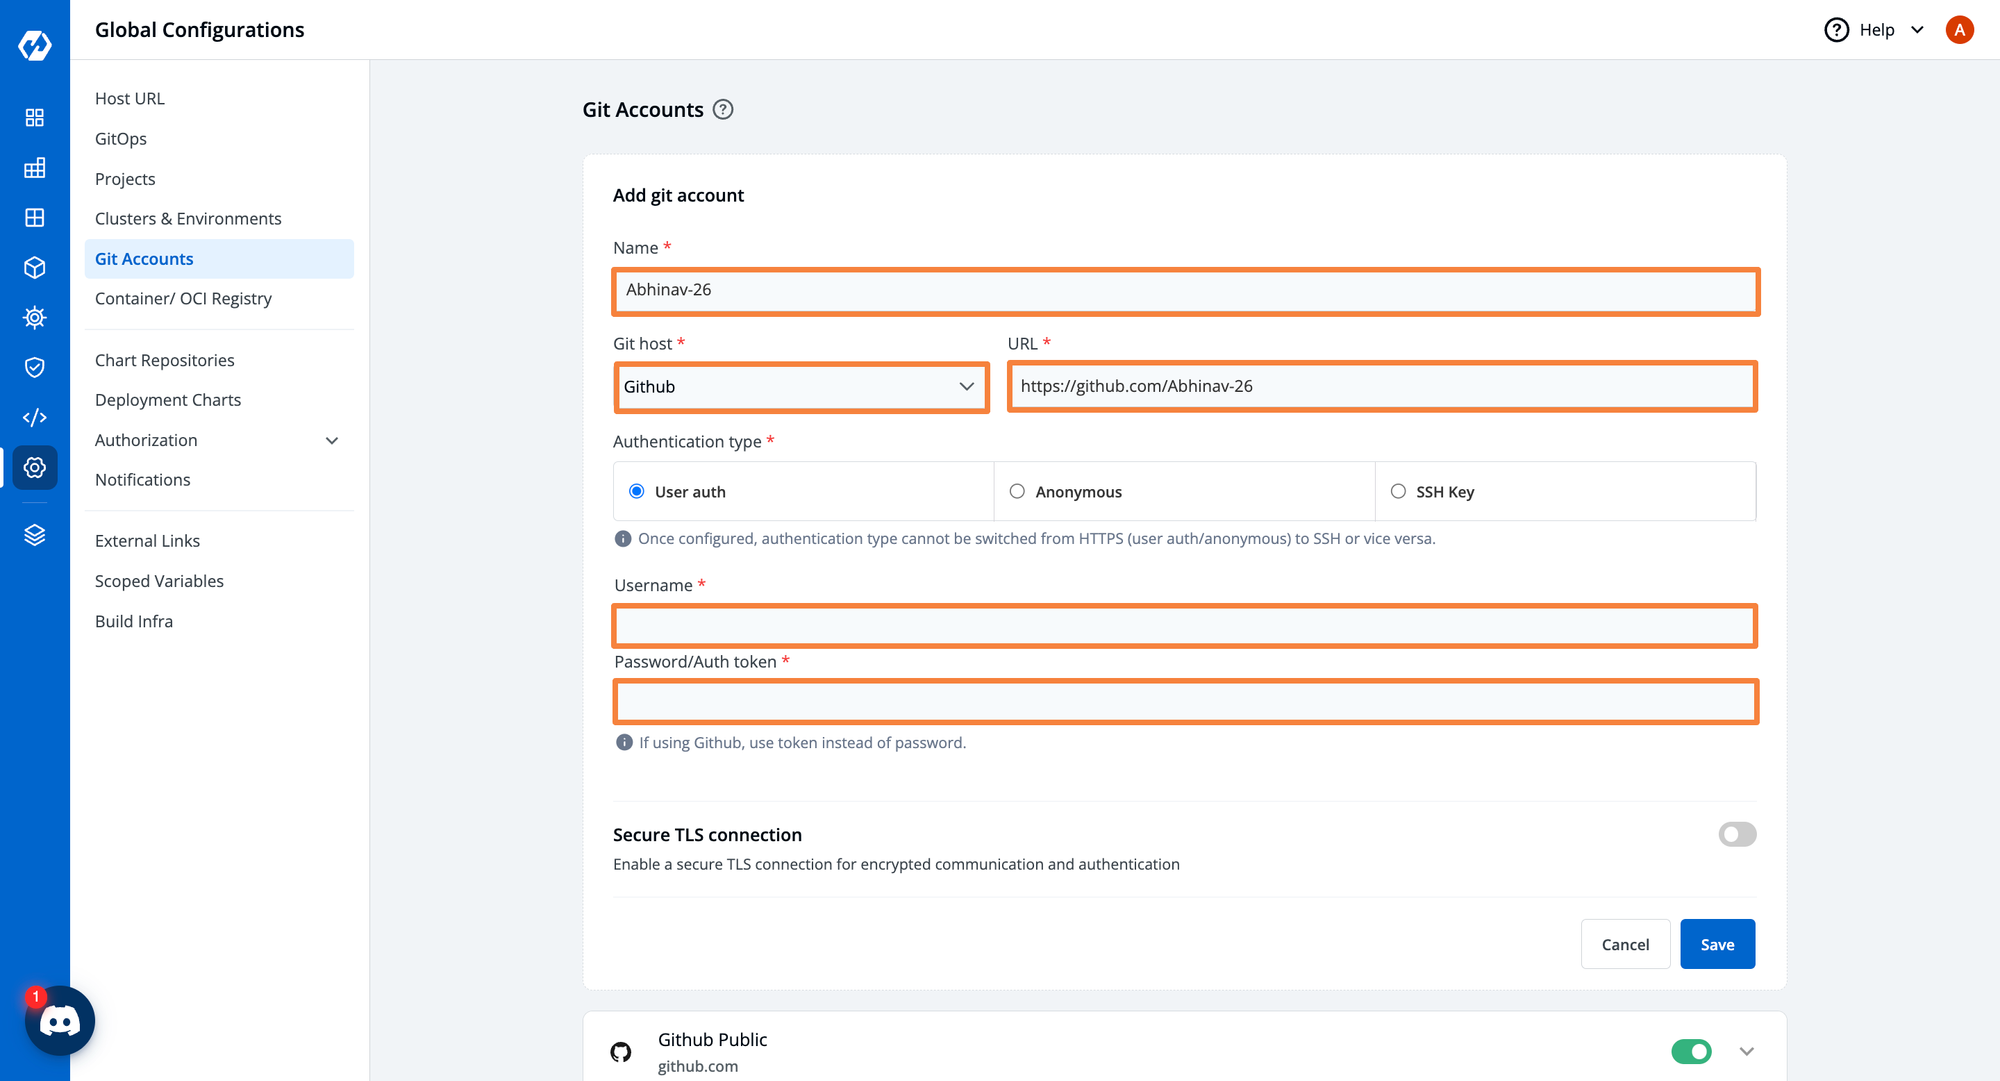
- User Auth: Provide the username and password/auth token which has read-only access
- Anonymous: If it's a public repository, no credentials are required
- SSH Key: If you want to clone your application using ssh key
For this application, let's go with user auth, where we can add our GitHub Account where all source code is being hosted.
Under Global Configurations, click Git Accounts.
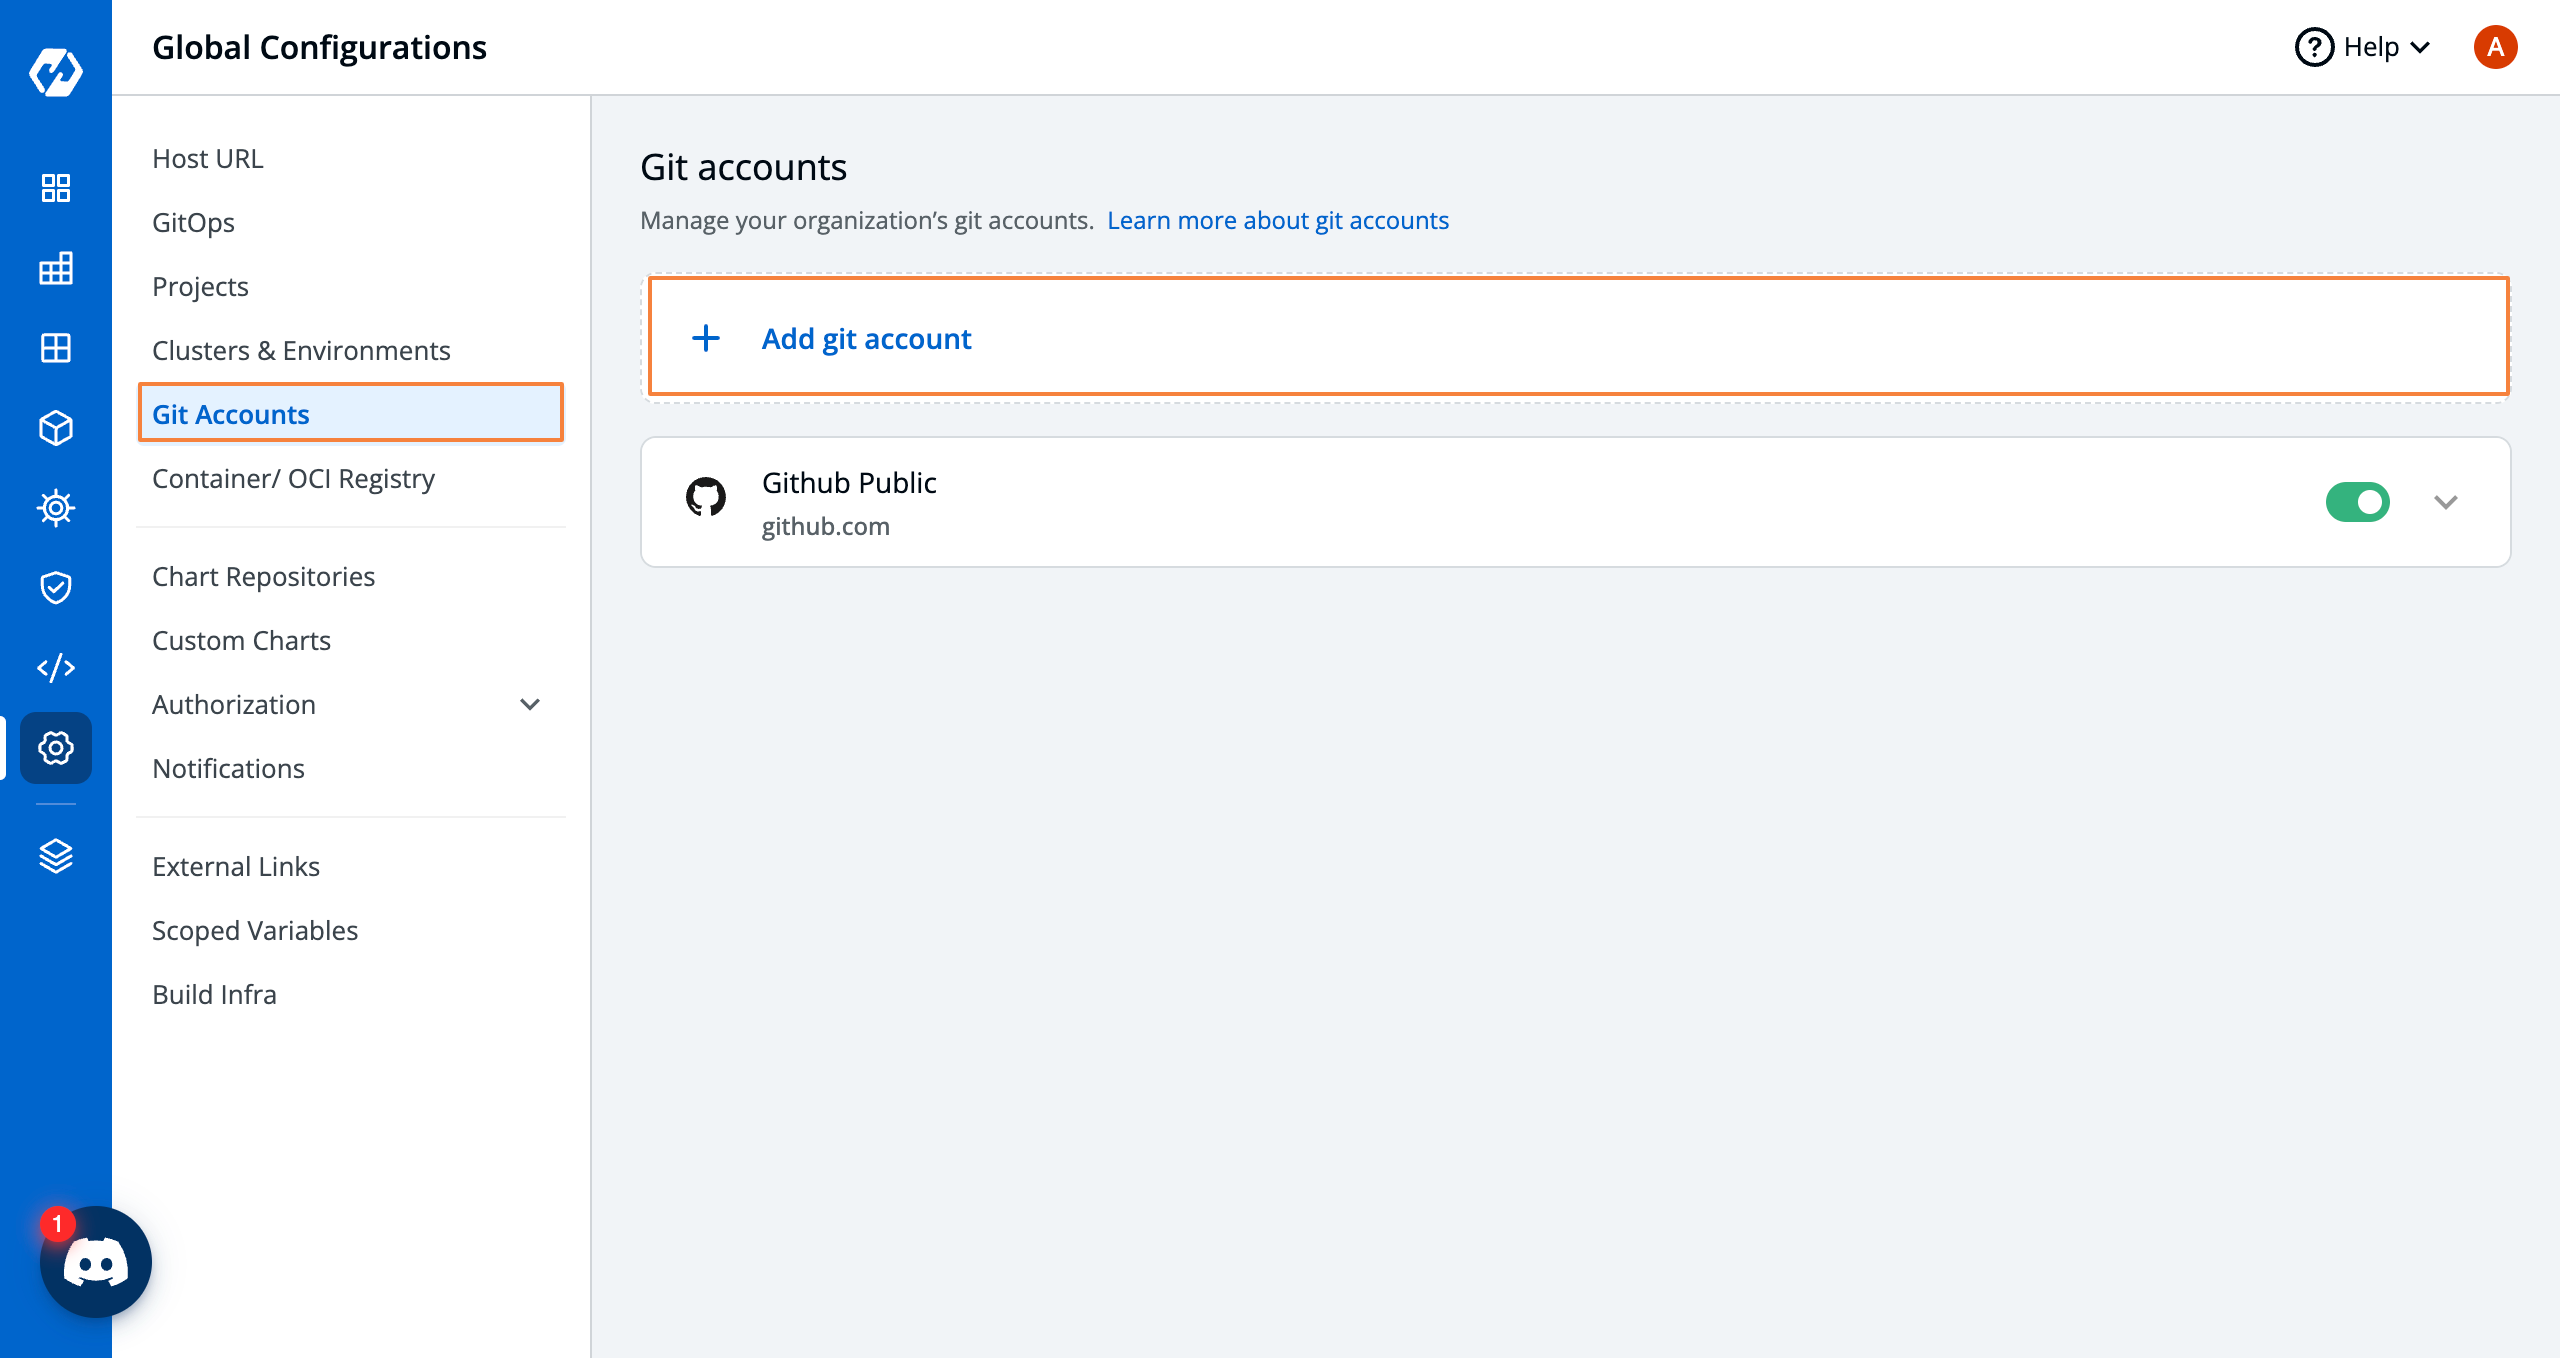
Add the source control information for your Git Account including the Git Host which can any git version control like Bitbucket, Gitlab, GitHub, etc., then provide the GitHub URL, and authentication information.
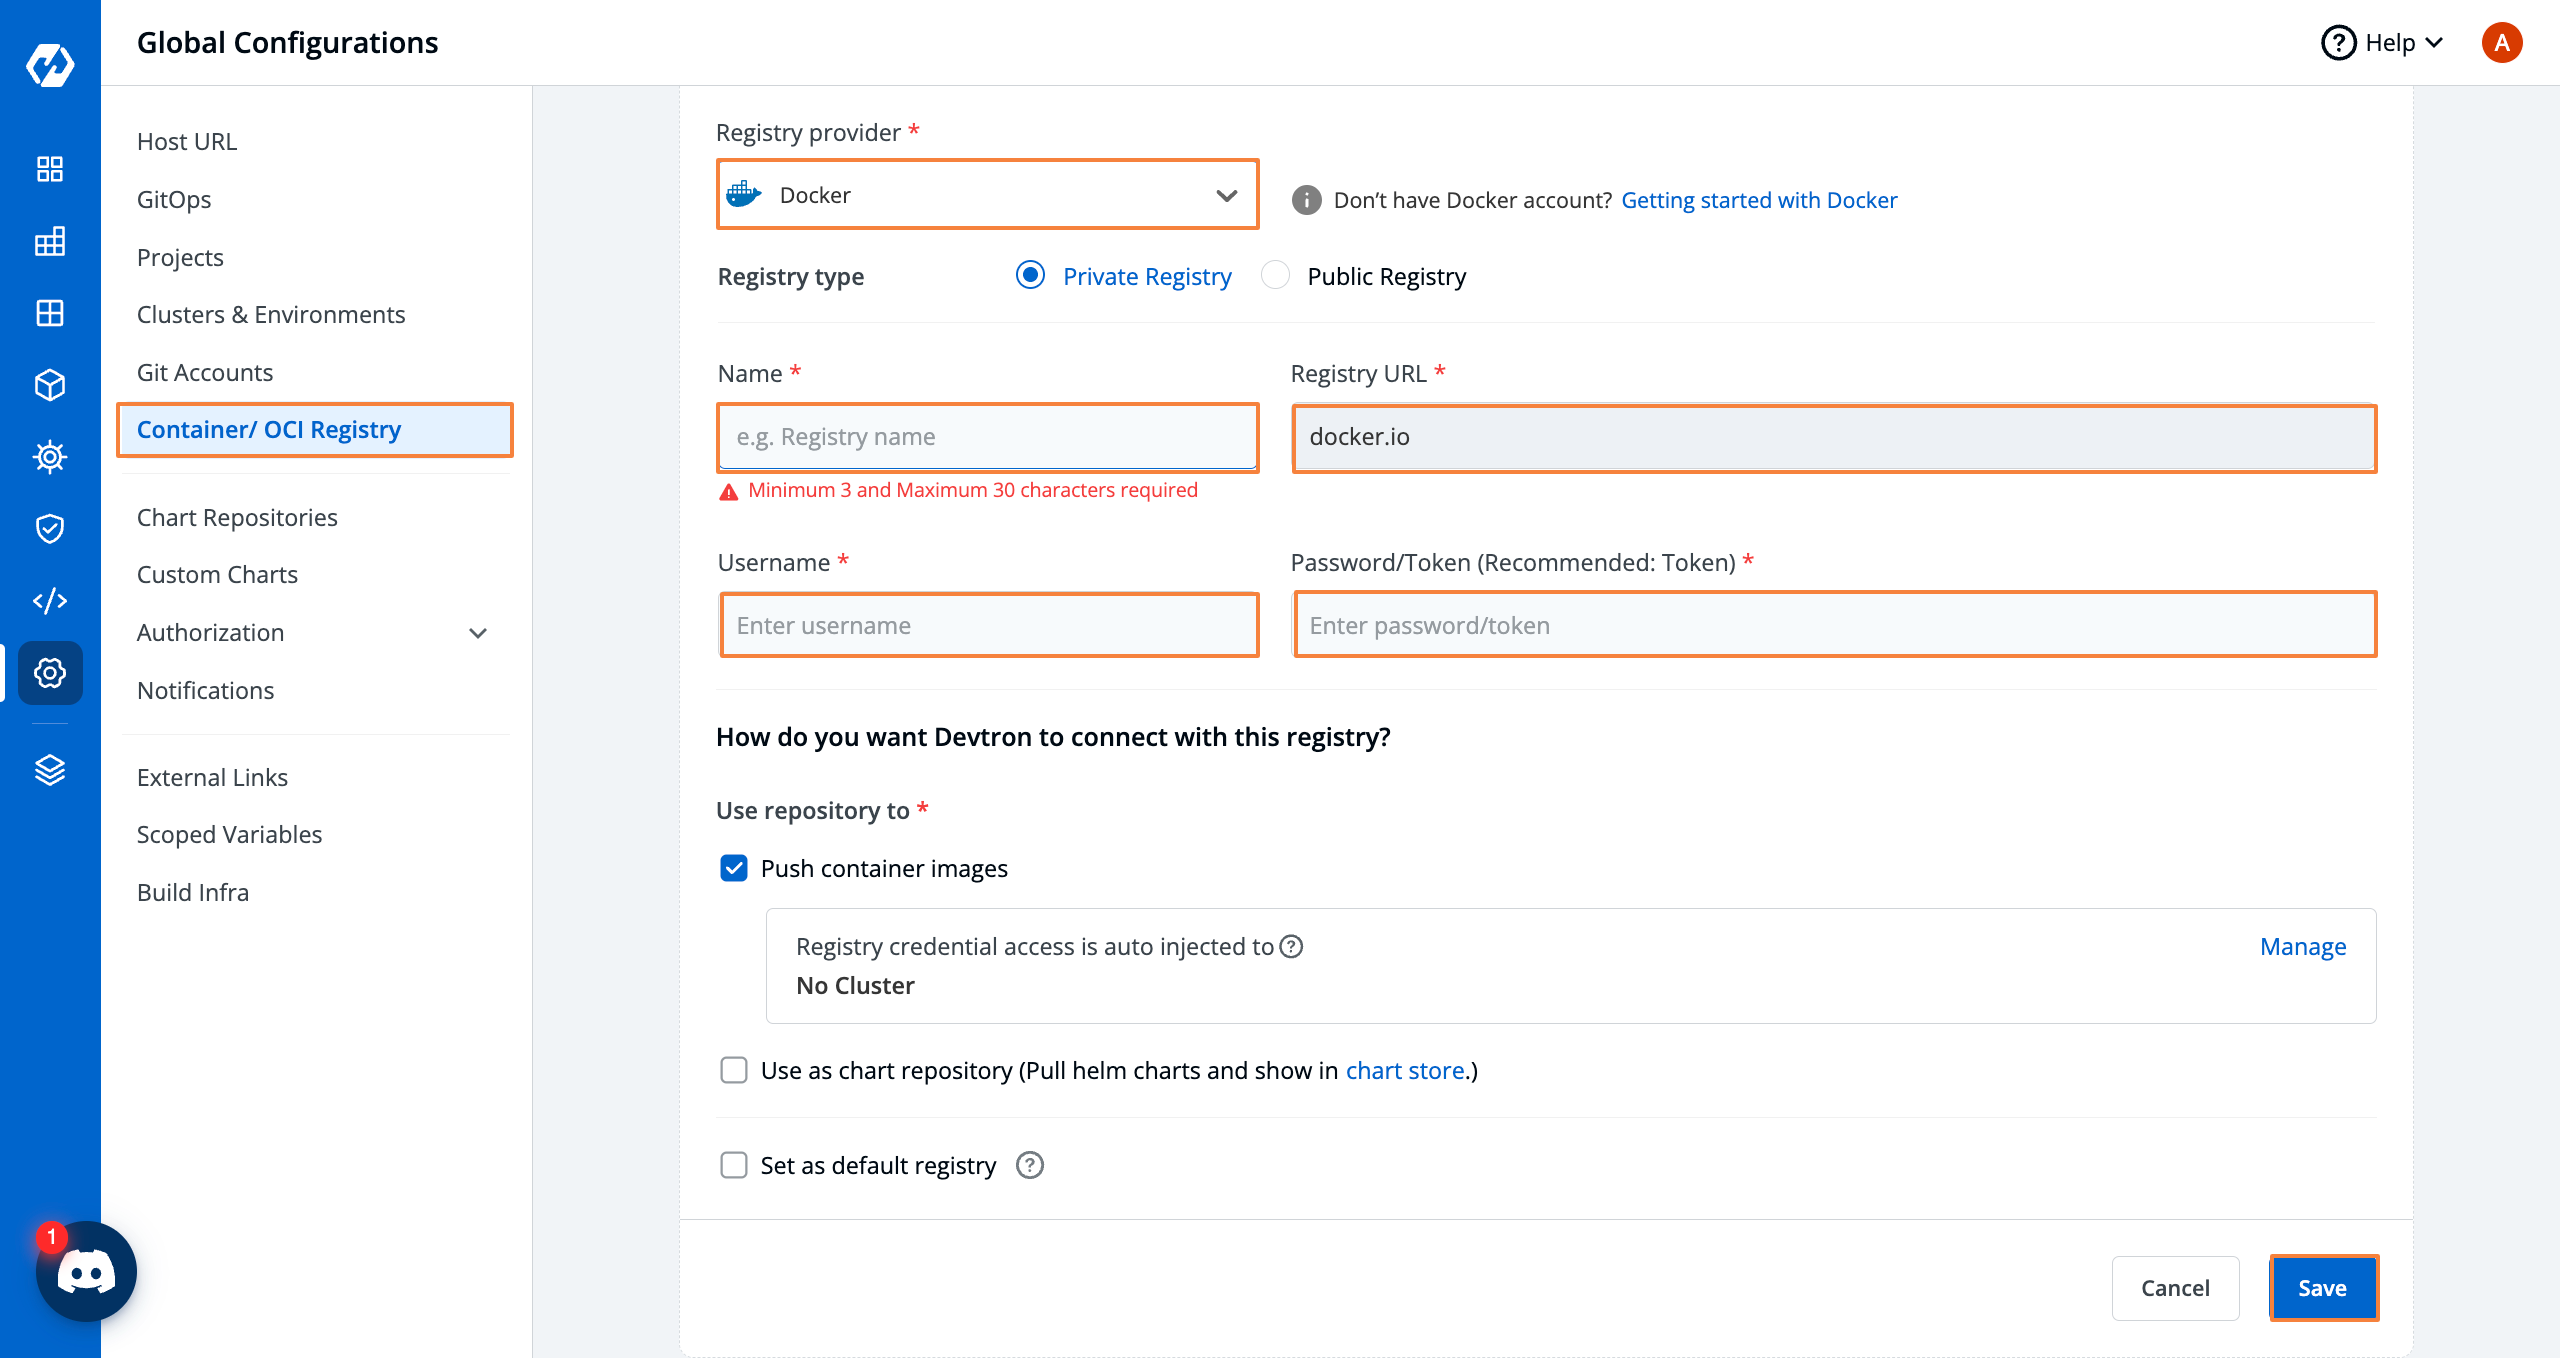
Adding a Container Registry
Once the project is created and version control credentials are added if necessary, you’ll need to connect an Open Container Initiative (OCI) compliant container registry or any other container registry.
If you don’t already have a container registry, you can create one for free on DockerHub. https://www.docker.com/blog/how-to-use-your-own-registry-2/
Under Global Configurations, choose the Container/OCI Registry option.
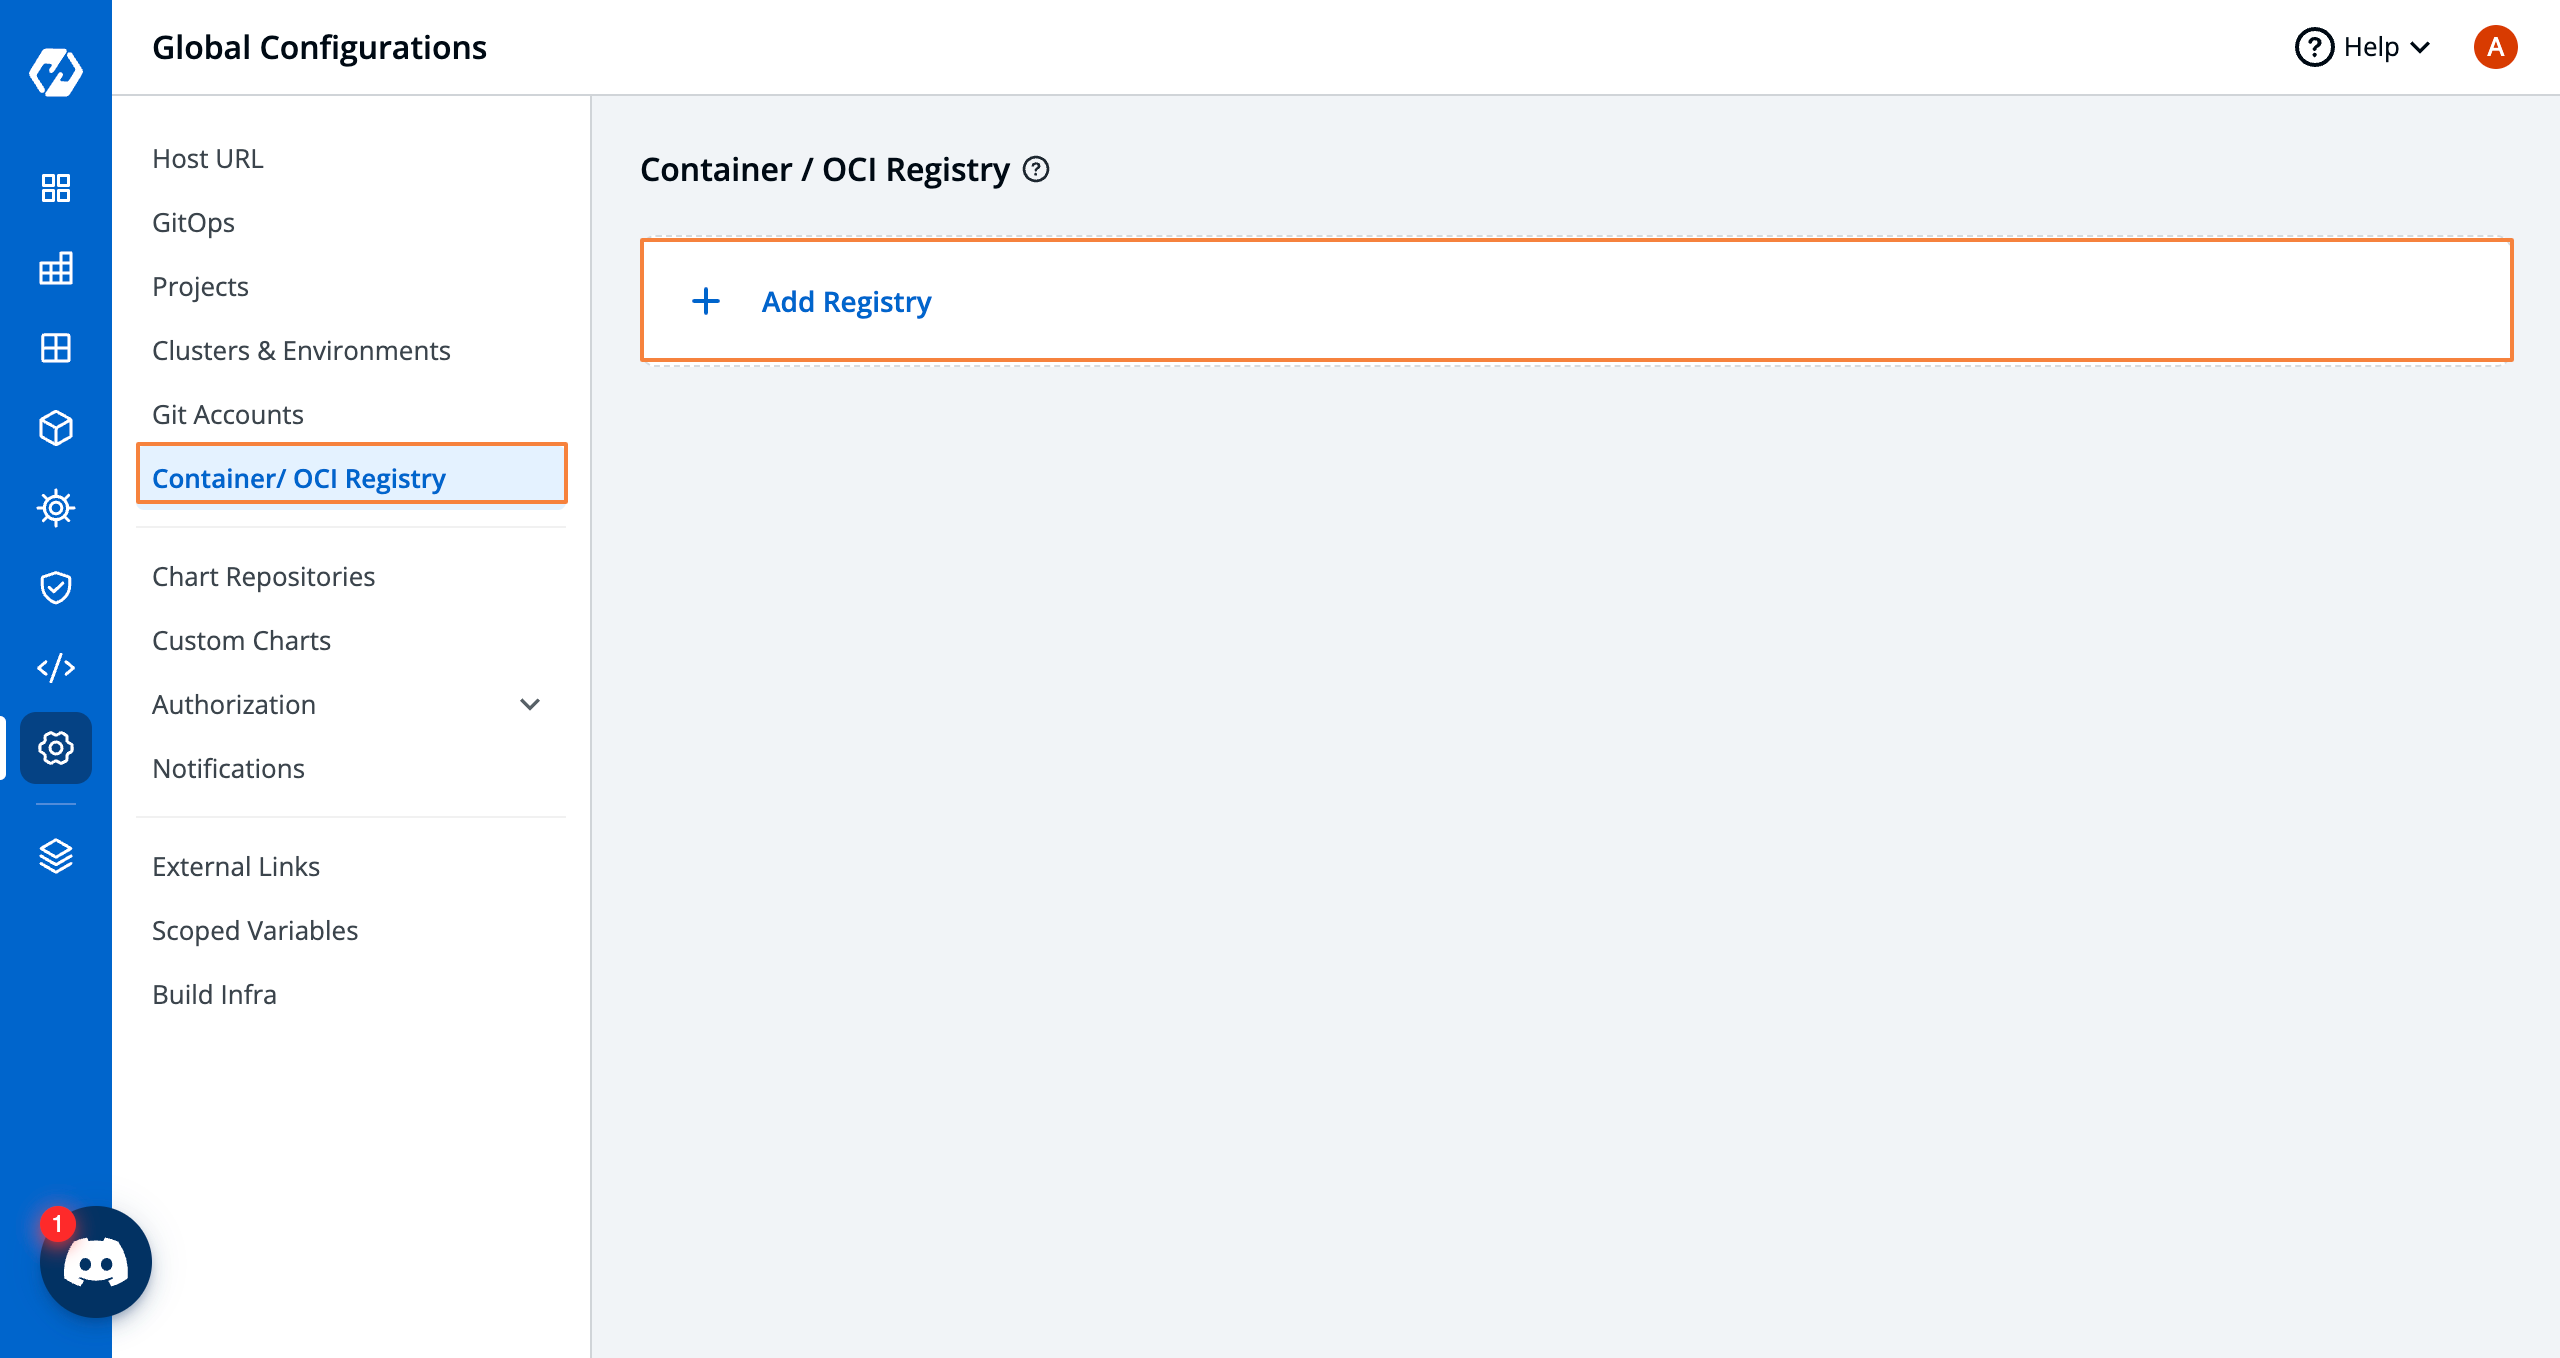
Add the registry information including the registry name, username, and password. Devtron supports any type of container registry such as Docker, ECR, Harbour, etc.
Deploying an Application on Kubernetes
Once the GitOps, Project, Container Registry, and Git Account is added, we can move further and onboard our first microservice on Devtron and deploy using Devtron's CI/CD and ArgoCD.
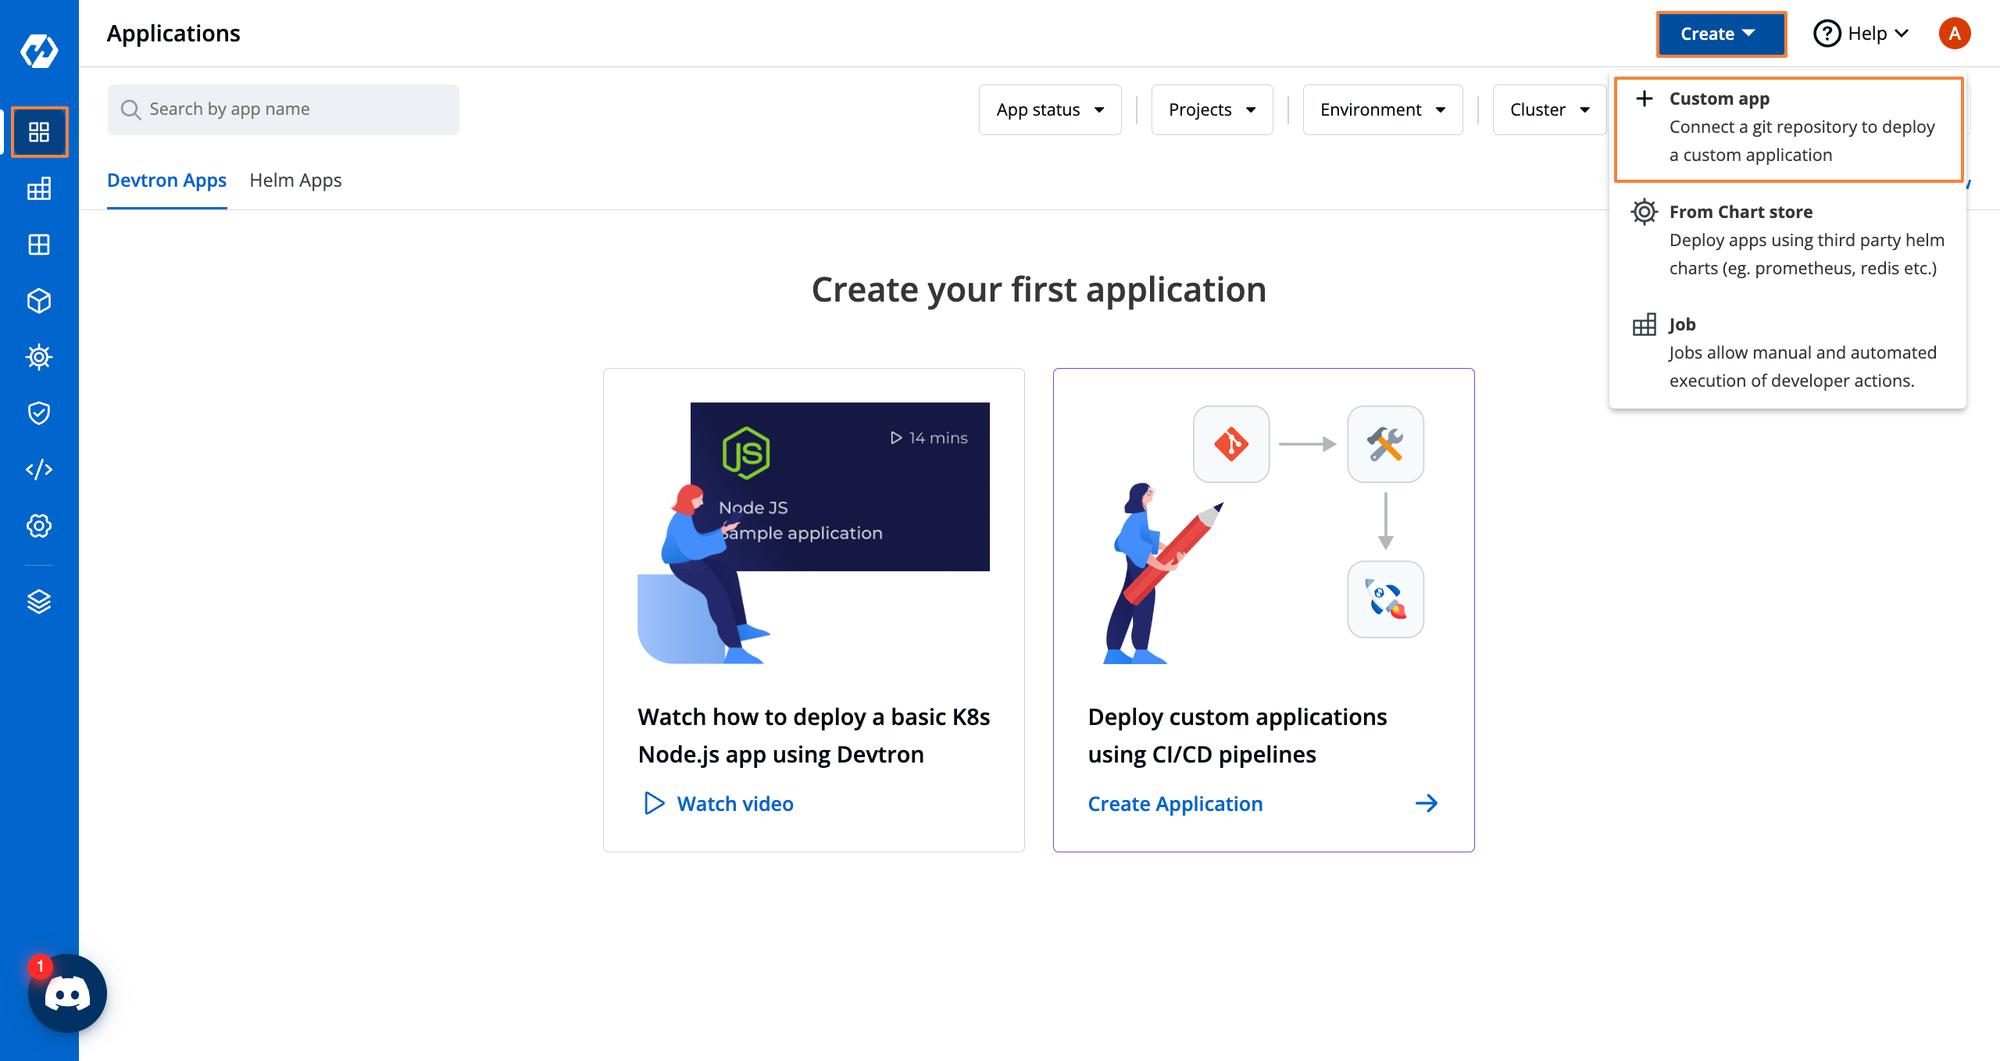
Create an Application
To deploy an application with Devtron, click on the Applications button. Within Applications, click the blue Create button and click the + Custom app button.
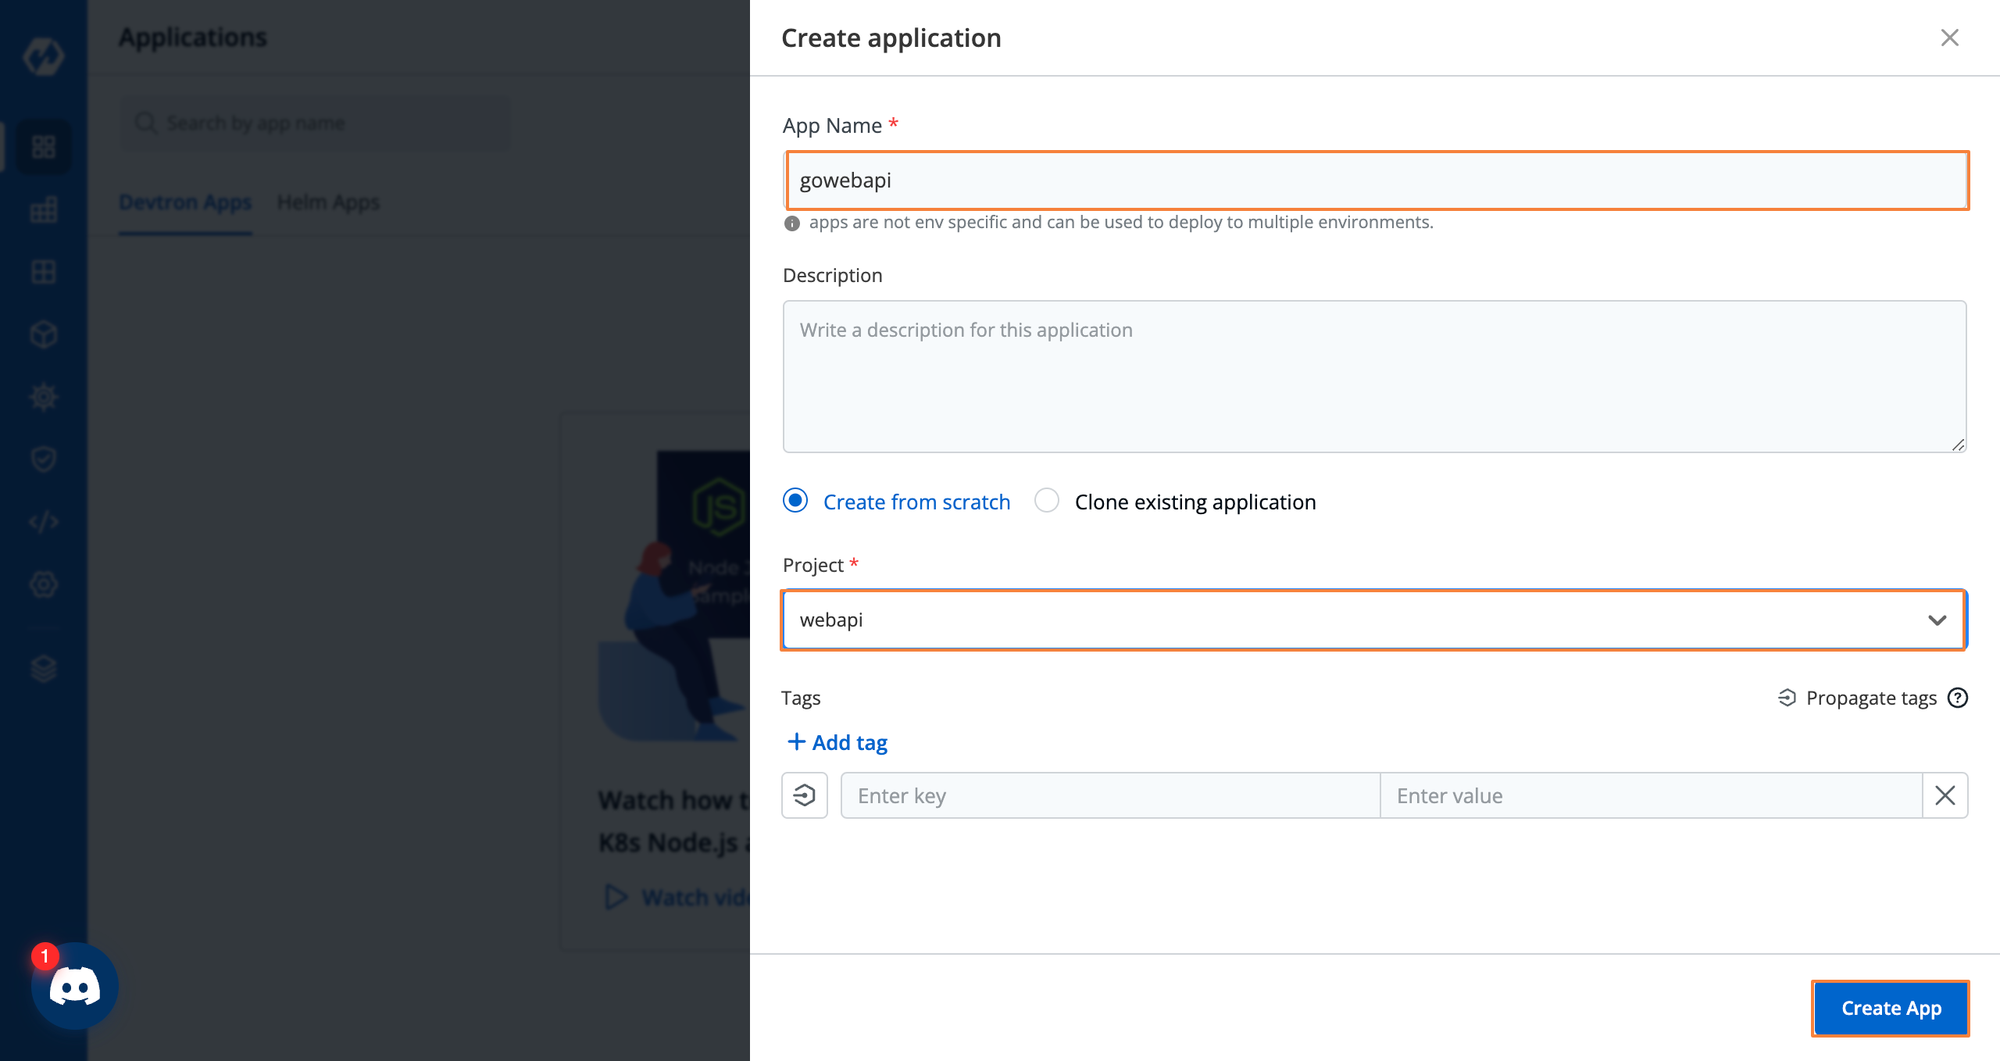
Give your application a name and choose the relevant project where it is associated. In our case, it's webapi what we have created. Additionally, you can also provide tags for your application and you can propagate these tags as labels for all the K8s resources created with this application.
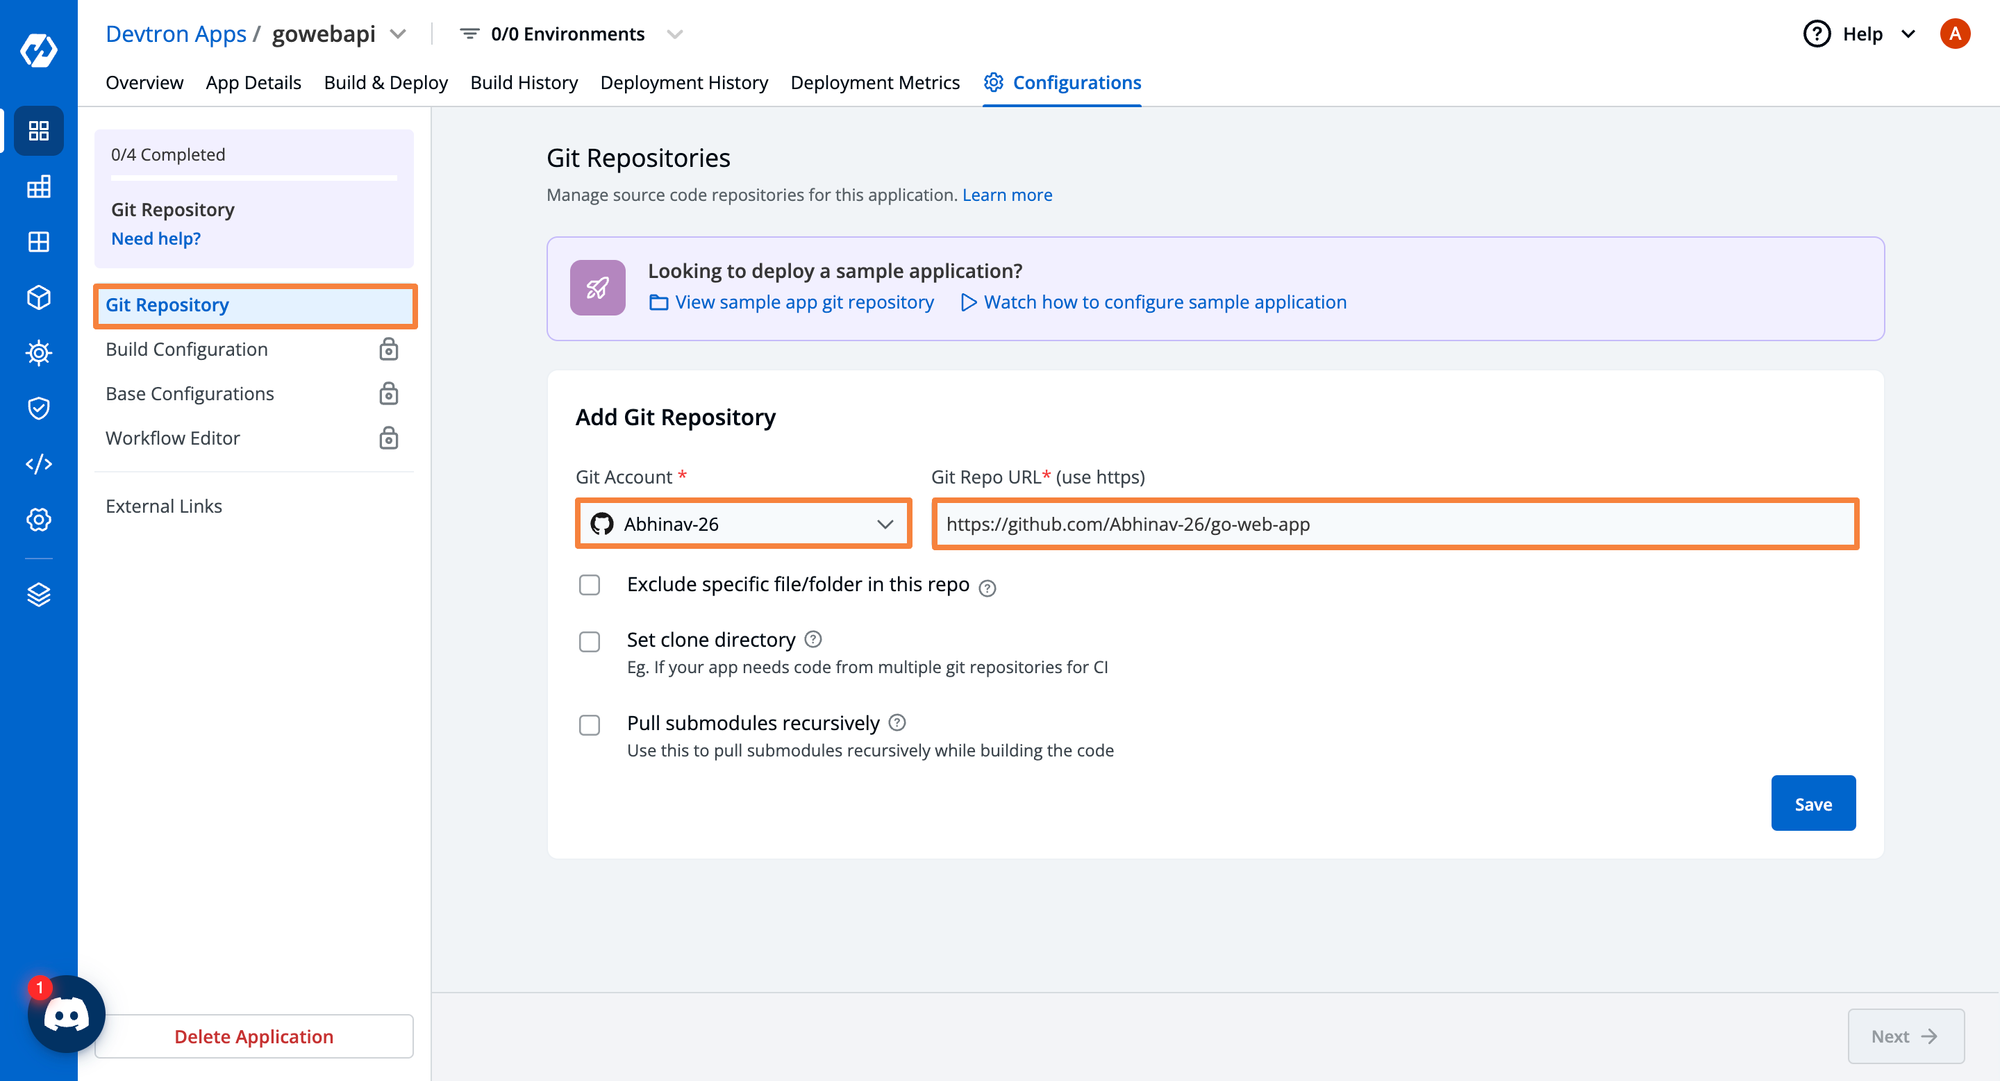
Configure Git Repository
Once the application is created, you will automatically land to App Configuration. Point to the repo with your application to deploy. If you don’t have an application to use, you can use the GoWebAPI here: https://github.com/AdminTurnedDevOps/GoWebAPI

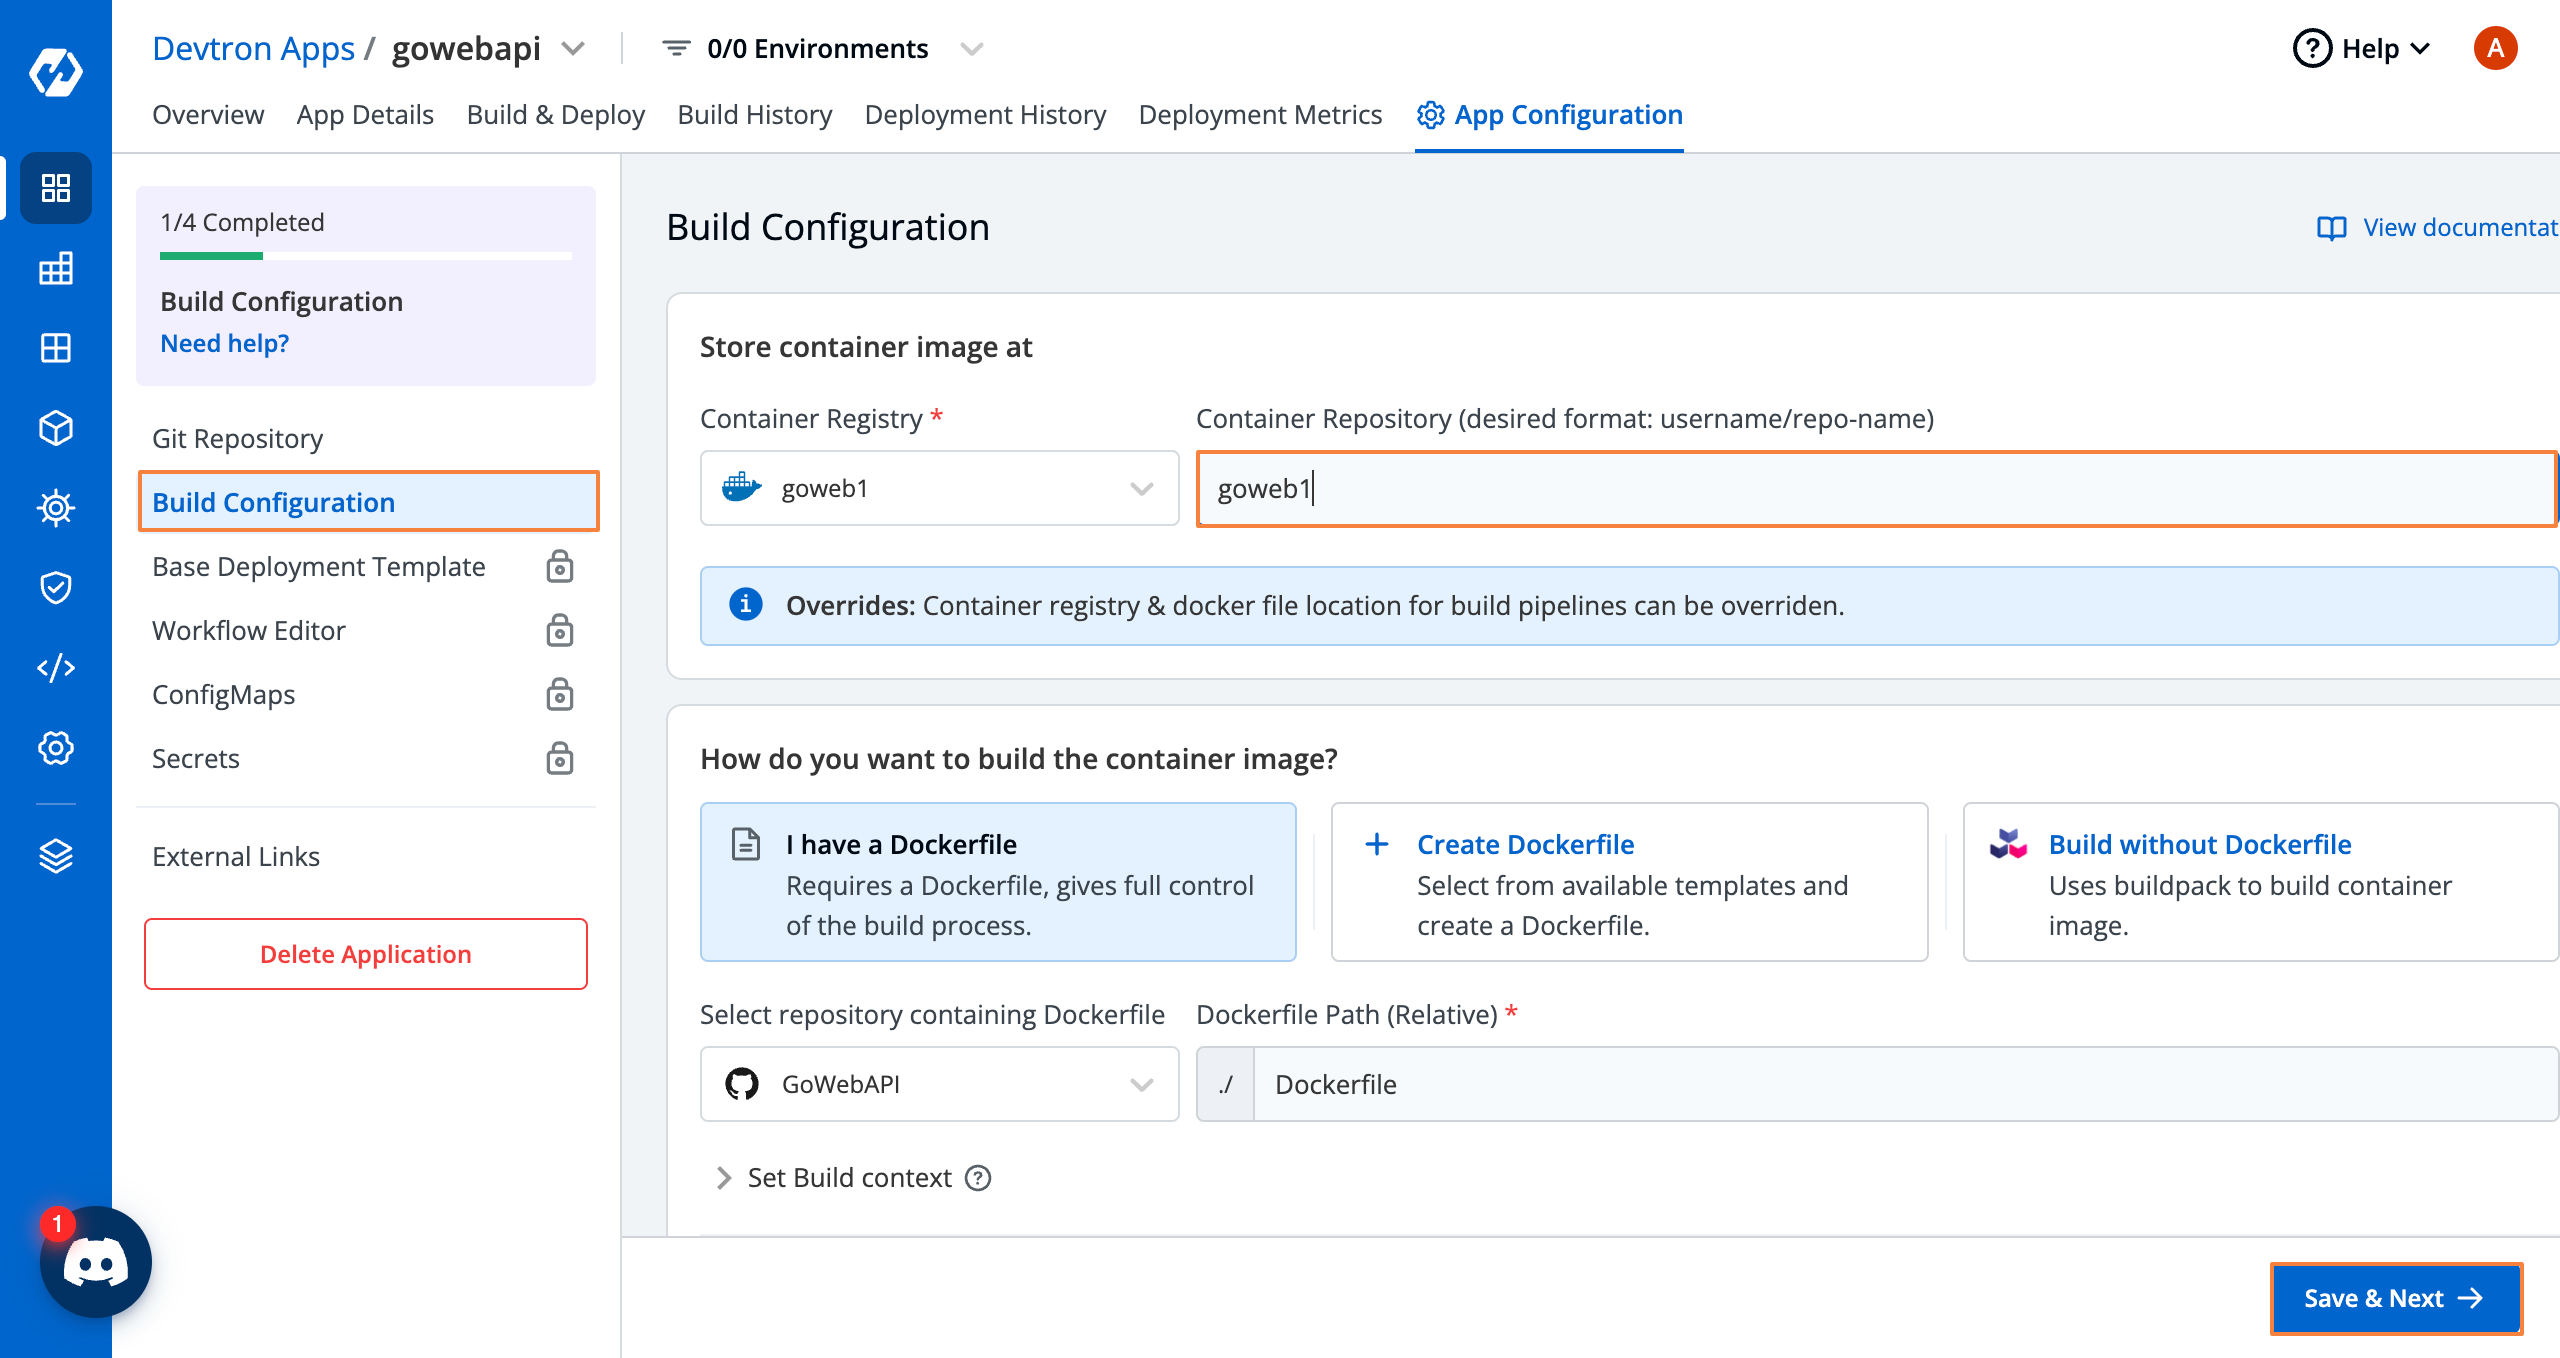
Configure Build Configurations
Next, you’ll be brought to the Build Configuration stage. The build configuration page has three options:
- Use a Dockerfile that already exists in your repository.
- Create a Dockerfile from the pre-defined Dockerfile templates provided.
- Use a Buildpack. Buildpacks are a way to build and deploy containerized applications without Dockerfile.
If you have used the GoWebAPI, there’s a Dockerfile that already exists. Provide the name and path of the Dockerfile. Additionally, you can also define the Build Context from where you want to build the container image.
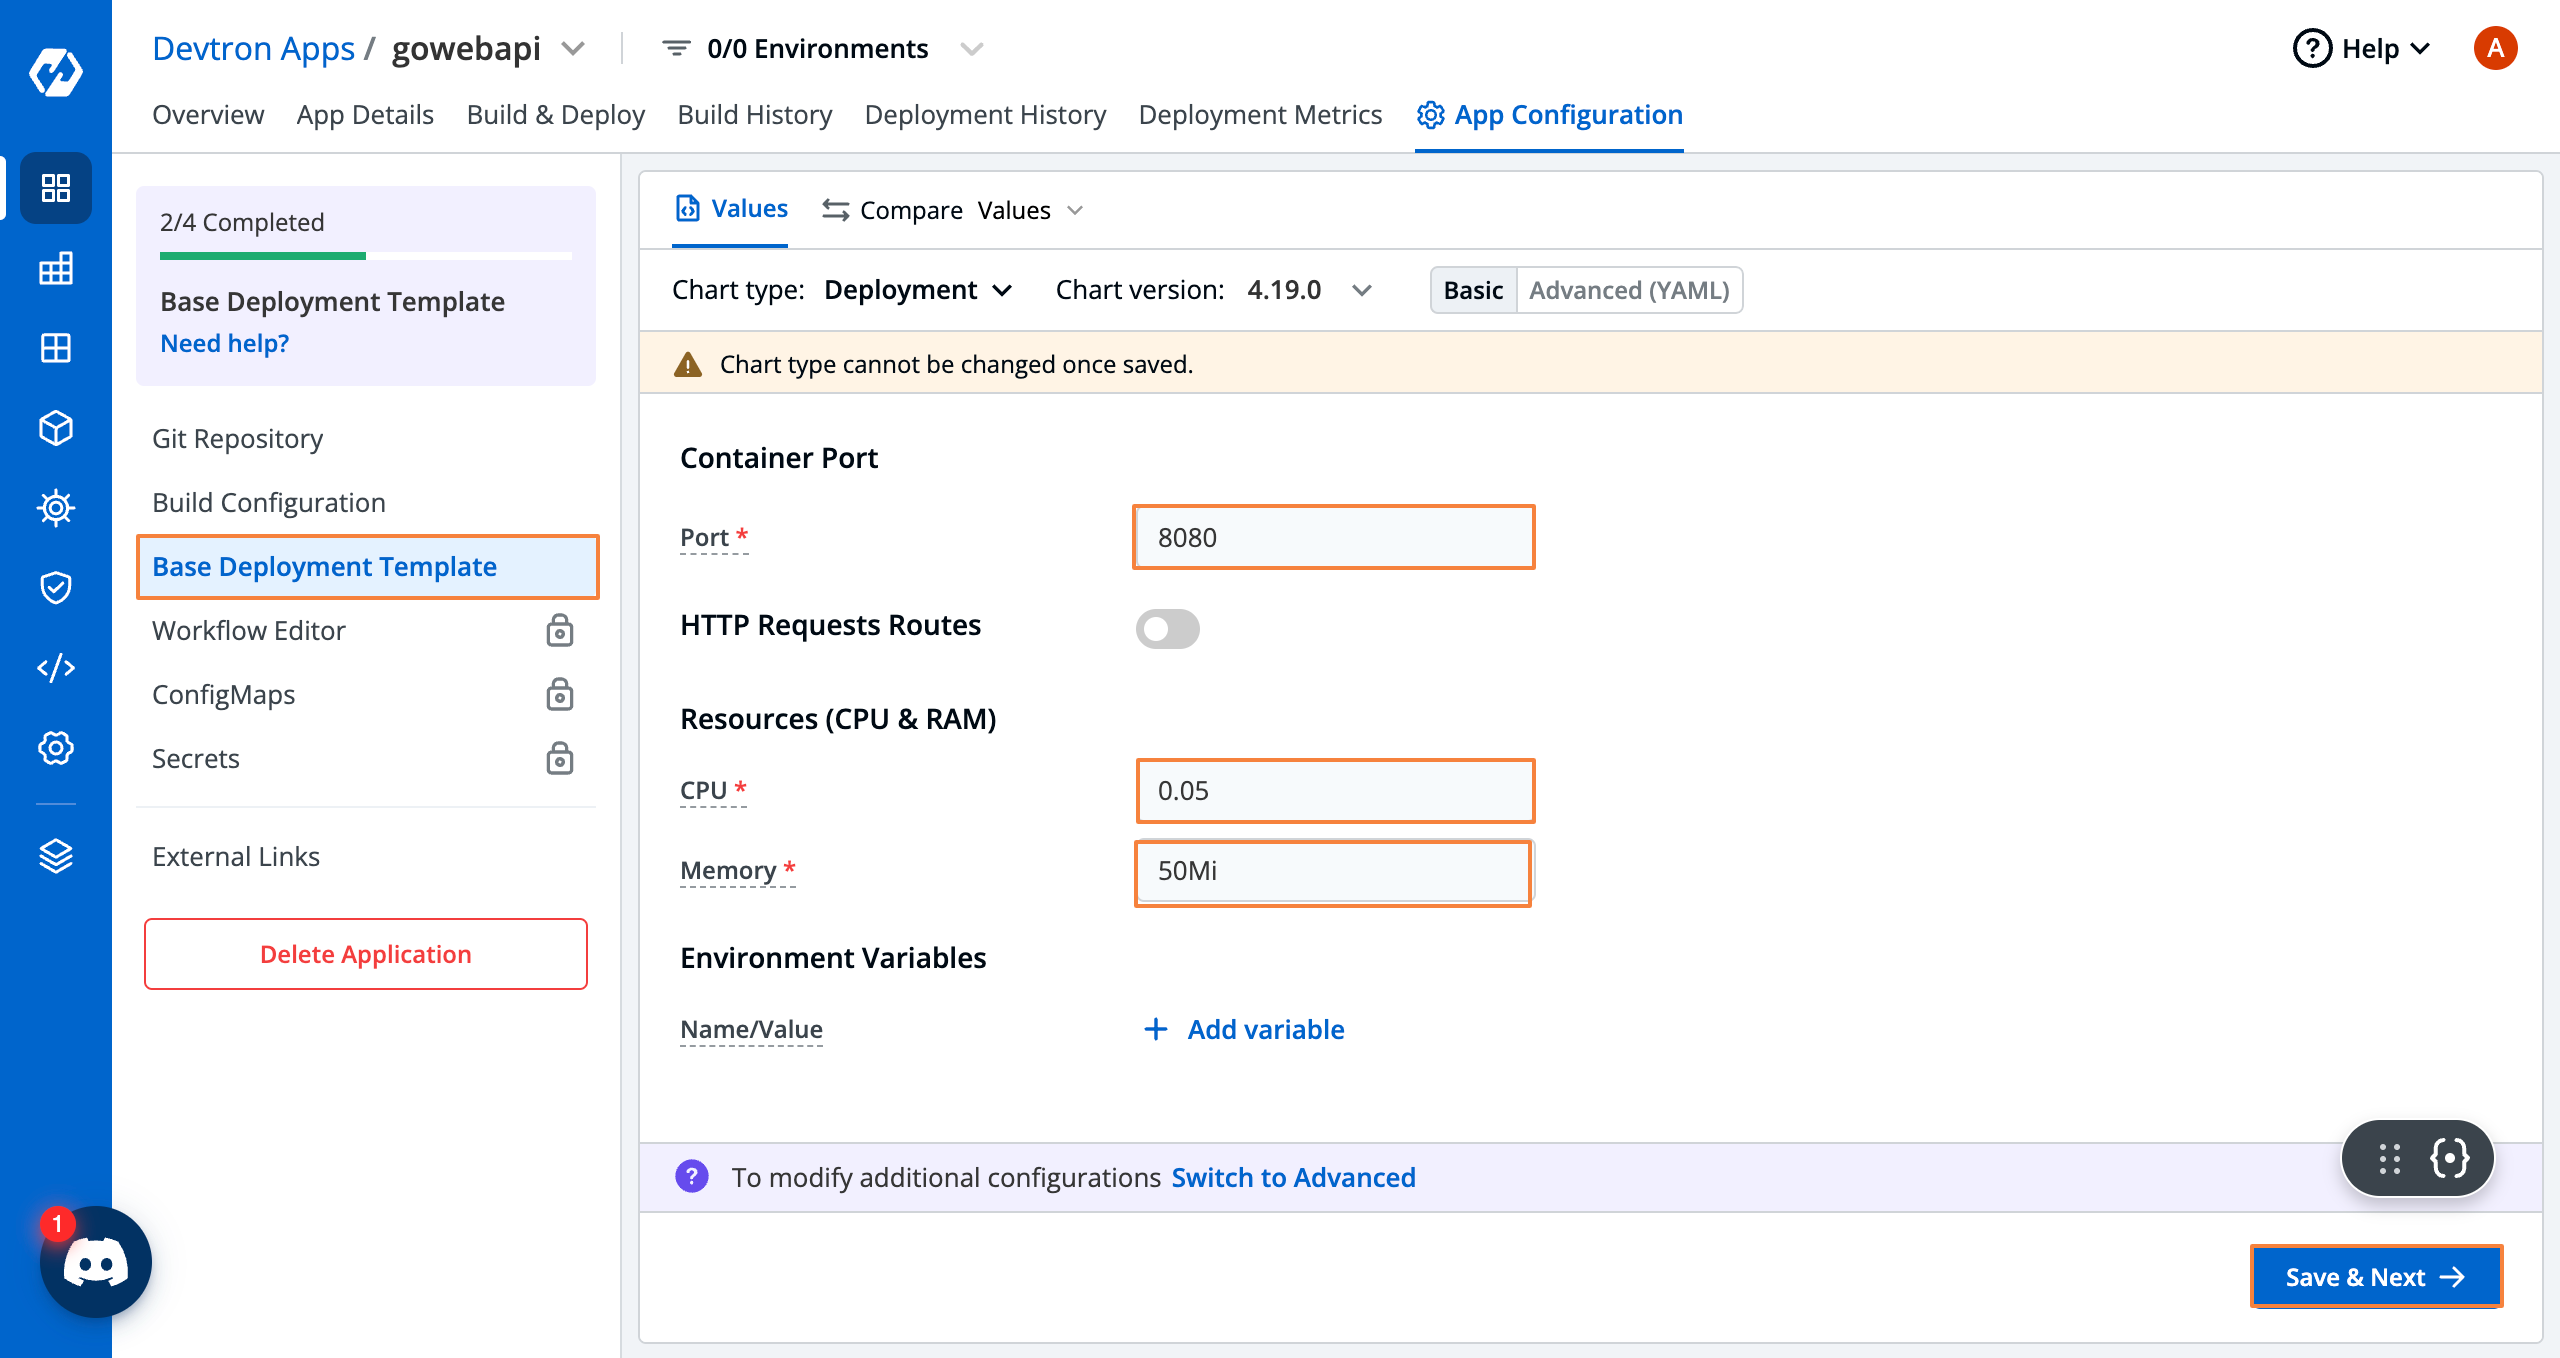
Configuring Kubernetes Configurations
Within the Deployment Template, you can configure almost everything that you need for your containerized application like the ports, resources, services, ingress, HPA, etc., which are required to run the application properly. Devtron provides a GUI along with Advanaced YAML, where it abstracts out the complexities of managing and writing Kubernetes manifests.
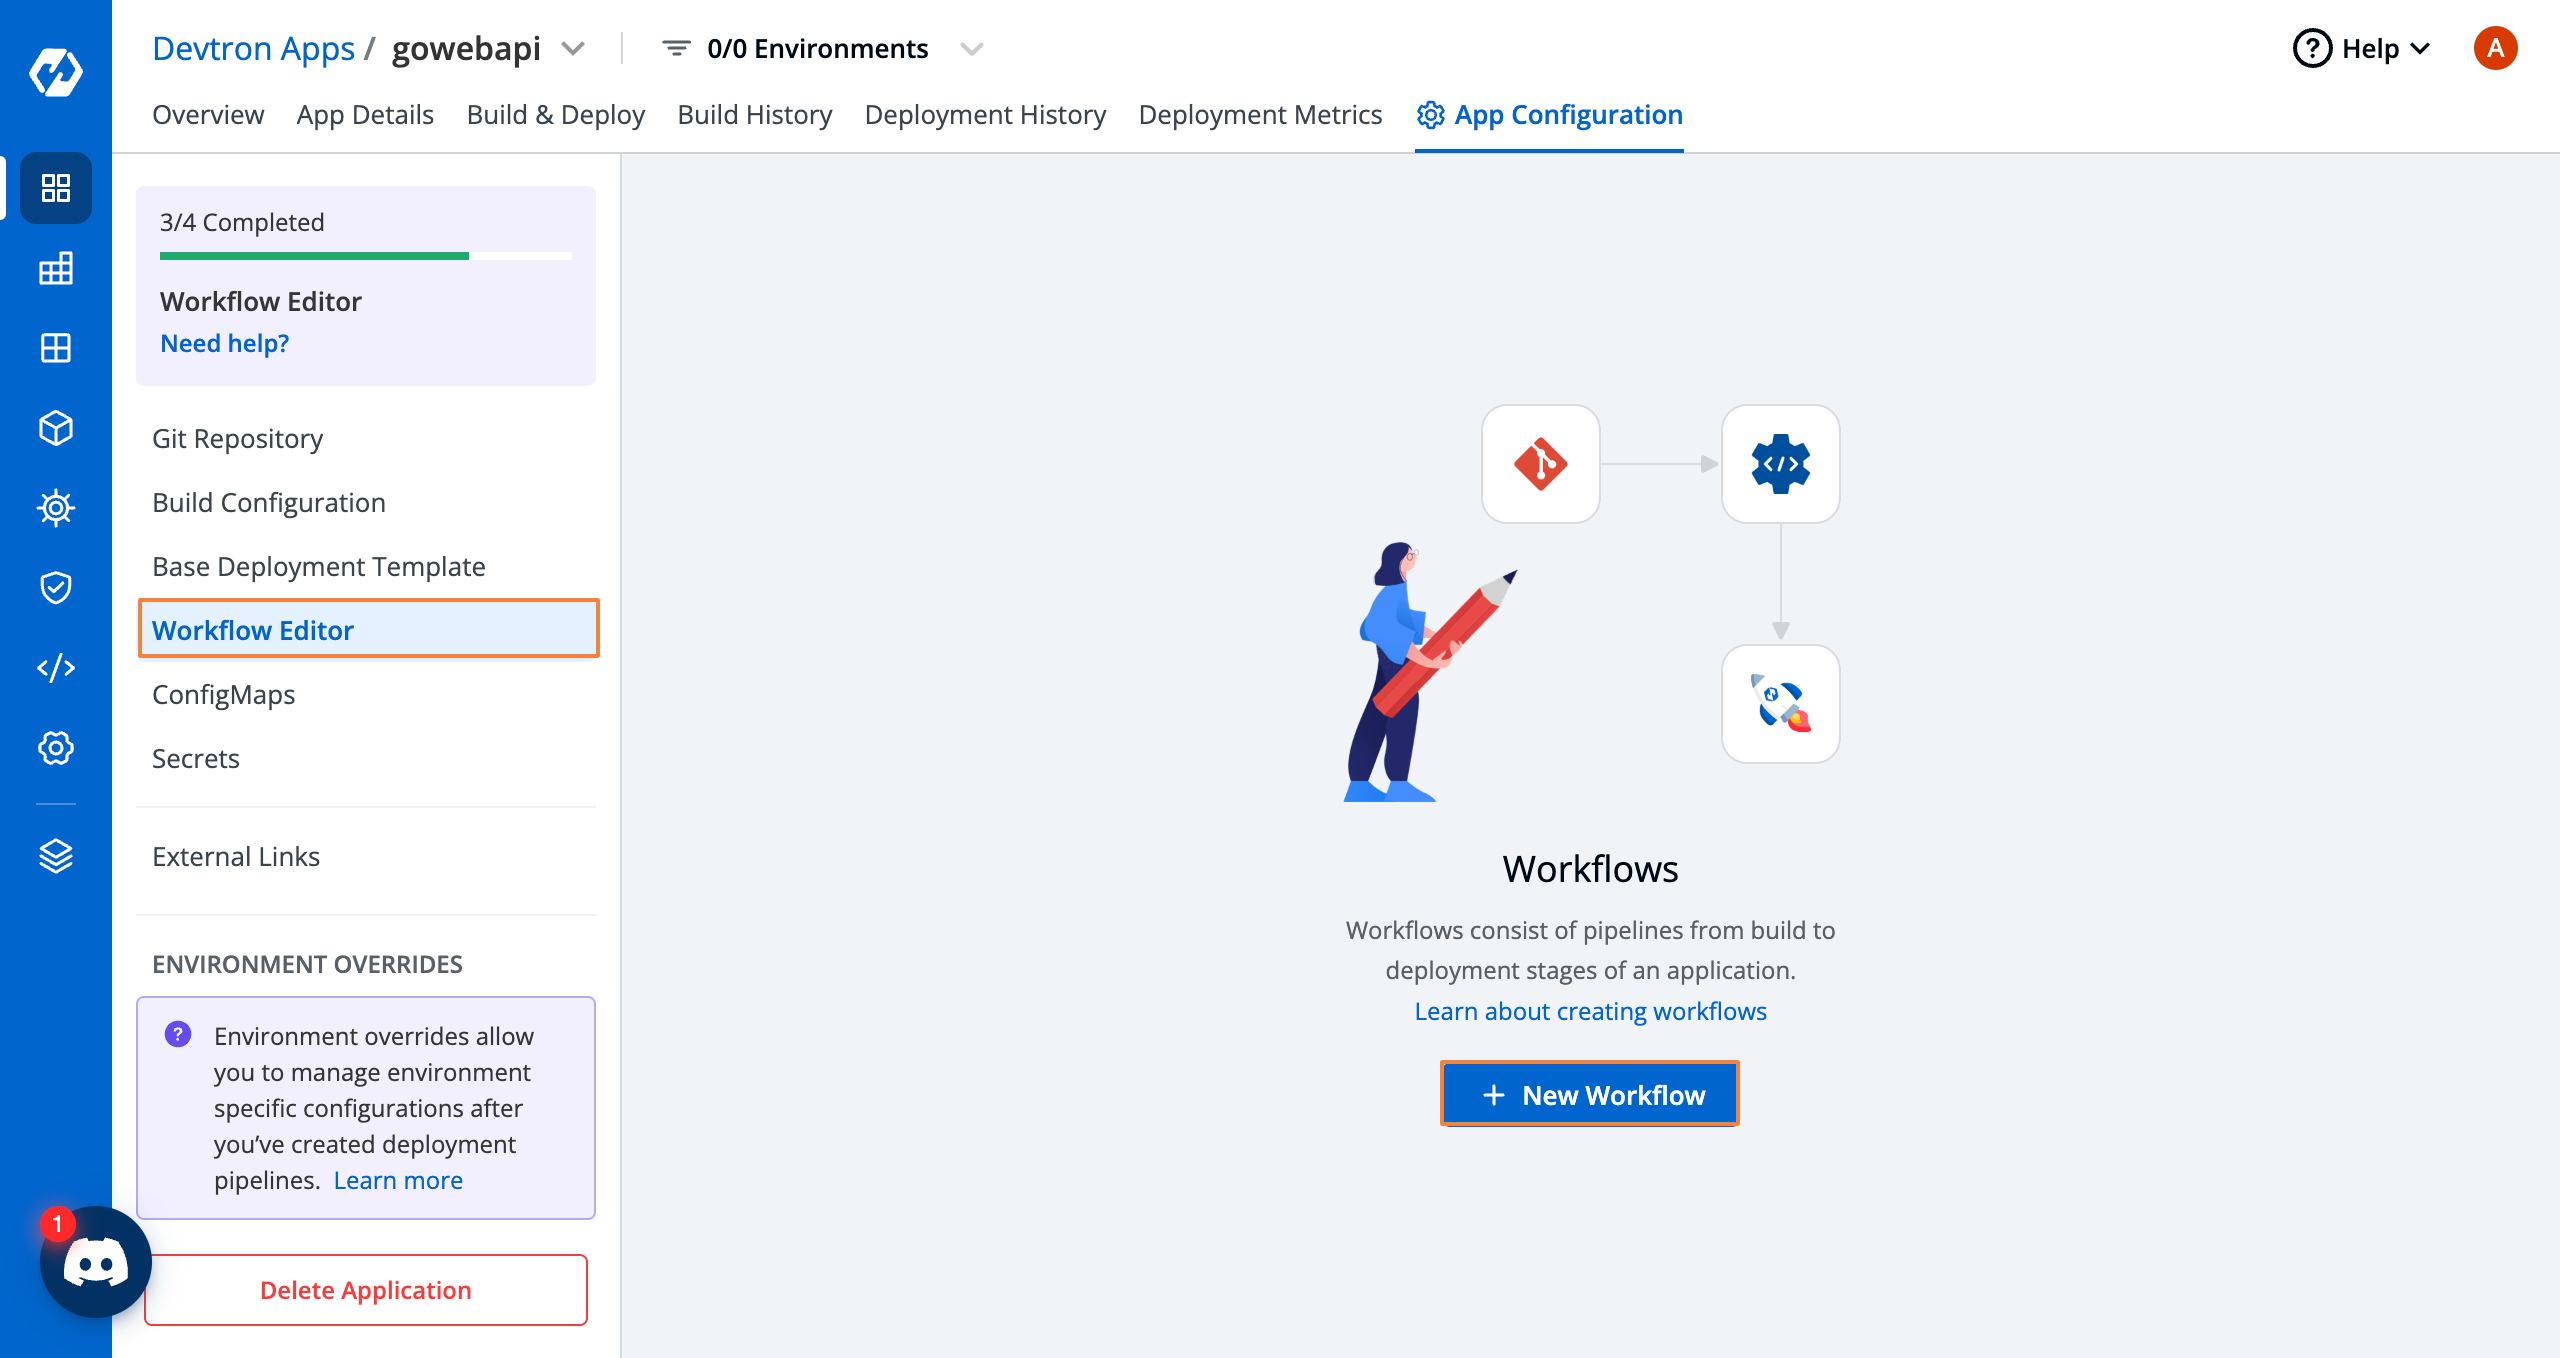
Creating CI/CD Pipelines for Kubernetes
After the k8s configuration, you’ll come to Workflow Editor where you can configure your build and deployment pipelines. Devtron provides different ways to create the workflow, and it easily integrates with your external build pipelines as well such as Jenkins or GitHub Actions.
Click the blue + New Workflow button.
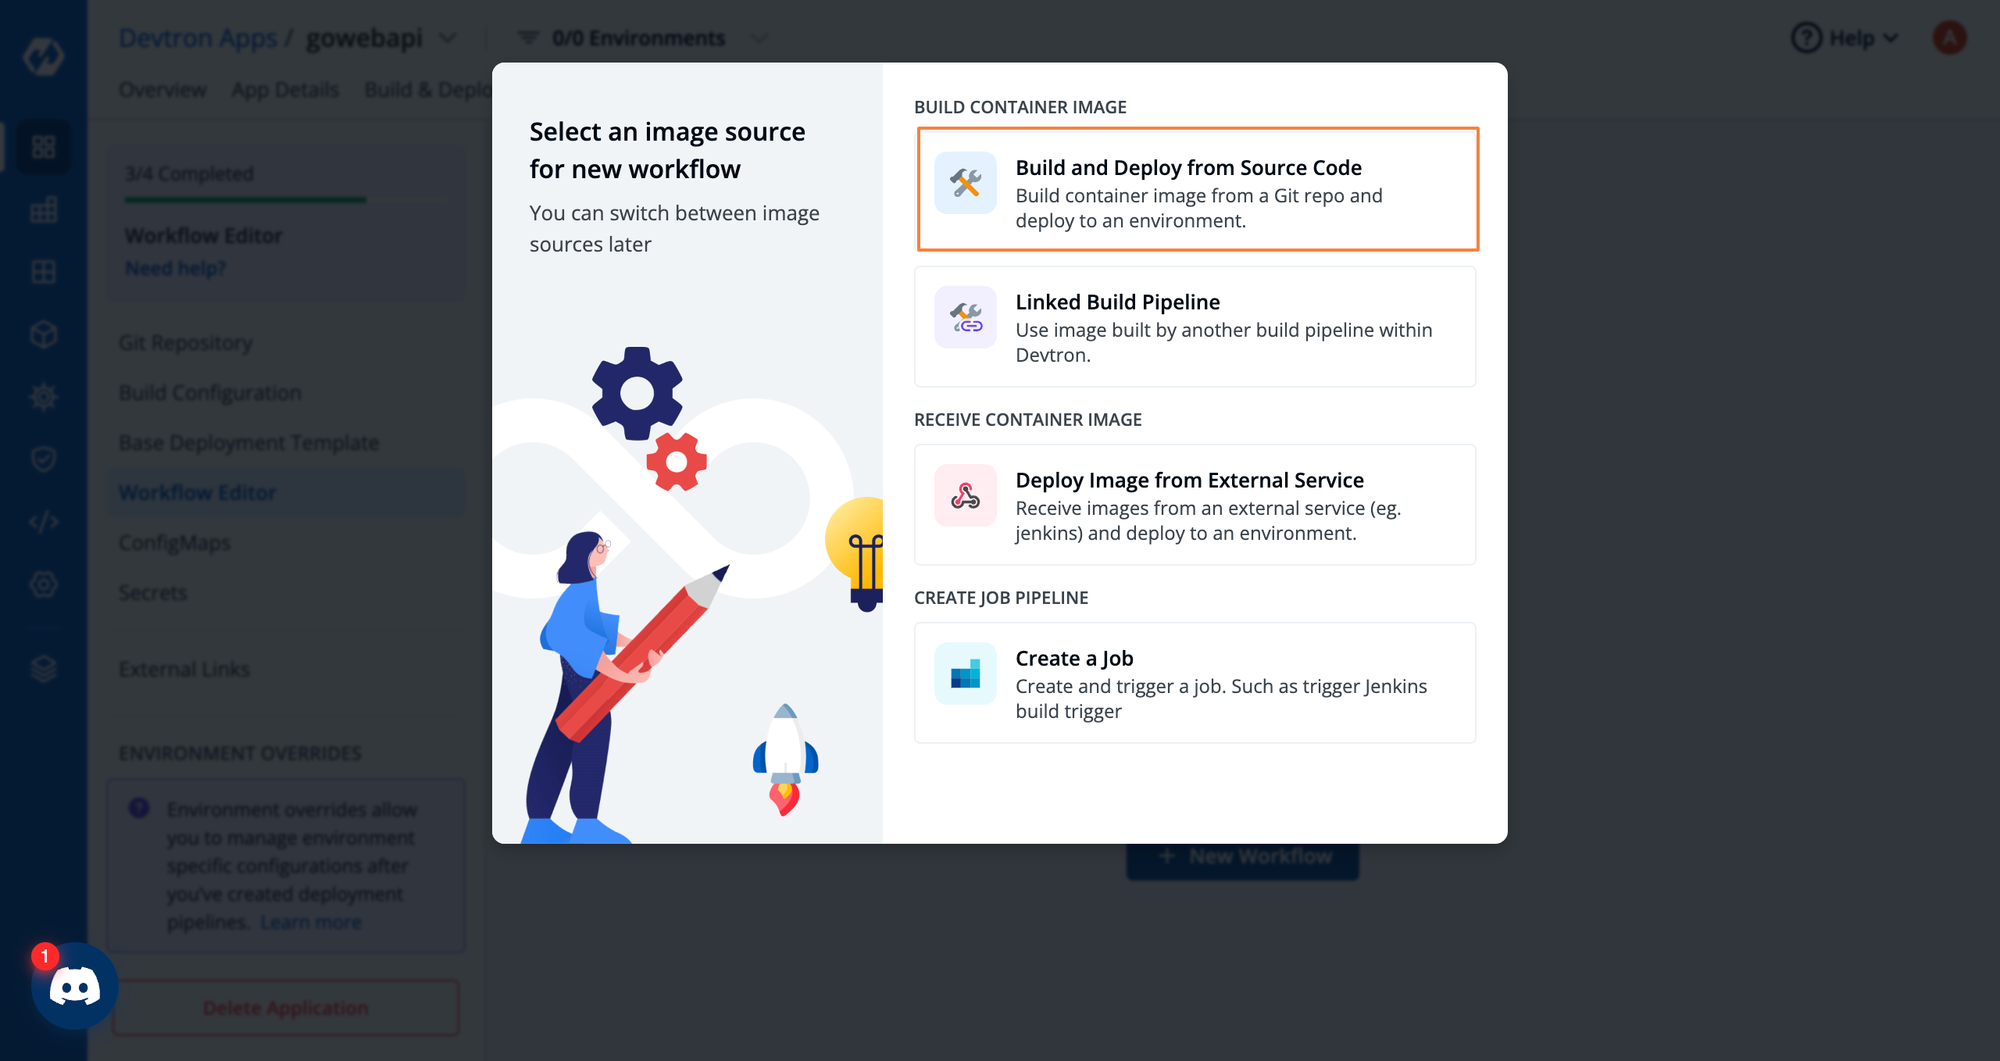
Select the Build and Deploy from Source Code option if you want to use Devtron for building the container images along with deploying it with Devtron.
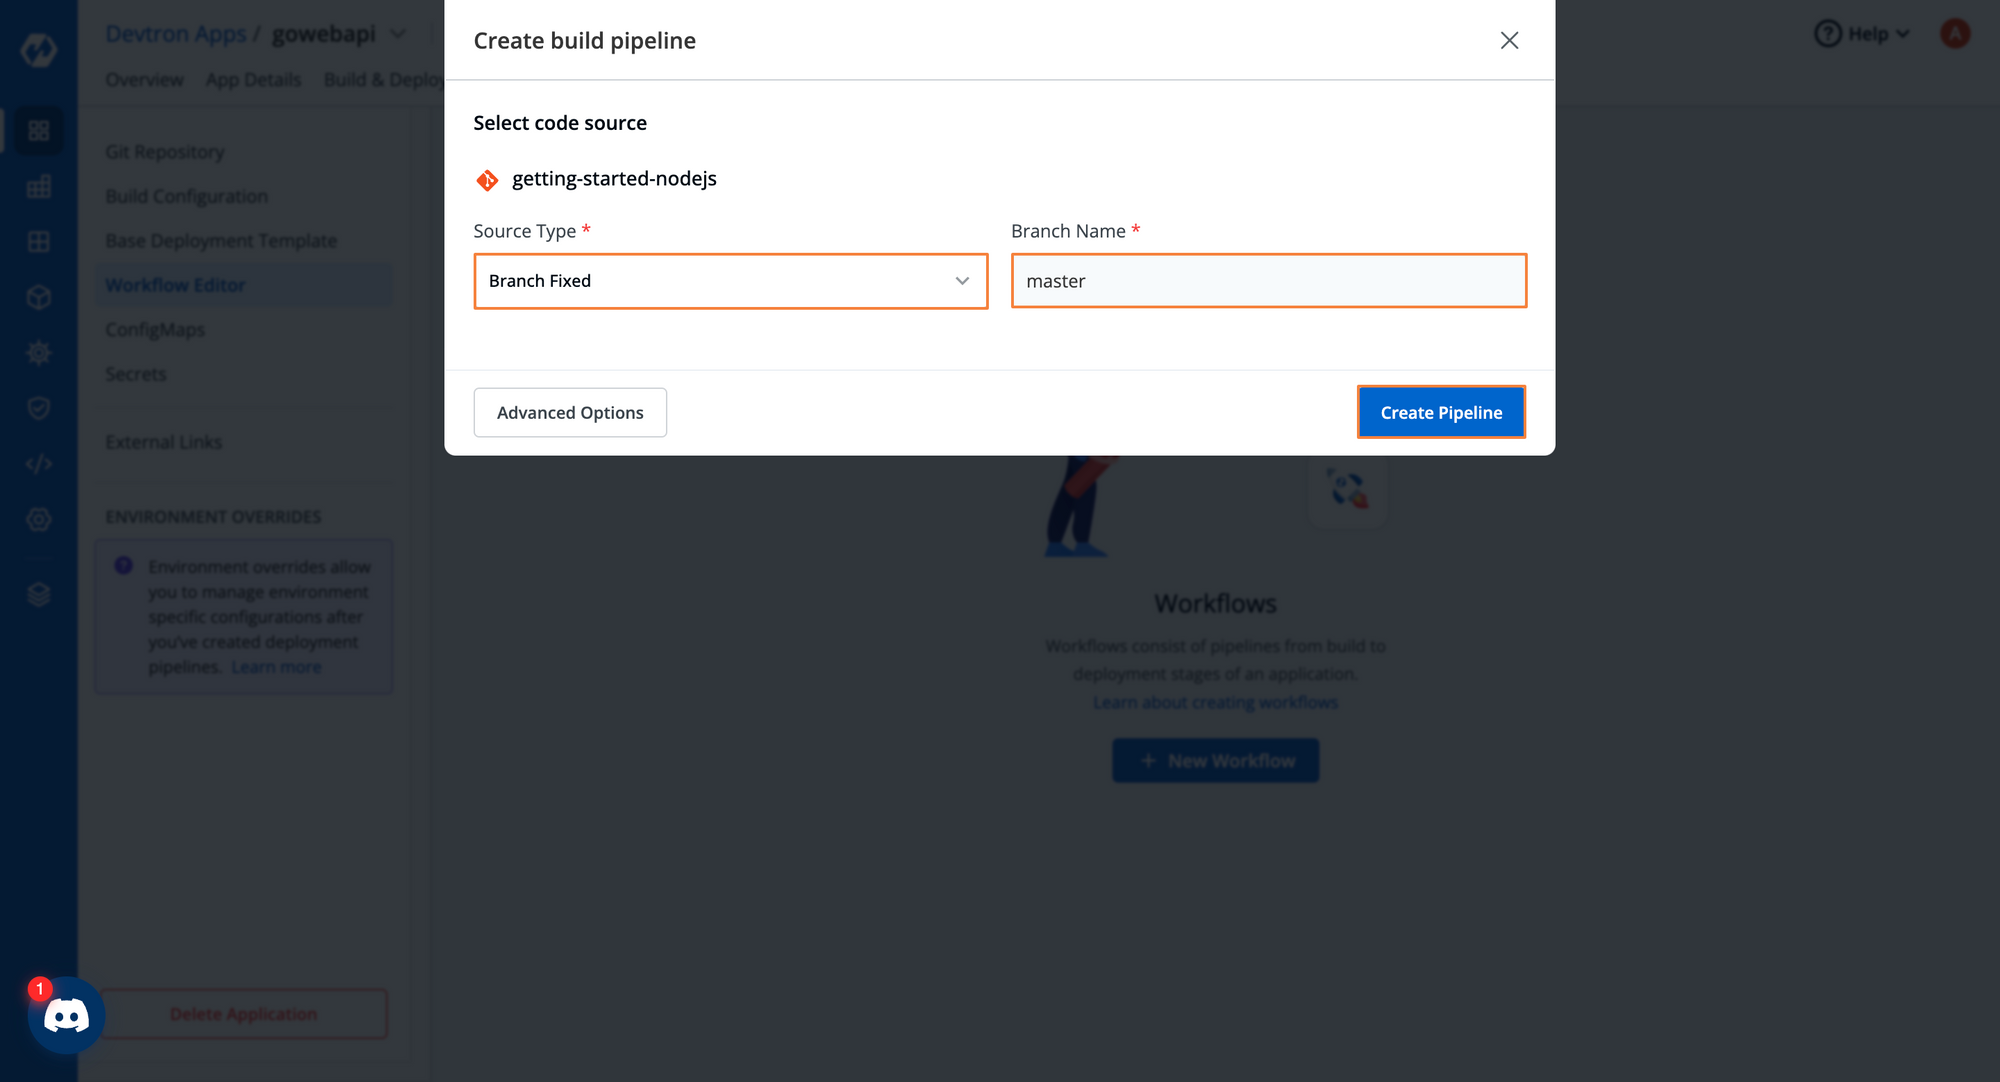
Input the branch name from which you wish to build the container image and then click the blue Create Pipeline button to create a Build Pipeline. You can easily integrate vulnerability scanning and pre/post build plugins such as sonarqube, codacy, etc., and define the source type such as fixed branch, triggering from a tag, regex pattern, and triggering build pipeline from a PR within the Build pipeline from Advanced Options.
Once the build pipeline is configured, you can click on the + button and create the deployment pipeline. In CD Pipeline as well, you can easily integrate pre/post deployment stages integrating plugins like SLO-based rollbacks, closing a Jira ticket, etc from the Advanced Options.
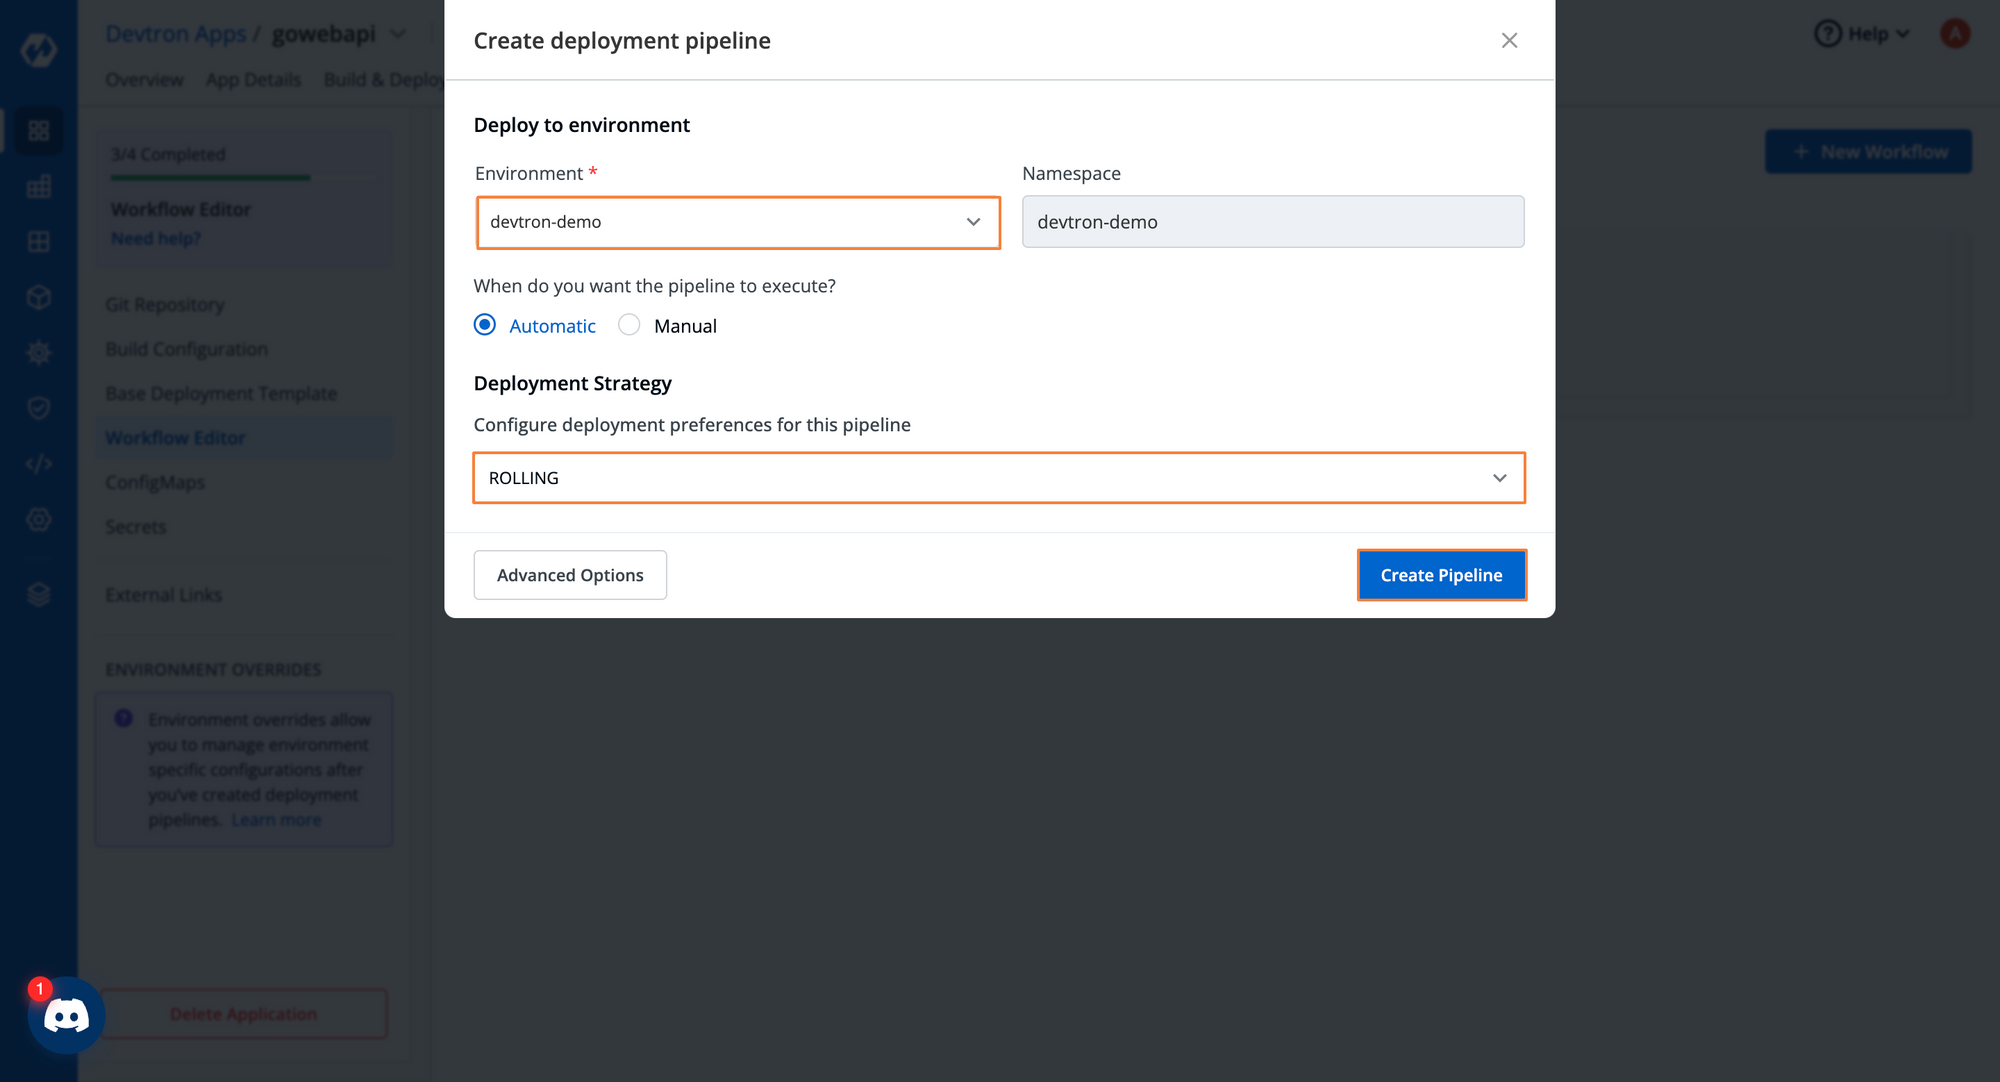
Build & Deploy the Application
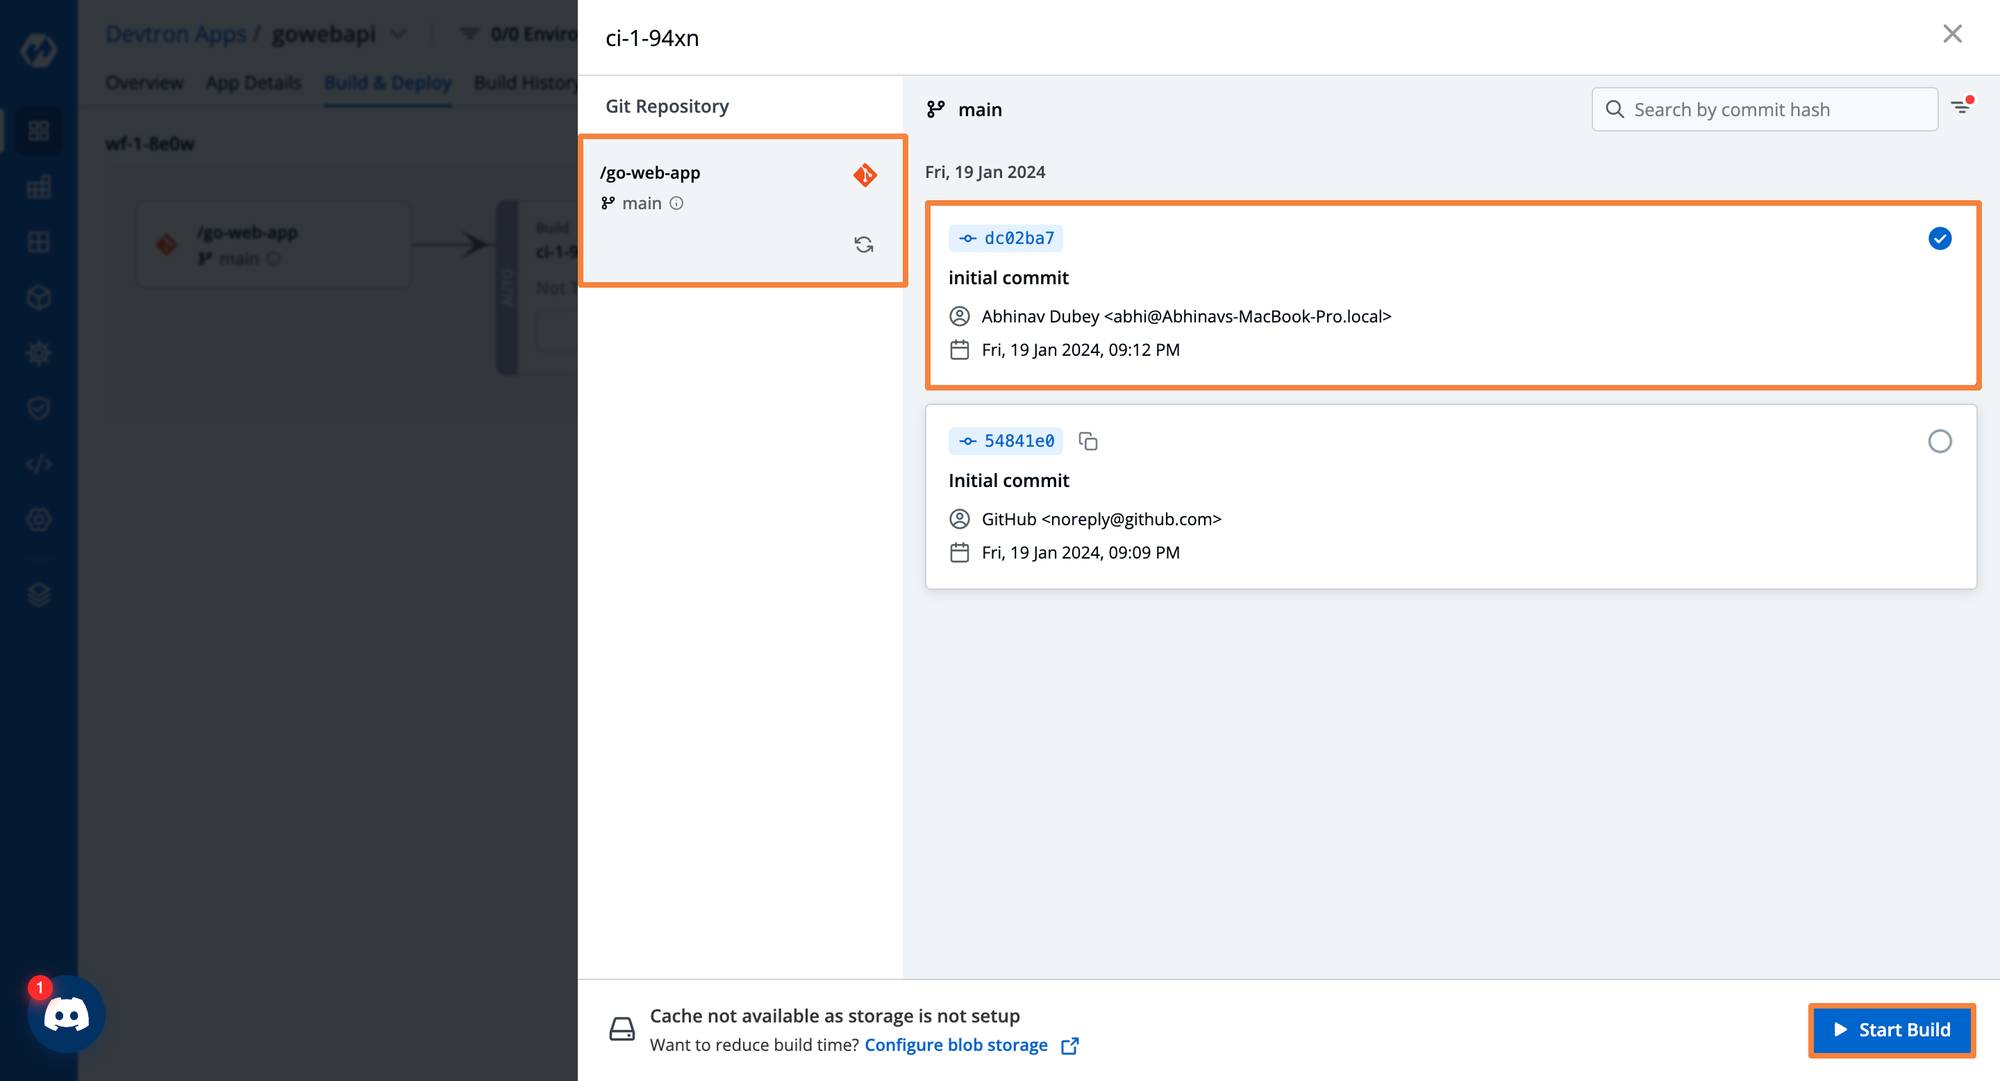
Once the workflow is created, you can navigate to Build & Deploy the section and click on Select Material form the build pipeline. You’ll now see that the Git repo is connected and you can press the blue Start Build button. Devtron automatically fetches and updates the latest commit here and you can choose the git hash corresponding to which you want to build the container image.
The build time of the pipeline depends on the type of application that’s being built. If it’s larger with more steps, it’ll take longer. If it’s a smaller app with fewer configuration options, it’ll have a shorter build time. Devtron natively supports a centralized cache mechanism, so from the next build it uses the cache which drastically reduces the build time.
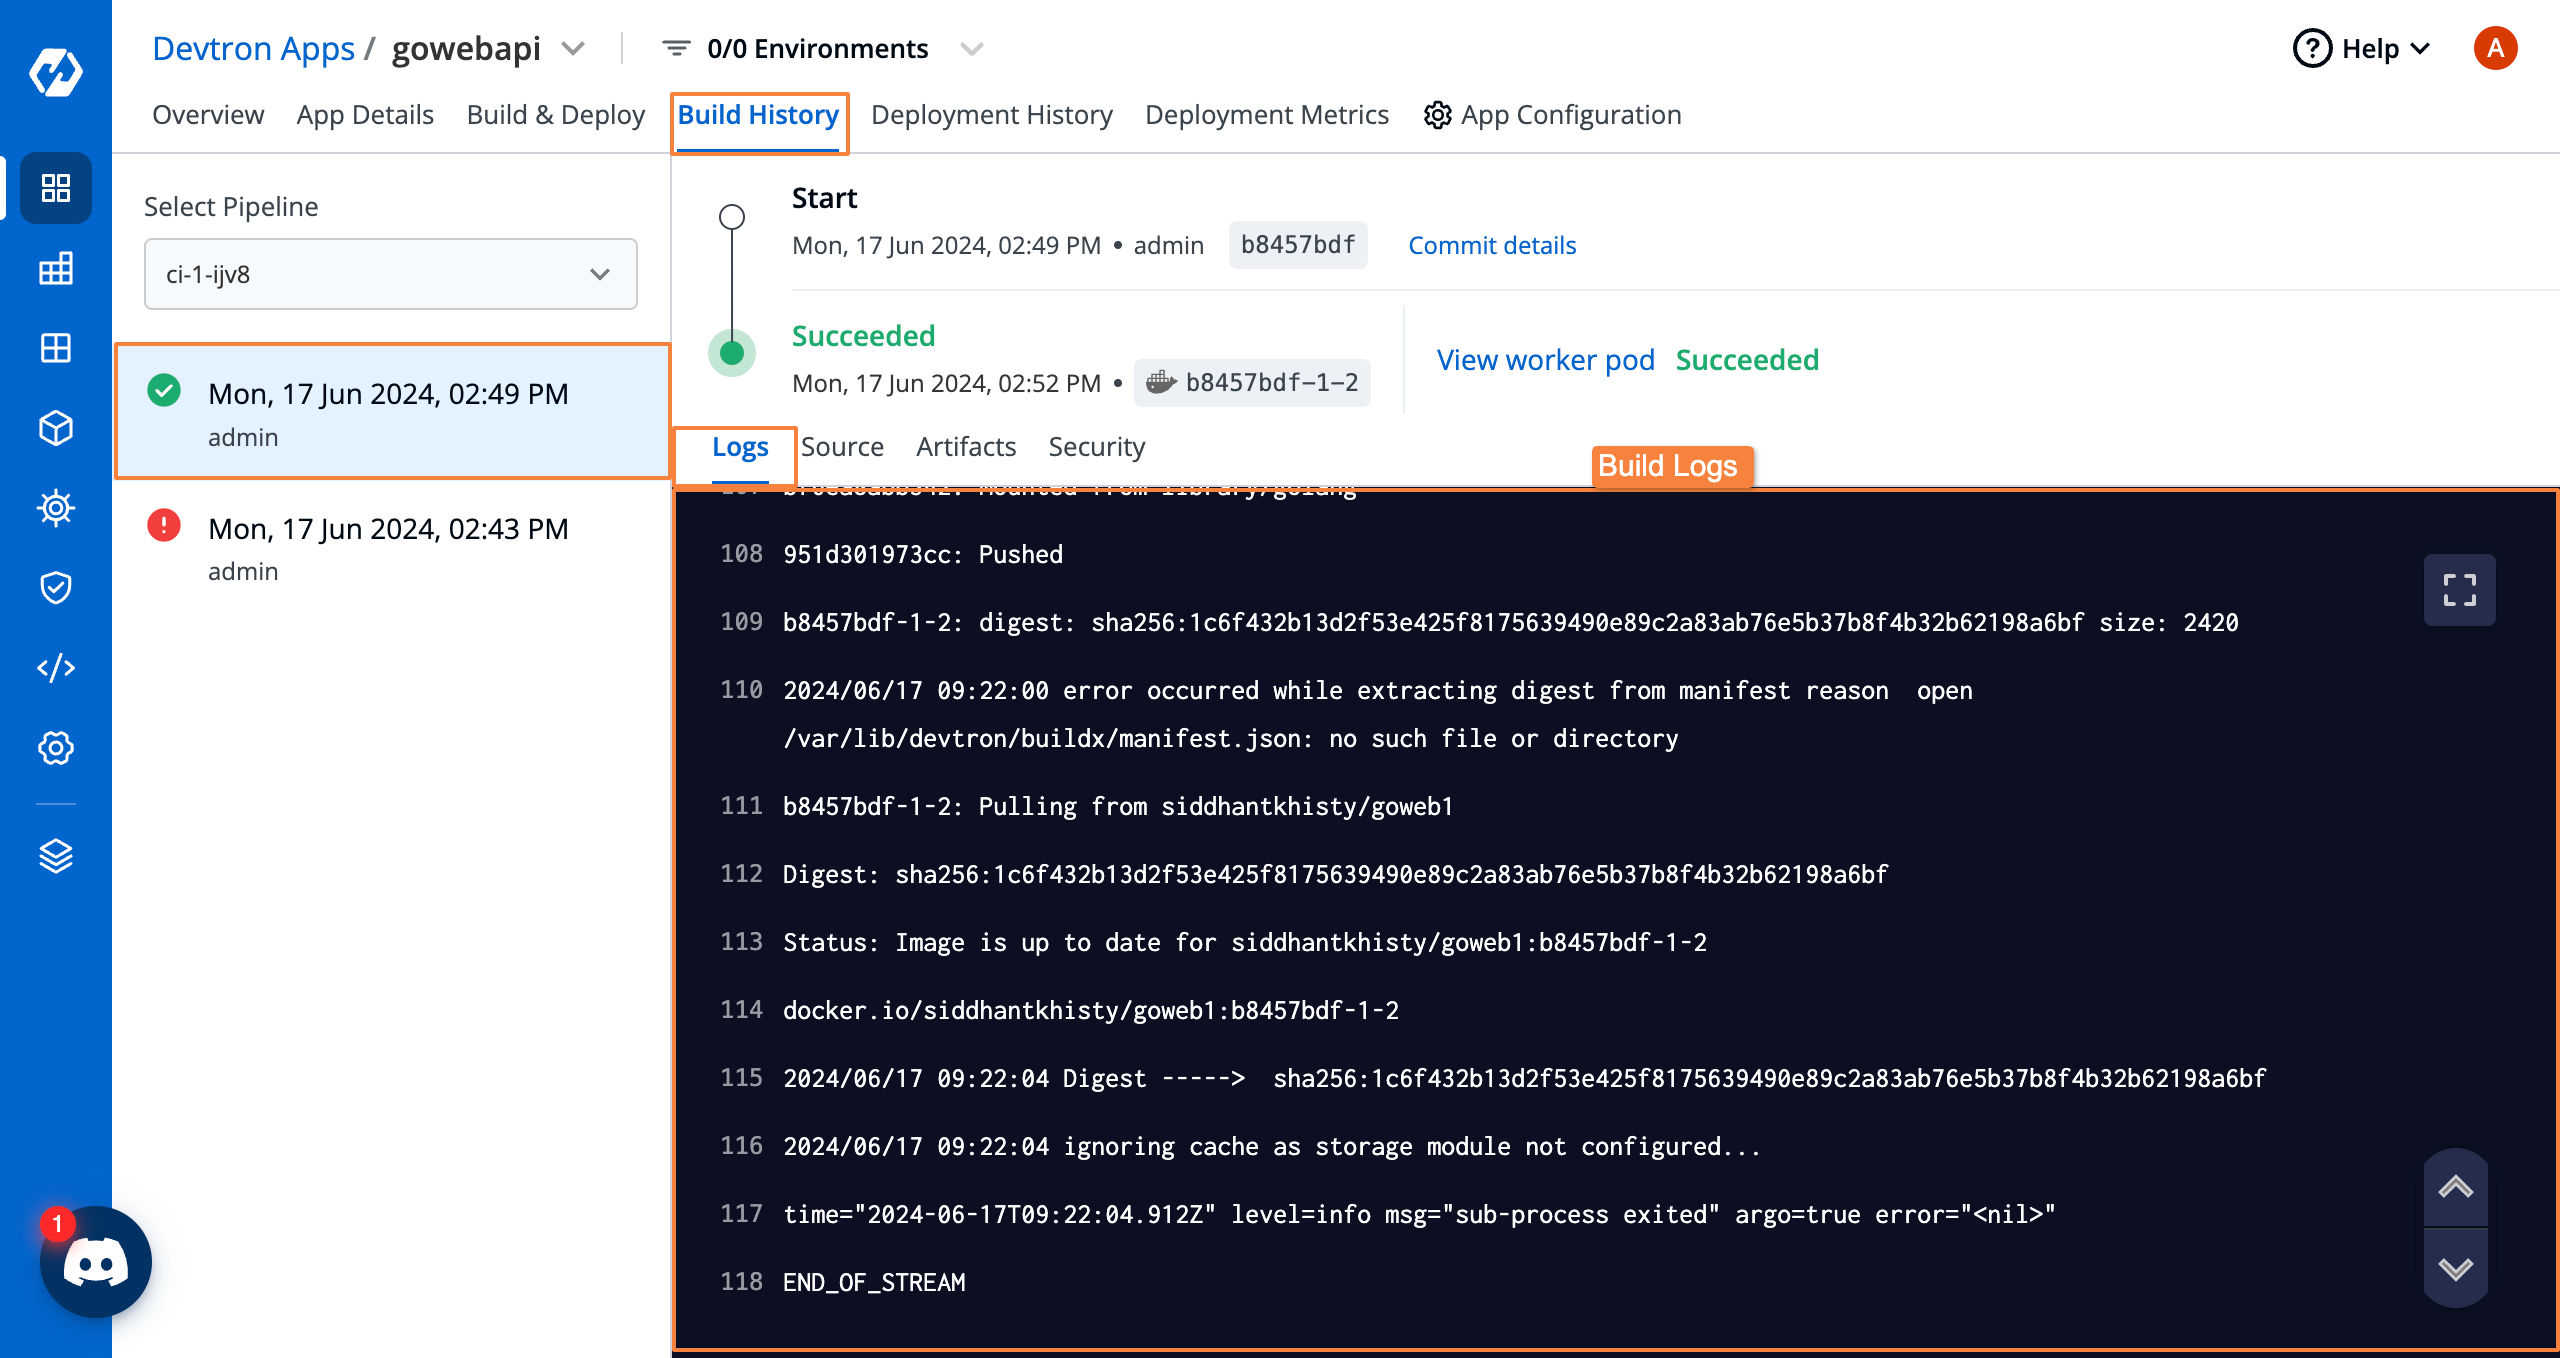
After the workflow is complete, you’ll see a green checkmark along with all the details of the build logs and audits.
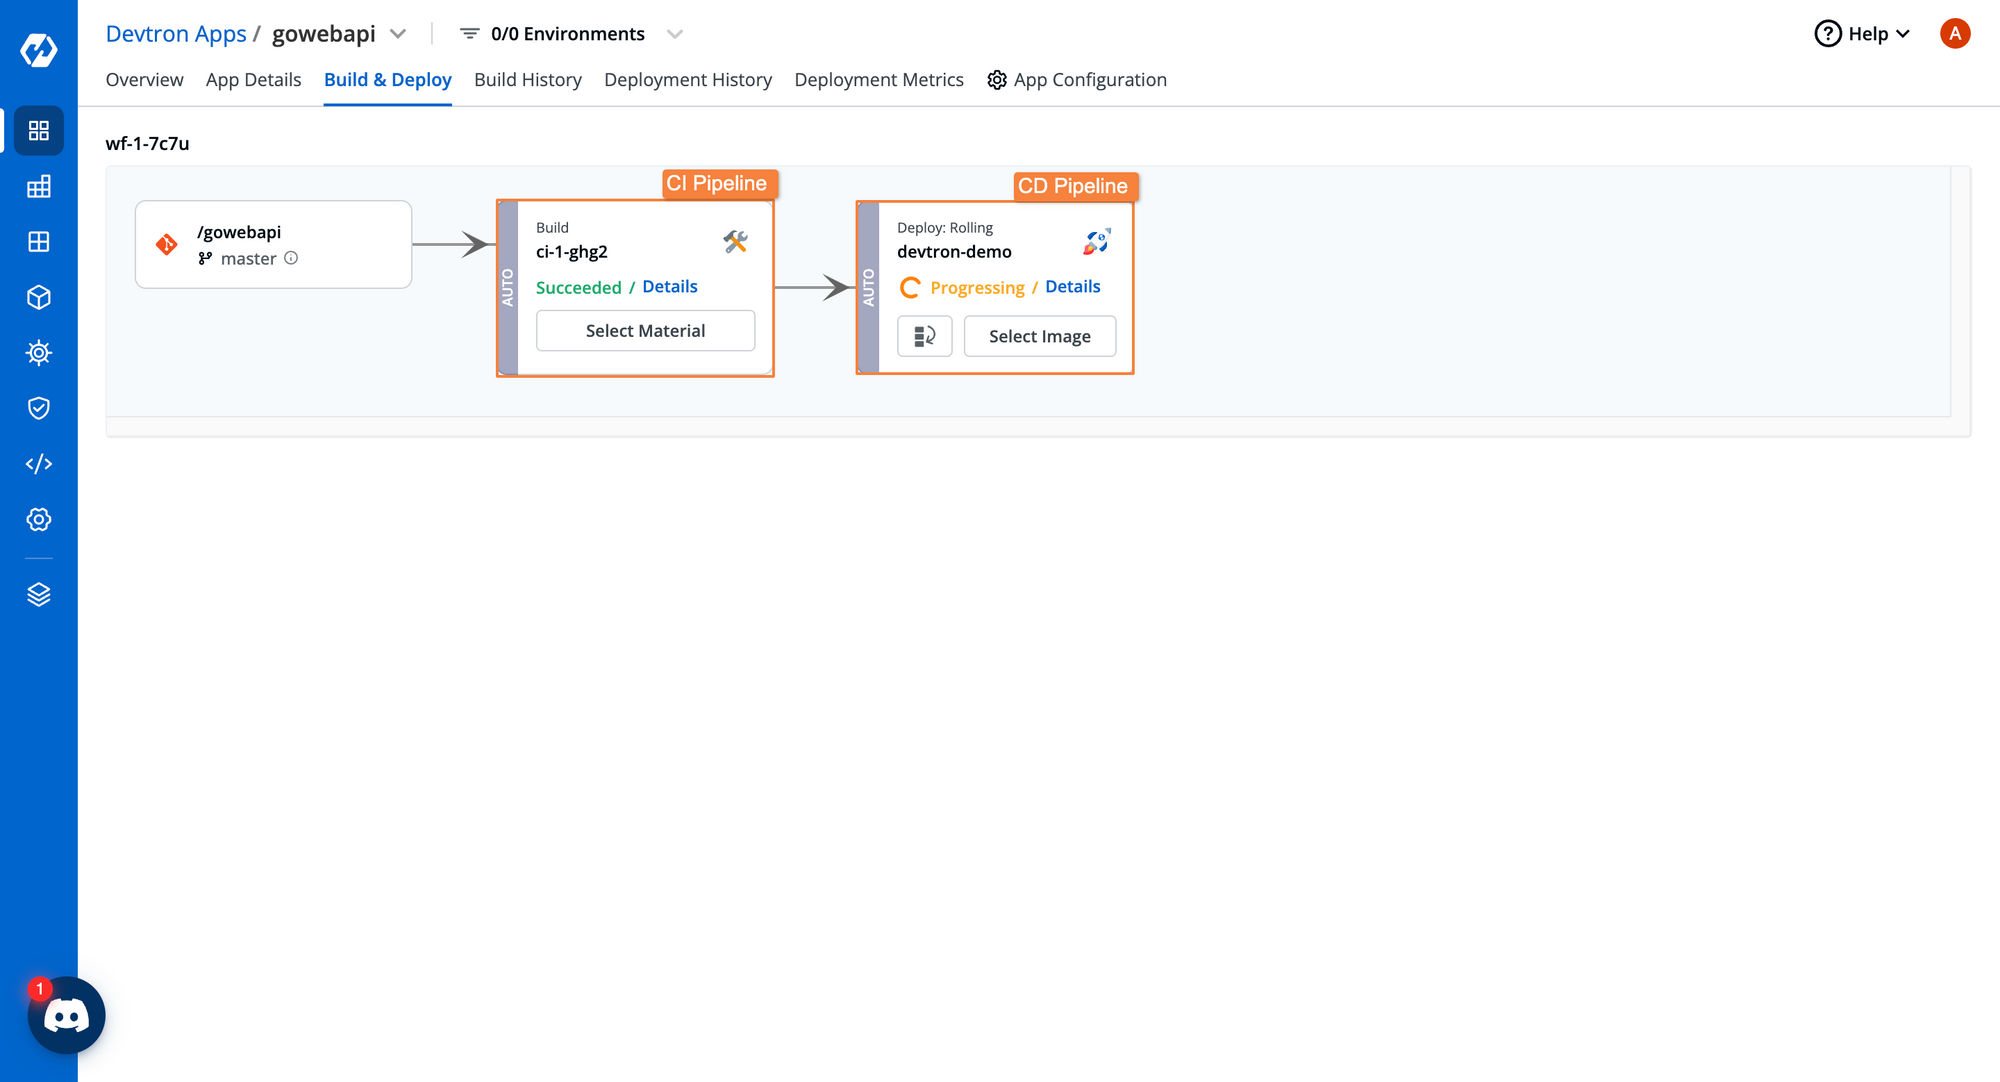
Now the build is done, we need to trigger the deployment pipeline. In the CD pipeline, click on Select Image, choose the image for which you want to deploy in the target environment, and click on Deploy. If it's an auto pipeline, as soon as the image is built, it will automatically deploy the latest image in the target environment.
Holistic View of Deployed Application
After the successful deployment, you can navigate to App Details where you can see all the details about the application such as application metrics (if configured), deployment status, and resourced grouped view of all workloads deployed with this application. You can also check out the real-time logs, events, and even exec into the container for troubleshooting and debugging if required.
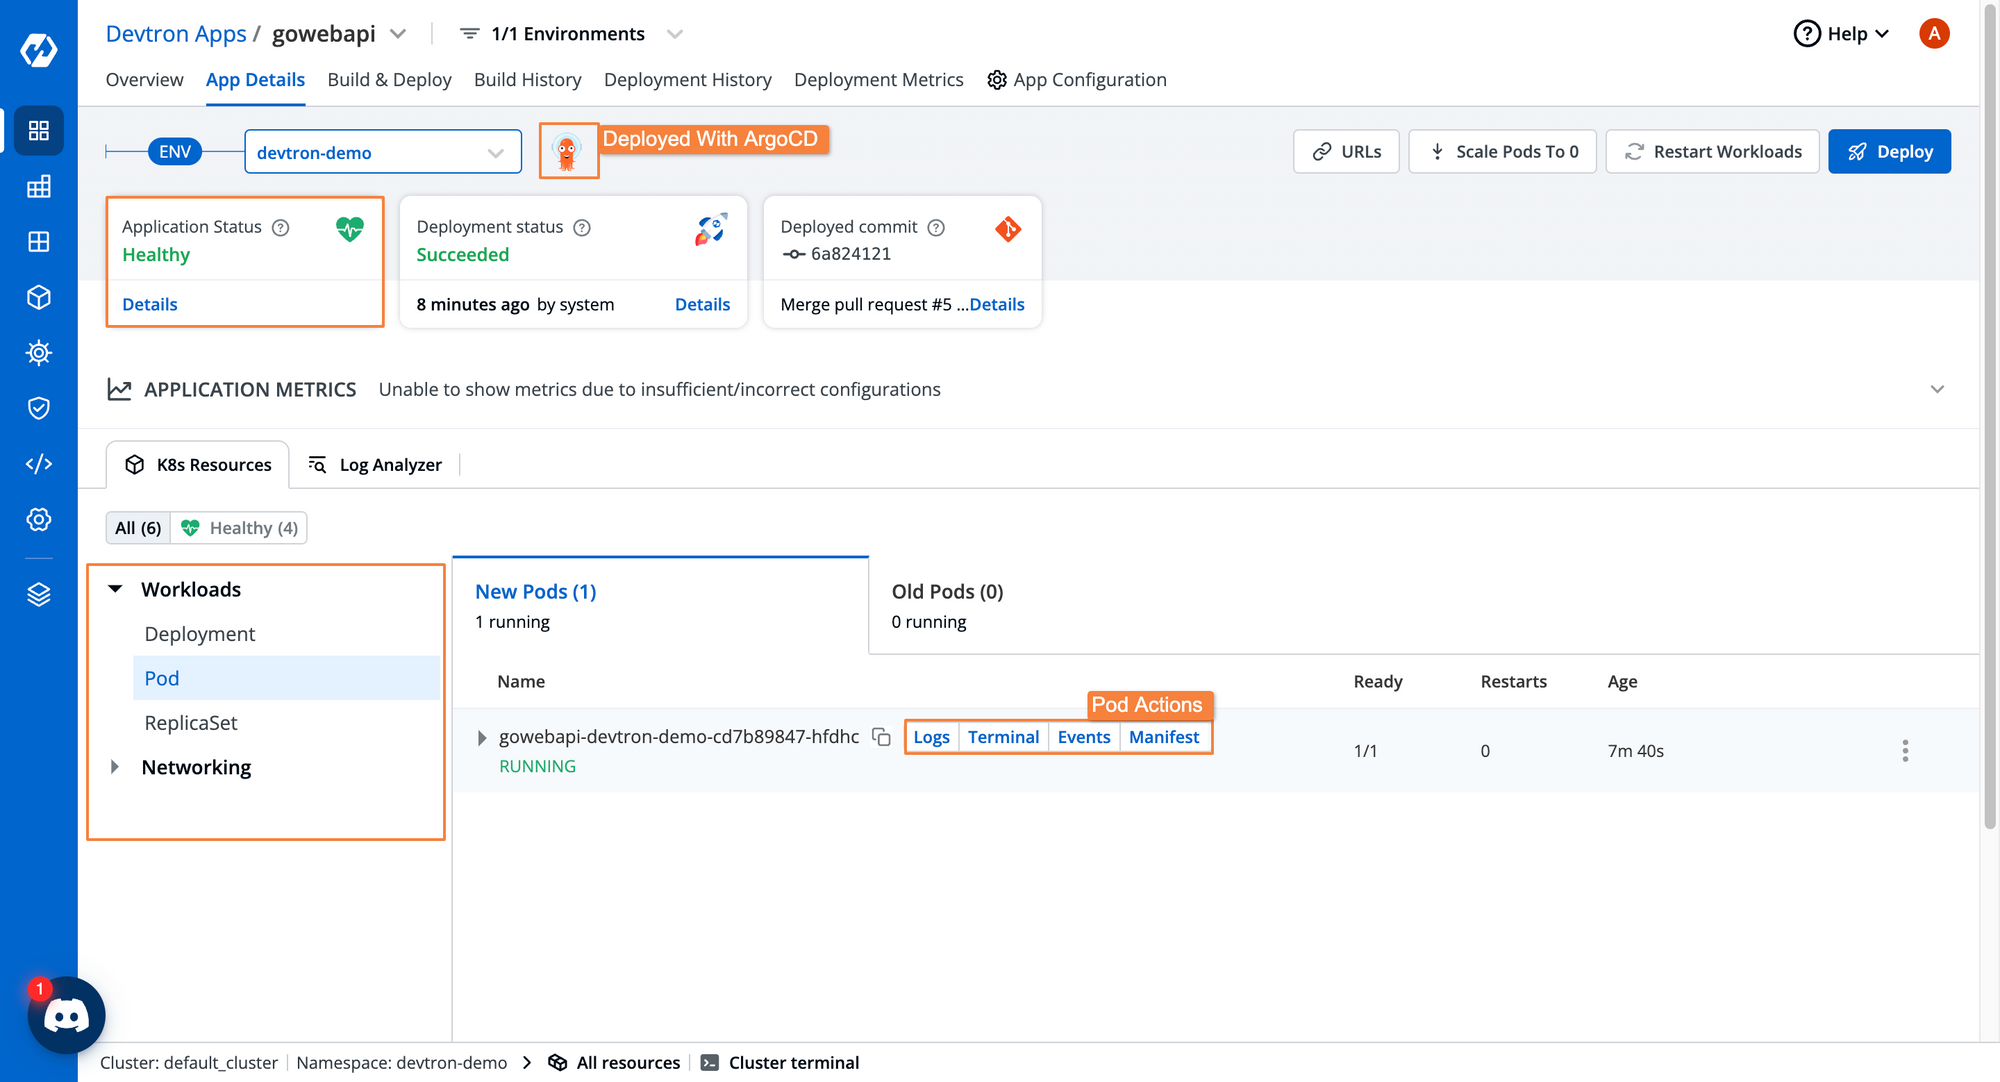
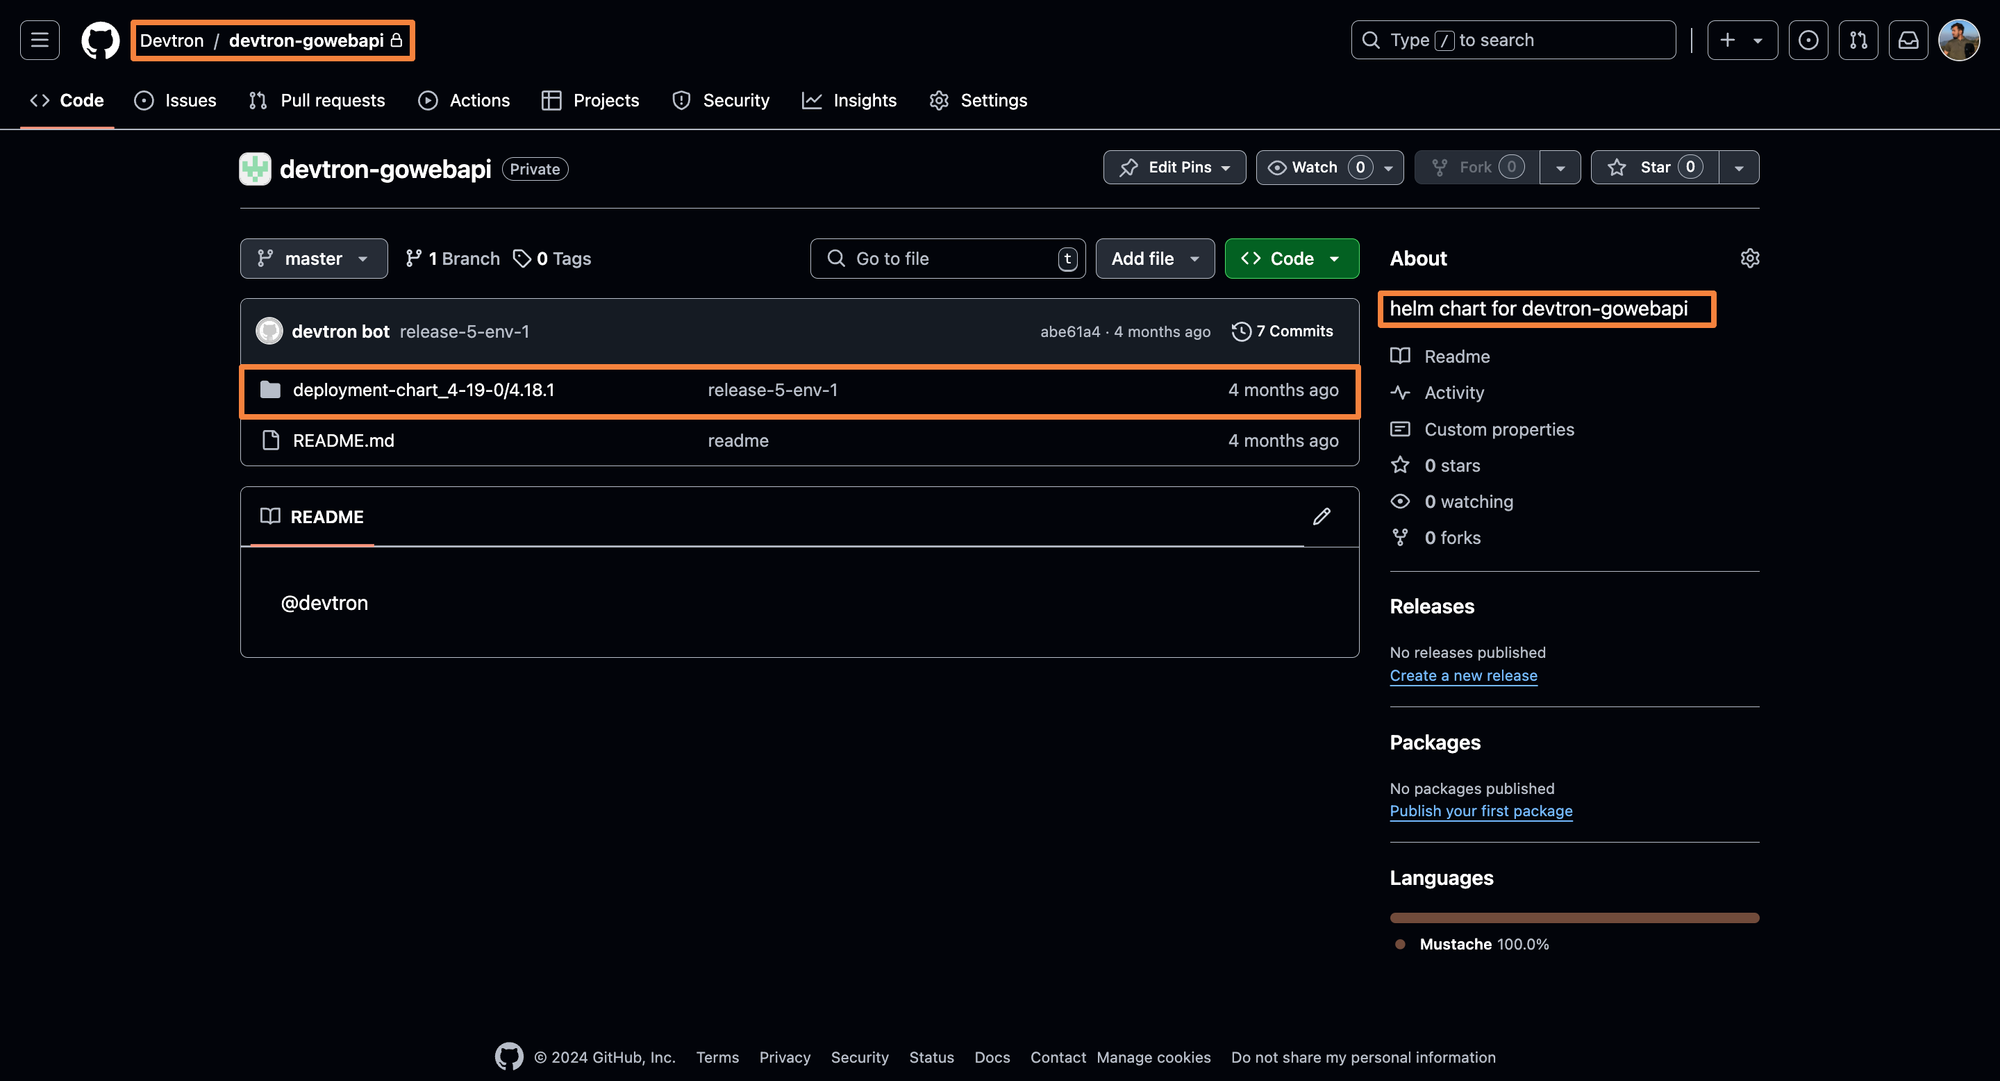
One thing we can observe here is that the deployment method is GitOps, and we can see an ArgoCD logo at the top, beside the environment name. In the entire CI/CD process, we don't have to deal with any of the manual setups of ArgoCD, configuring ArgoCD in clusters, writing Application objects, and pushing manifests to git. Everything is automatically taken care of by Devtron. As soon the application is deployed, Devtron automatically pushes the K8s manifests to the GitOps organization which you have configured from Global Configuration, as you can see in the below image.
Conclusion
With ArgoCD as a standalone, you will have to integrate different tools and workflows such as Argo Workflow or Jenkins, GitHub Actions, Trivy, Grafana, Prometheus, External Secrets, and much more to build a complete end-to-end workflow. Additionally, ArgoCD works on a pull-based GitOps mechanism on the other hand, Devtron works on a push-based GitOps mechanism. With Devtron, you get all the benefits of ArgoCD such as syncing the cluster's current state with the desired state, following a GitOps-based approach, and along with that, you get a lot of other benefits. You don't have to deal with the manual steps of writing and pushing manifest to git, configuring and integrating different other tools, and managing those tools. From Devtron's stack manager, you can easily integrate and install the integration you want and additionally, in the build and deployment pipelines, you can also integrate different plugins required.
Devtron takes out all the complexities of K8s, with its intuitive dashboard while giving out all the flexibility of the existing tooling system. Even with ArgoCD and Devtron coming together, you can still access the ArgoCD dashboard if required and can see all applications in the ArgoCD dashboard that are deployed through Devtron.
If you have any queries, don't hesitate to connect with us. Join the lively discussions and shared knowledge in our actively growing Discord Community.