When working with Infrastructure as Code (IaC), many tools rely on domain-specific languages like HCL (HashiCorp Configuration Language) or formats like YAML. HCL, commonly used with Terraform while YAML is widely used with tools like Ansible because of its simplicity and readability.
While these formats make defining infrastructure straightforward, they fall short when you need to introduce more advanced logic. For example, if you wanted to spin up EC2 instances with advanced logic, HCL or YAML can fall short. These tasks require more advanced logic, which can be easily defined using Pulumi
Pulumi lets you write infrastructure definitions using the full power of a programming language such as JavaScript, Golang, or Python. This makes it much easier to handle complex scenarios while keeping your code clean and easy to manage.
What Is Pulumi?
Pulumi is a modern Infrastructure as Code platform that allows DevOps teams to use existing programming languages like TypeScript, JavaScript, Python, Go, .NET, Java, and tools to build, deploy, and manage cloud infrastructure such as virtual machines, containers, applications, etc.
Key Benefits of Pulumi
- Manage infrastructure across cloud providers such as AWS, Azure, GCP and others in a declarative way using familiar programming languages
- Define advanced logic for provisioning and configuring Infrastructure using IaC practices
- Use standard programming languages like Go, Python and Java to define the infrastructure configurations
- Built-in secrets encryption, avoiding plaintext secrets in config files.
What are Core Components of Pulumi?
Pulumi consists of several core components which makes it powerful and flexible. Let’s examine each of those components in detail.
Pulumi Software Development Kit (SDK)
The Pulumi Software Development Kit (SDK) provides a set of libraries for managing infrastructure for various cloud providers.
- Provides libraries for different cloud providers like AWS, Azure and GCP
- Let's developers configure infrastructure in a programming language of their choice
- Pulumi officially supports over 150 providers
Pulumi Command-Line Interface (CLI)
The Pulumi Command-Line Interface (CLI) is the primary tool for working with Pulumi.
- Acts as the primary tool for working and interacting with Pulumi
- Works in conjunction with Pulumi Cloud
- Helps with deployments, updates, and infrastructure destruction.
Pulumi Deployment Engine
The Pulumi Deployment Engine is the core component that interprets your code and interacts with cloud provider APIs to provision, update, or destroy resources.
- The deployment engine analysis current state of infrastructure and applies the code defined by the user.
- Integrates with APIs of cloud providers to provision, configure and delete infrastructure resources
- Tracks the live state of the current infrastructure
Pulumi Stack
A stack in Pulumi is like a separate workspace for your cloud setup, typically used for different environments like development, staging, or production.
- Pulumi stacks helps to separate environments for a cloud setup.
- Ensures that each environment is separate and isolated from each other
- Allows you to have unique configurations for the different environments.
How Does Pulumi Work?
Now that we’ve covered the core components—Pulumi CLI, Deployment Engine, and Providers; let’s see how they all work together when you run a Pulumi command, like pulumi up.
pulumi up starts reading the code and provisioning & configuring infrastructure.Let's have a look at the Pulumi Engine Diagram that is taken from their website.
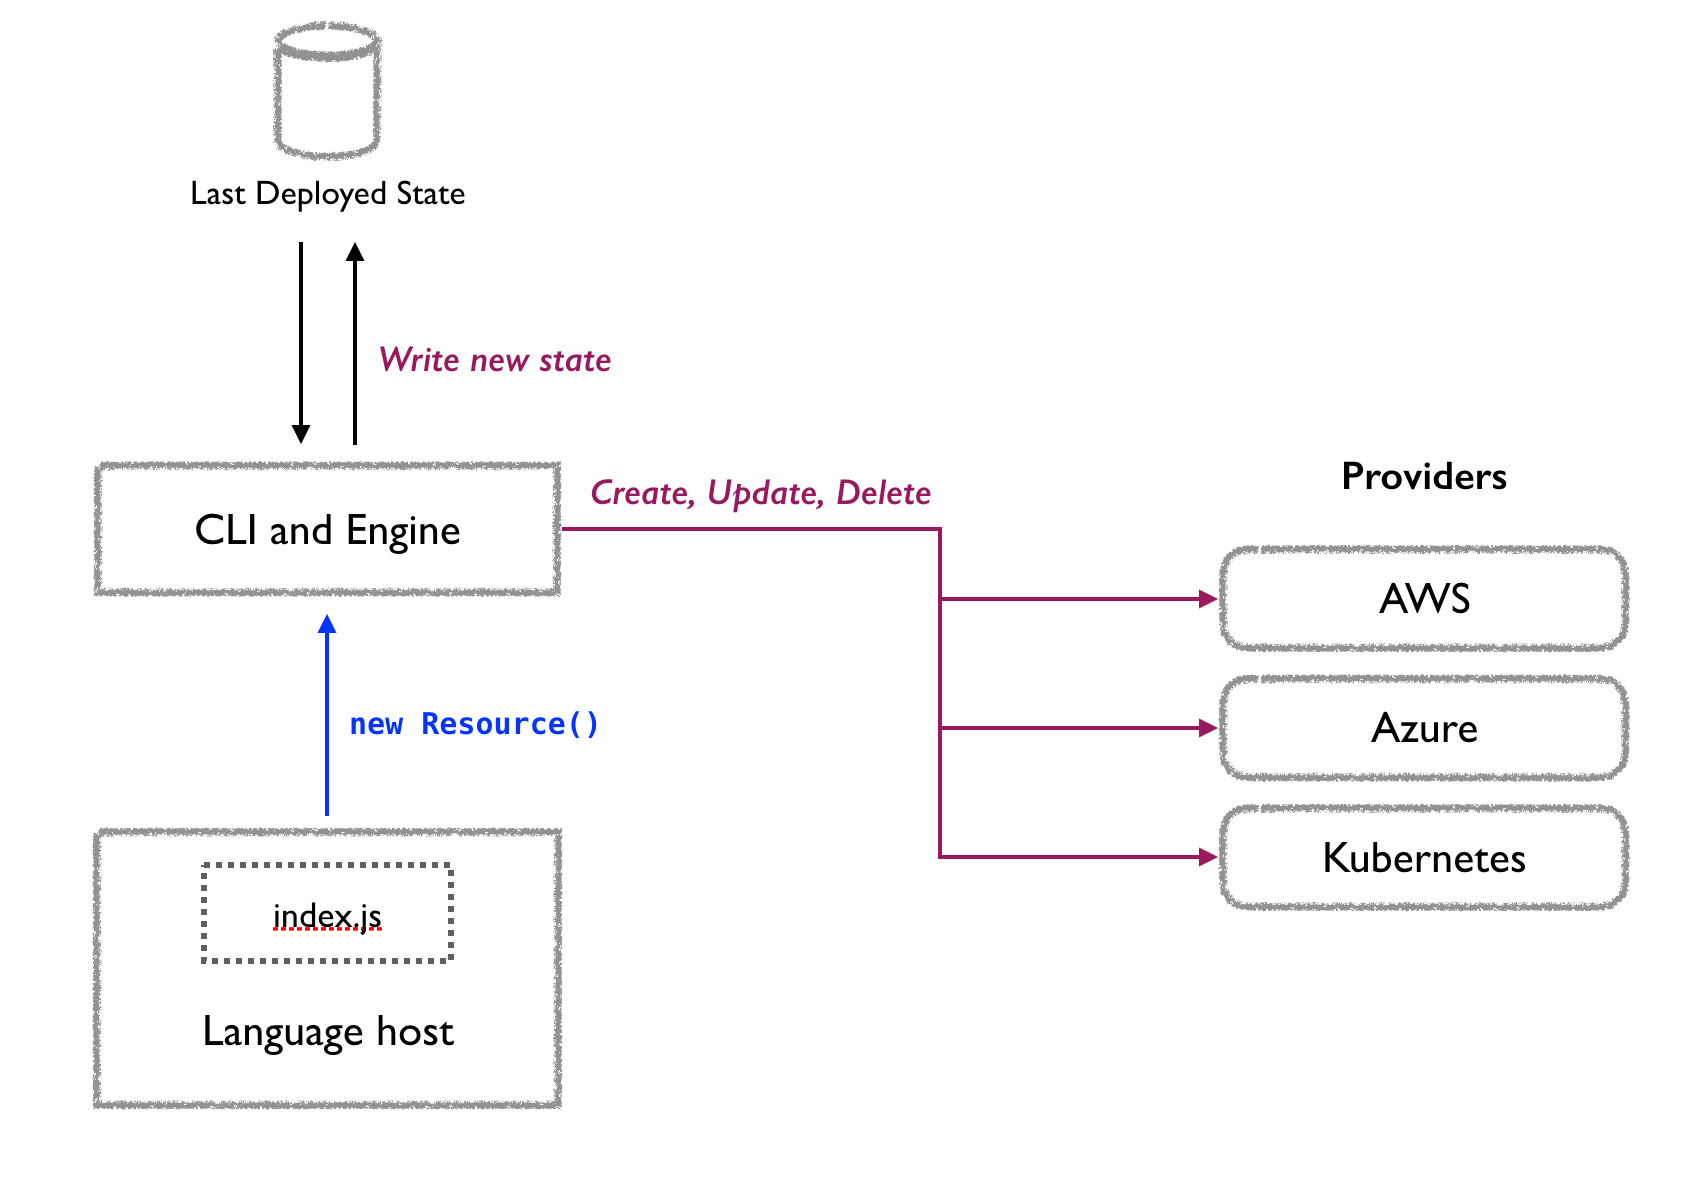
Image Credits: Pulumi Documentation
Pulumi follows a structured approach to deploying and managing the various infrastructure components. Let's understand how does the entire execution flow work.
Step 1: CLI Execution
- After running the
pulumi upcommand, the CLI launches the appropriate environment to run your Pulumi program. - The Environment is launched based on which language the Pulumi code is written in.
Step 2: Resource Registration
- Pulumi defines the resources which have to be created based on the code that you have written.
- The definitions are captured by the SDK and sent to the deployment engine
Step 3: Deployment Execution
- Pulumi's Deployment Engine compares the existing resource in the cloud and compares them with the defined resources using the state file
- Pulumi interacts with the cloud API to create, update or destroy infrastructure resources to ensure that the live state in the cloud matches the defined state
- If the resources already exist but have different configurations, Pulumi updates the configurations to the defined configurations.
The integration of the Language Host, Deployment Engine, and Providers makes Pulumi a smooth and efficient tool for defining, managing, and deploying infrastructure with familiar programming languages.
Pulumi Key Features
So far, we've explored what Pulumi is, its core components, and how it works. Now, let’s dive deeper into some of its key features.
Multi-Language Support
Pulumi supports multiple programming languages, such as Python, TypeScript, Go, and .NET, to define and manage your infrastructure. This approach allows you to use standard coding practices like loops, functions, and conditionals to create dynamic and reusable configurations. Unlike YAML or HCL, Pulumi makes it easy to handle complex logic, letting you write infrastructure code just like regular programming. This means you can add conditions, advanced functions, and iterative loops to automate repetitive tasks without any extra hassle.
Dynamic Providers
The Dynamic Provider feature in Pulumi enables you to define and manage custom resources that are not directly supported by an existing Pulumi provider. This feature allows you to write your own logic for creating, updating, and deleting resources using your preferred programming languages.
If you're working with a self-hosted service or a platform without an existing Pulumi provider, you can write your own dynamic provider using Pulumi's SDKs. This gives you the ability to define, manage, and deploy resources on virtually any platform, all within Pulumi’s Infrastructure as Code framework.
Automation API
The Automation API is another useful feature in Pulumi that allows you to programmatically manage infrastructure as part of your applications or services. Instead of relying on the Pulumi CLI for manual execution, the Automation API allows you to embed Pulumi directly into your code, enabling infrastructure management without the need for manual CLI execution.
Pulumi vs. Terraform
Pulumi and Terraform are two of the most popular Infrastructure as Code (IaC) tools, allowing us to define, deploy, and manage cloud infrastructure. While they share a common goal, their approaches and features differ significantly, catering to different use cases and preferences.
Here is a summary of the key differences between Pulumi and Terraform:
Features |
Pulumi |
Terraform |
|---|---|---|
| OSS License | Yes, Apache License 2.0 | No, Business Source License 1.1 |
| Language Support | Python,TypeScript, JavaScript, Go, C#, F#, Java, YAML | HashiCorp Configuration Language (HCL) |
| Dynamic Provider Support | Yes | No |
| Secrets Management | Yes. Secrets are encrypted in transit and in the state file. | No. Secrets are stored in a separate product (Vault). There is no way to encrypt them in the state file. |
| Modes Of Execution | Run CLI commands or initiate commands programmatically with Automation API. | Run CLI commands |
Pulumi Installation on AWS Hands-On: A Quick Start Guide
To begin using Pulumi, the first step is to install it. The installation process depends on your operating system. In this guide, we’ll walk through the process of installing Pulumi and deploying your first AWS resource using it.
Step 1: Pulumi Installation
To install Pulumi execute the following commands.
Using a bash script:
curl -fsSL https://get.pulumi.com | shThe above command downloads the Pulumi binary and sets it up on your system, making it readily available for local use.
For macOS or Linux using Homebrew:
brew install pulumi/tap/pulumi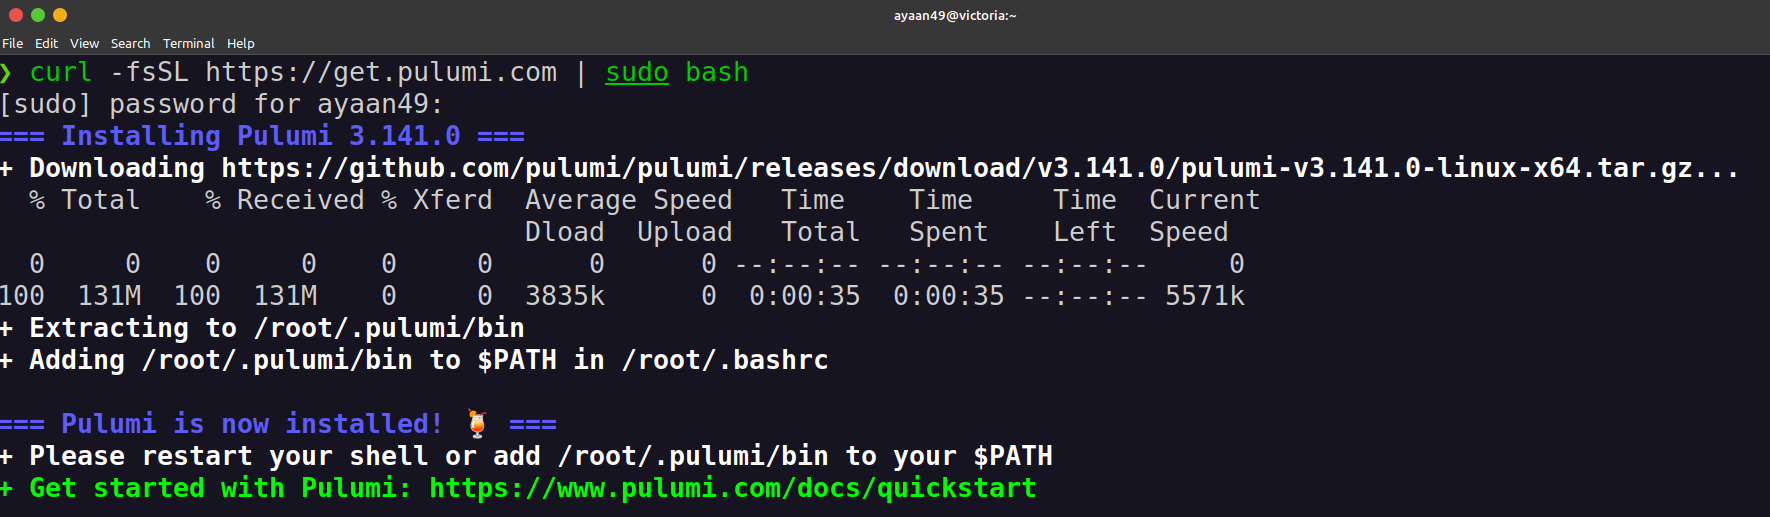
When the installation is complete, you can test it out by reading the current version:
$ pulumi version

v3.141.0
Step 2: Configure Pulumi to access your AWS account
Pulumi requires cloud credentials to provision and manage resources effectively. For AWS, you'll need an IAM user with programmatic access and the necessary permissions to deploy and manage resources through Pulumi. You can configure Pulumi to access your AWS account by setting up your AWS credentials using the AWS CLI.
Set up AWS credentials using the below command
aws configureThis will ask for your AWS access key and AWS Secret as below
AWS Access Key ID [None] : ******
AWS Secret Access Key [None] : ******
Default region name : [leave it none, press enter]
Default output format : [leave it none, press enter]
Now you’ve created the ~/.aws/credentials file and populated it with the expected settings.
Step 3: Provisioning an S3 Bucket on AWS with Pulumi
Now that you have configured Pulumi with your AWS account, let’s create our first Pulumi program using Python as our preferred language.
Start by creating an empty directory, then run the pulumi new command. This command initializes your project by generating a set of predefined files, such as requirements.txt, Pulumi.yaml, and __main__.py.
mkdir demo && cd demo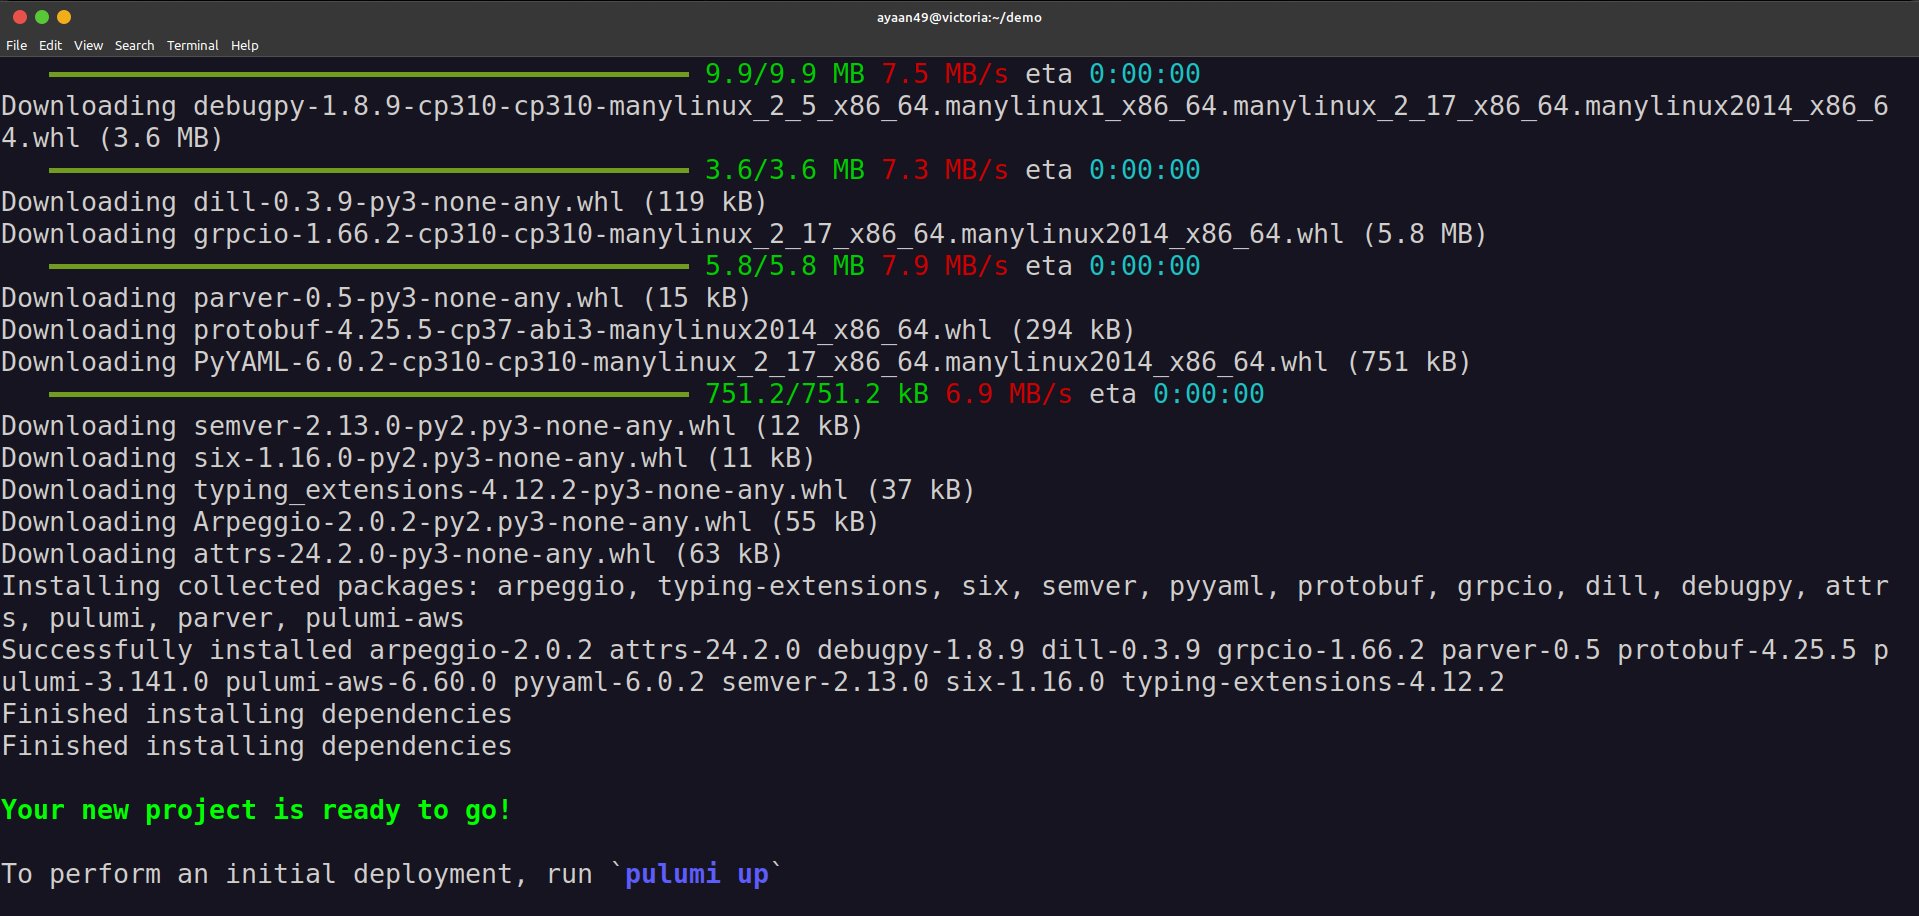
pulumi newpulumi new or most other pulumi commands for the first time, you will be prompted to log in to the Pulumi service. The Pulumi CLI works in the background with the Pulumi service in order to deliver a reliable experience. It is free for individual use.Once you execute the pulumi new command, you should see an output similar to below
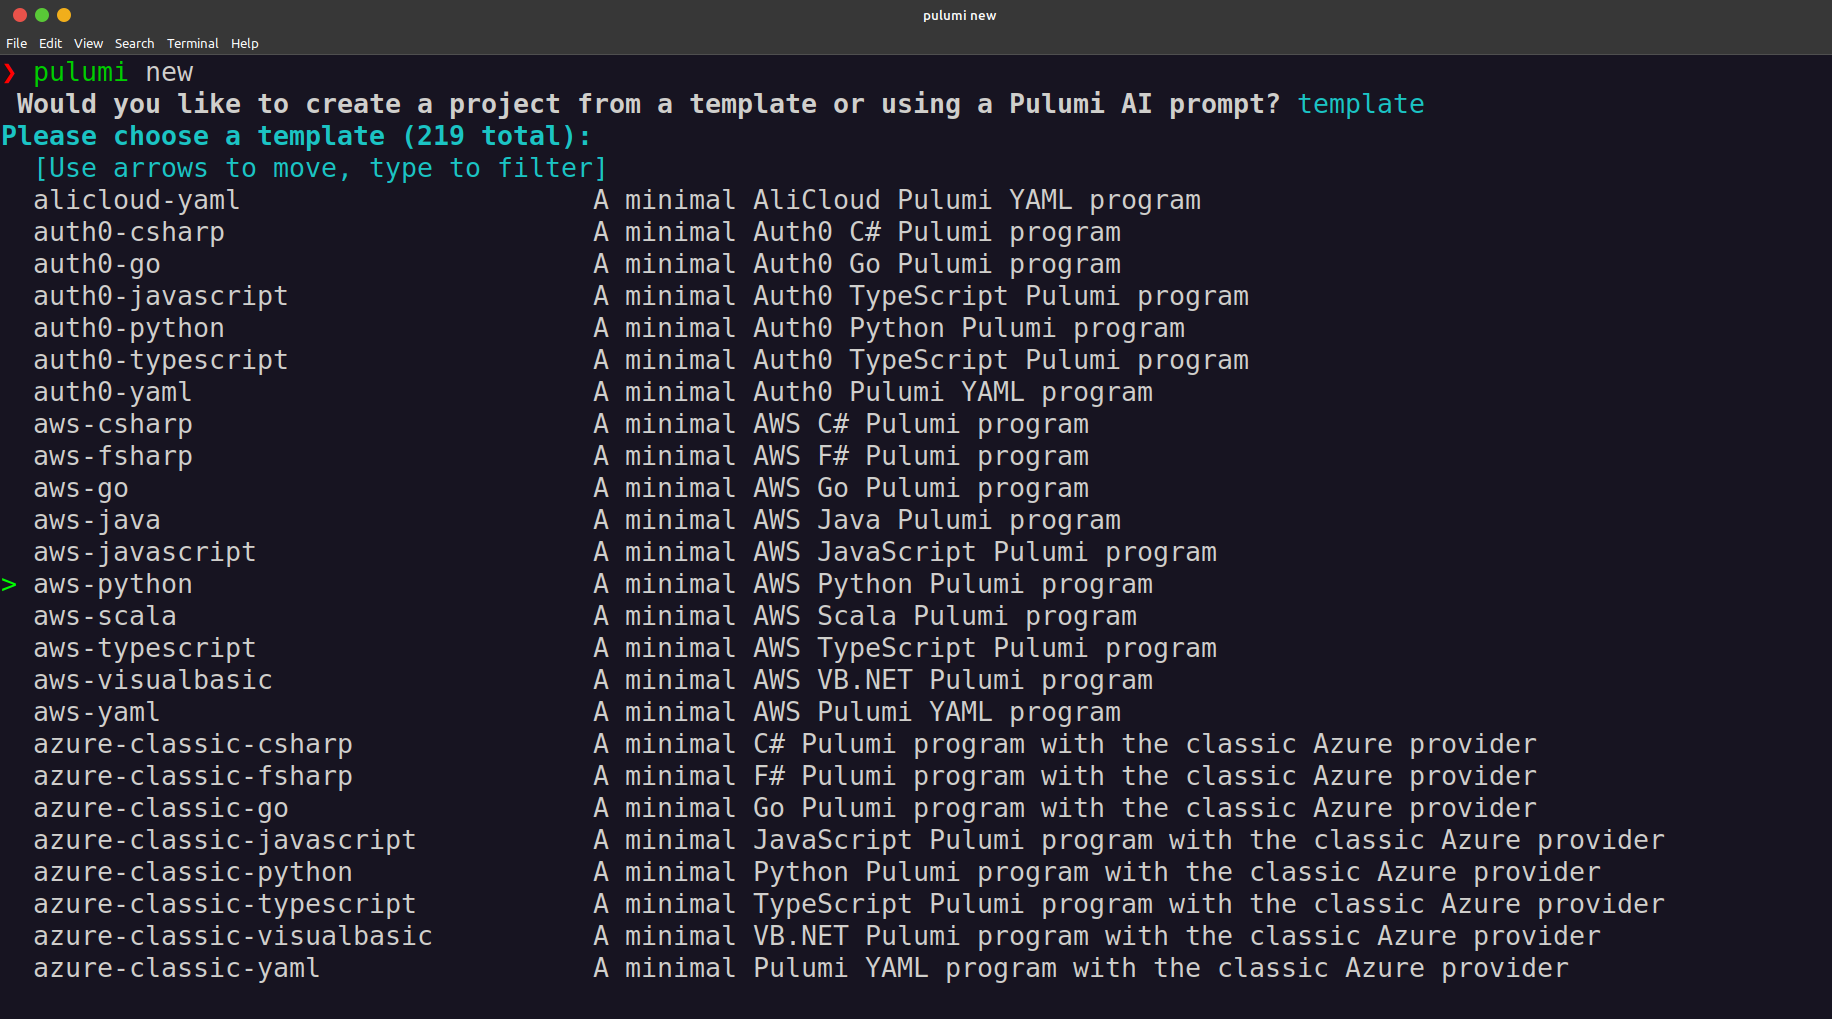
Using the up-down arrow key, select the aws-python option. Press Enter.
Specify the following information:
- Project Name: Defines the name of your Pulumi project.
- Project Description: Provides a brief summary of your project's purpose or goals.
- Stack Name: Represents an isolated environment (e.g., dev, staging, prod) for your infrastructure.
- Aws Region: Specifies the data center region where your resources will be deployed.
If you press Enter without entering any values, Pulumi will use the default settings. Once you provide all the required details, Pulumi will initialize and install the necessary libraries. The output should look similar to the one below:
Now our pulumi project is set up and ready! We are ready to make changes in the placeholder code.
You can do a simple ls and view all the files generated

Let’s review some of the generated project files:
Pulumi.yaml: Defines the overall project and its metadata.Pulumi.dev.yaml: Contains the configuration values specific to the stack you just initialized.__main__.py: Serves as the Pulumi program, where you define the resources for your stack.
Let’s examine __main__.py .
import pulumi
from pulumi_aws import s3

# Create an AWS resource (S3 Bucket)
bucket = s3.BucketV2('my-bucket')

# Export the name of the bucket
pulumi.export('bucket_name', bucket.id)
This Python code uses Pulumi to create an S3 bucket in AWS and export its unique name as an output.
- Import Modules: The
pulumimodule provides the core functionality for managing cloud resources and thepulumi_awsmodule includes tools for working with AWS resources like S3, EC2, etc. - Create Bucket:
s3.BucketV2('my-bucket')creates an S3 bucket. The name 'my-bucket' is Pulumi’s identifier, and AWS assigns a unique name. - Export Output:
pulumi.export('bucket_name', bucket.id)outputs the bucket's unique AWS ID for easy reference.
Next, you’ll deploy your stack, which will provision your S3 bucket.
Let’s go ahead and deploy your stack:
pulumi upThis command analyzes your program and identifies the resource updates needed. Initially, it provides a preview that outlines the proposed changes, giving you a clear understanding of what will happen during the update process.
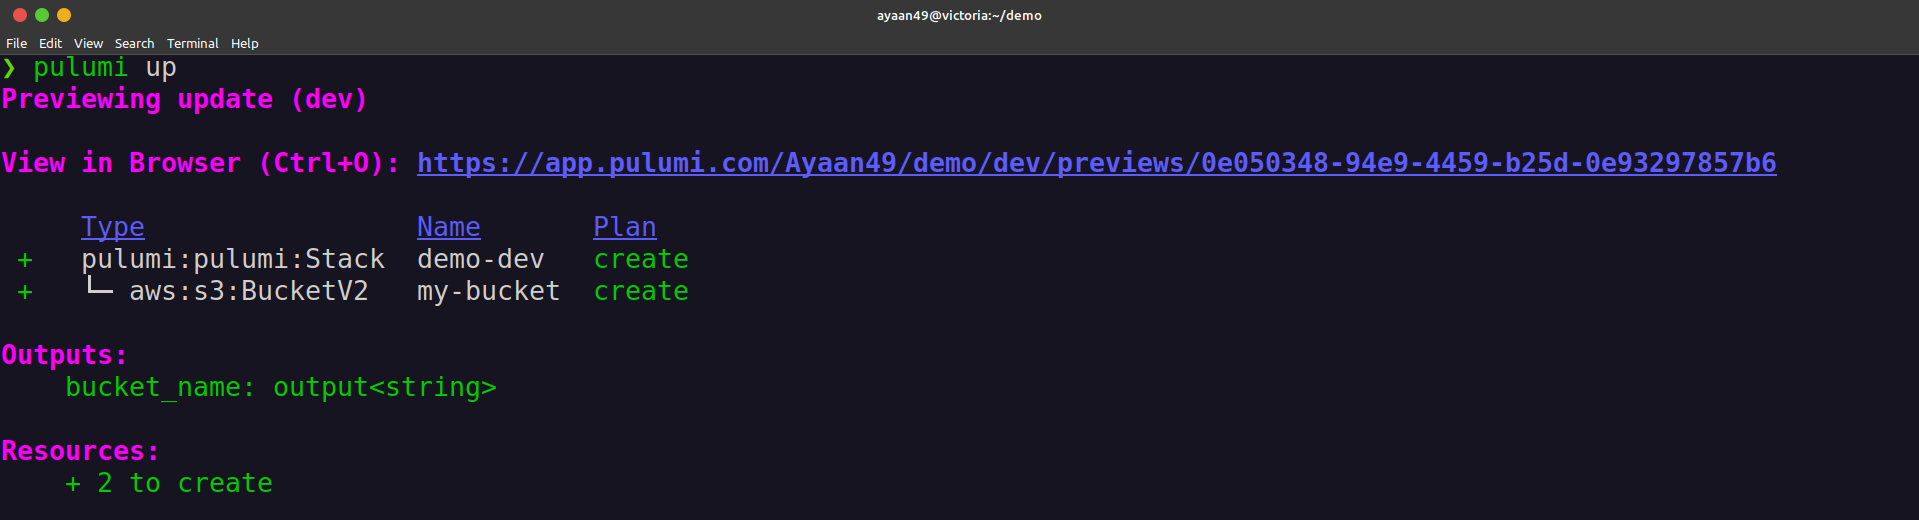
After the preview, you can choose details to view a detailed change summary, yes to create the S3 bucket in AWS, or no to cancel the update.
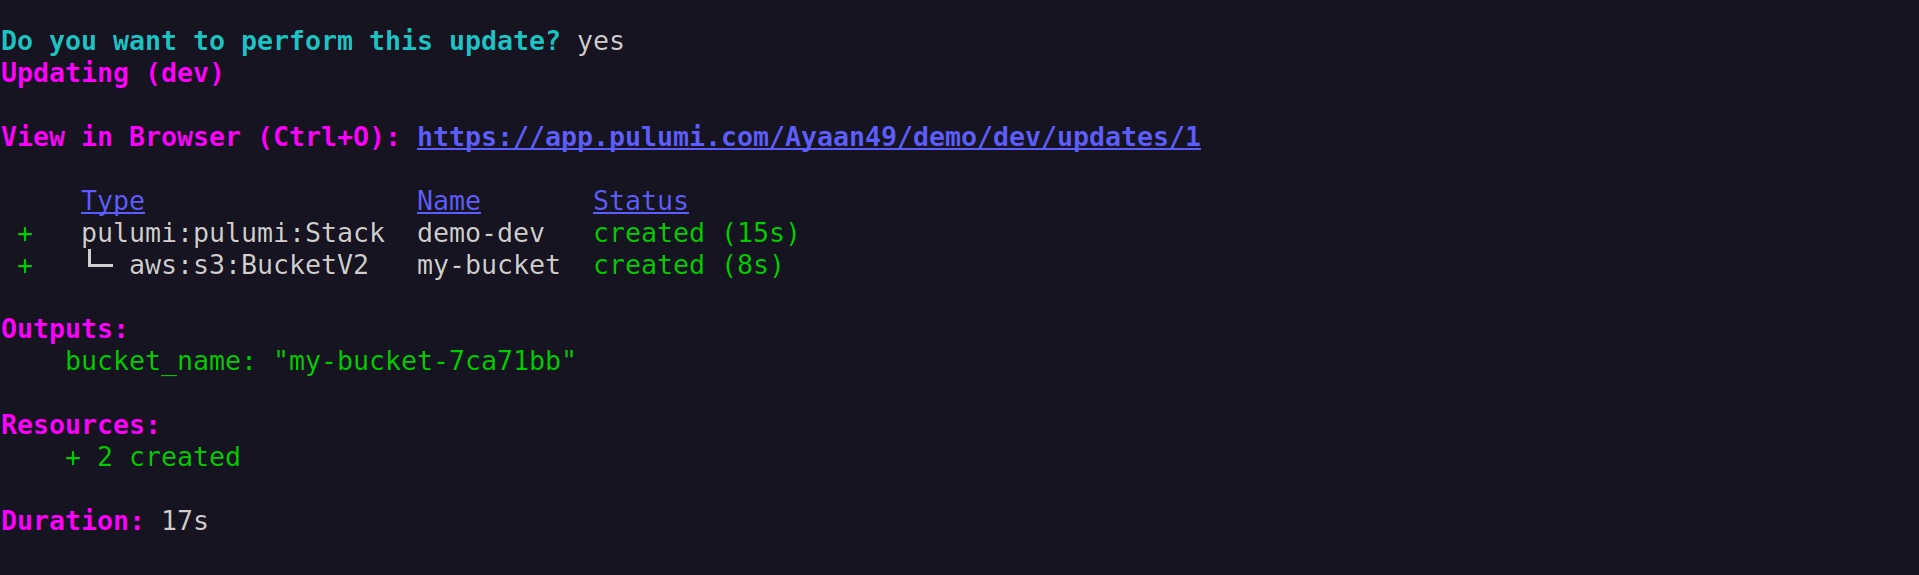
The bucket is created with a unique name like my-bucket-7ca71bb. Your bucket will have a different unique ID.
Step 4: Confirm the S3 Bucket Creation in the AWS Console
Now, Let’s head over to S3 in the AWS console to check and confirm that the bucket was successfully created.
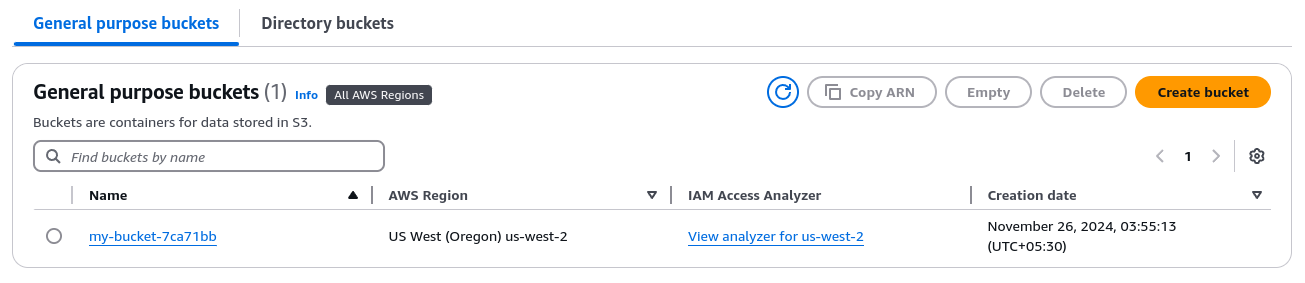
You can see that the bucket name matches perfectly with the output we received, confirming that the S3 bucket was successfully created using Pulumi.
Conclusion
Within this blog post, we have covered multiple functionalities of Pulumi and how it works. We looked at
- What is Pulumi & it's components
- Pulumi's execution flow
- Key differences between Pulumi and Terraform
- Hands-on walkthrough configuring and provisioning infrastructure using Pulumi.
Pulumi provides a modern and developer-friendly IaC approach, making cloud infrastructure scalable, reusable, and easy to manage. It also reduces the learning curve for DevOps teams as it integrates with existing tools and technologies.
FAQ
What is Pulumi?
Pulumi is an Infrastructure-as-code tool that lets you define infrastructure configurations in native programming languages such as Java, JavaScript, Golang, .NET ,and more.
What is the use of Pulumi?
Pulumi is an Infrastructure-as-code tool that lets you define infrastructure configurations in native programming languages such as Java, JavaScript, Golang, .NET ,and more.
What is Pulumi vs Terraform?
Pulumi handles state within the programming language runtime, offering direct integration with code, while Terraform uses a centralized state file to track resources declaratively.
What Language does Pulumi use?
Pulumi has multiple SDKs that allow you to use it with a number of different programming languages including Golang, JavaScript, TypeScript, Java and more.
Does Pulumi work in self-hosted environments?
Pulumi can be used in cloud environments such as AWS, GCP, Azure as well as used on self-hosted infrastructure.