1. Learn what a CI/CD pipeline is and how it automates the journey from code commit to production, reducing manual effort and speeding up software delivery.
2. Understand the core stages of a modern CI/CD pipeline: Source, Build, Test, Deploy, and Monitor & Rollback, along with the tools that power each stage for Kubernetes.
3. Discover why CI/CD pipelines are critical for Kubernetes, enabling faster deployments, zero-downtime rollouts, and improved application reliability through automation.
4. Explore the business and technical benefits, including faster time to market, reduced risks, lower operational costs, and improved collaboration between dev and ops teams.
5. Learn how tools like Devtron simplify Kubernetes CI/CD with GitOps-based deployments, advanced strategies like blue-green and canary, and end-to-end pipeline visibility.
What is a CI/CD Pipeline?
A CI/CD pipeline is an automated workflow that eliminates the manual effort involved in the software development lifecycle. It establishes a series of automated steps that take code from a developer's machine to a production environment with minimal human intervention. This practice is a cornerstone of modern DevOps, enabling teams to deliver high-quality software faster and more reliably.
The term "CI/CD" encompasses two key concepts:
- Continuous Integration (CI ): This is the practice of developers frequently merging their code changes into a central repository. Each integration triggers an automated build and test sequence, allowing teams to detect and fix bugs early in the development cycle.
- Continuous Delivery and Continuous Deployment (CD):
- Continuous Delivery extends CI by automatically releasing every validated code change to a repository or a staging environment. This ensures that the code is always in a deployable state.
- Continuous Deployment takes this a step further by automatically deploying every change that passes all tests to the production environment, making it available to end-users.
In essence, while CI/CD refers to the practices of continuous integration and delivery/deployment, the CI/CD pipeline is the automated implementation of these practices.
Why CI/CD Pipelines Are Essential for Kubernetes Deployments
Managing deployments manually in a Kubernetes environment can lead to inefficiencies, increased downtime, and operational bottlenecks. CI/CD pipelines help us mitigate these challenges:
- Faster Deployments: With the rapid pace of software development, organizations can no longer afford prolonged deployment cycles. A CI/CD pipeline ensures that code is integrated, tested, and deployed efficiently, enabling frequent releases without disrupting operations
- Reliability with Zero Downtime: Kubernetes-native deployment strategies like blue-green and canary deployments, when integrated into a CI/CD pipeline, allow seamless software rollouts with minimal risk.
- Enhanced Quality and Security: Incorporating automated testing and security scanning within the CI/CD workflow ensures that only high-quality and secure code reaches production.
Kubernetes has redefined how modern applications are deployed, but without CI/CD automation, teams can struggle with inefficiencies and errors. A well-implemented CI/CD pipeline tailored for Kubernetes accelerates development, enhances reliability, and enables organizations to scale faster.

Prakarsh Solutions Architect, Devtron
Prakarsh is the Lead Solutions Architect and Head of DevOps at Devtron. He specializes in architecting scalable, secure, and production-grade Kubernetes solutions. Prakarsh is passionate about process optimization and has successfully implemented tools like Istio, KEDA, and ArgoCD to streamline operations. He thrives on enabling enterprises to adopt modern DevOps practices, reducing onboarding times from hours to minutes through automation.
The Stages of a Modern CI/CD Pipeline
A typical CI/CD pipeline consists of several distinct stages, each with its own set of automated processes and tools.
1. Source Stage: Code and Version Control
- Process: The pipeline begins when a developer commits code to a version control system like Git (e.g., GitHub, GitLab, Bitbucket). This commit triggers the CI/CD workflow.
- Tools: Git, GitHub, GitLab, Bitbucket
2. Build Stage: Creating the Artifact
- Process: The source code is automatically compiled and packaged into a runnable artifact. For Kubernetes, this is typically a Docker image.
- Tools: Docker, Maven, Gradle, Buildpacks
3. Test Stage: Automated Quality Assurance
- Process: The newly built artifact undergoes a series of automated tests to ensure its quality and security. This includes:
- Unit Tests: Verifying individual components of the code.
- Integration Tests: Ensuring that different modules work together as expected.
- Security Scanning: Detecting vulnerabilities in the code and its dependencies.
- Tools: Selenium, JUnit, SonarQube, Clair
4. Deploy Stage: Releasing to Environments
- Process: Once the artifact passes all tests, it is deployed to a target environment. In a typical workflow, this involves deploying to a staging environment for final validation before being promoted to production. For Kubernetes, this involves applying manifest files (e.g., YAML) or using a package manager like Helm.
- Tools: Kubectl, Helm, Argo CD, Devtron
5. Monitor and Rollback Stage: Ensuring Stability
- Process: After deployment, the application is continuously monitored for performance and health. If issues are detected, the pipeline can automatically roll back to a previous stable version to minimize impact on users.
- Tools: Prometheus, Grafana, AppDynamics
Now, let us discuss why to use CI/CD pipelines for Kubernetes applications.
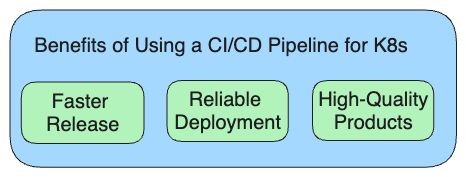
Benefits of Using a CI/CD Pipeline for Kubernetes
Implementing a CI/CD pipeline for Kubernetes offers numerous benefits that drive business value:
- Faster Time to Market: Automating the release process significantly reduces the time it takes to get new features and bug fixes to users.
- Reduced Costs and Risks: By catching bugs early and automating deployments, you can lower the cost of development and reduce the risk of production failures.
- Improved Developer Productivity: Automating repetitive tasks allows developers to focus on innovation and writing code.
- Enhanced Collaboration: A shared pipeline improves visibility and collaboration between development and operations teams.
- Greater Reliability: Automated testing and controlled deployments lead to more stable and reliable applications with less downtime.
Automate Your Kubernetes CI/CD Pipeline with Devtron
While building a CI/CD pipeline for Kubernetes from scratch is possible, it can be complex and time-consuming. Devtron is an open-source, Kubernetes-native platform that simplifies and automates the entire software delivery lifecycle.
With Devtron, you can:
- Set up a complete CI/CD pipeline in minutes.
- Leverage GitOps for declarative, version-controlled deployments.
- Gain a unified view of your CI/CD pipelines, from code to production.
- Utilize advanced deployment strategies like blue-green and canary with ease.
- Integrate with your favorite tools for security, monitoring, and collaboration.
Watch the video to see how easy CI/CD can be for Kubernetes with Devtron.
Ready to streamline your Kubernetes deployments? Schedule a Demo with Devtron to see how you can build a powerful and efficient CI/CD pipeline for Kubernetes.
FAQ
What is the main purpose of a CI/CD pipeline?
The main purpose of a CI/CD pipeline is to automate the software delivery process. It standardizes the steps for building, testing, and deploying code, which helps to minimize manual errors, increase efficiency, and enable development teams to release new features and bug fixes to users more quickly and reliably.
What is the difference between CI and CD?
- Continuous Integration (CI) is the practice of automatically building and testing code every time a developer merges changes into a central repository. The goal is to detect and address integration issues early.
- Continuous Delivery (CD) extends CI by automatically deploying every validated code change to a testing or staging environment, ensuring it is always ready for production release.
- Continuous Deployment (CD) goes one step further by automatically deploying every change that passes all tests directly to production without human intervention.
Why is a CI/CD pipeline important for Kubernetes?
Kubernetes, while powerful, involves managing numerous complex components. A CI/CD pipeline automates the entire process of deploying applications to Kubernetes, which is crucial for:
- Managing Complexity: It handles the intricate steps of creating container images, managing Kubernetes manifest files, and deploying to clusters.
- Ensuring Consistency: It guarantees that every deployment follows the same standardized, error-free process.
- Enabling Advanced Deployments: It facilitates sophisticated release strategies like blue-green and canary deployments, which are essential for maintaining high availability in a Kubernetes environment.
What is the difference between a CI/CD pipeline and DevOps?
DevOps is a broad cultural and professional movement that aims to break down silos between development (Dev) and operations (Ops) teams. It emphasizes collaboration, communication, and automation. A CI/CD pipeline is a foundational tool and a practical implementation of DevOps principles, as it provides the automation necessary to bridge the gap between development and operations. You can't effectively practice DevOps at scale without a solid CI/CD pipeline.