If you’ve worked with Kubernetes, chances are you’ve used Helm. It is the go-to package manager for deploying, managing, and upgrading applications using Helm charts. Helm simplifies complex Kubernetes configurations by packaging resources into charts. But as your setup grows, things can get complicated.
Imagine handling dozens of Helm charts across multiple environments—each requiring specific configurations and dependencies. Manually tracking these changes quickly becomes error-prone and time-consuming. Helm is great, but it can get tricky when managing big deployments with lots of charts that depend on each other.
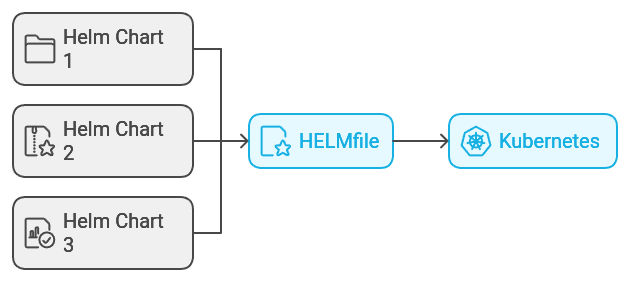
This is where Helmfile steps in. It helps you manage multiple Helm charts and environments from a single file, keeping everything organized and consistent. With Helmfile, you can easily handle complex deployments and focus on what matters most.
In this blog, we will take understand what Helm files are and how they help in managing Helm charts. Also, we will look at the feature of Devtron which acts similarly to Helm files and allows users to manage Helm charts more efficiently.
If you’re unfamiliar with Helm, check out our Introduction to Helm blog to get started.
Introduction
Helmfile is like the Terraform for Helm or Docker-Compose for Helm. Just as Terraform lets you define and manage infrastructure declaratively, and Docker-Compose simplifies working with multiple containers, Helmfile does the same for Helm charts in Kubernetes. It’s the tool you reach for when managing multiple charts with Helm isn’t enough, and you’re ready for something that handles complexity with ease.
At its core, Helmfile is a command-line tool that offers a declarative approach to managing Helm releases as code. With Helmfile, you can define all your Helm charts, releases, and configurations in a single file called helmfile.yaml, which allows you to orchestrate multiple Helm deployments in a structured and repeatable way. It separates environment-specific and general configurations, which means you can maintain different settings for production, staging, or development environments without duplicating files. For example, imagine you have two environments: production and staging. In your helmfile.yaml, you can specify that the production environment uses a different URL and more resources, while staging uses a test URL and fewer resources. Helmfile helps you manage these differences easily in one file without needing to create separate files for each environment.
Structure Of Helmfile And How It Works
So far, we’ve discussed what is Helmfile and why we need it. Now, let’s discuss its structure and how it works. Helmfile revolves around a single declarative configuration file, typically named helmfile.yaml. This file is where you define all the Helm charts you want to deploy, along with their configurations, values, and environments.
The basic structure of a helmfile.yaml includes:
- Releases: These define the Helm charts to deploy, their names, and versions.
- Environments: This allows you to customize settings for different environments, like production and staging.
- Values: You can specify custom configuration values for your charts.
Here’s a quick example of helmfile.yaml file to make it clearer:
environments:
  staging:
    values:
      - values-staging.yaml
  production:
    values:
      - values-production.yaml

releases:
  - name: my-app
    chart: stable/my-app
    namespace: default
    values:
      - common-values.yaml

  - name: my-database
    chart: stable/mysql
    namespace: default
    values:
      - common-values.yaml
      - database-values.yaml
Let’s understand how this YAML file works:
- Environments: This example has two environments—staging and production. Each environment has its own set of values (values-staging.yaml for staging and values-production.yaml for production), making it easy to keep things organized and avoid duplication.
- Releases: There are two releases defined:
- my-app: This deploys the stable/my-app chart with shared settings from common-values.yaml.
- my-database: This deploys the stable/mysql chart with shared settings from common-values.yaml and some additional database-specific configurations from database-values.yaml.
- What Happens: When you run a command like helmfile sync, Helmfile reads your
helmfile.yamlfile, applies the right values for the environment you choose (like staging or production), and deploys the charts exactly as defined.
So, instead of manually tweaking Helm commands or handling multiple files, Helmfile gives you one place to manage everything. It keeps your deployments consistent and makes life a whole lot easier when you’re working across different environments.
Key Features Of Helmfile
Now that you have a clear idea of what Helmfile is and how it’s structured, let’s explore its key features and the reasons why Helmfile stands out compared to managing Helm charts manually.
Labels In Helmfile
Labels in Helmfile are like tags you attach to your Helm releases to group and manage them easily. They let you target specific releases when running commands, which is super helpful when managing multiple releases.
Here’s a simple helmfile.yamlbreak down with labels:
releases:
  - name: frontend
    chart: stable/frontend
    labels:
      env: production

  - name: backend
    chart: stable/backend
    labels:
      env: staging
Let’s break down the above YAML file
- frontend release: This is a release for the frontend application, labeled with env: production, indicating that it belongs to the production environment.
- backend release: This is a release for the backend application, labeled with env: staging, indicating that it belongs to the staging environment.
Now that we've added labels to the releases, we can use the --selector flag to target releases based on their labels when running commands:
- Sync only production releases:
helmfile --selector env=production sync
This command will deploy only the releases labeled as env=production, which in our case would be the frontend release.
- Sync only staging releases:
helmfile --selector env=staging sync
This command will deploy only the releases labeled as env=staging, which in our case would be the backend release.
Environments in Helmfile
The Environments feature in Helmfile helps you define and manage configurations for different environments, such as staging, production, or development, all within a single helmfile.yaml. This feature allows you to maintain different production, staging, or development environment settings without duplicating files.
Here’s an example explaining this feature:
environments:
  staging:
    values:
      - values-staging.yaml
  production:
    values:
      - values-production.yaml

releases:
  - name: frontend
    chart: stable/frontend
    namespace: default
  - name: backend
    chart: stable/backend
    namespace: default
In the above helmfile.yaml file
- Environments Section:
- Specifies configurations for each environment (e.g., staging and production).
- Links each environment to specific values files (values-staging.yaml and values-production.yaml).
- Releases Section:
- Defines your Helm releases (like frontend and backend) in one place.
- The settings change based on the environment you choose.
We can now select our desired environment when running Helmfile commands by using the --environment flag:
- Deploy to staging:
helmfile --environment staging sync
This uses values-staging.yaml for staging-specific configurations.
- Deploy to production:
helmfile --environment production sync
This uses values-production.yaml for production settings.
Environment Variables in Helmfile
The Environment Variables feature in Helmfile allows you to dynamically inject values into your helmfile.yaml using variables defined in your system's environment. This is particularly useful for managing sensitive information (like secrets or API keys) without hardcoding values.
Here’s an example to describe this feature:
releases:
  - name: my-app
    chart: stable/my-app
    namespace: {{ requiredEnv "NAMESPACE" }}
    values:
      - replicas: {{ env "REPLICA_COUNT" | default "2" }}
In the above helmfile.yaml file
- requiredEnv: Ensures the
NAMESPACEvariable is set; otherwise, an error occurs. - env with default: Uses
REPLICA_COUNTor defaults to 2 if not set.
To apply this Helmfile, start by setting the required environment variables. You can do this either manually or by loading them from a .env file.
- Setting it manually:
export NAMESPACE=production
export REPLICA_COUNT=5
helmfile sync
- If using a
.envfile:
source .env
helmfile sync
This ensures Helmfile has the necessary configurations to deploy your releases correctly.
Secrets Management in Helmfile
When deploying applications, it's crucial to handle sensitive information like API keys, database passwords, and certificates securely. Helmfile provides Secrets Management to securely handle such sensitive data by integrating with secret management tools like Sops.
Here is an example of how to use Helmfile integrated with Sops for secret management:
- Use Sops to create an encrypted secrets file:
sops --encrypt --output secrets.yaml <<EOF
db_password: my-secret-password
api_key: my-api-key
EOF
The sops command encrypts the db_password and api_key values and stores them in a secrets.yaml file in an encrypted format.
- In your helmfile.yaml, you can then include the encrypted
secrets:
releases:
  - name: my-app
    chart: stable/my-app
    values:
      - values.yaml
      - secrets.yaml
The helmfile.yaml file references the secrets.yaml, which contains the encrypted values, and Helmfile will decrypt them during deployment.
Helm vs. Helmfile: A Quick Comparison
Until now, we’ve discussed Helmfile and its key features, including how it simplifies managing multiple Helm releases, supports environment-specific configurations, and enhances security through secrets management. Now, let's do a quick comparison between Helm and Helmfile, highlighting their core differences and how they complement each other in Kubernetes deployments.
| Features | Helm | Helmfile |
|---|---|---|
| Purpose | Package manager for Kubernetes, managing Helm charts. | Tool to manage multiple Helm releases declaratively. |
| Release Management | Manages individual Helm releases. | Manages multiple Helm releases with a single file. |
| Environment Support | Limited support for different environments. | Supports defining multiple environments with custom values. |
| Secrets Management | No built-in support for secrets. Relies on Kubernetes secrets or external tools. | Supports secrets management using tools like Sops or Kubernetes secrets. |
| Use Case | Ideal for managing individual Helm charts or simple deployments. | Ideal for complex scenarios with multiple charts or environments. |
Common Helmfile Commands
Helmfile offers several commands to help you manage your Helm releases in an organized way. Let’s go over some of the most common commands you'll use when working with Helmfile:
Managing Releases
To ensure your releases are in the desired state, you can use these commands to install or upgrade them as needed
helmfile sync
Running this will ensure your Helm releases are aligned with your Helmfile configuration, installing or upgrading them as needed.
helmfile apply
This command will ask for your approval before executing the changes, giving you a moment to review what’s about to happen.
Previewing Changes
Use this command to preview what changes will be made before actually deploying them, ensuring you can review differences before applying updates.
helmfile diff
This command shows a detailed preview of the differences between your current releases and the state defined in helmfile.yaml .
Deleting Releases
When you need to clean up or remove releases, this command will help you delete them from your Kubernetes cluster.
helmfile destroy
This command removes all releases defined in your helmfile.yaml from your cluster, essentially uninstalling everything.
Simplifying Helm Releases with Chart Group Using Devtron
In Devtron, Chart Group is a feature that allows users to group and manage multiple Helm charts as a single logical unit, enabling streamlined deployments of complex, multi-service applications. Instead of deploying individual Helm charts separately, Chart Groups help organize and deploy related charts together, simplifying the management of dependencies and configuration across services.
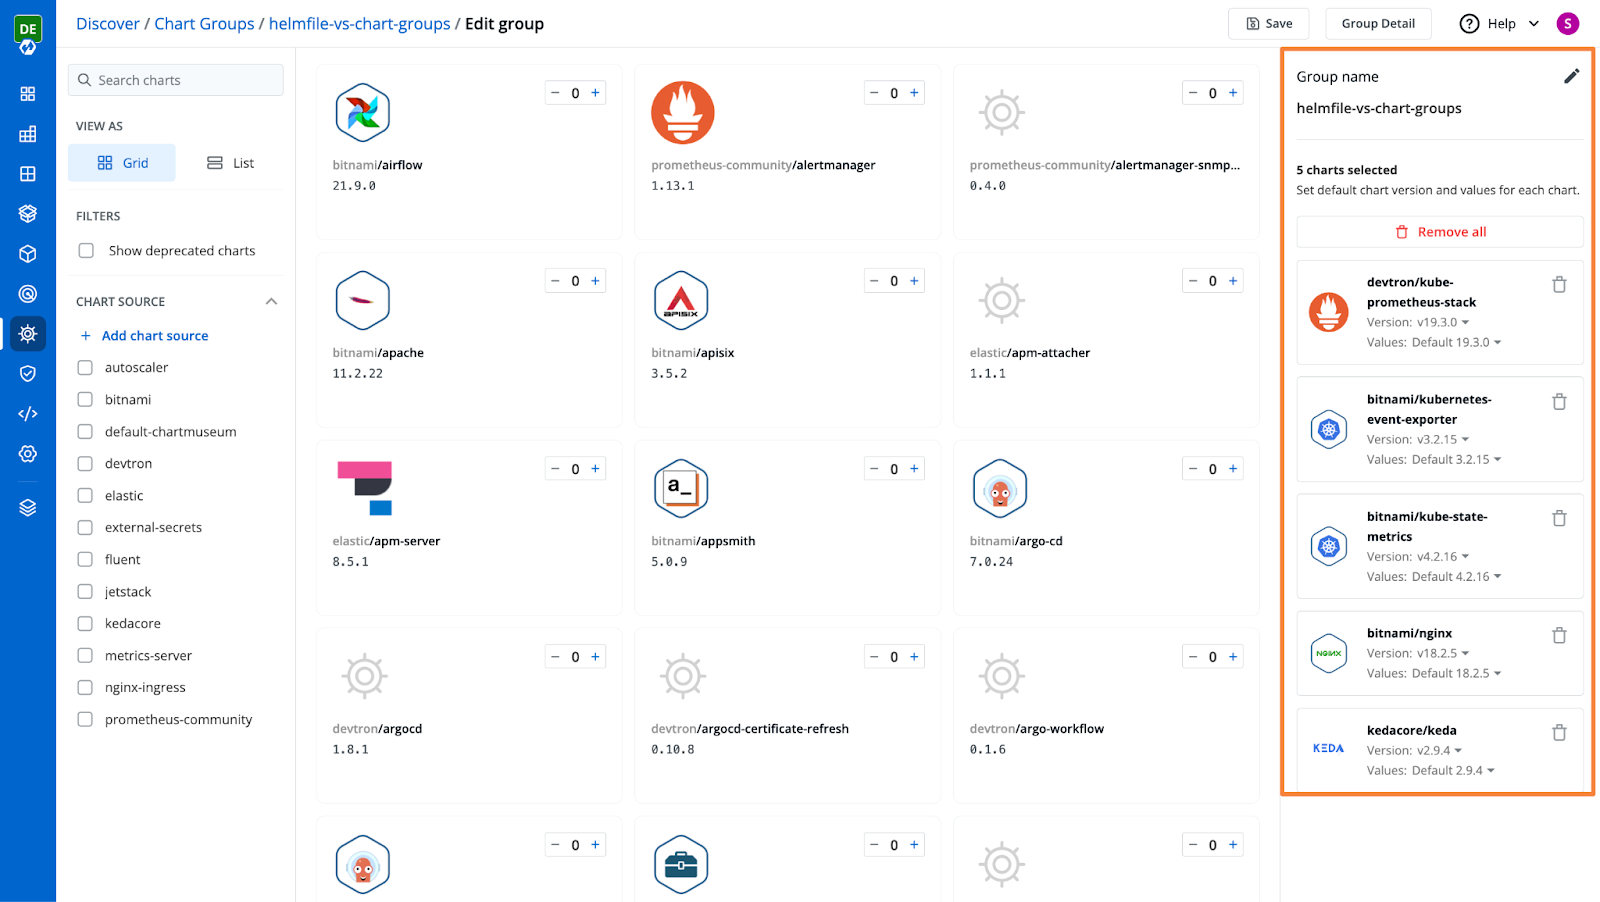
Unlike Helmfile, which requires developers to define and manage complex YAML files and scripts for Helm releases, Chart Groups offer a graphical interface integrated seamlessly with Devtron's CI/CD pipelines. This reduces the operational overhead of managing YAML files and commands, especially for teams focused on delivering cloud-native applications without diving deep into scripting or CLI-based tools. By leveraging Devtron's built-in environment management, approval workflows, and automation features, Chart Groups streamline the deployment process and make it easier to handle multi-chart applications. This contrasts with Helmfile’s more flexible but complex configuration, which may be overwhelming for teams seeking simplicity. For organizations already using Devtron, Chart Groups eliminate the need for external tools like Helmfile, bringing everything into a unified ecosystem and saving significant time and effort.
To learn more about how to use chart groups, please check out the chart group documentation by Devtron Inc.
Conclusion
In summary, we've explored how Helmfile makes managing Helm releases in Kubernetes much simpler. We talked about its key features, like handling multiple releases, managing different environments, and securely handling secrets. We also covered some essential commands such as helmfile sync, helmfile diff, and helmfile destroy, which help you keep everything in sync, review changes before applying them, and easily clean up when needed. Helmfile takes the complexity out of managing Kubernetes deployments, offering a more organized and efficient way to work with Helm charts.
FAQ
What is a Helm file in Kubernetes?
A Helm file defines the configuration and resources for deploying applications to Kubernetes using Helm charts.
What does a Helm chart include?
A Helm chart includes templates, values.yaml, and metadata files used to package and deploy applications consistently.
What is the purpose of values.yaml in Helm?
The values.yaml file allows users to customize configuration settings without modifying the main chart templates.
How do Helm files simplify Kubernetes deployments?
Helm files automate complex Kubernetes setups by templating manifests, making deployments reusable, versioned, and easy to manage.

