1. Learn how to build production-grade CI/CD pipelines with Jenkins for Kubernetes.
2. Understand why Jenkins excels at Continuous Integration (CI) but struggles with Continuous Deployment (CD).
3. Discover key Jenkins components and pipeline stages with Docker, SonarQube, and GitHub integrations.
4. Identify the limitations of Jenkins for managing CD at scale in cloud-native environments.
5. Explore how Devtron unifies CI/CD, governance, and AI-driven operations into one Kubernetes platform.
Introduction
In today’s fast-paced world of software development, organizations adopt DevOps practices to innovate faster while maintaining reliability. Among these practices, Continuous Integration (CI) and Continuous Deployment (CD) play pivotal roles by automating code builds, testing, vulnerability scans, and deployments, accelerating delivery cycles and reducing human error.
In this blog, we’ll explore how to set up a production-ready CI/CD pipeline with Jenkins, analyze its strengths and limitations, and see how platforms like Devtron extend Jenkins with modern, Kubernetes-native deployment capabilities.
Continuous Integration and Continuous Deployment (CI/CD)
Jenkins has been used for setting up CI/CD pipelines for a long time. Originally, Jenkins was developed for on-premises environments, but over time, with an increase in cloud-native adoption, it has continued to be one of the most popular tools used for CI/CD in cloud-native environments. Is it the right tool for continuous deployment in cloud-native environments? In this blog, we'll further answer the question and set up the CI/CD pipelines, but before moving there, let's take a quick re-cap on continuous integration (CI) and continuous deployment (CD).
Continuous Integration (CI)
Continuous Integration (CI) is the DevOps practice streamlining the development process, enabling developers to collaborate effectively and accelerate software delivery using automation at multiple stages. At the CI phase, multiple developers frequently keep committing changes to the central repository, once the code is committed the build and test stage get triggered automatically. The automated process ensures that best practices are followed, maintains the quality of code, and ensures that the code changes are integrated smoothly with existing code.
Continuous Deployment (CD)
The continuous deployment (CD) stage of the software lifecycle enables rapid and reliable deployment of the software changes to target environments. At the Continuous Deployment stage once the code changes are successfully passed the Continuous Integration phase is automatically or with manual approvals get deployed. The CD allows teams to rapidly deliver features and bug fixes to the end users, reduce the risk of human errors in the deployment process, and maintain the stability of production environments.
What is Jenkins?
Jenkins is an open-source tool from the CNCF landscape for managing continuous integration (CI) in the application development lifecycle. By using Jenkins you automate the stages like build, test, security scans, docker builds, etc. All these stages get triggered as the developer commits the code changes to the central code repository i.e. GitHub, Bitbucket, and GitLab. The core of Jenkins which executes all these automations is the Jenkins pipeline which can be defined in two ways: Jenkins file or Groovy script. We will discuss the Jenkins file and Groovy scripts further in this blog in detail. Jenkins also provides you with a user-friendly interface and robust plugin support, using them you will be able to connect multiple tools with Jenkins.
Jenkins Components
Jenkins consists of several key components that work together to provide a comprehensive solution for automating the build, test, and deployment processes. Let's explore the main components of Jenkins:
Jenkins Controller
Jenkins Controller is the central Jenkins server that manages CI builds for distributed systems. In distributed systems, the Controller acts as the brain, determining which builds are executed on which Jenkins Agent. It also handles crucial tasks such as user authentication, authorization, and build distribution.
For instance, in a case with four Jenkins Agents and one Controller, the Controller will be deciding which of the four Jenkins Agents will execute the build, the actions taken by Jenkins Controller are based on the provided configurations and Jenkins pipeline.
Jenkins Agent
Jenkins Agent formerly known as Jenkins Slave is a components that execute actions on behalf of the Jenkins Controller. Jenkins Agents take instructions from the Jenkins Controller and execute them accordingly. We can run these Jenkins Agents over local systems, docker containers, and on Kubernetes using containers the only prerequisite for Jenkins Agents is the system should have Java installed on it.
Jenkins Project (Jenkins Jobs)
Jenkins Projects previously known as Jenkins Jobs allow users to execute different tasks. It's a type of automation work that the user wants to get done using Jenkins, in case the user wants to set a Multibranch Pipeline for CI they can opt out of the Multibranch Pipeline project.
Jenkins Plugins
Jenkins has a robust extension and plugin system, enabling integration with numerous external tools like SonarQube for code scanning. These are community-developed modules that seamlessly integrate with Jenkins. By leveraging these plugins, developers can effortlessly incorporate external tools into their CI pipelines, enhancing functionality and streamlining workflows.
Jenkins Pipeline
Jenkins Pipelines are declarative workflows for CI processes, allowing developers to define multiple stages for automated CI execution. Each stage performs specific tasks such as code building, security, code scanning, or creating Docker images. Jenkins Pipelines can be defined in two ways:
- Jenkinsfile: A file containing the declarative Jenkins pipeline, stored in a version control system like GitHub, Bitbucket, or GitLab.
- Jenkins Dashboard: Directly writing declarative pipelines on the Jenkins dashboard interface.
How Jenkins Work
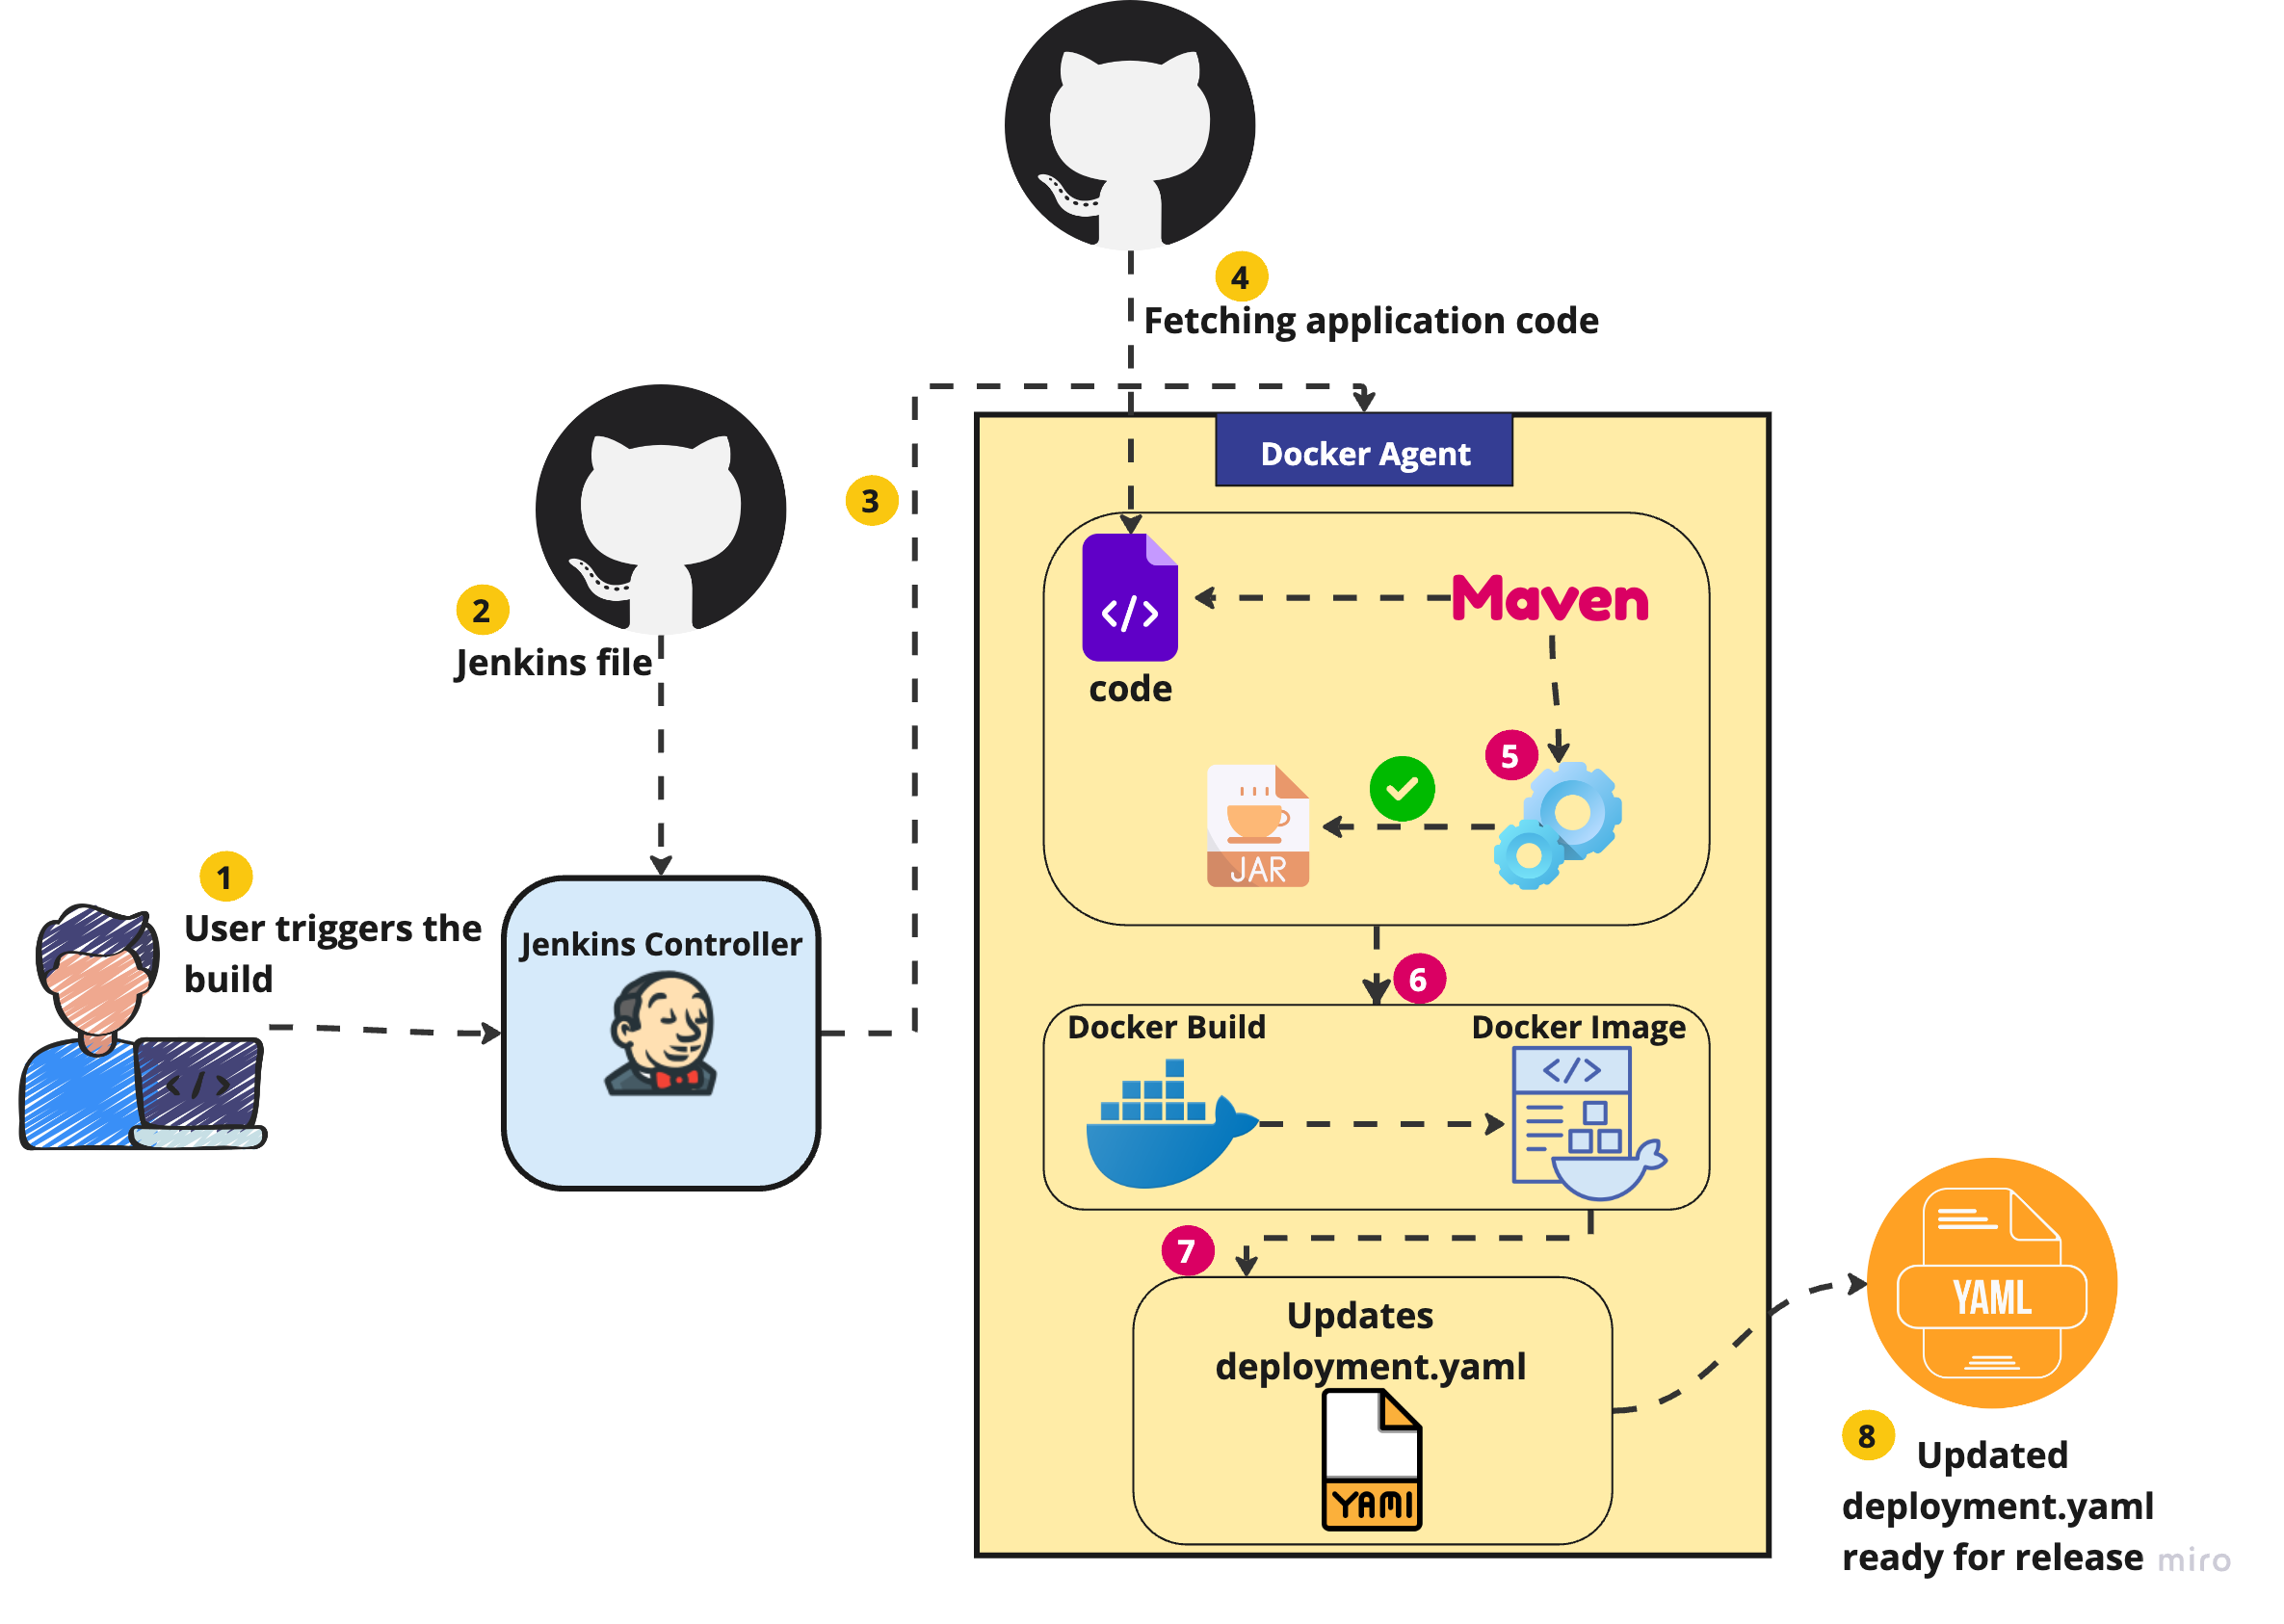
- The developer commits the code to the central repository which triggers the Jenkins build.
- Jenkins Controller fetches the Jenkins file from version control and starts executing the stages accordingly.
- According to the Jenkins file, the Jenkins Controller launches the Jenkins Agent which will be executing the CI build.
- Once the Jenkins Agent is started, it fetches the code from a central repository.
- The code gets built as defined in the Jenkins file.
- Once the code gets built, for instance, once the .jar file is created the next stage is executed i.e. Docker build. On completion of this Docker build a Docker image is generated which can be pushed on container registries.
- A stage can be defined to update the deployment of the application to the Kubernetes environment.yaml file with the latest container image.
- Once the deployment.yaml is updated with the latest version of the container image it's ready for getting deployed on target environments.
How to Create a CI/CD Pipeline with Jenkins
Now, let's get our hands dirty and set up the Jenkins CI/CD pipeline to deploy an application onto Kubernetes
Step 1: Install Jenkins
Before diving into writing our Jenkins pipeline, we need to set up an environment to support our CI/CD process. This setup will include static code analysis with SonarQube and Docker for Jenkins Agent.
Spin Up a Cloud VM: First, create a virtual machine in your preferred cloud platform. This VM will host our Jenkins server.
Install Java: Once the VM is up and running, install Java on the VM as Java is required for running Jenkins.
Install Jenkins: Once Java is installed, proceed with the installation of Jenkins. Refer to Jenkins's installation documentation.
Install SonarQube: As we will be running a static code analysis over code, install SonarQube on our virtual machine. The SonarQube dashboard can be accessed over http://<virtual machine ip address>:9000
The dashboard can be accessed with default credentials,
username: admin
password: admin
Install Docker: For our application build, we will be using Docker agent, for which we need to install Docker.
Step 2: Configuring Jenkins
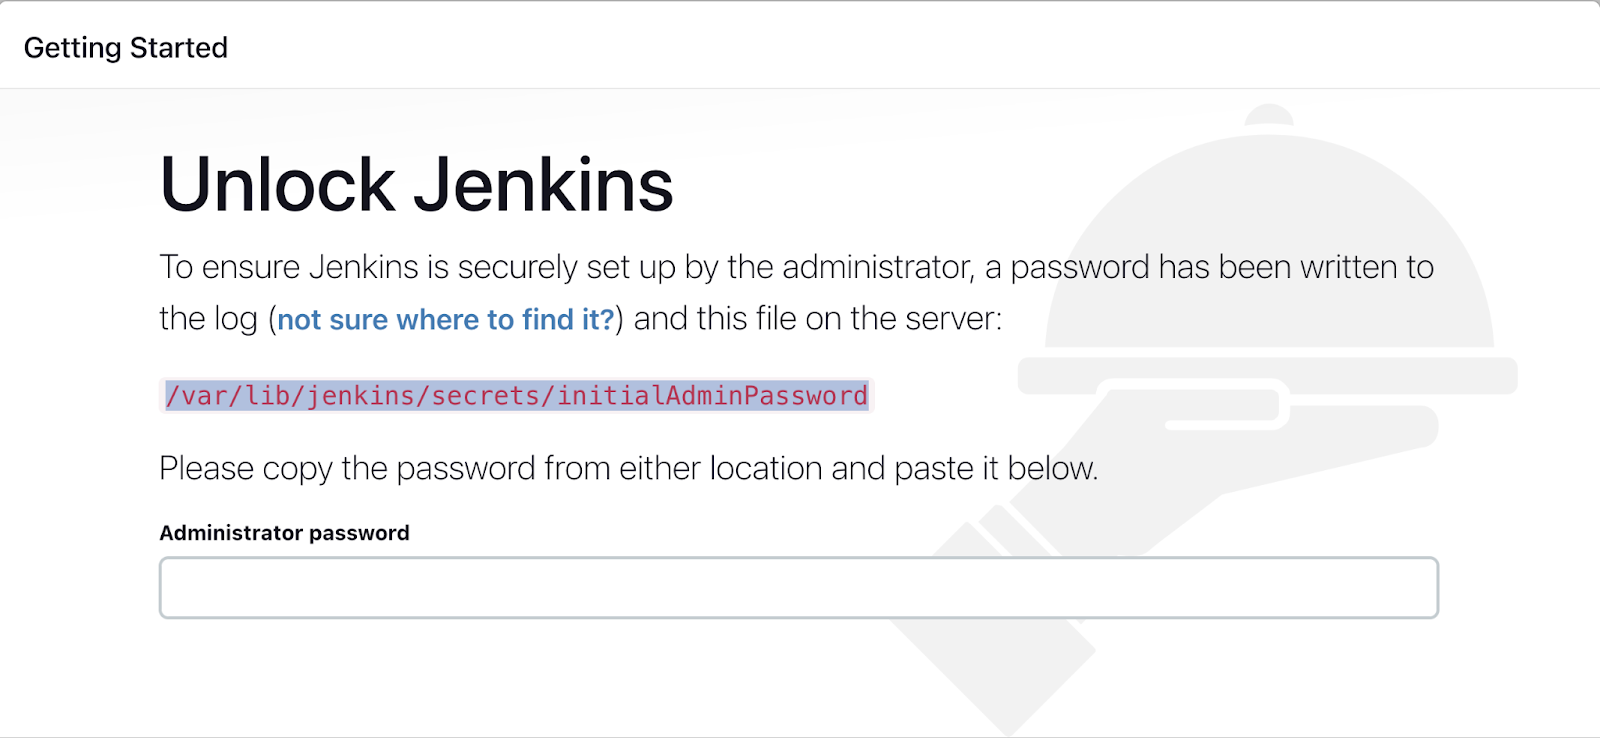
Accessing the Jenkins dashboard. Once Jenkins is installed the dashboard can be accessed over port no. 8080. To access the Jenkins dashboard navigate to http://<server ip address>:8080
Enter the admin password which can be found in the Jenkins logs at the time of installation of Jenkins. Either you can navigate to the initialAdminPassword file where the password is stored, which can be accessed by sudo cat /var/lib/jenkins/secrets/initialAdminPassword
Once we enter the password of admin, we need to install some suggested plugins or move by selecting the required plugin installation.
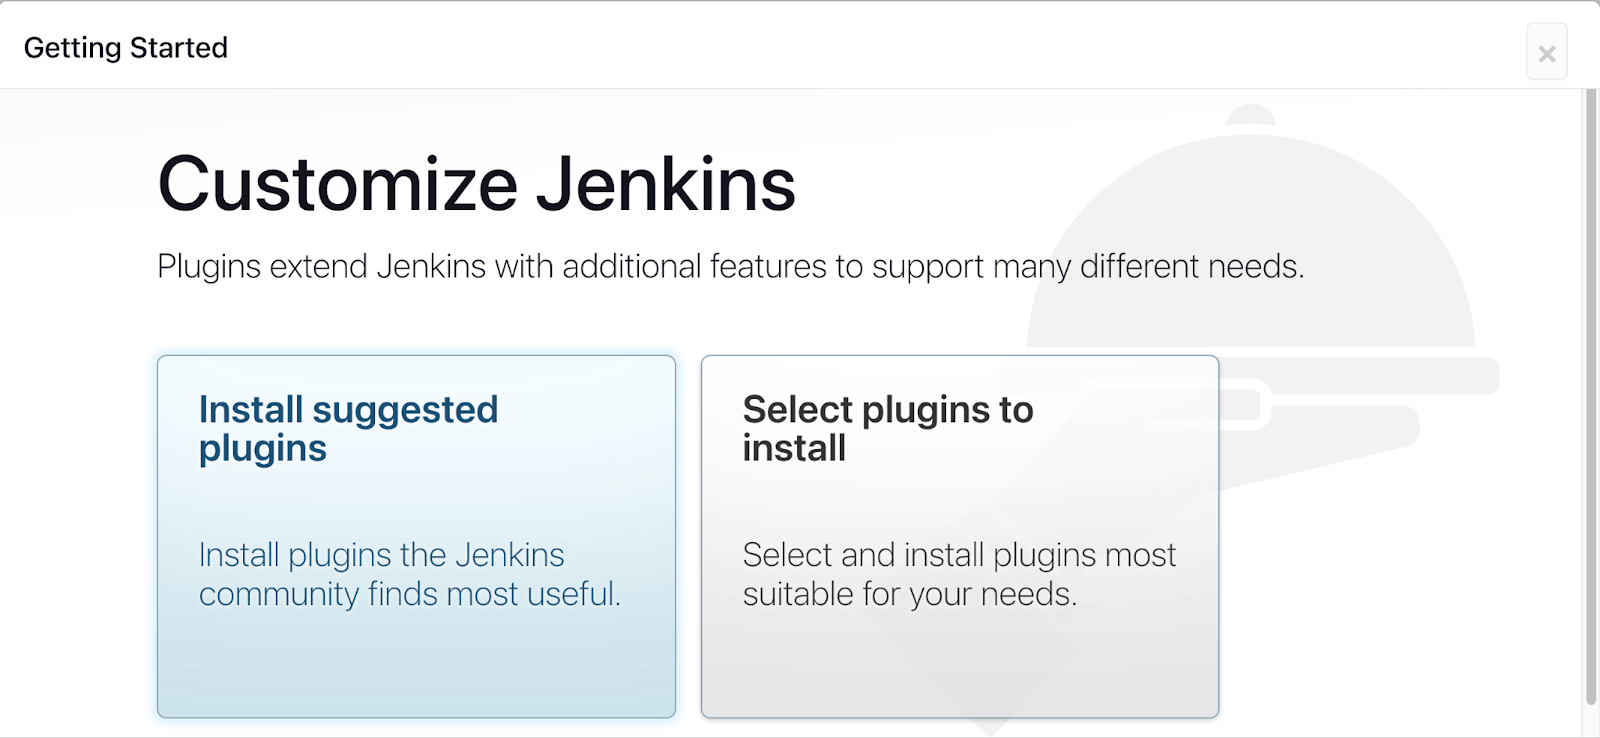
Create an Admin user, Before accessing the actual Jenkins dashboard we need to create a new user with a password and email of our choice (This step can be skipped).
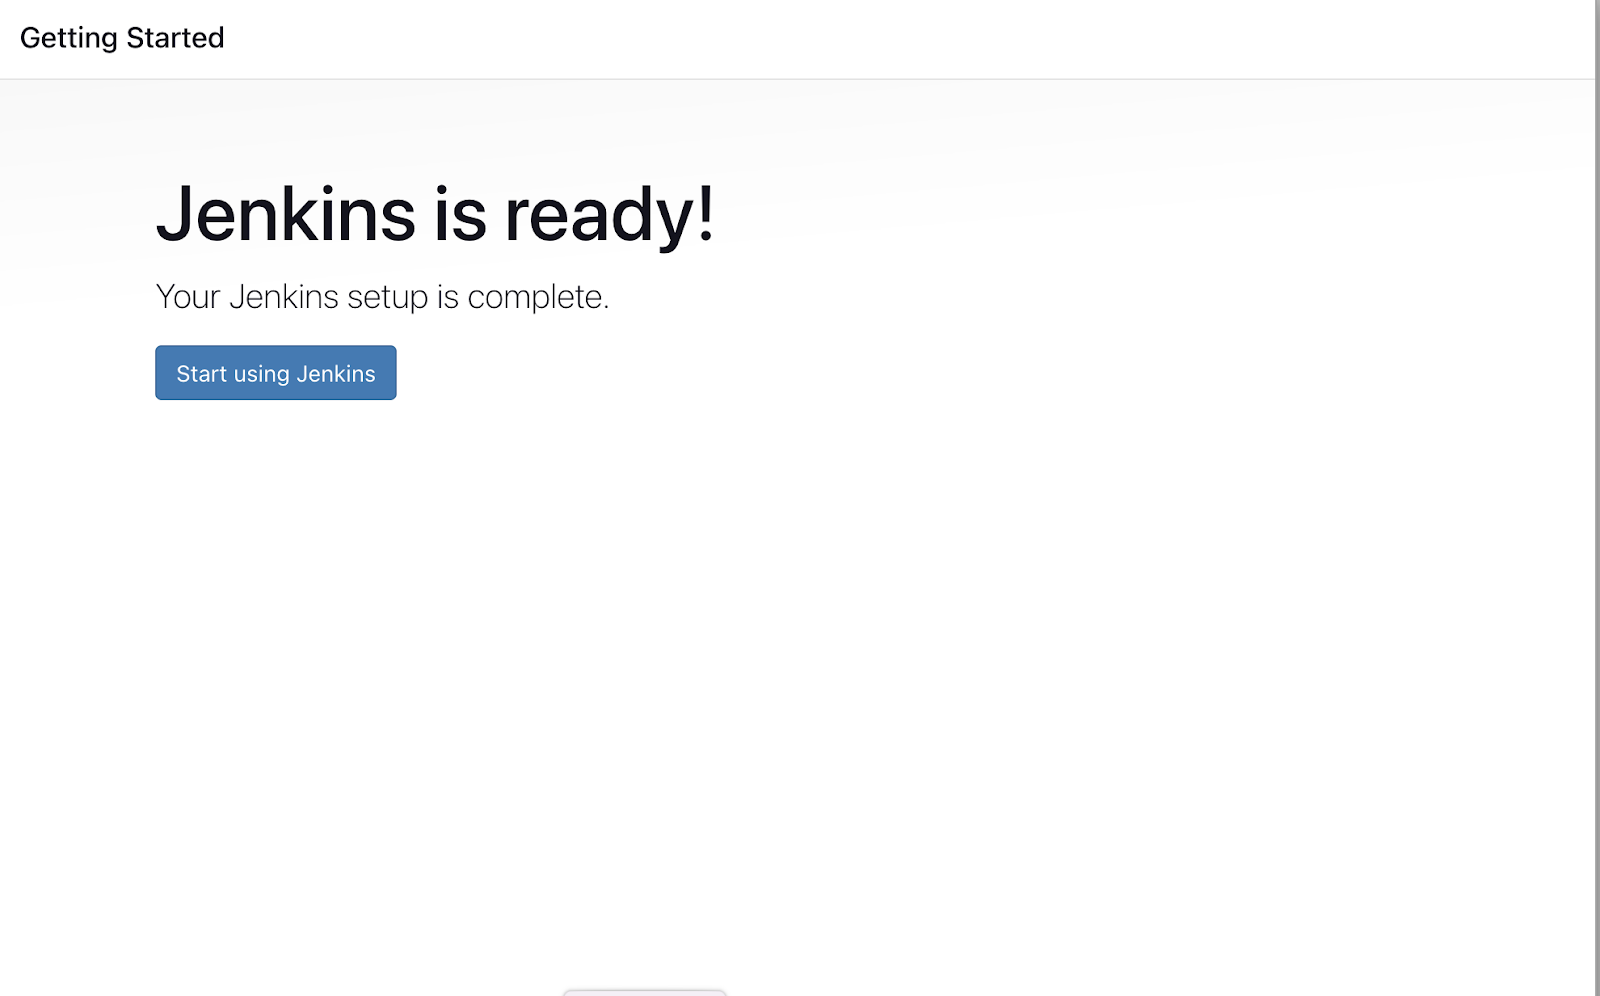
Now we are all set to access our Jenkins dashboard and execute our build pipeline.
Now, let's install some more plugins to execute our Jenkins pipeline smoothly. (e.g., Docker Pipeline, GitHub, SonarQube Scanner)
On Jenkins dashboard navigate to Manage Jenkins > Plugins > Available Plugins, and install the following plugins. Docker Pipeline, Github, SonarQube Scanner.
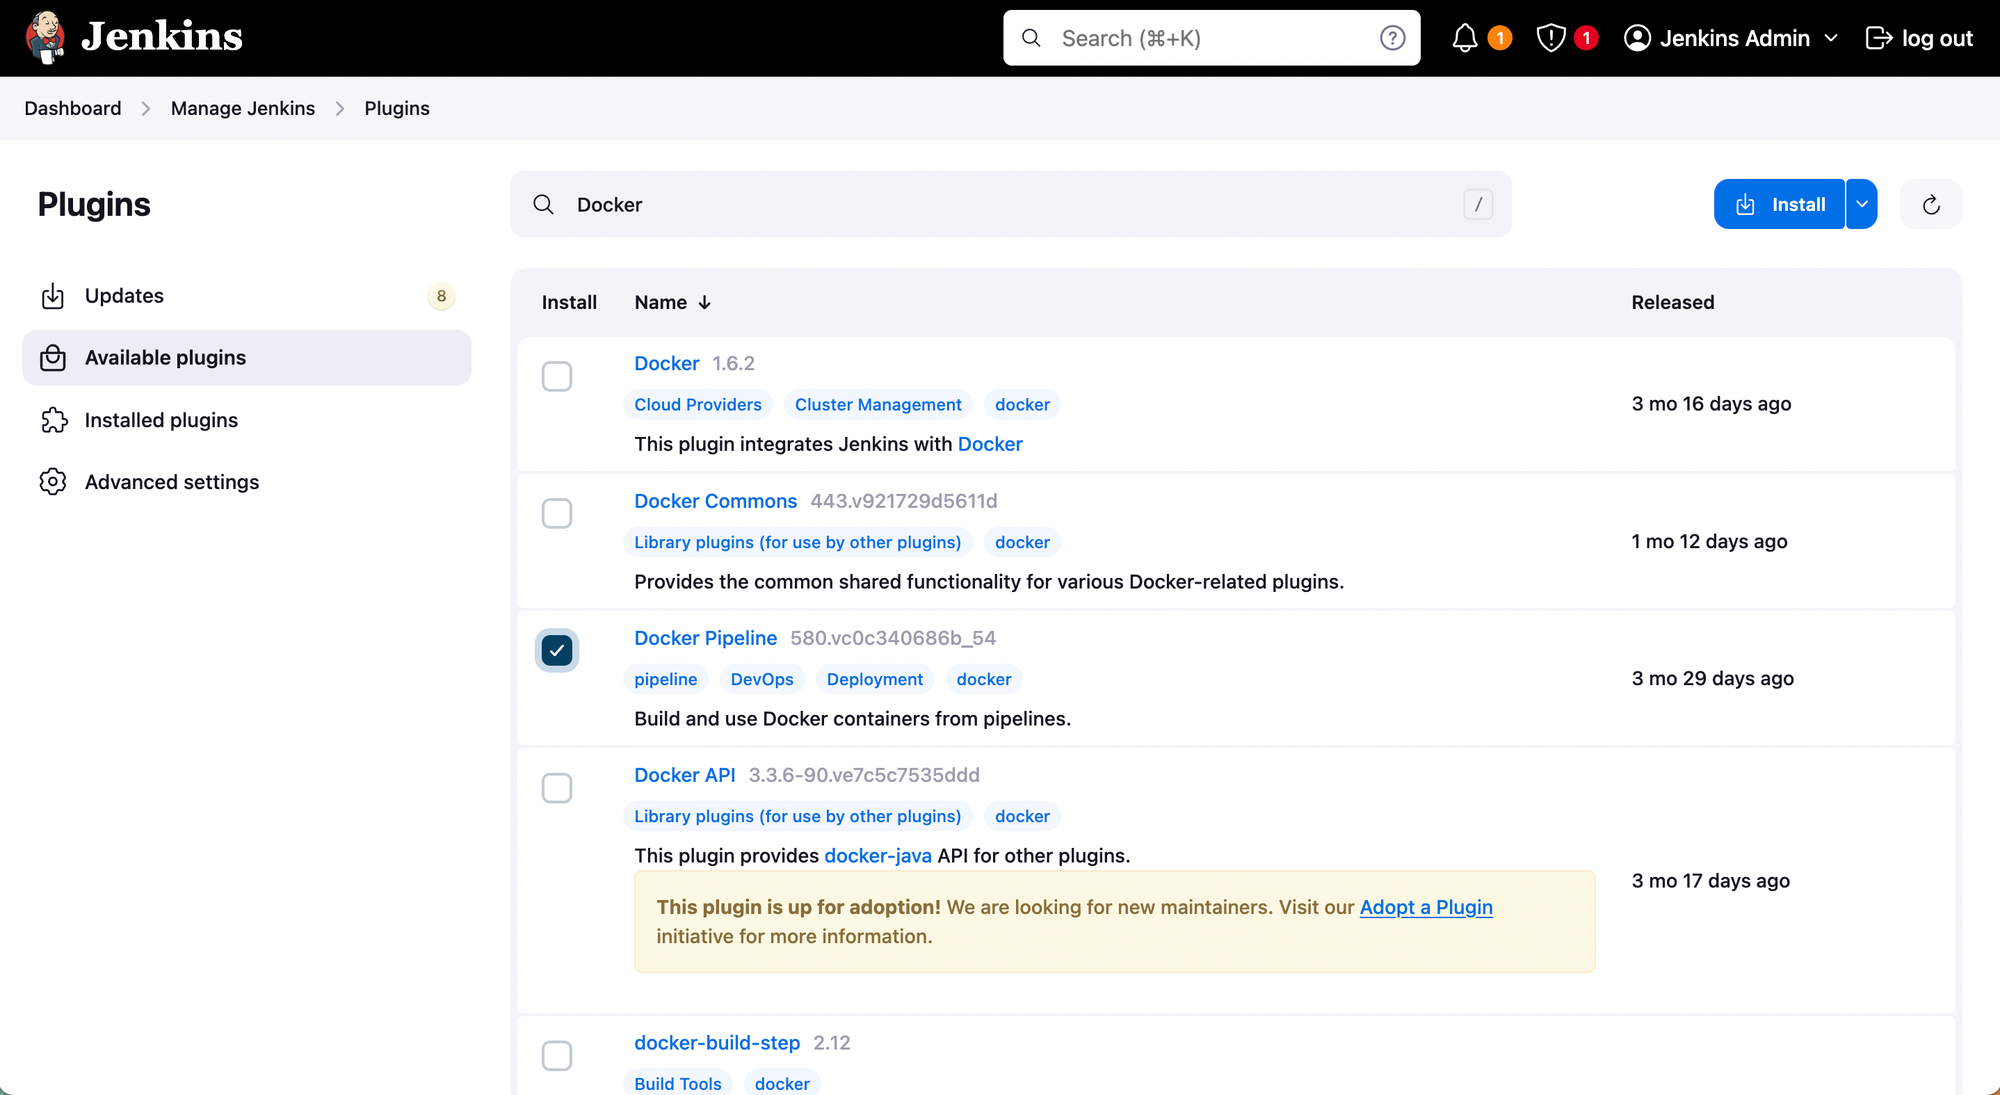
Note: Post installation of the plugins, restart of the Jenkins server is recommended.
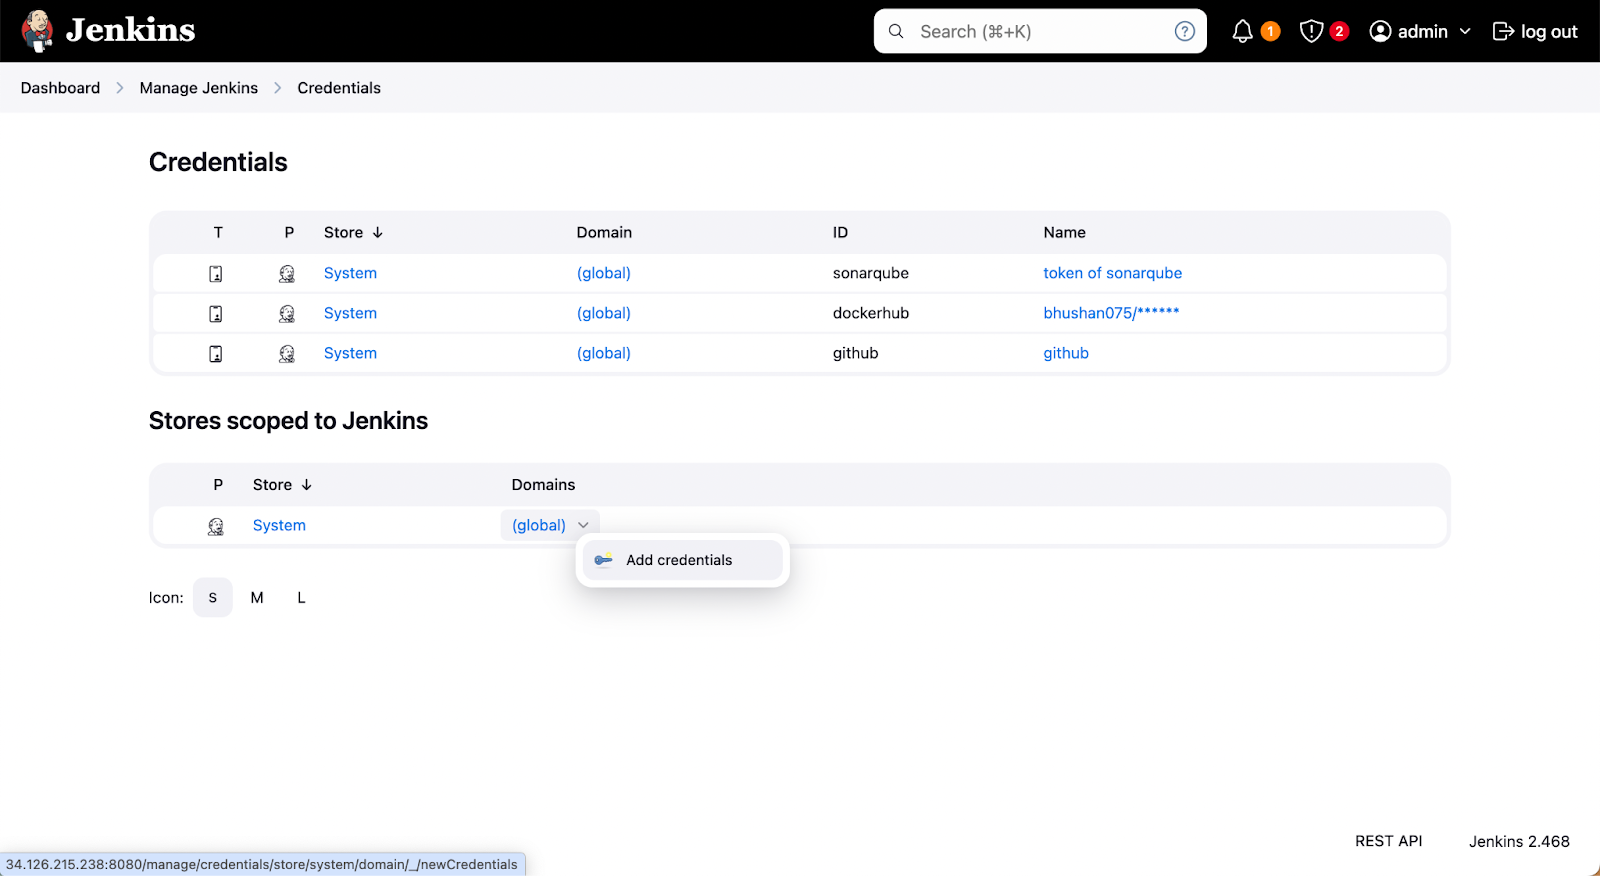
As we will be using external tools with Jenkins we need to provide credentials so that Jenkins can access them or the required files. Here, we will provide credentials for Docker (for Jenkins Agent), GitHub (to access the application code), and SonarQube (to perform static code analysis).
Navigate to Manage Jenkins > Credentials > Add credentials. Choose the scope of credentials, and paste the token/password in place of the password. Set an ID for unique identification of credentials which can be used as an environment variable.
Step 3: Setting Jenkins Pipeline
Jenkins pipeline is a declarative approach to defining continuous integration and delivery processes. These pipelines are generally written in Groovy scripts, these pipelines consist of multiple stages that execute sequentially. Common stages include building the application, performing static code analysis, creating Docker images, and pushing those images to repositories like Docker Hub. The declarative nature of the Jenkins pipeline provides us flexibility and capabilities to integrate multiple tools in a single workflow It also provides us with easily maintainable CI/CD workflows.
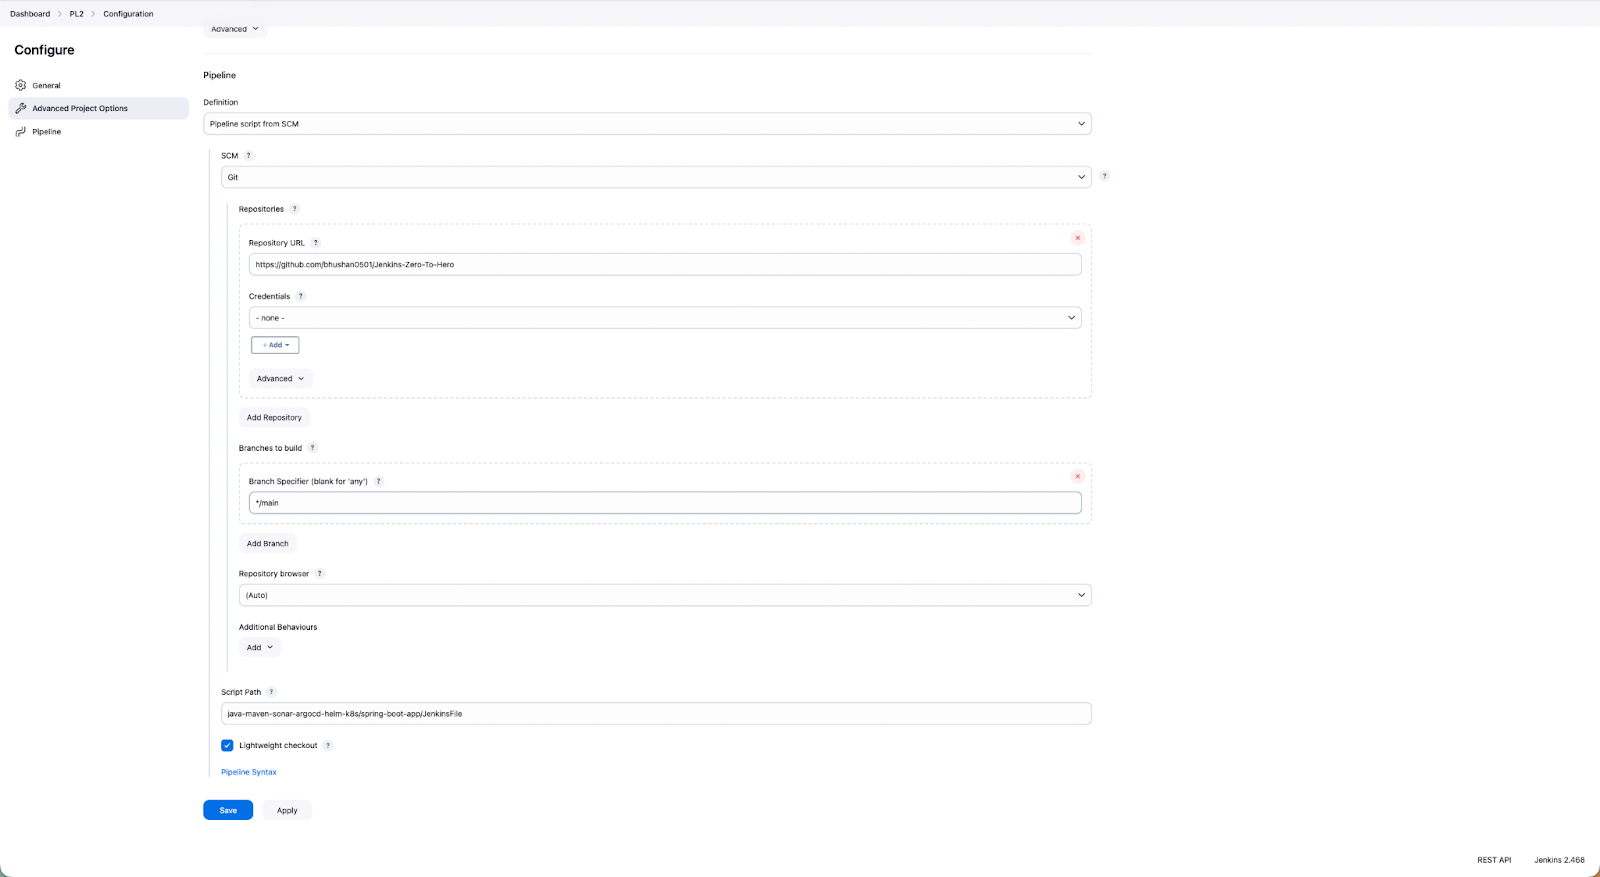
Jenkins offers two methods for configuring pipelines: you can either create the pipeline directly using Pipeline script on the Jenkins dashboard or store the pipeline script in a Jenkinsfile within a Git repository i.e. Pipeline script from SCM. For this blog, we will be using the Pipeline script from SCM.
- For configuring the Jenkins pipeline navigate to Dashboard > New Item > Enter an item name > Pipeline > Ok.
- Under Advance Project Options, choose Pipeline as Pipeline script from SCM > Choose SCM > Under Repositories Provide a URL of Git Repository > Credentials if the repository is private > Branches to build > Script Path (provide the path of JenkinsFile from the repository).
Step 4: JenkinsFile
Let’s take a look at each stage of this Jenkins pipeline, and understand it:
Agent Configuration:
agent {
  docker {
    image 'base-docker-image'
    args '--user root -v /var/run/docker.sock:/var/run/docker.sock'
  }
}
A Jenkins agent is an environment that runs build jobs for the Jenkins server. These agents are used to offload the execution of the build job allowing parallel execution, efficient resource use, and scalability. In the above section, we are using Docker as an agent to execute the Jenkins builds, the builds will be executed on Docker containers, and once the build is complete the Docker container will be deleted.
Build and Test Stage:
stage('Build and Test') {
      steps {
        sh 'ls -ltr'
        // build the project and create a JAR file
        sh 'cd java-maven-sonar-argocd-helm-k8s/spring-boot-app && mvn clean package'
      }
    }
This stage of the Jenkins pipeline, execute the build for our application which generates a .jar file, and run the test cases.
Static Code Analysis:
stage('Static Code Analysis') {
      environment {
        SONAR_URL = "http://<ip-address-of-server>:9000/"
      }
      steps {
        withCredentials([string(credentialsId: 'sonarqube', variable: 'SONAR_AUTH_TOKEN')]) {
          sh 'cd java-maven-sonar-argocd-helm-k8s/spring-boot-app && mvn sonar:sonar -Dsonar.login=$SONAR_AUTH_TOKEN -Dsonar.host.url=${SONAR_URL}'
        }
      }
    }
At this stage, we will perform static code analysis using SonarQube which we have already configured on a virtual machine.
Provide the URL of the SonarQube server at SONAR_URL and provide the credential ID which is already configured on Jenkins.
By performing the static code analysis you can detect the vulnerabilities and bugs from the code and make necessary changes to the code to deploy secure applications.
Build and Push Docker Image:
stage('Build and Push Docker Image') {
  environment {
    DOCKER_IMAGE = "<docker-hub-repository>:${BUILD_NUMBER}"
    REGISTRY_CREDENTIALS = credentials('dockerhub')
  }
  steps {
    script {
        sh 'cd java-maven-sonar-argocd-helm-k8s/spring-boot-app && docker build -t ${DOCKER_IMAGE} .'
        def dockerImage = docker.image("${DOCKER_IMAGE}")
        docker.withRegistry('https://index.docker.io/v1/', "dockerhub") {
            dockerImage.push()
        }
    }
  }
}
At the Build and Push stage, the docker image will be built and pushed to the Docker hub.
For accessing the Docker we need to provide the Docker hub credentials Id from Jenkins and the Docker hub repository name.
Once this stage is successfully executed you will be able to use the application image to deploy in any environment.
Updating the Deployment Template for K8s:
stage('Update Deployment File') {
        environment {
            GIT_REPO_NAME = "<github-repository-name>"
            GIT_USER_NAME = "<github-username>"
        }
        steps {
            withCredentials([string(credentialsId: 'github', variable: 'GITHUB_TOKEN')]) {
                sh '''
                    git config user.email "<github-account-email>"
                    git config user.name "<github-username>"
                    BUILD_NUMBER=${BUILD_NUMBER}
                    sed -i "s|image: .*|image: <docker-hub-repository>:${BUILD_NUMBER}|g" java-maven-sonar-argocd-helm-k8s/spring-boot-app-manifests/deployment.yml
                    git add java-maven-sonar-argocd-helm-k8s/spring-boot-app-manifests/deployment.yml
                    git commit -m "Update deployment image to version ${BUILD_NUMBER}"
                    git push https://${GITHUB_TOKEN}@github.com/${GIT_USER_NAME}/${GIT_REPO_NAME} HEAD:main
                '''
            }
        }
    }
  }
}
Now, that you have a Docker image of the application, for the deployment of the application to Kubernetes you need to update the deployment.yml file with the latest version of the application image.
In the above stage, you need to provide the credentials of GitHub and Docker hub, for fetching the latest version of the image and updating it to the deployment.yml file which is stored in the Git repository.
Once the deployment.yml file is updated you can configure ArgoCD for performing the GitOps deployment to Kubernetes.
Step 5: Triggering Jenkins CI pipeline
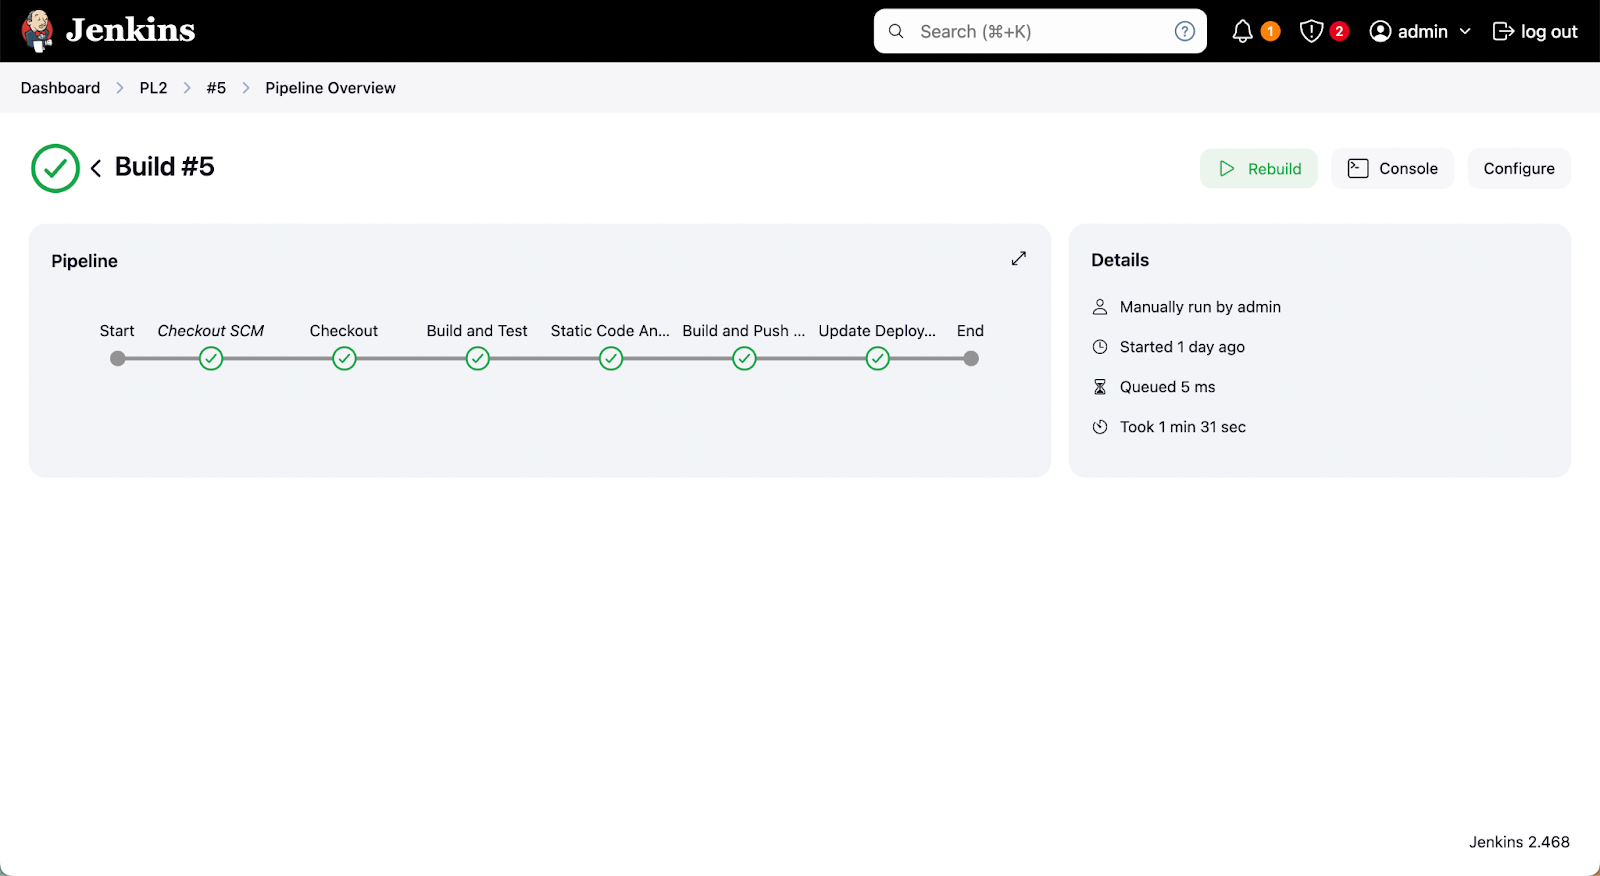
Now we are ready to trigger the Jenkins pipeline click Build Now on the Jenkins dashboard, which will execute the following steps.
- Creating a Docker Agent, to execute builds in a Docker container.
- Building an Application and generating the .jar file as the application is in Java.
- Performing the static code analysis using Sonarqube.
- Building a Docker Image and pushing the image to the Docker hub.
- The last step will update the deployment.yml file, which is stored in a git repository.
Jenkins Pros and Cons
| Pros | Cons |
|---|---|
| Extensive plugin support which provides easy integrations with numerous tools. | The steep learning curve for beginners. |
| Support of distributed builds across multiple agents. | The plugin sprawl introduces new kinds of complexities and version compatibility issues. |
| Declarative Pipelines: Highly customizable and flexible. | Need a dedicated server and resources which makes it resource-intensive. |
| Ability to scale with projects. | No support for production server deployments. |
| Stable and Battle-tested. | Configuration drifts at large scale. |
| Active open-source community support. | Requires extensive scripting for CD |
Recommendation: Don’t Use Jenkins for CD
Jenkins has primarily designed and developed as a Continuous Integration (CI) tool, which it excels by automating build, test, and integration processes. However, Jenkins has its limitations for Continuous Deployment (CD) operations, preventing it from being a complete CI/CD solution. For setting robust CI/CD pipelines for Kubernetes you can couple up Jenkins with any tool that supports the Continuous Deployment (CD), i.e. Argocd, FluxCD, or Devtron. Now let's take a sneak peek at how you can manage the continuous deployment (CD) flow with Devtron.
Manage your CD Pipelines with Devtron
Devtron extends Jenkins’ CI capabilities into a unified, enterprise-grade CD experience. It eliminates the complexity of managing multiple tools and provides a single control plane for building, deploying, and operating applications across clusters.
How Devtron Enhances Jenkins
- Unified Visibility: Devtron provides a single pane of glass that brings together application performance, deployment health, and infrastructure metrics across all your clusters and clouds. Instead of switching between multiple tools for logs, metrics, and manifests, platform teams get a comprehensive view of what’s running, where, and how it’s performing — ensuring faster troubleshooting and informed decision-making.
- Approval-Based Deployments: In high-stakes production environments, Devtron enables multi-level approval gates for deployments. Teams can configure manual reviews, compliance checks, or automated policy validations before release. This ensures deployments meet business, security, and quality standards.
- Modern GitOps Automation: With Devtron, GitOps isn’t an add-on it’s embedded by design. Devtron’s integrated GitOps engine automatically syncs Kubernetes states with your Git repositories, ensuring consistent and traceable deployments across environments. It removes the overhead of managing Argo CD or Flux CD manually while maintaining full transparency and auditability.
- Advanced Deployment Strategies: Devtron supports a range of advanced release patterns, including blue-green, canary, and rolling updates. Teams can safely test new releases, control rollout percentages, and minimize downtime. This level of control helps organizations deliver faster while maintaining service reliability.
- Pre/Post-Deployment Hooks: Devtron allows you to build rich, automated workflows around deployments. You can run pre-deployment checks like JIRA ticket validation, execute database migrations, or trigger GitHub PR status updates. Post-deployment hooks can notify teams via Slack or email, ensuring everyone stays aligned without manual intervention.
- Automated Rollbacks: Mistakes happen, but recovery shouldn’t require panic. Devtron offers one-click rollbacks as well as SLO-based automated rollbacks that revert to stable versions when performance or error thresholds are breached. This ensures business continuity and eliminates the risks of manual rollback errors during incidents.
- Policy and Governance: Enterprise teams need strong governance to manage scale. Devtron provides policy-as-code enforcement, RBAC, and CEL-based guardrails that prevent misconfigurations, enforce compliance, and secure your production pipelines. It allows developers to move fast while platform teams retain control and visibility.
- AI Operations: Devtron’s upcoming Agentic SRE introduces intelligent, AI-powered operations. Trained across both application and infrastructure data, it automatically identifies the root cause of issues, correlates incidents across domains, and even resolves 70% of them autonomously. By turning reactive firefighting into proactive operations, Agentic SRE will redefine how teams manage Kubernetes at scale 24/7, without human intervention.
To leverage Devtron's Continuous Deployment (CD) capabilities alongside your Jenkins CI pipelines explore our in-depth blog on Kubernetes CI/CD Pipeline with Jenkins and Devtron.
Conclusion
The features of Devtron we discussed above are just some of the highlights - Devtron has much more to offer. In addition to its core functionality, Devtron allows you to configure and execute robust CI pipelines directly within the platform. Check out this blog to simplify the CI/CD pipelines for Kubernetes. Alternatively, you can integrate any continuous integration (CI) tools like Jenkins and GitHub Actions. Moreover, Devtron provides visibility across multiple Kubernetes clusters, offering granular insights.
If you have any queries, don't hesitate to connect with us or ask your questions in our Discord Community.
FAQ
Why is Jenkins still popular for CI/CD pipelines?
Jenkins remains one of the most flexible and powerful CI tools due to its vast plugin ecosystem and open-source community. It automates key stages like building, testing, scanning, and packaging applications. However, while Jenkins excels at CI, it lacks native capabilities for modern Kubernetes-based Continuous Deployment (CD) and Day-2 operations.
Can Jenkins alone handle deployments to Kubernetes?
Not efficiently. Jenkins can build and push container images, but managing Kubernetes deployments requires additional configuration, scripting, and external tools. It lacks GitOps support, centralized visibility, and automated rollbacks — making it complex to manage production-grade deployments at scale.
How does Devtron extend Jenkins for Kubernetes CI/CD?
Devtron integrates seamlessly with Jenkins to handle deployment orchestration, environment governance, and post-deployment operations. It brings GitOps-based automation, multi-cluster visibility, and AI-driven operations, enabling end-to-end management of CI/CD pipelines from a single platform.
What makes Devtron better for Continuous Deployment than Argo CD or Flux CD alone?
While Argo CD and Flux CD are excellent GitOps tools, they often require additional management overhead and integrations. Devtron builds on GitOps principles but adds enterprise capabilities such as policy enforcement, advanced rollouts, approval workflows, and unified observability — all from one intuitive dashboard.