1. What is Canary Deployment? A zero-downtime strategy where new software is rolled out to a small subset of users before full release.
2. Why use it? Helps catch issues early, ensures better user experience, and reduces risk in production environments.
3. When to use it? For major updates, high-risk features, and large distributed systems.
4. How to implement it? On Kubernetes using Deployments, Services, Ingress Controllers, or advanced tools like Istio, Flagger, and Devtron.
See how easy Canary deployments are when using Devtron.
Introduction
Inspired by the use of canaries in British coal mines to detect toxic gases, canary deployment (aka canary release) has become a crucial technique in software deployment. Just as canaries served as early warning systems, canary deployment allows DevOps engineers to test new software releases with a small portion of users before rolling them out to everyone.
This blog explores the canary deployment process, benefits, best practices, Kubernetes integration, and the DevOps role in executing successful canary releases.
When to Implement Canary Deployment?
Canary deployment is particularly useful when:
- Releasing major software updates with significant new features.
- Introducing high-risk changes where failures may impact customer experience.
- Scaling in global distributed systems where regional rollouts are safer.
By rolling out new versions to a small percentage of users first, organizations reduce the risk of system-wide outages while maintaining zero downtime deployments.
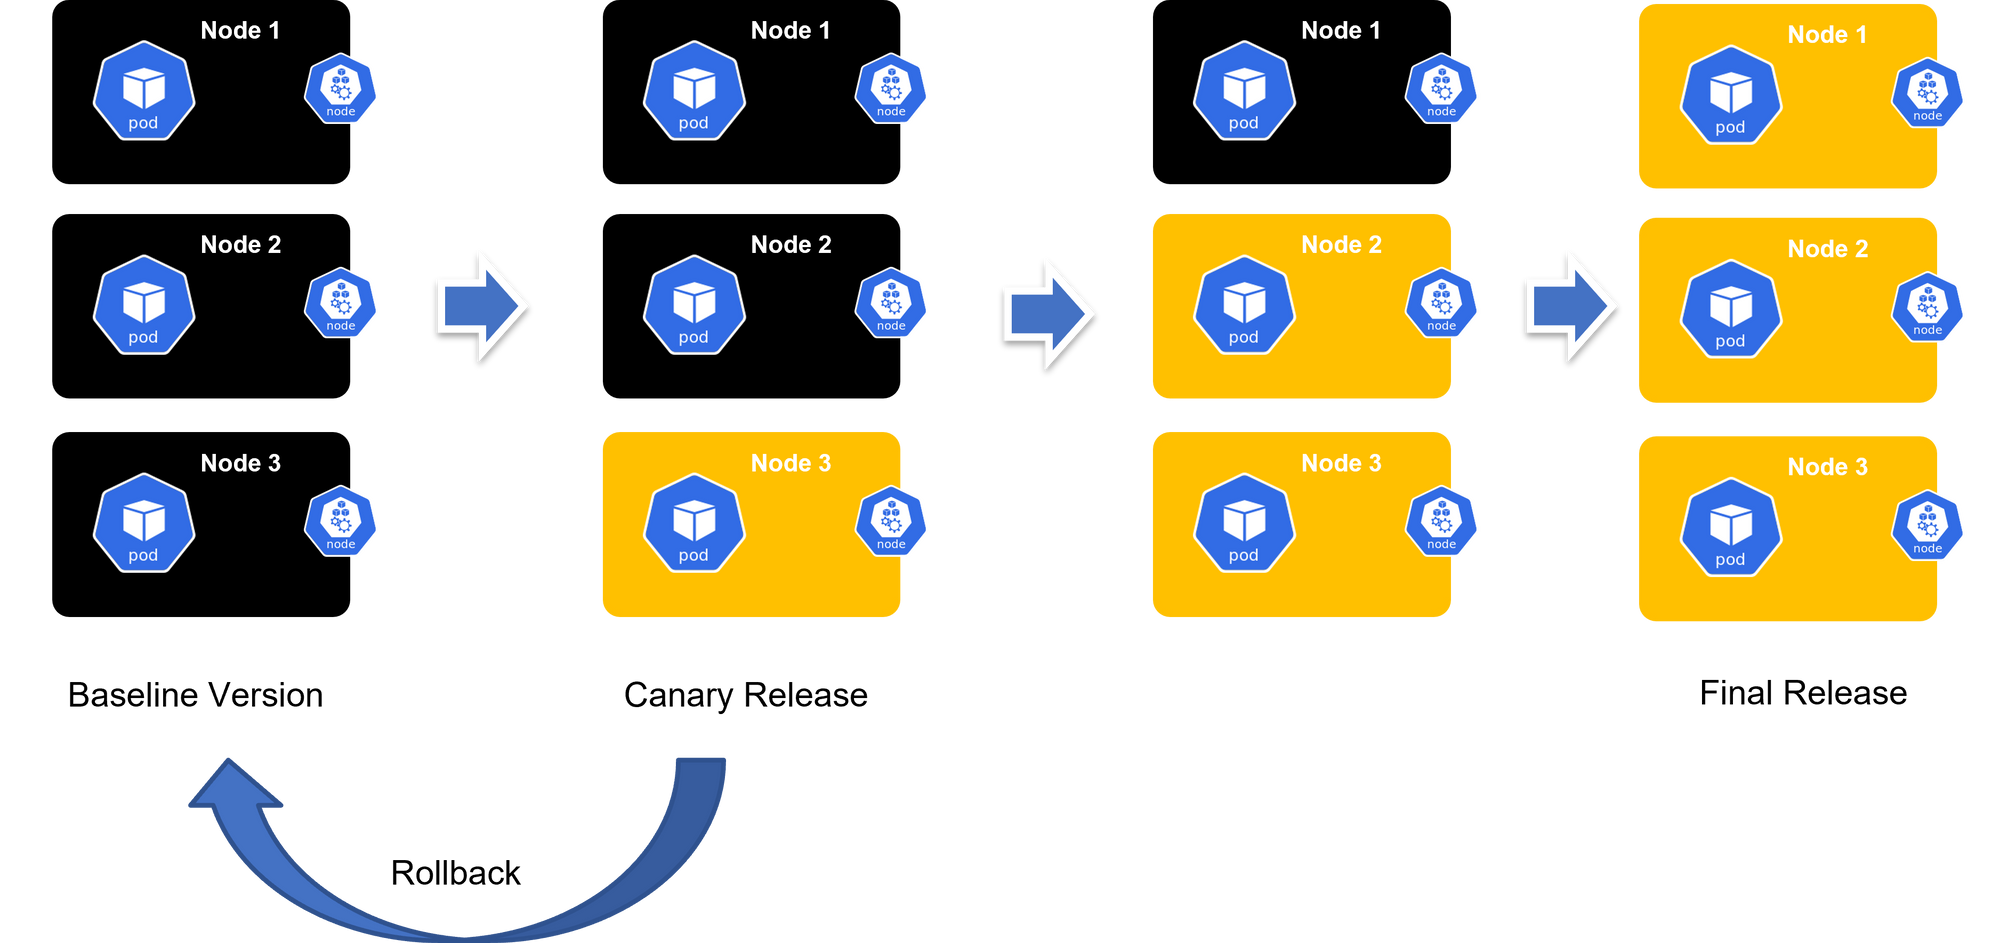
Typical Canary Deployment Process
- Plan & Create – Deploy the new version alongside the stable release, directing only a small portion of traffic to the canary.
- Analyze – Collect metrics, logs, and network data; compare performance against the baseline.
- Rollout or Rollback – If successful, gradually increase canary traffic until full rollout. If issues arise, rollback safely.
This risk-managed approach ensures that only stable versions reach the full user base.
DevOps Role with Canary Deployment Strategy
Canary deployments require orchestration. DevOps, SRE, and Platform Engineering teams typically handle:
- Defining deployment templates (Rolling, Blue-Green, Canary).
- Automating routing & monitoring via Kubernetes controllers.
- Providing observability dashboards for analysis.
With the right tooling, canary strategies can be standardized and reused across environments.
What About Feature Flags and Progressive Delivery?
- Feature Flags: Not a deployment method but a way to toggle features post-deployment.
- Progressive Delivery: Gradual feature flag rollouts to user segments — conceptually similar to canary but feature-focused instead of deployment-focused.
Influence of Kubernetes on Canary Deployment
Kubernetes has become the backbone for canary deployments due to:
- Containers: Lightweight, easy to replicate across versions.
- Ingress Controllers: Automate traffic routing for canary vs stable versions.
- Observability: Integrated metrics, logging, and monitoring for decision-making.
🔗 Get Started with Canary Deployments using NGINX Ingress
How To Do a Canary Deployment on Kubernetes - The Hard Way
Now that we know all about canary deployment strategies, let's take a look at how you go about implementing one.
Prerequisites
- A Kubernetes cluster
kubectlinstalled and configured to communicate with your cluster- An application deployed on Kubernetes
Step 1: Define Your Deployments
You need two deployments: one for the stable version of your application (primary) and one for the new version (canary). These deployments should be identical except for the version of the application they run and their labels.
Primary Deployment:
apiVersion: apps/v1
kind: Deployment
metadata:
  name: myapp-primary
spec:
  replicas: 5
  selector:
    matchLabels:
      app: myapp
      version: primary
  template:
    metadata:
      labels:
        app: myapp
        version: primary
    spec:
      containers:
      - name: myapp
        image: myapp:1.0
Canary Deployment:
apiVersion: apps/v1
kind: Deployment
metadata:
  name: myapp-canary
spec:
  replicas: 1
  selector: matchLabels:
    app: myapp
    version: canary
  template:
    metadata:
      labels:
        app: myapp
        version: canary
    spec:
      containers:
      - name: myapp
        image: myapp:1.1
Step 2: Create a Service
Deploy a Kubernetes service that targets both the primary and the canary deployments. The service acts as the entry point for traffic to your application.
apiVersion: v1
kind: Service
metadata:
  name: myapp-service
spec:
  ports:
  - port: 80
    targetPort: 8080
  selector:
    app: myapp
Step 3: Route Traffic
To control the traffic flow to your primary and canary deployments, you can use Kubernetes itself or an Ingress controller with advanced routing capabilities (like Istio, Linkerd, or Traefik). For simplicity, we'll stick with Kubernetes' native capabilities.
Option A: Manual RoutingManually adjust the number of replicas in your deployments to control the traffic split. For example, to increase traffic to your canary, you would decrease replicas in the primary deployment and increase replicas in the canary deployment.
Option B: Automated Routing with Ingress ControllerUsing an Ingress controller that supports advanced routing rules allows you to specify weights for traffic distribution between your primary and canary deployments. This approach requires additional setup for the Ingress controller and defining routing rules.
Step 4: Monitor and Scale
Monitor the performance and stability of the canary deployment. Tools like Prometheus, Grafana, or Kubernetes' own metrics can help you gauge how the new version is performing compared to the stable version.
Step 5: Full Rollout or Rollback
Based on the performance and feedback:
- If successful, gradually shift more traffic to the canary version by adjusting the number of replicas until the canary deployment handles all traffic. Finally, update the primary deployment to the new version.
- If issues arise, rollback by shifting traffic away from the canary deployment back to the primary.
You'll need to repeat this process every time you want to do a new canary deployment. 😢
How To Do a Canary Deployment on Kubernetes - The Easy Way
Now that we've seen the difficult, manual method for rolling out a canary deployment on K8s, let's look at the process when you use Devtron.
Prerequisites
- Have a Kubernetes cluster with Istio service mesh installed.
- Install Flagger, which automates the promotion of canary deployments using Istio’s routing capabilities.
- Install Devtron for simplified CI/CD, monitoring, and observability on Kubernetes.
Read more about this automated canary deployment process.
Step 1: Configure Canary Deployment in Devtron
Deploy Your Application: Use Devtron’s user-friendly dashboard to deploy your application onto the Kubernetes cluster. This involves setting up the application’s Docker image, configuring resources, and defining environment variables.
Set Up Canary Analysis: Configure canary analysis strategies in Devtron, specifying metrics that Flagger should monitor during the canary deployment. These metrics could include success rates, request durations, and error rates, ensuring that the new version meets your defined criteria for stability and performance.
Step 2: Automate Rollout with Flagger
Define Canary Custom Resource: Create a Canary custom resource definition (CRD) in Kubernetes that specifies the target deployment, the desired canary analysis strategy, and rollback thresholds. This CRD instructs Flagger on how to manage the canary deployment process.
Monitor Deployment Progress: Flagger, integrated with Prometheus, automatically monitors the defined metrics during the canary rollout. If the new version underperforms or fails to meet the criteria, Flagger halts the rollout and triggers a rollback to the stable version.
Step 3: Leverage Istio's Traffic Management
Control Traffic Split: Flagger uses Istio to dynamically adjust the traffic split between the stable and canary versions during the deployment, starting with a small percentage of traffic to the canary and gradually increasing it as the canary proves stable. Check out this blog for canary deployments with Flagger and Istio.
Step 4: Observability and Monitoring
Devtron provides integrated monitoring and observability features, offering insights into the deployment process, application performance, and user impact. Utilize these tools to closely monitor the canary deployment and make informed decisions.
Step 5: Finalize Deployment
Upon successful canary analysis, Flagger gradually shifts all traffic to the new version. If the canary meets all criteria, it's promoted to a stable release, and the old version is phased out. If issues arise, Flagger automatically rolls back to the stable version, minimizing the impact on users.
This automated canary deployment process will happen every time you trigger a new deployment from Devtron. There's no ongoing work required. 😀
Best Practices for Canary Deployment
- Start with 1-5% traffic to canary before scaling.
- Use SLOs (Service Level Objectives) for rollback criteria.
- Combine with A/B testing for feature validation.
- Ensure automated observability (Prometheus, Grafana, OpenTelemetry).
- Use a progressive rollout strategy (incrementally shifting traffic).
Conclusion
Canary Deployment is a proven strategy to minimize risk, ensure zero downtime, and improve release confidence. By gradually exposing new versions, teams reduce failures, deliver value faster, and gain flexibility for innovation.
Platforms like Devtron automate the entire process with monitoring, rollback, and zero-downtime testing, removing the complexity of manual canary rollouts.
FAQ
What is a Canary Deployment Strategy in DevOps?
A Canary Deployment Strategy is where a new software version is gradually rolled out to a small subset of users before making it available to everyone
Why Should You Use Canary Deployments?
Canary deployments help catch bugs early, reduce the risk of full-scale failures, and provide real-world feedback before a full rollout.
How do Canary Deployments work in Kubernetes?
In Kubernetes, canary deployments work by incrementally shifting traffic from the stable version of an application to a newer version.
What Are the Key Benefits of Canary Deployment Strategy?
- Reduced deployment risk
- Faster feedback loops
- Improved observability
- Safer rollbacks

