1. Learn how to connect CircleCI with Kubernetes for end-to-end CI/CD automation.
2. Understand the challenges CircleCI faces when managing deployments and post-deployment operations.
3. Discover how Devtron complements CircleCI by simplifying CD and Kubernetes management.
4. Explore how to set up Devtron’s GitOps-based deployment pipeline triggered by CircleCI webhooks.
5. See how Devtron streamlines multi-environment deployments and Day-2 operations with unified visibility.
Introduction
Within the previous blog, we had set up a complete CI/CD pipeline using CircleCI to build, test, and perform security scans on our application, build the container image, and push it to DockerHub. We also created a custom script that would create a deployment to our Kubernetes cluster. To address the security concerns of having the KubeConfig credentials leaked, we created a custom Circle runner within our target cluster, eliminating the problem of accidentally leaking credentials.
Integrating CircleCI with Kubernetes enhances your CI/CD pipelines, but managing deployments and post-deployment operations can be complex. Devtron simplifies this process, offering streamlined deployment, efficient day-2 operations, and real-time application health monitoring.
Challenges With CircleCI
While CircleCI is amazing at creating continuous integration (CI) pipelines and can be triggered as soon as a commit is pushed or a PR is raised, it lacks certain capabilities you would require to manage the application after it has been deployed. We discussed some of these challenges in the previous blog, but let’s get a good understanding of these challenges and how they impact the application lifecycle.
Heavy on Custom Scripts
CircleCI offers a lot of different templates through orbs for building a continuous integration (CI) pipeline. However, the number of orbs for a continuous deployment (CD) pipeline is quite limited, and you are required to write a lot of custom scripts for deploying your application properly.
Lack of native deployment strategies
When deploying a new application version, you would want to deploy using a deployment strategy such as blue-green or canary deployments to ensure application availability and reliability. However, CircleCI does not natively provide features to trigger this deployment. You will need to integrate an external tool such as ArgoCD to use various deployment strategies.
Lack of Application Visibility
After the CircleCI pipeline has been completed, all you know is that the tasks within the pipeline have finished executing. You do not have any real insight into whether the deployed resources are running properly, or if they have encountered any errors. A manual intervention will be required to check the health and take action in case of errors.
Rollback Complexities
After deploying an application, you might need to roll back to a previous deployment if the new one is having issues. There is a way to do this within CircleCI but you would need to incorporate a lot of different hacks. For example, one way could be to trigger a deployment, sleep for a few minutes, and then check the pod status. If something is not working, trigger a rollback using the kubectl command. This method involves writing a lot of scripts and adds unnecessary complexities to the pipeline.
Tool integration overhead
CircleCI will simply manage building and deploying the applications according to what you have configured. When deploying a production application, you will want integrations of various tools. These tools will need to be manually installed, configured, and managed within the cluster, adding a management overhead. Moreover, you might need to set some configurations for each application such as autoscaling via KEDA.
Within this blog, we will build up on what we did previously. Instead of using CircleCI to handle the continuous deployment (CD) pipeline, we will use it for creating the continuous integration (CI) pipeline and we will then use Devtron to create the continuous deployment (CD) pipeline to deploy an application on the Kubernetes cluster.
We will also look at how Devtron provides support for post-deployment tasks such as version updates, rollouts, handling drifts, etc, and enhances the capabilities of CircleCI.
CircleCI for CI, Devtron for CD: A Unified Approach
Instead of relying on CircleCI for both CI and CD, an optimized workflow splits responsibilities:
- CircleCI: Handles CI building, testing, scanning, and image creation.
- Devtron: Manages CD deploying to Kubernetes, managing environments, and handling Day-2 operations.
This combination leverages the strengths of both tools: CircleCI’s automation speed and Devtron’s unified control and visibility.
Creating a continuous deployment (CD) Pipeline with Devtron
Within Devtron, you have the option to create a continuous integration (CI) and continuous deployment (CD) pipeline for your application. However, since we already have the continuous integration (CI) pipeline set up within CircleCI, we can use an external webhook which can be used for triggering the deployment within Devtron. Let’s walk through the entire process of setting up an external webhook for the CircleCI pipeline, and see what the additional features that devtron enables us with. We will be deploying this application using GitOps with ArgoCD.
Step 1: Install Devtron
Before proceeding please make sure that you have Devtron set up on a public cloud, and that an external source can reach Devtron. If Devtron is locked behind a VPN, or running on localhost, you will need to ensure that CircleCI can access Devtron’s instance through VPN peering and send a webhook request.
Also, make sure that you have the Build and Deploy and the GitOps integrations enabled. You can install Devtron with the GitOps capabilities using the below command:
helm repo add devtron https://helm.devtron.ai

helm repo update devtron

helm install devtron devtron/devtron-operator \
--create-namespace --namespace devtroncd \
--set installer.modules={cicd} \
--set argo-cd.enabled=true
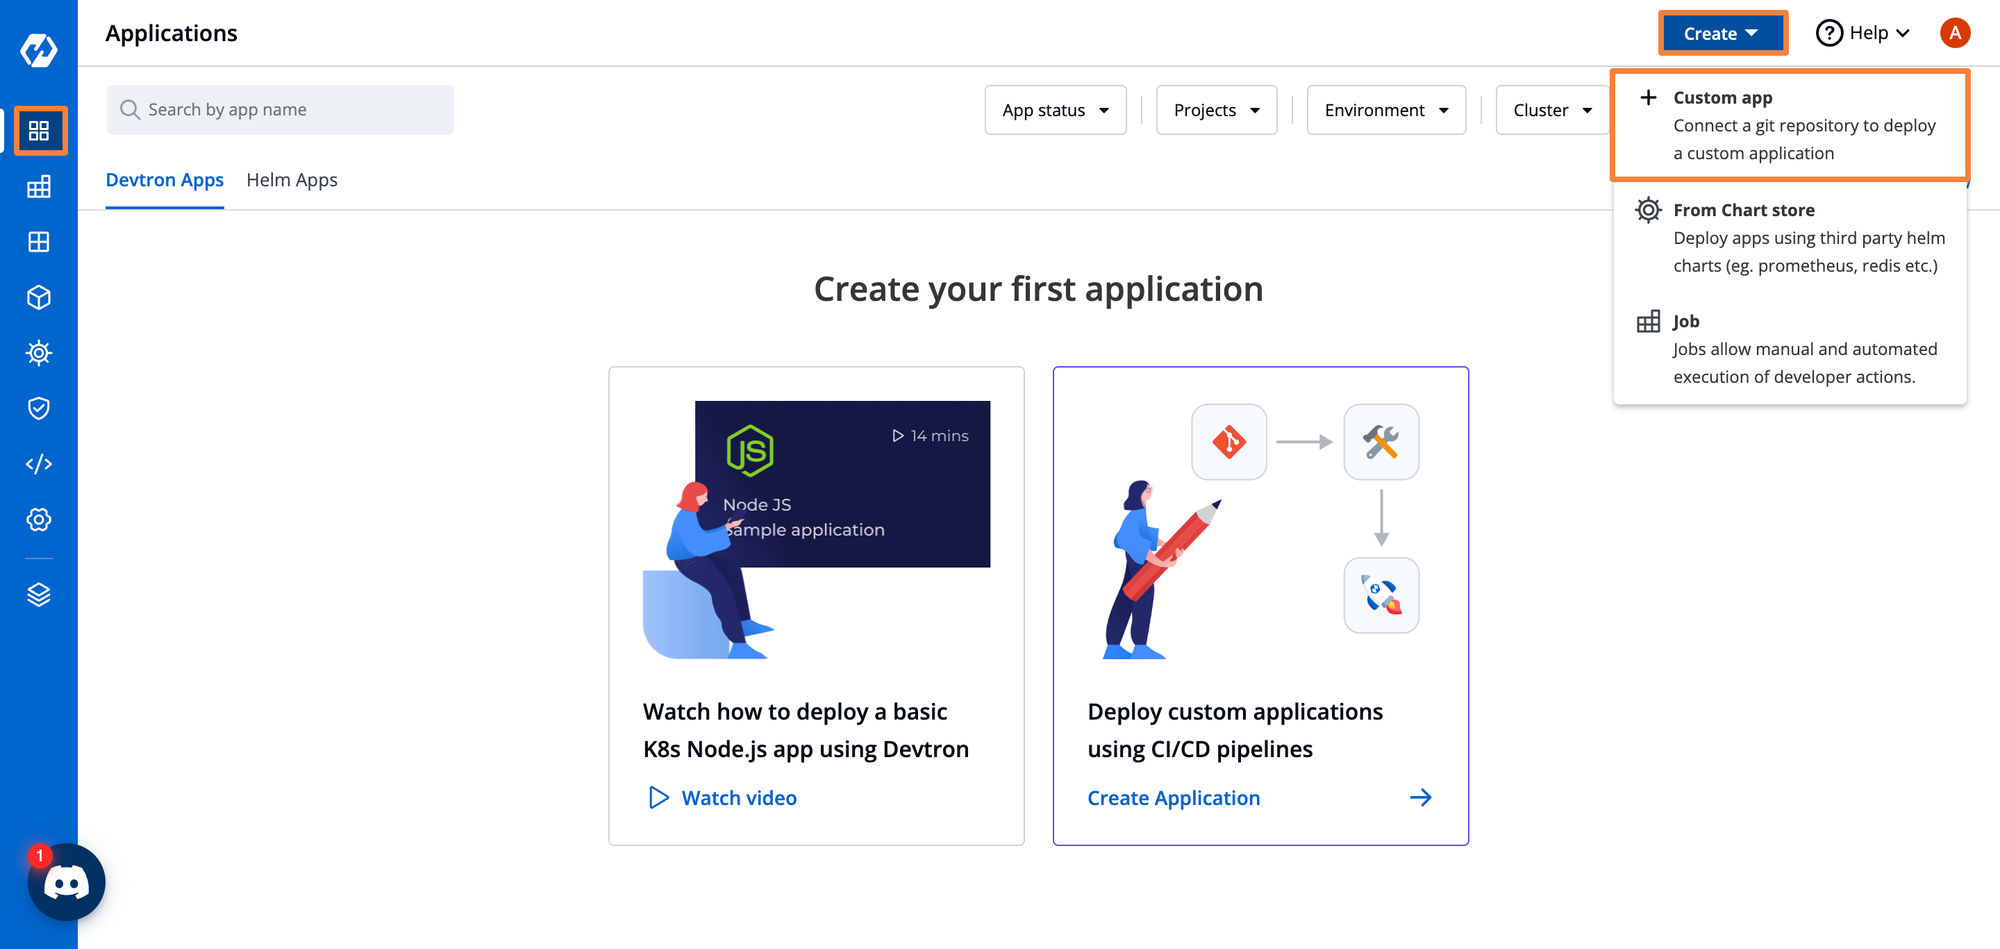
Step 2: Create a Devtron Application
On the Devtron Dashboard, we have to first create an application. Click on Create and create a Custom app from the Applications Dashboard.
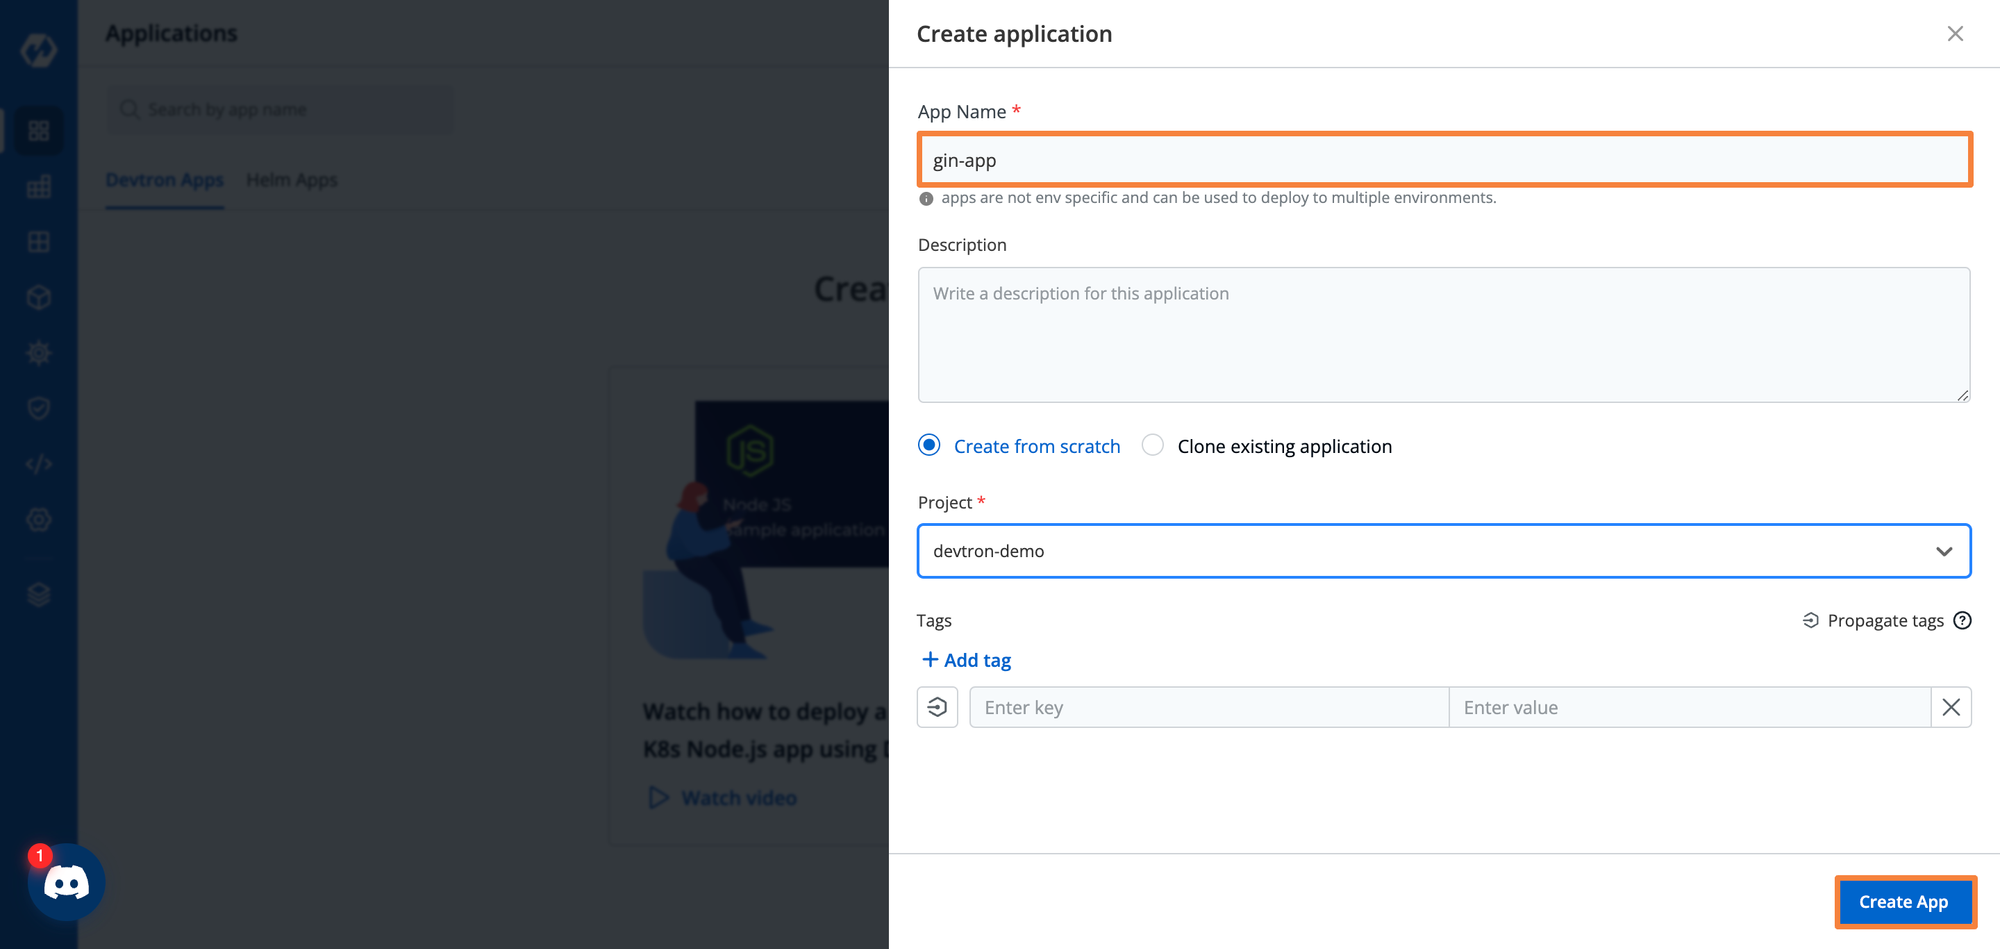
We have to set a few configurations for this application. Give your application a name, and select which environment you want to deploy it to. Then click on Create. For this application, we will call it gin-app.
Step 3: Configure the Application
After creating the application, there are certain application-specific configurations that we need to configure. The first thing to configure is to set up a Git Repository. We will point it to our gin-kv repository.
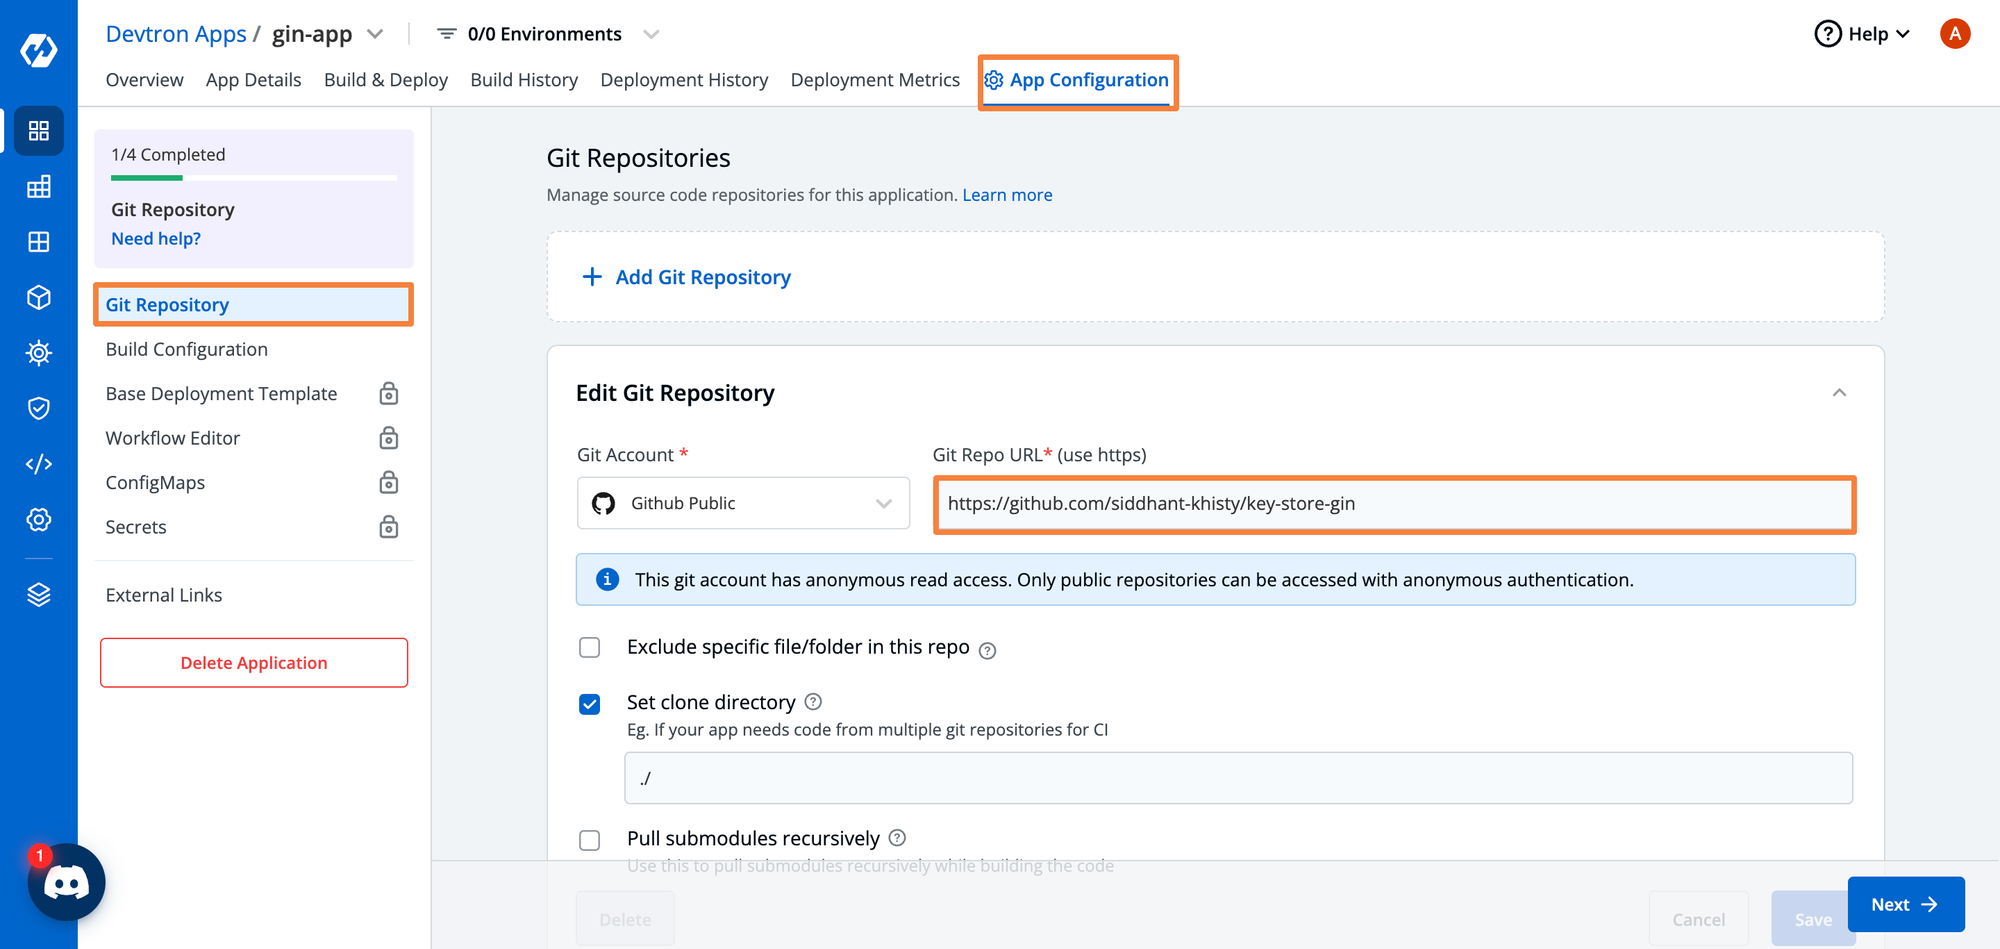
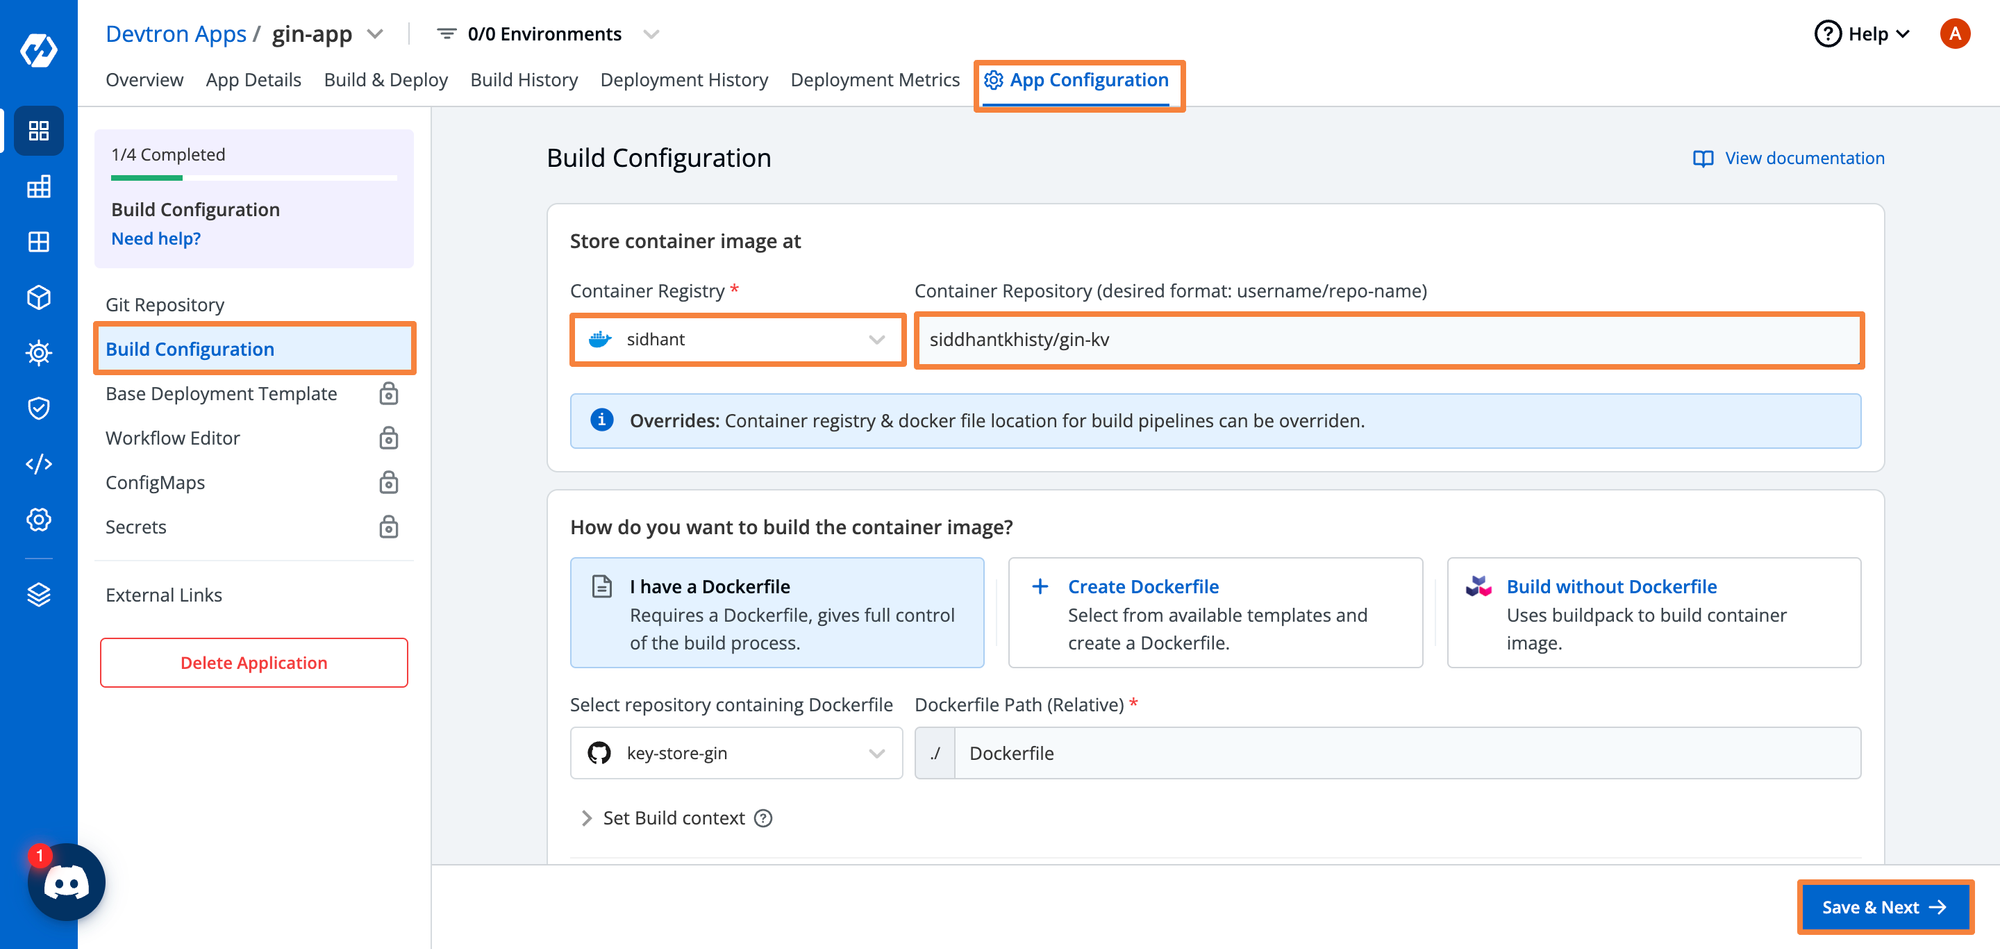
We also need to set up a container registry. To set the container registry. You need to first add and authenticate to the Registry from the Global Configuration. Please check this doc to learn how to add a container registry to your Devtron installation.
After adding the registry in the Global configurations, we can add the registry for the application.
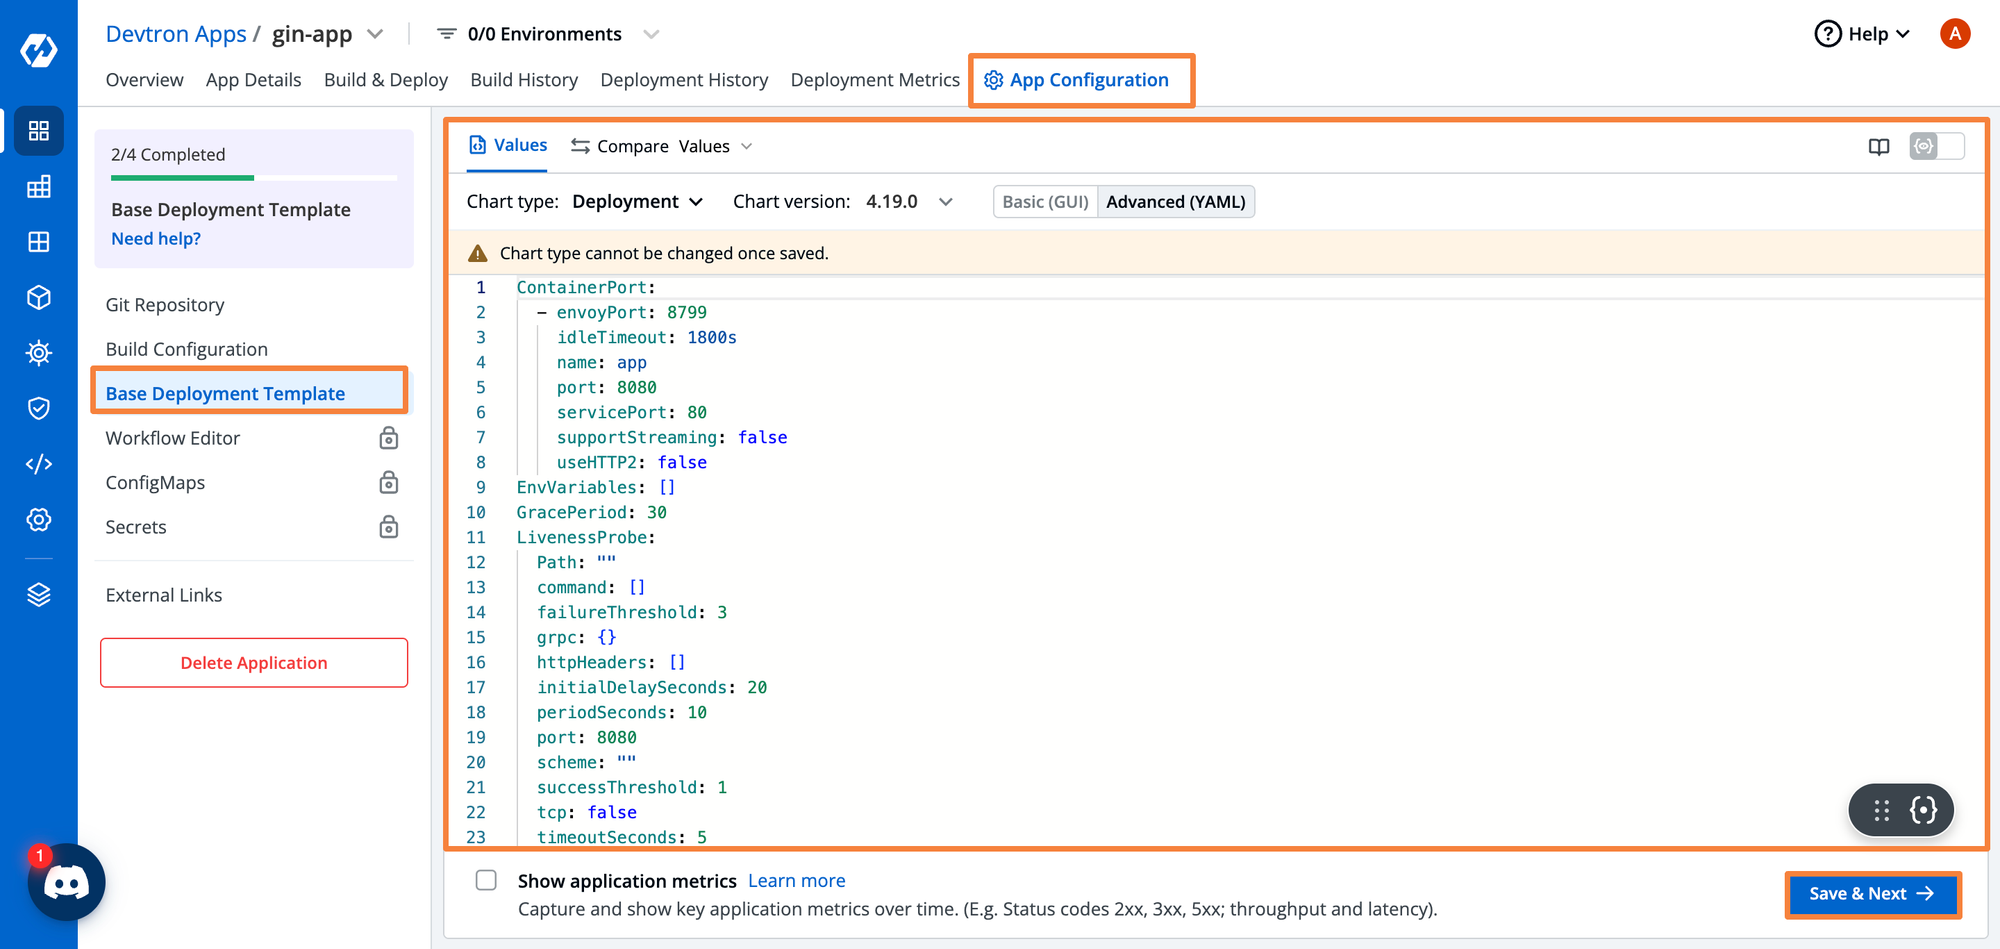
If you have read the previous blog, we had to create our deployment YAML files. Within Devtron, we do not need to create our own YAML files. We have a deployment template, which satisfies most use cases.
Within this template, you can edit and change certain configurations as you see fit. Instead of having to write all the manifests from scratch, working with this template makes it a lot easier to properly configure your applications. When Devtron deploys the application, it will use this deployment configuration.
The only thing you need to provide Devtron with is the correct image and tag. We will see how to do that when we create the pipeline.
Moreover, the template provided by Devtron has many different functionalities that you may want within your application. For example, if you scroll through the template, you will see that you have the option to enable and configure an ingress resource for the application. This saves you from the hassle of creating the ingress resource and properly configuring it, and you also don’t need to context switch to ensure that it’s configured correctly. Similarly, you will find fields for autoscaling and more.
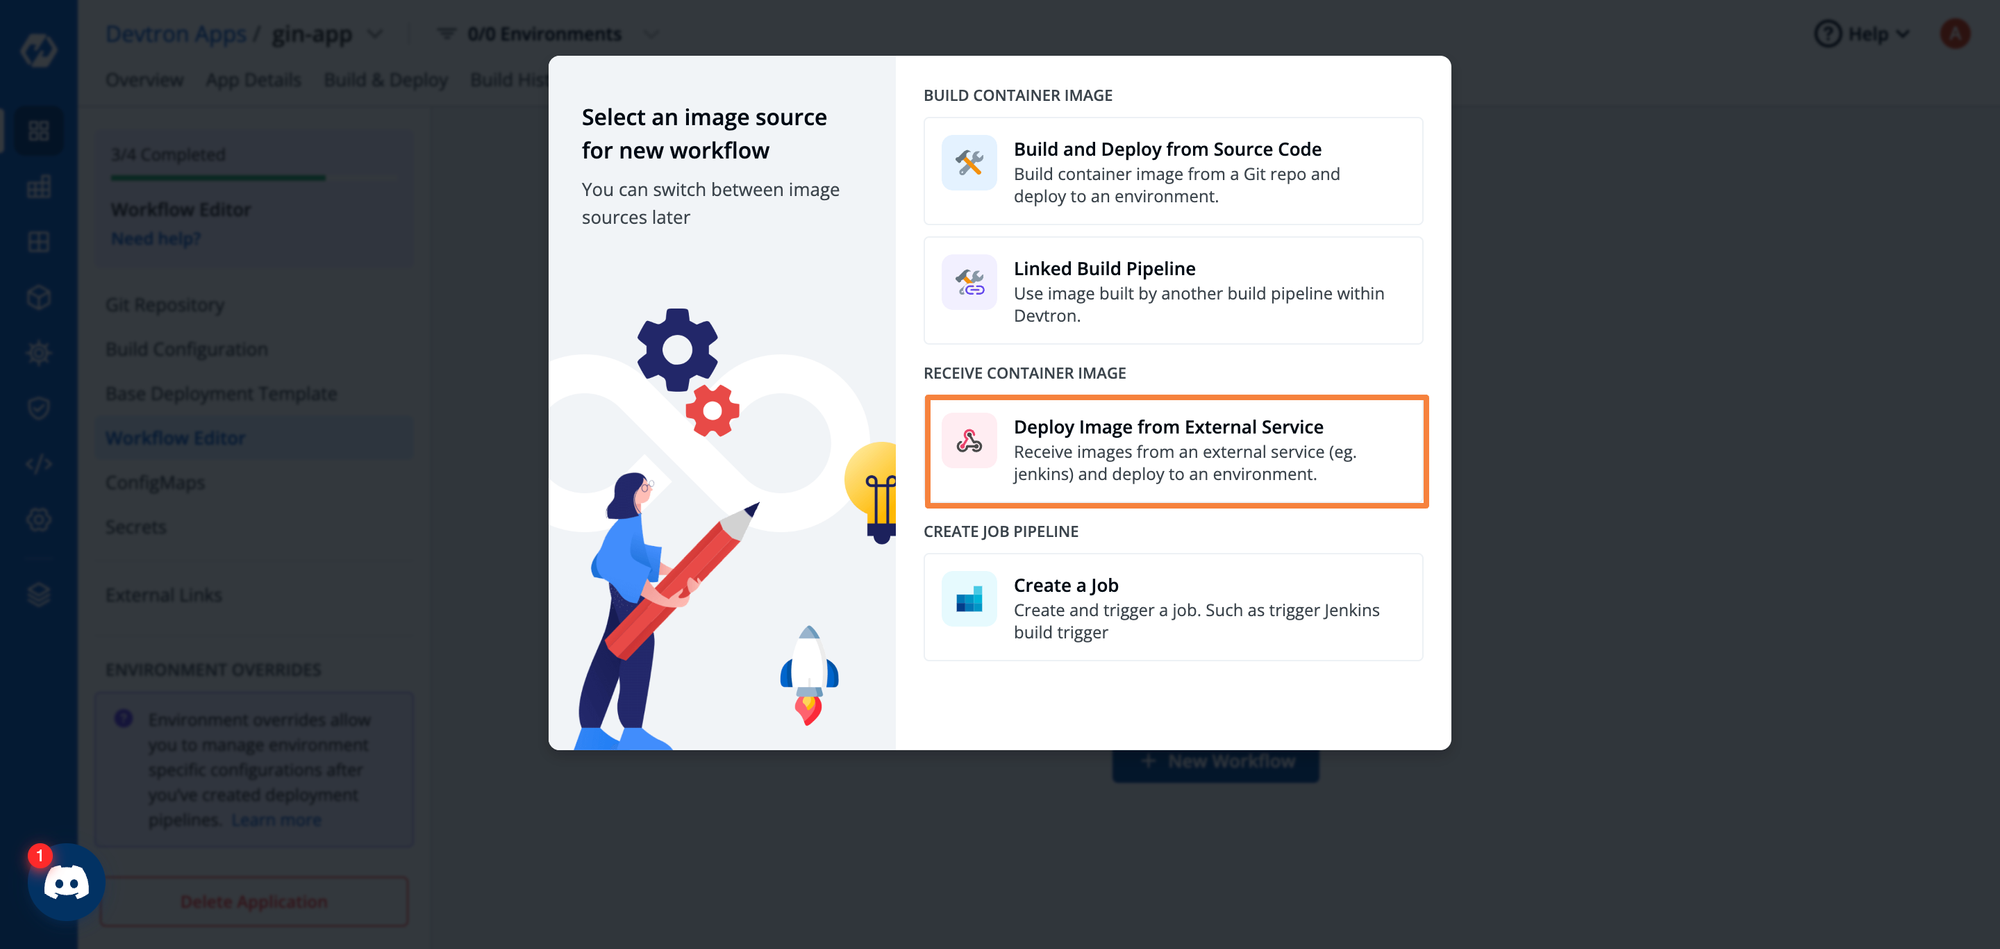
Step 4: Create the Pipelines
Now, let’s create the Deployment Pipeline. Within Devtron, you have the option to create the continuous integration (CI) pipeline within Devtron itself. However, since we already have a pipeline created and configured, we will select the external pipeline option. Click on Deploy Image from External Service
After selecting the destination, you will have to set the deployment pipeline options. Within this pipeline, you have to configure the environment where you wish to deploy the application and the deployment strategy. You can also configure if you want to trigger the deployment manually, or automatically.
If you select the Automatic deployment, Devtron will trigger the deployment as soon as it receives the image from the external pipeline. We can also select the deployment strategy such as recreate, blue-green, canary, or a rolling strategy.

Step 5: Send a Webhook request from CircleCI to Devtron
As we have chosen an external pipeline, Devtron is not aware of which pipeline we are using for the build. All Devtron cares about is the correct image. We will be providing this image to the Devtron pipeline using a webhook.
After clicking on the external pipeline from the workflow editor, you will see the configurations of the webhook. From the below image, you can see that we already have a template for the curl request that needs to be sent by the CircleCI pipeline.
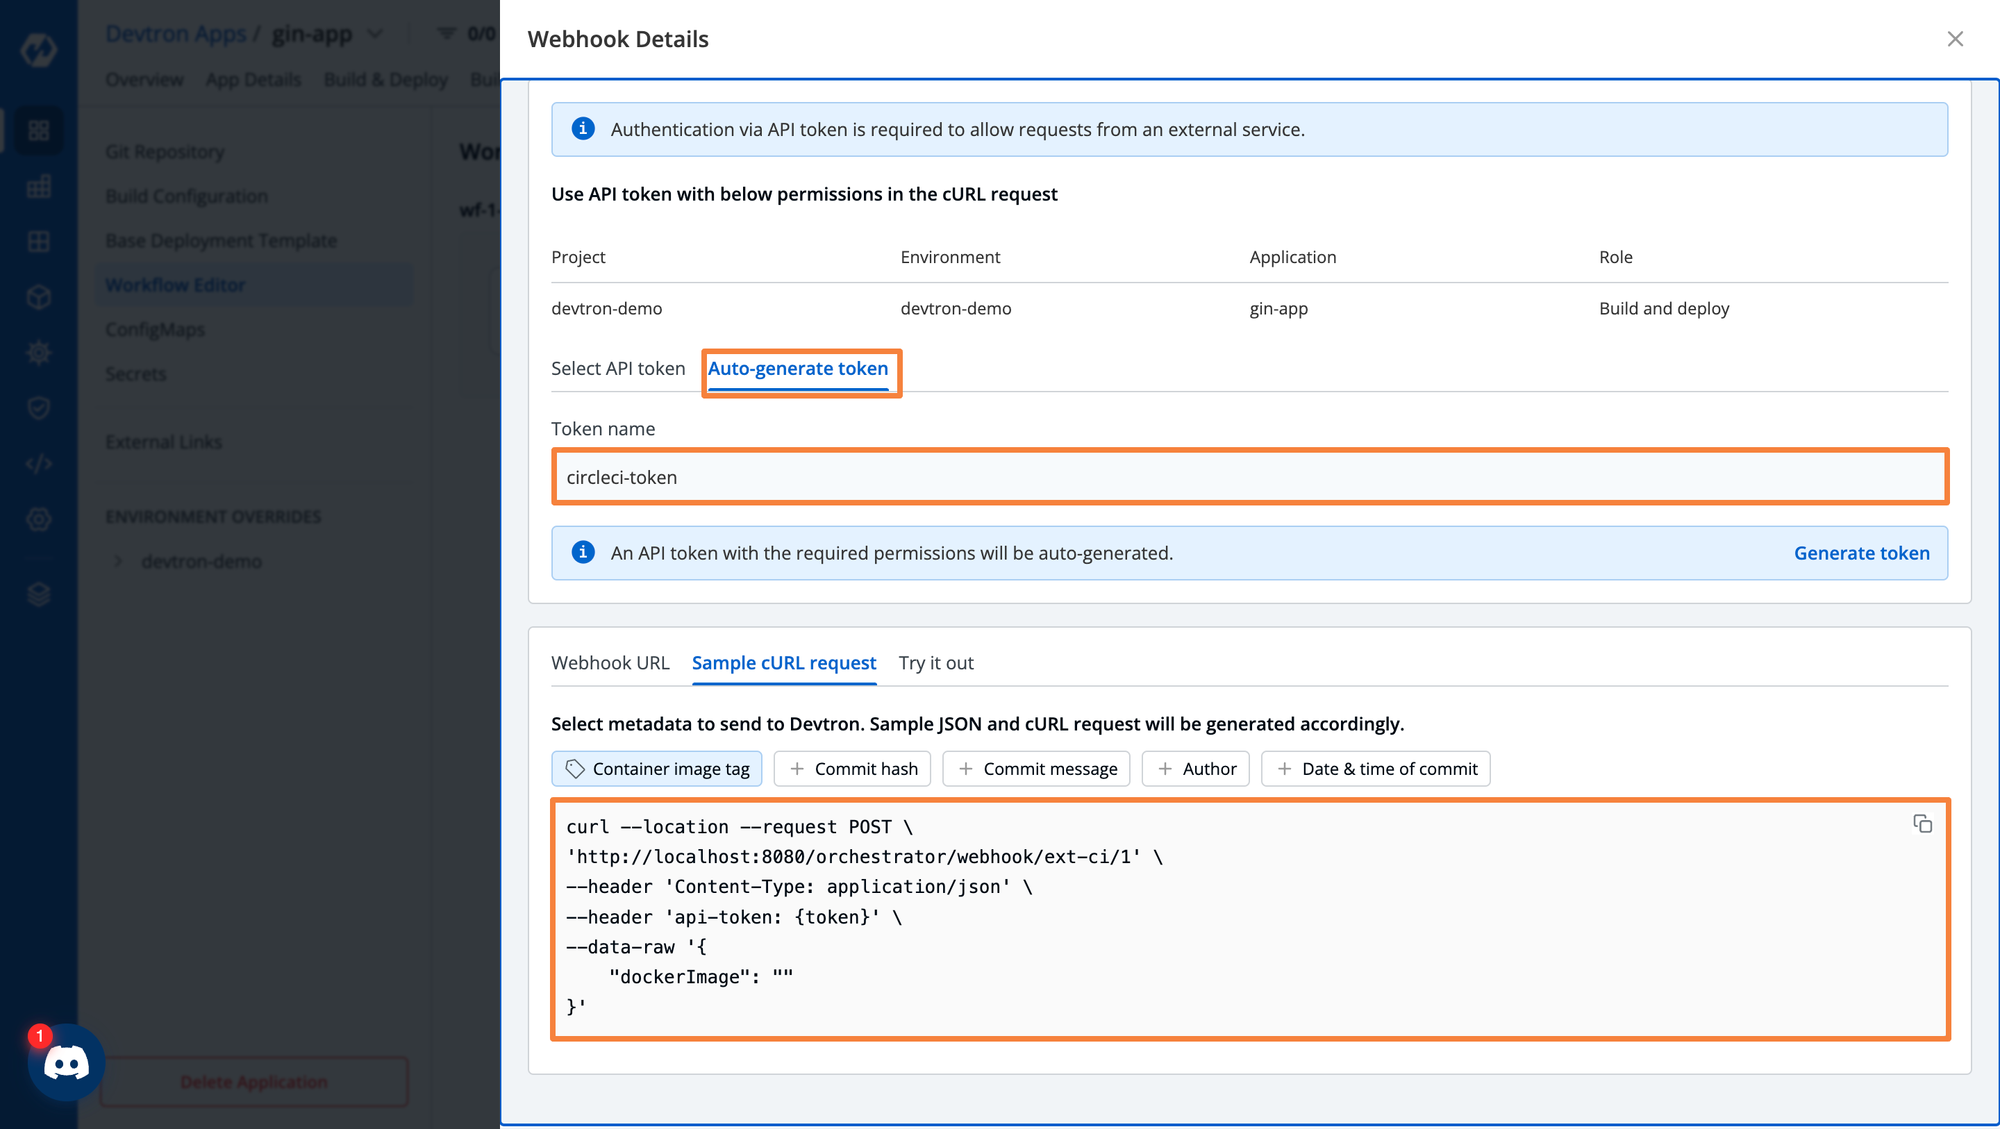
Before the request can be made, we need to generate an Authentication token. If you have previously generated an API token in Devtron, you can use an existing token. If not, Devtron can auto-generate a token for you with the required permissions.
We are auto-generating a token named circleci-token. To maintain good security practices, we will reference this token within the pipeline using a Secret variable.
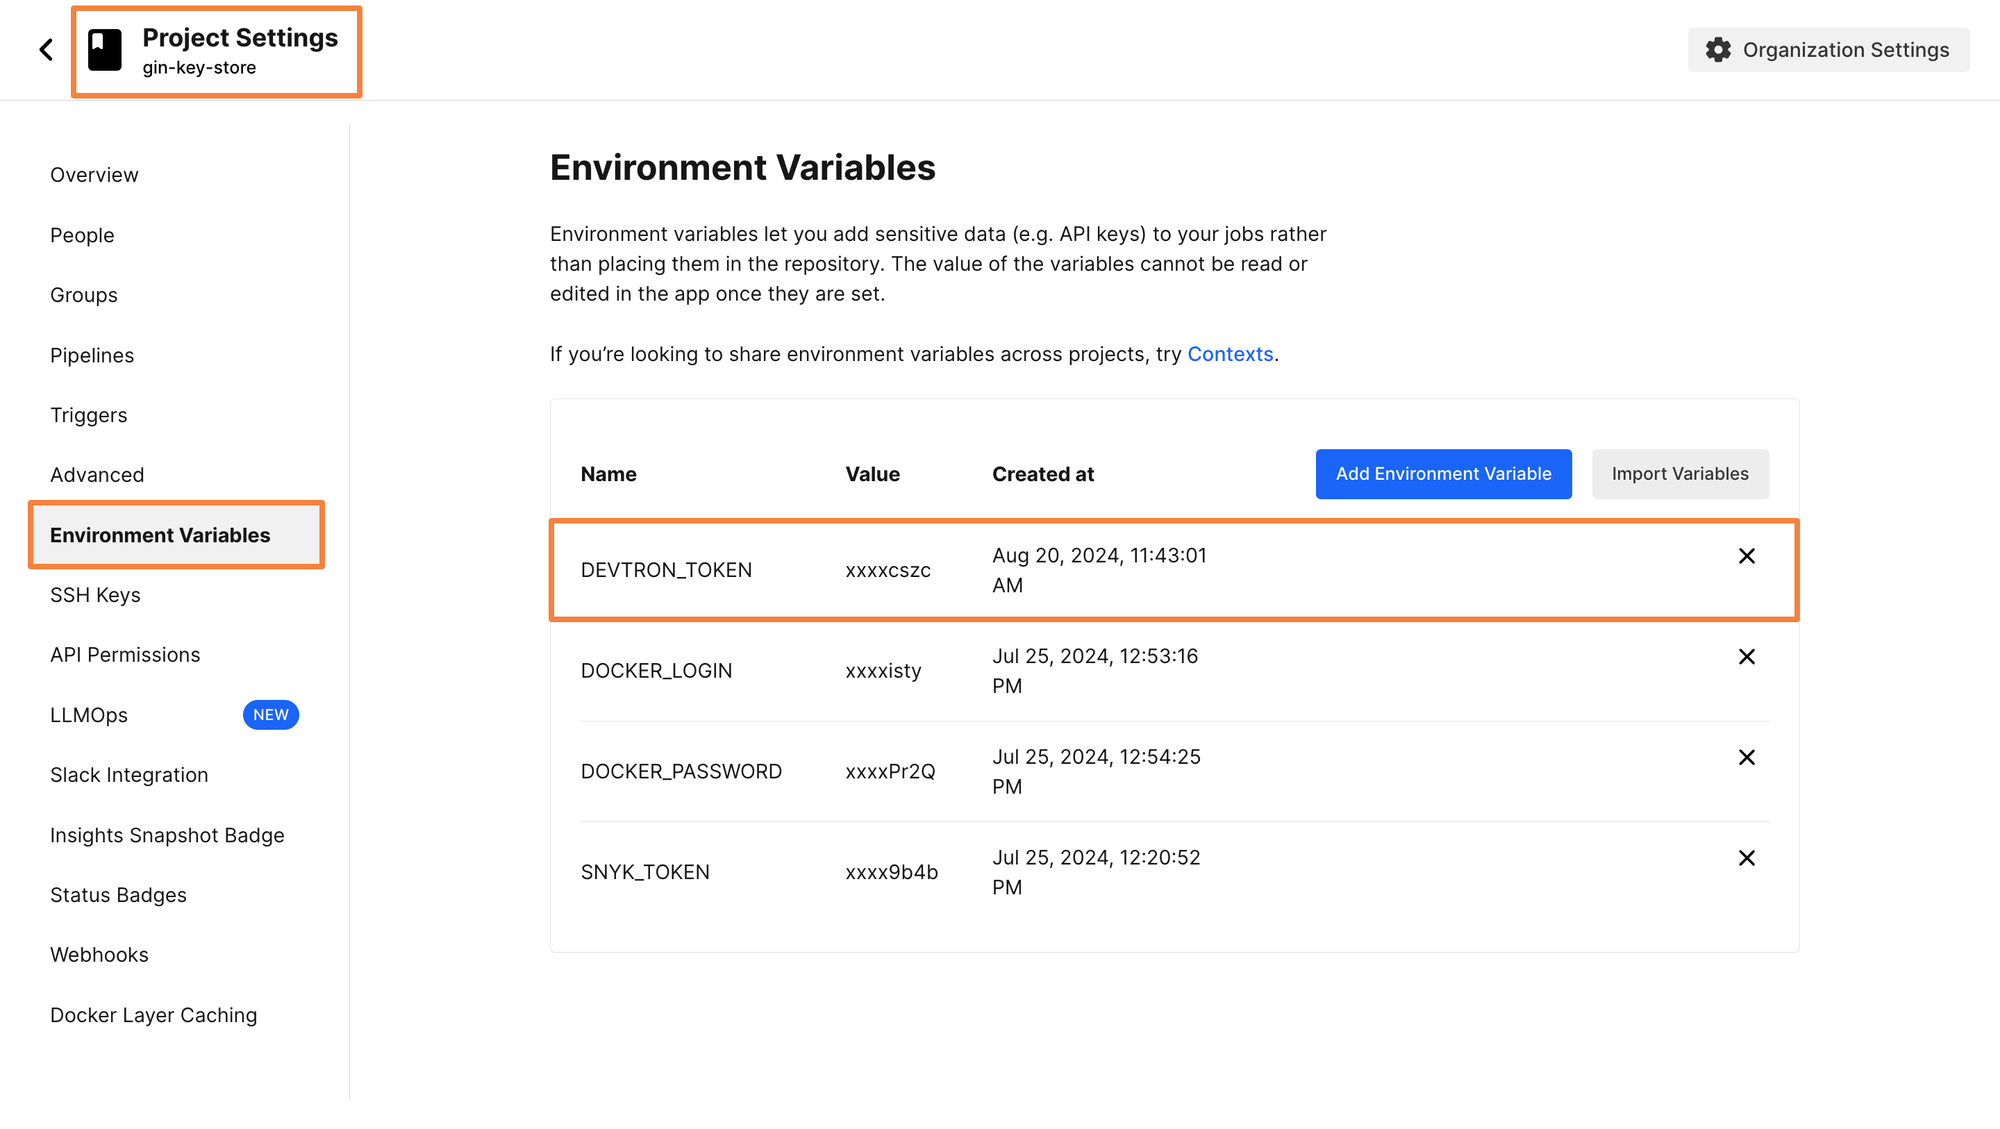
Let’s create a new environment variable in CirlceCI and its value will be the token generated by Devtron. We will call this token as DEVTRON_TOKEN and it will be referenced in the curl command which we run in the continuous integration (CI) pipeline.
To create the token, head to the project settings, and from Environment Variables, you can add the Devtron Token
Next, we want to put the curl command within the deploy job. As a quick recap, the Deploy job was used to connect to the Kubernetes cluster and apply the YAML manifests. Instead, now this job will be sending a curl request containing the image information to Devtron.
We can use the following YAML to create the new job.
      - name: Ping devtron server
        run: |
              curl --location --request POST \
              'http://35.184.124.194:31515/orchestrator/webhook/ext-ci/3' \
              --header 'Content-Type: application/json' \
              --header 'api-token: ${{ secrets.DEVTRON_TOKEN }}' \
              --data-raw '{
              "dockerImage": "siddhantkhisty/gin-kv:latest"
              }'
The above script sends the correct POST request to the Devtron continuous deployment (CD) pipeline. Notice that in the api-token section, we have referenced the secret variable that we created earlier. This ensures that the token is not leaked.
For the dockerImage field, we have defined the image name as well as the tag. If you want to have custom tags, you can use a tool such as Jinja to dynamically tag the image, and use the same tag within the curl command.
With this, we have created the entire continuous integration (CI) and continuous deployment (CD) pipeline. When we trigger the pipeline, CircleCI will build and test the application, run security scans using Snyk, build the docker image, and push it to DockerHub. As an additional step, the pipeline will send a curl request to the Devtron dashboard with the correct Docker Image.
This is one of the methods in which you can use Devtron for deploying your application. An alternative way is to use the Pull Container Image plugin within Devtron. Using the plugin, your continuous integration (CI) pipeline will simply build and push the container image to a container registry such as DockerHub. Then, Devtron will constantly poll the repository to get information about the images within the repository, and you can deploy the image from there.
Similar to this, Devtron has a number of different plugins which you can integrate into your pipeline. For example, you can run some security scans or load tests using K6s before triggering the continuous deployment (CD) pipeline.
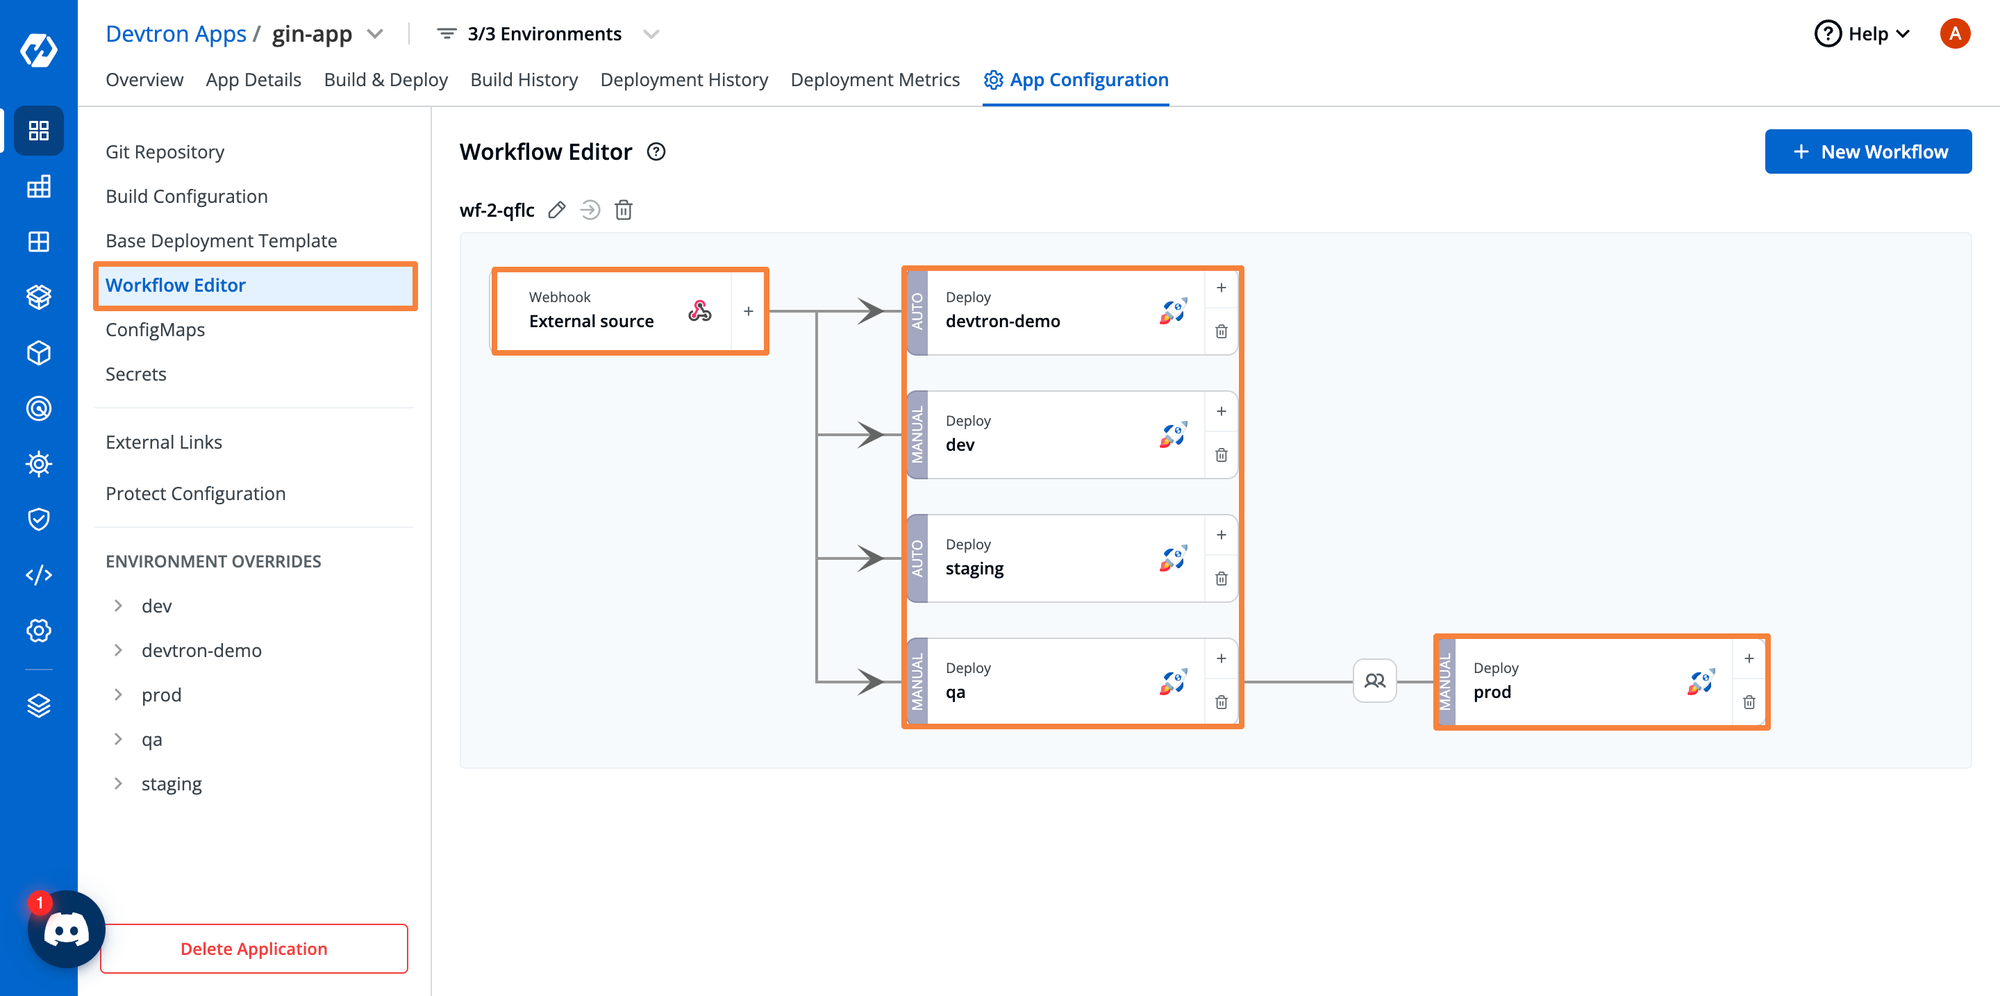
What we have created right now, is a simple pipeline. What if we wanted to deploy this application to multiple different environments, or we wanted to pass it through a QA environment before releasing it to production? Within Devtron, we can set different custom environments where we want to deploy the application. We can create either parallel, sequential, or a combination of both types of pipelines.
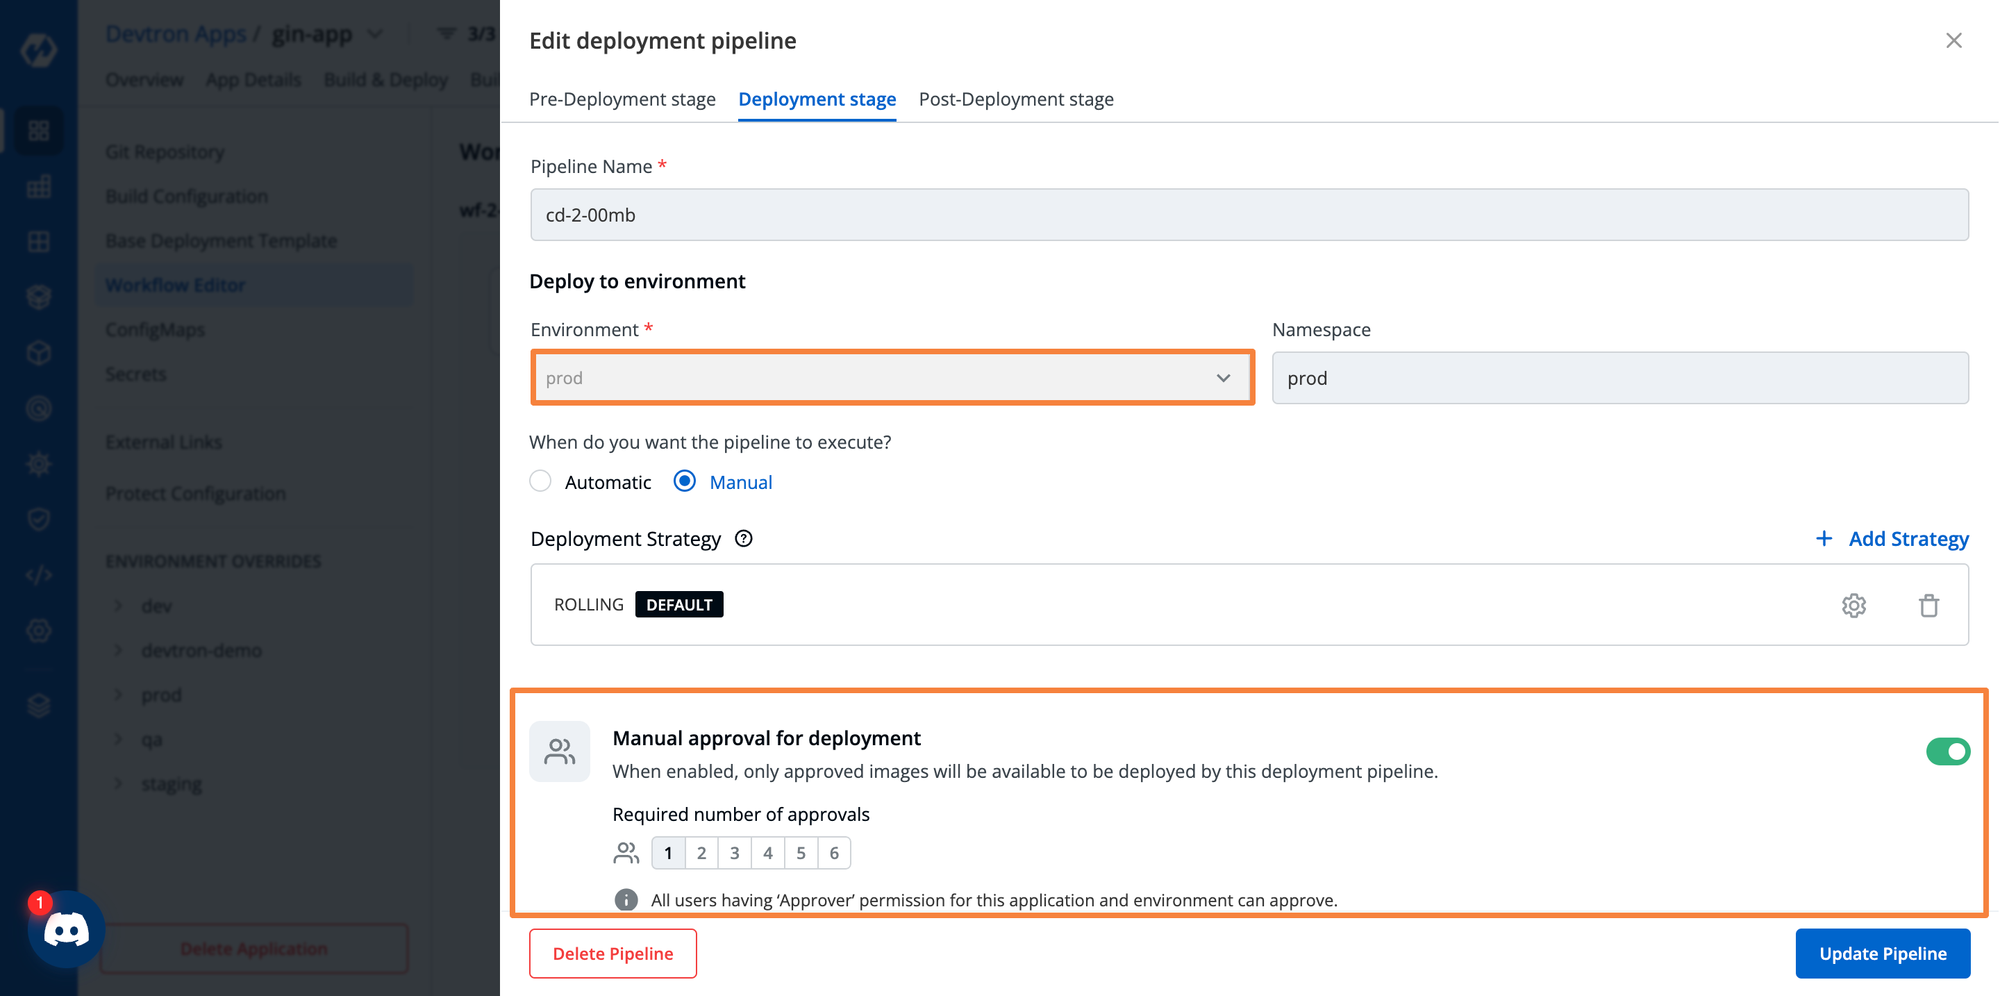
When you’re deploying your application to a production environment, you would not want to directly set up a deployment. You want to ensure that the production environment gets proper approval before the deployment gets triggered.
Within the deployment pipeline for the production environment, we can set the number of approvals that are required to trigger the deployment.
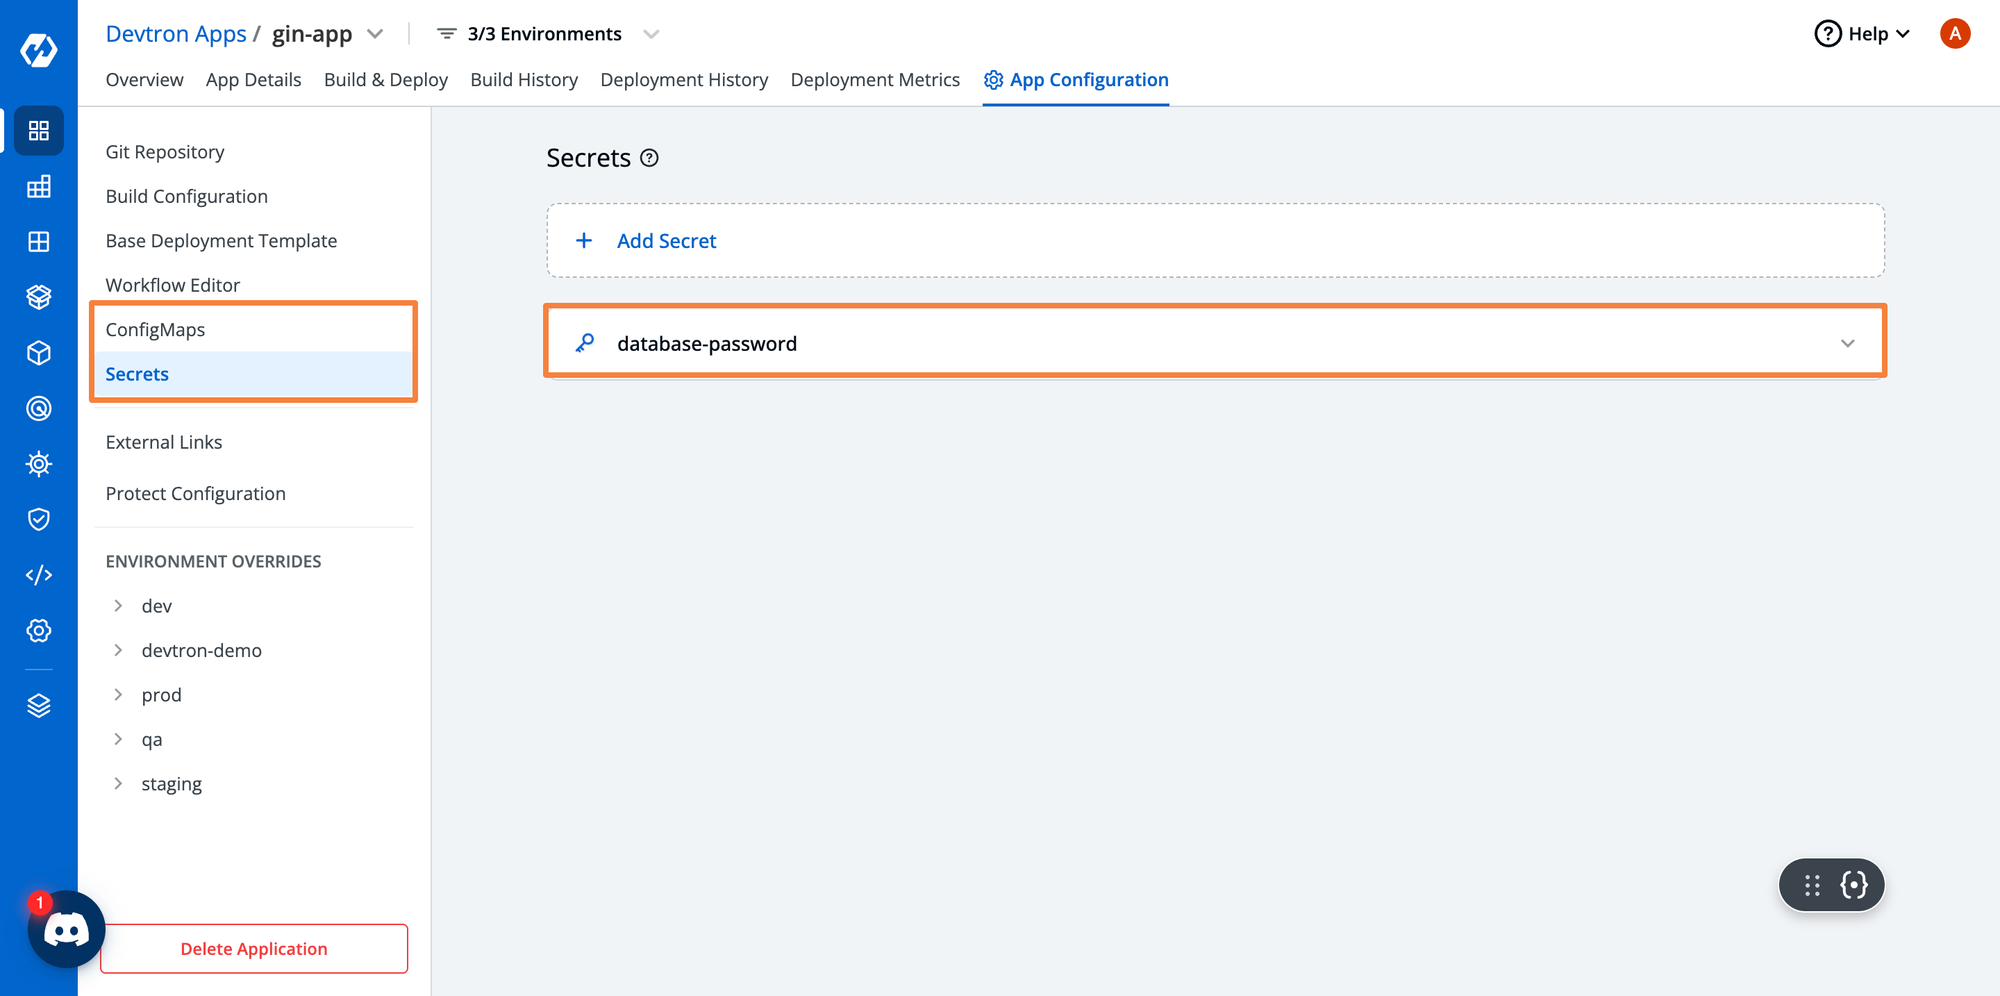
For many applications, you also have a config map to define configurations or secrets that contain sensitive data such as database passwords or security tokens. You want to ensure that these tokens do not get leaked no matter what.
By using CircleCI, it would be tricky to create these tokens. You might need to have a separate private repository that listens for a webhook from the main application repository to trigger the deployments of the config maps and secrets. This process becomes very complex very quickly.
Within Devtron, you can create these configmaps and secrets with ease, without having to worry about the keys getting into the wrong hands. Unless the user has the correct permissions, they will not be able to view or change the secrets or config maps.
When you’re deploying applications to multiple different environments, you will want to change certain configurations within those environments. Devtron will let you configure files for all the different environments.
In our case, since we have 5 different environments, we can set environment-specific config maps and secrets for each. We can even change the deployment template as needed. For example, you might want the ingress host for your QA application to be a host defined for the QA environment. Similarly, your dev and production environments would have different ingress hosts.

Within Kubernetes, it becomes a challenge to monitor and configure various configuration drifts. Many times, you want to ensure that the configurations of a particular environment cannot be changed unless the user has the correct permissions.
Within Devtron, you can protect the configuration of environments using the Protect Configuration feature. This aids developers and the operations team to minimize drifts caused by human intervention.
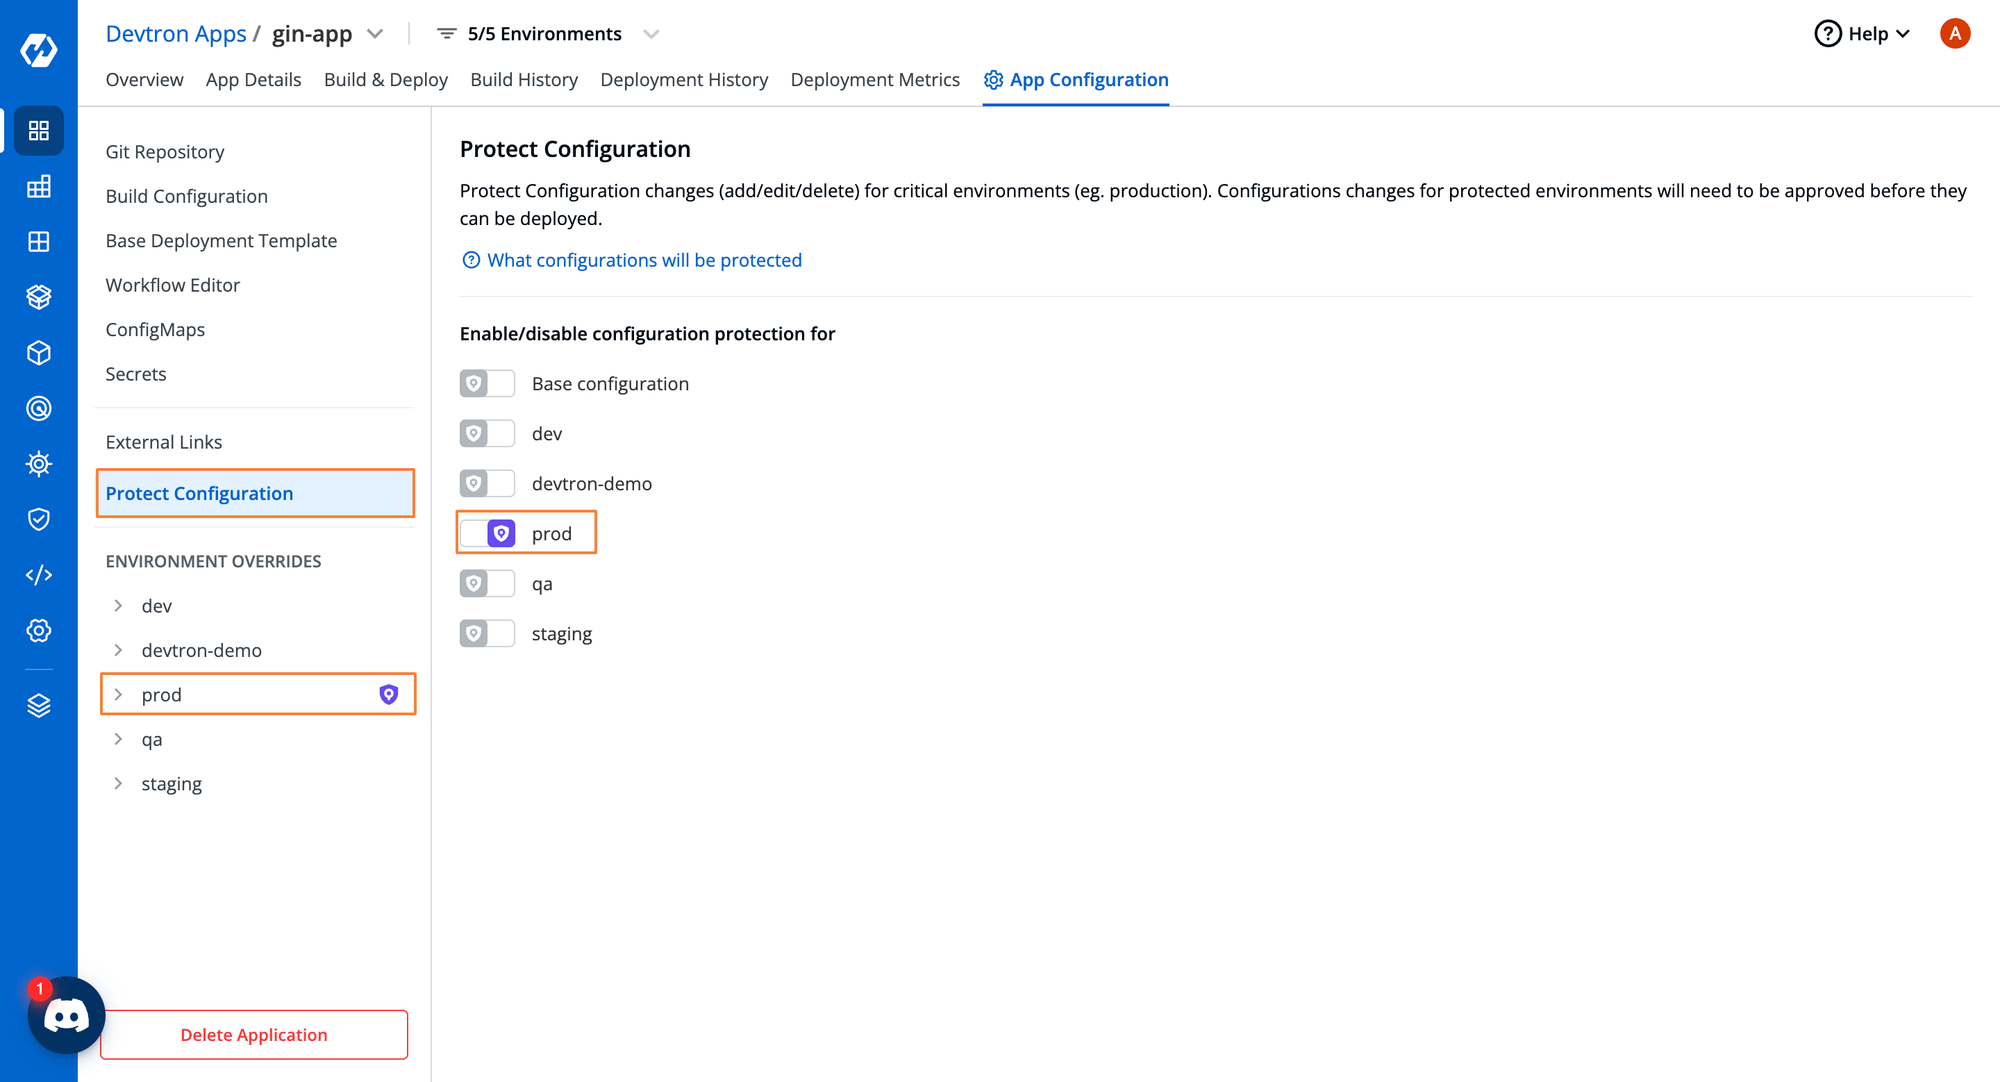
Within the above image, we have protected the configuration for the production environment. Unless the user has the correct permissions, they will not be able to change any of the configurations that have been set for the production environment.
Step 5: Deploying the application to Kubernetes
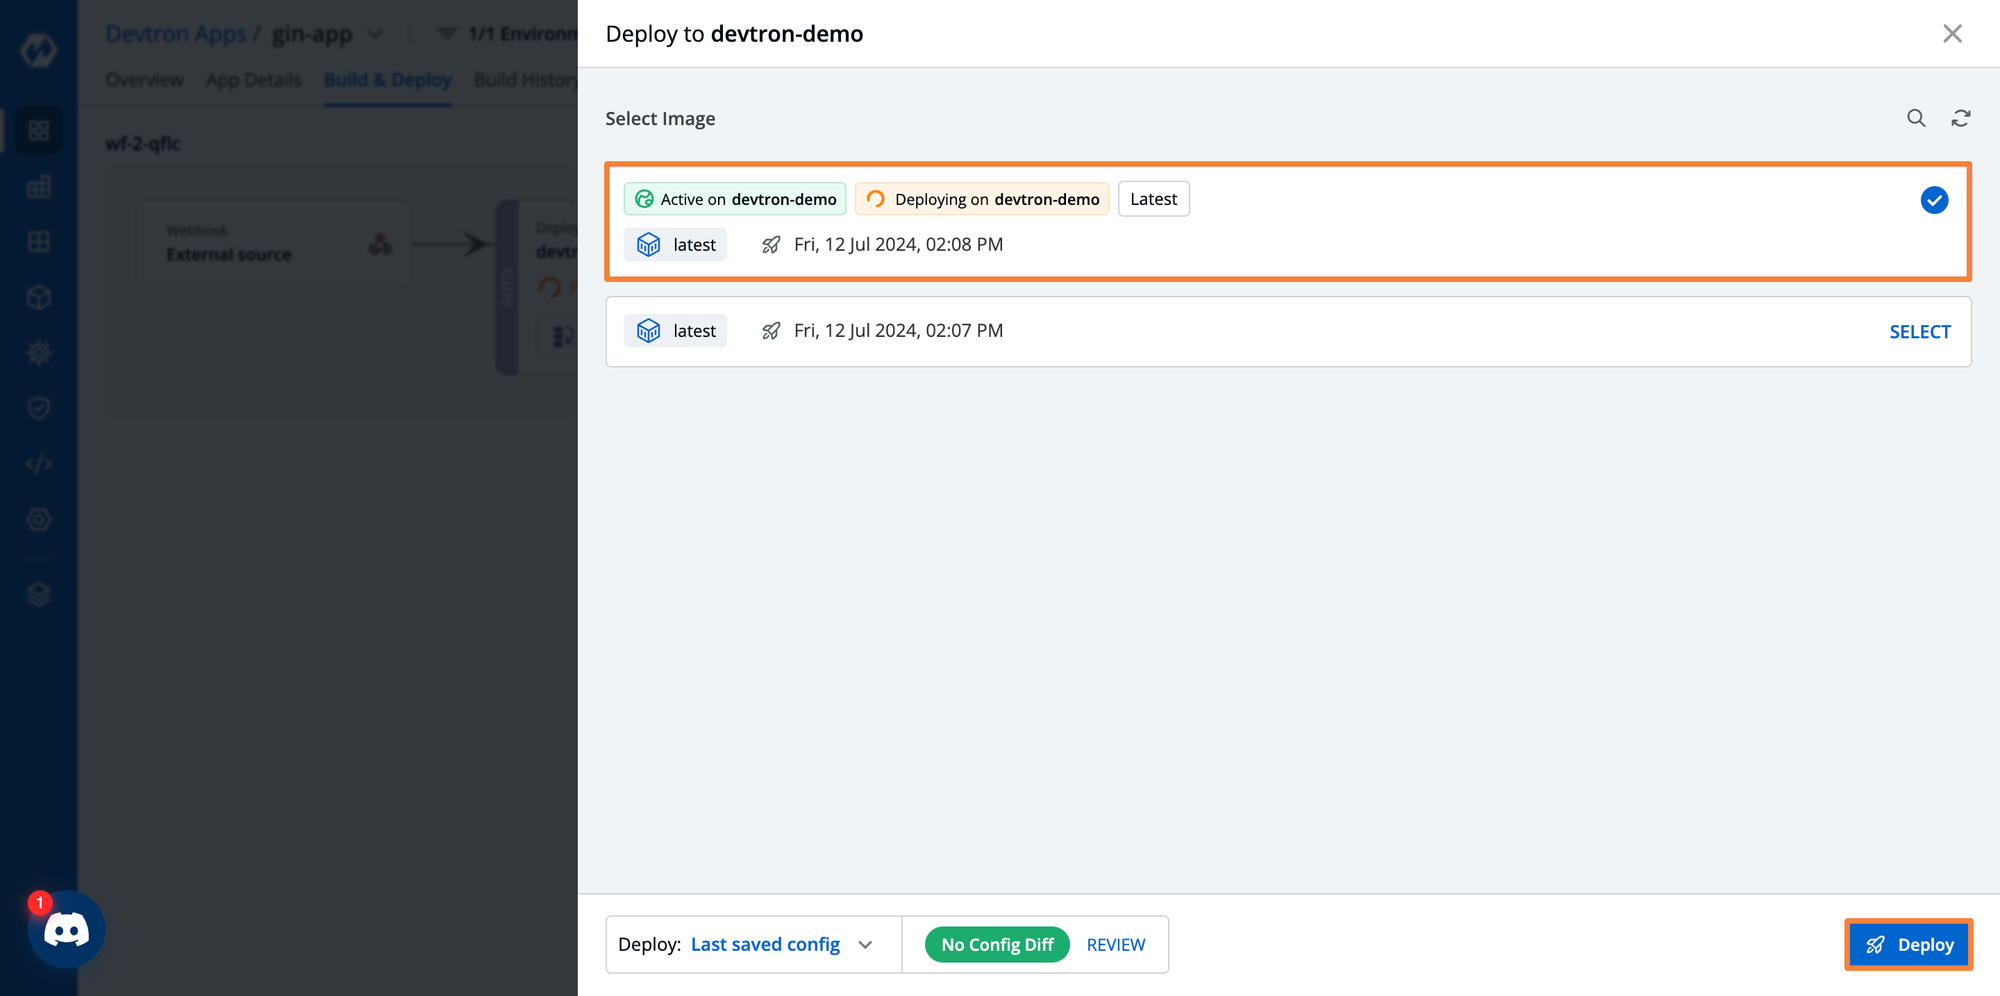
After you’ve built the application, and the curl command has successfully run, you are ready to deploy the image. In the Build and Deploy tab, you can see that the deployment stage has only the images that were sent via the curl request. Here, we can see that all the images have the latest tag, as we build the images with only one specific tag. If we used a tool such as Jinja to template the tags, each image would have a unique tag.
From here, we can go ahead and trigger a build. When creating the deployment pipeline, if you selected the automatic deployment mode, then the deployment will be triggered as soon as the curl request succeeded.
After you’ve triggered the deployment, you will be able to see the status of the entire deployment. You can also see the health of each individual resource.
The different pods, deployments, networking resources, and all other resources will be grouped into their own logical sections.

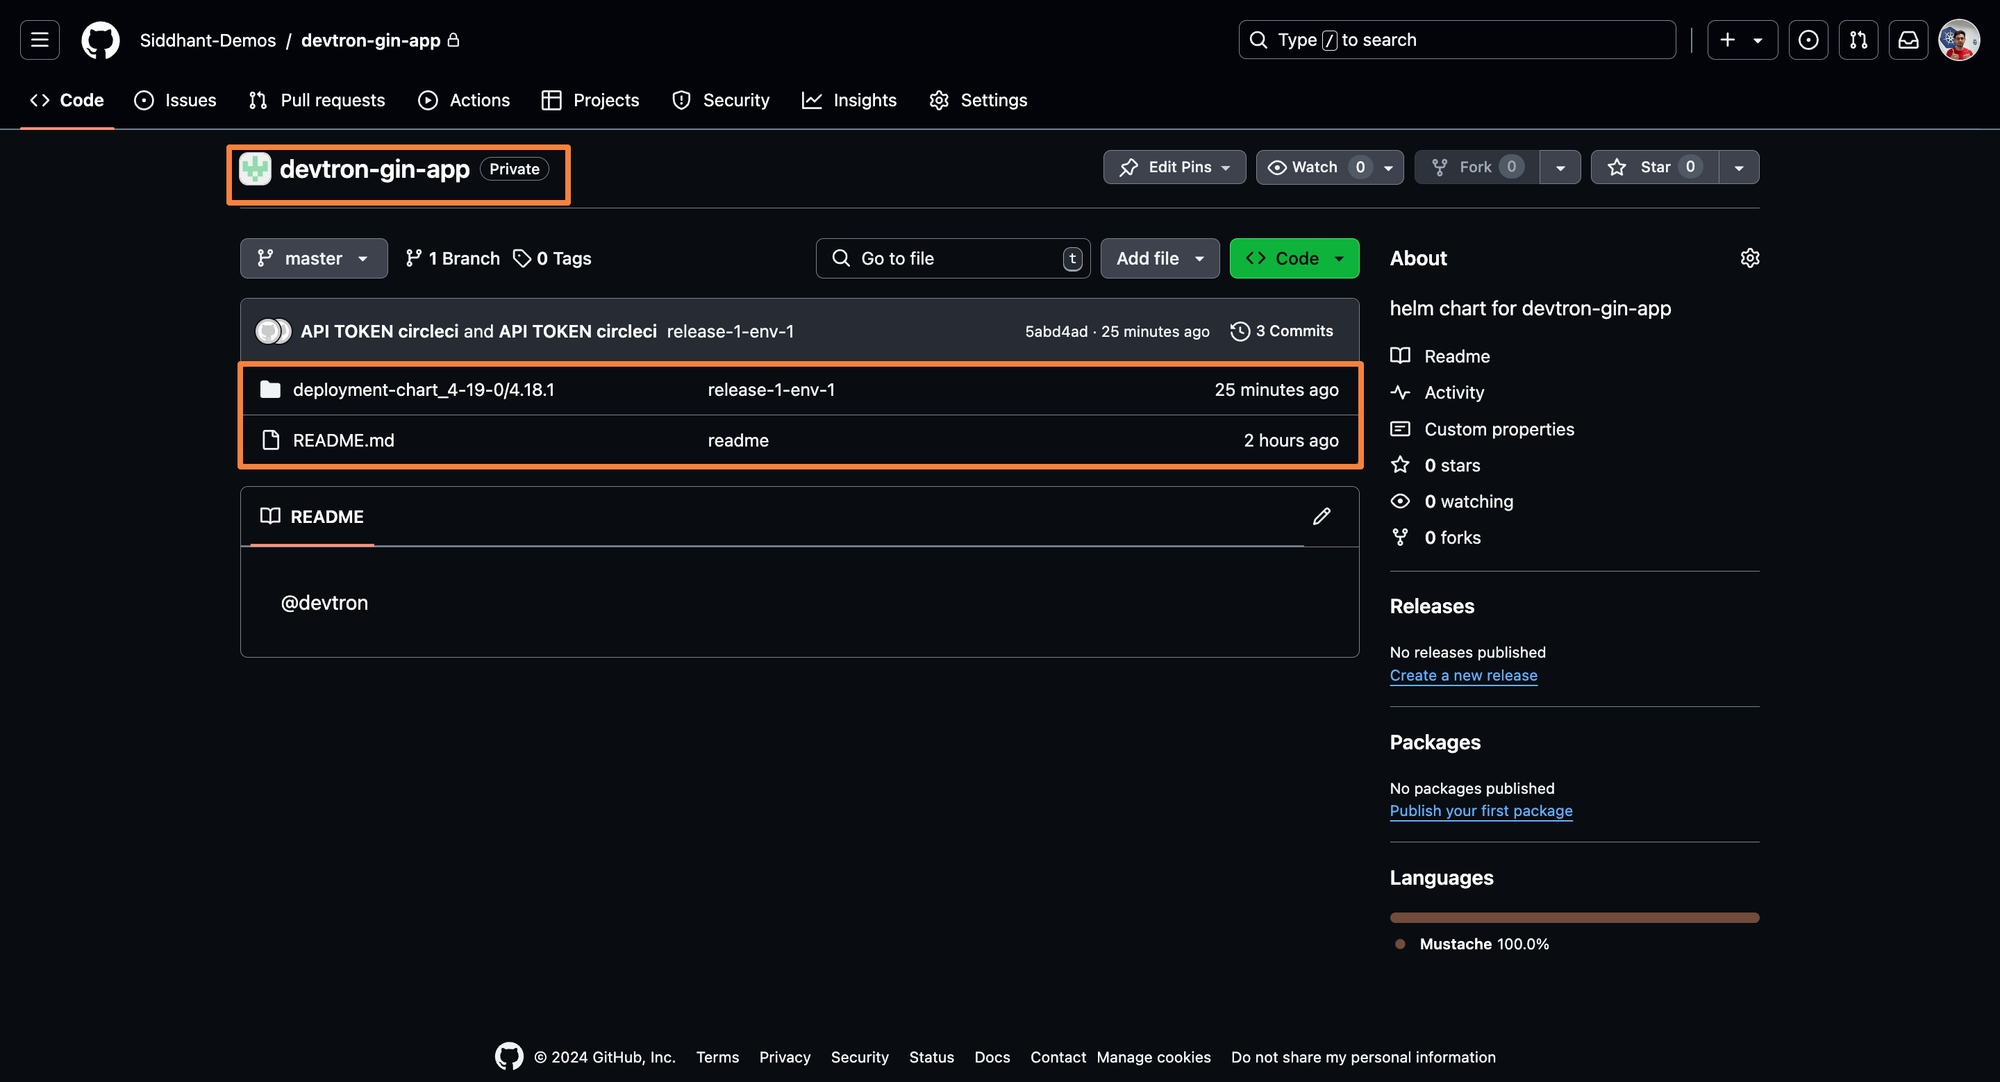
Since the application is deployed with GitOps, a private git repository has automatically been created within the organization that is configured. Devtron will sync with this repository to ensure that the resources are healthy and that there is a record of the applied manifests
As you can see above, we have successfully deployed the application. But that’s not where it ends. There are still a lot more things that we will need to do after the initial deployment is completed. Let’s explore what are some of the post-deployment features that Devtron can help us out with.
Simplifying Kubernetes Day-2 Operations
Traditionally, teams rely on a patchwork of tools like Prometheus, Grafana, KEDA, and cert-manager to monitor, scale, and govern Kubernetes environments. But managing and correlating insights across these tools quickly turns into operational chaos.
Devtron brings order to that chaos by unifying every aspect of Day-2 operations visibility, intelligence, governance, and optimization into a single platform.
- Unified Visibility: See applications and infrastructure together in one view. Detect performance degradation and resource constraints instantly, without context switching.
- Complete Operational Intelligence: Correlate metrics, logs, and dependencies to understand why issues occur — bridging the gap between app behavior and cluster health.
- Automated Governance: Enforce policies, compliance, and cost controls continuously through policy-as-code and intelligent drift detection.
- AI Operations: Devtron’s Agentic SRE continuously learns from your environment to predict failures, correlate causes across domains, and autonomously resolve up to 70% of incidents, keeping operations running even when you’re offline.
- Seamless GitOps Control: Maintain a single source of truth for every change, with full traceability and versioned rollbacks.
Read about how Devtron solves the challenges with Kubernetes complexities and day-2 operations.
Conclusion
CircleCI provides powerful CI automation but struggles with Kubernetes deployments and Day-2 management.
Devtron fills that gap, enabling GitOps-based deployments, environment-specific configurations, approvals, and post-deployment observability all in one platform.
Together, CircleCI and Devtron deliver a complete, scalable CI/CD solution that transforms Kubernetes complexity into unified operational excellence.
Join our growing Discord Community for support, discussions, and shared Kubernetes knowledge.
FAQ
Can I use CircleCI and Devtron together for a full CI/CD pipeline?
Yes. CircleCI is great for building, testing, and scanning applications (CI), while Devtron excels at deploying and managing them in Kubernetes (CD). You can connect both using Devtron’s external webhook integration to trigger deployments directly from CircleCI builds.
What makes Devtron better for Kubernetes deployments compared to CircleCI alone?
CircleCI handles automation up to build and test stages, but lacks native Kubernetes deployment visibility, rollout control, and Day-2 management. Devtron adds these capabilities — enabling GitOps-based deployments, real-time application health monitoring, and multi-environment rollouts — all within one platform.
How does Devtron simplify multi-environment and approval-based deployments?
Devtron allows you to define environments like dev, QA, staging, and production, each with custom configurations and approval gates. You can create sequential or parallel pipelines and control who can promote builds between environments — ensuring compliance and deployment safety.
What are Day-2 operations, and how does Devtron handle them?
Day-2 operations refer to managing applications after deployment — such as monitoring, scaling, and drift correction. Devtron unifies all of this with built-in observability, policy-based governance, and AI-powered operations to keep your Kubernetes environments continuously reliable and optimized.
Is Devtron compatible with other CI tools besides CircleCI?
Yes. Devtron integrates seamlessly with Jenkins, GitHub Actions, and GitLab CI in addition to CircleCI. Its webhook-based design allows you to trigger deployments from any CI system that can send HTTP POST requests, ensuring full flexibility across different workflows.