While working with Kubernetes, the cluster has many tiny internal components that all work together to deploy and manage your business applications. Kubernetes itself is a distributed system, consisting of tons of different components that work together to provide the experience that we are all familiar with. To learn about all those different Kubernetes components, please check out our blog on Kubernetes Architecture and the different Kubernetes Workloads.
In a traditional monolithic application, your main concerns would be ensuring that your application code is written securely and that the environment where it is deployed is secure and has the necessary firewalls and security permissions set up. When talking about security in Kubernetes, the story gets a lot more distributed. Since many different components work together to create and operate a cluster, you need to ensure that each individual component is secure. You have to set up proper mTLS between all the different Kubernetes components.
When you deploy your business applications, will have to once again ensure that it meets your security standards. You also need to ensure that only authorized users have access to the Kubernetes clusters and that they have the correct level of access to the cluster. Luckily, Kubernetes has a way to authenticate users to the cluster and restrict their level of access to the cluster as required.
Securing your Kubernetes cluster starts with proper access control. Devtron simplifies RBAC management, ensuring the right users have the right permissions—without the complexity.
What is Role Based Access Control (RBAC)?
Whenever a user has access to any systems, in this case, Kubernetes, you do not want every single user to have super-admin levels of access to the cluster. This can pose a security risk. Imagine handing over super-admin access to the production cluster to someone who does not know all the ins and outs of a Kubernetes cluster. There is a possibility that they may unknowingly perform some action that takes the entire cluster offline.
To avoid the above scenario, you want only one or two super-admin users that have unrestricted access to the Kubernetes cluster. Every other user like the developers, should have limited access to the cluster for only the resources they require. For example, if the development team is working on developing a new microservice called backend-beta, they should have access to the specific namespace and resources that are related to the backend-beta application to avoid accidentally messing up any other workloads running in the cluster. Kubernetes has a robust RBAC mechanism which let's you fine-grain the level of permission for each user.
An additional benefit of using Kubernetes RBAC is that it can limit the impact of accidental credential leaks. In the unlikely event that a developer's credentials are accidentally leaked, the attacker would have very limited access to the information within the cluster as the RBAC policies have limited the developers level of access. Another step that can be taken to minimize the impact is to implement time-based RBAC. After a certain amount of time, the access would expire and the token which was given to the developer would be rendered useless.
Implementing Role Based Access Control (RBAC) in your Kubernetes systems has multiple benefits such as:
- Better security: Limiting user access to the cluster, restricting access to only the required resources
- Minimize the impact of leaked credentials: Minimizing the impact of leaked cluster credentials as the malicious party would have very limited access to the cluster
- Compliance: Enables organizations to follow set security compliance standards which improves a cluster’s overall security posture
- Granular Control: Provides the ability to granularly control a user’s access to the cluster and provide only specific permissions that they require
Levels of RBAC Permissions in Kubernetes
Whenever you want to allow a user to get access to the Kubernetes cluster, you do not want to give them super admin permissions. Doing so may lead to unintended deletions of resources or a change of configurations. You want to ensure that the user has access to only a few specific resources in the cluster. If you have a developer user, they should only be allowed to access the applications that they are developing in their particular namespace.
On the other hand, if you had a node admin or a storage admin, they would require access to every single node or every single storage resource across all namespaces in the cluster. What if you have deployed an application to the Kubernetes cluster that requires some permissions to view a particular cluster resource? The application too would need to be assigned the correct level of permissions.
Kubernetes by default has several objects that help satisfy all of the above use cases and fine-grain the RBAC permissions. These objects include
- Roles: A role defines a set of permissions that are allowed. It is a namespace-scoped resource. For example, creating and deleting a pod
- RoleBindings: A RoleBinding is used to assign the permissions defined in the role to a particular user or application
- ClusterRole: Similar to a Role, with the key difference that it is a cluster-wide resource
- ClusterRoleBinging: Same as RoleBinding, with the difference that the permission is applied to every namespace in the cluster
- ServiceAccounts: When an application needs to be given some permissions, it uses a service account. The actual set of permissions is assigned to the service account object.
All these Kubernetes Objects help you to set up a robust RBAC mechanism for Kubernetes users as well as applications, improving the overall Kubernetes Security Posture.We will be looking at all the above Kubernetes objects in detail later in this article. First, let us look at how you can add a user to the cluster.
Adding a user to the Cluster
Before you can go ahead and assign RBAC permissions in the cluster, you will first need to authenticate(authN) the user to the Kubernetes cluster. To add the user to the cluster, you must create a Certificate Signing Request (CSR). The cluster signing key will use the user’s public key to authenticate with the cluster.
Let’s say that we want to onboard a new developer named John to the cluster. He has provided us with his public key. Let us create a Certificate Signing Request (CSR) to add John to the cluster.
To create a Certificate Signing Request, you will need to paste John’s public key into the manifest file below under spec.request.
apiVersion: certificates.k8s.io/v1
kind: CertificateSigningRequest
metadata:
 name: john
spec:
 request: <request>
 signerName: kubernetes.io/kube-apiserver-client
 expirationSeconds: 86400  # one day
 usages:
 - client auth
Once you’ve created the above manifest file, go ahead and apply it using
kubectl apply -f csr.yamlUpon applying the manifest, a CSR object will be created. You can check all the CSR’s made to the cluster by running
kubectl get csrYou should be able to see that John’s CSR has been created, and is pending approval. Since we already know that John is our developer user, we want to accept this request. To do so, you can run the below command
kubectl csr approve johnNow, the user John is authenticated to the cluster and has access to the cluster. The authorization permissions (authZ) still need to be set up.
If you want to add users to the cluster with ease, without creating a CSR, you can use an SSO to easily authenticate your users via their GitHub, Google, or Microsoft accounts and then assign the RBAC permissions. Please check out this blog to learn more about SSO.
Setting User Permissions
Now that you have added a user to the cluster, it’s time to set up the appropriate RBAC permissions and fine-grain the level of access for the user. As we discussed before, you can set permissions at two levels
- Namespace Scoped permissions using Role & RoleBinding
- Cluster Scopped Permissions using ClusterRole & ClusterRoleBinding.
We will take a look at how you can create RBAC rules using both types of permissions.
Role & RoleBinding
After a user has been added to the cluster, we can now go ahead and assign certain RBAC permissions to them. To do this, Kubernetes provides two objects called a Role and RoleBinding.
As discussed earlier, the role defines the set of RBAC permissions, and the role-binding assigns the role to a particular user.
Let’s say that you have a new developer called John who has joined your organization to work on a sensitive project called Project Gamma. In your existing setup, you have a separate namespace called project-gamma for all the resources of the project. You want to allow John to create deployments and pods only in the project-gamma namespace.
To enforce these RBAC rules, you have to create the proper role and role-binding resources. Let’s take a look at how you can create the two objects and assign the correct permissions to John.
Step 1: Create a role called gamma-developer-role and assign it the proper set of permissions.
This can be done imperatively using kubectl or declaratively by using a YAML file. We will be looking at creating the file declaratively.
The YAML file below can be used to create the role with the required permissions.
apiVersion: rbac.authorization.k8s.io/v1
kind: Role
metadata:
  namespace: project-gamma
  name: gamma-developer-role
rules:
- apiGroups: [""]
  resources: ["pods"]
  verbs: ["create", "get", "list", "delete"]
- apiGroups: [""]
  resources: ["deployment"]
  verbs: ["create", "get", "list"]
Let’s understand some of the important configuration fields that are described in the above manifest
- Name: Name of the role
- Namespace: The will be created in this namespace and the permissions and will be limited to it.
- Rules: These are the actual RBAC permissions that are defined. We can define multiple permissions as needed
- API groups: The API group used for targeting the specific resource. This is useful when there are multiple custom resources
- Resources: The particular type of resource that you wish to assign the permissions on.
- Verbs: The particular permission that you wish to allow for the defined resources. You can select between the following verbs: get, create, delete, list, patch, update, watch.
Step 2: Create a RoleBinding called gamma-developer-binding and configure it to use the correct Kubernetes RBAC role and assign the correct user
Once the role has been created, it also needs to be assigned to a user. Similar to the role, the RoleBinding can also be created imperatively with the kubectl create rolebinding command. We will look at how to make it declaratively using a YAML file.
The below YAML file will create the RoleBinding and assign the permissions to John.
apiVersion: rbac.authorization.k8s.io/v1
kind: RoleBinding
metadata:
  name: gamma-developer-binding
  namespace: project-gamma
subjects:
- kind: User
  name: John
roleRef:
  kind: Role
  name: gamma-developer-role
In the above manifest, some of the important configuration fields are as follows:
- Name: Name of the RoleBinding
- Namespace: The NameSpace where the RoleBinding will be created. The permissions will be limited to that namespace.
- Subjects: The subjects to which the roles should be applied
- roleRef: The permissions of the specific role that should be applied to the Subject.
Step 3: Validate the permissions
After creating the RBAC role and assigning it to the correct user using RoleBinding, it’s time to make sure that the permission works correctly.
You can use the kubectl auth can-i command to ensure that the permissions work correctly.
The command will show you if the action that you are trying to run will be successful or not. For example, John should be able to get the pods in the project-gamma namespace. But he should not be able to get the pods in the default namespace. We can verify this by running the below two commands.
kubectl auth can-i get pods -nproject-gamma --as=John

kubectl auth can-i get pods --as=John
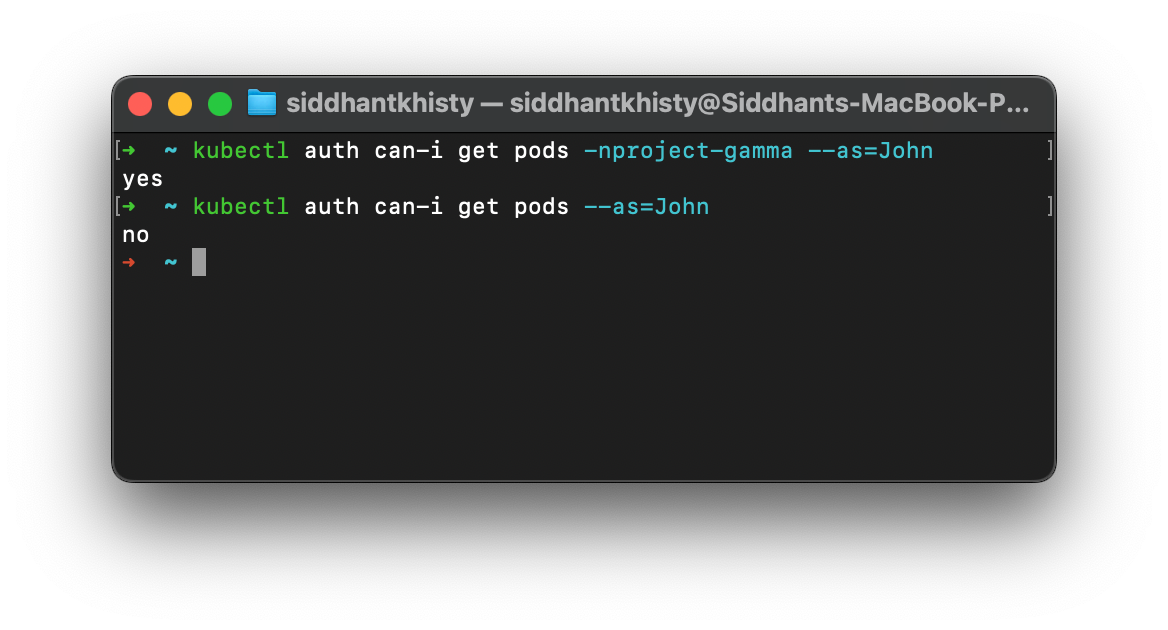
As you can see from the above image, John can get the pods in the project-gamma namespace, but cannot get the pods in the default namespace. This is the exact permissions that we wanted to create which means we have successfully created the RBAC permissions for this namespace.
ClusterRole & ClusterRoleBinding
Similar to the Roles and RoleBindings, ClusterRoles, and ClusterRoleBindings can be used to create RBAC permissions for a user. The key difference is that the ClusterRole and ClusterRoleBinding will be applied across the entire cluster i.e it will work in every namespace in the cluster. The RBAC permissions defined by the Roles and RoleBindings on the other hand are limited to the particular namespace they exist in.
Let’s look at how to create and assign RBAC permissions across the entire cluster using ClusterRole and ClusterRoleBinding with an example. Imagine that you have an application called DeploymentManager which is responsible for managing all the Deployments in the cluster. For this application to perform its functions, it needs to have admin permissions for all the Deployments in the cluster.
Let’s look at the step-by-step process for how we can assign the correct RBAC permissions for this application
Step 1: Create a Service Account
When we want to assign RBAC permissions to a user, we can directly assign it to them. However, when RBAC permissions have to be applied to an application, it cannot be directly applied to the pod or deployment of the application. Kubernetes has a resource called a Service Account which is a non-human account with a distinct identity. When an application needs certain RBAC permissions within the cluster, it is assigned to them via a service account.
Let us create a ServiceAccount called deploy-manager-sa. You can create the service account imperatively using the below command.
kubectl create serviceaccount deploy-manager-saYou also want to ensure that the application is using this new ServiceAccount. Edit the application’s manifest and update the serviceAccount field so that it uses the new service account that has been created.
Step 2: Creating the ClusterRole
As the application is responsible for managing every single deployment in the cluster, it will require permission to perform all actions on the deployments.
Similar to what we discussed with Roles, ClusterRoles can be created imperatively as well as declaratively. We saw how to create Roles in a declarative manner. Let us create the ClusterRole named deploy-manager-cr with the imperative method. You can use the below command to create the ClusterRole with the correct permissions.
kubectl create clusterrole deploy-manager-cr --verb=’*’ --resource=deployments
The above command will allow the Service Account to perform any actions on only the deployment objects. It will not be able to perform any action on any other resource type.
If you wish to run the same command using the declarative commands, you can use the following YAML manifest:
apiVersion: rbac.authorization.k8s.io/v1
kind: ClusterRole
metadata:
  name: deploy-manager-cr
rules:
- apiGroups: [""]
  resources: ["deployment"]
  verbs: ["*"]
Step 3: Create the ClusterRoleBinding
Finally, we want to create a ClusterRoleBinding to assign the ClusterRole to the Service account that we had created. Let us call this ClusterRoleBinding as deploy-manager-crb.
We will create the ClusterRoleBinding imperatively with kubectl commands. You can use the below command to create the ClusterRoleBinding such that it will use the RBAC permissions defined in the deploy-manager-cr and assign it to the deploy-manager-sa service account
kubectl create clusterrolebinding deploy-manager-crb --clusterrole=deploy-manager-cr --serviceaccount=default:deploy-manager-saThe above command ClusterRoeBinding can also be created declaratively. You can use the following YAML manifest to create the same role using the declarative method.
apiVersion: rbac.authorization.k8s.io/v1
kind: ClusterRoleBinding
metadata:
  name: deploy-manager-crb
subjects:
- kind: ServiceAccount
  name: default:deploy-manager-sa
roleRef:
  kind: ClusterRole
  name: deploy-manager-cr
Step 4: Validate the RBAC permissions
Similar to how we validated the RBAC permissions for the Roles and ClusterRoles, we also want to validate the permissions for the ClusterRole and ClusterRoleBinding using the kubectl auth can-i commands.
Let’s see if the ServiceAccount can get the deployments, as well as if it can get individual pods or not. You can use the below commands to try it out
kubectl auth can-i get deployments --as=system:serviceaccount:default:deploy-manager-sa

kubectl auth can-i get pods --as=system:serviceaccount:default:deploy-manager-sa
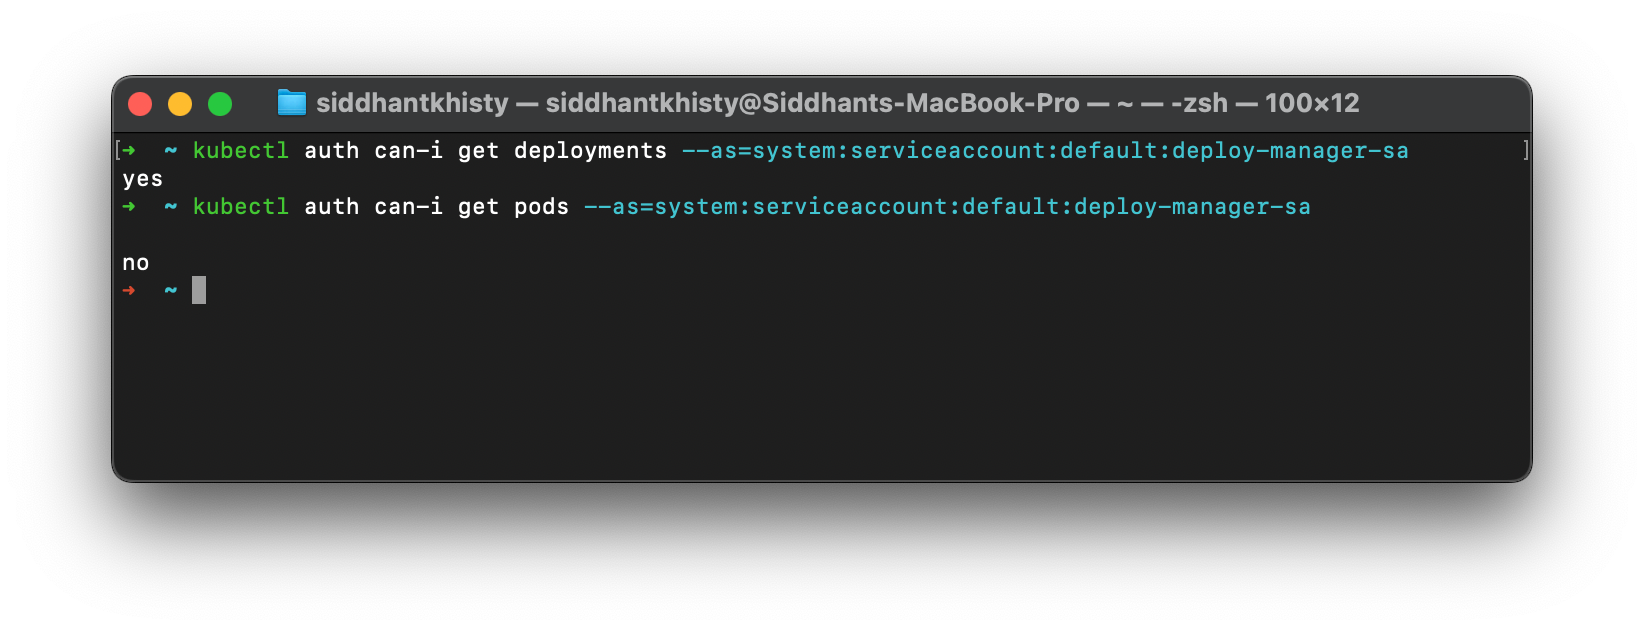
As you can see, the service account can perform actions on deployments, but cannot perform actions on any other resource such as pods. This means we have successfully set the RBAC permissions for the application.
User Accounts & Service Accounts
While we were creating the roles and role bindings in the above examples, you may have noticed that when we were assigning the permissions to a user, we directly assigned the permission to the user. However, when we wanted to give some RBAC permissions to an application, we had to do it through a service account.
- User Accounts: A user account is an account used by a human. They are intended to be a global resource i.e. they must have a unique name across all namespaces in the cluster. A user account belongs to a cluster operator such as a DevOps engineer or Developer.
- Service Accounts: A service account is an account used by a non-human i.e it is used by an application. It is a namespace-scoped resource i.e. multiple service accounts can have the same name across different namespaces. A service account is used to assign a set of permissions to applications running inside the pod.
In this blog, you’ve seen the entire process of adding a user to the Kubernetes cluster and adding fine-grained RBAC permissions for them using Roles, RoleBindings, ClusterRoles, and ClusterRoleBindings. Kubernetes provides a robust and flexible way to define the permissions for different users and applications. However, certain limitations and challenges do arise when creating the permissions with just the Kubernetes resources.
Some of the challenges with implementing Kubernetes RBAC are as follows:
- Lack of Visibility: To assign RBAC permissions to any user, you need to create multiple resources such as Roles and RoleBindings. It becomes very difficult to understand which role is mapped to which RoleBinding which makes it difficult to properly manage the permissions.
- Manual role assignment: Whenever a new user is onboarded on the Kubernetes cluster, the roles have to be manually created and assigned to the user. You cannot assign the same set of RBAC permissions to a group of users such as the developer users.
- No Time-based access: If you wish to allow access to the cluster for only a limited time, you need to manually assign the permissions, and remove them after a set period. The access does not automatically expire, and the cluster administrator needs to manually remove the RBAC permissions.
- Difficult to manage at scale: As organizations grow, the number of users that have access to the cluster increases. This in turn increases the number of Roles, RoleBindings, ClusterRoles, and ClusterRoleBindings. It becomes very difficult to manage these resources at scale as there are hundreds of them.
- Difficulty in onboarding users: When you want to onboard a new user to the cluster, you need to obtain their public keys and create a Certificate Signing Request (CSR). This CSR then needs to be approved by the cluster admin, which becomes a lengthy process. Moreover, the cluster admin needs to ensure that the correct CSR is being approved and no malicious actors get access to the cluster.
Devtron is a robust Kubernetes dashboard that makes it much easier to add users to your Kubernetes cluster by using an SSO service. It also helps you fine-grain the level of access you wish to assign to all your users. Devtron’s permissions groups can help you assign the same permissions to different users, such as all Developer users or Operations users. It also provides the option to set a time-based access to the cluster which ensures that the user has access only for a limited period.
Additional reading on how Devtron helps with Kubernetes RBAC:
- Using SSO for RBAC in Kubernetes
- Securing access to a cluster
- Kubernetes Access Management made easy with Devtron
Conclusion
Kubernetes Security has multiple aspects to it. One of the most important aspects of Kubernetes Security is properly setting up role based access control (RBAC). Kubernetes RBAC is useful to limit the actions that a user can perform in the Kubernetes cluster. A user is first added to the cluster by creating a CSR request which authenticates(authN) the user with the Kubernetes cluster.
Once the authentication is done, the user needs to be assigned the proper authorization(authZ) permissions to ensure that they have access only to the resources they require. To set up the authorization permissions in the cluster, Kubernetes provides users with Roles, RoleBindings, ClusterRoles, and ClusterRoleBindings which are useful for setting authorization permissions either at the namespace level or the cluster level.
Devtron is a Kubernetes Dashboard that takes Kubernetes Security one step further by making it easier to create and assign RBAC permissions to different users. It also provides permission groups to assign the same set of permissions to a group of users such as the developers. It also helps provide time-based access to particular resources in the cluster and revokes access once the set period has expired.
If you have any queries, don't hesitate to connect with us. Join the lively discussions and shared knowledge in our actively growing Discord Community.