1. RKE2 (Rancher Kubernetes Engine 2) is a lightweight, security-focused Kubernetes distribution with CIS benchmark compliance and hardened component images.
2. Simplified provisioning & upgrades: RKE2 clusters can be installed with just a few commands and upgraded using manual or automated workflows.
3. Production-ready out of the box: Comes preinstalled with critical components like
kubectl, CoreDNS, Ingress-NGINX, Canal, and Metrics Server.4. Ideal for bare-metal and edge environments, but requires an external load balancer like MetalLB for high availability (HA).
5. Combining RKE2 + Devtron enables a secure, production-grade Kubernetes platform with simplified day-2 operations and scalability.
What is Rancher
Rancher provides a web-based Kubernetes dashboard that simplifies the management of multiple Kubernetes clusters spinning across multiple regions. Rancher provides an intuitive interface for teams from which they can manage their Kubernetes infrastructure and cloud-native applications. The Rancher dashboard eliminates the complex and tedious process of managing Kubernetes through a command-line interface.
Rancher Kubernetes Engine (RKE2) is a Kubernetes distribution developed by Rancher Labs. RKE2 is a lightweight yet powerful Kubernetes distribution known for its security and ease of performing operations like setting up a production-grade Kubernetes cluster and handling upgrades. RKE2 eliminates the tedious and complex process of provisioning self-managed Kubernetes clusters. With just a couple of commands, we get a production-grade Kubernetes cluster that is ready with the essential components like kubectl.
Why RKE2
The very first point in “Why RKE2” I will be mentioning is the security aspect—RKE2 is well known for the security it provides for its services. To ensure the security of the Kubernetes cluster, RKE2 uses Hardened Images of the components, where each image is scanned for vulnerabilities and built on top of a minimal base image. There is a lot more RKE2 does in security—we will discuss it later in this section.
Some of the other reasons why I would prefer using an RKE2 cluster over vanilla Kubernetes clusters in my production servers are:
Simplified Installation
Provisioning of RKE2 is much simpler than vanilla Kubernetes. I was able to provision my RKE2 cluster with just a single binary file. Whereas provisioning a vanilla Kubernetes cluster using Kubeadm takes a lot more effort.
Ease of Upgrades
Every DevOps/Developer guy is well known for the pain of Kubernetes version upgrades. RKE2 provides two ways for upgrading the RKE2 clusters.
Manual Upgrades
To upgrade the RKE2 cluster manually, we have three ways:
- Use an installation script by RKE2
- Manually install the binary of the desired version
- Use rpm upgrades in case of rpm-type installation
Refer to the documentation for manual cluster upgrades.
Automated Upgrades
RKE2 also provides an automated cluster upgrade—these are handled by Rancher’s System Upgrade Controller. Refer to the documentation for automated cluster upgrades.
Production Ready
RKE2 comes with multiple preinstalled components that make it a production-ready cluster within minutes. In just a few minutes, you can connect multiple nodes.
The essential components, like kubectl, canal, coredns, ingress-nginx, and metrics-server, come preinstalled with the RKE2 cluster. Once the RKE2 cluster is up, we can use these components for production server operations.
Security
As I have mentioned above, RKE2 is well known for its security. We already discussed how RKE2 component images are hardened and scanned repeatedly for vulnerabilities. For production environments, RKE2 provides security that passes the CIS security benchmarks.
To fully secure RKE2 production clusters, some manual intervention like:
- Securing the host operating system
- Configuring Network Policies
Moreover, to strengthen the security:
- RKE2 can be installed over SELinux systems, which itself is a security-enhanced Linux kernel.
- To ensure the security of secrets, we get the option to encrypt secrets in RKE2.
For user access management, RKE2 provides easy-to-configure Token Management and Certificate Management systems.
Quick Guide for RKE2 Installation
It’s enough of theory now—let’s fire up our labs and start some hands-on. In this section, I will be walking you through the whole process of RKE2 installation and getting some applications deployed over it.
Step 1: Setting up the environment
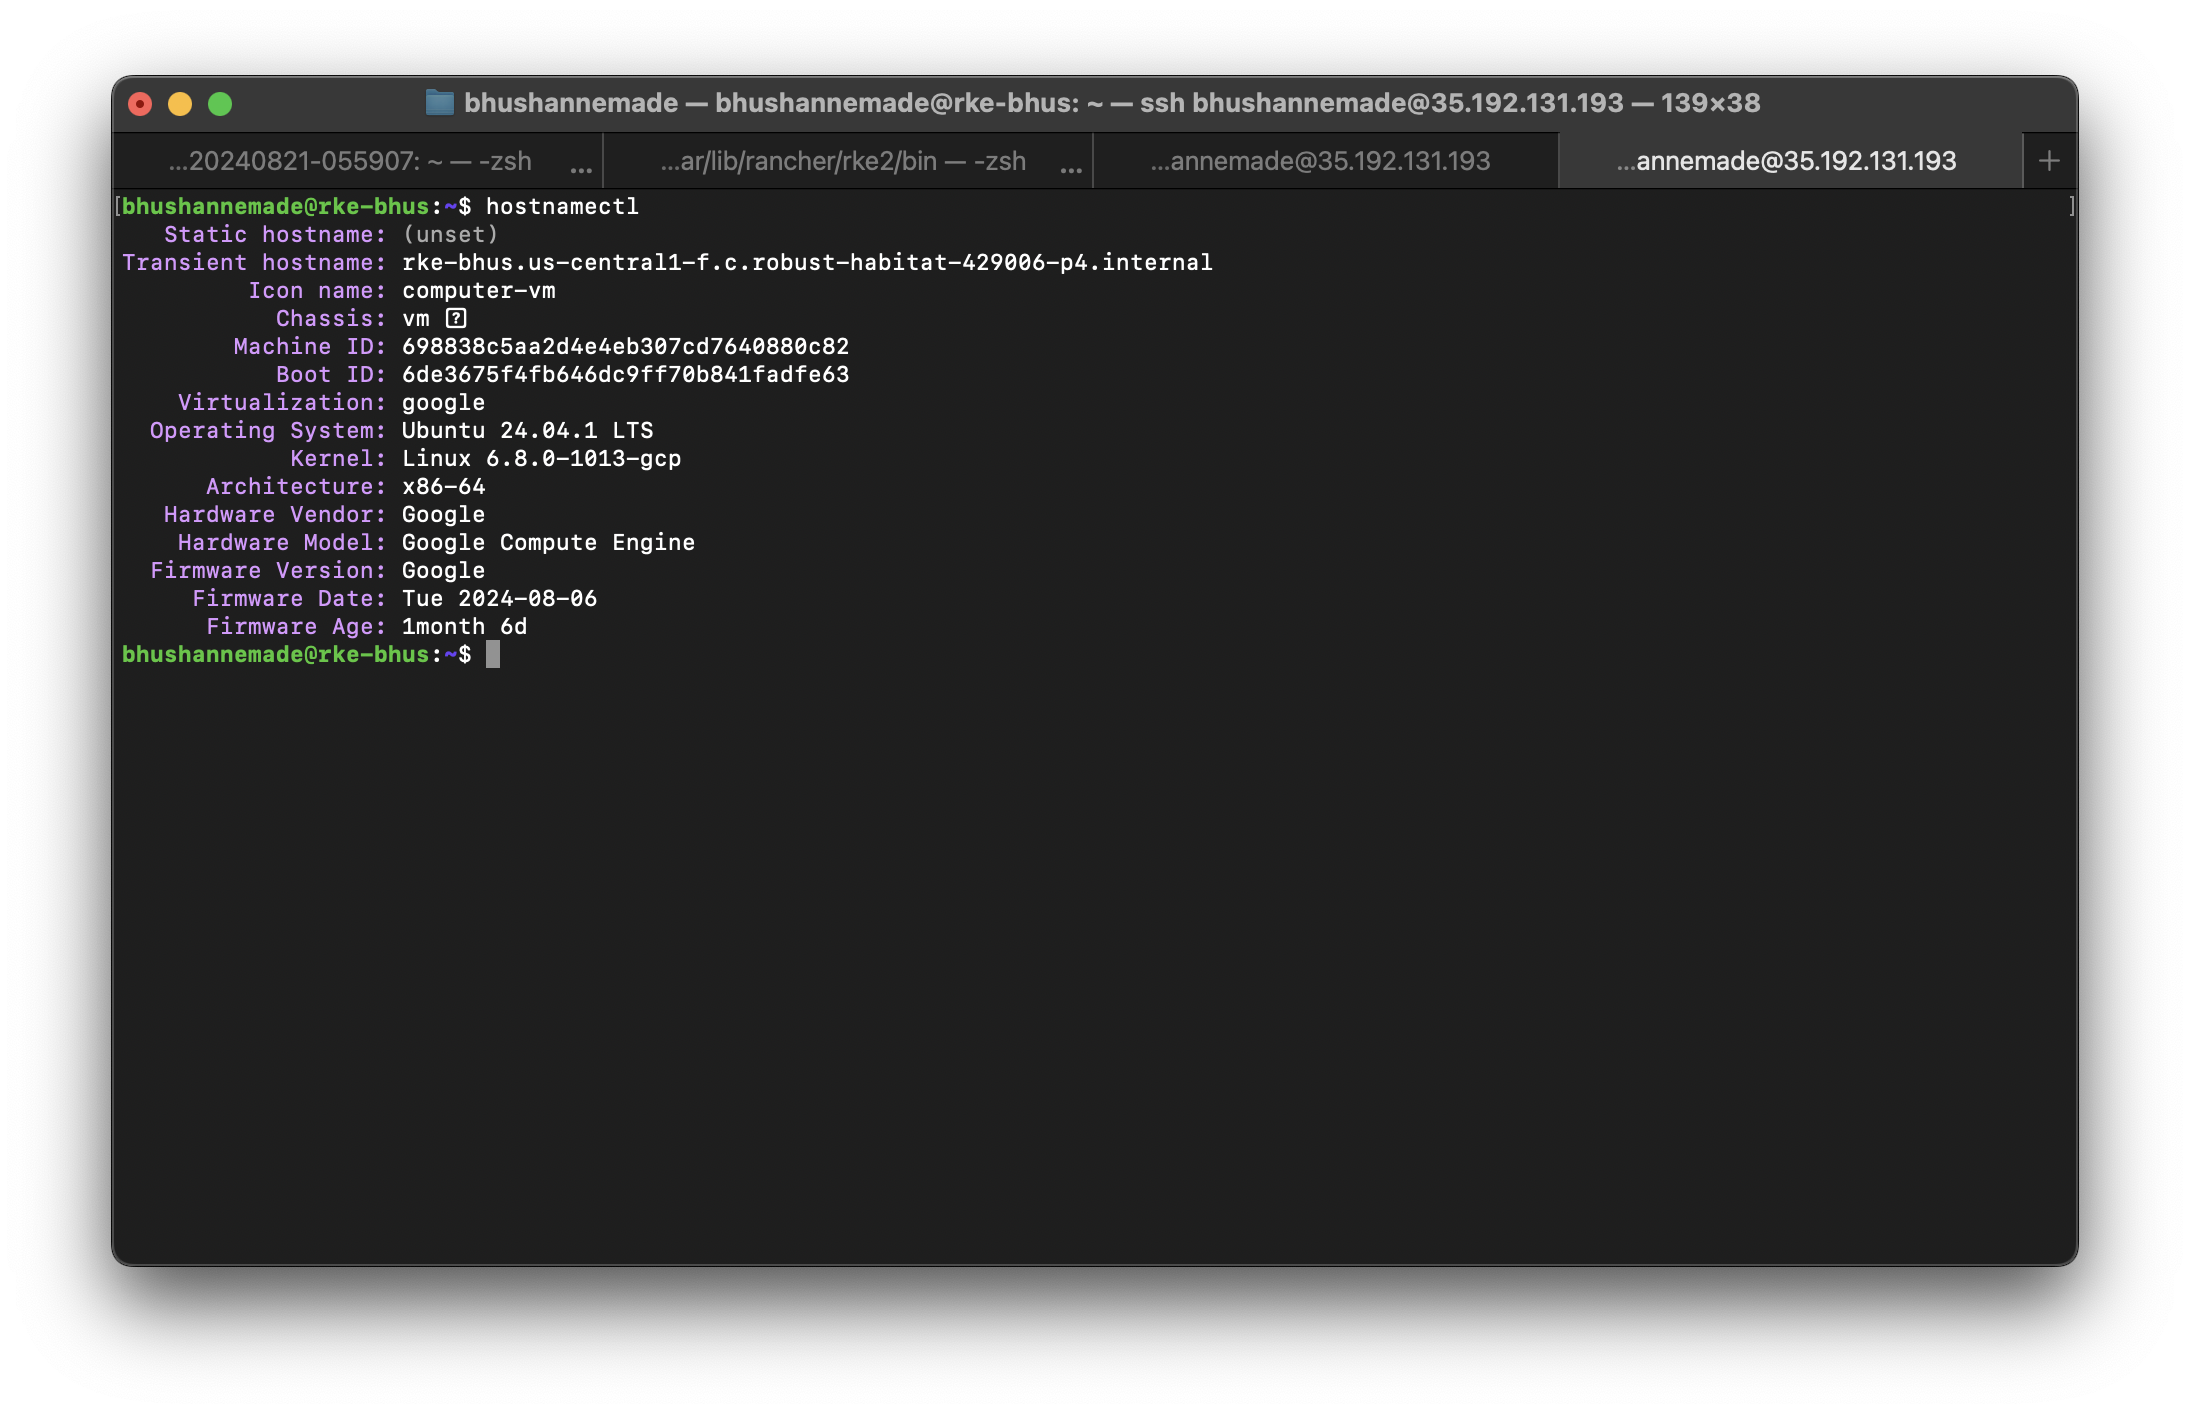
To start with an RKE2 installation, we require a VM with a Linux/Windows operating system. For this tutorial, we will be using two instances with Ubuntu V - 24.04. One will act as a server and another as a worker (Control plane and Worker node).
Tip: Use the latest LTS Ubuntu version for long-term support and smoother upgrades.
Step 2: RKE2 Server Node Installation
Before executing any command for provisioning of the RKE2 Server or Agent node, you must have root access to the machine.
A server node is a control plane for our RKE2 cluster, which has components like:
- api-server
- metrics-server
- ingress-nginx
- coredns
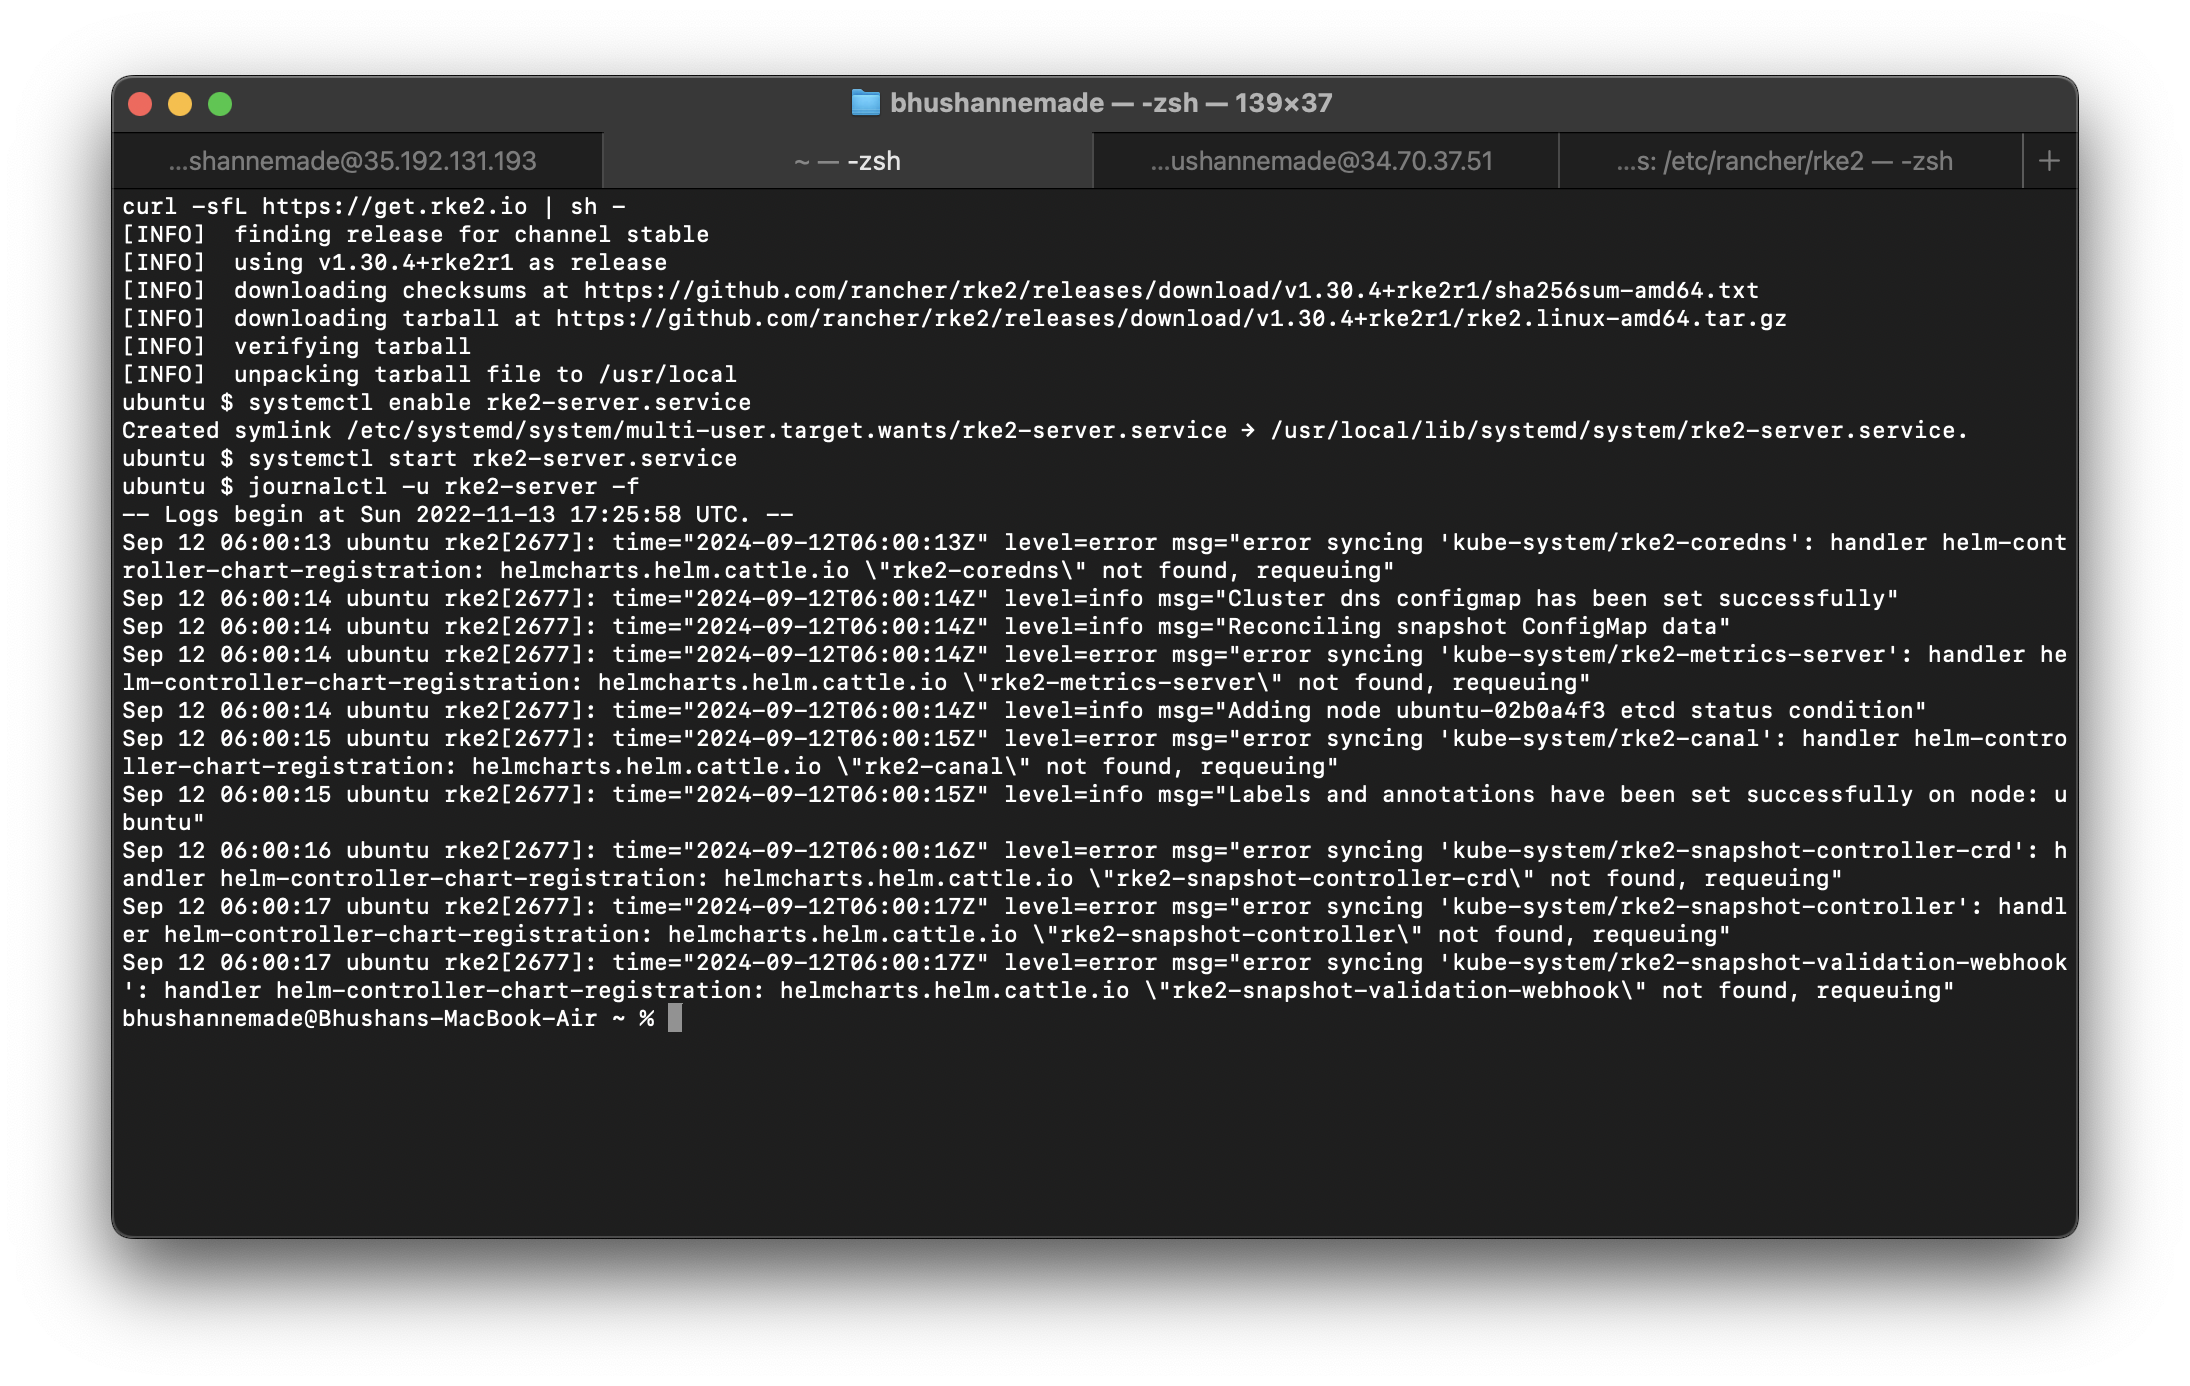
To fire up the server node, we need to execute the following commands:
- An installer service for the RKE2 server.
curl -sfL https://get.rke2.io | sh - - Enable the RKE2 server service.
systemctl enable rke2-server.service - Start the RKE2 server service.
systemctl start rke2-server.service - Optional: Observe installation logs
journalctl -u rke2-server -f
- Once the RKE2 Server is ready, get your compass for navigation (i.e.,
kubectl), navigate to: -
cd /var/lib/rancher/rke2/bin/ - Here you will see pre-installed kubectl, but the path is not configured yet. To fire kubectl commands, set the path with:
export KUBECONFIG=/etc/rancher/rke2/rke2.yaml- Now, run:
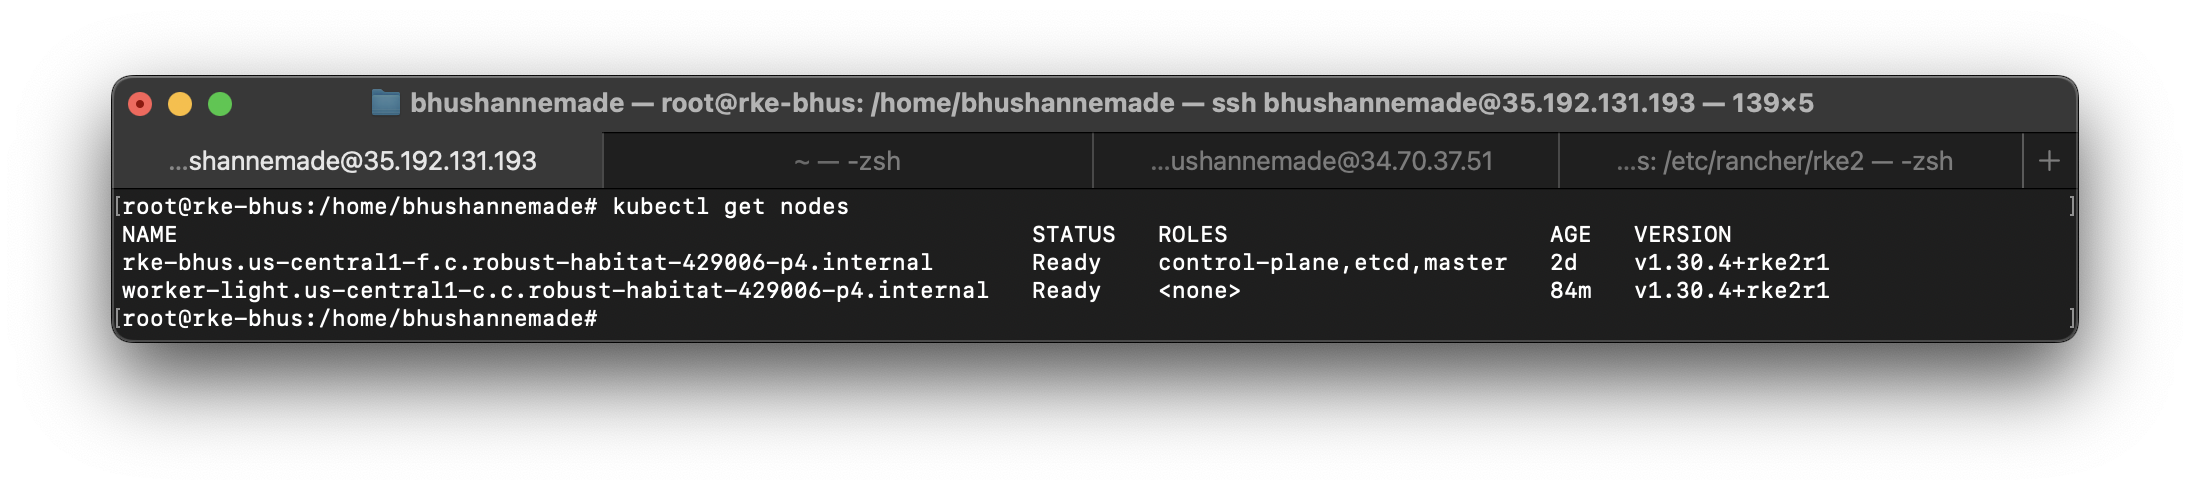
kubectl get pods- You will be able to visualize all pods and their state

The kubeconfig file for RKE2 can be found at:
/etc/rancher/rke2/rke2.yaml
You will also need to connect the Agent node to the Server node of RKE2.
Step 3: Setting up Agent Node for RKE2 Cluster
- For setting an Agent node, we will be using a VM with similar configurations to the Server node.
Save the config.yaml file and start the agent servicesystemctl start rke2-agent.service
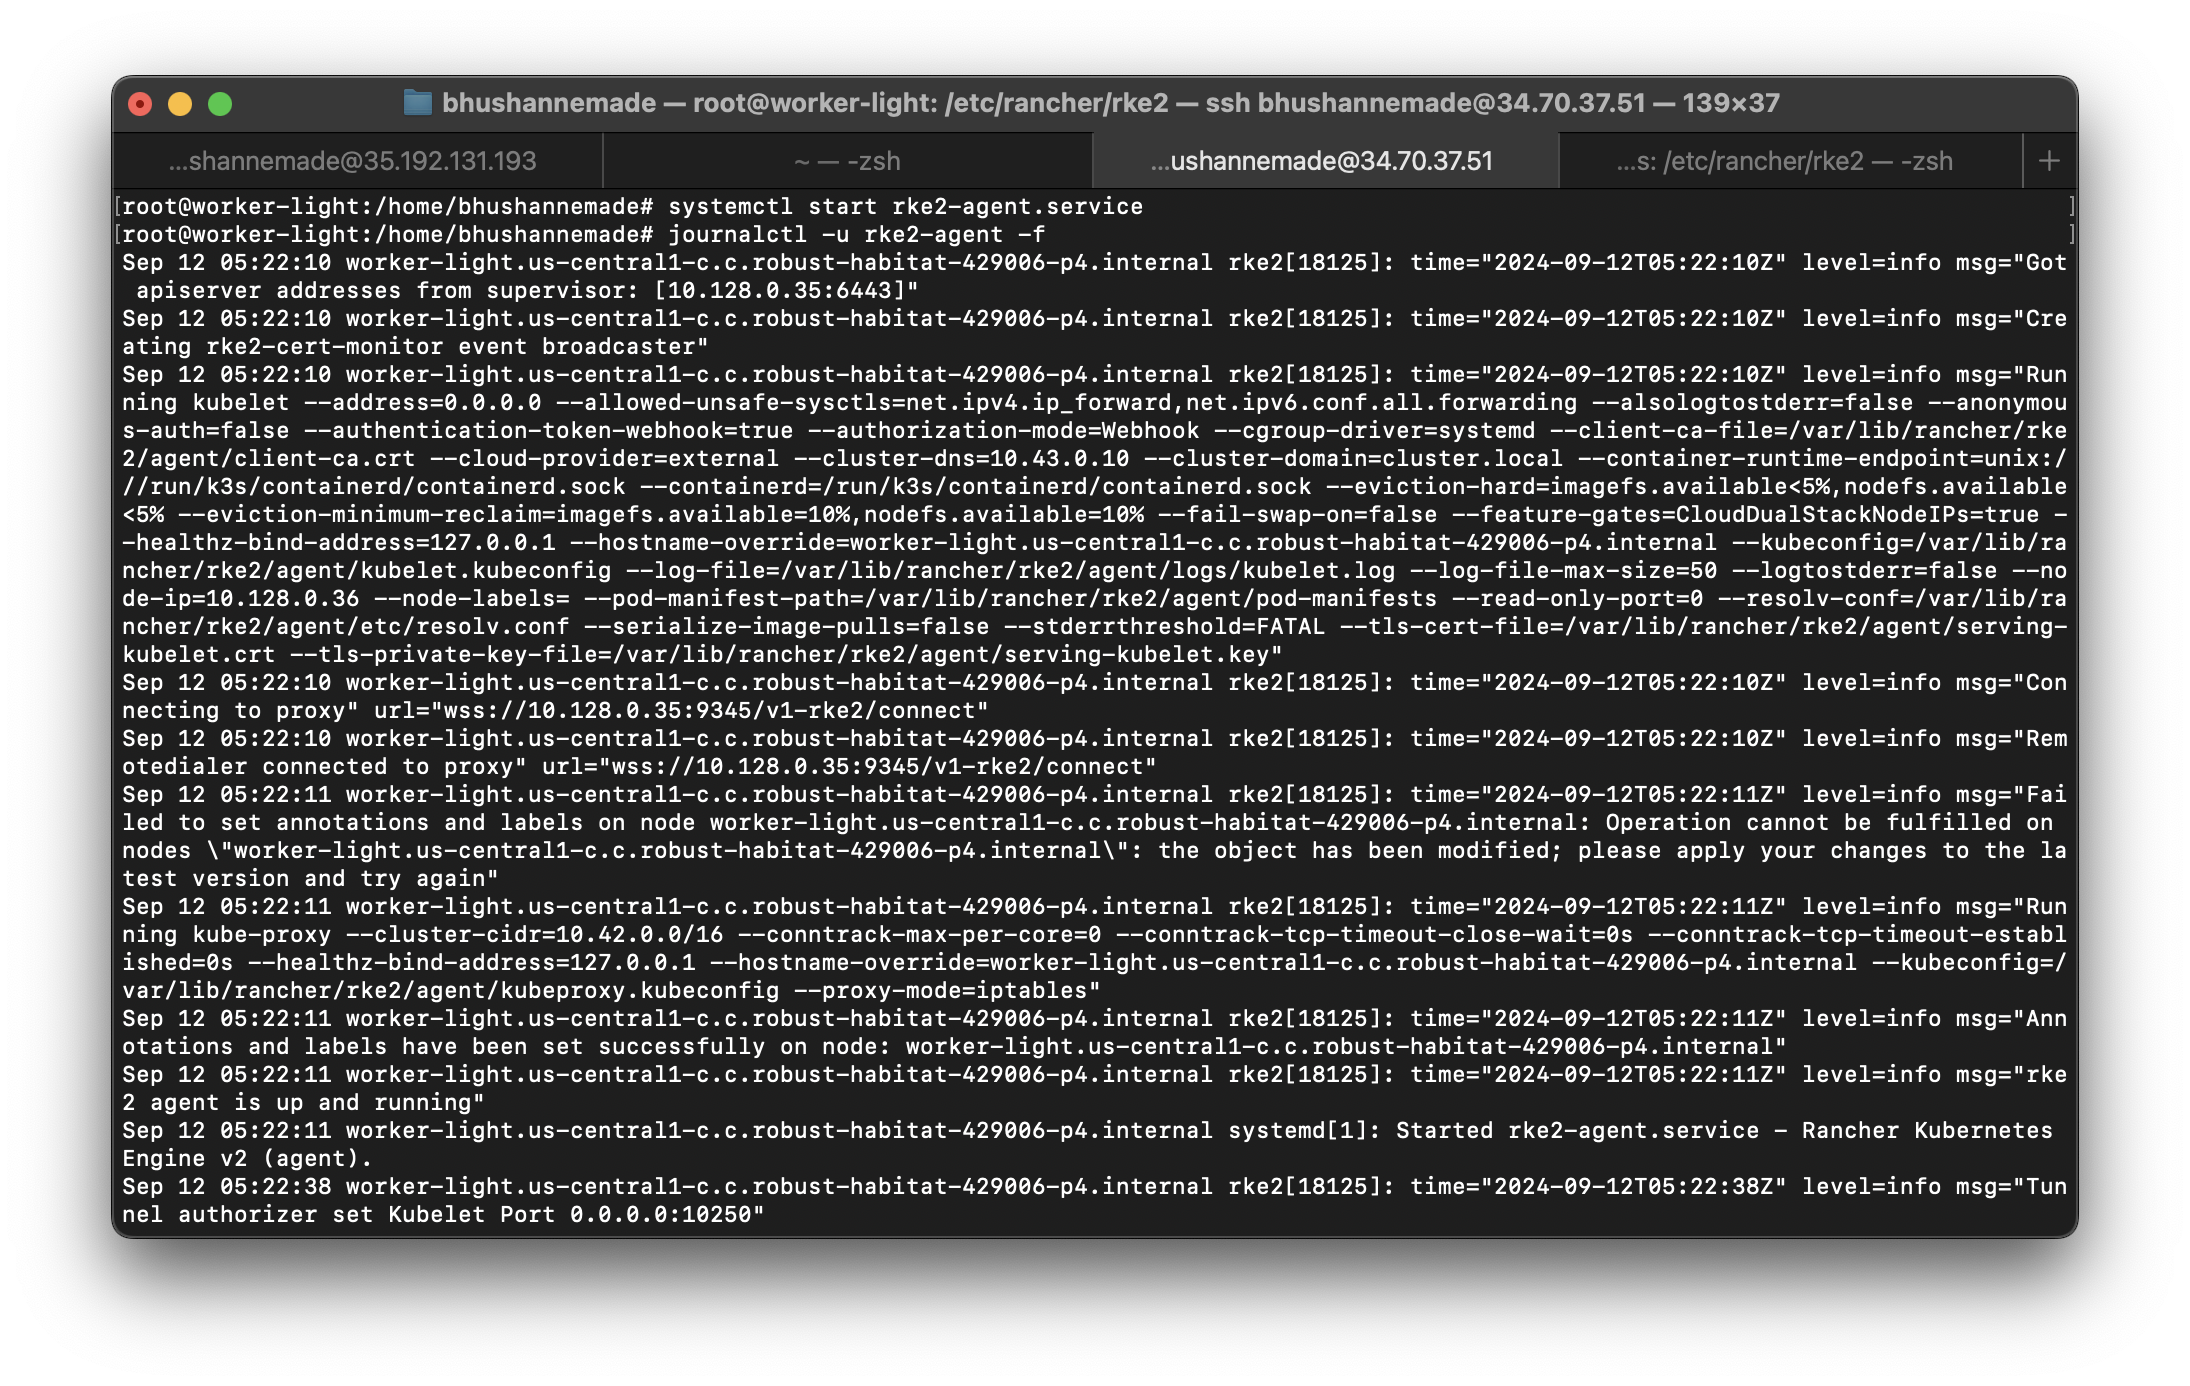
- To prepare the Agent node, we need to fire up a set of commands:
- An installer service for RKE2 agents
curl -sfL https://get.rke2.io | INSTALL_RKE2_TYPE="agent" sh -- Enable the RKE2 agent service.
systemctl enable rke2-agent.service- Now to connect an agent node with the server and config.yaml file is required on the agent node. This file includes the server address and secret token for setting up the connection.
mkdir -p /etc/rancher/rke2/configurevim /etc/rancher/rke2/config.yaml- The content that we need to put in the config.yaml is
server:https://<server>:9345 and token: <token from server node> - At <server>, provide the IP address of your RKE2 Server, and at < token from server node>, provide the node-token which can be found at:
/var/lib/rancher/rke2/server/node-tokenon the server node.- Save the
config.yamlfile and start the agent servicesystemctl start rke2-agent.service,
Step 4: Test the RKE2 Cluster
- Let’s get back to our server node and take a look at our cluster. Execute the following command to check if your agent node is ready:
Kubectl get pods
- You can also perform a small health check-up for all pods by executing:
kubectl get pods --all-namespaces- All pods will be listed with their current state

With just a few commands, we were able to get the RKE2 cluster up and running.
To make this a production-grade and high-availability (HA) cluster, we need to do a few more configurations.
- You’ll need to create a
config.yamlhigh-availability file with information on all the agent nodes.
To set up an HA cluster, refer to the official RKE2 High Availability documentation.
Running RKE2 on Bare Metal Machines
RKE2, being lightweight and easy to set up, is well-suited for bare metal environments.
However, unlike other managed Kubernetes distributions like:
- EKS (AWS)
- AKS (Azure)
- GKE (Google Cloud)
RKE2 does not come with a built-in load balancer, which is an essential requirement for HA clusters.
To address this, there’s MetalLB — an open-source project and easy-to-set-up load balancer designed specifically for bare metal Kubernetes clusters.
To set up MetalLB with RKE2, refer to their documentation or their GitHub repository.
Pros and Cons of RKE2
Pros
- Enhanced Security: RKE2 is a security-focused Kubernetes distribution. It comes with features like hardened component images and compliance with CIS security benchmarks, which makes it a strong choice for organizations with high-security requirements.
- Lightweight: RKE2's lightweight design makes it efficient and potentially more cost-effective to run on bare metal and edge servers. It requires fewer resources compared to some other Kubernetes distributions, making it suitable for various deployment scenarios.
- Ease of Upgrades: RKE2 offers automated upgrade processes, which simplify cluster maintenance and regular version updates.
Cons
- Potential Vendor Lock-in: Adopting RKE2 might make it challenging to switch to other Kubernetes distributions in the future due to dependency on Rancher-specific configurations.
Some other renowned managed Kubernetes distributions include:
- EKS (Amazon)
- AKS (Azure)
- GKE (Google Cloud)
For self-managed Kubernetes, common distributions include:
- microk8s
- K3d
- K3s
Each offers unique benefits such as:
- Simplified installation
- Enhanced security features
- Tight integration with specific cloud ecosystems
- Optimizations for particular hardware or edge environments
In upcoming blogs, we will be covering each one of them, analyzing their features, pros, and cons over vanilla Kubernetes.
- Limited Ecosystem: RKE2 has fewer third-party tools and integrations available compared to cloud-based managed Kubernetes distributions like EKS, AKS, and GKE.
- Learning Curve for Teams: Teams unfamiliar with Rancher and RKE2 might need time to adapt to its specific features and workflows. This could lead to initial productivity slowdowns.
Complexities of Kubernetes
The real game starts now—once an RKE2 cluster is up and running at the production level with multiple clusters, each having multiple nodes and hosting several applications/services. These clusters are typically spread across regions worldwide. While RKE2 eliminates some complexities at the cluster level (e.g., provisioning and version upgrades), the real challenge lies in managing the fleet of clusters at scale in production.
The complexities of Kubernetes are well-known and grow with system scale. A single misconfiguration can result in:
- Downtime for services
- Complete disruption of production environments
Managing this high-availability (HA) Kubernetes infrastructure solely with command-line tools like kubectl is not only tedious but risky. These tools are powerful but can act as double-edged swords. Common challenges include:
Kubernetes Pain Points via CLI Tools:
- Limited Visibility Across Clusters
- Complex User Access Management
- Configuration Management Difficulties
- Limited Collaboration
- Logging and Troubleshooting Complexities
- Scalability Challenges
RKE2 with Kubernetes Dashboard by Devtron
The above challenges can be significantly reduced using a Kubernetes dashboard, especially one designed for multi-cluster visibility and operational efficiency.
There are several dashboards for managing Kubernetes at scale:
- Lens
- Rancher
- Headlamp
- Devtron
Each has its own feature set, but Devtron stands out with several unique capabilities.
Visibility Across Clusters
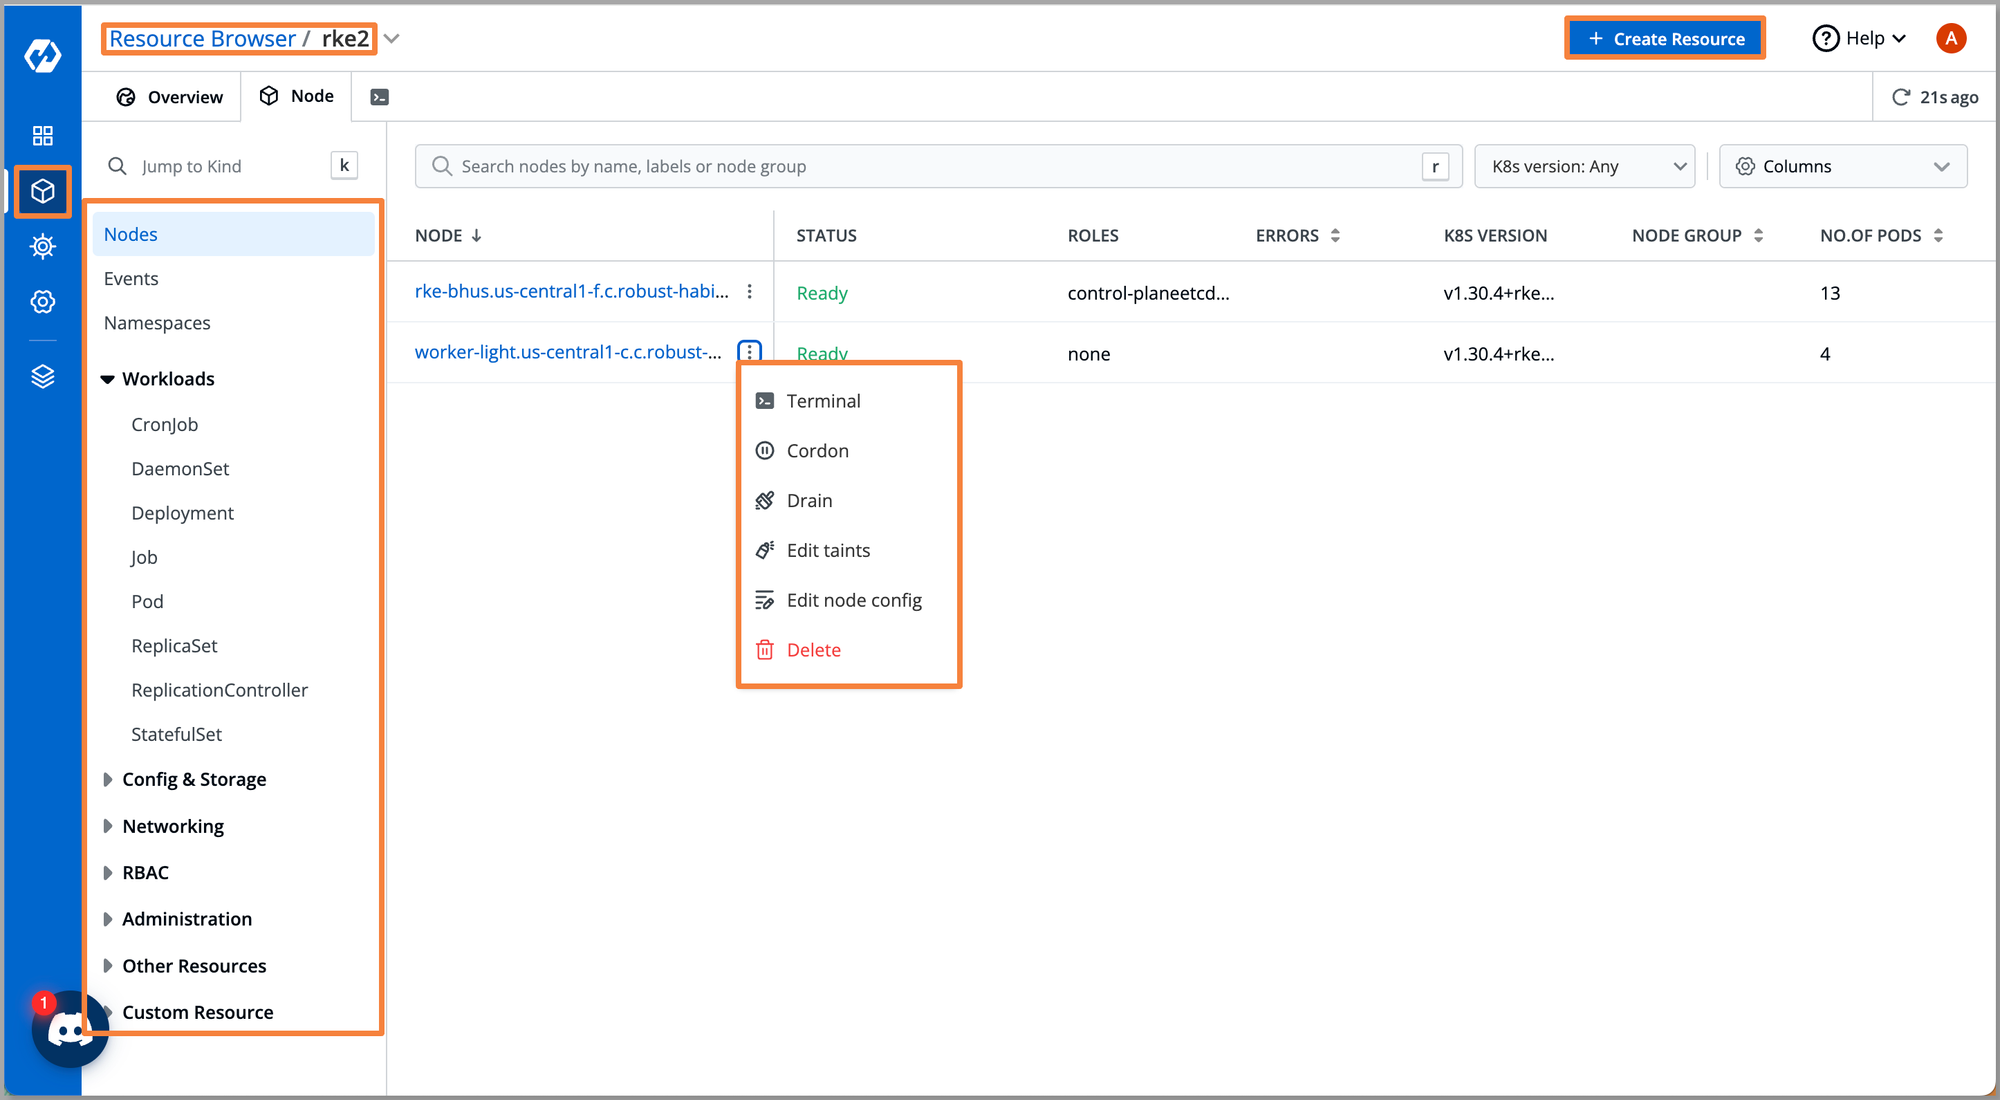
Devtron’s Resource Browser offers:
- Granular visibility of RKE2 clusters
- Ability to view each node, namespace, workload, and other Kubernetes resources
It also provides:
- Terminal access for debugging
- Cordon, Drain, Taint editing, Node config editing, Deletion actions
- Management of Pods, Deployments, Jobs, etc.
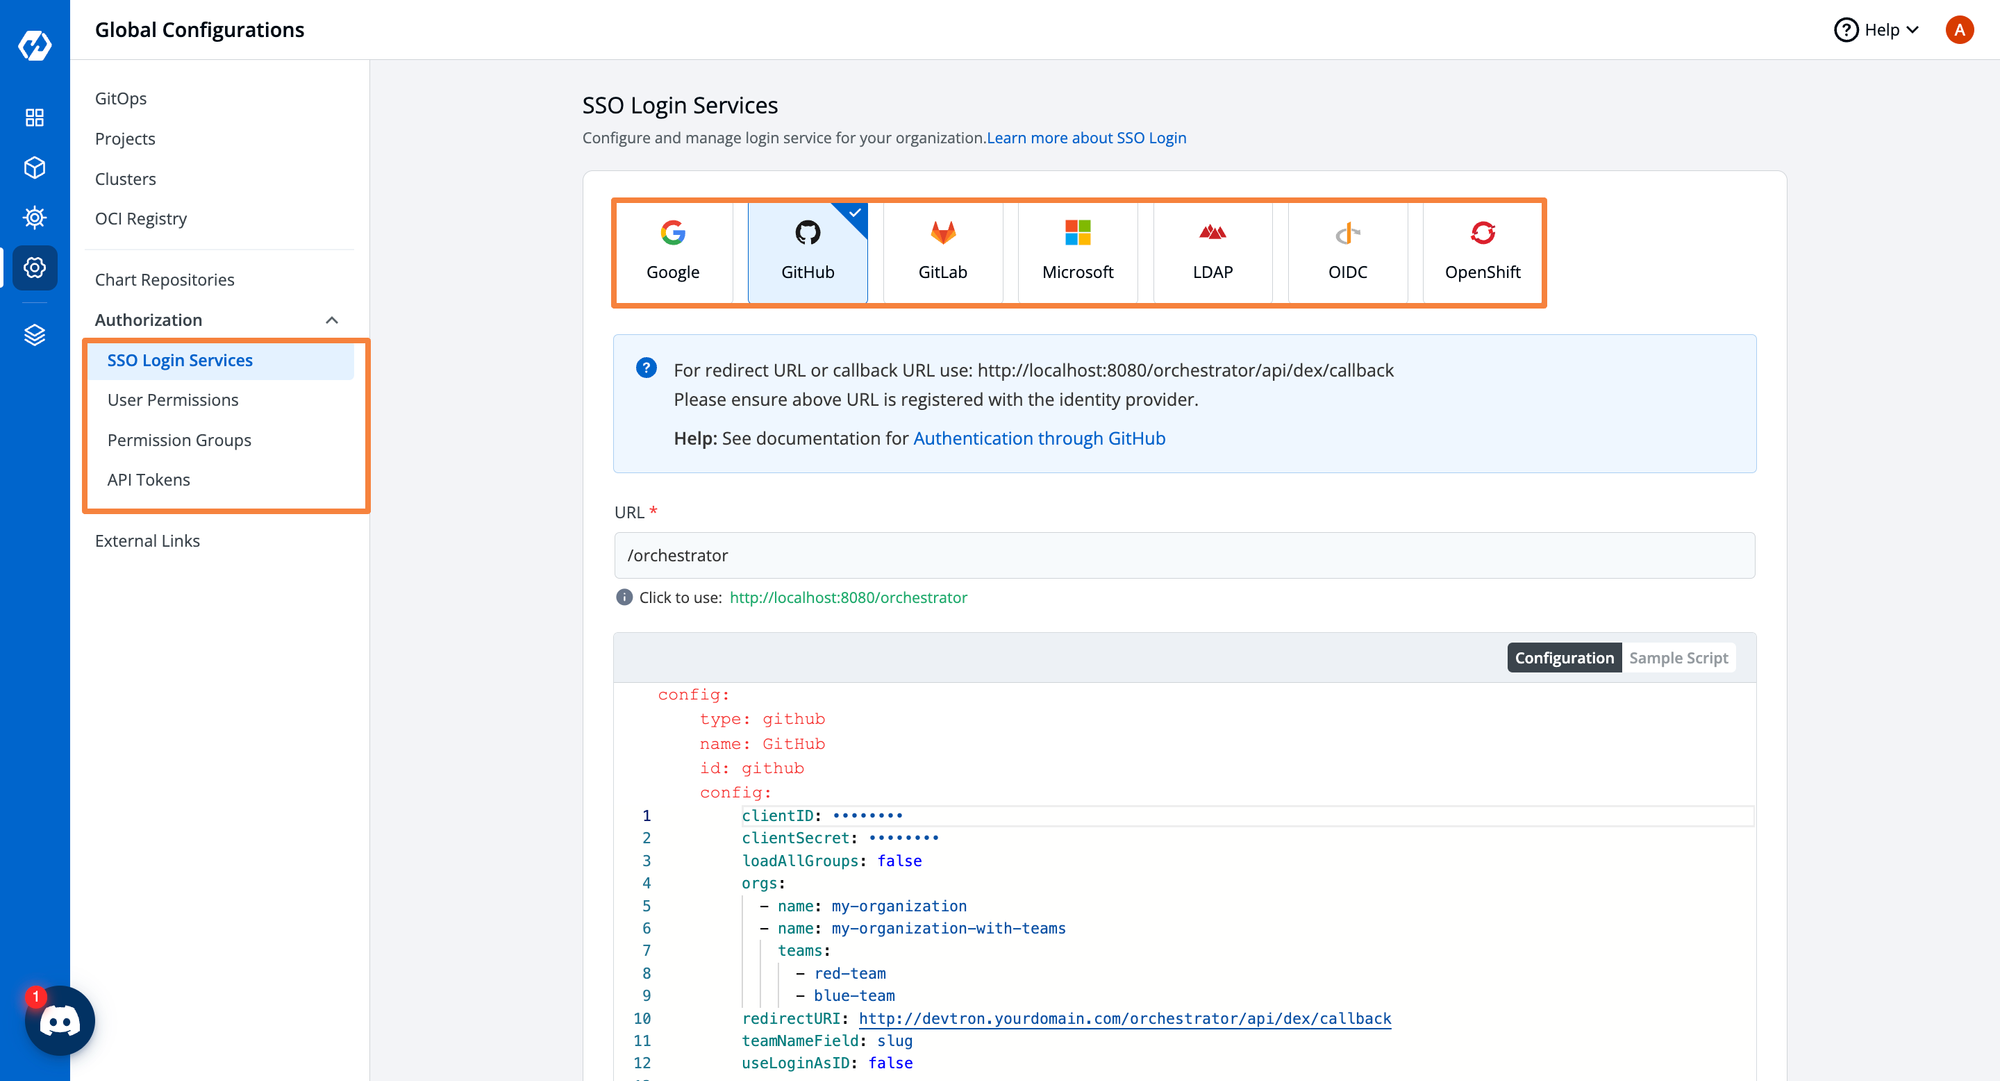
User Access Management
Devtron enables:
- Fine-grained RBAC configuration
- Creation of Permission Groups with predefined access levels
- Easy assignment to users
- SSO integration with multiple identity providers
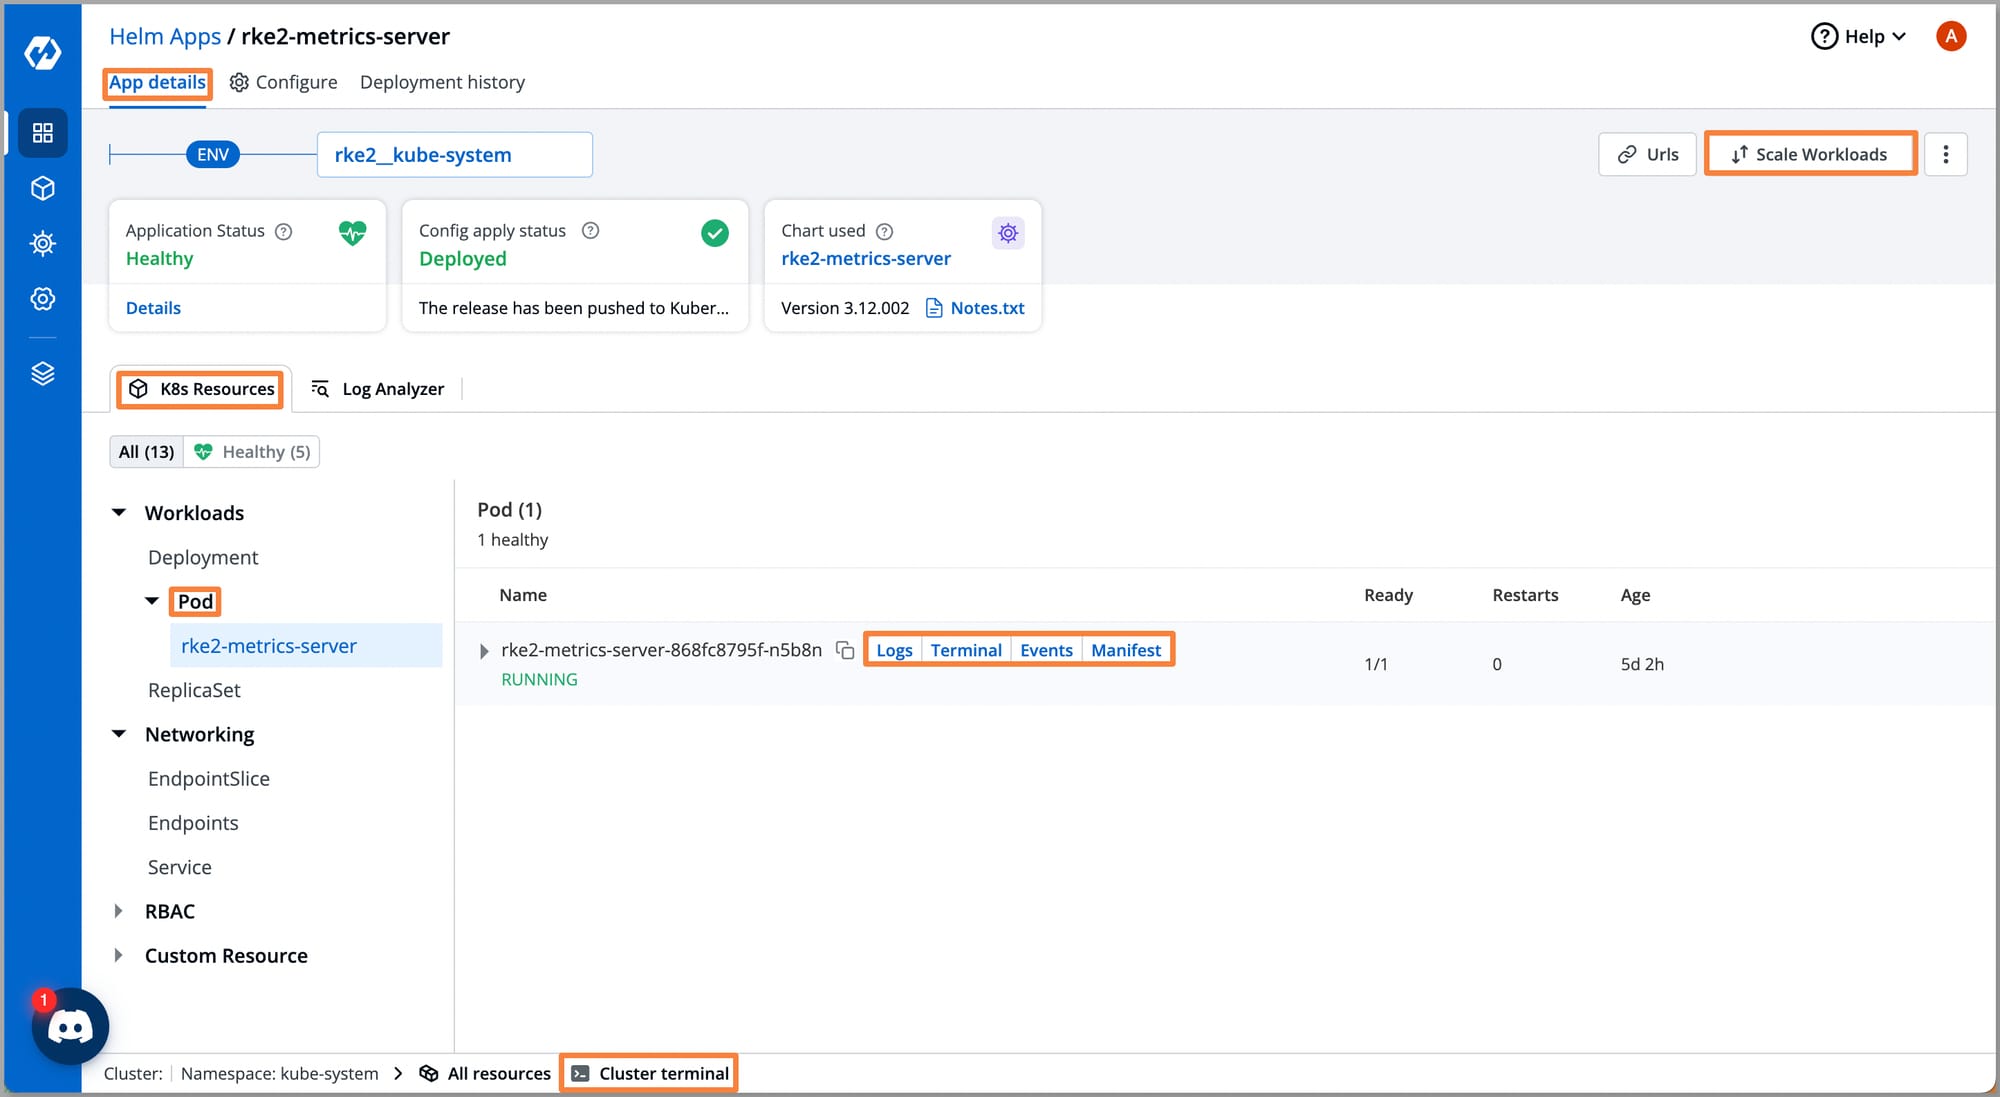
Application Live Status
Devtron provides:
- Real-time live status of applications
- Logical grouping of Kubernetes resources by app
- Integrated troubleshooting (Terminal, Logs, Events, Manifests)
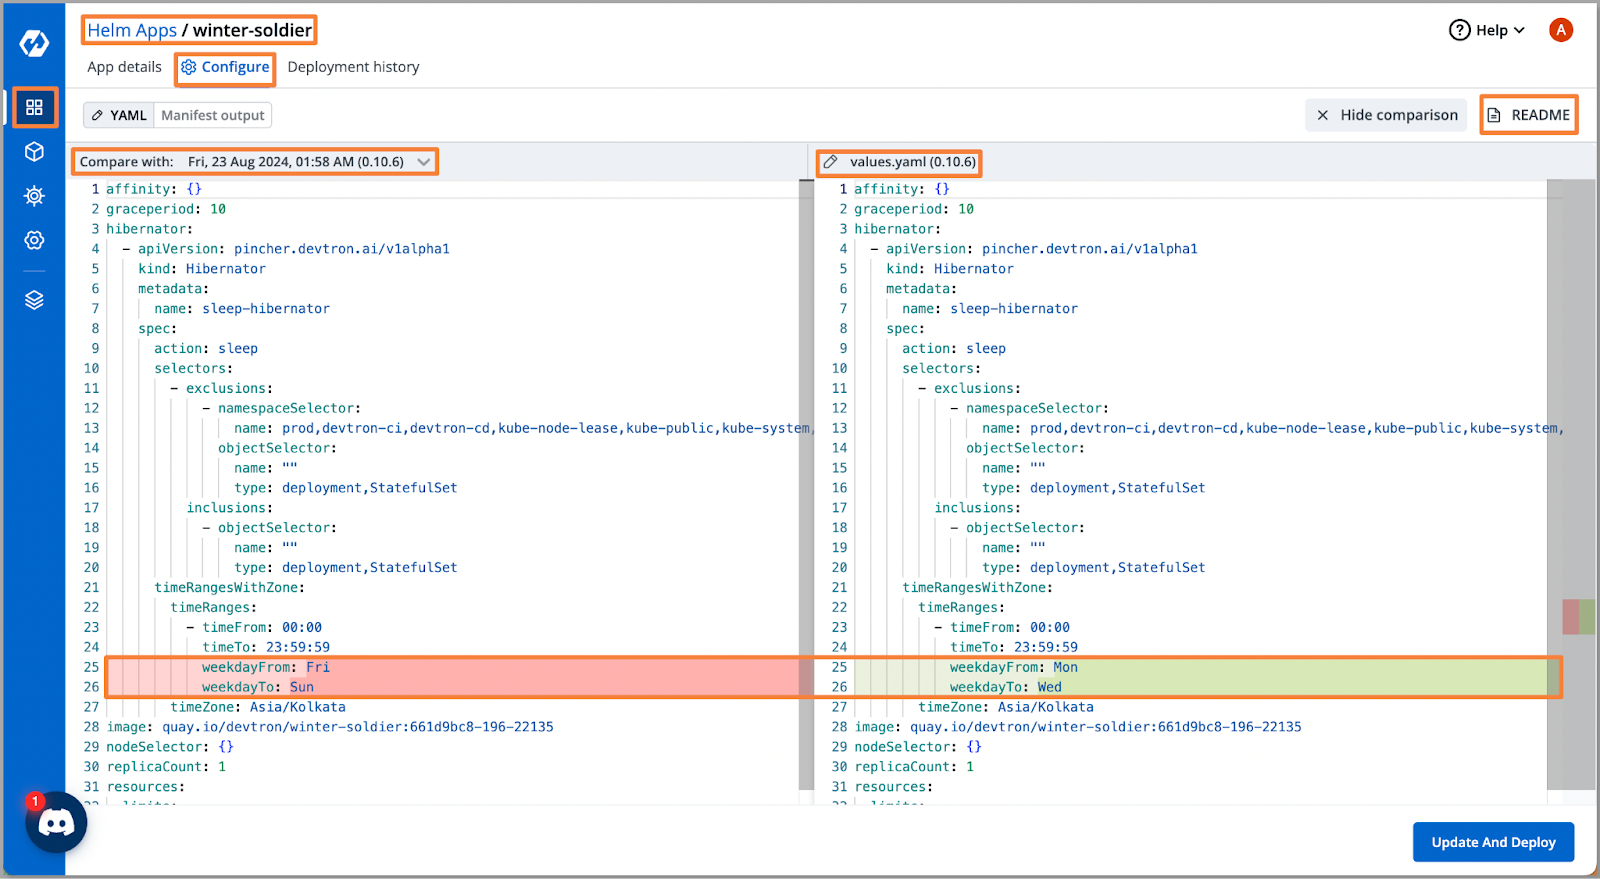
Configuration Management for Applications
A major CLI limitation is the lack of visibility into config diffs between deployments.
Devtron solves this by:
- Showing config changes between past and current deployments
- Offering complete deployment audit logs
Conclusion
Setting up a secure, production-grade Kubernetes environment doesn't have to be complex. Much is a robust combination for modern Kubernetes operations.
Frequently Asked Questions (FAQs)
What is RKE2, and how is it different from vanilla Kubernetes?
RKE2 (Rancher Kubernetes Engine 2) is a security-focused Kubernetes distribution by Rancher Labs. It wraps vanilla Kubernetes with hardened images, simplified installation, and automated upgrades to make it production-ready out of the box.
Is RKE2 suitable for bare metal or on-prem deployments?
Yes, RKE2 is ideal for bare metal environments. It's lightweight and does not require cloud-native load balancers. When paired with MetalLB, RKE2 supports high-availability (HA) setups on physical infrastructure.
What makes Devtron different from other Kubernetes dashboards?
Devtron offers multi-cluster visibility, granular RBAC, Helm application lifecycle management, built-in logs and terminal access, and configuration diffs—all from a single UI. It's built for DevOps and platform engineering teams managing Kubernetes at scale.
Can I use Devtron with an existing RKE2 cluster?
Absolutely. Devtron can be integrated with any existing Kubernetes cluster, including RKE2. Once connected, it provides real-time visibility, application deployment support, and access control capabilities.
Does RKE2 support automated upgrades?
Yes, RKE2 supports both manual and automated upgrades. Automated upgrades are managed using Rancher’s System Upgrade Controller, reducing the operational overhead of maintaining up-to-date clusters.


