Imagine that you’ve built your application, it passes all of its test cases and after months of development, it’s finally ready to be released to the Public. You go ahead and write the manifest files for deploying the application onto a Kubernetes cluster. You’ve written all the deployment specs, the appropriate services, configmaps, etc, and you go ahead and deploy the app into your production environment.
Once you deploy your application, you’re expecting traffic to start flowing in. But to your surprise, there’s no incoming traffic. You check the logs, and the application status is all good. So where does the problem lie? You soon start getting reports from users that they are not able to access your application. Upon checking, you soon realize that there’s no way to accept incoming traffic into your cluster. After doing a bit of research, you figured out that what your cluster is missing is the Kubernetes Ingress resource.
Ingress is powerful but sometimes daunting to deploy. Devtron removes the complexity so that it is usable by teams of any size. Learn how Devtron simplifies the process in order to improve productivity and collaboration.
Why do we need Ingress in Kubernetes?
Before we get on to Ingress, let’s talk about the 3 common types of Services that Kubernetes offers.
- ClusterIP: Exposes the service on an internal IP within the cluster, making it accessible only from within the cluster. So, pods can talk to other pods, but external traffic cannot access the pods.
- NodePort: Exposes the service on a specific port on each node, allowing external access. In order to access the applications using NodePorts, you need to know the Node IP and the NodePort on which the service is exposed.
- LoadBalancer: A load balancer is usually created by a cloud provider and exposes the application through a public IP. It handles how the traffic is distributed across nodes and pods.
While the above services have their uses, they fall short when it comes to handling traffic within a production environment. A ClusterIP only handles traffic within the cluster i.e Pod to Pod communication. The only way to access an application through a ClusterIP service is to port forward it to your local machine. However, to do this, the users will require access to the cluster. Hence, we won’t consider this as a valid option for a production application.
NodePort offers a better option than ClusterIPs since external traffic can access the application. When you create a NodePort service, the service is exposed randomly from the NodePort range i.e 30000-32767. These ports are static, which means that if any other service attempts to use the same port, a conflict would arise. Moreover, NodePort is not ideal for a production environment where hundreds of thousands of users are using your application. It lacks DNS support which means your users would need to know the Node IP address and NodePort number, which is not an ideal experience. Moreover, there is a limited load balancing capability which means your end-users will need to manually figure out which Node to access.
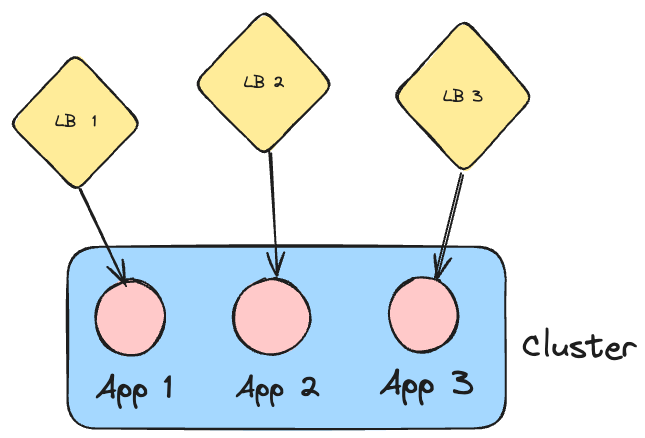
The final option, which answers all of our problems, is LoadBalancer. A LoadBalancer is typically a separate entity itself which is created by your cloud provider. It provides robust load balancing between different nodes and group of pods. Since it exposes applications on a Public IP, you can easily map it to a DNS record and provide a seamless experience for your users. The challenge with a LoadBalancer is that a new LoadBalancer is created for every single service. Take, for example, you have 3 services of type LoadBalancer, exposing 3 different applications. The cloud provider will provision 3 unique load balancers for each service. This very quickly increases the cluster costs.
When we introduce an Ingress resource within the cluster, the need for multiple LoadBalancers is eliminated. Let’s try and understand what exactly is Kubernetes Ingress, and how it’s useful for managing incoming traffic within your clusters.
What is Ingress?
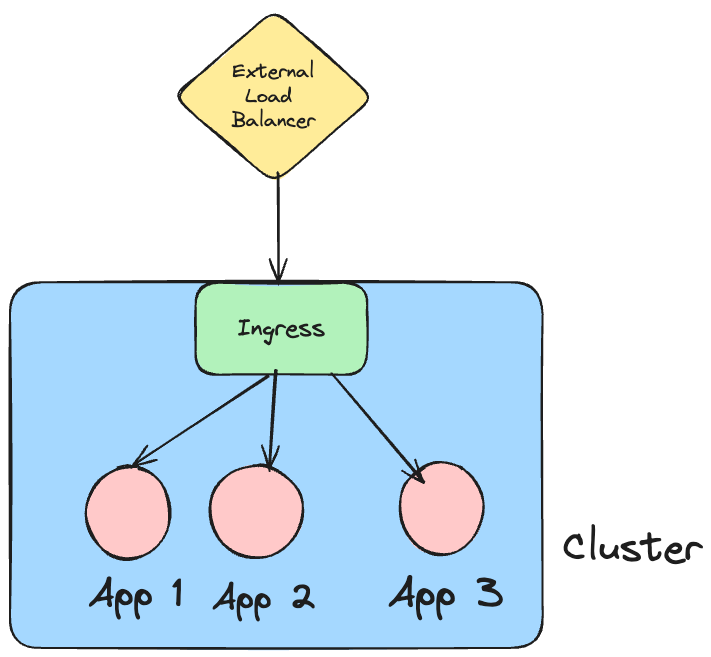
Within Kubernetes, Ingress is an API object that handles external access to the cluster and provides load-balancing capabilities based on certain rules that you can define. An Ingress can act as a single point of entry for your Kubernetes cluster. Instead of requiring to expose multiple services individually, you can use an Ingress to provide access to those applications.
It provides support for TLS termination allowing you to manage HTTPS traffic and offload the TLS processing from your application services to the Ingress resource. In order to use Ingress, you will need to have an Ingress controller installed within your cluster. Some popular options for Ingress controllers include NGINX, Apache APISIX, Contour, and HAProxy. There are many more Ingress controllers than these. You can find a list of the available Ingress Controllers in the official Kubernetes documentation. In certain scenarios, you may not need to install an Ingress controller. The controller may come built into CNI solutions such as Cilium.
With the introduction of an Ingress within your cluster, you don’t need to provision multiple external load balancers to gain access to your applications. You can have just one single external load balancer for exposing the Ingress to your end users. The Ingress will then determine how to distribute the traffic within the cluster, and your different applications.
Types of Ingress Routing in Kubernetes
Earlier in the blog we discussed that an Ingress acts as a single point of entry for external traffic to access the Kubernetes cluster. But how does the ingress know which is the correct service to redirect the traffic to?
Within Kubernetes, two types of Ingress routing are commonly used. Let’s understand what both of these types are.
Path-Based Ingress Routing
Within ingress, Path-based routing directs incoming traffic to a particular service based on the URL path. Imagine that you have 4 applications, all mapped to the same domain. With Path-based ingress routing, you will have a path within the main URL to determine which service your users will land on. For example, let’s say that the URL is foobar.com and the 4 services are pictures, movies, booking and cart.
The different paths and the services that the paths will point to will be as follows:
| URL | Service Pointed to |
|---|---|
| foobar.com/pictures | pictures |
| foobar.com/movies | movies |
| foobar.com/booking | booking |
| foobar.com/cart | cart |
Path based routing is useful when your application has multiple subcomponents. It provides a lot of flexibility in directing the traffic to the correct microservice, and this method is quite scalable at the same time.
Host Based Ingress Routing
Host based routing on the other hand, helps redirect traffic based on the provided host. It splits your applications using multiple subdomains. Similar to the above example, imagine that we still have the same 4 services called as pictures, movies, booking and cart. And our main domain is also foobar.com. With Host based Ingres Routing, our services will be accessible on the following URLs
| URL | Service Pointed to |
|---|---|
| pictures.foobar.com | pictures |
| movies.foobar.com | movies |
| booking.foobar.com | booking |
| cart.foobar.com | cart |
Host-based routing in Kubernetes Ingress provides a clean and efficient way to route traffic based on the requested hostname. This is particularly beneficial for managing multiple applications or services that require their domains or subdomains For example, you can separate multiple internal toolings such as the DNS to your grafana dashboard using Ingress. So instead of having a raw IP address or having to port forward the grafana dashboard, your DNS record can be as simple as grafana.dummy-organization.com
Ingress vs Gateway API
In recent years, the Gateway API project has been gaining popularity and is being used instead of Ingress. Both these resources are useful for managing external traffic. The key difference lies in how they are implemented and their functionality.
Let’s first talk about Ingress. Throughout this blog, we’ve discussed Ingress, and we know that to use Ingress, we need to add an Ingress controller. While Ingress is very useful, it has a few limitations. One of the major limitations is that Ingress works only on HTTP/S traffic on L7. If for example, you want to use a different L7 protocol such as gRPC or a L4 protocol such as TCP or UDP, ingress falls short. To handle this traffic, you would have to introduce a custom controller extension, rather than using the native ingress capabilities. This causes fragmentation since enabling features such as authentication, rate limiting policies, and advanced traffic management depend on vendor-specific or platform-specific custom annotations.
In order to solve the above limitations of Ingress, the Gateway API project was created. It defines a common set of Kubernetes resource objects and usage patterns that all compliant gateways must support. The Gateway API supports both L4 and L7 protocols including TCP, UDP gRPC, and HTTP, which makes it a lot more flexible than an Ingress resource.
Implementation within Devtron
Now that we understand what an Ingress resource in Kubernetes, and what are its benefits, let’s go ahead and see how we can get started with using Ingress.
Prerequisites
Installing an Ingress Controller
As we discussed before, to add an Ingress object to your Kubernetes cluster, you first need an Ingress controller. For us, we will be using the Nginx Ingress controller.
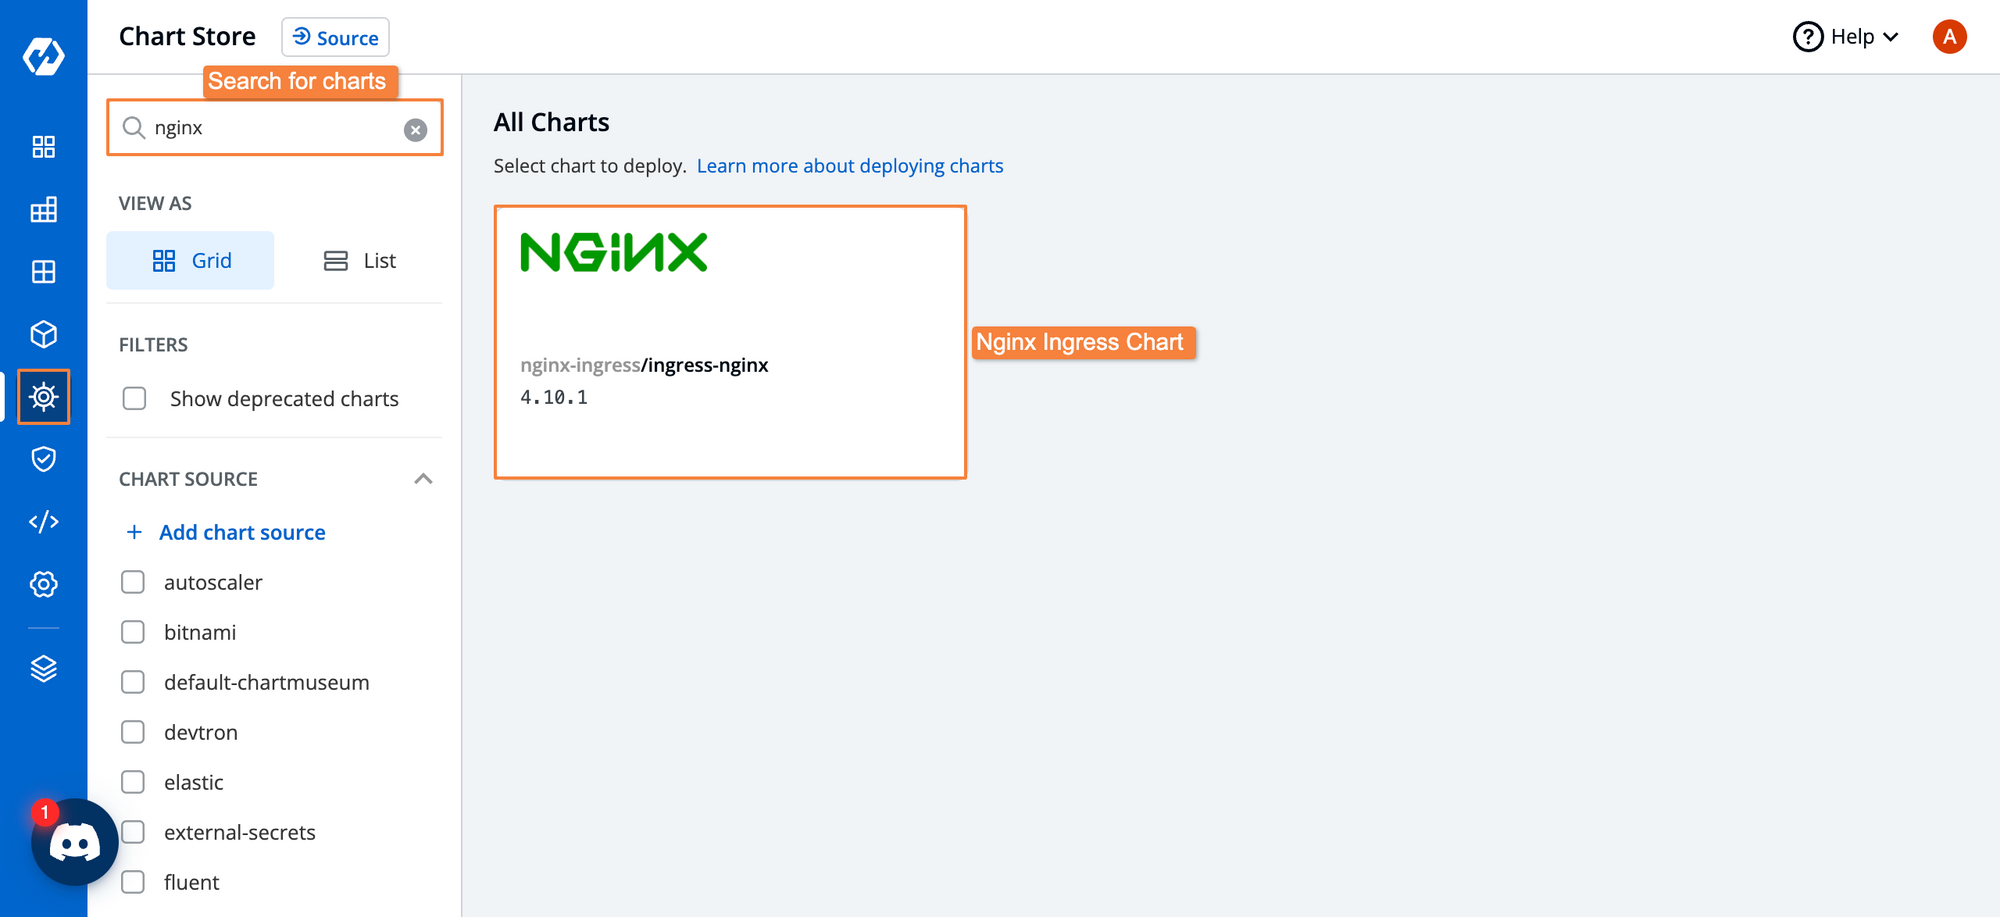
Within Devtron, you can install the Nginx Ingress controller easily by using its Helm chart. Head over to the charts tab, and select the ingress-nginx chart.
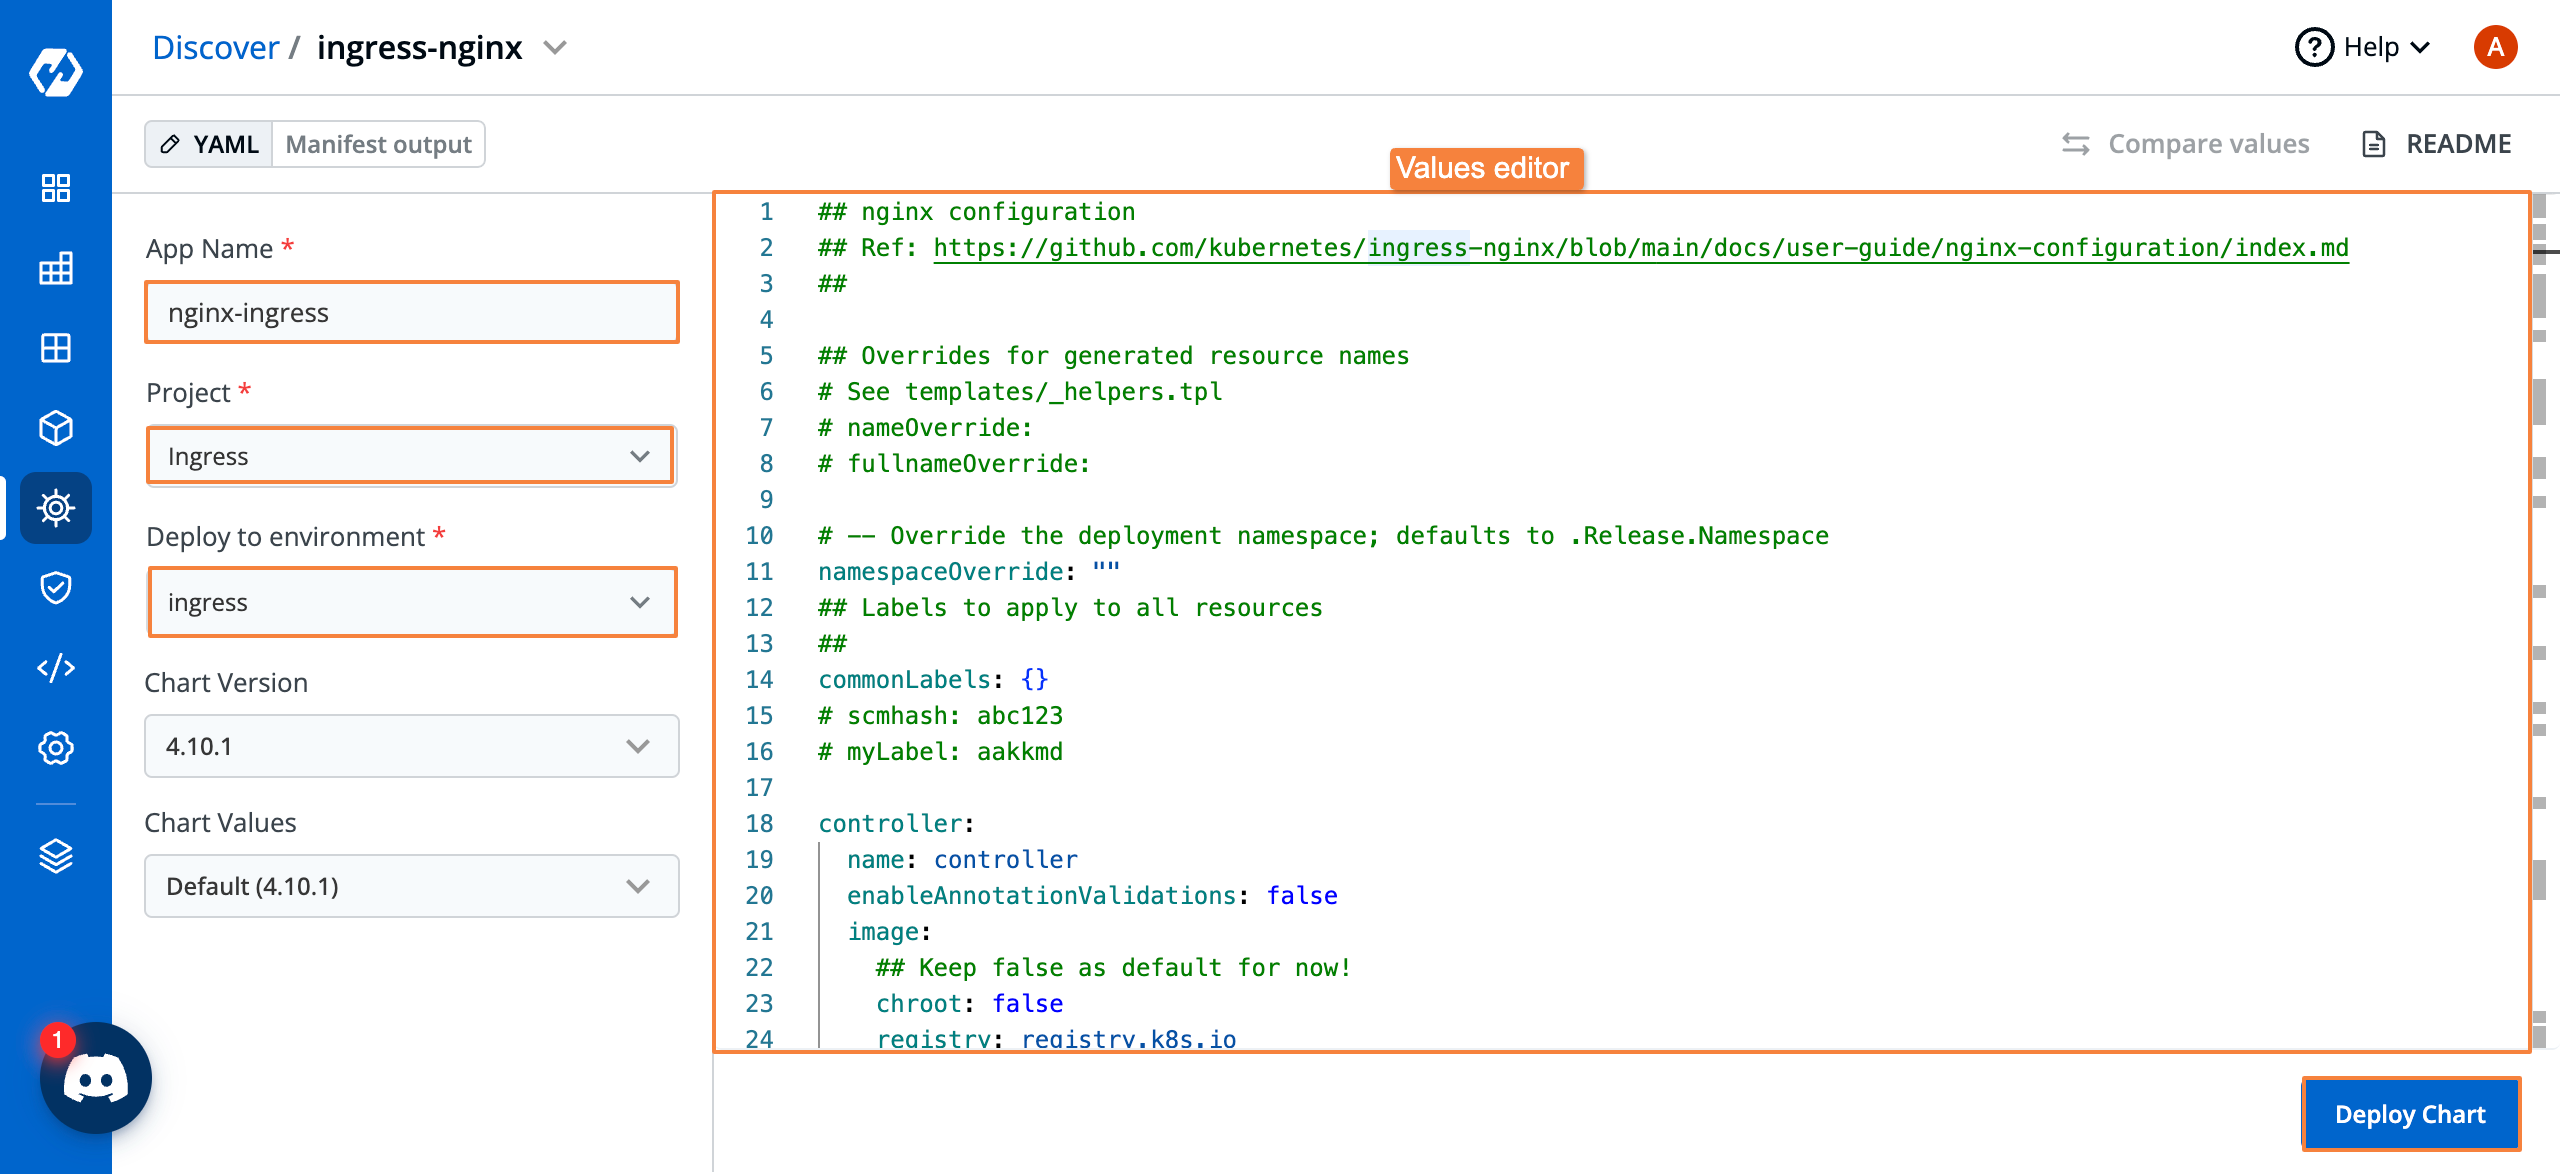
Fill out the configuration options, and if you want to update the chart values, you can do so. Once you’re satisfied with the configurations, go ahead and click on Deploy Chart.
After deploying the chart, you should be able to see that the application is healthy. This means that we now have an Ingress controller present within our cluster.
We should now be able to deploy an application and give it ingress rules. If you haven’t used Devtron before, please check out the docs on deploying applications, and configure all the necessary components within global configuration.
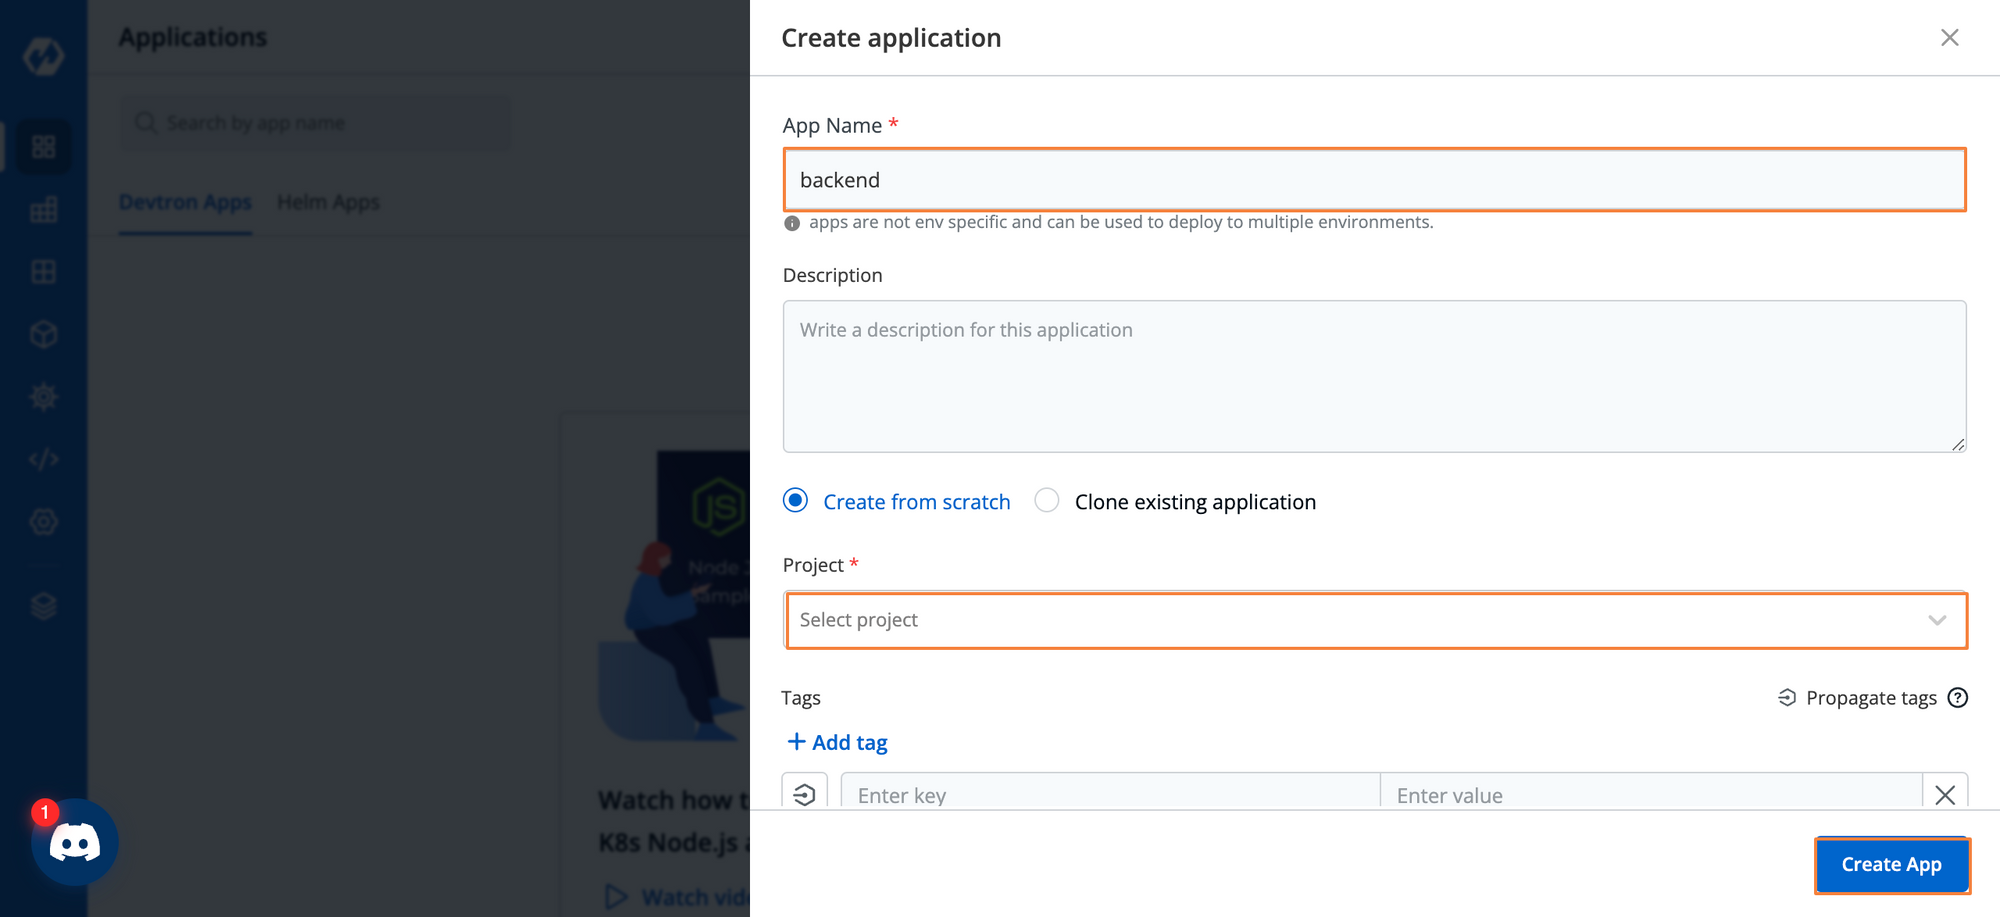
After you’ve configured all the required settings, let’s go ahead and deploy a new application. Go to the applications dashboard and create a custom application.

Give your app a name, and configure the settings. Once you’re satisfied with the settings, click on Create Application.
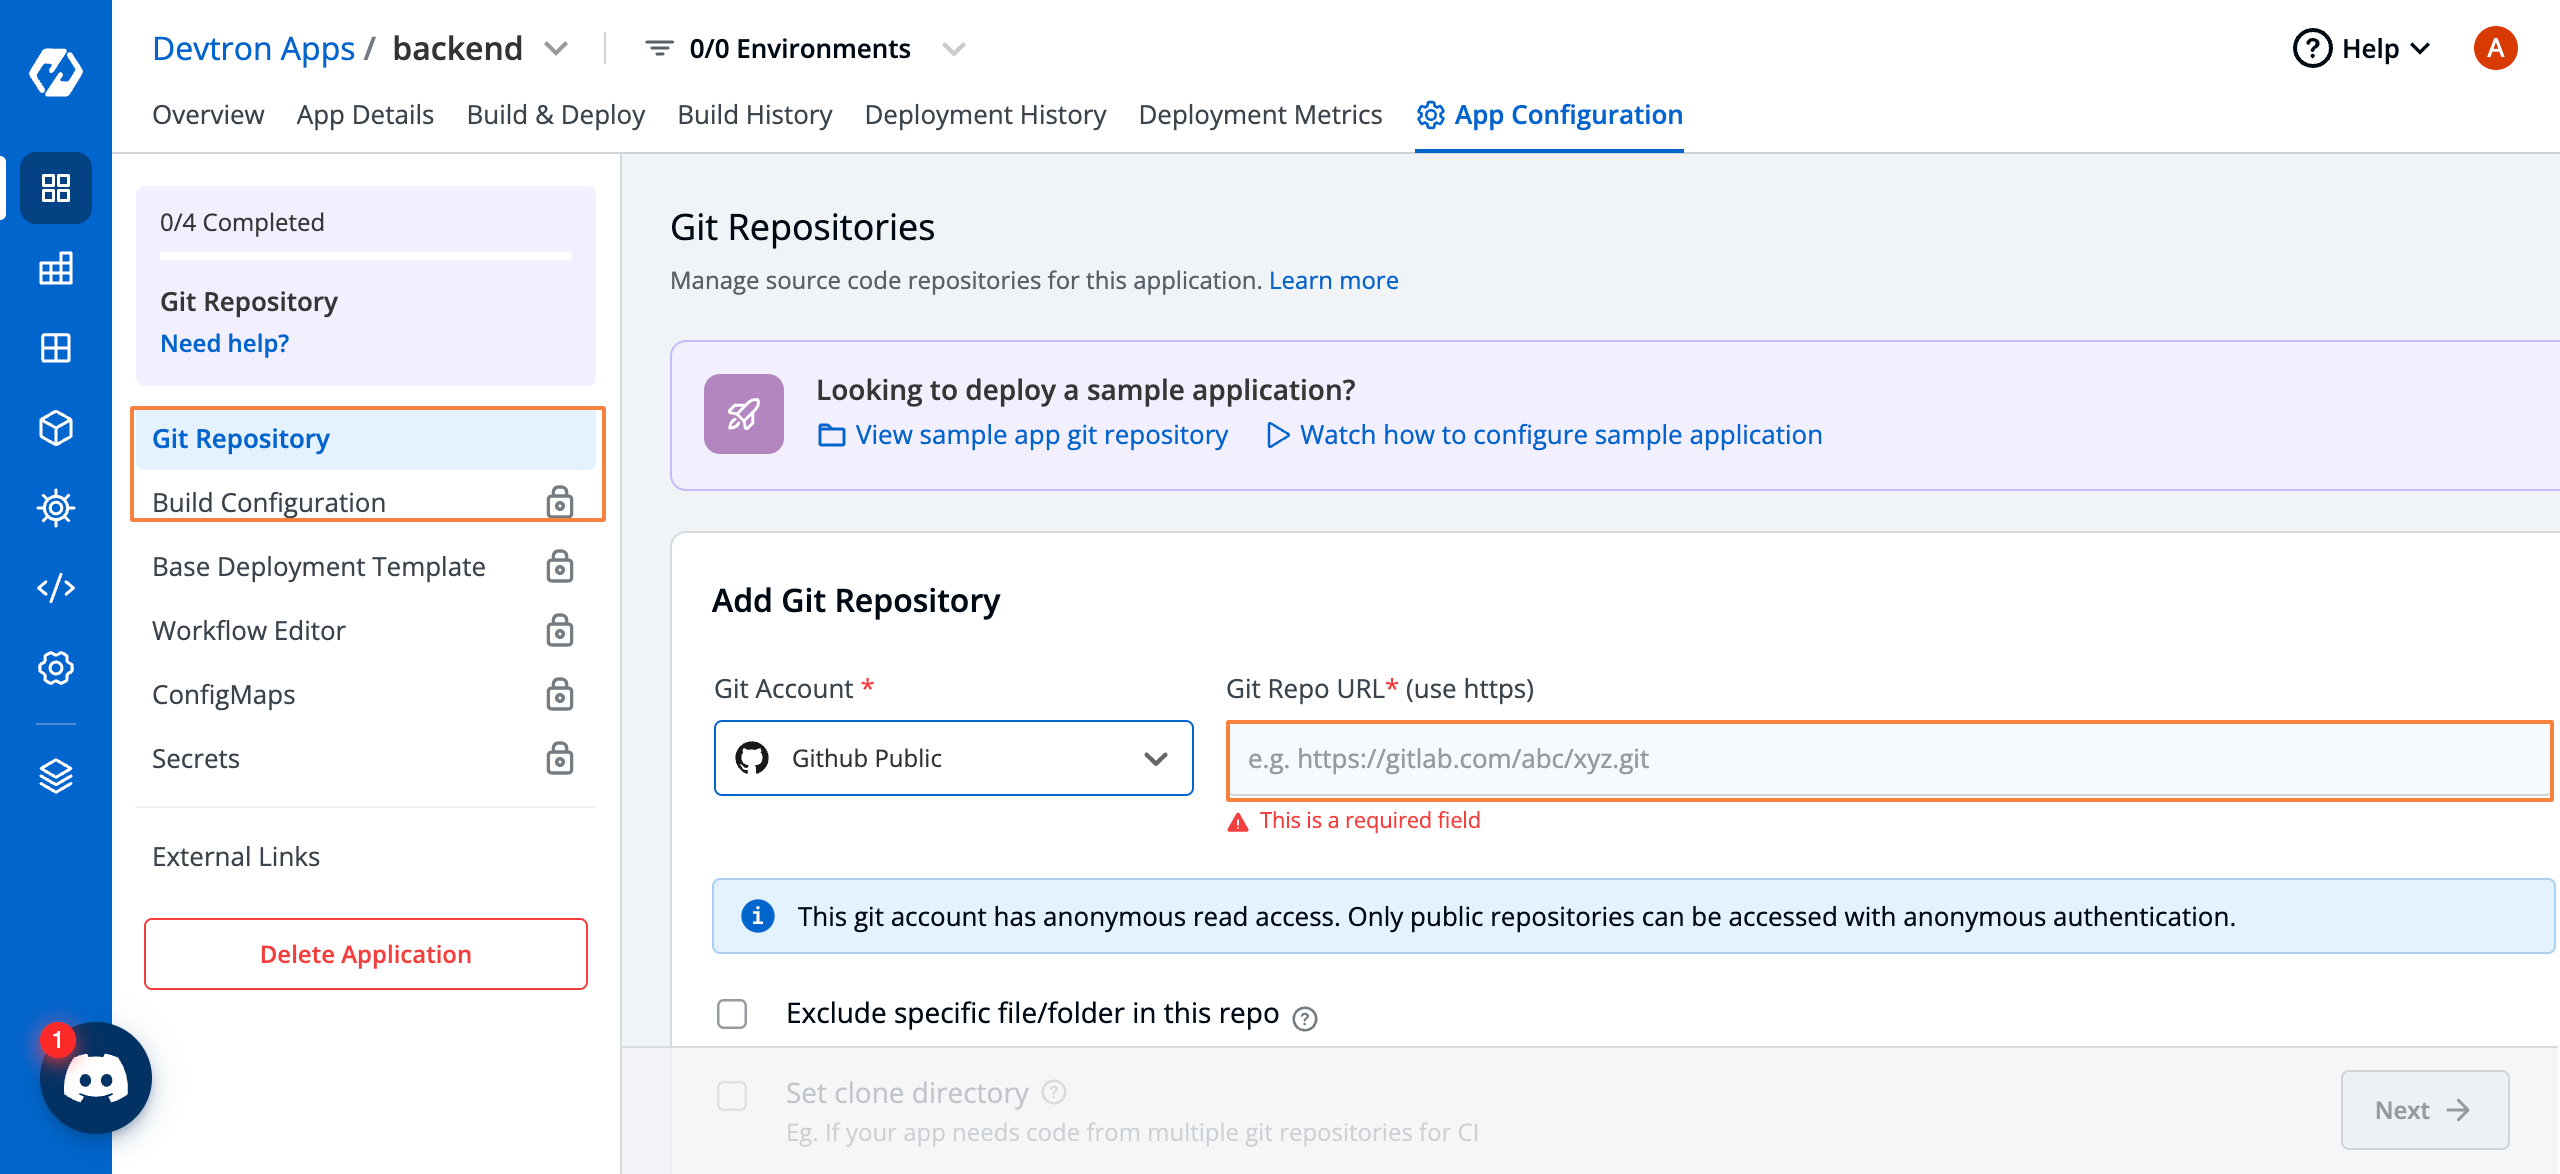
Within the App Configuration page, set the Git Repository and container registry. Within the base deployment template, we will configure the ingress paths.
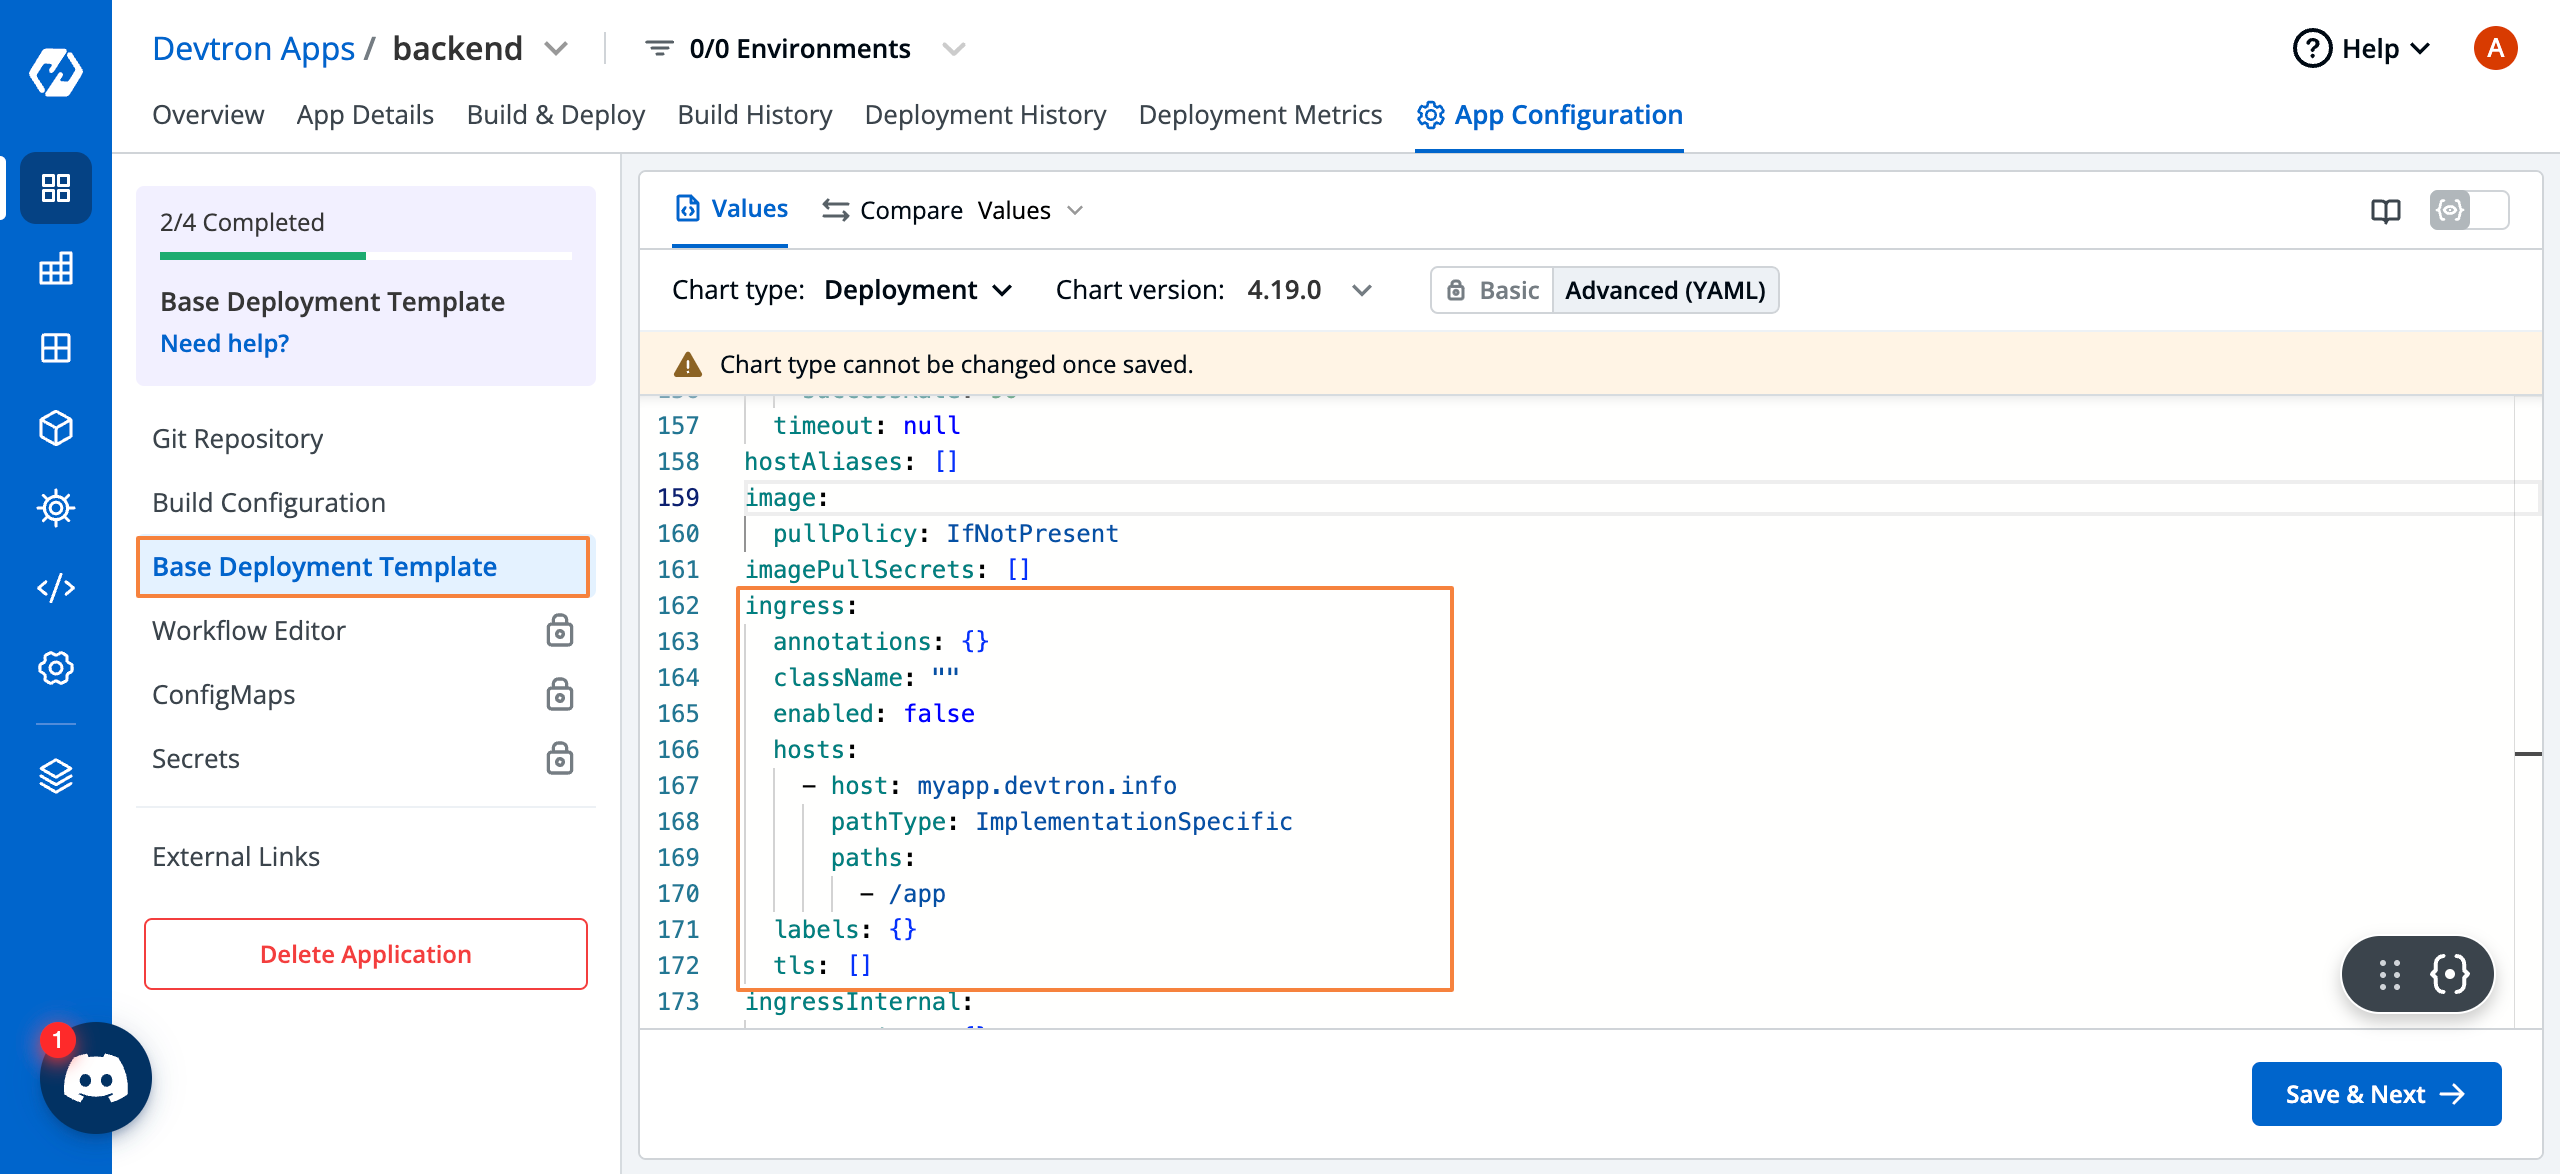
Within the Base Deployment Template, search for the ingress setting. Here you can configure the Ingress resource as you like. We have given the hostname as myapp.devtron.info and have assigned the path as /app. Also, make sure that you change enabled to true.
Next, go ahead and create your deployment pipelines. If you are not familiar with creating pipelines, please refer to the documentation on setting up workflow editor.
Next, we will build and deploy the application, and make sure that it’s in a healthy state.
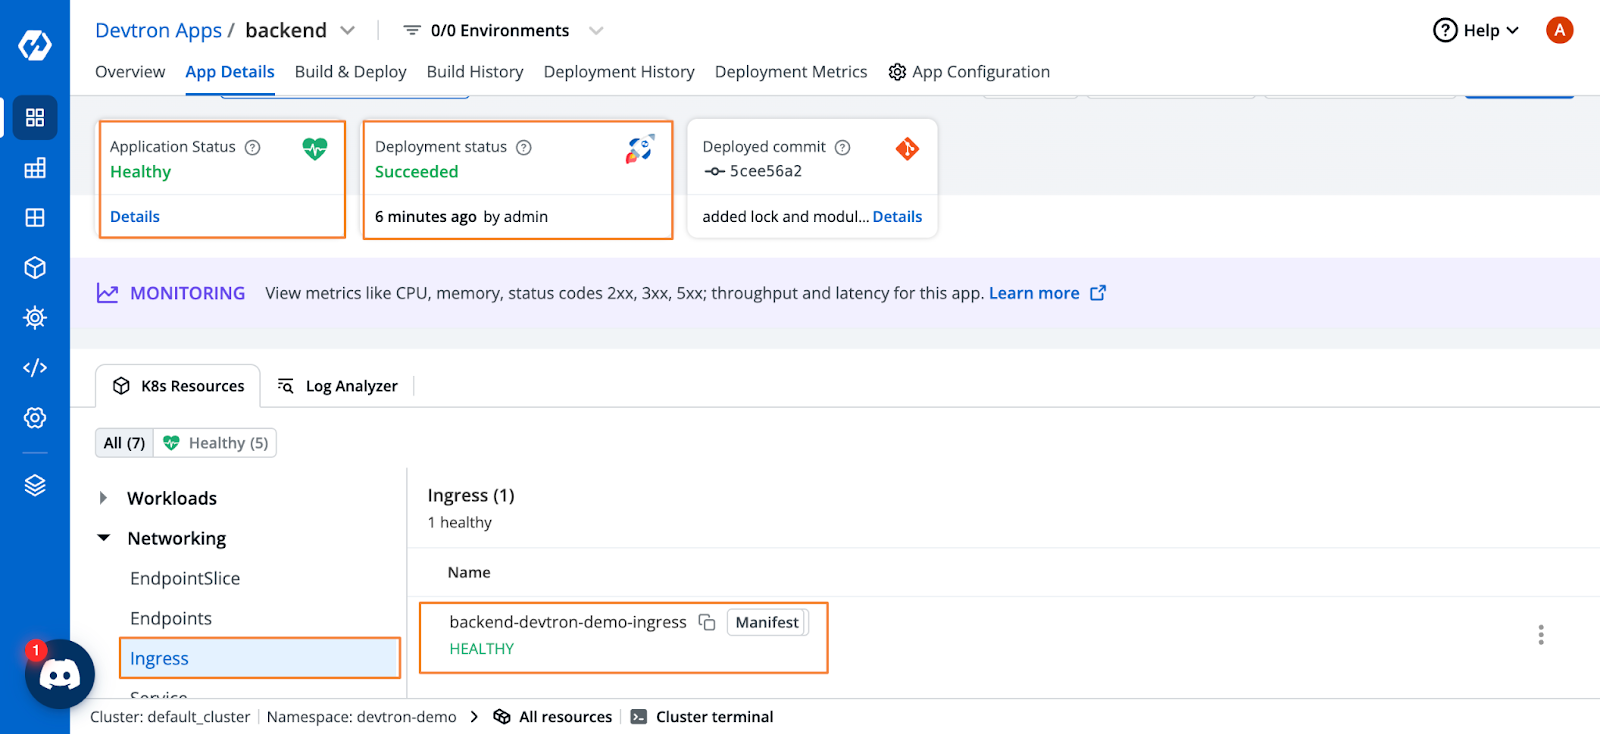
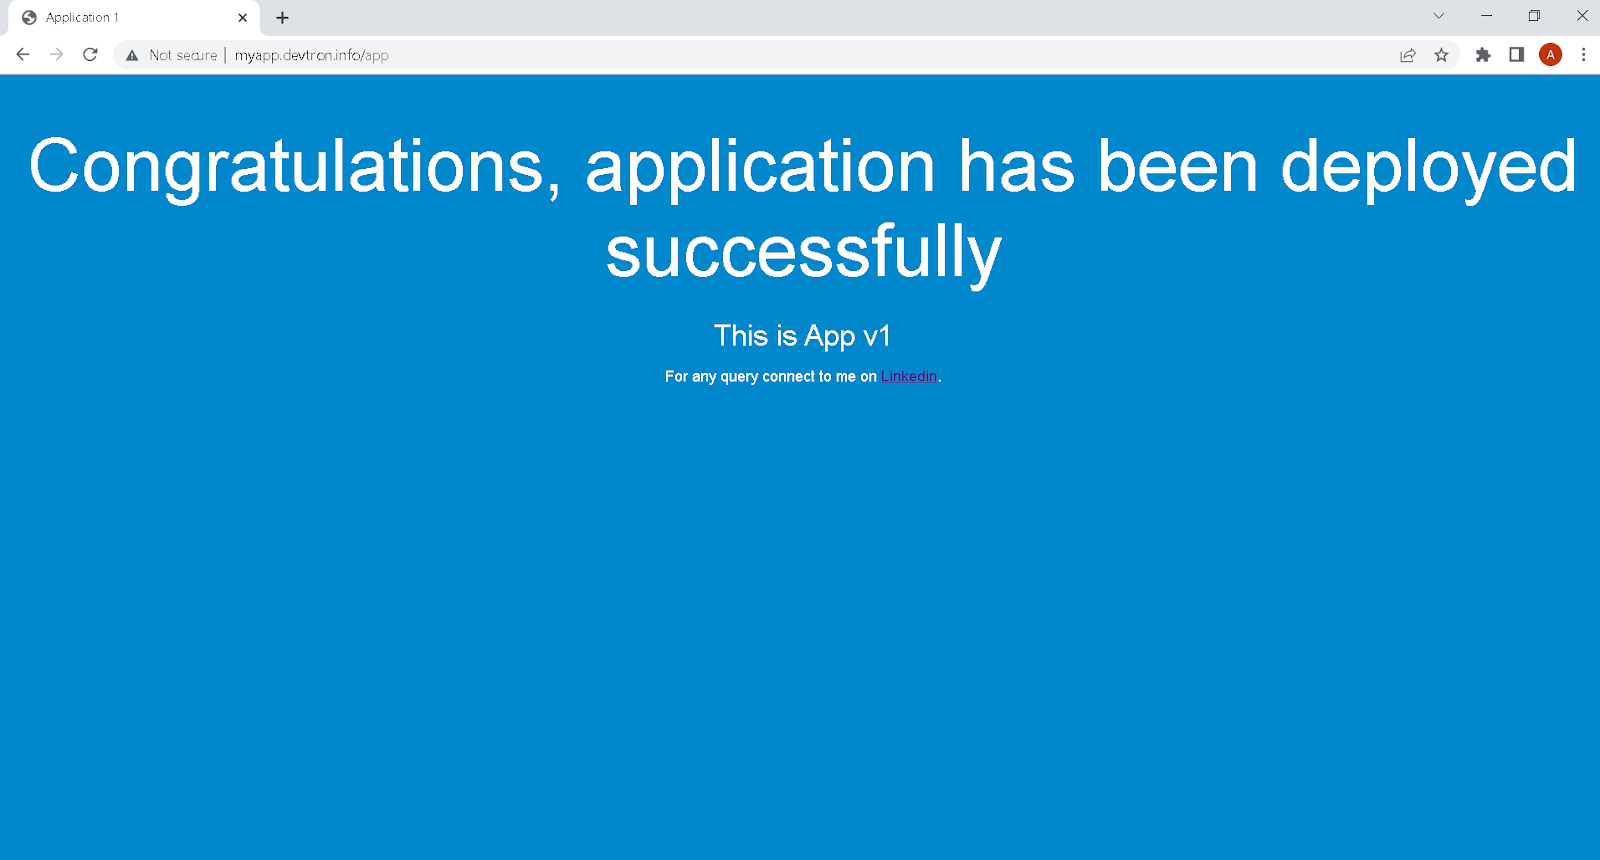
We can see that the application is now in a healthy state, and we also have an Ingress networking object created. We can now access the application on the hostname and Path that we configured.
Conclusion
Kubernetes has a lot of benefits thanks to its distributed nature. But when it comes to exposing those applications to the public, you will run into challenges. The built-in services have their limitations. While they are good for local development and testing purposes, they fall short if you want your users to access your applications. Load balancers provide a solution to this problem, but the costs quickly start to pile up, especially when you have many services that need to be exposed to the public.
Kubernetes Ingress provides a great way to have a single point of entry for your application and redirect the traffic to the appropriate service depending on the path included within the URL. This is both scalable and cost-effective. We also saw how you can set up an Ingress for your applications with Devtron.
FAQ
What is Kubernetes Ingress and why is it important for exposing applications?
Kubernetes Ingress is an API object that manages external access to services in a cluster, usually HTTP/HTTPS. Instead of assigning a LoadBalancer to every service, Ingress allows routing multiple services through a single entry point—saving costs and simplifying traffic management in production environments.
How does Kubernetes Ingress differ from ClusterIP, NodePort, and LoadBalancer services?
ClusterIP is internal-only, NodePort exposes services via static ports on each node, and LoadBalancer assigns a public IP for external access. Ingress, however, centralizes traffic routing using custom rules (host or path-based) and supports TLS, making it a more scalable and cost-effective alternative for handling external traffic.
What are the types of routing supported by Kubernetes Ingress?
Kubernetes Ingress supports two main routing types:
Path-based routing: Directs traffic to services based on URL paths (e.g., /login, /cart).
Host-based routing: Routes requests based on subdomains (e.g., api.example.com, shop.example.com).
Both methods enable efficient traffic distribution across microservices in a scalable architecture.
How can Devtron simplify Ingress configuration and management in Kubernetes?
Devtron provides a visual UI to configure and deploy Ingress controllers like NGINX using Helm charts. With Devtron, teams can easily set ingress paths, enable TLS, view deployed Ingress objects, and debug issues—all without complex CLI operations, making Kubernetes more accessible and manageable.