1. CircleCI Pipelines automate code build, test, and deployment saving developer effort and accelerating software delivery.
2. Workflows, jobs, and executors define the structure; Orbs simplify repetitive tasks.
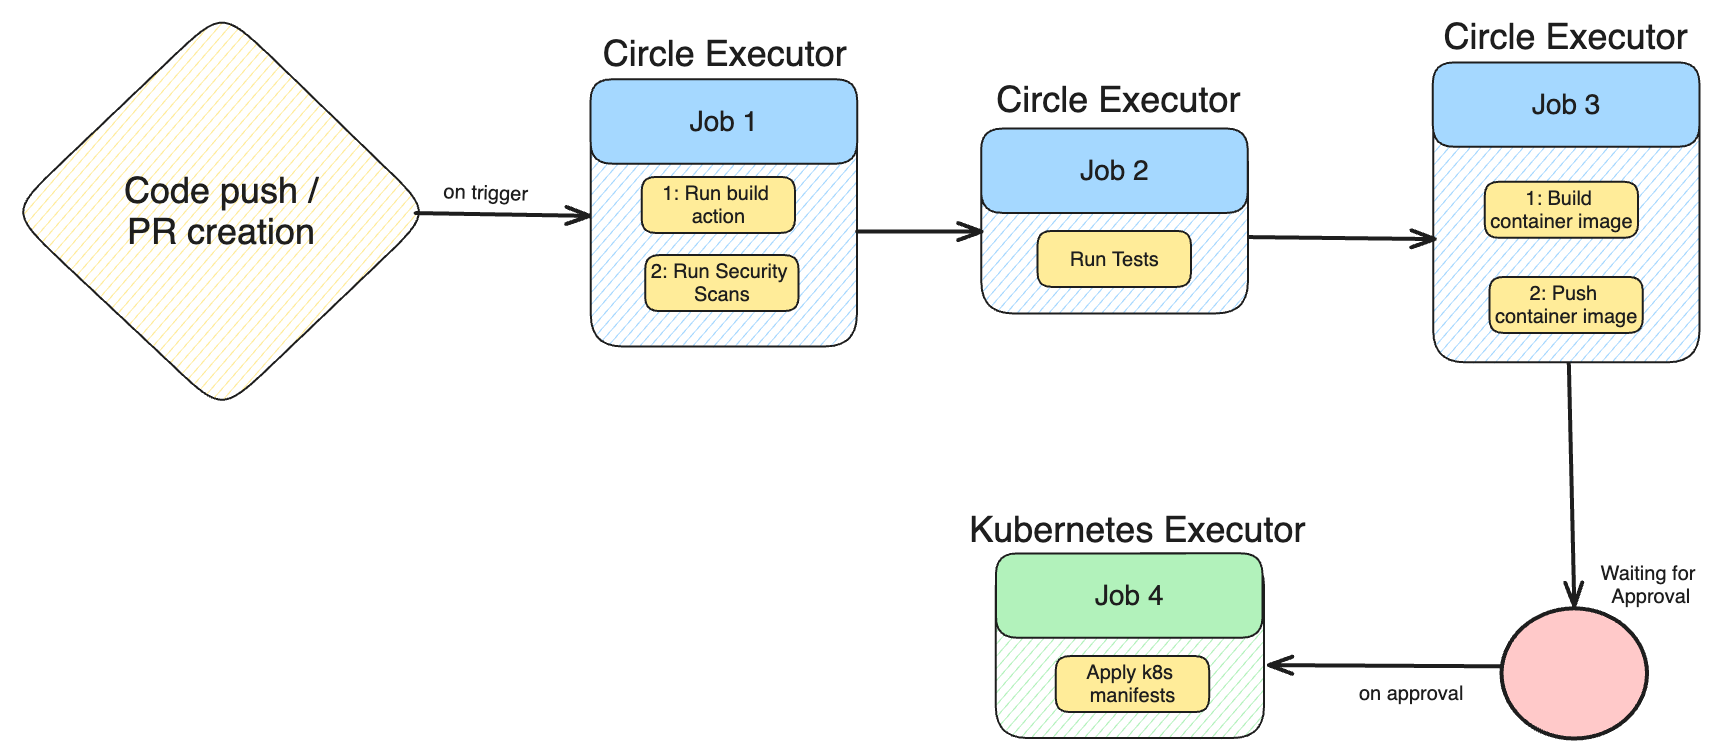
3. Full CI/CD example includes: build with Go, run tests, security scan (Snyk), build/push Docker image, deploy to Kubernetes.
4. Custom self-hosted CircleCI runners inside Kubernetes enable secure, direct cluster deployments.
5. Limitations: fewer built-in CD templates, no native blue-green/canary, limited post-deploy visibility.
What is a CircleCI Pipeline?
A CircleCI Pipeline is the top-level configuration that automates your continuous integration (CI) and continuous deployment (CD) process.
It runs workflows, sequences of jobs (build, test, deploy) inside isolated executors (Docker, VM, machine images)—and can be triggered by events like commits, pull requests, or schedules.
By combining reusable Orbs and custom scripts, CircleCI Pipelines can run in diverse environments (Linux, macOS, Windows) and target platforms like Kubernetes.
Why CircleCI Pipelines?
Manually building and testing slows development. With CircleCI Pipelines, teams can automate:
- Code compilation
- Unit tests and security scans
- Container builds and pushes
- Deployments to environments (including Kubernetes)
CircleCI Pipeline Components
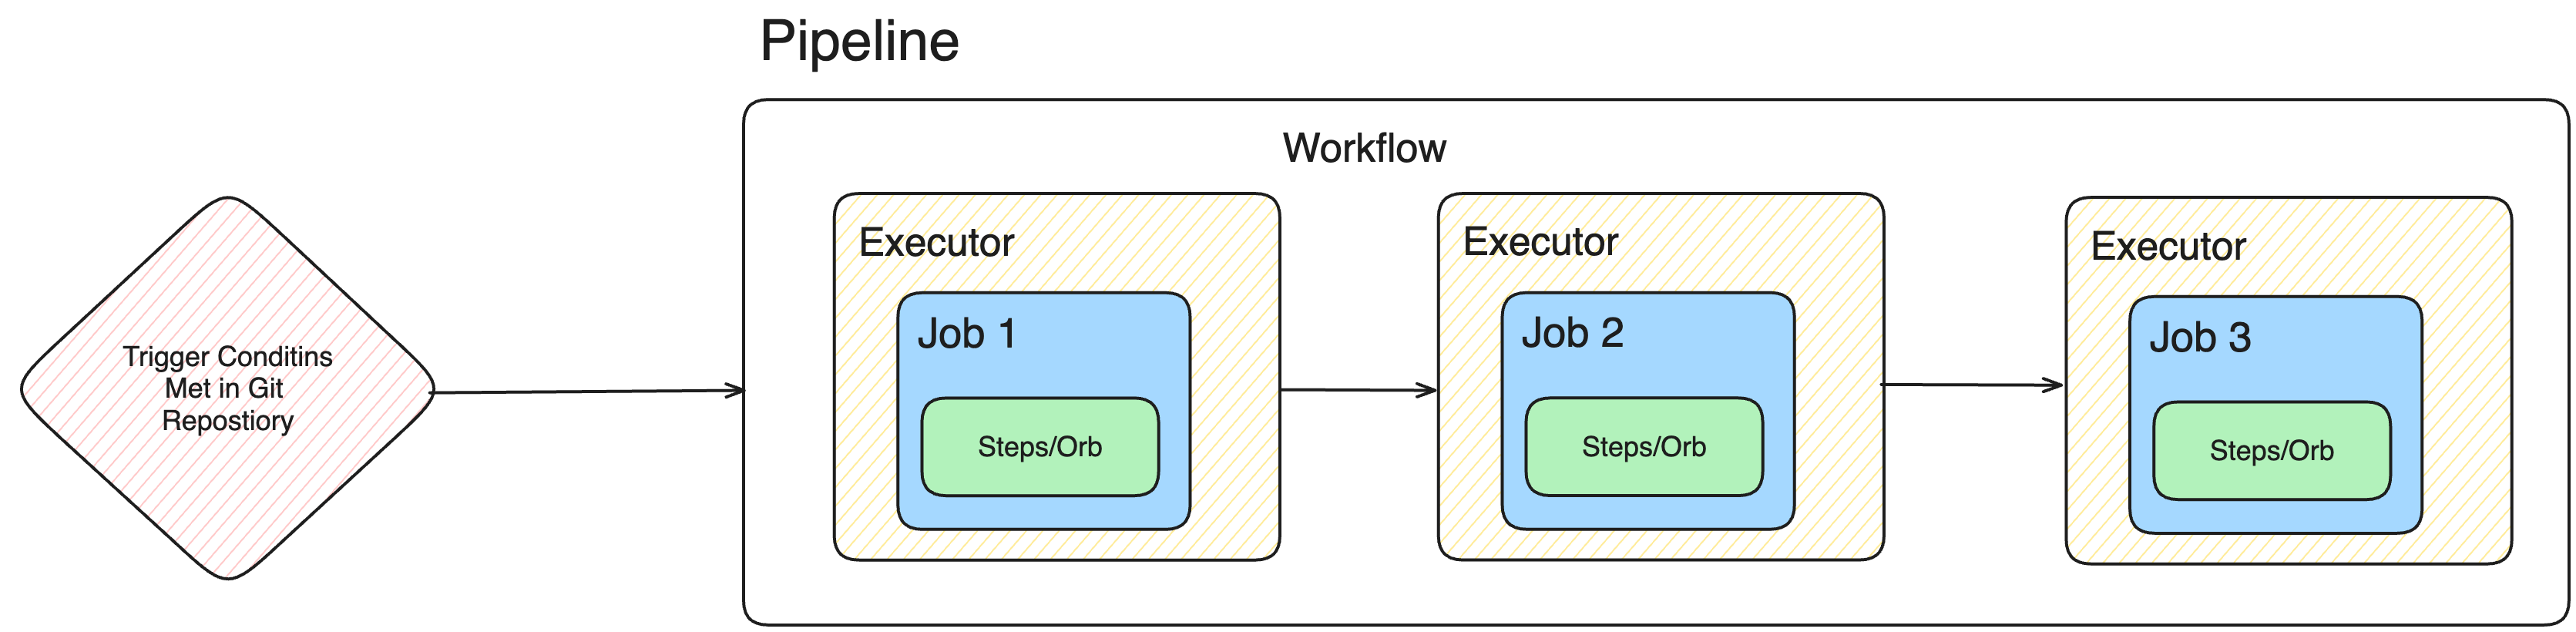
- Pipeline: The outer container—triggers workflows.
- Workflow: Manages order, conditions, and dependencies for jobs.
- Executor: Environment where a job runs (e.g., Docker container, VM).
- Job: Collection of ordered steps (build, test, deploy).
- Orb: Shareable config package (e.g., Docker orb, Kubernetes orb).
Creating a CI Pipeline — Quick Steps
- Connect CircleCI to your GitHub repo.
- Create
.circleci/config.ymlwith jobs for build, test, and image push. - Use Orbs for common tasks:
snyk/snyk,circleci/docker,circleci/kubernetes. - Add manual approval for production deploys.
- Deploy with a custom CircleCI runner inside Kubernetes.
1. Connect CircleCI to Your Version Control
We will be using the CircleCI Cloud platform. Before we can go ahead and create the actual config file for the pipeline, we need to create a Circle CI account and connect the GitHub repository to CircleCI.
Once you have a CircleCI account, you must create an organization. An organization can be connected to multiple projects, and you can view the pipelines and configurations for each project. To create an organization and connect it with your Git Repository, you can follow the steps below:
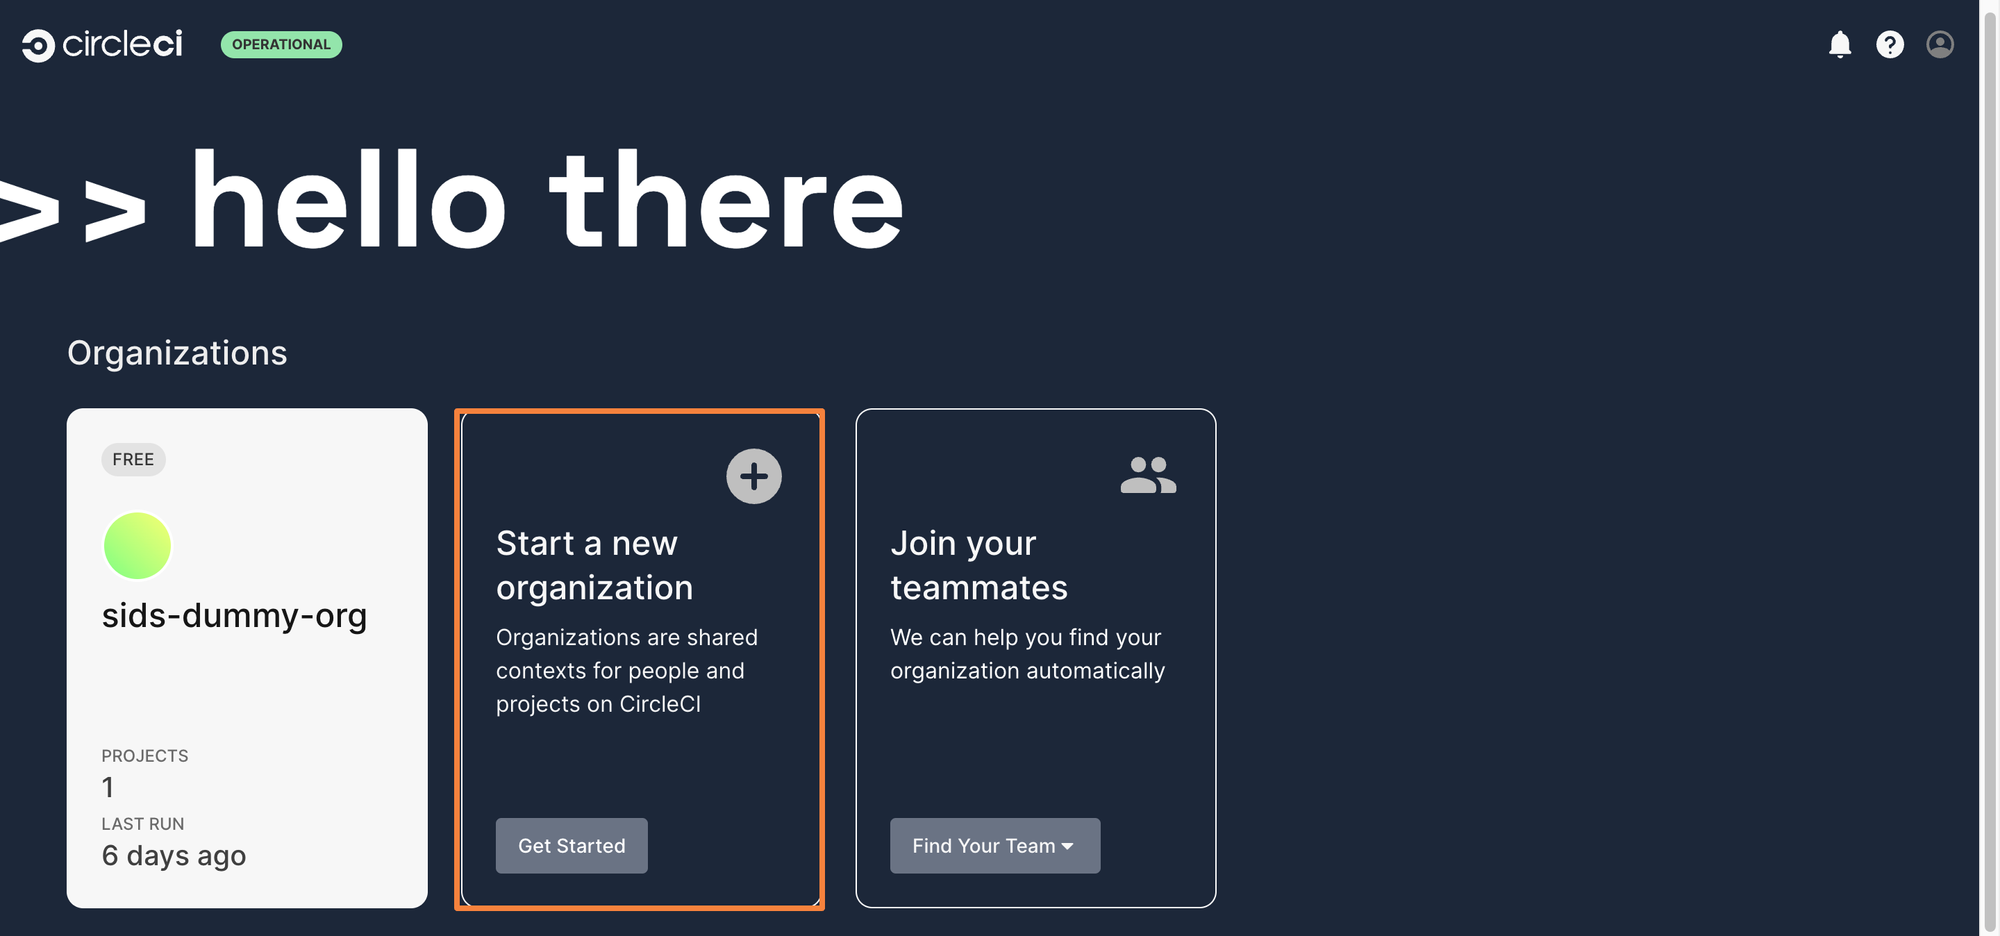
Step 1: Click on Start a new Organization
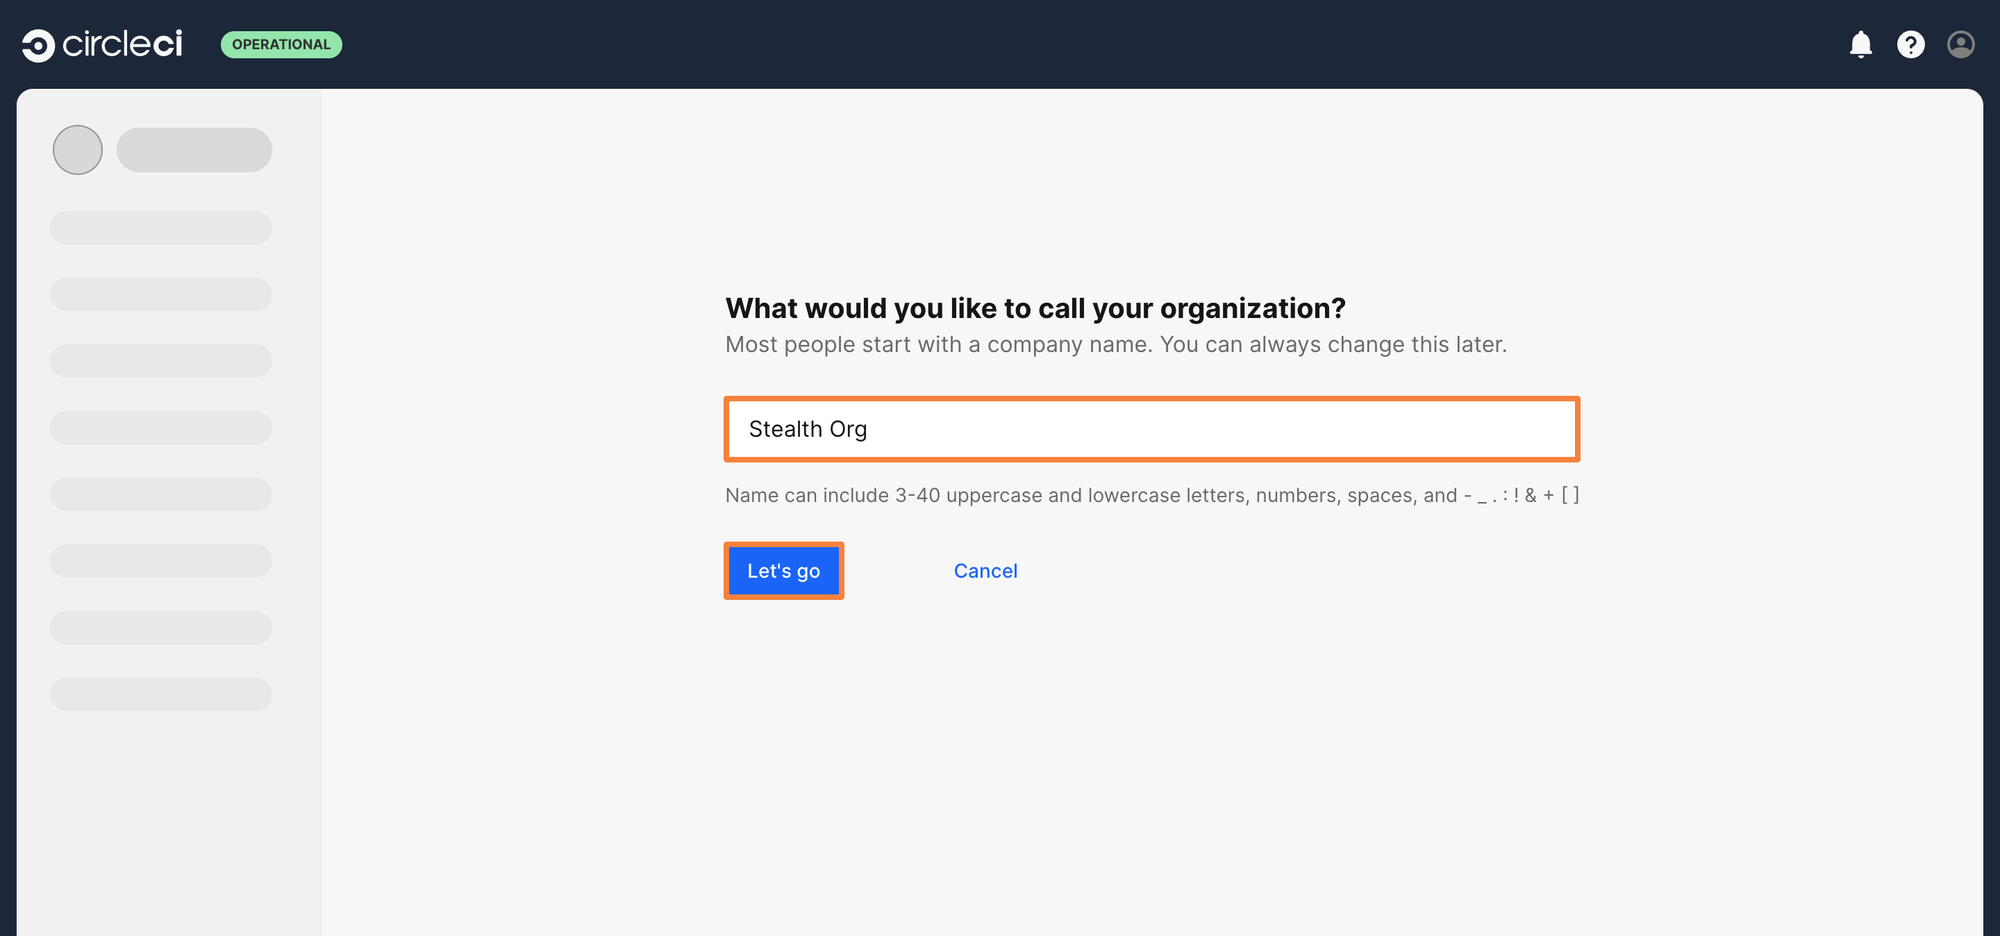
Step 2: Give your organization a name. For this example, the organization is named as Stealth Org
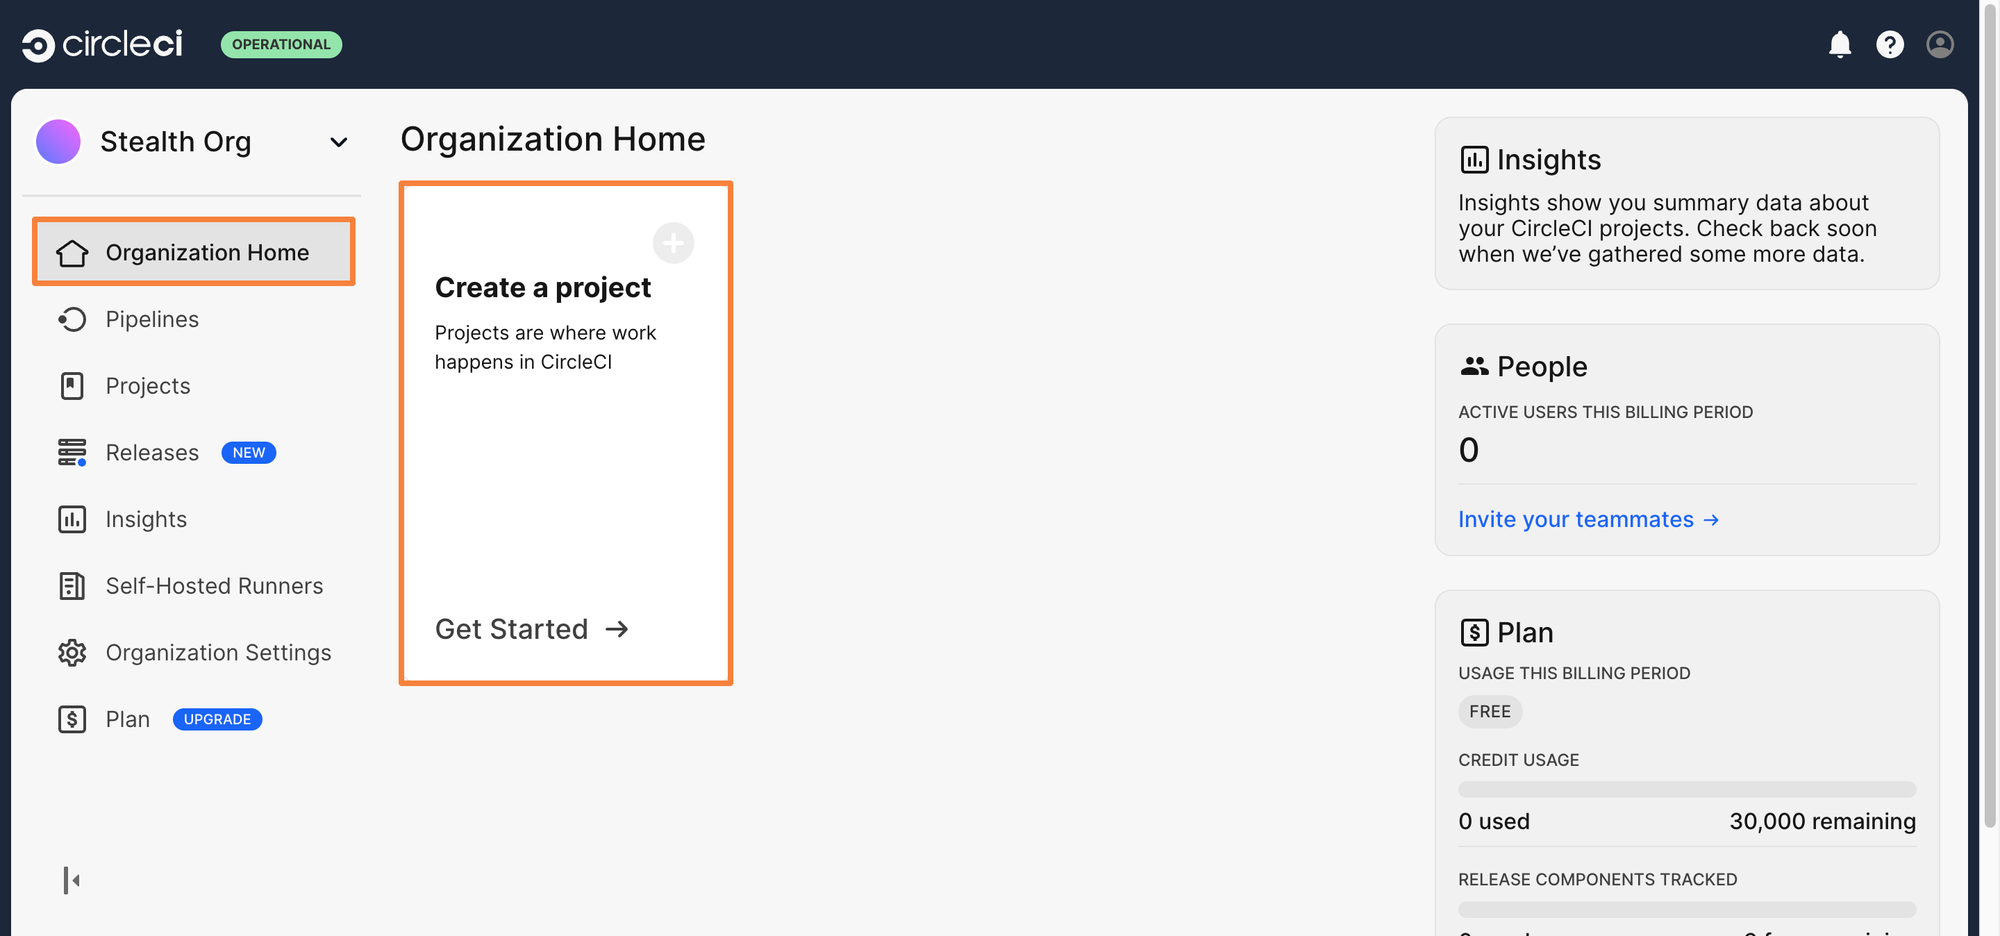
Step 3: From the CircleCI Dashboard, click on Create a Project
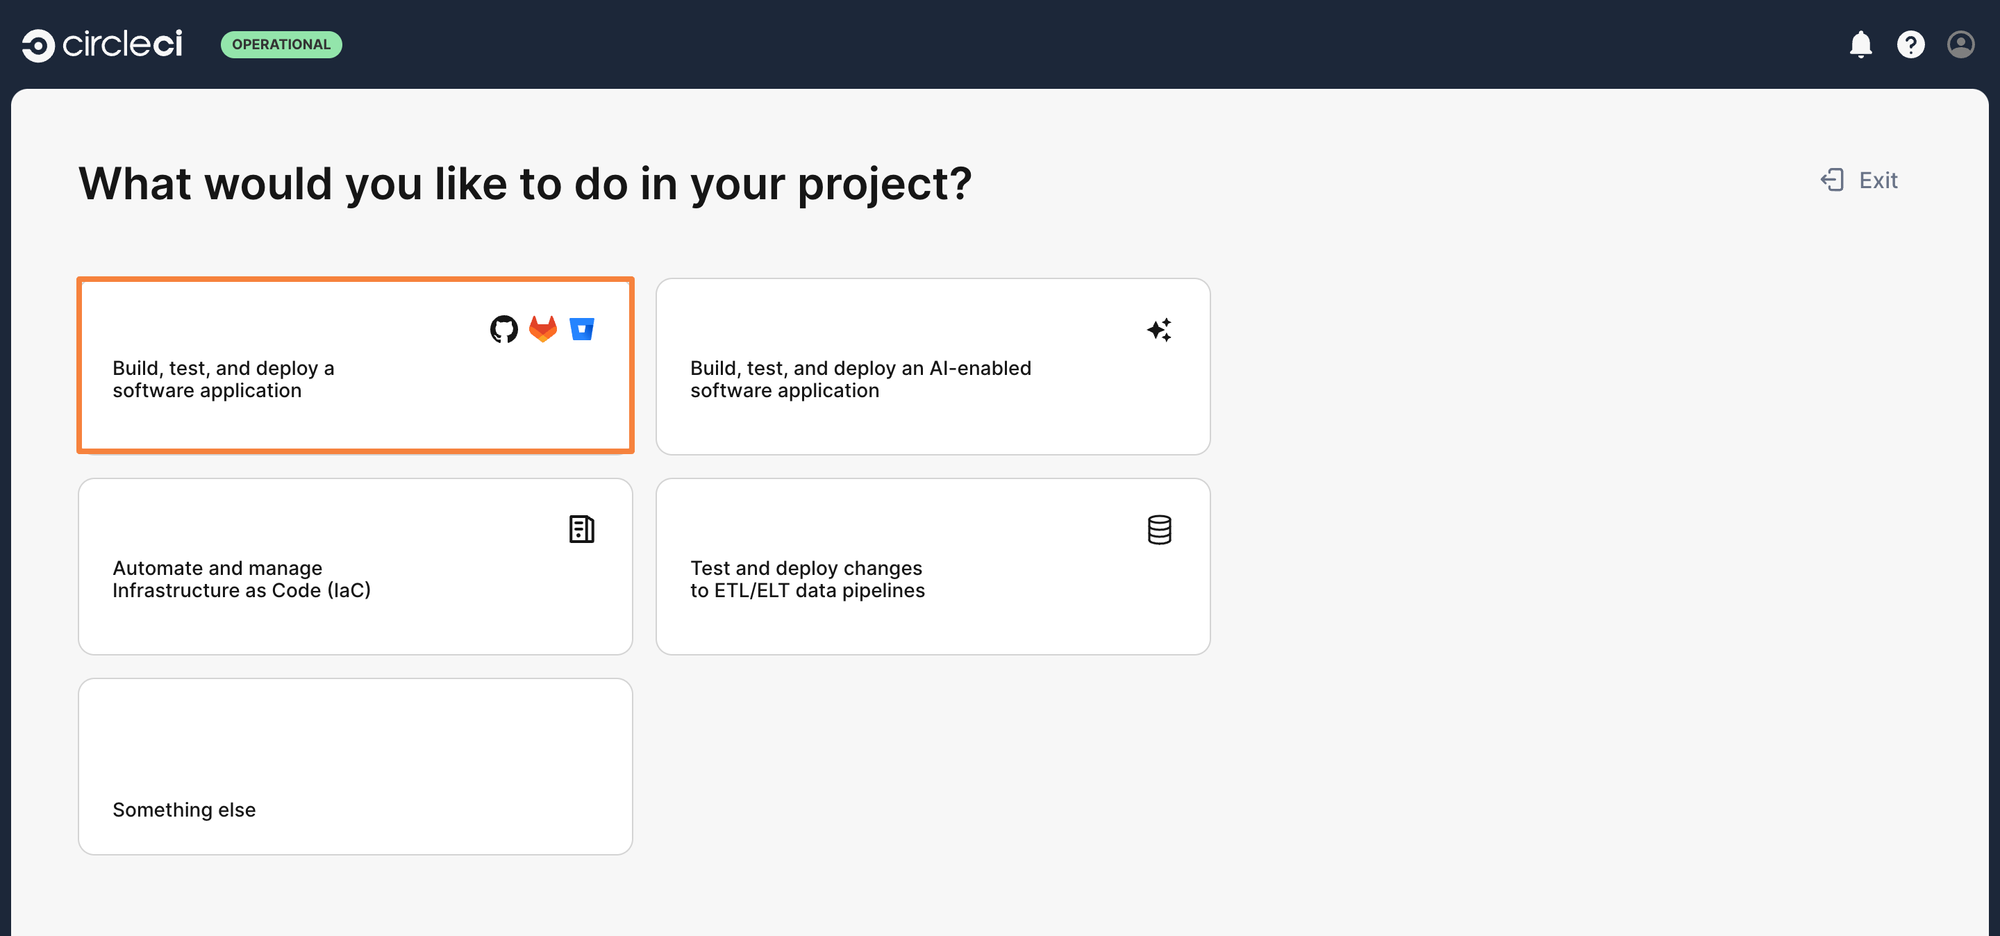
Step 4: As it’s a software application that exists within a Git Repository, we will select the Build, test, and deploy a software application
Step 5: Now it’s time to connect the Git Repository to the CircleCI organization. Click on Add Repos, and select the correct VCS. As the project exists on GitHub, let’s connect GitHub with the organization.
You will be redirected to GitHub to authorize Circle CI with your account. A Circle CI GitHub app will be created to authenticate with GitHub. Configure the GitHub application so it can access only one particular repository i.e. the gin application for which we will create a pipeline.

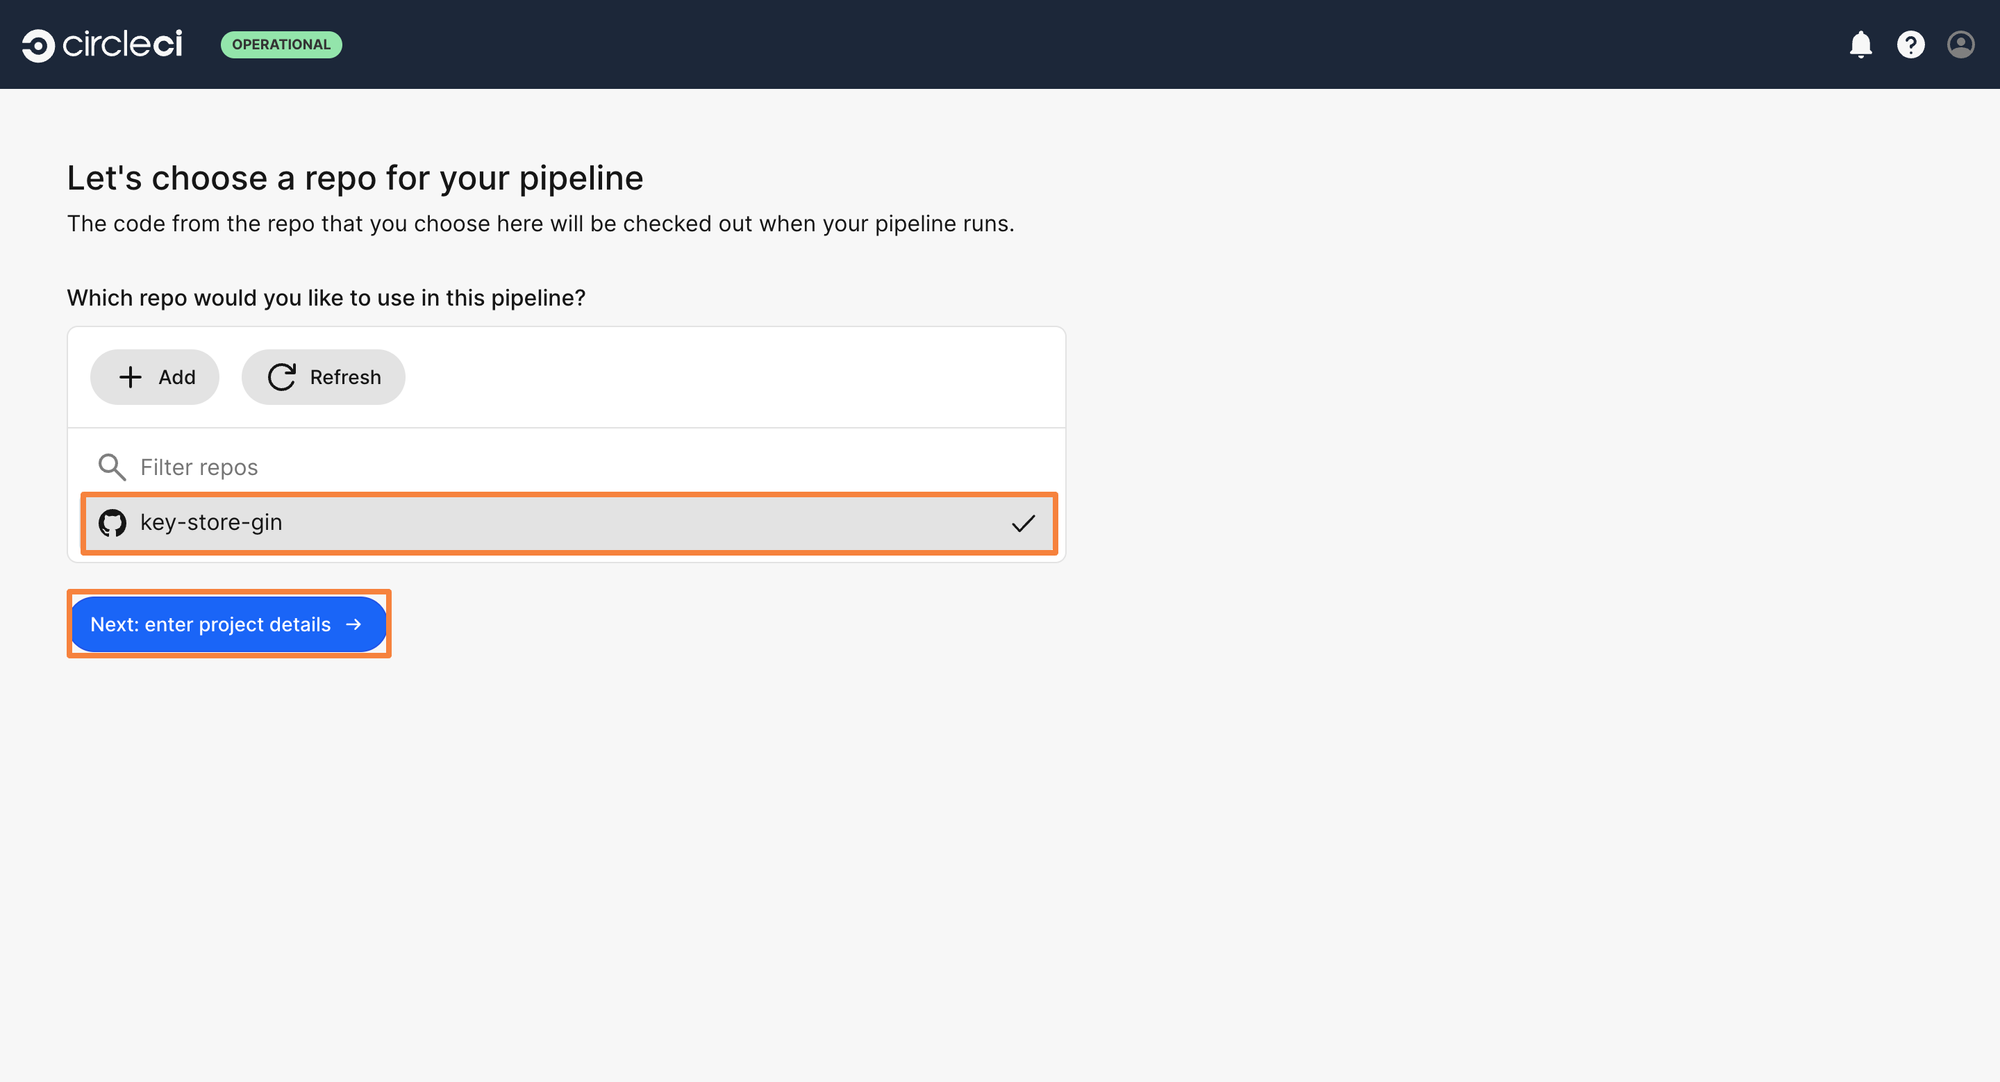
Step 6: Since the Circle CI GitHub app is allowed to access only one repository, you will see only that particular repository within the Circle CI Dashboard. Select the repo and then configure the project details
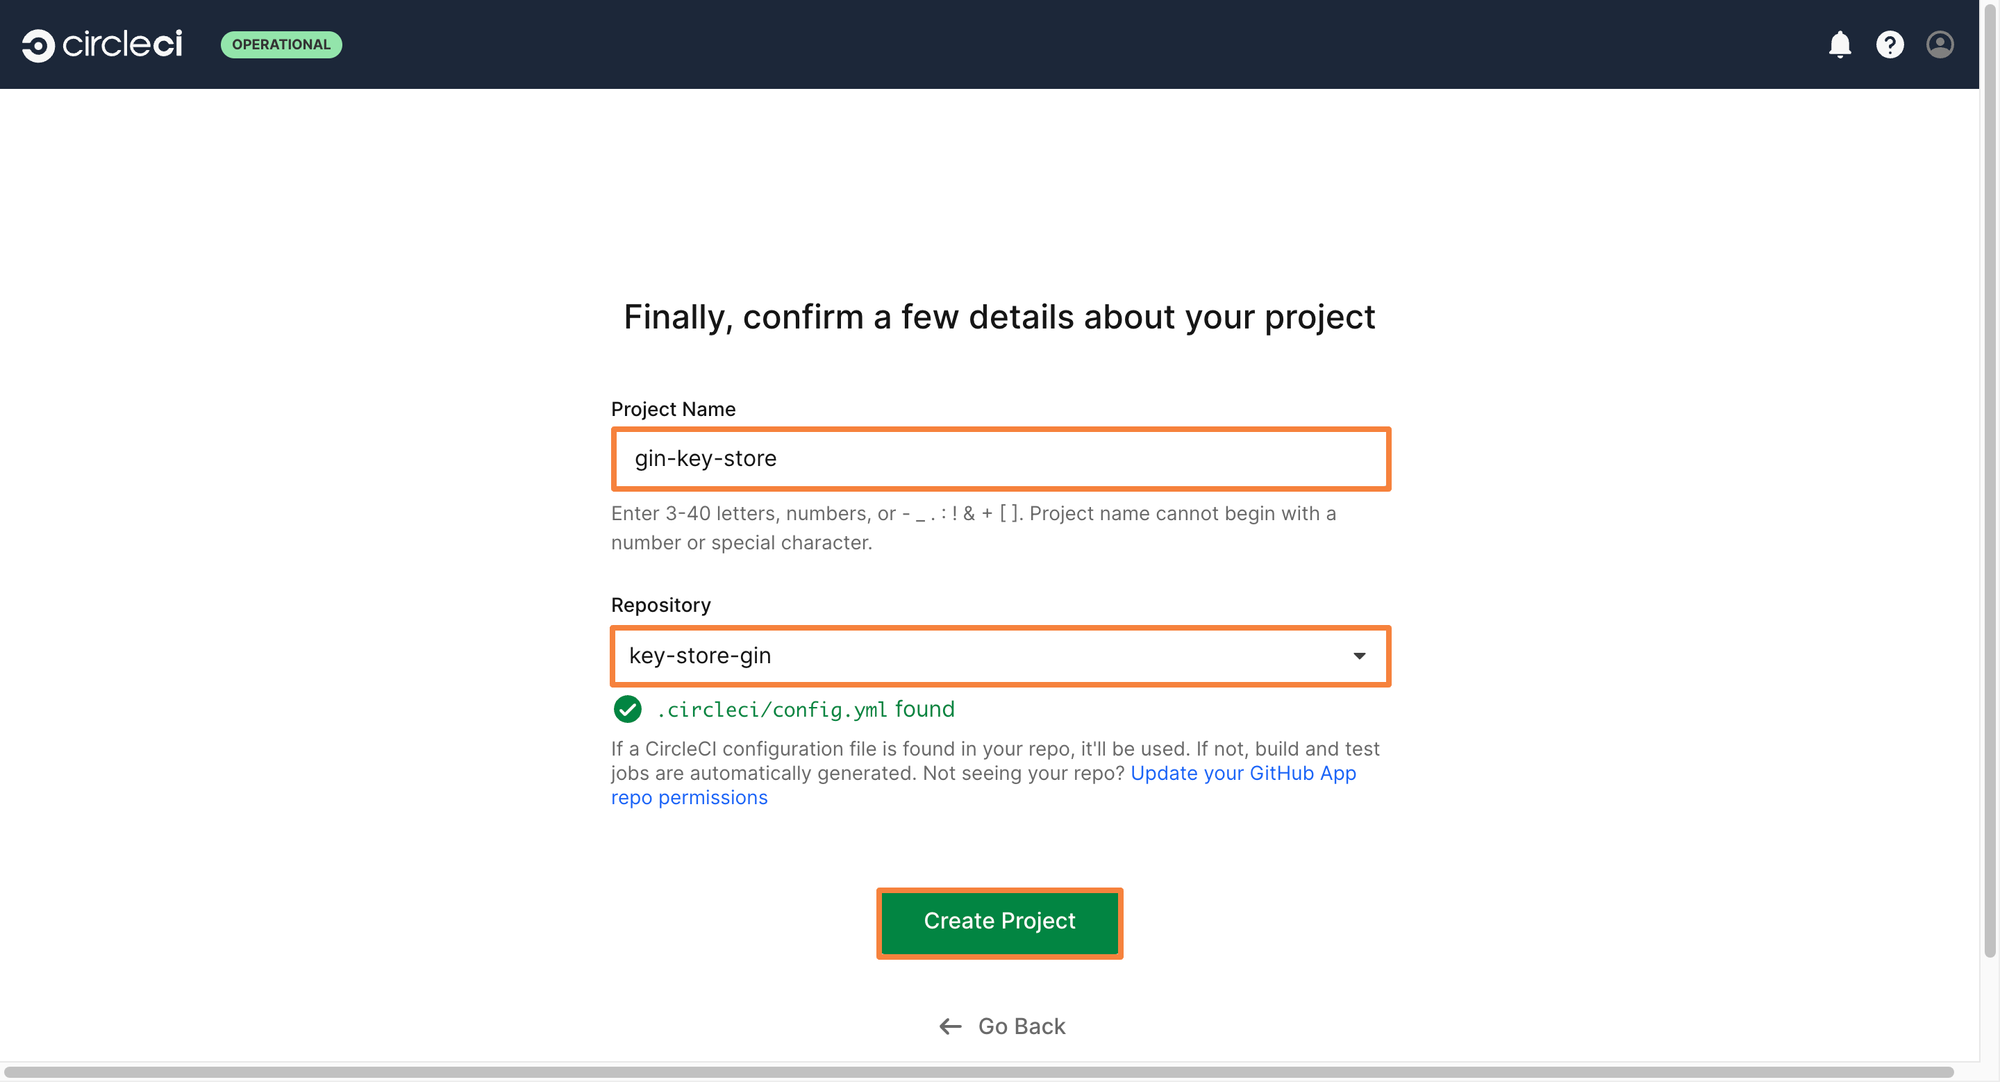
Step 7: Enter a project name and select the correct repository. If Circle CI finds a config file within the repository, it will use that to create a pipeline. If not, it will automatically analyze your code, and create a config file for you which you can edit as you wish.
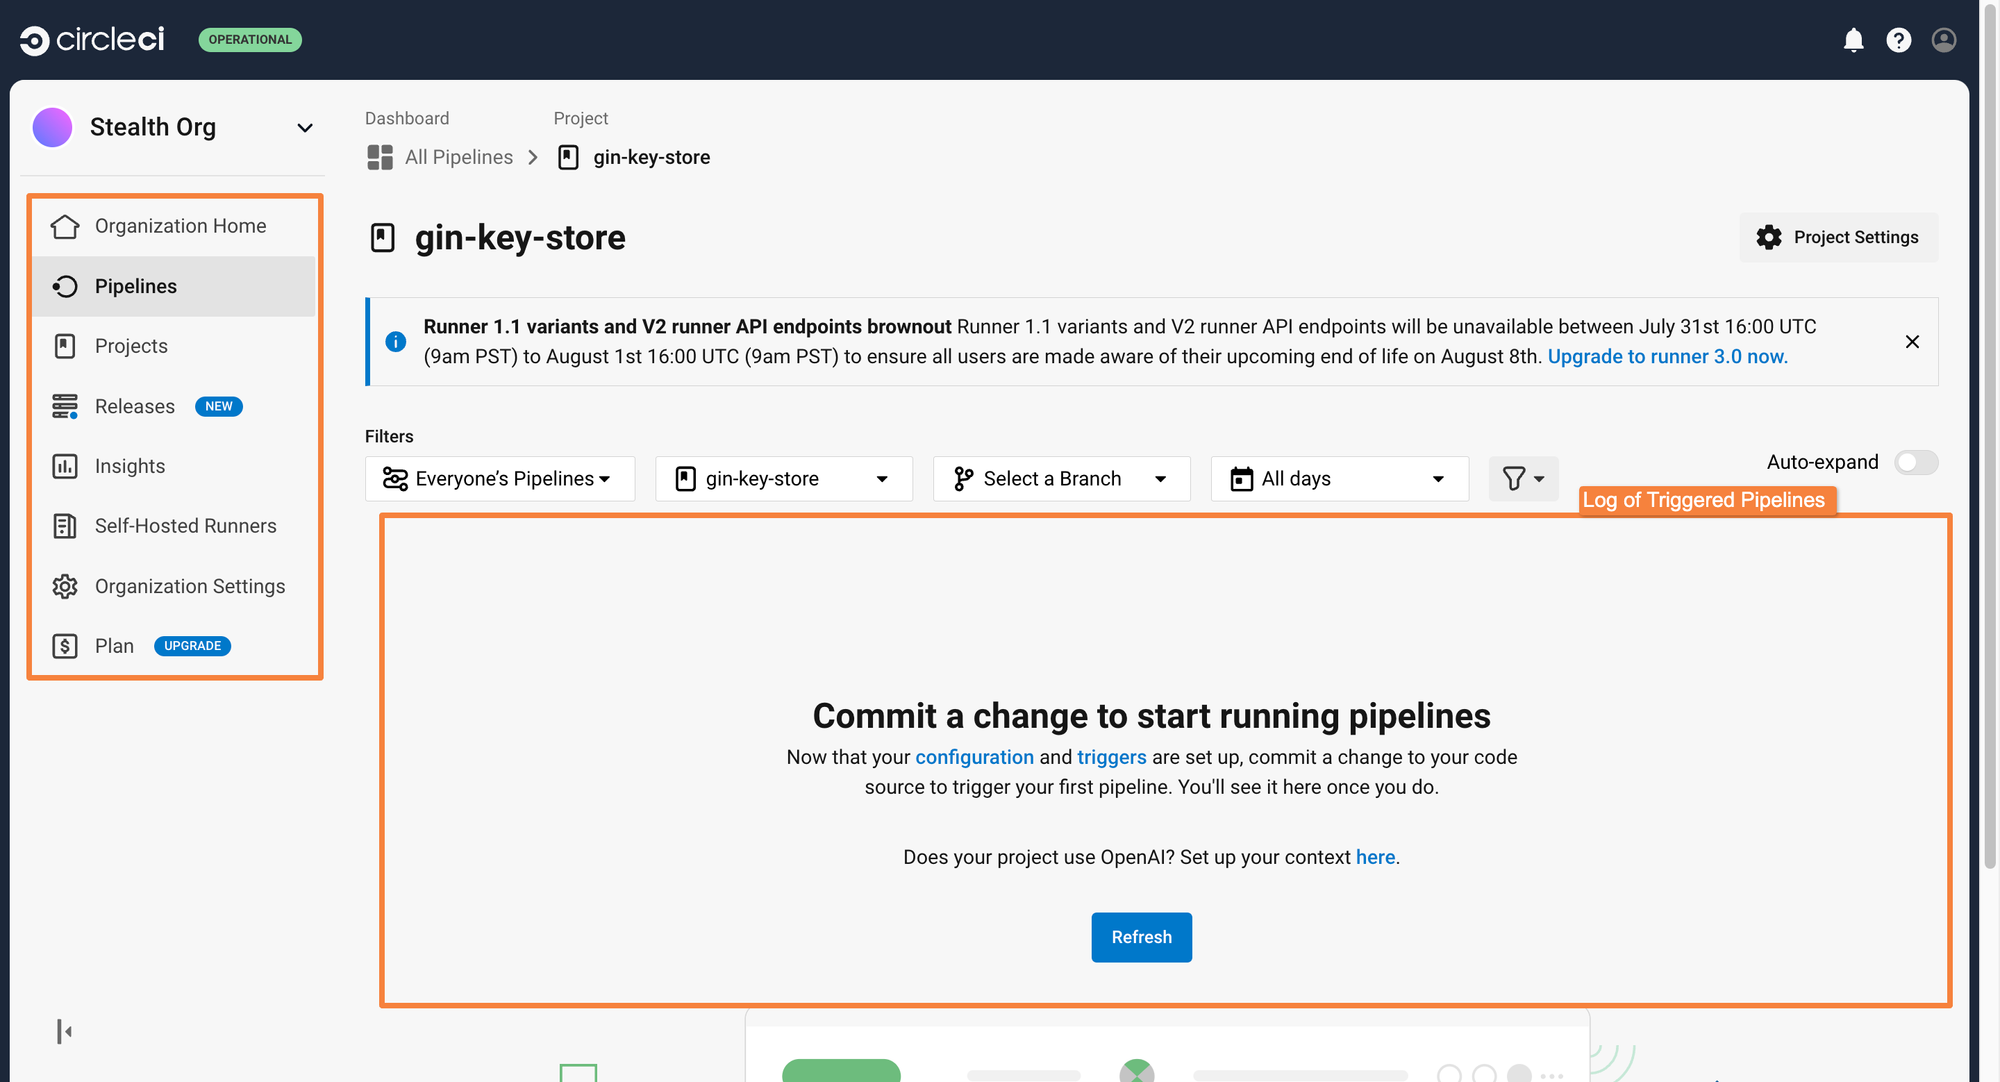
After you follow all the above steps, you will be able to see the CircleCI dashboard as shown below. Feel free to explore the dashboard.
In the image below, there are no pipelines shown, as they have not yet been triggered. As builds are triggered, this dashboard will get populated with the pipeline history.
2. Create config.yml
- In your repo’s root, create
.circleci/config.yml. - Define jobs for every pipeline task (e.g., build, test, image packaging).
- Structure using workflows to specify job order and dependencies.
- Use the latest CircleCI config syntax for full feature support.
3. Build Job
Let’s first write the configuration for building the application. Before writing the steps required for the job, an executor needs to be defined. CircleCI provides a Docker image for building go applications called cimg/go. It can be defined as such:
  build:
    docker:
      - image: cimg/go:1.21.5
Notice that the go version is 1.21.5, as the application uses the same version of go. After defining the execution environment, you can go ahead and define the steps for building the application.
If you’ve worked with Golang before, you know that the command for building go applications is quite straightforward. You simply need to run go build -v ./. The -v flag indicates verbose. This will generate detailed logs while building the application. The logs are useful in case the build fails and you want to debug it.
Before running the build command, you first need to tell Circle CI that we want it to check out in the repository. CircleCI has some special steps built in such as the checkout step. The checkout step tells CircleCI to check out the source code of the configured path. You can define all of this using the following yaml:
    steps:
      - checkout
      - run: go build  -v ./
Before you can be done with the build stage, there has to be a step to run security scans. Luckily, CircleCI has the Snyk Orb.
CircleCI Orbs are a set of pre-built steps and jobs. They are used for repetitive and complex tasks such as running security checks. Orbs can help reduce the amount of code that developers have to write within the pipeline configurations.
To use the Snyk orb, define the orb within the config file. Right under the line where the versions are defined, include the following lines to use the Snyk Orb.
orbs:
  snyk: snyk/snyk@2.1.0
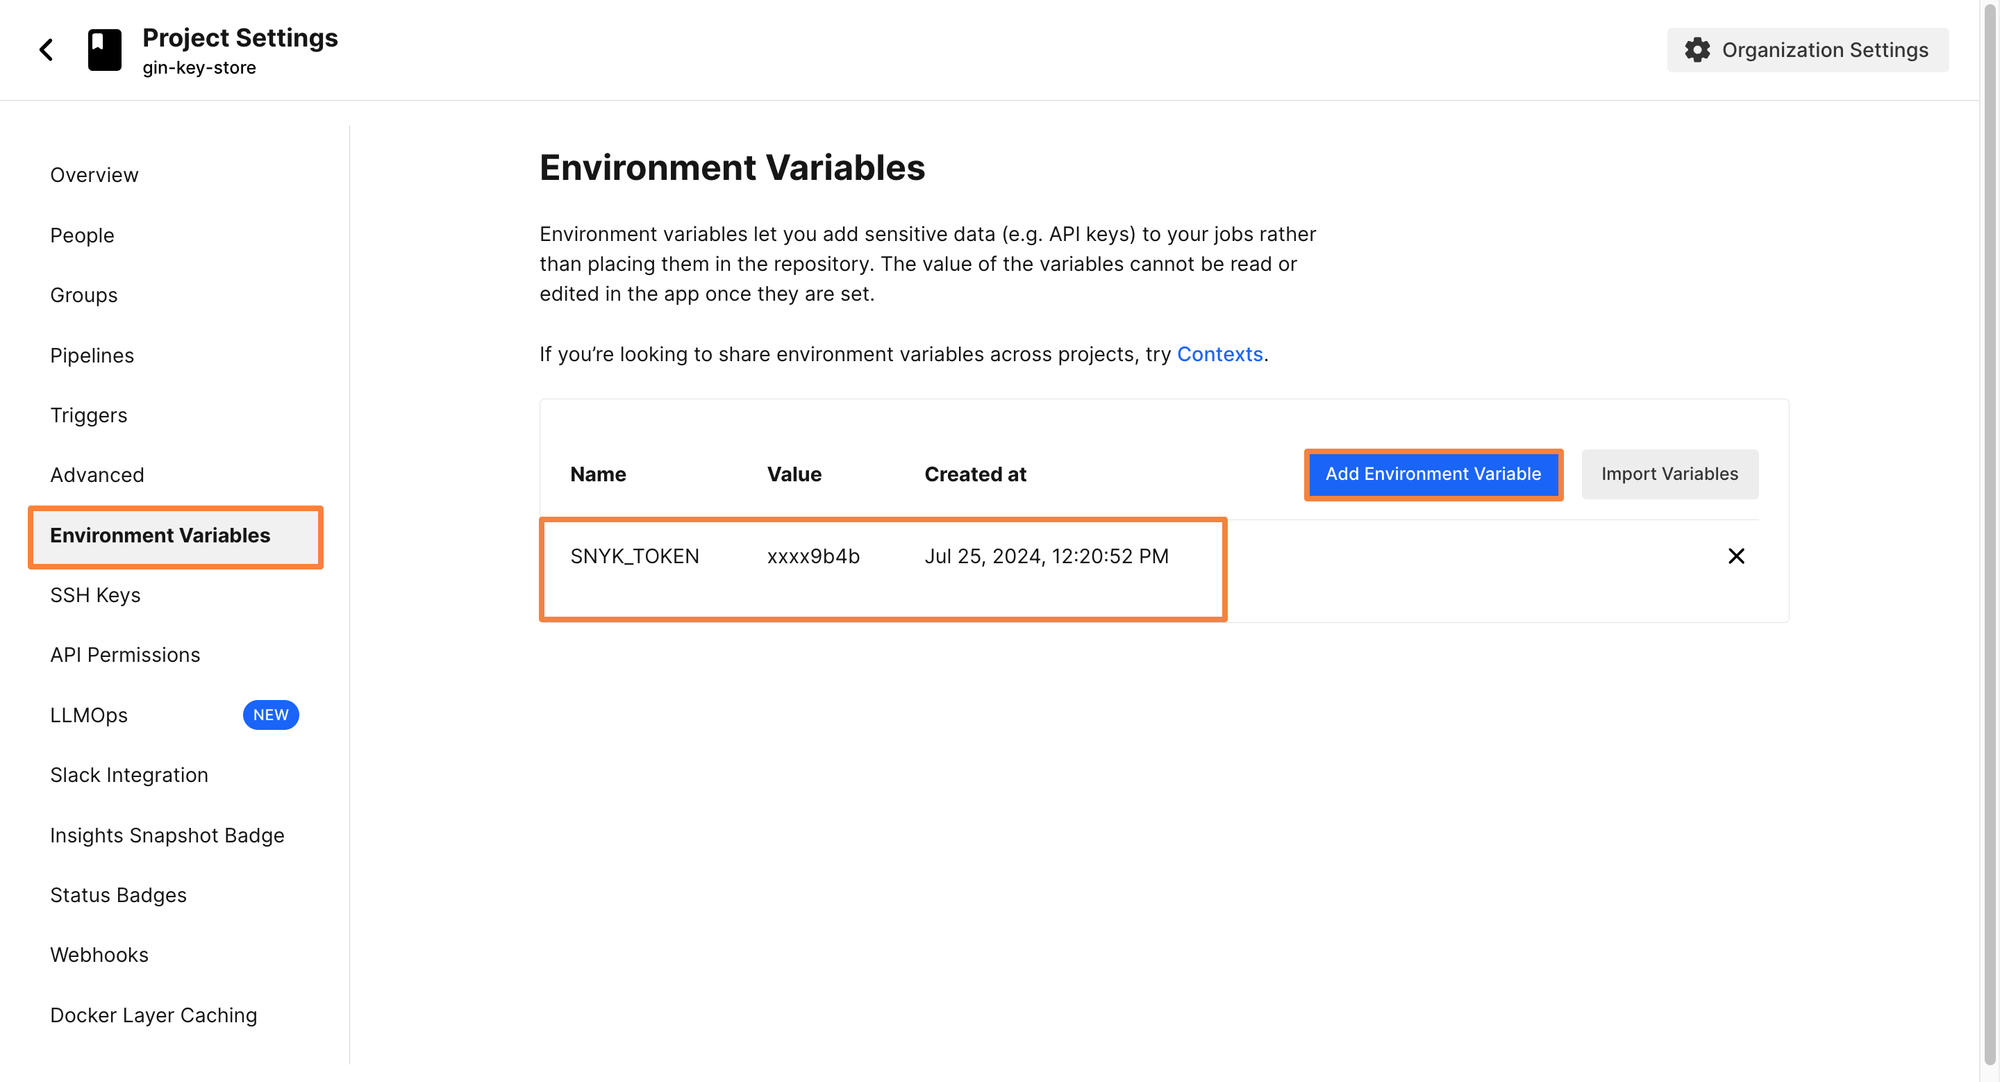
There is still one more step before Snyk can be used. The Snyk orb authenticates with your Snyk Account. To run it, you need to provide an environment variable containing the access token for your Snyk Account.
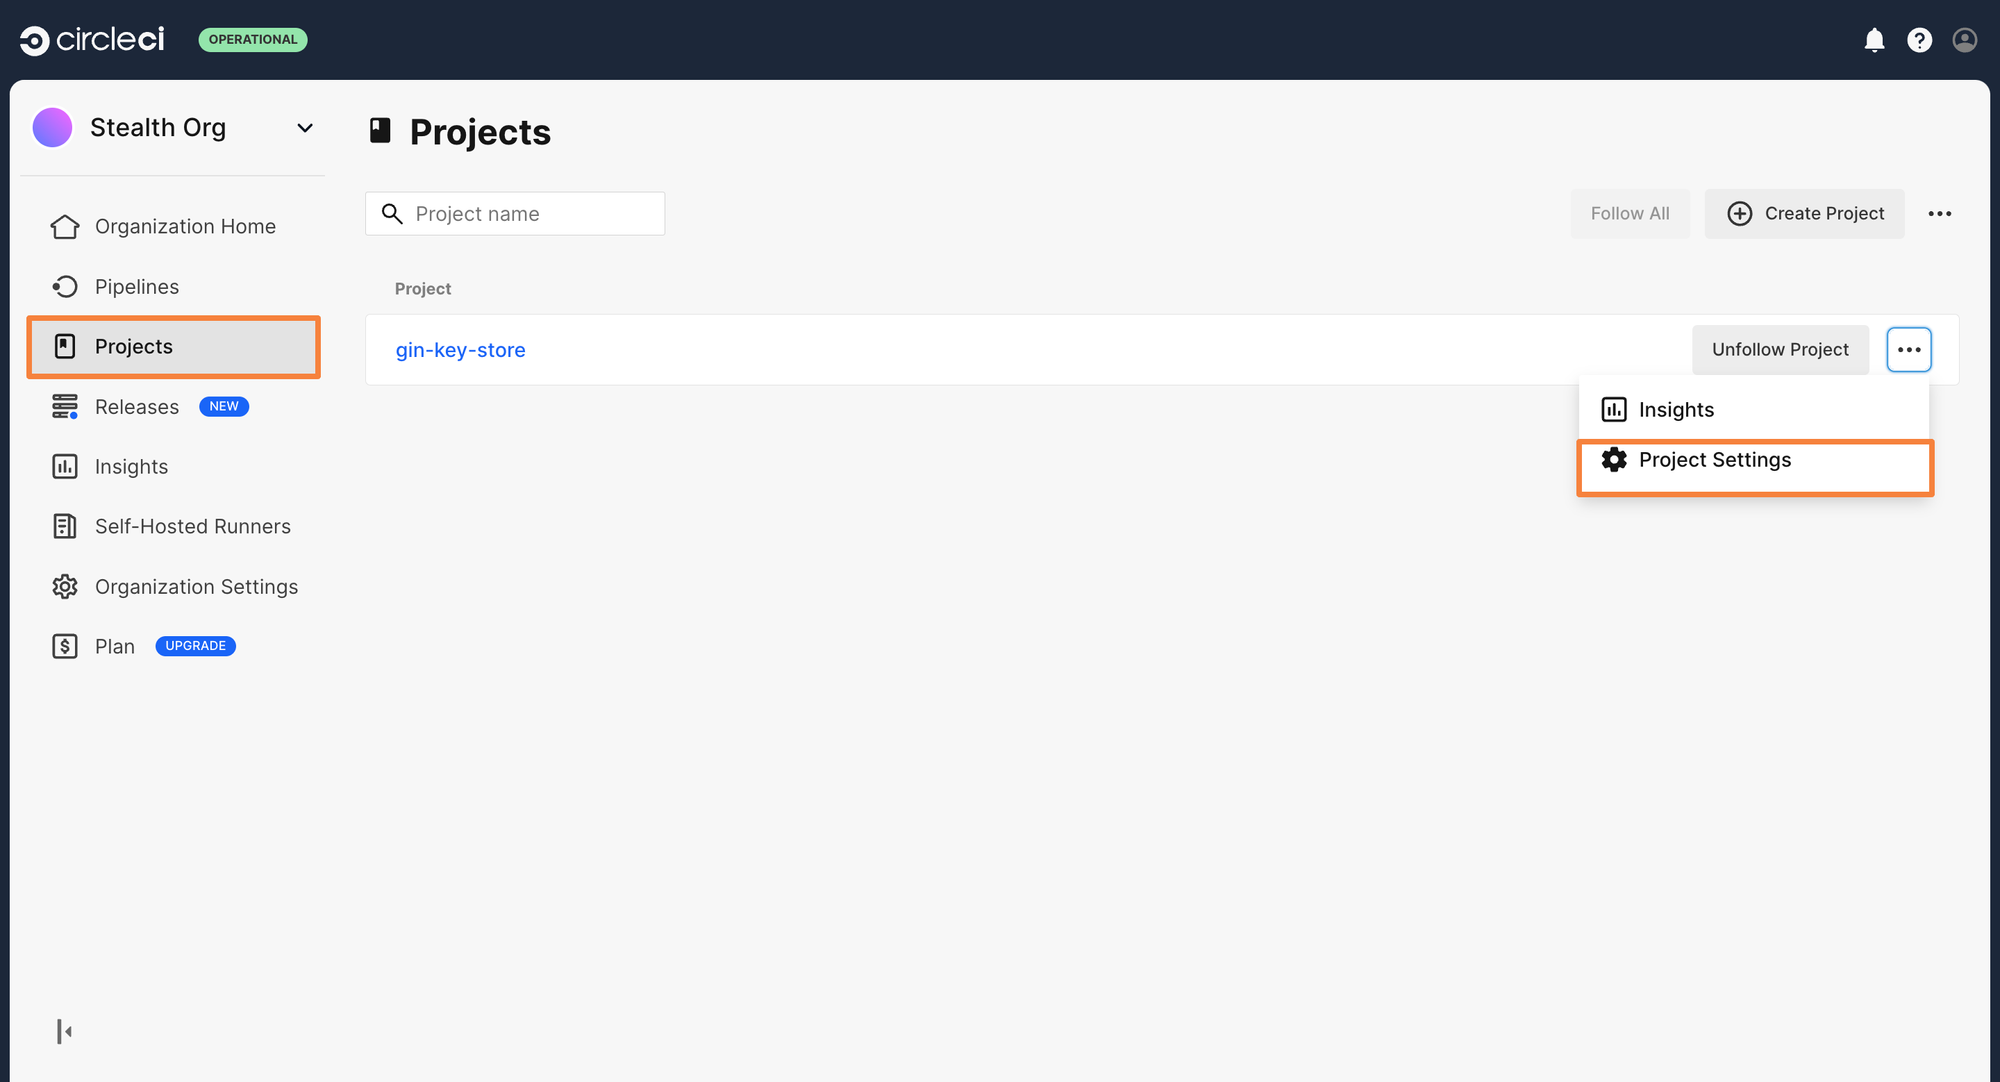
To create an environment variable, click on Projects> Project Settings > Environment Variables.
From here, click on Add Environment Variable and enter your Snyk Token as the value. Let’s call the key as SNYK_TOKEN.
If you want more details about Snyk Orb, you can check out the official documentation page for it. Similar to the Snyk Orb, every orb in CircleCI has its documentation page where you can see how to use the orb, and what environment variables are referenced in the steps.
Now that there is an environment variable to authenticate to the Snyk Account, you can add a step to run the Snyk scans. Although the scanning is defined as a step, you are using the Snyk Orb. Add the following step within your build job:
- snyk/scanWith this, the build configuration is complete. The entire yaml for the job will look like this:
jobs:
  build:
    docker:
      - image: cimg/go:1.21.5
    steps:
      - checkout
      - run: go build  -v ./
      - snyk/scan
4. Add Manual Approval Gates for Production Deployments
- Insert an approval job before deploying to production.
- This ensures only reviewed code reaches critical environments.
- Use workflow
type: approvalto freeze the pipeline until confirmation.
5. Build & Push Container Image
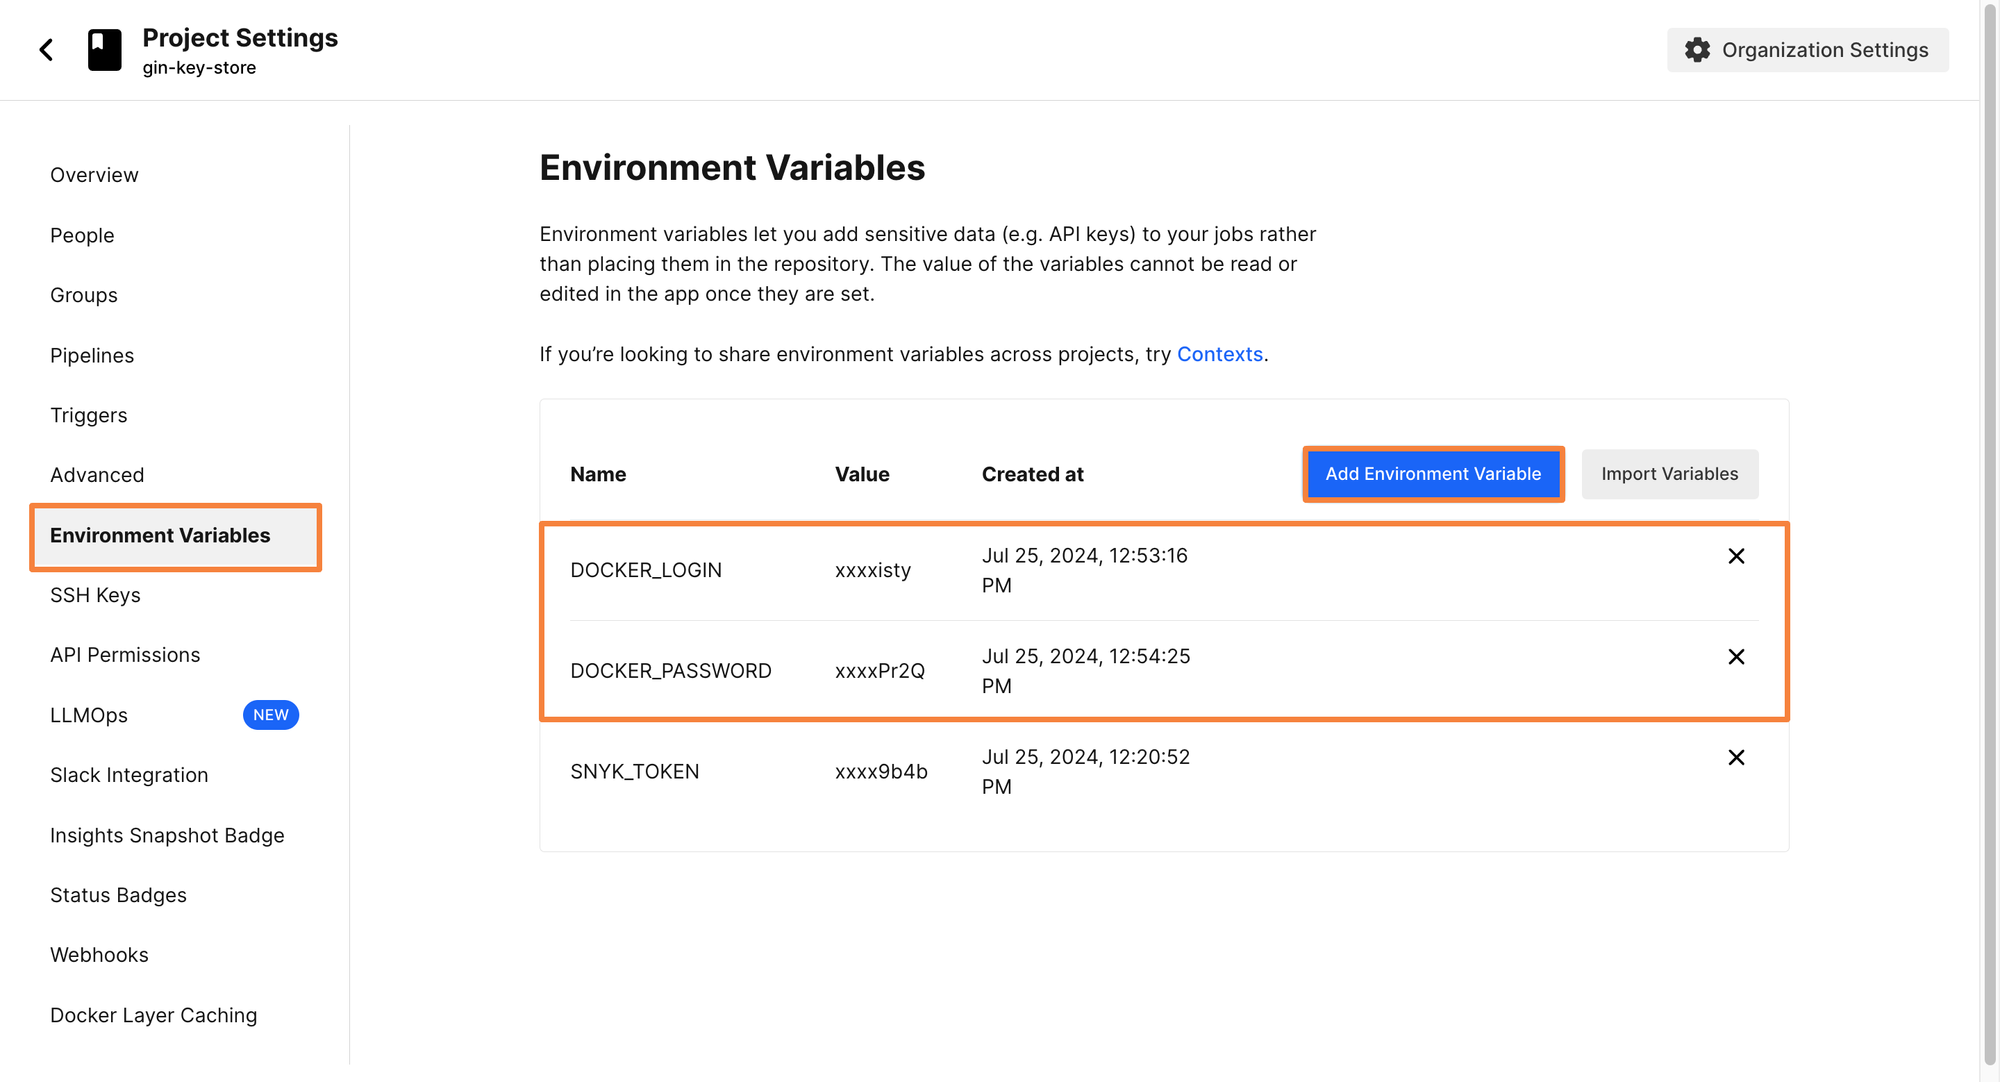
The final job for completing the continuous integration (CI) pipeline is to create the job for building container images and pushing them to a container registry. Before writing the configuration files for creating the jobs, some environment variables have to be defined. For pushing container images to a container registry, you need to be authenticated with the registry first.
Since the image will be pushed to DockerHub, let’s create two environment variables for the DockerHub Credentials. These environments will be DOCKER_LOGIN and DOCKER_PASSWORD.
CircleCI has created the Docker orb, which makes it much easier to set up the steps for building and pushing to a container registry. Since you’ve already provided the required authentication credentials as environment variables in the above step, all that’s left is importing the orb, and using the correct steps.
To use the Docker Orb, add it alongside the Snyk Orb which was defined earlier. The YAML file will look like below:
orbs:
  docker: circleci/docker@2.6.0
  snyk: snyk/snyk@2.1.0
The Circle CI documentation recommends using the Python image for building docker images. Hence, within the Docker executor, you can use the Python image
build-and-push-image:
    docker:
      - image: cimg/python:3.6
You also need to set up the Docker Engine. Without the Docker Engine, the executor will not be able to run Docker commands to build or push the container image. Luckily, CircleCI has a special step called setup_remote_docker which handles this task for you.
After the Docker Orb is ready and the Docker Engine is set up, you can go ahead and start writing the build-and-push job. Similar to the previous jobs, you will first need to check out the repository before we can trigger any kind of image creation process.
With Docker, you have an added step to authenticate with the container registry. If this image was not going to be pushed to a registry, the authentication could have been skipped. But since you want to push this image to a Docker Registry, you need to authenticate with it. We can use the Docker Orb to handle the authentication using docker/check.
The next two steps are similar in configuration. The build stage will build the image, and the push stage will push the image to the Docker registry. However, they both need an additional configuration option in order to work. You will have to define an image within them. You can define it as follows:
    - docker/build:
        image: siddhantkhisty/gin-kv
    - docker/push:
        image: siddhantkhisty/gin-kv
Now, the Build and Push job is ready. The final YAML manifest would be looking like this:
  build-and-push-image:
    docker:
      - image: cimg/python:3.6
    steps:
    - setup_remote_docker
    - checkout
    - docker/check
    - docker/build:
        image: siddhantkhisty/gin-kv
    - docker/push:
        image: siddhantkhisty/gin-kv
With this, you are done with setting up the continuous integration (CI) pipeline. Pat yourself on the back for getting this far. In the next section of this blog, let’s explore setting up a CD pipeline to deploy this container image to Kubernetes.
Creating a Continuous Deployment(CD) pipeline
You want to deploy the application to a Kubernetes cluster with the continuous deployment(CD) pipeline. The manifests required for the deployment are already created within the Kubernetes directory in the GitHub repository, so all that’s needed is to apply those configurations to the cluster. There are multiple different ways to approach deploying to Kubernetes through the pipeline.
- Authenticate with the cluster using the environment variables and use kubectl apply
- Use the Kubernetes orb to connect to the cluster and then apply the manifests
- Use a GitOps tool such as ArgoCD, FluxCD or Devtron to sync with the cluster
- Package the application with Helm and deploy the Helm chart
- Deploy a custom Circle CI runner on Kubernetes and authenticate with it
In this article, let’s deploy a custom Runner on the Kubernetes cluster, and run the continuous deployment (CD) job within that runner. As the runner is already in the target cluster, you need not worry about authentication to the cluster. You just need to ensure the runner has the appropriate permissions required for creating the Kubernetes resources.
Let’s first go ahead and deploy the Circle CI Runner on Kubernetes
1. Deploying a runner on Kubernetes
Before getting started with deploying the runner on a cluster, make sure you have the following pre-requisites
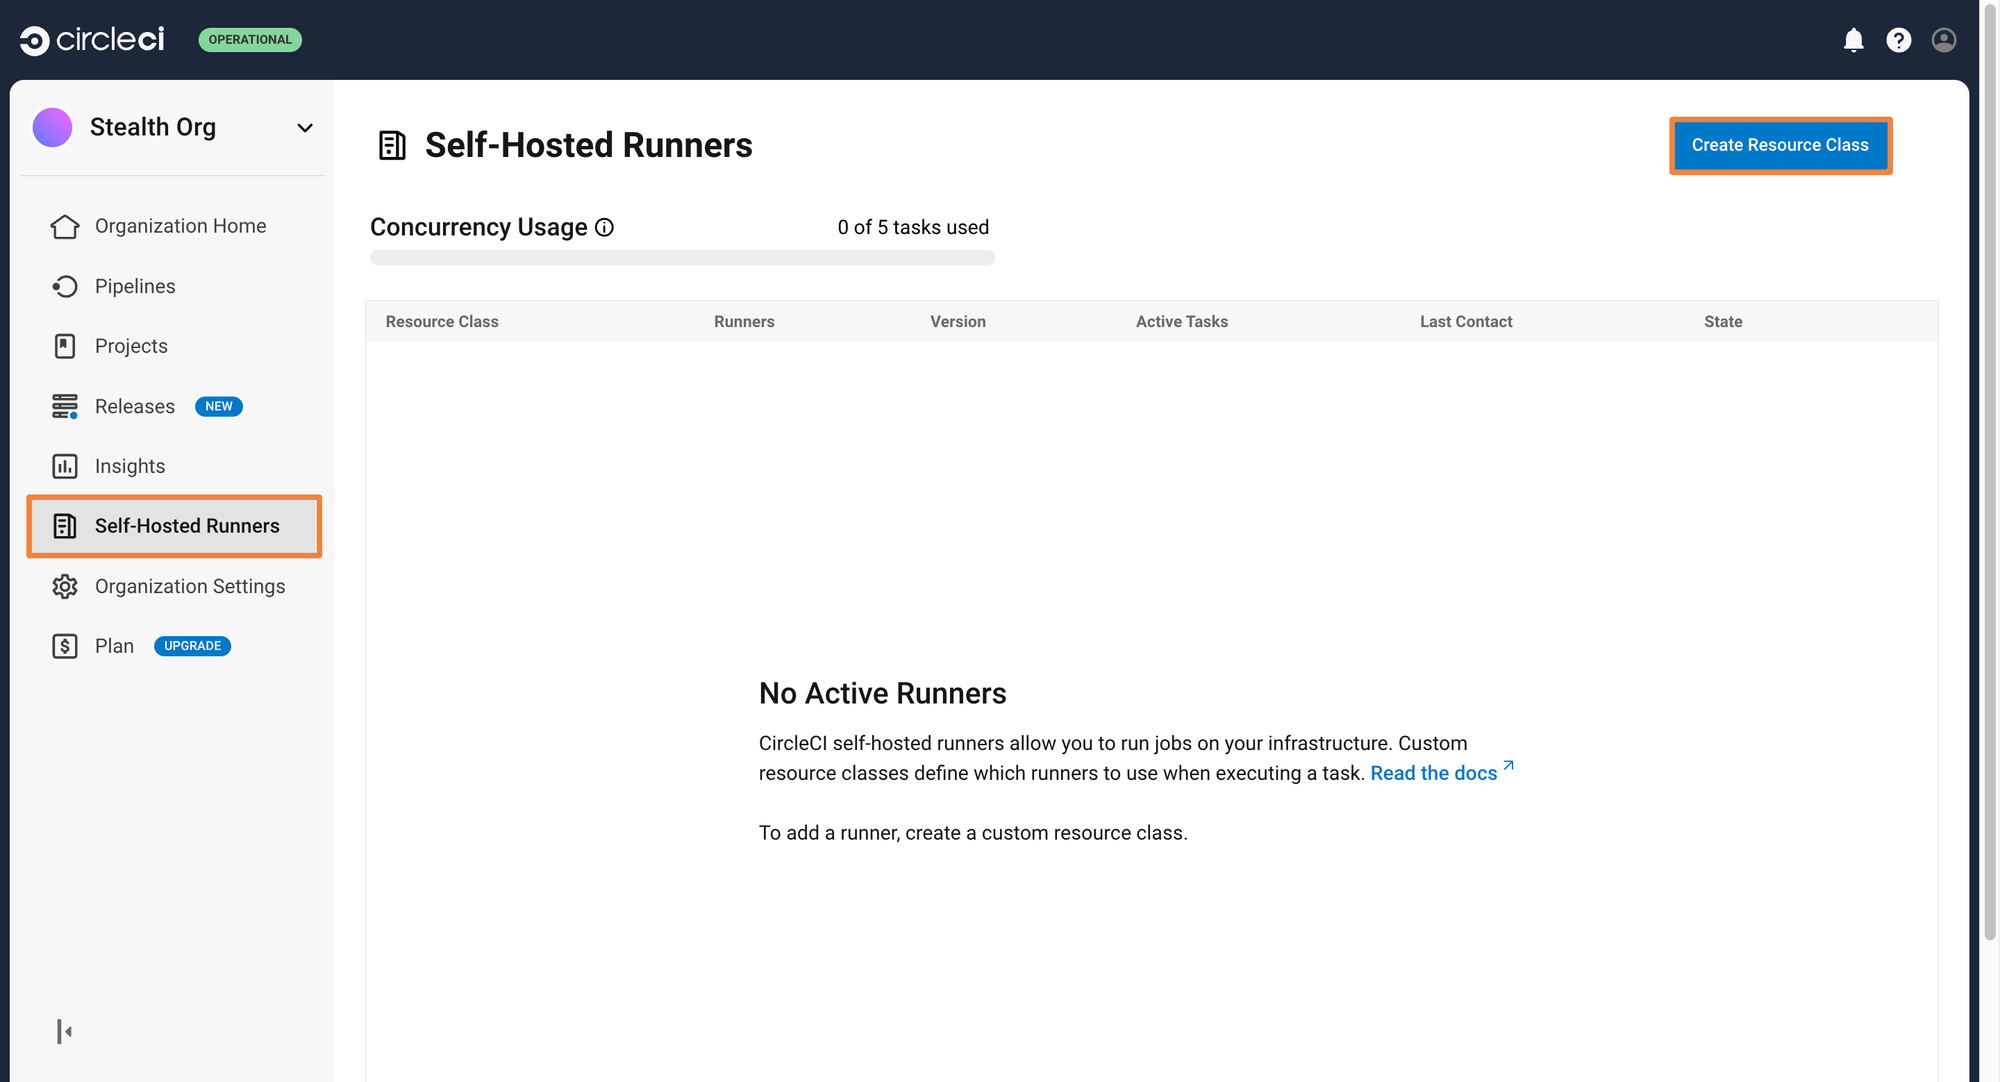
Before playing around with the Kubernetes cluster, you need to create a namespace and a resource class within the Circle CI dashboard.
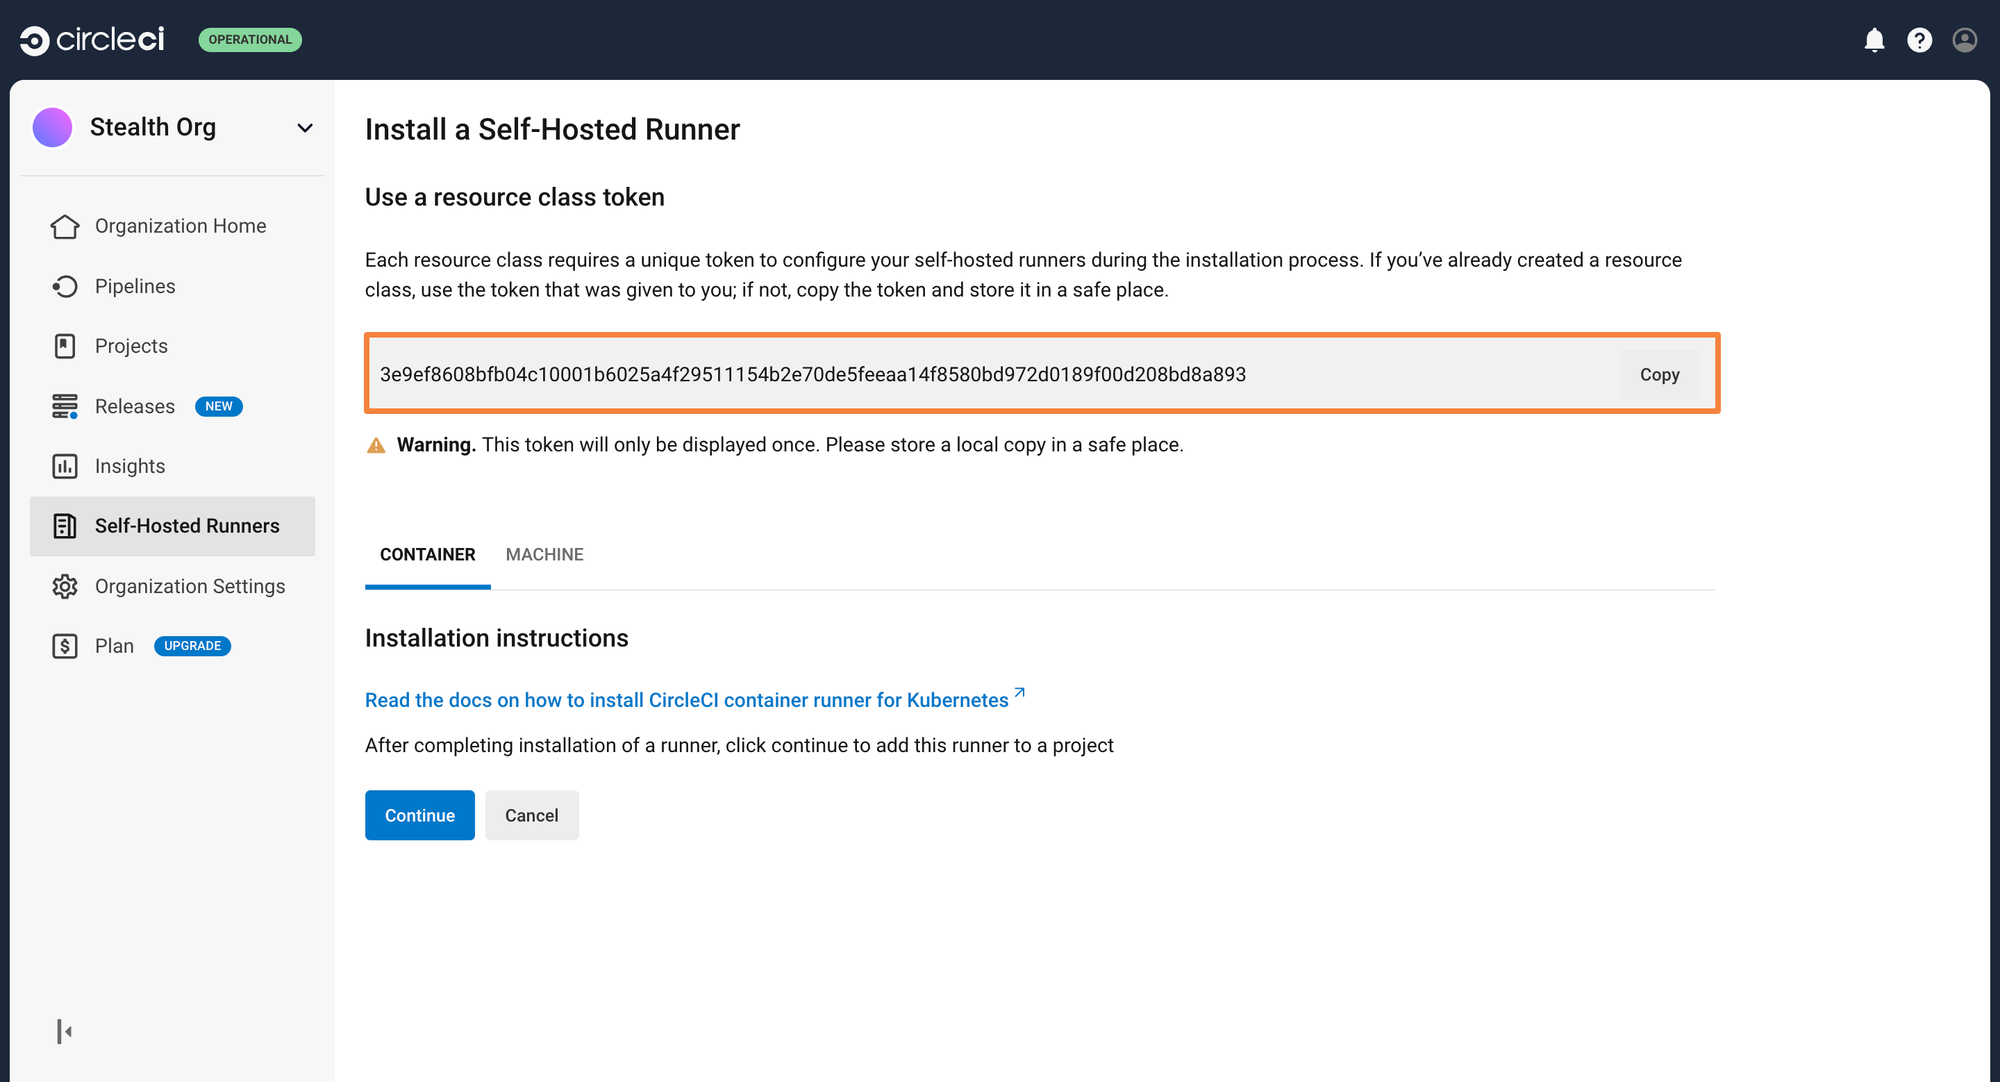
Step 1: From the Circle CI dashboard, go to Self Hosted Runner > Create a Resource Class
Step 2: Give a namespace and the resource class name. In the below example, the namespace is called circle-runner and the resource class is custom-runner
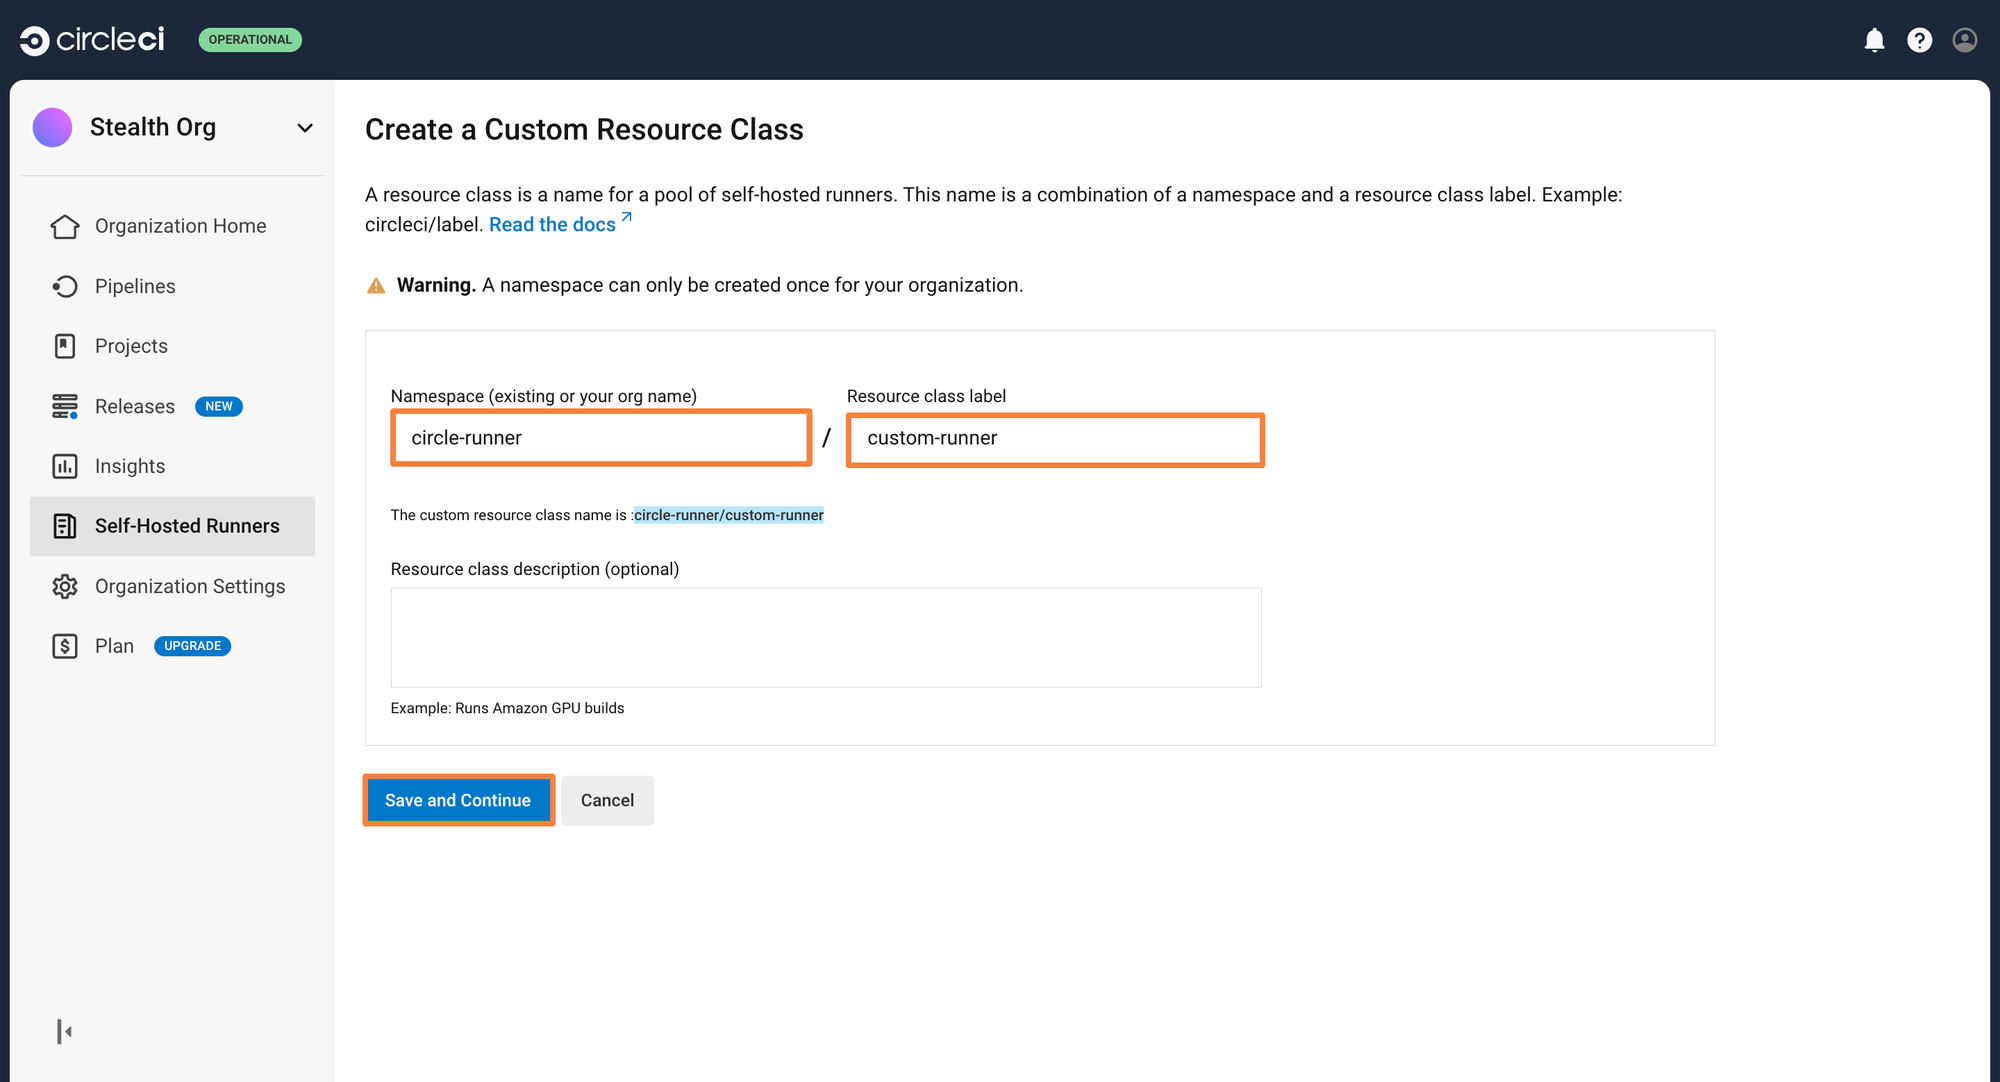
You will have gotten a Resource class token after this step. Save this token securely. It will be used while you deploy the runner in your Kubernetes cluster
You can now go ahead and deploy the runner on the Kubernetes cluster. Please make sure that you have Helm installed, as it will be used to deploy the runner.
Add the CircleCI Helm Charts using the below commands
helm repo add container-agent https://packagecloud.io/circleci/container-agent/helm

helm repo update
You also need to create a namespace within your Kubernetes cluster where the runner will be deployed. The namespace by default is expected to be circleci. You can create it using:
kubectl create namespace circleciOnce the runner is deployed on the cluster, it will require an authentication token so that it can talk with your CircleCI pipelines. For this, you will be passing the token generated earlier within a values.yaml file. This file will override the default helm values once the deployment is initiated.
agent:
  resourceClasses:
    namespace/my-rc:
      token: <resource_class_token>
Finally, you can go ahead and deploy the runner to your Kubernetes cluster using the below command
helm install container-agent container-agent/container-agent -n circleci -f values.yamlWhen the runner is created, its permissions will be handled by the service account called default which is a part of the circleci namespace. To ensure that the runner can apply the application manifest and resources are created, you will need to create a ClusterRole and ClusterRole Binding for this service account. This ensures that the created runner will have the required permissions for applying the manifest files.
To create the ClusterRole, you can use the below command. This will create a cluster-role called circle-runner and it will have all permissions.
kubectl create clusterrole circle-runner --verb=get,list,watch,create,delete,update,patch --resource='*'
To make sure the service account has the permissions granted by the above clusterrole, we will also create a ClusterRoleBinding and map it to the correct service account. You can use the below command to do so
kubectl create clusterrolebinding circle-runner --clusterrole=circle-runner --serviceaccount=circleci:default
Now the runner has the appropriate permissions it needs to deploy the application to the cluster.
2. Creating the Deployment Job
Since all the prerequisites are out of the way, it’s time to go and write the deployment job. Similar to what we have done before, we will be using the Kubernetes orb. Append it to the existing two orbs, and you will get the following yaml lines
orbs:
  kubernetes: circleci/kubernetes@1.3.1
  docker: circleci/docker@2.6.0
  snyk: snyk/snyk@2.1.0
The Kubernetes orb provides a lot of useful functionalities for Kubernetes-specific tasks including authenticating to the cluster. Since you have already deployed the runner within your cluster, you can skip the authentication step.
You want to make sure that this particular job runs on the custom runner that is deployed to the Kubernetes cluster. You can use the resource_class: field to define this. Earlier, the resource call was named as circle-runner/custom-runner. Hence it can reference that within the resource class. You will also be using the base docker image provided by CircleCI for running the deploy job
    docker:
      - image: cimg/base:current
    resource_class: circle-runner/custom-runner
Similar to the above steps, you must checkout into the repository, as the manifest files exist within the repository.
You can define 3 steps using the Kubernetes orb. These 3 steps will apply the different yaml files that are used for deploying the application in the cluster. Since the build and push image job has already run, the deployed image will always be the latest one.
The entire yaml manifest for the deploy job will look as follows:
Creating the Pipeline Workflow
Until now, you have only created all the jobs that need to run. You also need to specify how, and when the jobs should run. This can be done by using the workflow field in the YAML manifest.
All you have to do is list the jobs in the proper order, and add some conditions when they should run. Let’s look at creating the workflow for all the jobs we have created so far. The workflow will be called as build-test-and-deploy but you can give it any name that describes it accurately.
Within it, you need to specify the order in which the jobs will run. Since the first job i.e. the build job doesn’t require any pre-requisites, that will be the first job that runs.
workflows:
  build-test-and-deploy:
    jobs:
      - build
For the next two jobs, i.e., the testing and the build-and-push-images, you want to ensure that the previous jobs are completed. You don’t want to push an image on code that doesn’t build properly or is faulty. To add the requirement for completion of previous jobs, you can use the requires field and mention all the jobs that need to be completed before running the jobs.
      - test:
          requires:
            - build
      - build-and-push-image:
          requires:
          - test
Let’s assume that you are deploying the application to a production environment. You wouldn’t want to deploy it without having manual approval. Let us add an approval job to the workflow before triggering the deployment job. This job will be called prod-available and assigned as an approval type.
      - prod-available:
          type: approval
          requires:
            - build-and-push-image
Finally, you can run the deploy job after the approval has been granted by the CircleCI admin. In the code block below, the configuration is set so that CircleCI will run the deployment job only for the main branch.
- deploy:
requires:
- prod-available
filters:
branches:
only: main
If you wish to take a look at the entire yaml configuration, you can check it out in the GitHub repository.
Triggering the pipeline
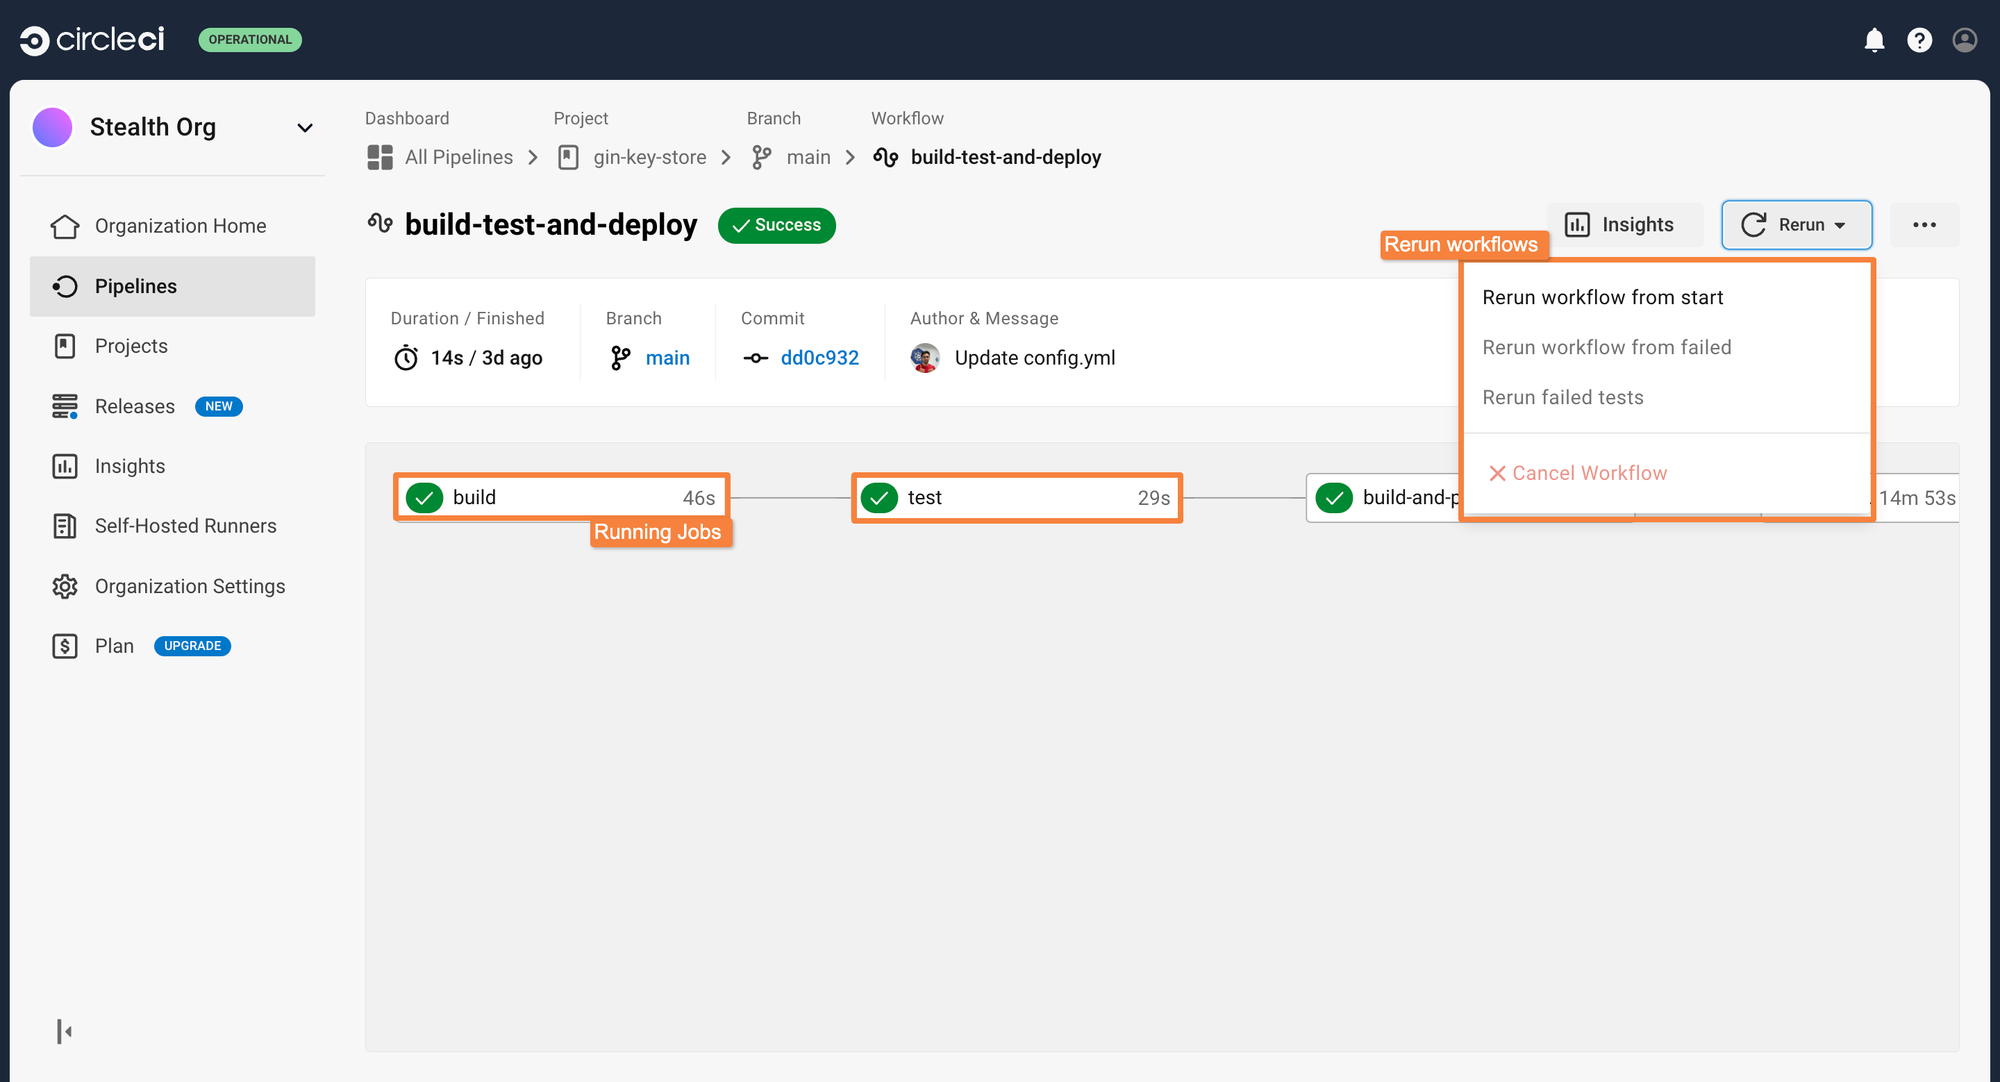
This CircleCI pipeline can be triggered whenever a commit or a PR is created within the repository. Go ahead and make a commit to trigger the pipeline. After making the commit, you can see the pipeline executing the individual jobs within the Pipelines tab. You can click on individual jobs to see all the steps that are occurring during the execution of the jobs.
In case a job fails, you can rerun just that specific job instead of executing the entire pipeline again. This saves your build minutes and reduces build costs as well.
We had assigned an approval gate before the pipeline will be able to deploy the application. After the image build and push job has completed, the workflow will stay frozen until manual approval is provided.
You can click on the approval job, and approve the deployment. This will trigger the deployment job, and the application will get deployed to the Kubernetes cluster.

CircleCI is great for continuous integration (CI) Pipelines
CircleCI is a great tool for creating continuous integration (CI) pipelines for the cluster. However, has it’s fair share of challenges when trying to create a robust continuous deployment (CD) ecosystem. Many of these challenges can be resolved with some workarounds, but they become difficult to maintain over time. Let’s understand some of the challenges you will face with CircleCI when using it for continuous deployment (CD):
- Heavy on Custom Scripts: CircleCI offers a lot of different templates through orbs for building a continuous integration (CI) pipeline. However, the number of orbs for a continuous deployment (CD) pipeline is quite limited, and you are required to write a lot of custom scripts for deploying your application properly.
- Advanced Deployment Strategies: When deploying a new application version, you would want to deploy using a deployment strategy such as blue-green or canary deployments to ensure application availability and reliability. However, CircleCI does not natively provide features to trigger this deployment. You will need to integrate an external tool such as ArgoCD, FluxCD, or Devtron to use various deployment strategies.
- Limited Visibility: After the CircleCI pipeline has been completed, all you know is that the tasks within the pipeline have finished executing. You do not have any real insight into whether the deployed resources are running properly, or if they have encountered any errors. A manual intervention will be required to check the health and take action in case of errors.
- Complex Rollbacks & Recovery: After deploying an application, you might need to roll back to a previous deployment if the new one is having issues. There is a way to do this within CircleCI, but you would need to incorporate a lot of different hacks. For example, one way could be to trigger a deployment, sleep for a few minutes, and then check the pod status. If something is not working, trigger a rollback using the kubectl command. This method involves writing a lot of scripts and adds unnecessary complexities to the pipeline.
- Tool integration overhead: CircleCI will simply manage building and deploying the applications according to what you have configured. When deploying a production application, you will want integrations of various tools. These tools will need to be manually installed, configured, and managed within the cluster, adding a management overhead. Moreover, you might need to set some configurations for each application, such as autoscaling via KEDA.
- Manage Configuration Drifts: It would be difficult to observe any configuration drifts that occur within the deployed application or get a detailed overview of the deployment history. This can make it difficult to troubleshoot the application in case of failure.
While CircleCI can be very useful for creating robust continuous integration (CI) pipelines, they fall short when it comes to deploying applications on Kubernetes and dealing with everyday operations tasks. Devtron is an open-source software delivery workflow for Kubernetes that not only lets you make a robust continuous deployment (CD) pipeline, with all the post-deployment tasks, but it also helps simplify all Day 2 operations, including tool integrations, debugging, and much more.
Conclusion
Creating CI/CD pipelines is an essential part of the software development lifecycle, which also enables you to accelerate software release cycles. While there are many tools out there that enable you to create your own CI/CD pipelines, Circle CI enables the seamless creation of pipelines with its plethora of pre-built orbs and steps, which can plug into workflows without requiring overly complicated custom configurations and scripts.
FAQ
What is a CircleCI pipeline?
A CircleCI pipeline is an automated workflow that runs build, test, and deployment jobs in sequence or in parallel, triggered by code changes in a repository.
How does CircleCI integrate with Kubernetes?
CircleCI can build Docker images, push them to a container registry, and deploy them to a Kubernetes cluster using kubectl, Helm charts, or GitOps tools like ArgoCD.
What are CircleCI orbs?
Orbs are reusable packages of CircleCI configuration that automate common tasks like Docker builds, security scans, or Kubernetes deployments without writing custom scripts.
Can I use CircleCI for both CI and CD?
Yes, CircleCI supports both continuous integration and continuous deployment. However, some teams use CircleCI for CI and adopt dedicated GitOps tools for CD.
What are the benefits of using CircleCI pipelines?
CircleCI pipelines reduce manual work, accelerate releases, improve test coverage, and provide integration with a wide range of DevOps and Kubernetes tools.