1. Learn how Kubernetes Requests and Limits work to guarantee minimum resources for your containers while preventing overconsumption with maximum thresholds.
2. Understand how requests impact pod scheduling and why insufficient resources leave pods in the Pending state, while limits control CPU throttling and OOMKilled scenarios.
3. Discover the tradeoffs between stability and cost, including the risks of under- or over-provisioning and the importance of workload rightsizing.
4. Get step-by-step guidance and best practices, like setting memory requests equal to limits, avoiding unnecessary CPU limits, and leveraging Horizontal Pod Autoscaler (HPA).
5. Learn how ongoing monitoring and tuning of requests and limits improve cluster efficiency, reduce costs, and prevent resource-related downtime.
What are Requests and Limits in Kubernetes?
In Kubernetes, requests and limits define how much CPU and memory a container is guaranteed and allowed to use. Requests ensure that your application always gets the minimum resources it needs, while limits cap the maximum usage to prevent overconsumption. Setting these correctly improves stability, avoids resource contention, and keeps costs optimized. This guide explains Kubernetes Requests and Limits with examples, best practices, and real-world use cases.
Understanding Requests (Guaranteed Resources)
Requests are guaranteed resources that Kubernetes will ensure for the container on a node. If the required Request resources are not available, the pod is not scheduled and lies in a Pending state until the required resources are made available (by cluster autoscaler). Increasing or decreasing the Request value can have direct implications on your Cloud Infrastructure Cost, as the more Request you allocate to a container, the fewer pods will be scheduled per node.
Limits (Maximum Resources)
Limits are the maximum resources that can be utilized by a container. If the container exceeds this quota, it is forcefully killed with a status of OOMKilled. The resources mentioned in limits are not guaranteed to be available to the container; it may or may not be fulfilled depending on the resource allocation situation on the node.
apiVersion: apps/v1
kind: Deployment
metadata:
  name: nginx-deployment
  labels:
    app: nginx
spec:
  replicas: 3
  selector:
    matchLabels:
      app: nginx
  template:
    metadata:
      labels:
        app: nginx
    spec:
      containers:
      - name: nginx
        image: nginx:1.14.2
        resources:
            limits:
              memory: 200Mi
              cpu: 1
            requests:
              memory: 100Mi
              cpu: 100m
        ports:
        - containerPort: 80
Consider the resources section of the above-mentioned Deployment, the container specs request 100m of CPU and 100Mi of memory. This means that this container will be allocated 100m of CPU resource and 100Mi of memory resource on whichever node it is scheduled on.
            requests:
              memory: 100Mi
              cpu: 100m
However, if you check the limits section, it allocates 1 CPU (or 1000m CPU) and 200Mi of memory, which means that this container can use up to 1000m CPU and 200Miof memory, but if it requests resources more than that, then it will be either throttled or OOMKilled by the k8s controller.
            limits:
              memory: 200Mi
              cpu: 1
How Kubernetes Uses Requests for Scheduling
Kubernetes uses the requests value to determine where to place a pod during scheduling. If a node doesn’t have enough free CPU or memory to meet a pod’s request, the pod will remain in the Pending state. The scheduler only assigns the pod to a node that can guarantee the requested resources, ensuring predictable performance for critical workloads.
CPU Throttling and Memory OOMKilled Explained
When a container exceeds its CPU limit, Kubernetes throttles the CPU usage, slowing down the application instead of terminating it. However, if the memory usage crosses the specified limit, the container is forcefully terminated with an OOMKilled status. These safeguards ensure one misbehaving container doesn't compromise the stability of the entire node.
What if no Resources are specified?
Without requests and limits, Kubernetes may overpack pods onto a node, potentially causing severe performance degradation and node instability, as no minimum or maximum boundaries are enforced. Always specify both CPU and memory resources in your container specs.
Tradeoffs: Balancing Stability and Cost
Resource allocation has a direct impact on your cloud bills and cluster stability:
- Undersized requests/limits: Risk pod evictions and performance drops.
- Oversized requests/limits: Leave nodes underutilized, increasing costs and minimizing cluster efficiency.
There’s no universal formula for optimal resources. Analyze your app's criticality and historical resource usage to guide configuration (a process also called "rightsizing")
Best Practices for Setting Requests and Limits
1. Proportional Requests and Limits
- For extreme stability, set limits to within 110% of your requests (e.g., request: 100Mi, limit: 110Mi).
- For workloads with high startup needs (like Java), higher bursts may be necessary; consider limits up to 130-140% of the request.
2. Set Memory Requests and Limits Equal
- Kubernetes experts recommend setting memory requests equal to memory limits for predictable memory usage, minimizing OOMKilled risks.
3. Avoid CPU Limits Where Possible
- Avoid CPU limits unless necessary. They often cause throttling and can degrade performance, especially for latency-sensitive applications. Instead, rely on CPU requests and let workloads utilize spare CPU.
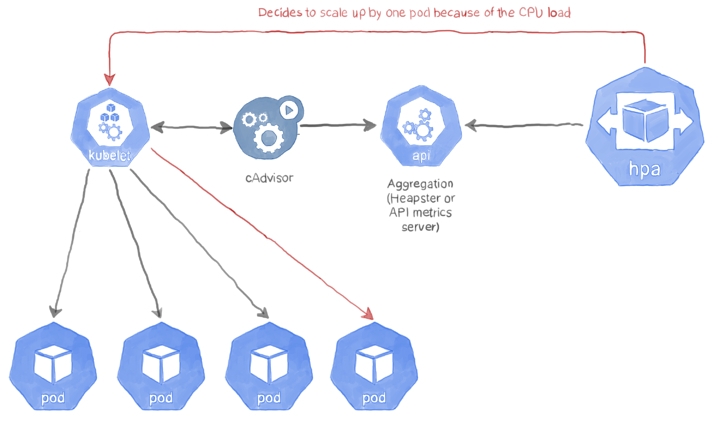
4. Leverage Autoscaling (HPA)
- Use the Horizontal Pod Autoscaler (HPA) for dynamic scaling. Configure HPA to trigger scale-up at a target, such as 60% CPU utilization for best cost/performance balance.
5. Choose the Right Node Types
- Match instance shapes with workload profiles (e.g., memory-intensive apps should use memory-optimized nodes), maximizing node and resource utilization.
6. Regular Review and Rightsizing
- Routinely monitor, review, and tune requests and limits based on real workload data.
Final Takeaway
Apply a data-driven and workload-specific approach to Kubernetes requests and limits:
- Always specify them in every pod spec.
- Set memory requests=limits for predictability.
- Consider not setting CPU limits unless required.
- Use autoscaling and instance matching for flexibility and efficiency.
- Regularly revisit your configurations using observability data for ongoing optimization.
FAQ
Why Are Kubernetes Container Resources Important for Cluster Stability?
Proper resource configuration (requests and limits) ensures Kubernetes cluster stability. Misconfigurations can lead to node failures or performance issues. Requests guarantee resources, while limits prevent overuse, balancing stability and performance.
What Happens If No Resources Are Specified in Kubernetes Container Specs?
If no resources are specified, Kubernetes may overload nodes with pods, leading to instability and performance degradation, as autoscaling won't trigger.
How Can You Optimize Kubernetes Resource Allocation to Minimize Costs?
Balance resource requests and limits to avoid overuse or underutilization. Autoscaling (HPA) helps by adjusting resources based on usage, reducing waste while maintaining performance.
How Do Kubernetes Autoscaling and HPA Improve Resource Efficiency?
Kubernetes autoscaling and HPA automatically adjust pod counts based on resource usage, optimizing efficiency and reducing costs while ensuring performance


