Kubernetes is the go-to platform for managing containerized applications and microservices at scale. For local setups, tools like Minikube, MicroK8s, or K3s work well, while Kubeadm offers more control for self-managed clusters. For a fully managed experience, platforms like DigitalOcean Kubernetes (DOKS) simplify provisioning, scaling, and maintenance. In this tutorial, we’ll show you how to deploy a Kubernetes cluster on DigitalOcean and run your first containerized app.
What is DigitalOcean
DigitalOcean is a cloud infrastructure provider known for its simplicity and developer-friendly tools. It offers scalable computing resources and cloud services that help businesses and developers build, deploy, and scale applications efficiently. DigitalOcean’s straightforward approach makes it a popular choice for startups, small businesses, and individual developers looking for an easy-to-use cloud platform with competitive pricing.
Some of the major cloud services provided by DigitalOcean are:
- Droplets – Scalable virtual machines for app hosting
- Spaces – Object storage with simple file management
- Kubernetes – Managed Kubernetes clusters
- App Platform – Platform-as-a-Service (PaaS) for building, deploying, and scaling apps
- Load Balancers – Distributing traffic across multiple instances
- Managed Databases – Fully managed database solutions
- Block Storage – Scalable and high-performance storage
- VPC – Private cloud networking …and much more.
Kubernetes in DigitalOcean
DigitalOcean Kubernetes (DOKS) is a fully managed Kubernetes service that simplifies the deployment, scaling, and management of containerized applications on DigitalOcean's cloud infrastructure. With automated cluster management, built-in monitoring, security features, and seamless integration with other DigitalOcean services, DOKS provides an easy way to run cloud-native applications without worrying about infrastructure management. It allows developers to focus on application deployment, while DigitalOcean handles the underlying infrastructure and scaling needs.
Core Features of DOKS:
- Managed Kubernetes: Automatic updates, scaling, and maintenance to ensure that you can focus on your applications instead of infrastructure.
- Automated Scalability: DOKS adjusts your cluster resources based on workload demands, ensuring optimal performance.
- Multi-Cluster Support: Easily manage clusters across different regions through a single control plane.
- Native Integration with DigitalOcean Services: Seamless integration with other DigitalOcean services like Load Balancers, Spaces, and Databases.
For more control, users can also set up Kubernetes clusters on DigitalOcean's virtual machines, though this requires additional management compared to the fully managed DOKS service.
How to set up a DOKS cluster
To set up a Kubernetes cluster on DigitalOcean, we'll use the DigitalOcean CLI (doctl). Before starting, ensure you have a DigitalOcean account and the doctl tool installed on your system. You can sign up for DigitalOcean and get $100 free credits to explore their services.
Follow these steps to create a Standard Kubernetes Cluster using the DigitalOcean CLI:
Step 1: Authenticate to DigitalOcean CLI
Log in to your DigitalOcean account using the doctl CLI:
doctl auth init
This will prompt you for your API token. You can generate it in your DigitalOcean dashboard.
Step 2: Create a Kubernetes Cluster
Run the following command to create a 2-node Kubernetes cluster in the desired region:
doctl kubernetes cluster create my-cluster \
    --region nyc1 \
    --size s-2vcpu-4gb \
    --node-pool "name=default;size=s-2vcpu-4gb;nodes=2" \
    --version 1.24.4-do.0
Explanation of flags:
- region nyc1 → Deploys the cluster in the nyc1 region (adjust as needed)
- size s-2vcpu-4gb → Specifies the size for the worker nodes
- node-pool "name=default;size=s-2vcpu-4gb;nodes=2" → Creates a pool with 2 nodes of specified size
- version 1.24.4-do.0 → Specifies the Kubernetes version (adjust as needed)
Step 3: Get Kubeconfig for the Cluster
Once the cluster is created, get the kubeconfig file to authenticate and manage the cluster:
doctl kubernetes cluster kubeconfig save my-cluster
This command sets up your kubeconfig so you can interact with the cluster using kubectl.
Step 4: Verify the Cluster
To verify if the cluster is up and running, check the status of the nodes:
kubectl get nodes
This will show the list of nodes in your DigitalOcean Kubernetes cluster.
With these steps, your Kubernetes cluster will be up and running on DigitalOcean, ready for you to deploy your applications.
Deploying an application on DOKS
Now that your DOKS cluster is set up, it's time to deploy a containerized application. In this guide, we'll deploy a sample Node.js application, demonstrating how to package, push, and run your app on Kubernetes.
Step 1: Clone the GitHub Repository
Clone this Node.js application repo:
git clone https://github.com/devtron-labs/getting-started-nodejs.git
Change the directory to the project directory
cd getting-started-nodejs
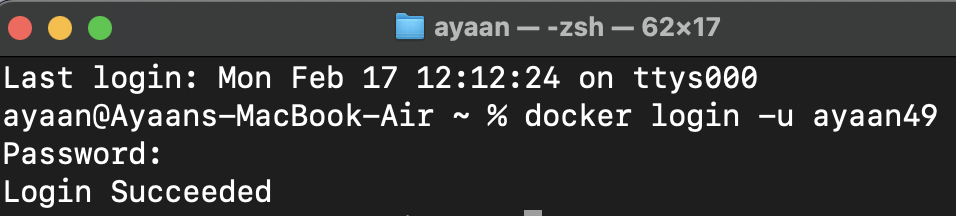
Step 2: Log in to Docker Hub
First, authenticate with Docker Hub:
docker login -u username
You will be prompted to enter your DockerHub password. Provide your Dockerhub Personal Access Token when prompted.
Step 3: Build the Docker Image
Run the following command from the project directory:
docker build -t <DOCKERHUB_USERNAME>/<DOCKERHUB_REPOSITORY>:v1 .
Replace <DOCKERHUB_USERNAME> With your actual Docker Hub username <DOCKERHUB_REPOSITORY> With your actual repository name.
Step 3: Push the Image to Docker Hub
Upload the image to your Docker Hub repository:
docker push <DOCKERHUB_USERNAME>/<DOCKERHUB_REPOSITORY>
You can verify it by checking your repository on Docker Hub.
Step 5: Deploy the Image on DOKS
Create a Kubernetes deployment manifest and reference the image that you pushed to Docker Hub in the previous step:
apiVersion: apps/v1
kind: Deployment
metadata:
 name: nodeapp-deployment
spec:
 replicas: 3
 selector:
   matchLabels:
     app: nodeapp
 template:
   metadata:
     labels:
       app: nodeapp
   spec:
     containers:
     - name: nodeapp-container
       image: <Dockerhub_Username>/<Dockerhub_Repository>:v1
       ports:
       - containerPort: 8080
Let’s understand what’s happening in the above YAML manifest.
- Kind: The type of Kubernetes object. In this case, it’s a deployment object.
- metadata.name: The Name of this deployment.
- spec.replicas: The number of pod replicas that this deployment should have. In this case, there will be three replicas.
- Template: The template will be used to create the pod.
- Template.spec.containers: The containers that will be present within the pod.
Now, create a Kubernetes Service manifest:
apiVersion: v1
kind: Service
metadata:
 name: nodeapp-service
spec:
 selector:
   app: nodeapp
 ports:
   - protocol: TCP
     port: 80
     targetPort: 8080
 type: NodePort
Let’s break down what’s happening within this service manifest.
- Kind: The type of Kubernetes object that is being created.
- metadata.name: The name of this service object. In this case, it’s called nodeapp-service
- Spec.selector: The pod labels that should be exposed by this service
- Ports: Defining the protocol type and port numbers that should be exposed for the application
- Type: The type of service that is being created.
Using these manifests, you can deploy the application to the Kubernetes cluster. Please run the below command to apply the deployment and service manifest to your Kubernetes cluster.
kubectl apply -f deployment.yaml service.yaml
With this, you have successfully deployed the Node.js application to the DOKS cluster.
Kubernetes Deployment with Devtron
Devtron is a comprehensive Kubernetes management platform designed to simplify the entire DevOps lifecycle, from the initial build stages to deployments and beyond. It eliminates the complexities of Kubernetes by providing an intuitive interface for automating CI/CD pipelines, managing Helm charts, and monitoring deployments in real-time. When deploying applications on DOKS, Devtron simplifies the process by handling containerization, generating Kubernetes manifests, and ensuring seamless rollouts with built-in security and scalability best practices.
Let’s go through the steps of deploying an application on DOKS using Devtron:
Prerequisites
Before moving forward, let’s look at all the things you’ll require to follow along:
- An Application on GitHub
- Devtron is installed and configured on your machine. If you haven’t installed Devtron, feel free to check out the well-managed documentation and join the discord community for help!
A DOKS cluster integrated with the Devtron platform. Check out the documentation for a step-by-step guide on setting it up.
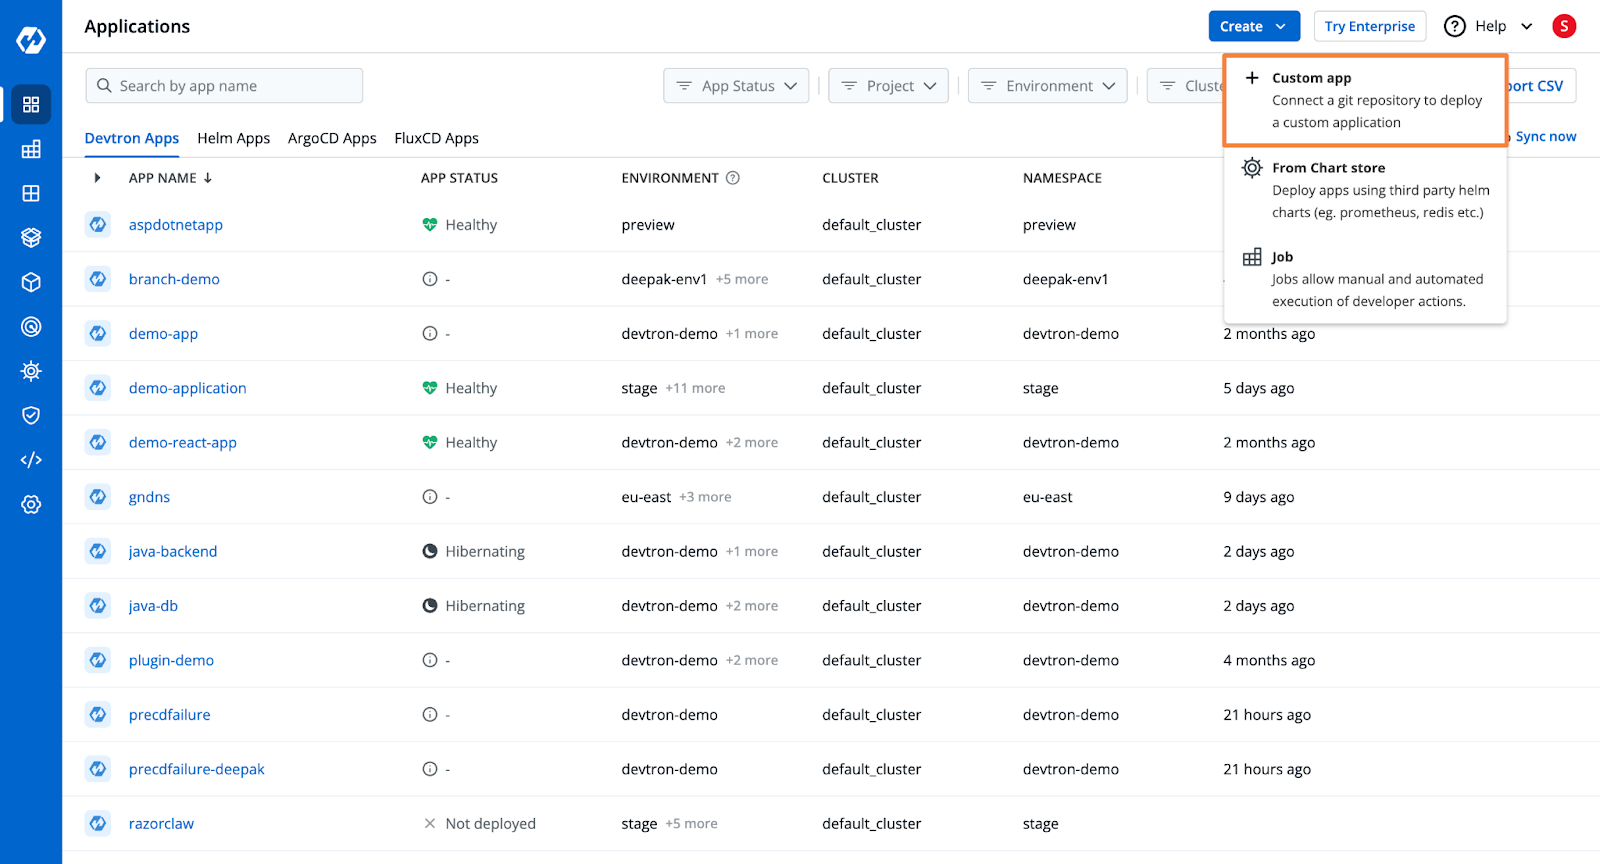
Step 1: Create a Devtron application and add the Git Repository
From Devtron’s home page, create a new Devtron application, and name it as demo-application
Devtron can build the application and create the container image. To do this, it needs the URL for the Git Repository. Check out the documentation to learn more about the application creation process.
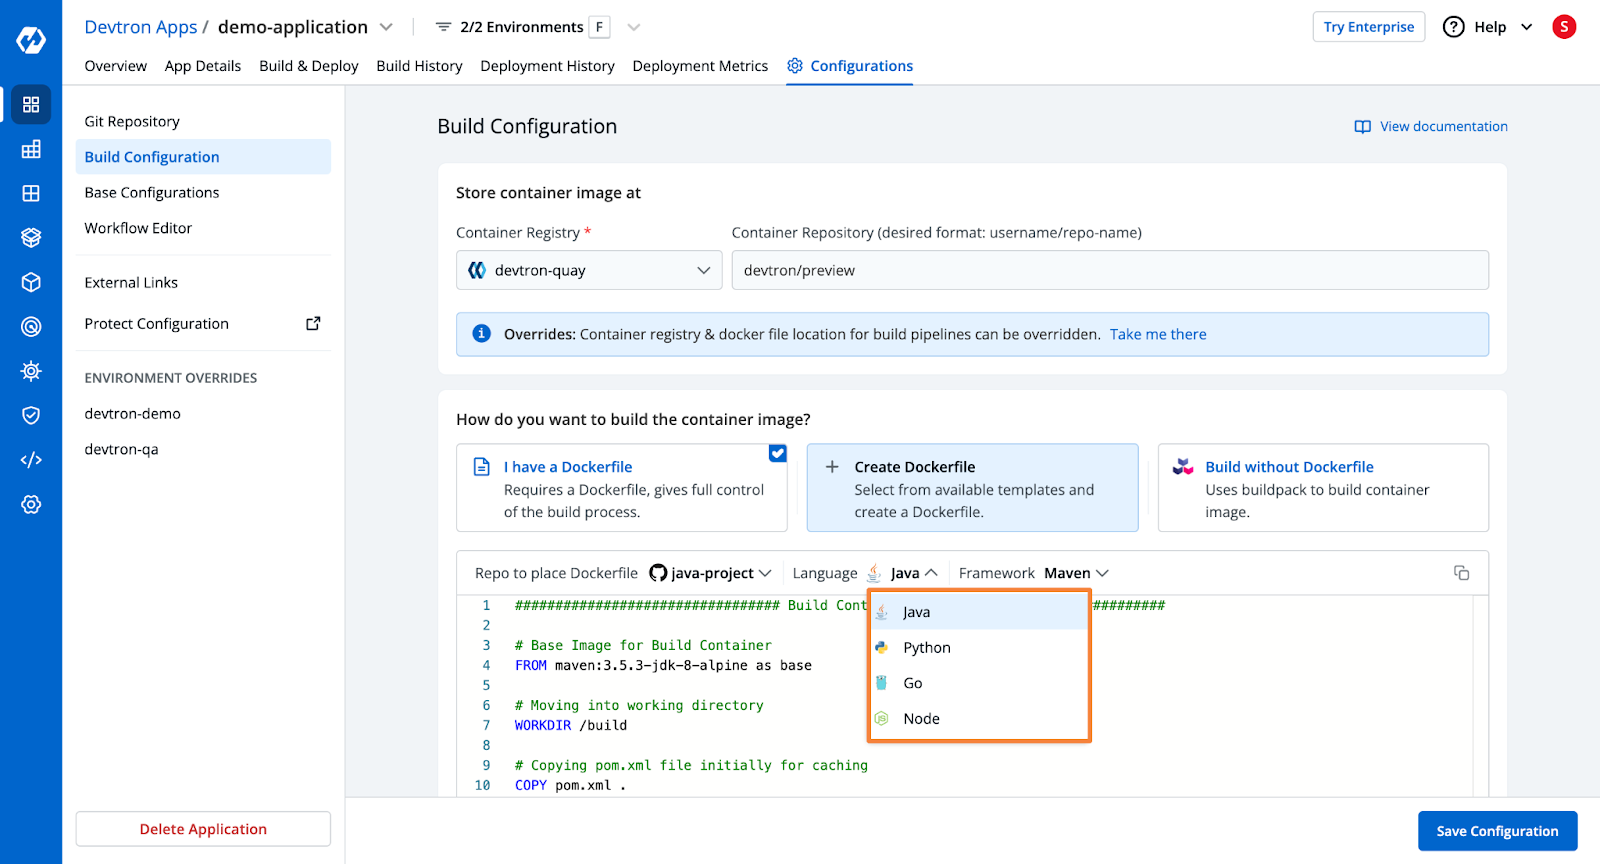
Step 2: Configure the Build
Devtron will automatically take the code from the Git repository and build the container image. For this, it requires an OCI Container Registry to push the build container image, and it requires a Dockerfile.
You can add the Container Registry from the Global Configurations.
For the build instructions, Devtron provides you with 3 options.
- Use an existing Dockerfile
- Create the Dockerfile
- Use Buildpacks
If you choose to create the Dockerfile within Devtron, you are offered several templates for popular programming languages and frameworks.
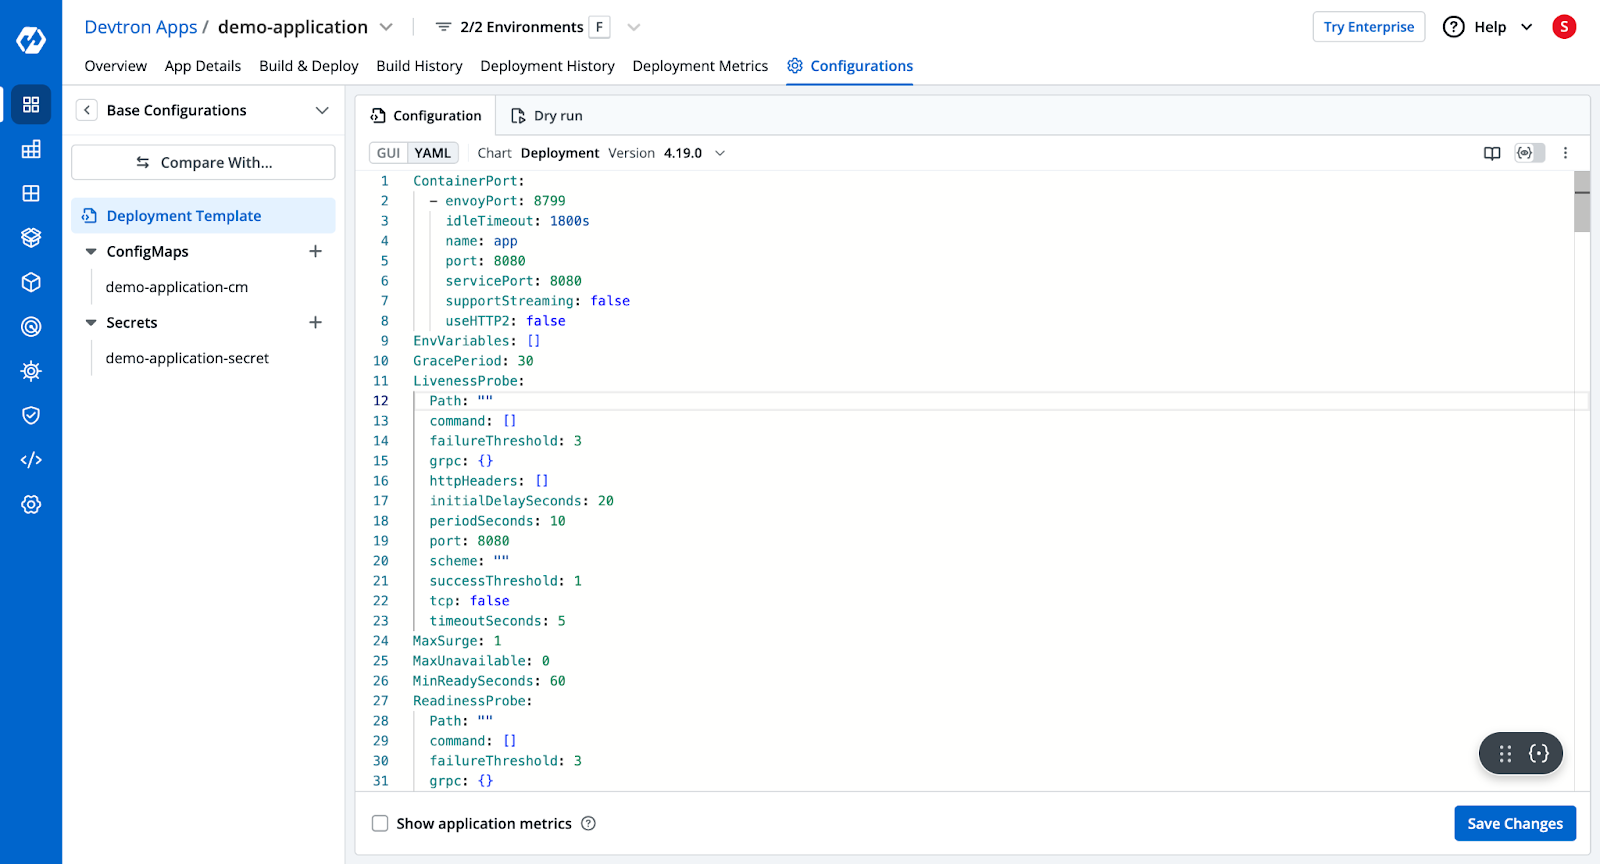
Step 3: Deployment Configurations
Next, you want to configure the actual deployment manifest that will be applied to the Kubernetes cluster. Unlike before, where you had to manually write all the YAML files, Devtron provides a YAML template where you can simply put in the configurations you want.
This template also has advanced configuration options such as ingress and autoscale. Simply configure the deployment template according to your needs, and Devtron will automatically create the configured resource.
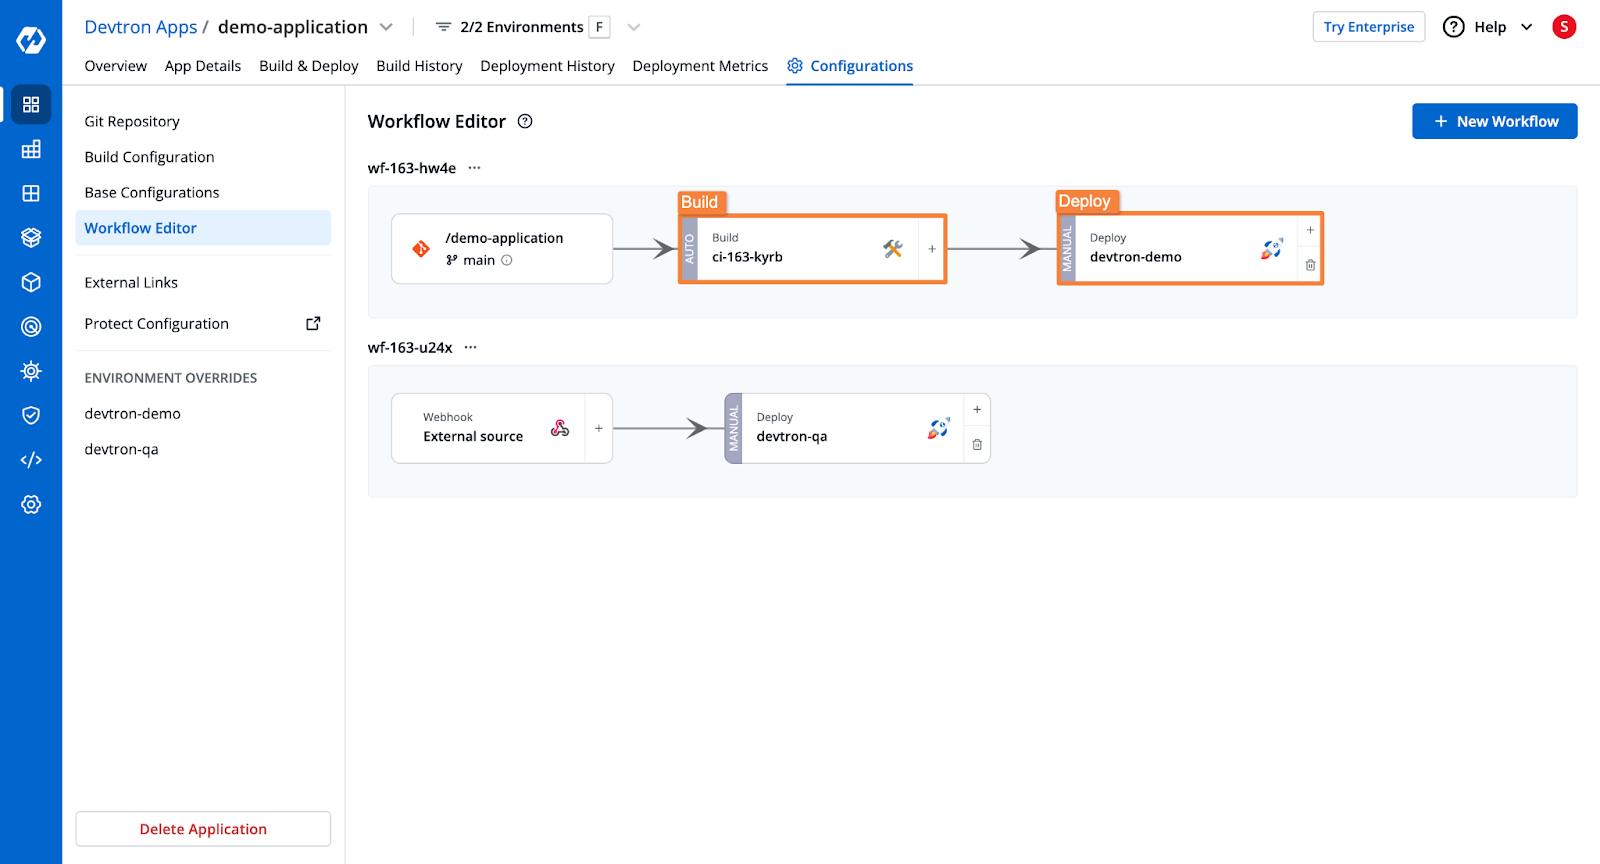
Step 4: Create the Build and Deploy Pipelines
Next, you want to create the CI (continuous integration) and CD (continuous deployment) pipelines.
The CI pipeline will take your application code from the configured Git Repository and branch and will build the Dockerfile and push it to a Docker Repository. You can also configure a security scan within the Build Pipeline.
The Deployment pipeline, on the other hand, will trigger the Deployment on the Kubernetes clusters in the configured environment.
In both the build and deployment pipelines, you can configure a pre- and post-stage, and configure them to take certain actions. For example, you can configure the SonarQube plugin to scan the code for vulnerabilities in the pre-CI stage.

Please check the documentation to learn more about the pipeline configurations.
Step 5: Trigger the Build and Deployment Pipelines
Once all the configurations are complete, all that’s left is to trigger the build stagethe and subsequently the deployment.
From the Build & Deploy tab, select the Git material to trigger the build stage. The pipeline will build the container image.
Once the build stage is complete, you can trigger the deployment for the built artifact.
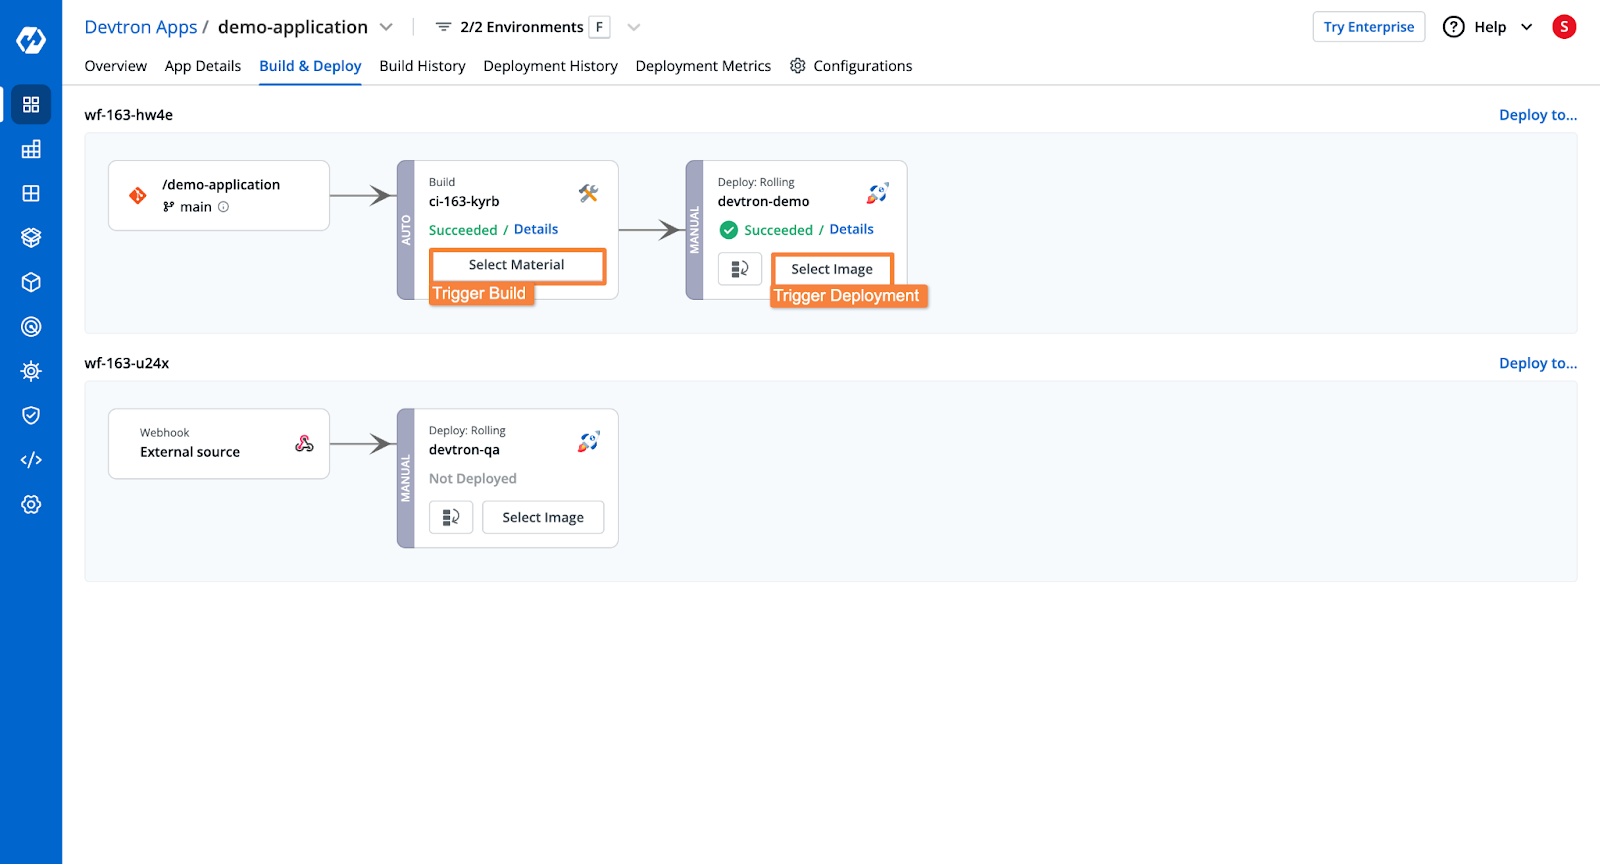
Upon triggering the deployment, Devtron will deploy the application to your DOKS cluster, with the configurations that you created earlier.
Once the application is deployed, you will be able to see the application health, deployment status, security vulnerabilities, the Kubernetes resources of the application, and more.
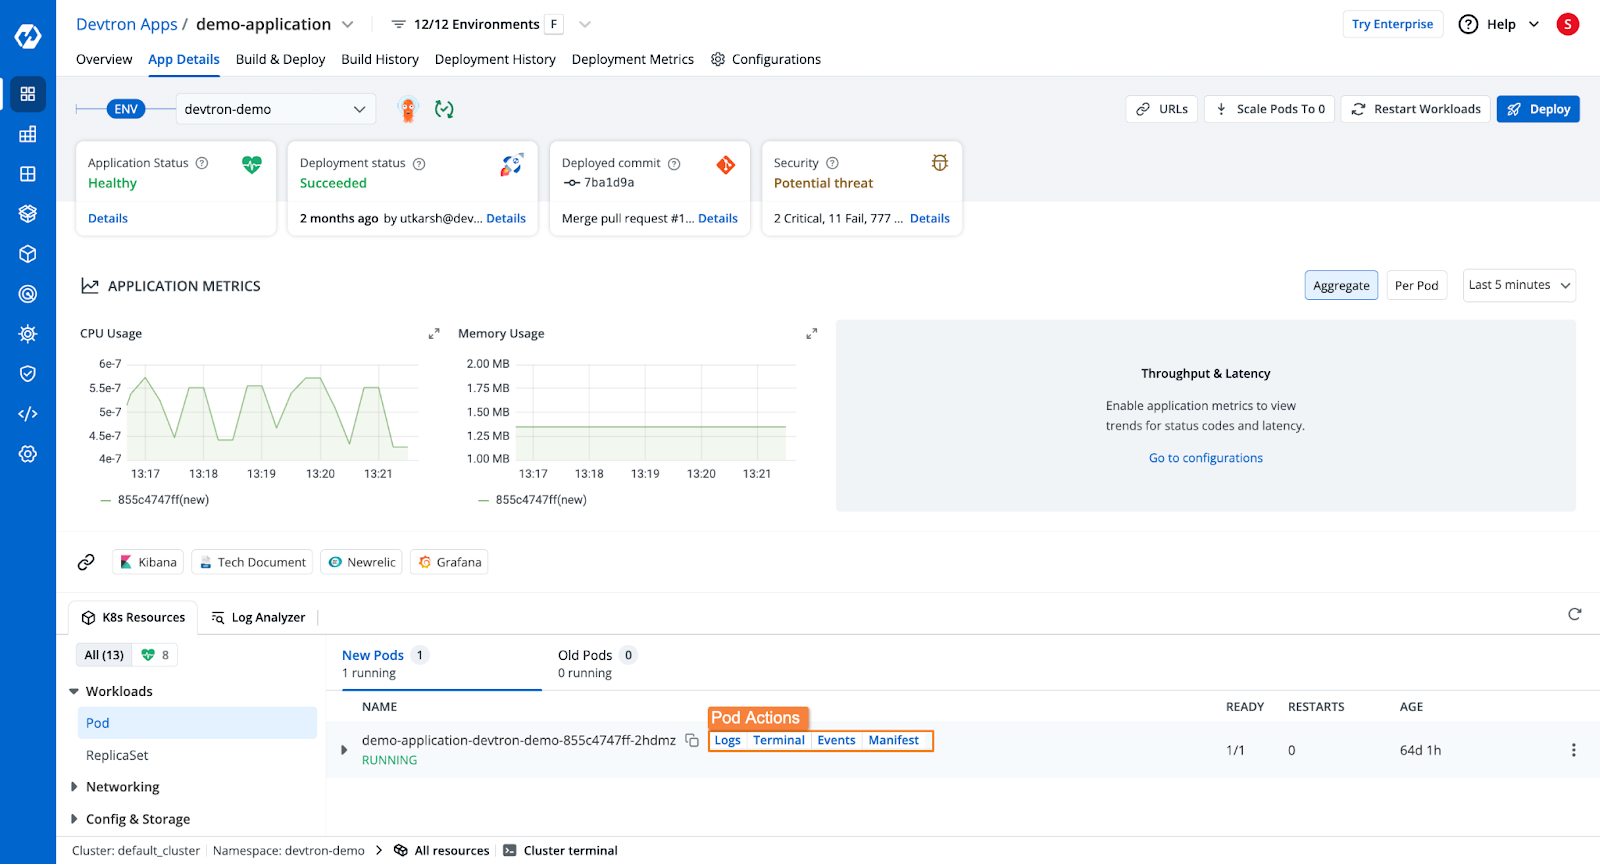
Additionally, Devtron will also show the entire Build as well as the Deployment history. In case of any errors in the deployment, you can also trigger a rollback to a previous deployment version.
Conclusion
In this blog, we explored the step-by-step process of configuring and deploying an application on a DOKS cluster. To summarize, we covered:
- Configuring a DOKS cluster
- Creating Kubernetes manifests
- Deploying the application on DOKS
- Streamlining deployments with Devtron
Devtron can help accelerate deployment velocity while also ensuring that deployments are more reliable. For working with Kubernetes, Devtron can act as the single solution you need.
Check out Devtron’s GitHub page, and start deploying applications to Kubernetes.
FAQ
How do I create a Kubernetes cluster on DigitalOcean?
You can create a Kubernetes cluster using the DigitalOcean UI, CLI (doctl), or Terraform.
What are the best practices for deploying applications to a DigitalOcean Kubernetes cluster?
- Use Namespaces to organize workloads.
- Implement Horizontal Pod Autoscaler (HPA) for scaling.
- Store secrets in DO Secrets Manager or Kubernetes Secrets.
- Use Ingress controllers (NGINX or Traefik) for managing external traffic.
- Monitor with Prometheus + Grafana.
How do I deploy a containerized application to DigitalOcean Kubernetes?
- Build and push the container to Docker Hub or DigitalOcean Container Registry.
- Create a Kubernetes Deployment YAML file.
- Apply the YAML using
kubectl apply -f deployment.yaml.
How do I manage secrets and environment variables in DigitalOcean Kubernetes?
- Use Kubernetes Secrets or DigitalOcean Secrets Manager.
- Avoid hardcoding secrets in YAML files.
- Use sealed-secrets for encrypting secrets.
How do I expose Kubernetes application to the Internet?
To expose a Kubernetes application on the Internet, you use the expose command with NodePort as a parameter.