In this article, we'll dive deep into interpreting docker build commands, what PVCs(Persistent Volume Claims) are, how they work, and how Devtron can solve build time problems using PVCs in conjunction with docker build commands to store cache for faster build times.
First, let’s define a problem statement to set the context and clearly articulate the specific issue or challenge we are trying to address. How can we make docker build faster and more efficiently? Before we understand how you can start implementing lighting build speeds, we must understand two important concepts. - PVCs and Docker Build. These two concepts need two work in tandem to improve build speeds.

What is a Docker Build?
Docker is a containerization technology that allows you to package and distribute applications in a portable and consistent manner. The docker build command is used to build a Docker image from a Dockerfile, a script containing instructions for creating the Docker image.
When you run the docker build command, Docker reads the Dockerfile and creates a new image based on the instructions in the file. Each instruction in the Dockerfile creates a new layer in the image, which can be cached and reused to speed up future builds.
How does a docker build work?
When you run a docker build command to create a new Docker image, the output can be quite verbose and contain a lot of information. It is important to understand how to interpret this output so that you can troubleshoot any errors or issues that arise during the build process.
The docker build command works as follows:
- You create a Dockerfile that specifies the base image to use, any additional packages or dependencies that need to be installed, and any custom configuration that needs to be applied.
- You navigate to the directory that contains the Dockerfile and run the docker build command with the appropriate arguments, such as the name and tag of the image.
- Docker reads the Dockerfile and creates a new image based on the instructions in the file. Each instruction in the Dockerfile creates a new layer in the image.
- Docker caches each layer of the image, which can be reused to speed up the process in future builds.
- Once the image has been built, it can be run using the docker run command or pushed to a Docker registry for distribution.
How can you build images at lightning speeds?
You can make the docker build faster and more efficient in multiple ways. Faster builds boost user experience and save a lot of time.
Use a smaller base image: Choosing a smaller base image can significantly reduce build time. A smaller image has fewer layers and dependencies, meaning fewer packages to download and install. Using a smaller image also reduces the disk space required to store the image.
Cache dependencies: Docker caches dependencies to speed up builds. By caching dependencies, Docker doesn't need to repeatedly download and install the same packages. You can use a caching mechanism like docker-compose build --no-cache or --build-arg.
Use multi-stage builds: Multi-stage builds can help reduce build time and image size. With multi-stage builds, you can split your Dockerfile into multiple stages, where each stage creates a new layer in the final image. By separating the build process into multiple stages, you can keep only the necessary files in the final image and reduce the image size.
Minimize the number of layers: Each layer in a Docker image adds overhead, and more layers mean slower build times. You can minimize the number of layers in your Dockerfile by combining multiple RUN commands into a single command.
Use a buildkit: Buildkit is a toolkit for building Docker images faster and more efficiently. It provides advanced features like parallelization and caching, significantly speeding up the build process. To enable buildkit, you can set the DOCKER_BUILDKIT environment variable to 1.
Use a build cache: Docker provides a build cache that can speed up builds by reusing previously built layers. While running the docker build command, you can enable the build cache by setting the --cache-from flag. The build cache can be used in conjunction with other optimization techniques like multi-stage builds and caching dependencies.
Using these techniques can significantly reduce build time and improve the user experience. We’ll dive deeper into the last point i.e., using build cache to improve build time, and we will see how we can interpret the docker build command and store the cache into PVC.
How to leverage a build Cache for faster docker builds?
Here is an example of the output you might see when running a docker build command:
> docker build  -f Dockerfile --network host -t prakash1001/sams-repository-2 .

Sending build context to Docker daemon  22.13MB

Step 1/8 : FROM golang:latest as builder
latest: Pulling from library/golang
3e440a704568: Pulling fs layer
68a71c865a2c: Pulling fs layer
670730c27c2e: Pulling fs layer
5a7a2c95f0f8: Pulling fs layer
db119aaf144b: Pulling fs layer
6f87262882f9: Pulling fs layer
28b555baed36: Pulling fs layer
db119aaf144b: Waiting
6f87262882f9: Waiting
28b555baed36: Waiting
5a7a2c95f0f8: Waiting
68a71c865a2c: Verifying Checksum
68a71c865a2c: Download complete
670730c27c2e: Verifying Checksum
670730c27c2e: Download complete
3e440a704568: Verifying Checksum
3e440a704568: Download complete
5a7a2c95f0f8: Verifying Checksum
5a7a2c95f0f8: Download complete
28b555baed36: Verifying Checksum
28b555baed36: Download complete
db119aaf144b: Verifying Checksum
db119aaf144b: Download complete
6f87262882f9: Verifying Checksum
6f87262882f9: Download complete
3e440a704568: Pull complete
68a71c865a2c: Pull complete
670730c27c2e: Pull complete
5a7a2c95f0f8: Pull complete
db119aaf144b: Pull complete
6f87262882f9: Pull complete
28b555baed36: Pull complete
Digest: sha256:1724dc3128e2e63f0bc3e055fe4fa478d67f6da4bd95c0e69690f6435f658804
Status: Downloaded newer image for golang:latest
---> aba10049833c
Step 2/8 : RUN mkdir /app
---> Running in 4f04f04c21ea
Removing intermediate container 4f04f04c21ea
---> 98d0eb118829
Step 3/8 : ADD . ./app
---> ac9ee372aba7
Step 4/8 : WORKDIR /app
---> Running in 60c841635bb8
Removing intermediate container 60c841635bb8
---> 5835e8fcc864
Step 5/8 : COPY . ./
---> c0c384f53909
Step 6/8 : RUN go build -o main .
---> Running in b36a4f5a7f44
go: downloading github.com/google/wire v0.5.0
go: downloading github.com/gorilla/mux v1.8.0
go: downloading github.com/jinzhu/gorm v1.9.16
go: downloading github.com/lib/pq v1.10.7
go: downloading github.com/jinzhu/inflection v1.0.0
Removing intermediate container b36a4f5a7f44
---> 7659016fc2d3
Step 7/8 : EXPOSE 8080
---> Running in 3e21f84e9fbe
Removing intermediate container 3e21f84e9fbe
---> 15e484d846d3
Step 8/8 : CMD ["/app/main"]
---> Running in 1c4952849ac1
Removing intermediate container 1c4952849ac1
---> 021d031b083b
Successfully built 021d031b083
Successfully tagged prakash1001/sams-repository-2:latest
Here is a breakdown of what each section of this output means:
- Sending build context to Docker daemon: This line shows the size of the build context being sent to the Docker daemon. The build context is the set of files and directories used to build the Docker image.
- Step x/y : COMMAND: This line shows the current step being executed in the Dockerfile. The x represents the current step number, and y represents the total number of steps in the Dockerfile. The COMMAND is the instruction being executed in that step.
- ---> HASH: This line shows the ID of the intermediate image created after successfully executing the current step.
- Removing intermediate container: This line shows that the container created to execute the previous step has been removed.
- Successfully built IMAGE_ID: This line shows that the Docker image was successfully built and provides the ID of the final image.
- Successfully tagged IMAGE_NAME:TAG: This line shows that the Docker image was successfully tagged with a name and tag.
It is important to note that if an error occurs during the build process, the output will show an error message, and the build will be aborted. The error message will inform where the error occurred in the Dockerfile and what caused the error.
Interpreting docker build when caching is enabled
When you run a docker build command for the first time, Docker will use its build cache to optimize the build process. This can affect the output when running the command and requires an understanding of how to interpret the output.
When you build an image for the first time, Docker builds each layer of the image from scratch. However, when you rebuild the same image, Docker reuses all the layers that haven't changed. Thus greatly speeding up the build process.
Here is an example of the output you might see when running a docker build command again for the second time.
> docker build  -f Dockerfile --network host -t prakash1001/sams-repository-2 .

Sending build context to Docker daemon  22.13MB

Step 1/8 : FROM golang:latest as builder
---> aba10049833c
Step 2/8 : RUN mkdir /app
---> Using cache
---> 6b4f59ee85f4
Step 3/8 : ADD . ./app
---> 38d595853df1
Step 4/8 : WORKDIR /app
---> Running in f7e3615aa1bd
Removing intermediate container f7e3615aa1bd
---> fec07822d29d
Step 5/8 : COPY . ./
---> Using cache
---> cc1373163f10
Step 6/8 : RUN go build -o main .
---> Using cache
---> Running in 8d79292cfe37
Removing intermediate container 8d79292cfe37
---> ffb8420f86cc
Step 7/8 : EXPOSE 8080
---> Running in 7b9eaf849283
Removing intermediate container 7b9eaf849283
---> 1f412d36dc04
Step 8/8 : CMD ["/app/main"]
---> Running in 55d3b7d61e4d
Removing intermediate container 55d3b7d61e4d
---> b5ca8f0967b1
Successfully built b5ca8f0967b1
Successfully tagged prakash1001/sams-repository-2:latest
In the above example, you'll see that some of the steps are marked as Using cache. This means that Docker is reusing layers from the previous build rather than rebuilding them from scratch.
When using the cache can be problematic, you can use the --no-cache option with the docker build command to ensure that Docker rebuilds all image layers from scratch:
docker build –no-cache -t my-image .What is PVC?
A PVC (Persistent Volume Claim) is a Kubernetes resource that requests storage in a persistent volume. It is a way for applications to request storage without knowing the underlying details of where the storage comes from, such as whether it is a local disk or a remote network file system such as AWS EFS, AWS EBS, Azure Storage, etc.
PVCs typically store data that needs to persist across pod restarts or when pods are moved between nodes. For example, if an application needs to store data such as configuration files, logs, or other types of data that should be available across pod restarts or node failures, it can request a PVC.
When a PVC is created, Kubernetes tries to find a persistent volume (PV) that matches the storage requirements specified in the PVC. If a matching PV is found, the PVC is bound to it. Kubernetes can dynamically provision a new PV and bind it to the PVC if no matching PV is found.
Once a PVC is bound to a PV, the application can use it like any other volume in Kubernetes. This means that the application can read from and write to the storage and that the data will be persisted even if the pod is deleted or restarted.
What are the uses of PVC?
- Storing data that should persist across pod restarts or node failures
- Sharing data between multiple pods or nodes
- Providing a way for applications to request storage without knowing the underlying details of the storage implementation.
How to leverage PVC to further improve docker build speeds?
One use case for PVCs in Kubernetes is storing database data. Databases are critical components of any application, and they require persistent storage to ensure that data is not lost in the event of a pod restart or node failure. PVCs provide a way to abstract away the details of the storage implementation, making it easy to store and manage data consistently and reliably.
For example, let's say we have a microservices-based e-commerce application that uses Kubernetes for orchestration. The application uses a MySQL database to store customer information, orders, and other data. To ensure data availability and consistency, we must store the MySQL data in a persistent volume.
To achieve this, we can create a PVC to request storage for the MySQL data. We can then configure the MySQL container in our pod to mount the PVC as a volume. This allows the container to read and write data to the PVC like a local file system.
Here's an example YAML configuration for a MySQL pod with a PVC:
apiVersion: v1
kind: Pod
metadata:
    name: mysql
spec:
    containers:
    - name: mysql
      image: mysql:latest
      volumeMounts:
      - name: mysql-data
	mountPath: /var/lib/mysql
    volumes:
    - name: mysql-data
      persistentVolumeClaim:
      claimName: mysql-pvc
In this example, we've defined a persistent volume claim named mysql-PVC that requests 10GB of storage. We've configured the MySQL container in our pod to mount the PVC at /var/lib/mysql. This allows the container to read and write data to the PVC as a local file system.
With this configuration, the MySQL data is stored in the PVC, which is backed by a persistent volume. This ensures that the data is persisted even if the pod is restarted or moved to a different node. Additionally, because we've abstracted away the details of the storage implementation with PVCs, we can easily switch to a different storage provider or upgrade our storage infrastructure without changing our application code.
How can you configure a PVC in your cluster?
Firstly, check for the default storage class name, you can also configure your storage-class but for convenience purpose let’s pick the default storage class.

Now create a PVC yaml file, for example, you can create a sample PVC from the below PVC yaml,
apiVersion: v1
kind: PersistentVolumeClaim
metadata:
  name: example-pvc
spec:
  accessModes:
    - ReadWriteOnce
  storageClassName: microk8s-hostpath
  resources:
    requests:
      storage: 10Gi
Then we can execute the following commands and apply the PVC yaml in the devtron-ci, it’s important to apply the PVC into devtron-ci namespace as the pods that run the image building procedure are situated in the devtron-ci namespace.

Now we can see that the PVC has been created and is ready to be used.
Improve docker build speed using PVCs on Devtron.
Now, head over to the Devtron dashboard and attach the PVC created in the above step. In the Devtron dashboard, PVCs can be attached at the environment level i.e, pipeline and application level for any Devtron app. Follow along with the below steps to attach PVC to your application and start leveraging it for lightning-fast build times.
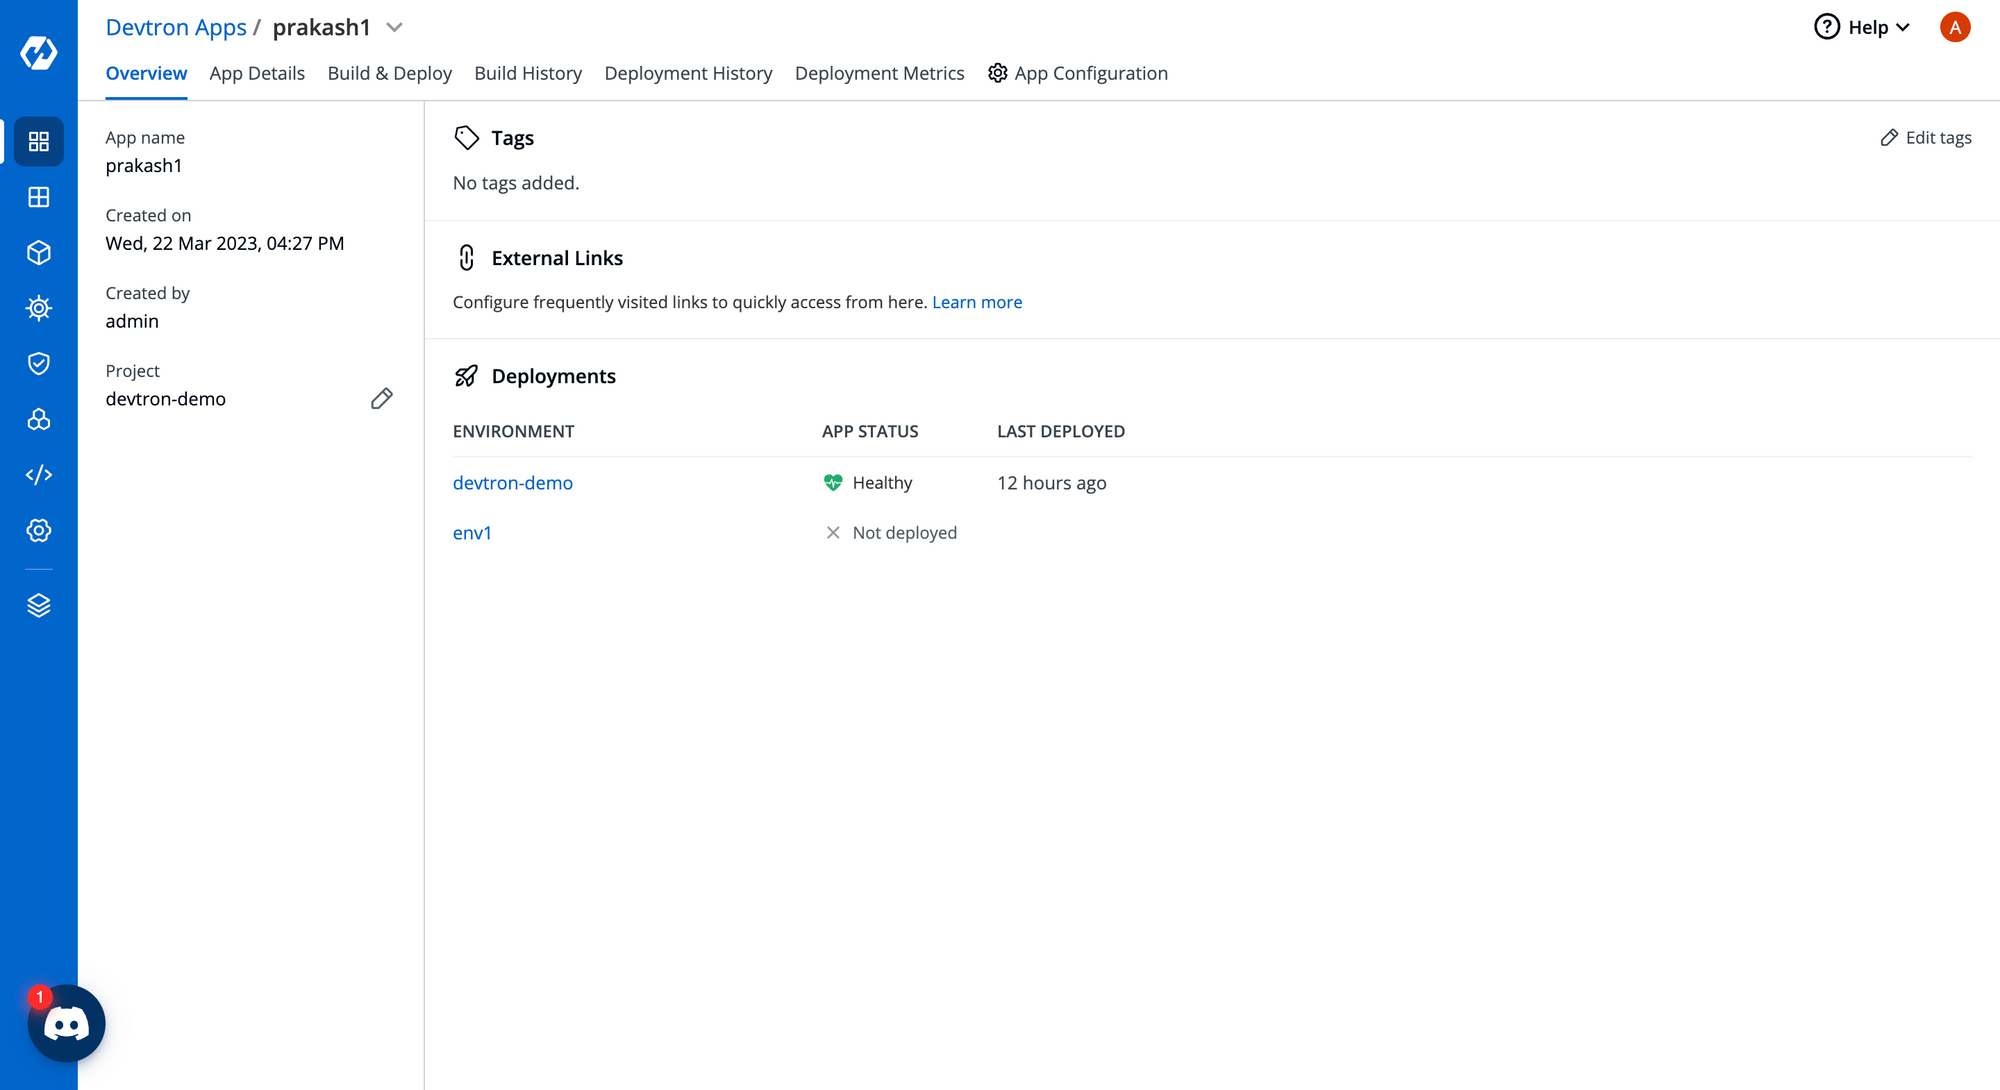
Step-1: Select App
Go-to any Devtron App -> click on Overview you will see something like the screenshot below.
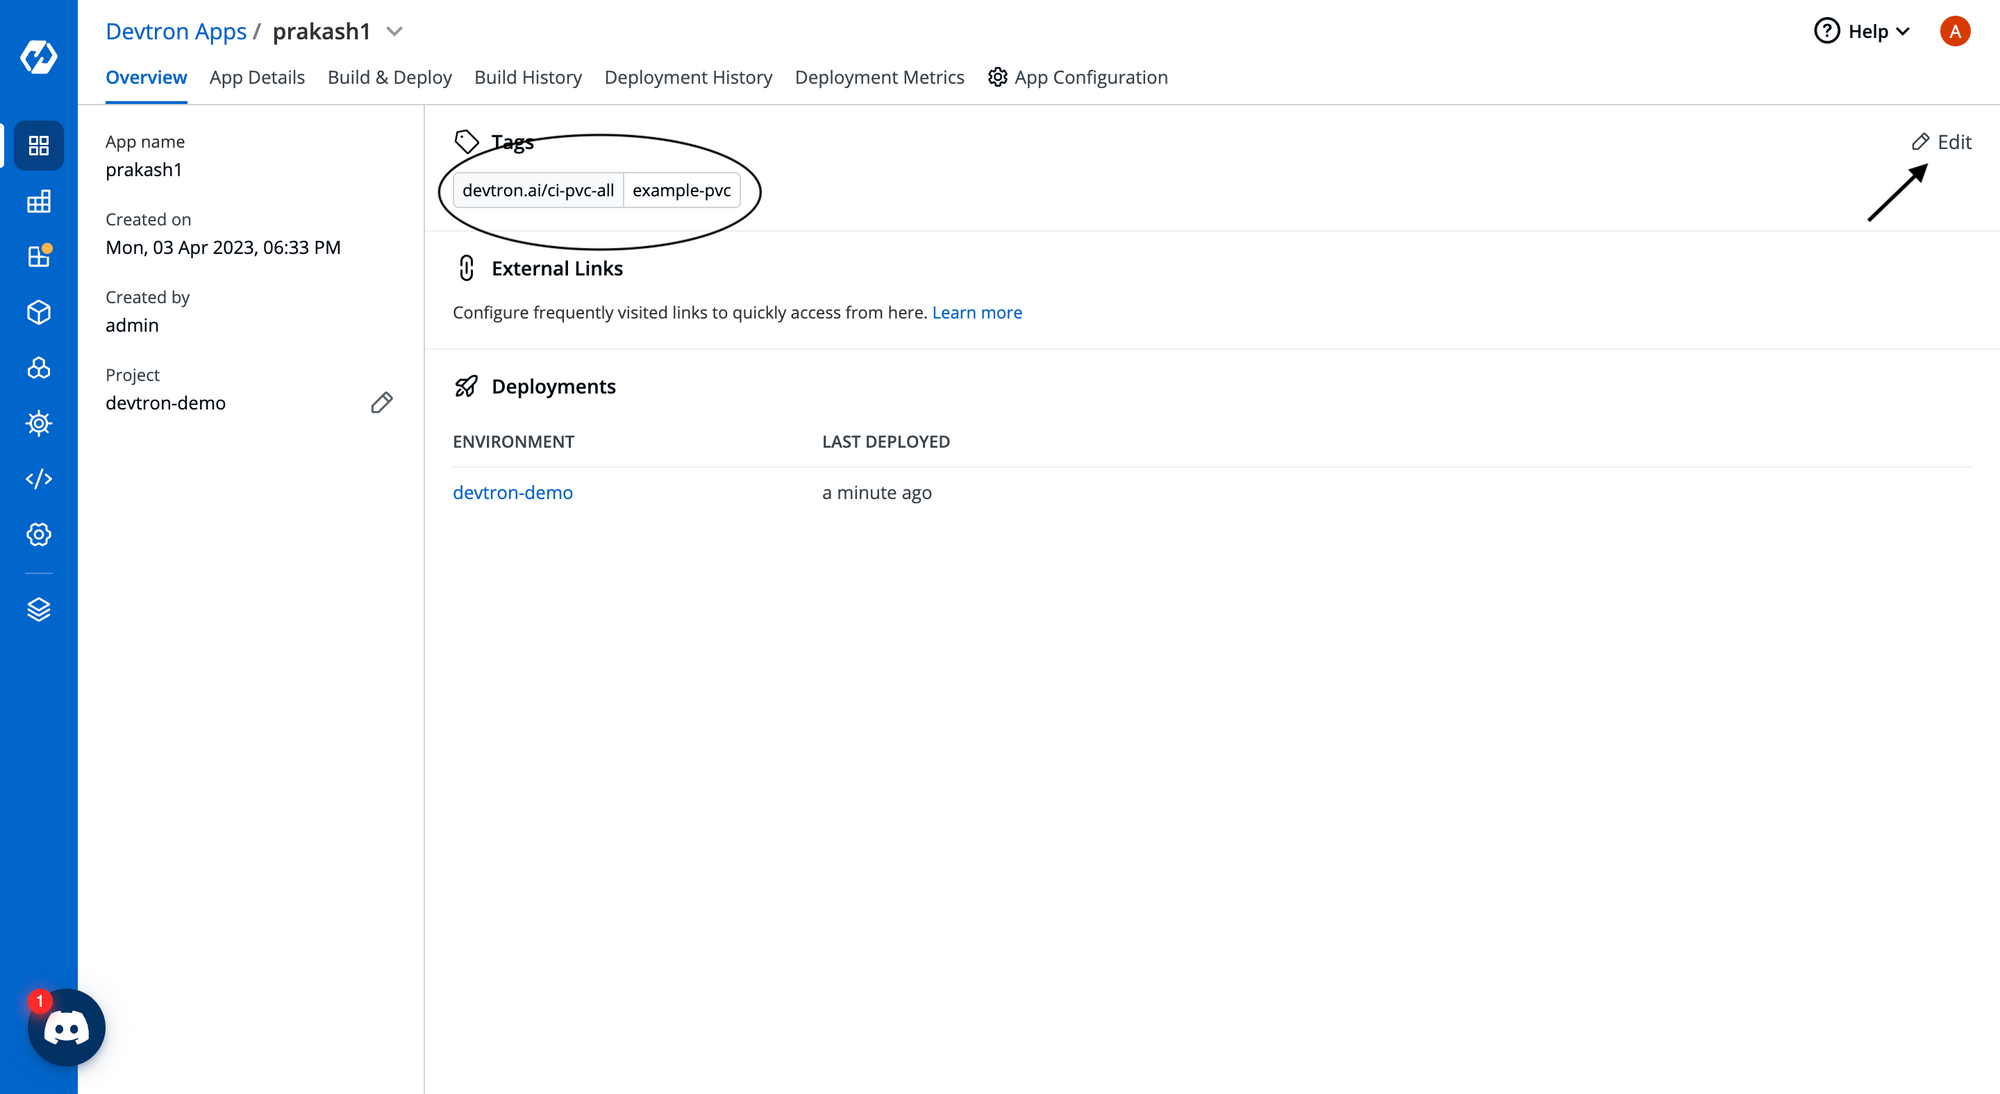
Step-2: Attach PVC key value
Click on the Edit Tags button to add a key value pair, for attaching PVC you need to add the below-mentioned tag as shown in the image.
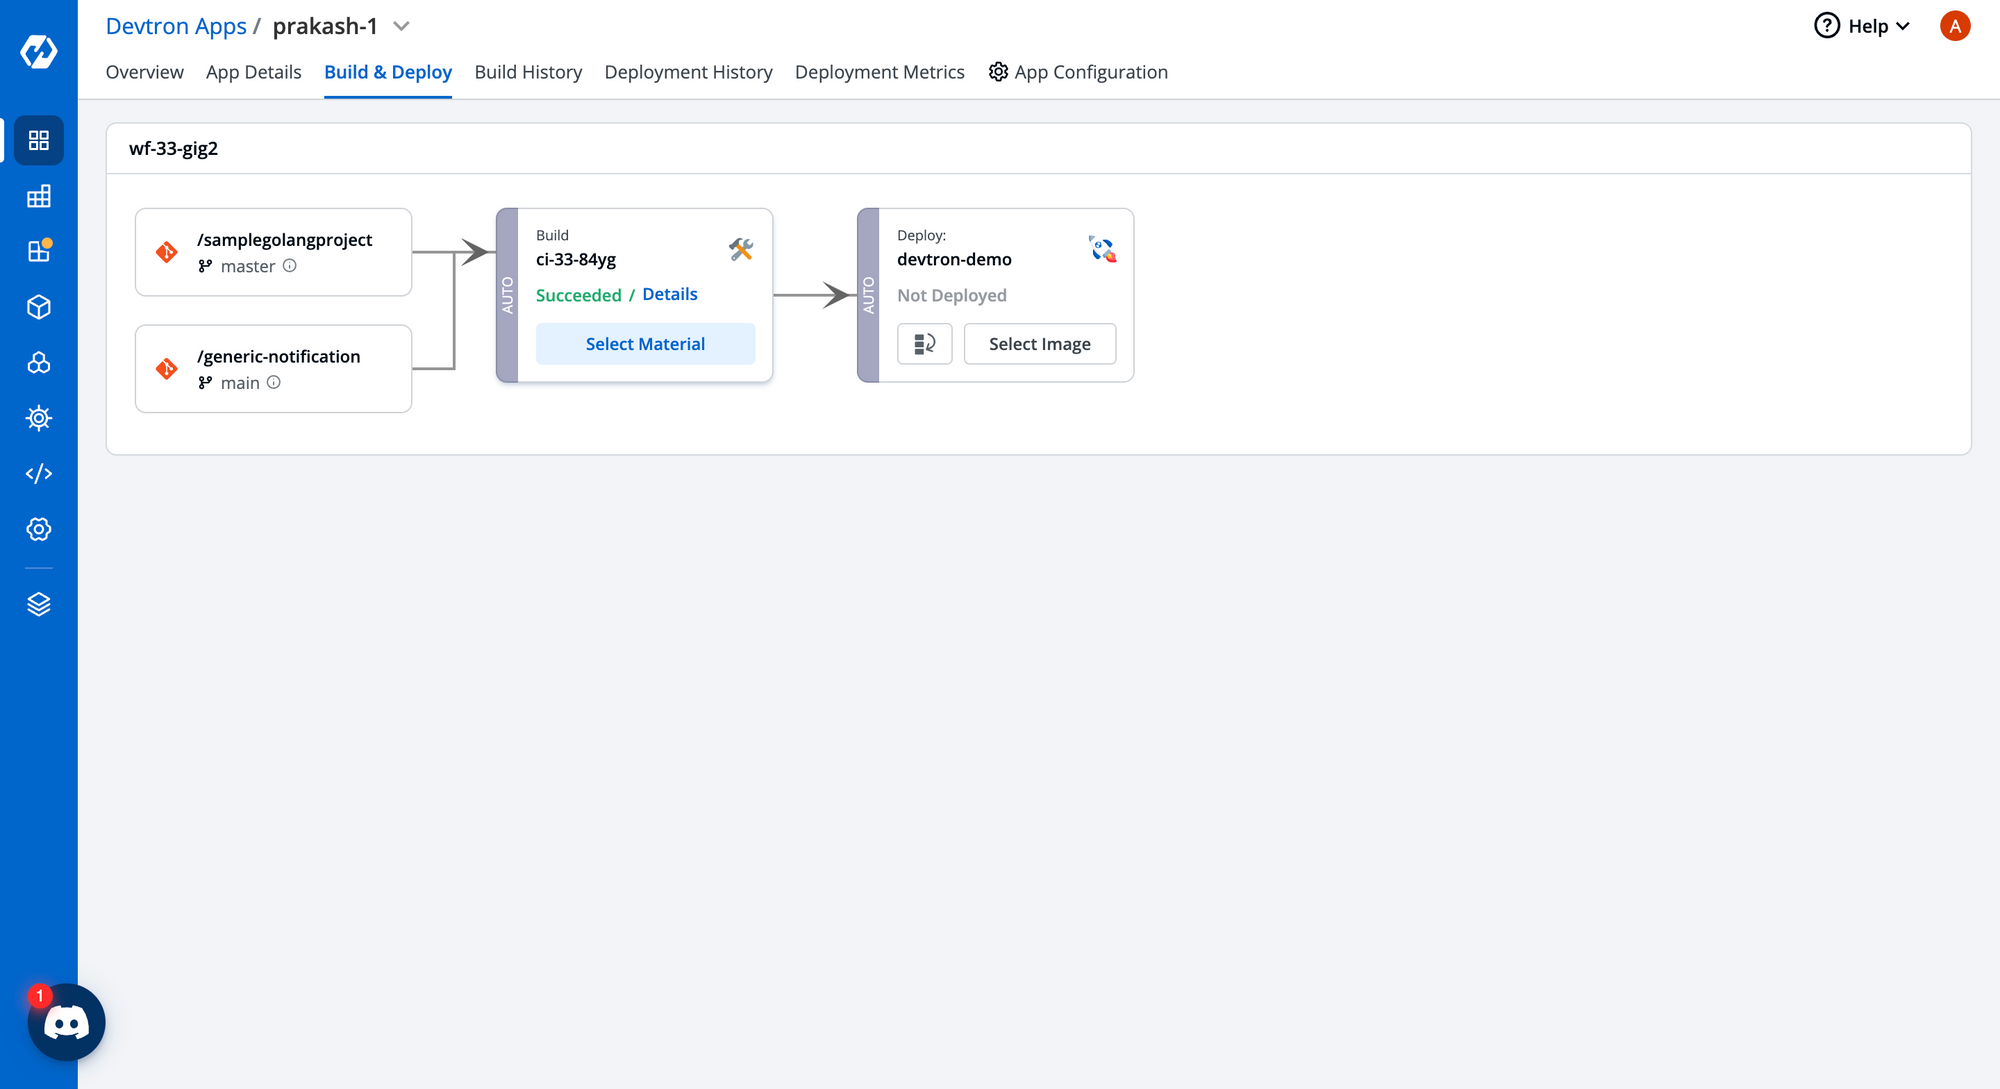
Step-3: Build & Deploy
Click on Build & Deploy → for build pipeline, click on Select Material → Select the commit hash against which you want to build an image → click on Build.
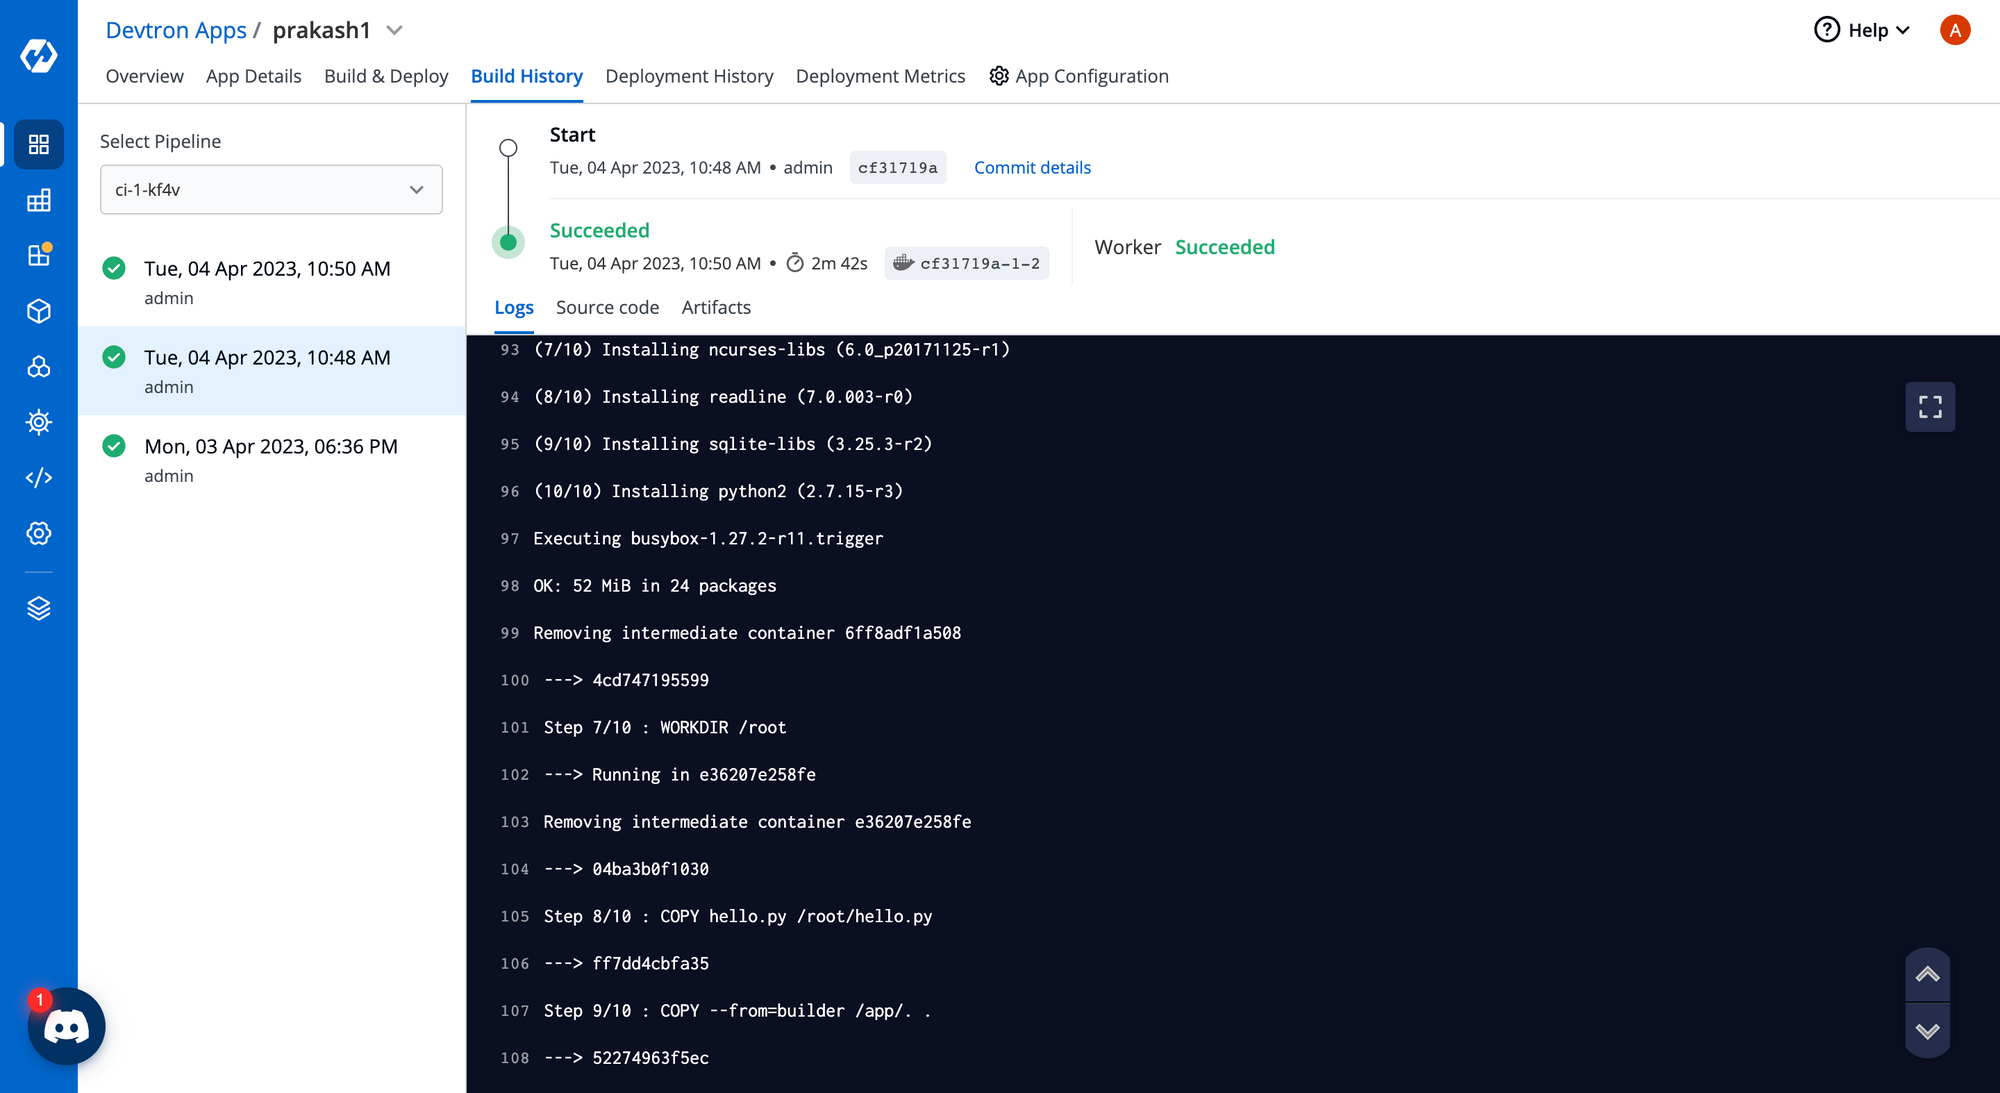
Before and After PVCs
Before applying PVC, you can see from the logs that the build is not using cache at these steps and also note the build time in case PVC is not being used, this build took 2m42s to complete.
After configuring PVC in the Overview section, let’s see the logs.
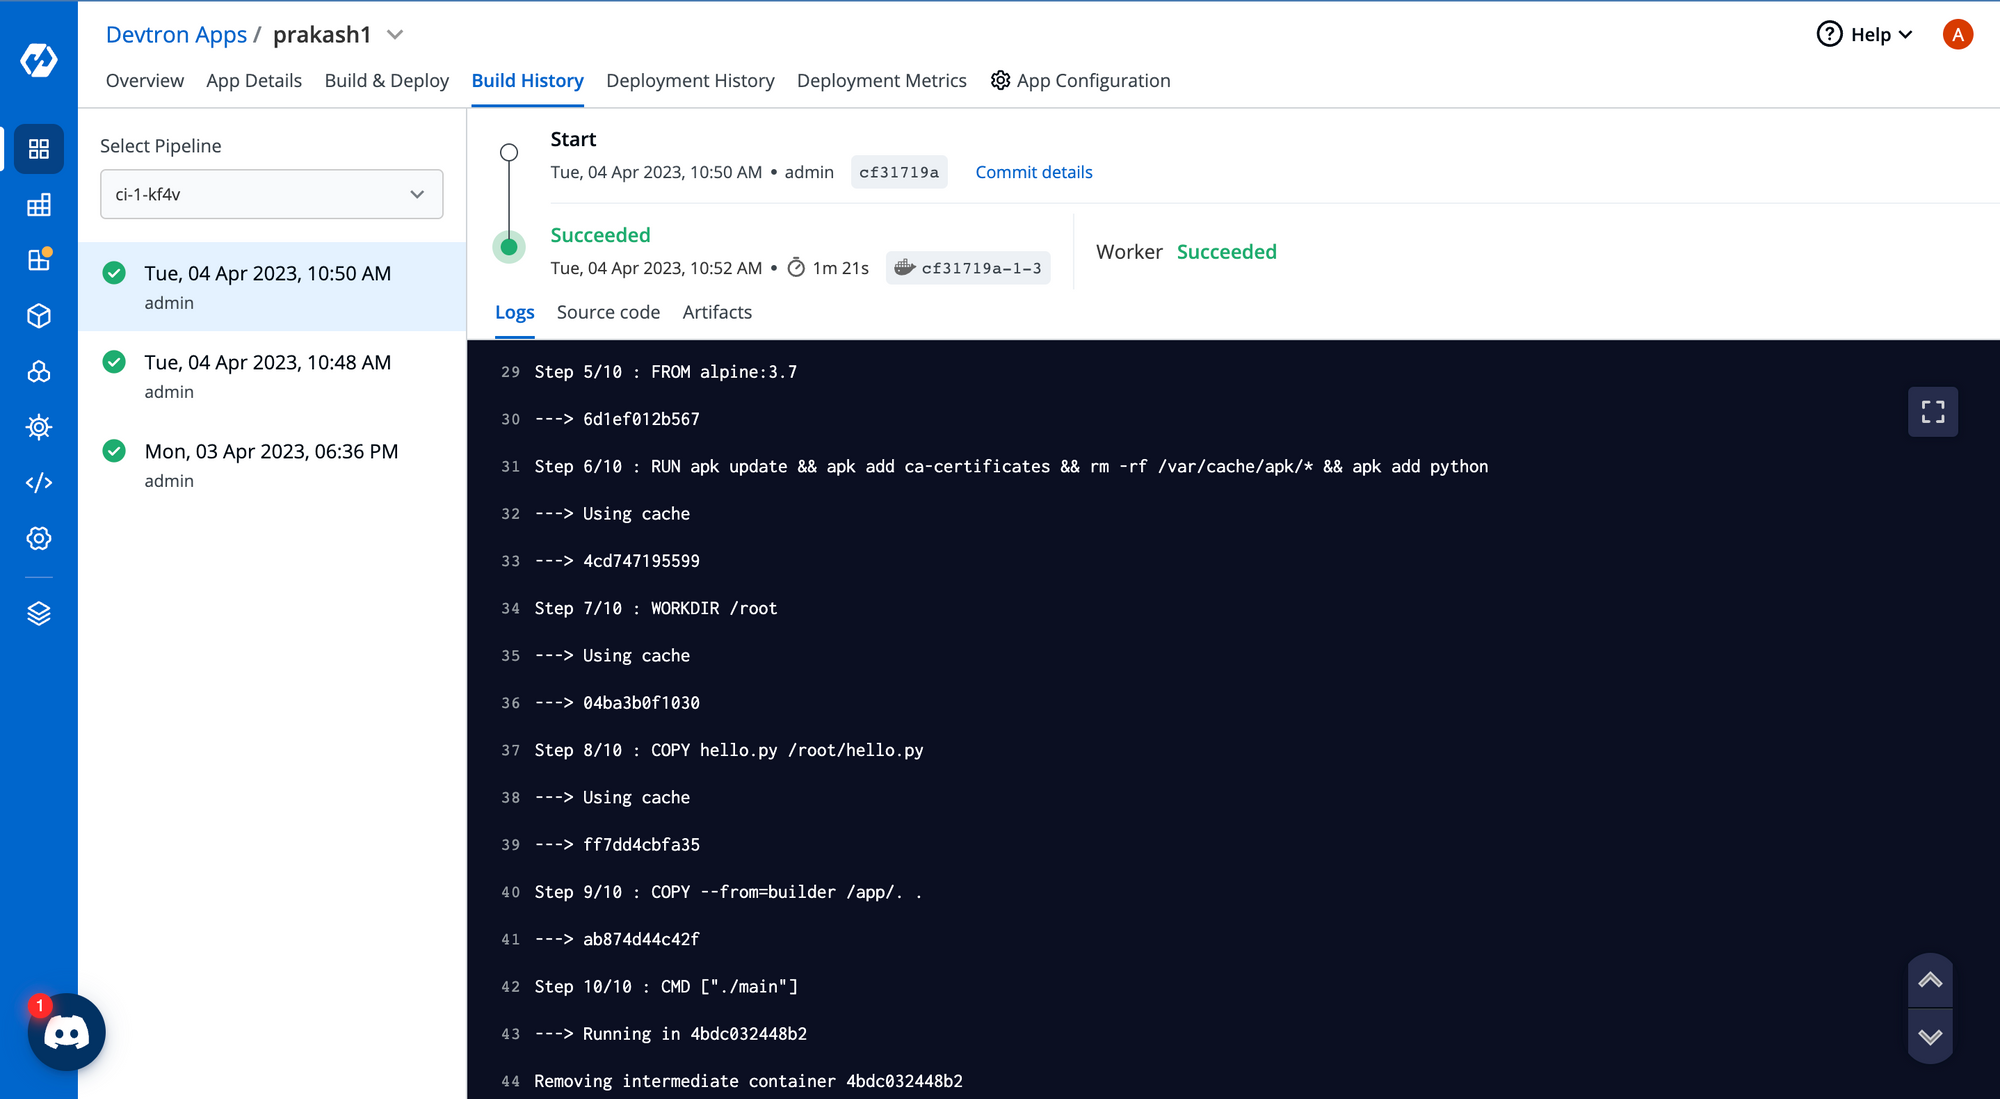
This build uses the cache from the previous build stored in the PVC, and also, the build took only 1m21s, so the difference is huge for build time, and for bigger Dockerfiles the difference will be more prominent.
Conclusion
Hence PVC can significantly reduce the build times also note that by doing this, the PVC gets attached to the pod of ci-workflow, and even if the pod dies, the PVC persists in the cache.
Whether you're deploying a lightweight application or a complex enterprise system, a Persistent Volume Claim can help you ensure that your data is always available and reliable. With built-in redundancy and failover capabilities, you can rest easy knowing your Kubernetes cluster is always prepared for the unexpected.
As Kubernetes continues to gain momentum in the world of cloud-native computing, Persistent Volume Claims are quickly becoming a must-have feature for any serious deployment. With support for a wide range of storage options and flexible management capabilities, they offer a powerful tool for building scalable and reliable applications that can stand up to even the most demanding workloads.