1. NGINX Ingress supports Canary Deployments via specific annotations like
canary, canary-by-header, and canary-weight.2. Canary deployments allow safer rollouts by sending a percentage of user traffic to new versions.
3. Devtron simplifies the entire process—no YAMLs, just a UI-driven experience with deployment pipelines.
4. Real-time traffic routing and rollback made easy with NGINX and Devtron’s deployment templates.
Introduction
Deploying releases into production always gives goosebumps, even though we’ve been doing it multiple times. Different deployment strategies are advocated to alleviate some nervousness, and Canary Deployment is one of them.
With the release of specific NGINX Canary annotations, you can now achieve canary deployments using NGINX Ingress. In this blog, you’ll learn how to implement an NGINX Canary Deployment both traditionally and using Devtron, without writing multiple YAMLs.
What is a Canary Deployment?
A Canary Deployment is a technique that allows teams to expose new features to a small percentage of traffic before releasing them to everyone. For example, traffic can be exposed to 5%, 15%, 75%, and finally 100% of users, minimizing risk.
Benefits of Canary Deployment:
- Safe rollouts with live traffic testing
- Reduced blast radius for faulty releases
- Fast rollback capabilities
- Boosts developer confidence
- Enables incremental feedback
NGINX Canary Deployment with Ingress Annotations
NGINX Ingress controller enables canary releases using annotations. This allows you to control how much traffic is routed to new versions of your app.
Here are the key annotations:
nginx.ingress.kubernetes.io/canary: "true"
nginx.ingress.kubernetes.io/canary-by-header: "X-Canary"
nginx.ingress.kubernetes.io/canary-weight: "50"
Explanation:
canary: true– Enables canary logiccanary-by-header: X-Canary– Routes traffic based on header valuecanary-weight: 50– Sends 50% of traffic to the canary
You can combine these annotations to control traffic routing dynamically. For a full list of annotations, refer to Kubernetes Ingress Documentation.
Traditional Approach to NGINX Canary Deployment
Here’s a sample ingress manifest to enable a canary deployment using NGINX:
apiVersion: networking.k8s.io/v1
kind: Ingress
metadata:
  annotations:
    nginx.ingress.kubernetes.io/canary: "true"
    nginx.ingress.kubernetes.io/canary-by-header: X-Canary
    nginx.ingress.kubernetes.io/canary-weight: "50"
  labels:
    app: edureka
  namespace: canary-poc
spec:
  ingressClassName: nginx
  rules:
    - host: edureka.devtron.info
      http:
        paths:
          - path: /
            pathType: ImplementationSpecific
            backend:
              service:
                name: edureka-canary-poc-service
                port:
                  number: 80
This manifest enables a 50% traffic split between the stable and canary versions.
Devtron’s No-YAML Approach to NGINX Canary Deployment
With Devtron, you don’t need to write YAML files. It simplifies and automates the canary release process using an intuitive dashboard.
Prerequisites:
- Install Devtron (Follow Devtron Installation Guide)
- Ensure NGINX Ingress controller is installed
Step-by-Step Canary Deployment Using Devtron:
Step 1: Create an application → Custom App → Fill details → Create.
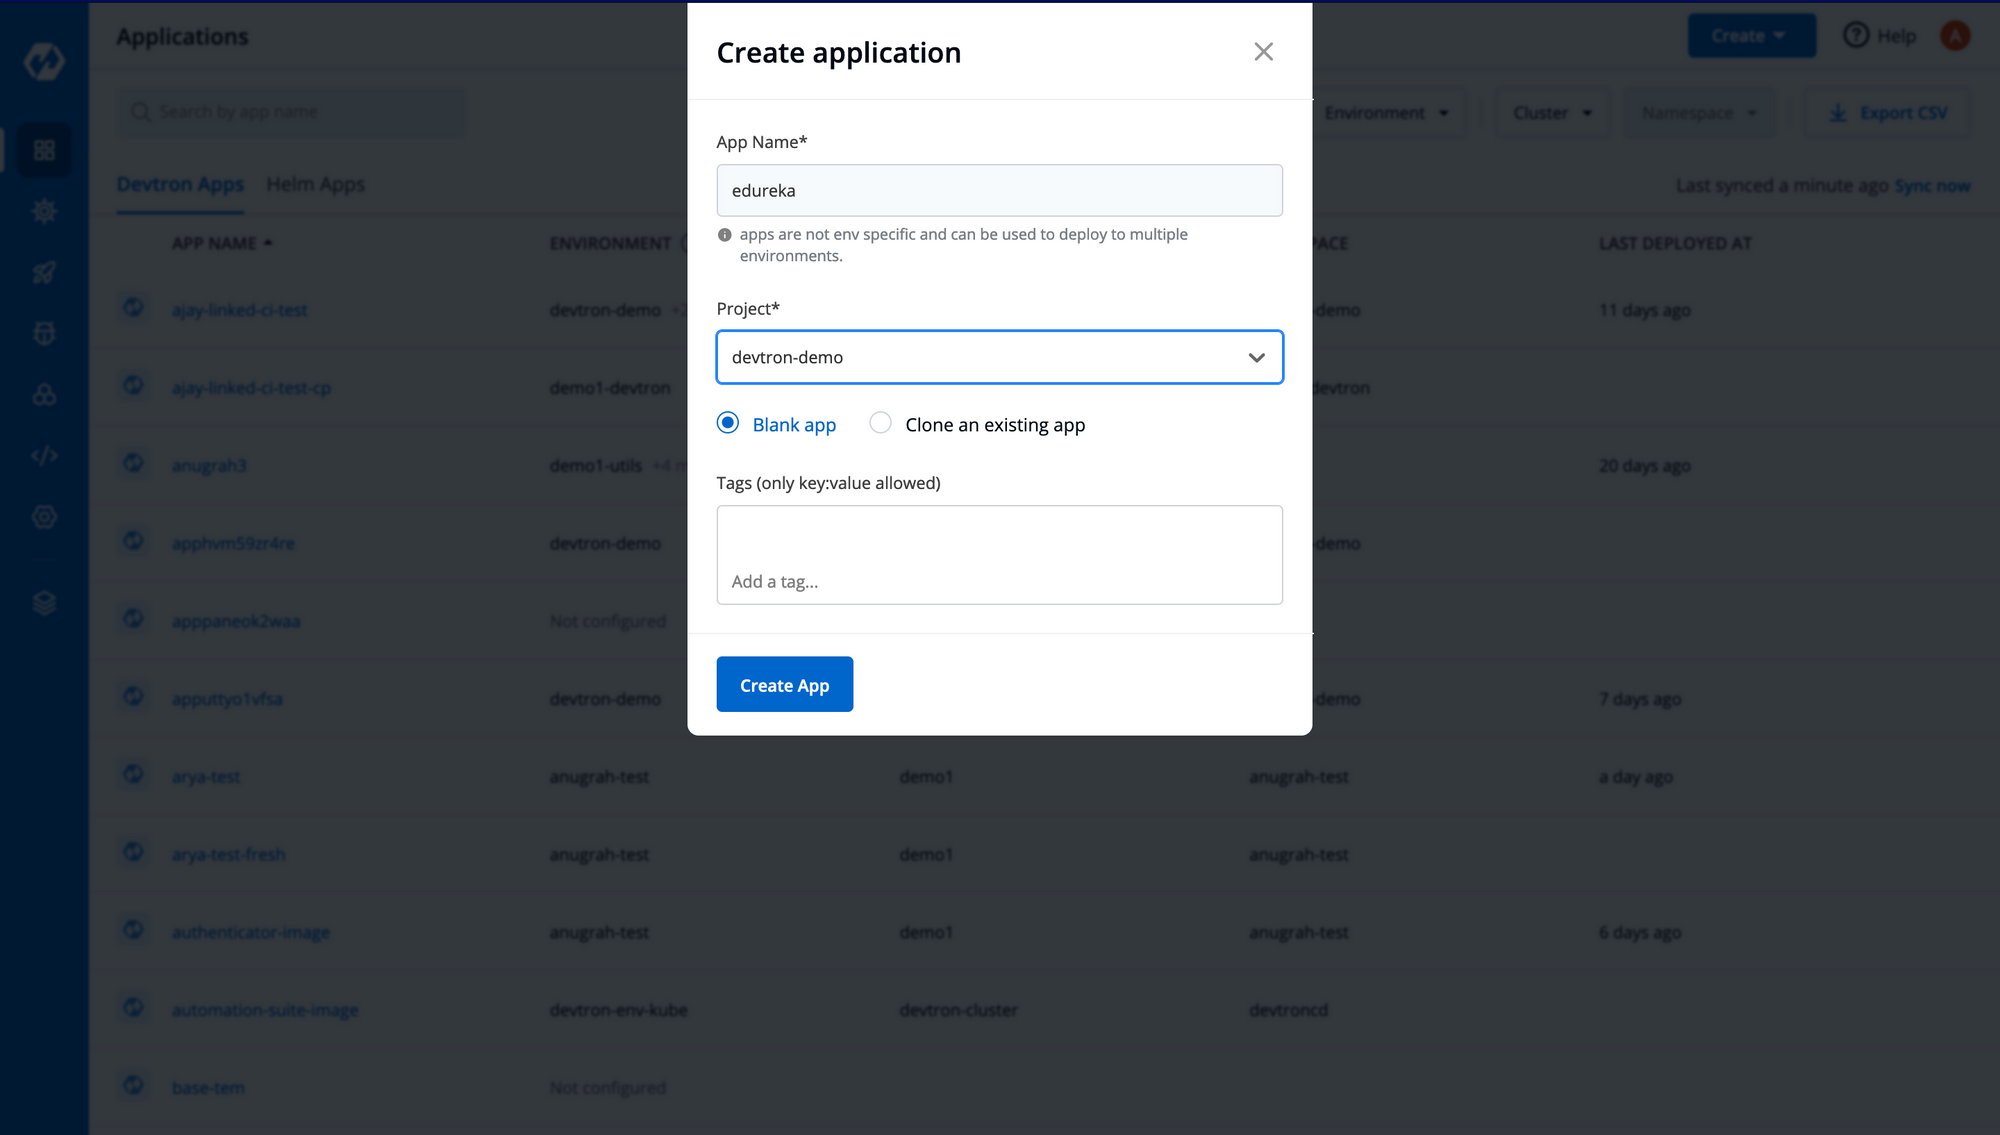
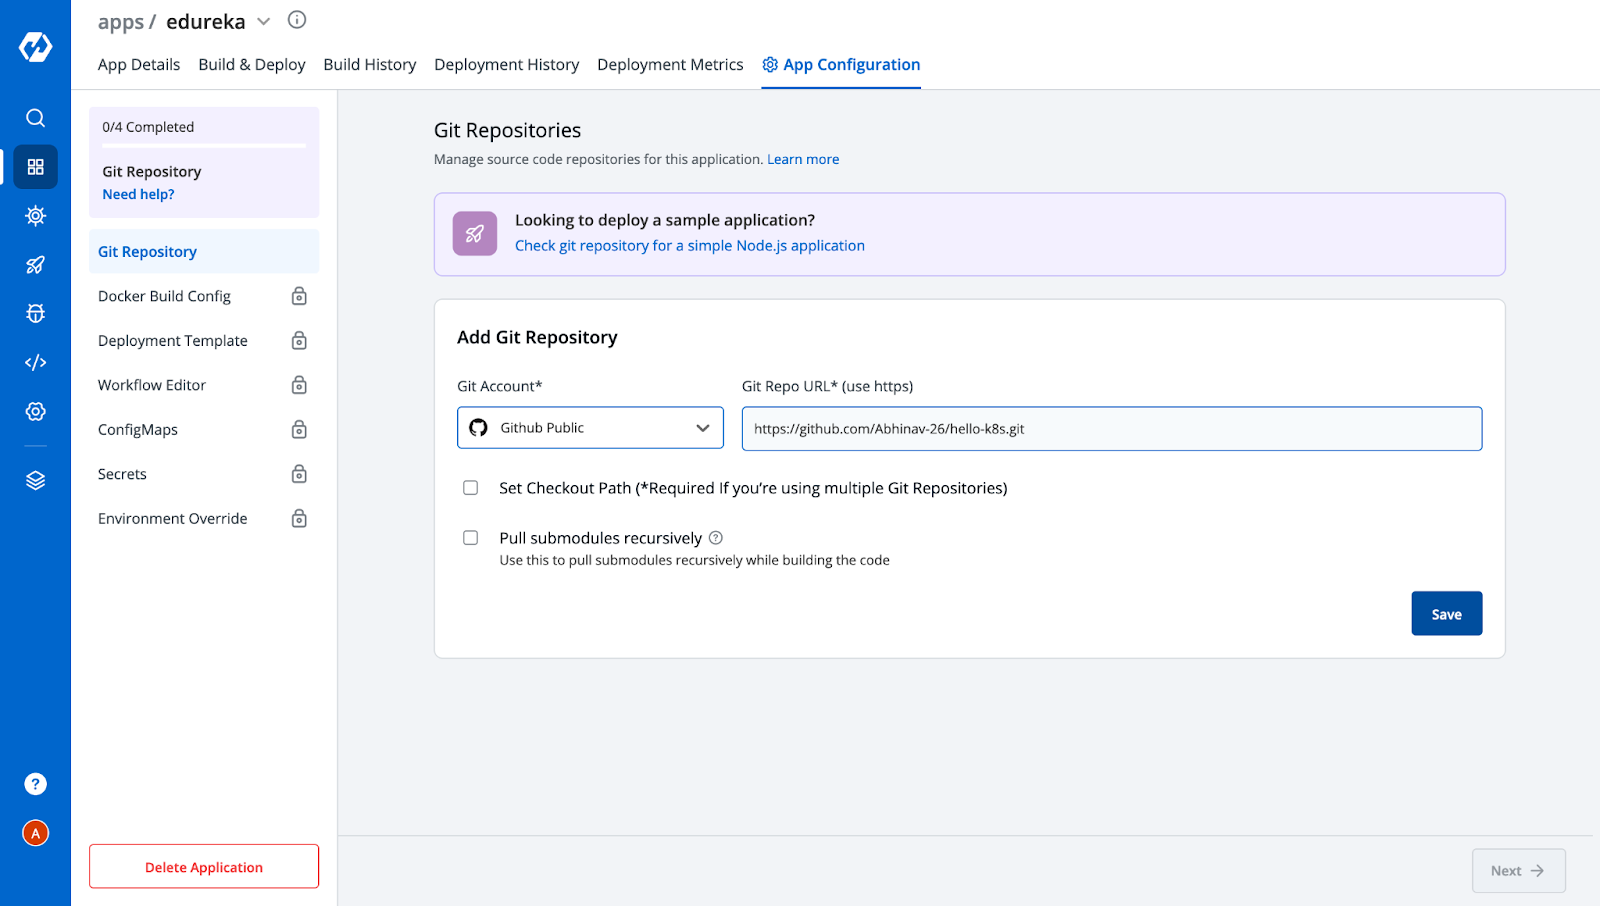
Step 2: Configure the Git repository containing your source code.
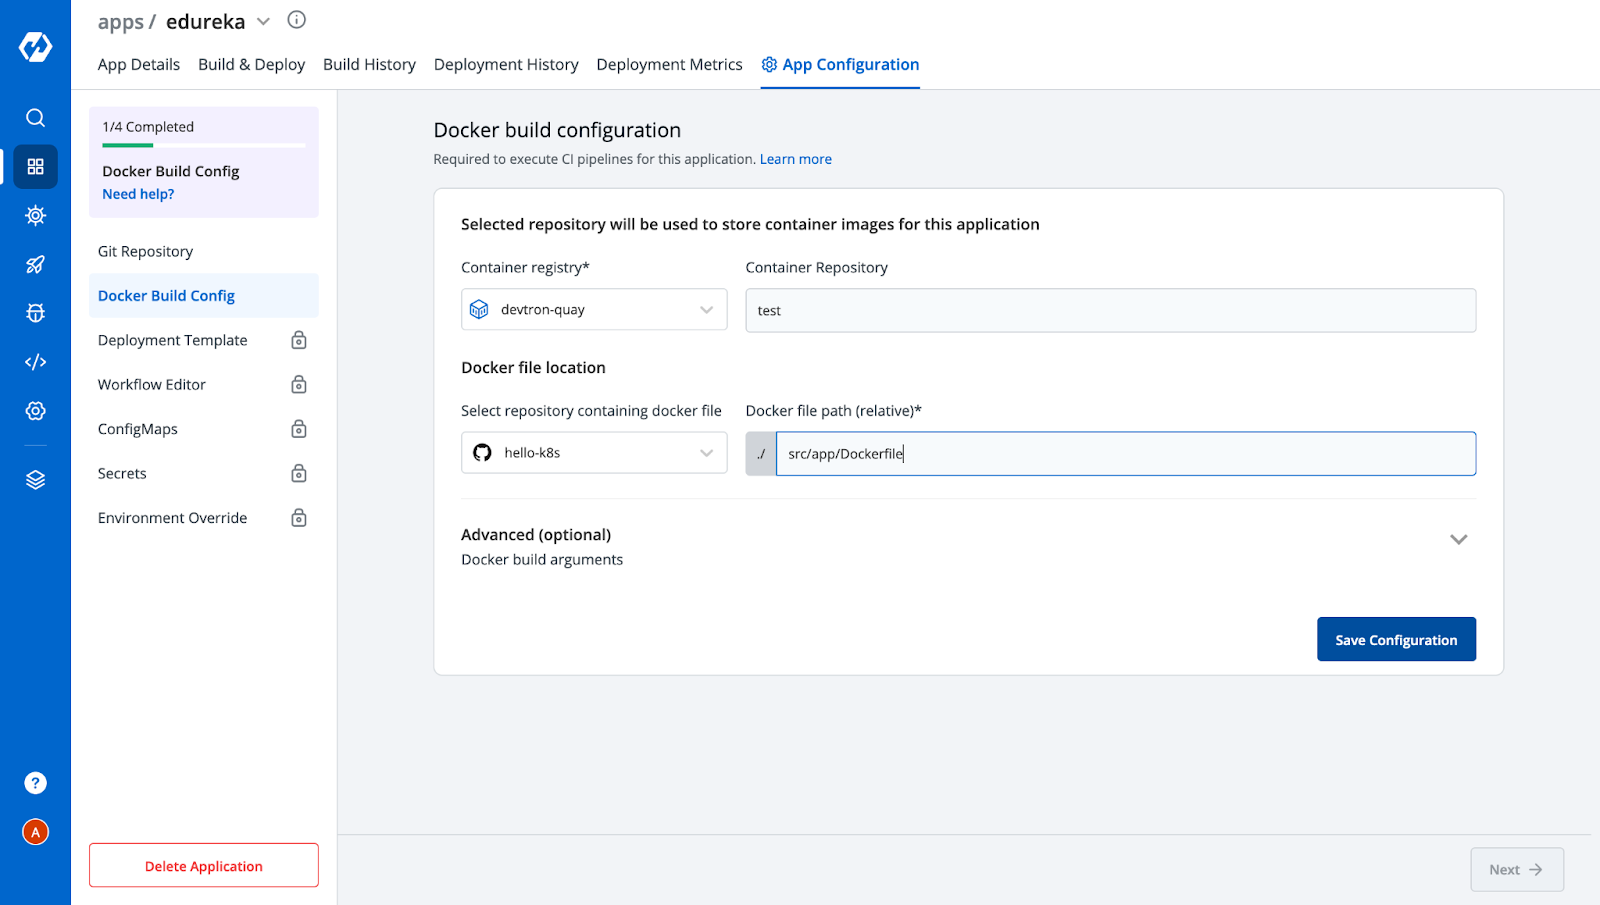
Step 3: Add Docker Build configuration.
Step 4: In Deployment Template:
- Add container port
- Enable Ingress
- Add canary annotations like
canary: true,canary-weight: 50, etc.
[Note: Ingress Controller should be deployed on your cluster before deploying ingress]
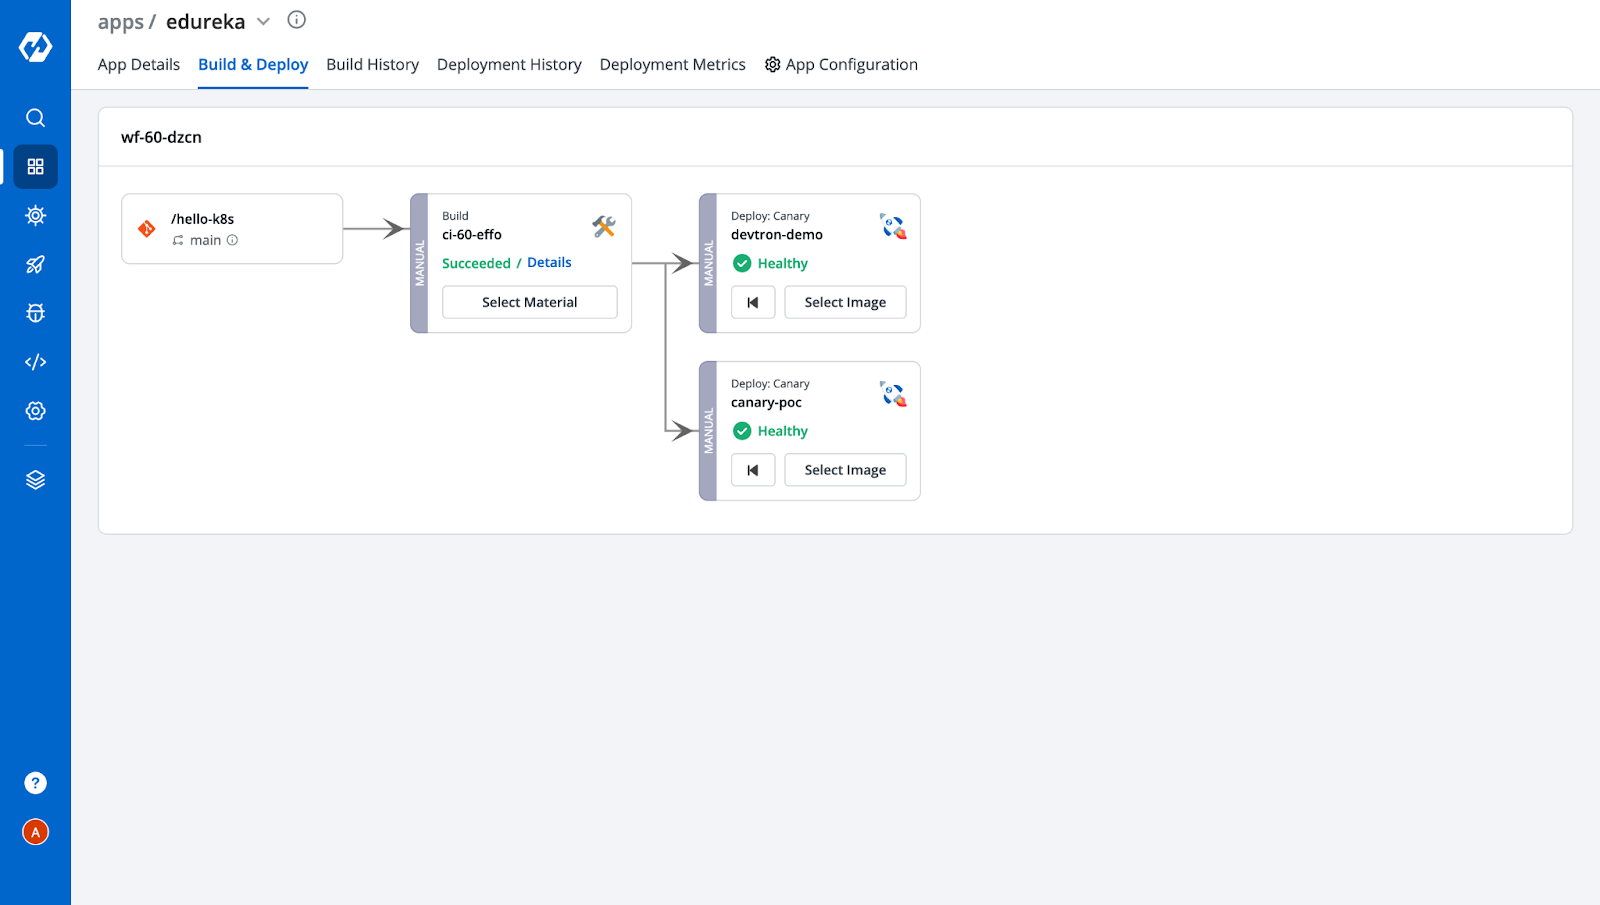
Step 5: Create CI & CD pipelines. For canary, create two CD pipelines—one with canary annotations, one without.
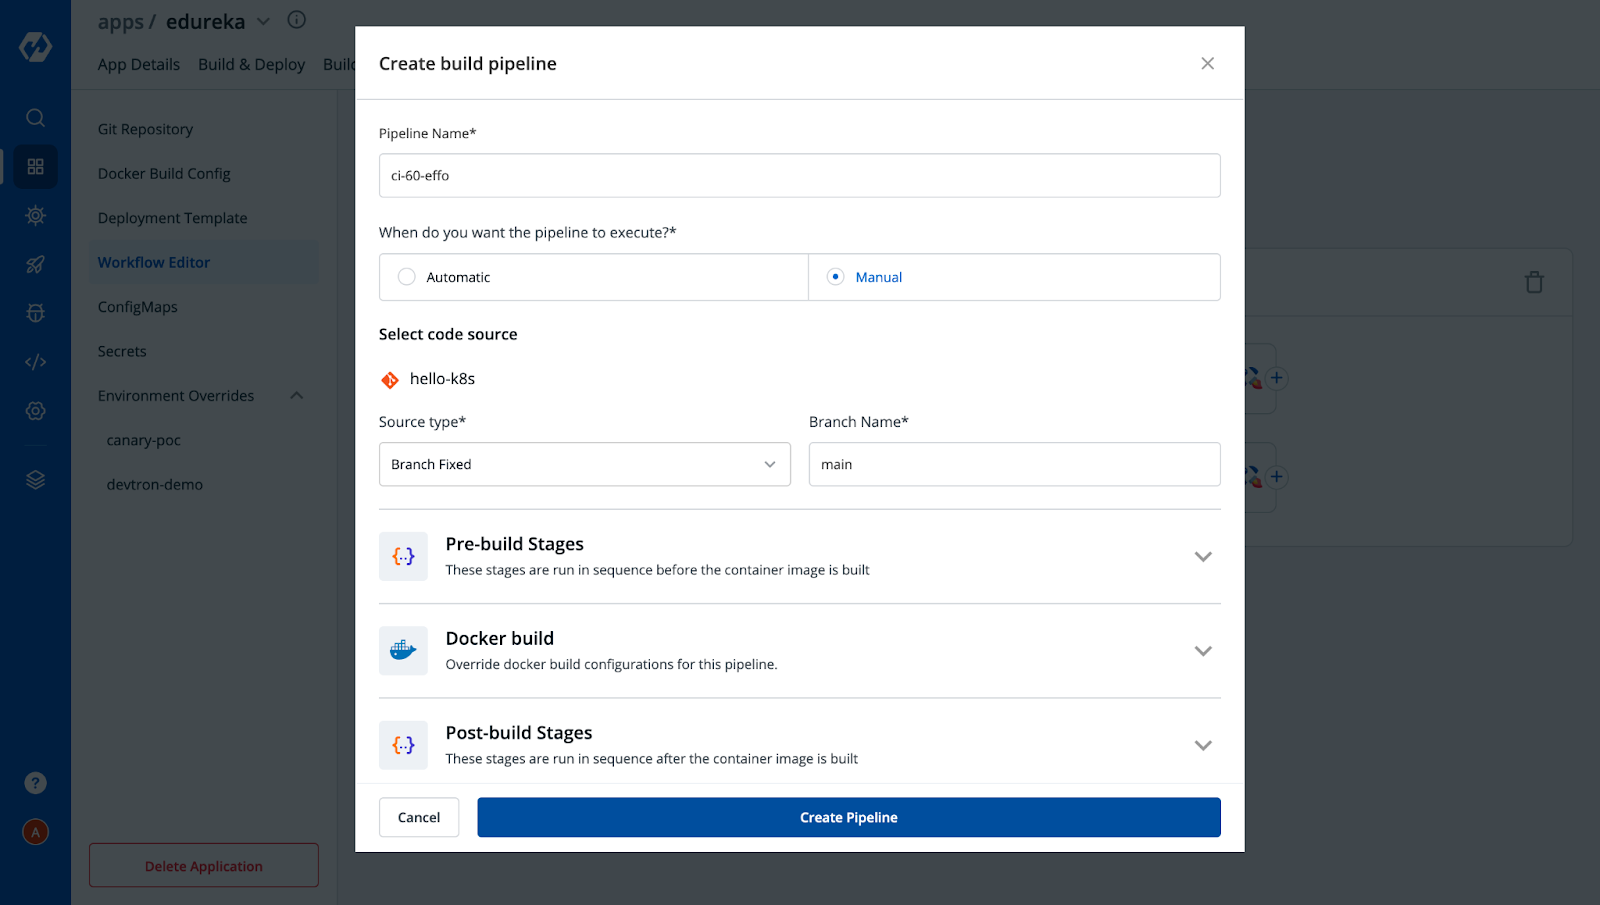
After creating Build Pipeline, click on the + button to Add Deployment Pipeline and provide the necessary configs as per your requirement.
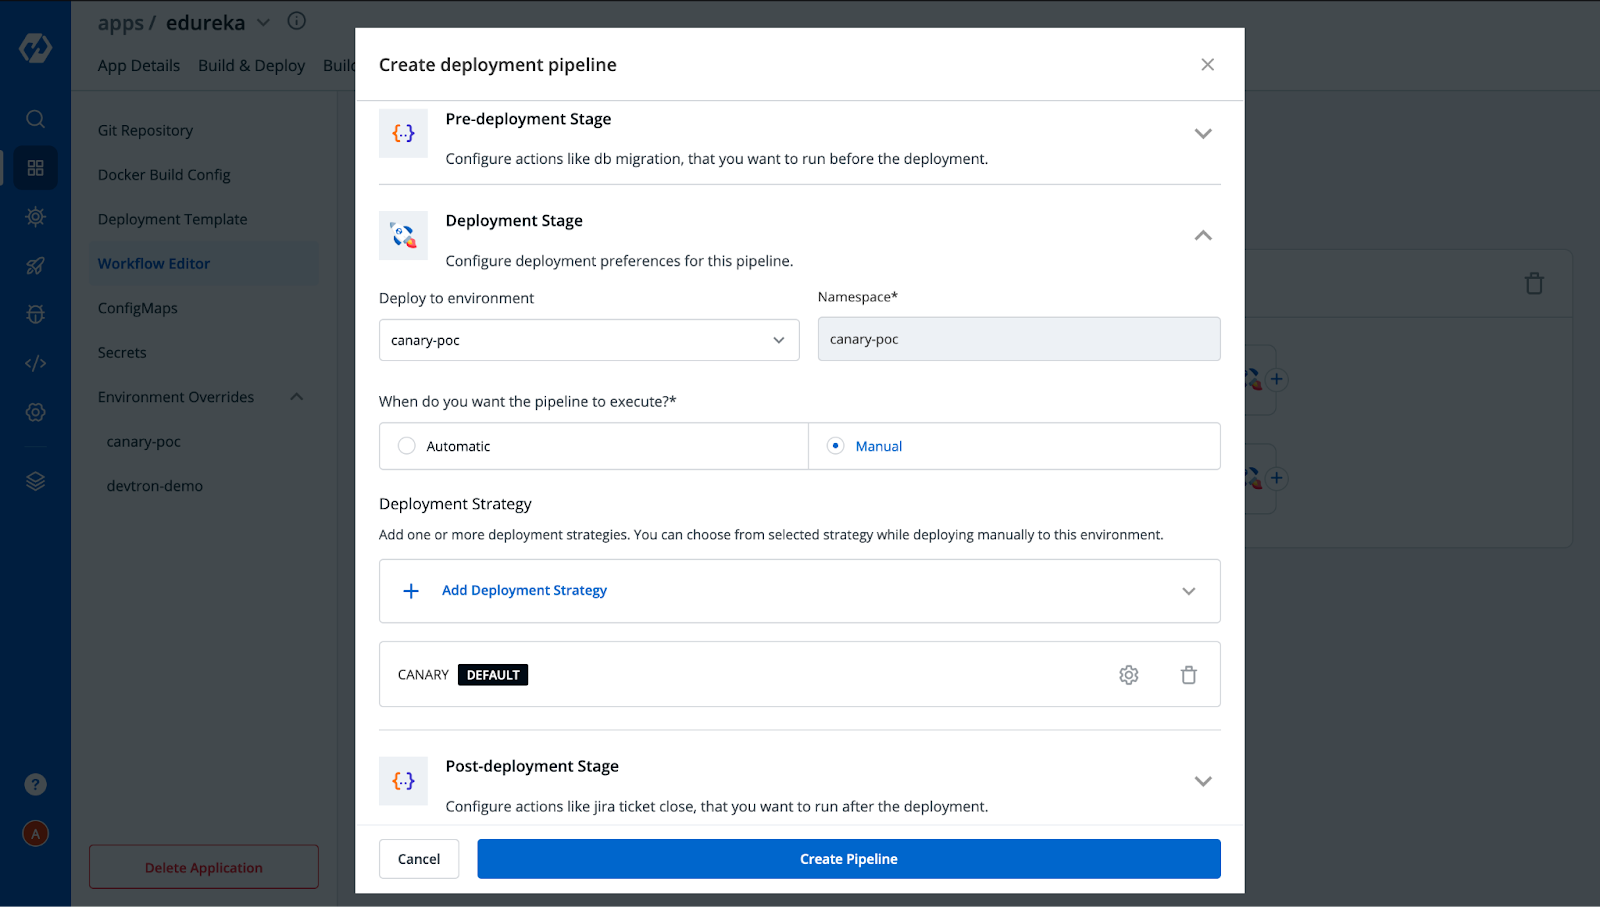
Similarly, you can also create multiple deployment pipelines for a single build. In our case, we have created two deployment pipelines, one with Canary enabled and another without Canary, to check and verify services serving incoming traffic. After adding two pipelines, the Workflow editor would look like this.
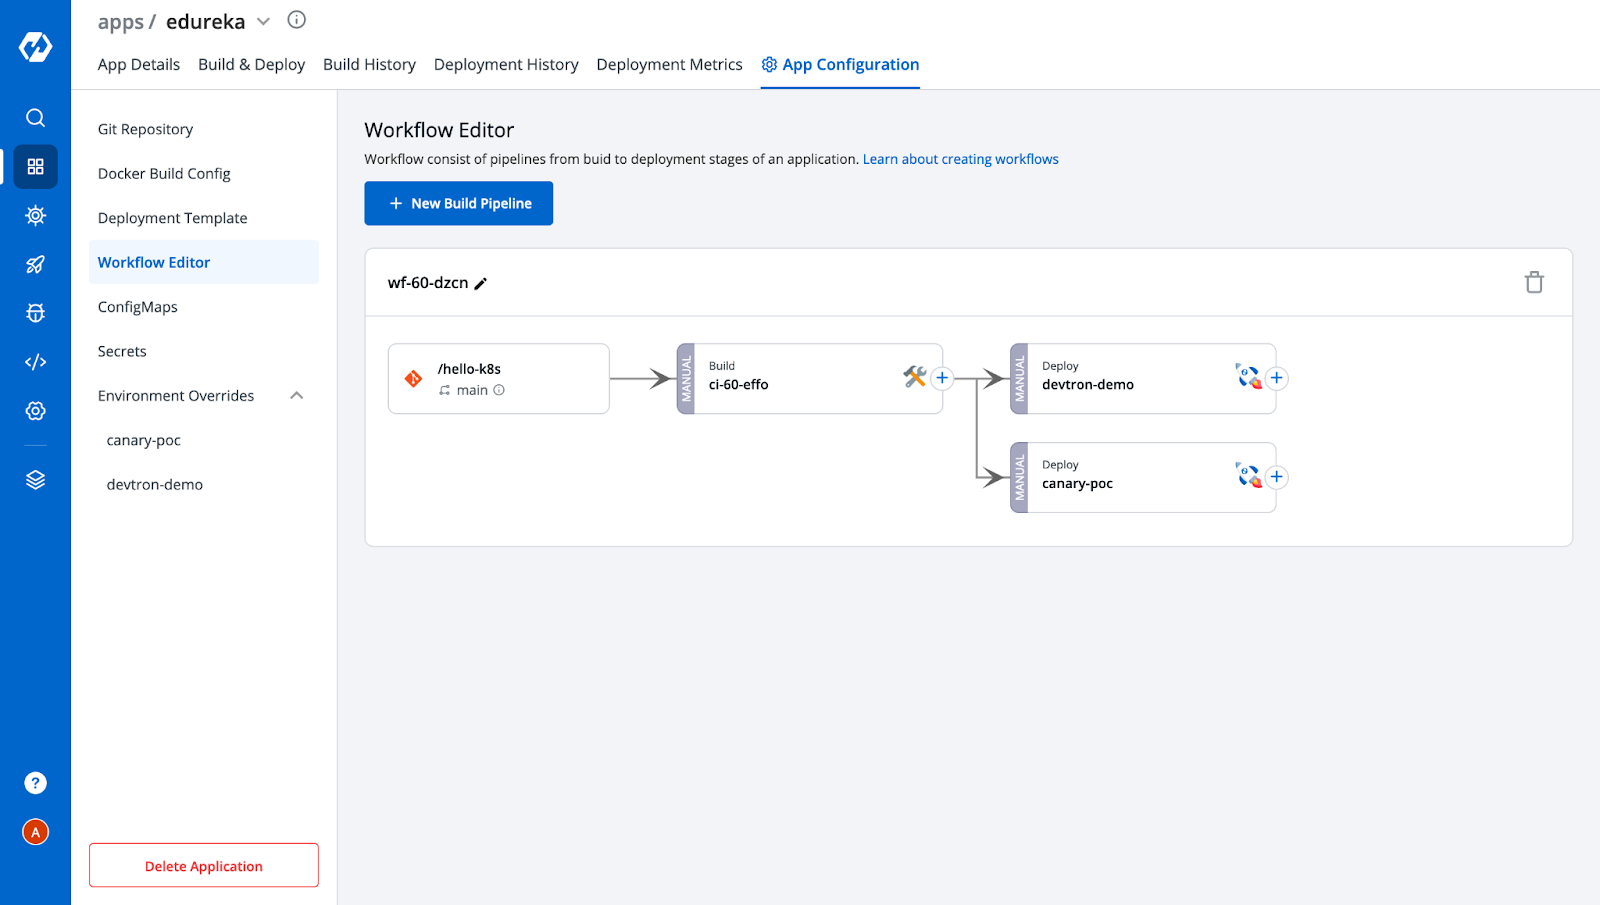
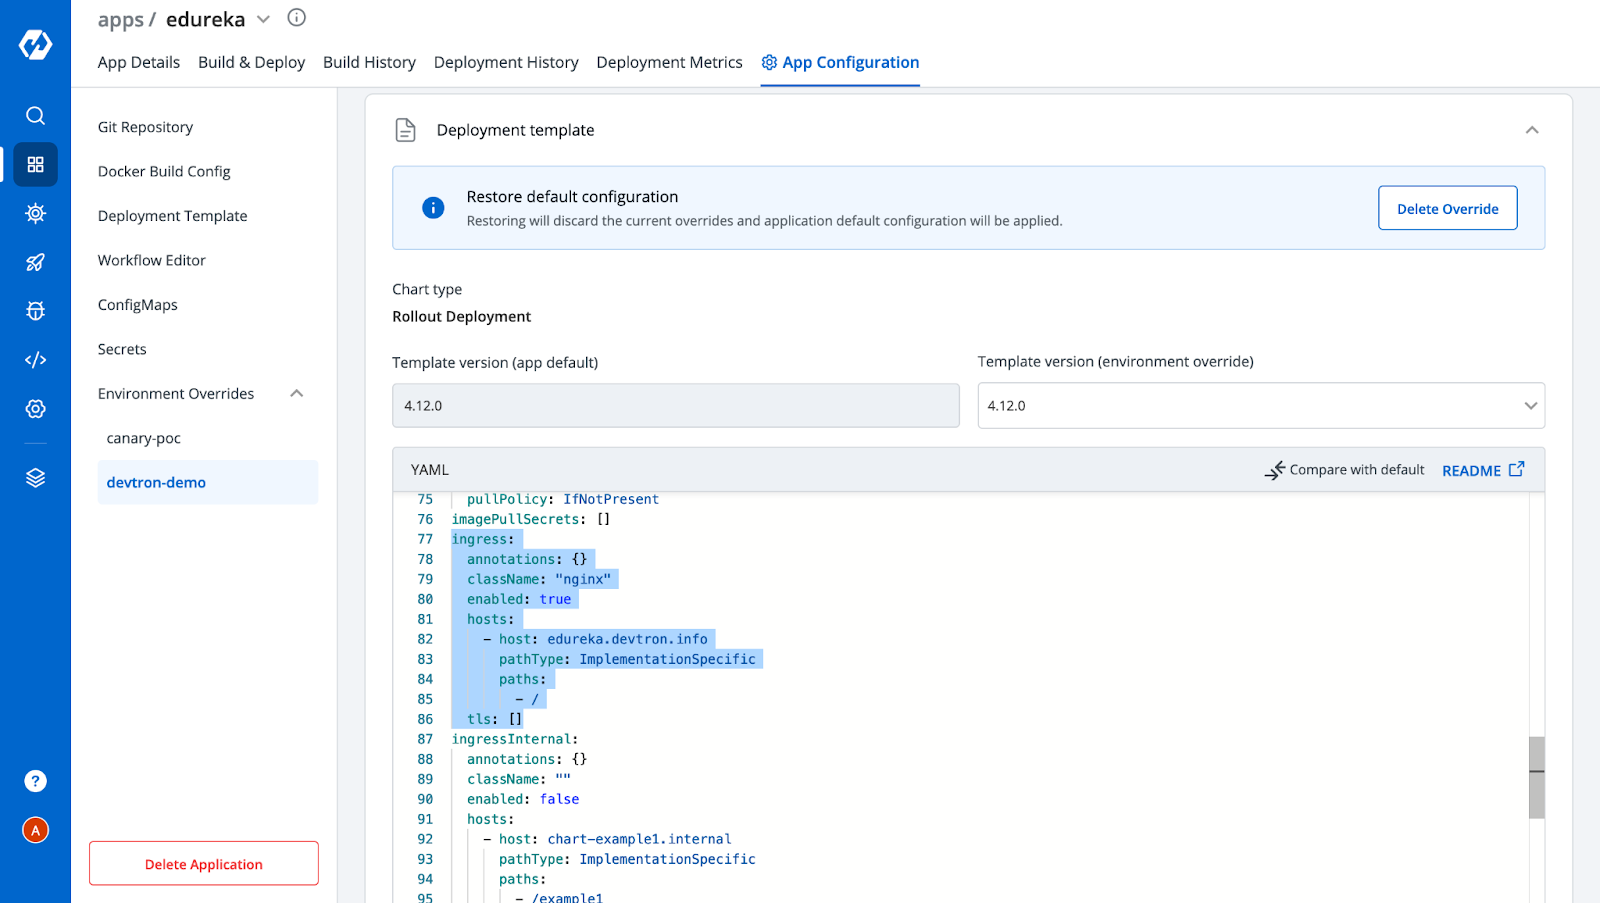
Also, you can observe from the above image that after creating the deployment pipelines, we got two environments under the Environment Overrides Config. It will increase with the number of deployment pipelines that you add. These represent the configuration you saved for each deployment. Since for the other environment i.e, devtron-demo, we don’t want the Canary Ingress, let's remove the ingress annotations from it.
Step 6: Customize each environment (e.g., remove ingress in the stable pipeline).
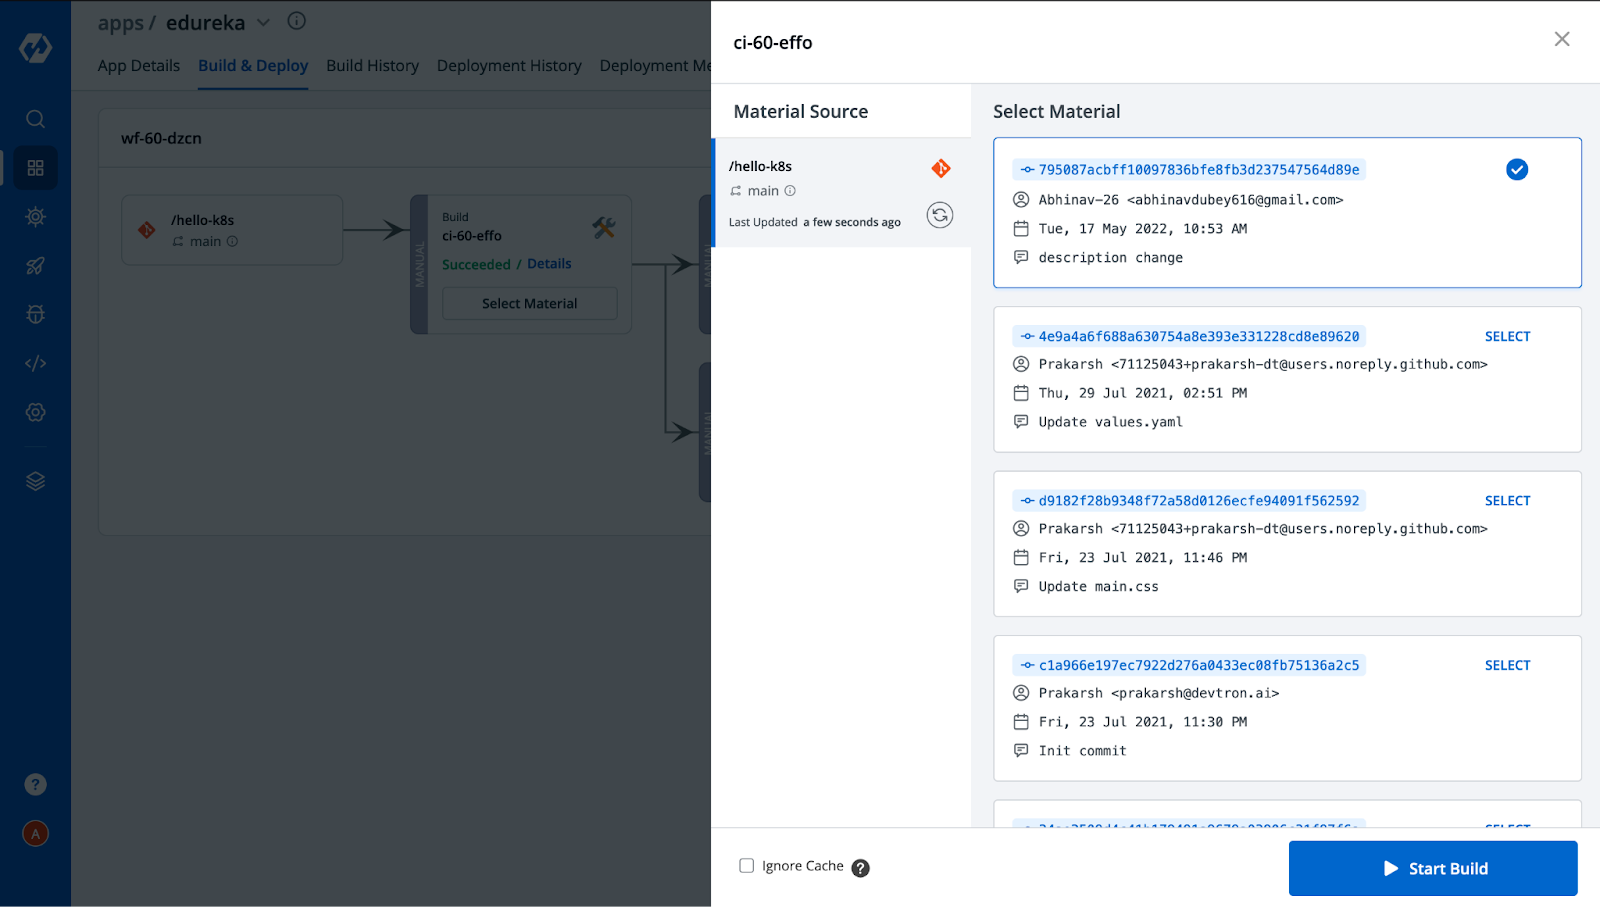
Step 7: Build the image → Select Material → Start Build.
Step 8: Deploy the image to both environments (canary and stable).
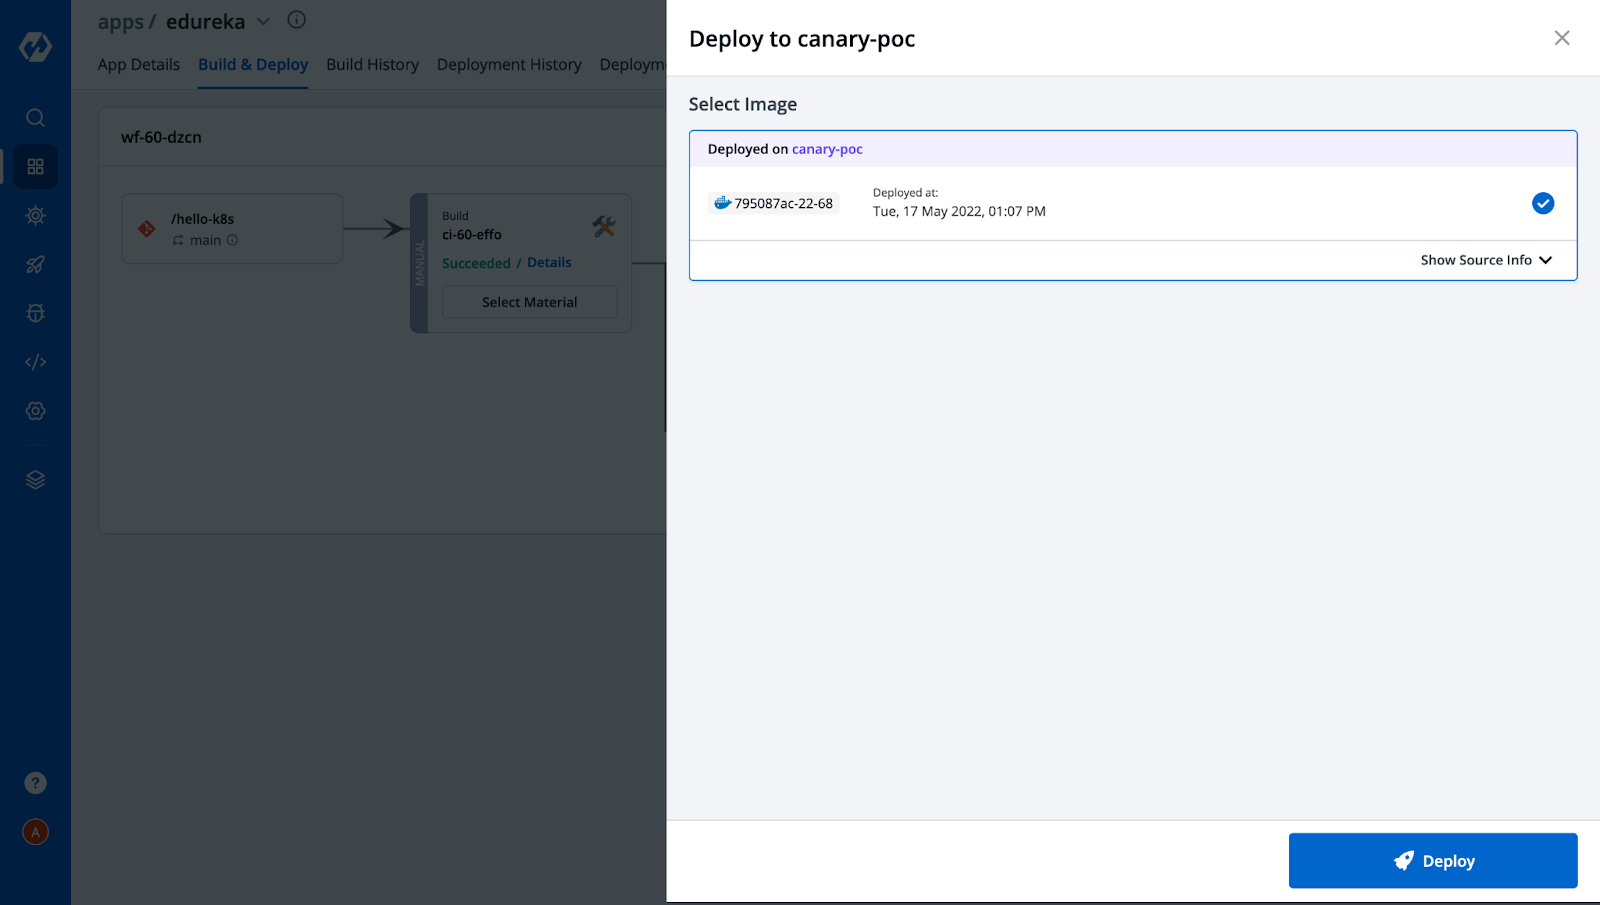
After the successful deployment in both environments, the Build & Deploy tab would look like this,
Step 9: Monitor the application via App Details tab.
In the below snippet, all the YAML files of Kubernetes objects are already created by Devtron without having to write a single line. You can also see how easily we can navigate to different environments and check the configuration we applied for each of them with a few clicks.
Deployment is a breeze with Devtron!
App details of Canary deployments
Step 10 Deployment: Access your app via the ingress host. Based on traffic routing, you’ll see requests served from either the canary or stable pod.
[Note: The IP of the node should be mapped to the ingress host if you are using NodePort or Loadbalancer. In our case, we are using NodePort]
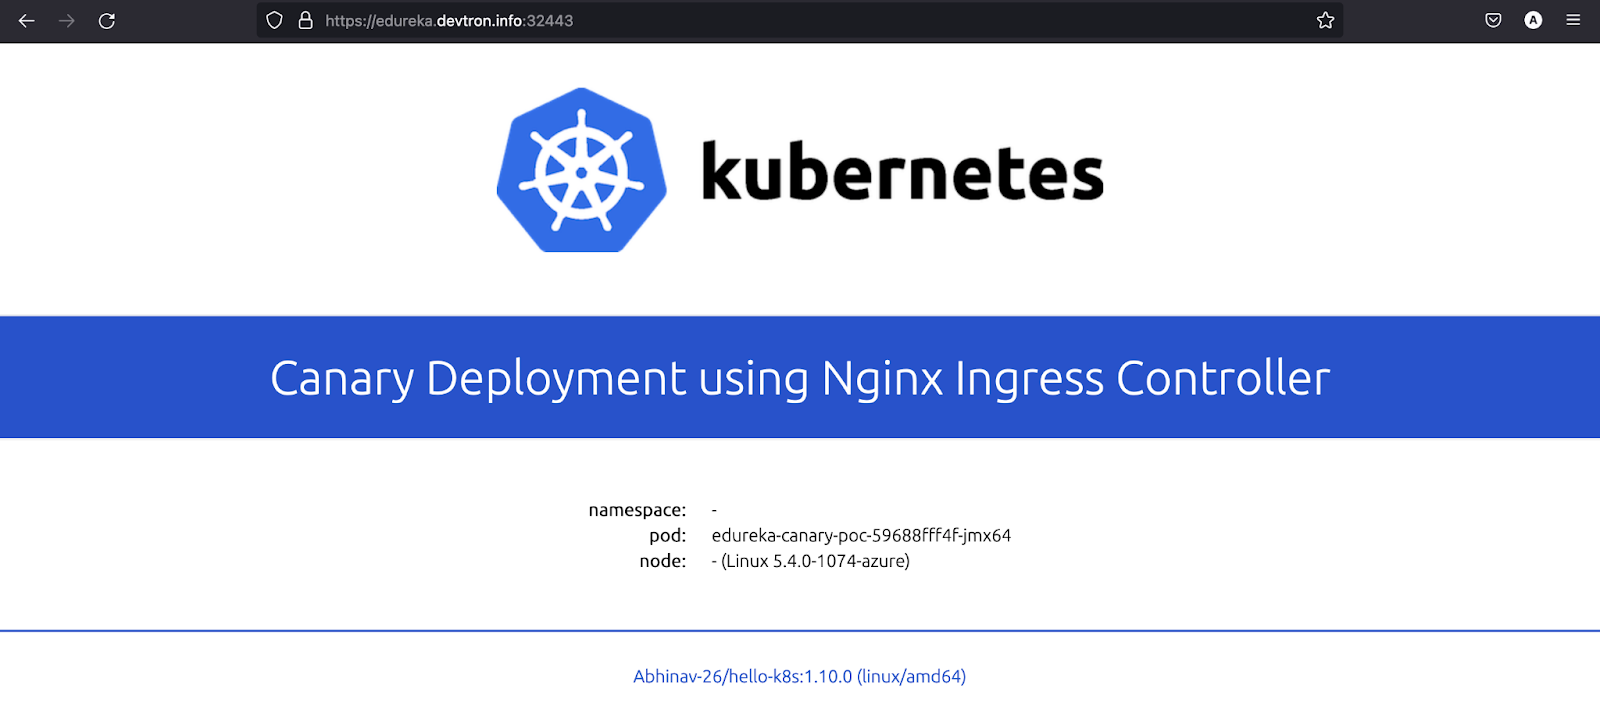
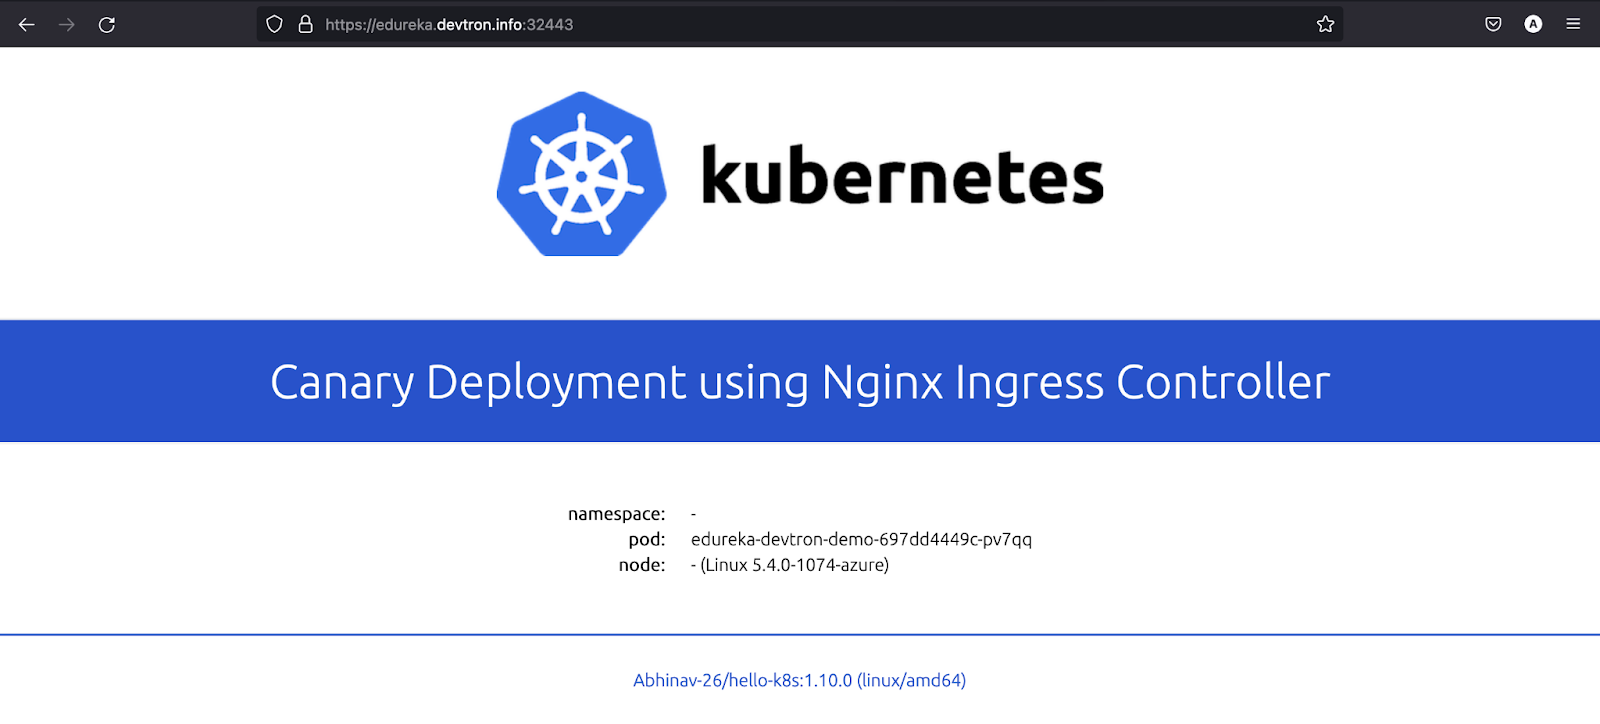
In the application, you can see the pod name which is serving the user traffic request. The pod is named edureka-canary-poc-59688fff4f-jmx64 since the request was routed to canary deployment. If we refresh the page again 1-2 times, we will see the pod name has changed to edureka-devtron-demo-697dd4449c-pv7qq (as shown in the image below) since it was routed to the stable release.
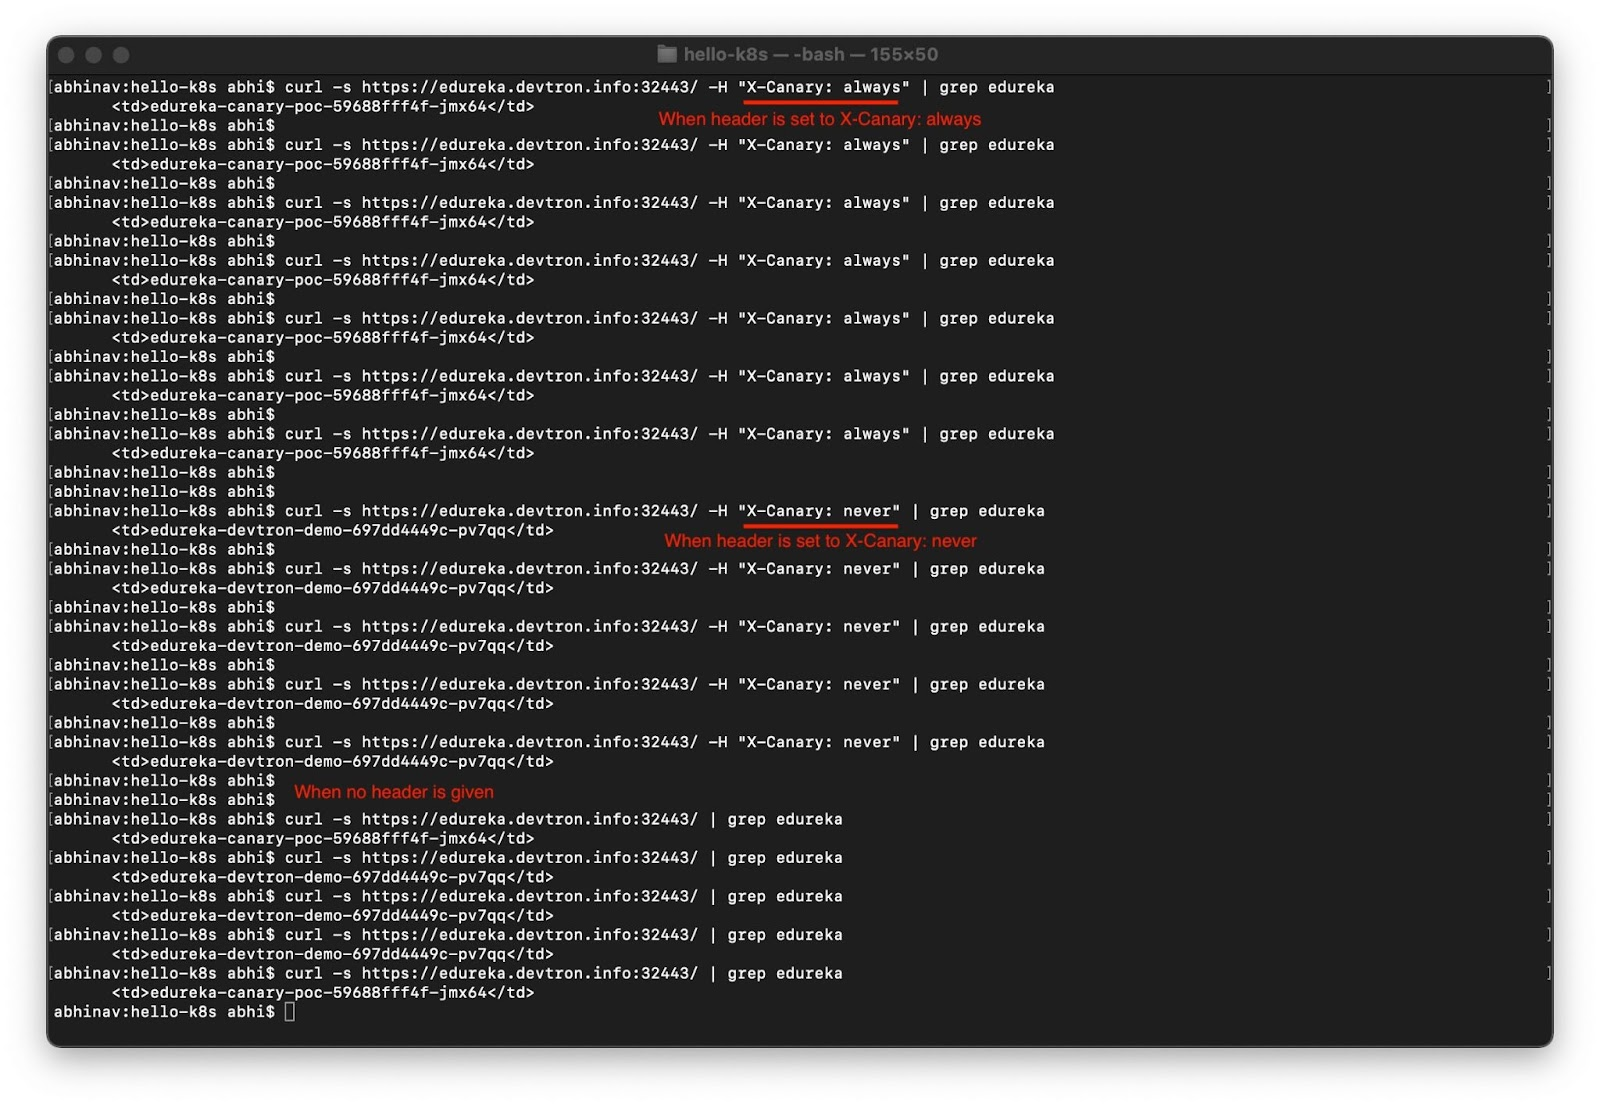
The magic is happening because of the ingress annotations that we gave and set the canary-weight as 50. So the incoming traffic is distributed between the pods.
If you want to redirect all the requests to the canary or to a stable service, it can also be achieved by passing the header in the request. In the below image, as you can see, when we pass the header X-Canary: always, all the requests are routed to canary deployment, and when we pass X-Canary: never none of the requests are sent to the canary. Also, in the end, where we didn’t provide any headers, the requests were randomly distributed to canary or stable releases.
Kudos! As you can now see that configuring and implementing a Canary deployment is made easy using Devtron.
Why Choose Devtron for NGINX Canary Deployment?
- No YAMLs – UI-based configuration
- Multiple environments managed in one place
- Visual pipelines for better control
- Auto-generated Kubernetes manifests
- Integrated monitoring and rollback
Final Thoughts
An NGINX canary deployment is a powerful way to reduce risk during production rollouts. Whether you're using the traditional method or Devtron's UI-driven approach, canary deployments help you deliver safer, faster, and smarter.
Give Devtron a try to streamline your deployment workflow, and don’t forget to join our Discord community or check out our GitHub repo ⭐
FAQ
What is a Canary Deployment in Kubernetes?
Canary Deployment lets you release new app versions to a small set of users before full rollout, helping reduce risk.
Routes a small % of traffic (e.g., 5%, 25%, 50%) to the new version.
Enables real-time testing in production.
Supports fast rollback and safer deployments.
Boosts developer confidence with early feedback.
How does NGINX Ingress support Canary Deployments?
NGINX Ingress uses annotations to control traffic routing for canary releases.
canary: "true" enables canary behavior.
canary-weight: "50" splits traffic between stable and canary.
canary-by-header: X-Canary routes traffic based on request headers.
How does Devtron simplify Canary Deployments?
Devtron provides a no-code way to configure and manage canary releases using its UI.
Pre-configured deployment templates with ingress/canary support.
Visual CI/CD pipelines for setup and rollout.
Environment overrides without writing YAML.
What are the benefits of using Devtron for Canary Releases?
Devtron makes canary deployments easier, faster, and more reliable.
No YAMLs needed—configure from the dashboard.
See which pods are serving traffic in real time.
Quick rollback and header-based traffic control.
Supports multi-environment testing and overrides.