As modern software architectures increasingly adopt microservices and cloud-native approaches. The deployment and management of applications in Kubernetes environments have become more complex. Maintaining consistency and reliability across deployments can be challenging with multiple services, configurations, and environment-specific settings.
Enter Helm, a package manager for Kubernetes. It solves resource issues by letting you bundle resource files into a single package. With Helm, you can define, install, and upgrade the entire application consistently and reliably. In this blog post, we will learn about Helm, how Helm works, the pros of Helm, and the shortcomings of Helm-cli.
What if it were possible to manage Kubernetes applications as easily as managing packages in your machine? Enter Helm, the solution that does exactly that by making application deployment and lifecycle management a breeze. Devtron simplifies the deployment and management of the Helm applications.
What is Helm?
Helm, a Kubernetes package manager, simplifies application deployment over Kubernetes. The helm chart includes all the Kubernetes resources. They are defined in Yaml files, which are often called manifests. These resources include deployments, secrets, config maps, and services. Where the configuration values for each environment are templated from file name values.yaml. By leveraging the Helm charts you can streamline the deployment process. Instead of changing each manifest (deployments, secrets, config maps, and services), you must edit the values.yaml file. Helm then deploys your app with the new values to Kubernetes. It ensures consistency and reduces the potential for errors in configurations.
Helm Charts
Charts are the building blocks for the deployment of applications to Kubernetes. These charts are pre-configured packages. They contain templates of all the needed resources for your application to run on Kubernetes. These charts can be used to deploy something simple as a pod or something complex as a full-fledged enterprise application.
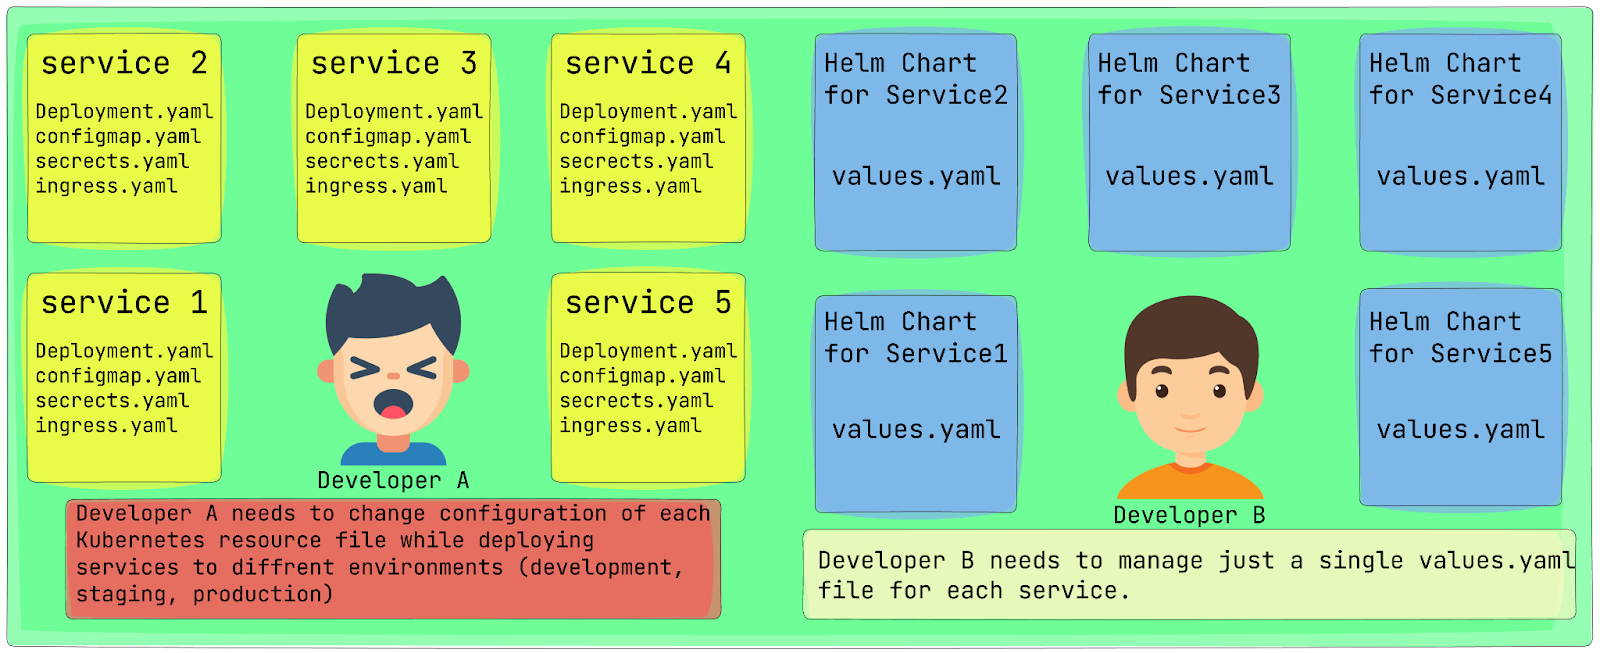
Consider an application with 15 microservices. They should be deployed across staging, development, and production environments. Each environment will have its own set of parameters and configurations
- You may need 3 replicas for some services, at the staging environment. Production may need 5 copies. This is to ensure high availability, fault tolerance, and scalability. They are required to handle production-level traffic.
- If your application includes a service like a database, the configuration and secrets will vary for each environment.
- The monitoring and observability setup may differ across the environments.
- The networking setup will differ across environments. It includes ingress setup (e.g., load balancers, and routing rules).
To handle this, you need to maintain multiple YAML files. You need them for each service and environment (staging, development, production). That gets complicated and error-prone. With Helm charts, you need to manage a single package. It's a chart of your application. It contains all the resources required to deploy the application to Kubernetes. Helm charts use templating architecture. This allows them to fetch environment-specific values (like staging, development, and production) from a single ‘values.yaml’ file. So when you need to deploy an application in any environment, you just need to modify a single ‘values.yaml’ file.
This approach makes configuration management simpler and promotes consistency across environments. It also helps with versioning and rollbacks.
Structure of Helm Chart
Let's understand the structure of a Helm chart by taking the example of the Nginx chart:
A typical Nginx Helm Chart has the following structure:
nginx/
├── Chart.yaml
├── values.yaml
├── templates/
│   ├── _helpers.tpl
│   ├── configmap.yaml
│   ├── deployment.yaml
│   ├── hpa.yaml
│   ├── ingress.yaml
│   ├── service.yaml
│   ├── serviceaccount.yaml
│   └── tests/
│       └── test-connection.yaml
└── README.md
- Chart.yaml: This file contains metadata for the chart. i.e. name, version, etc.
- values.yaml: This file contains the configuration values for the Application deployment to a specific environment. These values can be updated while deploying the Application to another environment.
- templates/: This directory contains the Kubernetes resource manifests (deployments, services, configmaps, ingress, and secrets) templates that will be combined with the values from values.yaml to generate the final manifests.
- _helpers.tpl: This file contains helper functions and templates that can be used in other templates.
- configmap.yaml: This template defines a ConfigMap object that can be used to store Nginx configuration files.
- deployment.yaml: This template defines the Deployment object for running the Nginx pods.
- hpa.yaml: This template defines a HorizontalPodAutoscaler object for automatically scaling the Nginx deployment based on CPU usage or other metrics.
- ingress.yaml: This template defines an Ingress object for exposing the Nginx service to external traffic.
- service.yaml: This template defines a Service object for exposing the Nginx deployment internally within the cluster.
- serviceaccount.yaml: This template defines a ServiceAccount object that can be used by the Nginx pods if needed.
- tests/test-connection.yaml: This template defines a test pod that can be used to verify the Nginx deployment is working correctly.
- README.md: This file contains instructions and documentation for the Nginx Helm chart.
Chart Repositories
Chart Repositories have a crucial role in the Helm ecosystem it provides a centralized location for sharing Helm charts. These Repositories can be hosted locally or on remote servers, making downloading and installing charts easy. E.g. Helm Repository is ArtifactHub. With these Chart Repositories developers can leverage pre-built charts for common applications and services like using a chart of Prometheus for monitoring purposes. This saves time and effort as you can use proven configurations for specific applications and services.
Helm Architecture
To understand how current Helm architecture works i.e. Helm 3, we need to understand the working of previous versions of Helm i.e. Helm 2.
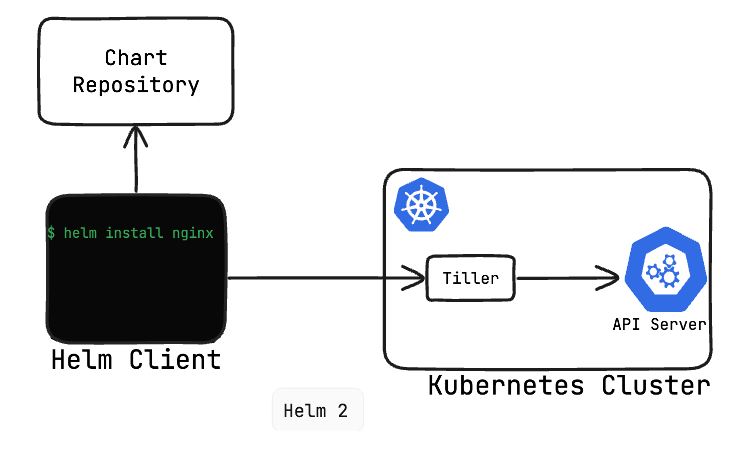
The previous version i.e. Helm 2 was based on ‘Client-Server’ architecture. The components for that were:
- Helm Client
- Helm Server (tiller)
Helm Client
It’s a command line tool that helps you interact with the Helm server (Tiller) to manage Kubernetes resources (Helm charts). The Command Line Tool is responsible for creating, installing, upgrading, and uninstalling Helm charts.
Helm Server (Tiller)
Past then Kubernetes lacked functionality like Resource Base Access Control (RBAC). To allow the Helm to interact with the Kubernetes cluster while facilitating security, a new component “Tiller” was introduced.
A server-side component of Helm runs on your Kubernetes cluster. It handles the operations you request through the Helm client. Includes taking your configuration files, rendering the Helm charts, and communicating with the Kubernetes API server to create or modify the resources.

Helm 3 Architecture
As Role-Based Access Control (RBAC) gained traction in Kubernetes, users gained the capability to manage granular and precise permissions for Kubernetes resources and actions. In Helm 3, the middle component “Tiller” was completely removed. Now the security is being handled by the RBAC. In Helm 3, the client can directly communicate with the API server of your Kubernetes cluster. Know more about Helm 3 in this blog post
How does Helm Works?
To understand how Helm simplifies application deployment and configuration management, let's consider a scenario where you need to deploy an application across multiple environments, such as production, staging, and development. Without using Helm, you would typically need to maintain separate Kubernetes resource files (YAML manifests) for each environment, managing the differences in configurations, replica counts, secrets, and other environment-specific settings.
Whereas with Helm, you can create a single chart for your application, which bundles all the necessary Kubernetes resources (deployments, services, ConfigMaps, secrets, etc.) into a unified package. Instead of modifying individual YAML files for each environment, you can just modify values.yaml file and deploy the application.
This is how the process works:
- Creation of Helm Chart: You will start by creating a Helm Chart for your application, which includes templates for all required Kubernetes resources (deployments, services, ConfigMaps, secrets, etc.).
- Values.yaml: You will be defining the configurations for your application as per the environment you are deploying. I.e. for staging if you require 2 replicas, you will be updating the values.yaml file accordingly.
- Helm Renders Charts: During the deployment process, Helm renders the chart templates with the appropriate configuration for specific environments from values.yaml file and generate environment-specific Kubernetes manifets.
- Deploying to Kubernetes Cluster: Once Helm generates the environment-specific Kubernetes manifests they are deployed to the Kubernetes cluster. According to the Helm request the Kubernetes APIs create or update the necessary resources based on configurations.
Advantages of Helm
- Simplified Application Deployment: Helm packs all the necessary Kubernetes resources (deployments, services, ConfigMaps, secrets, etc.) into a single package called a chart, making it easier to deploy and manage applications on Kubernetes.
- Consistent and Reliable Deployments: With the use of Helm charts, you can ensure consistent and reliable application deployment across environments (development, staging, production) by simply modifying the values.yaml file.
- Configuration Management: Helm separates the application configurations from deployment manifests, allowing you to manage configuration more effectively. You can easily update configurations by modifying the values.yaml file.
- Versioning and Rollbacks: Helm supports versioning of charts, allowing you to track changes and roll back to previous versions if needed, promoting better release management.
- Reusability and Sharing: Helm provides a centralized repository (e.g., ArtifactHub) for sharing and discovering pre-built charts for common applications and services, enabling reusability and saving time and effort.
Challenges with Helm
At a point where Helm offers numerous advantages for deploying and managing your applications over Kubernetes, there are some challenges with it that users are most likely to face.
- Learning Curve: Helm CLI, being a command line utility, brings up a learning curve for users to understand and master ample commands. On the other hand, the templating structure itself is quite complex when it comes to creating a helm chart for complex microservices.
- Lack of Visibility and Monitoring: Helm CLI does not provide a built-in mechanism to view the health and status of applications deployed through its charts. Users need to rely on external monitoring tools or manually inspect the deployed resources to assess the state of their applications.
- Limited Integration with GitOps Tools: Popular GitOps tools like ArgoCD do not natively store the deployment history of applications deployed through Helm. This can make it challenging to track changes and rollbacks for Helm-based deployments.
Streamlining Helm Deployments Using Devtron
To tackle the challenges associated with Helm, like a learning curve, lack of visibility and monitoring, and limited integrations with GitOps tools. Devtron comes with a comprehensive solution that simplifies the deployment and management of Helm applications (applications that are being deployed using Helm charts) by providing a user-friendly interface. Devtron comes with a feature called Helm dashboard which provides you with the following:
- User-friendly interface: Devtron’s Helm dashboard provides an intuitive graphical user interface (GUI) for managing your Helm applications. You can also manage your charts or use pre-configured Helm charts through the Chart Store of Devtron
- Integrated GitOps support: Devtron integrates Argo CD, enabling users to manage their Helm releases through a Git-based workflow.
- Simplified access control: Devtron provides a precise role-based access control (RBAC), allowing administrators to define granular permissions for different users.
- Centralized visibility: Devtron’s Helm dashboard provides you with a centralized view of all deployed releases. You can check for Application Status and Deployment Status. It also allows you to take a look at Logs, Manifests, and Events. You can also access the Terminal for specific pods of application.
Let me show you the features of Devtron in a better way by deploying a Helm application using Devtron.
Step 1: Adding Helm Repository
- Devtron provides a range of community helm charts, commonly used Helm charts available in the Charts marketplace. If you want to install a custom chart Devtron simplifies the process.
- If you have a Helm chart for your application ready (hosted on GitHub, a version control system, or locally), you need to push the Helm chart to a chart repository before deploying it.
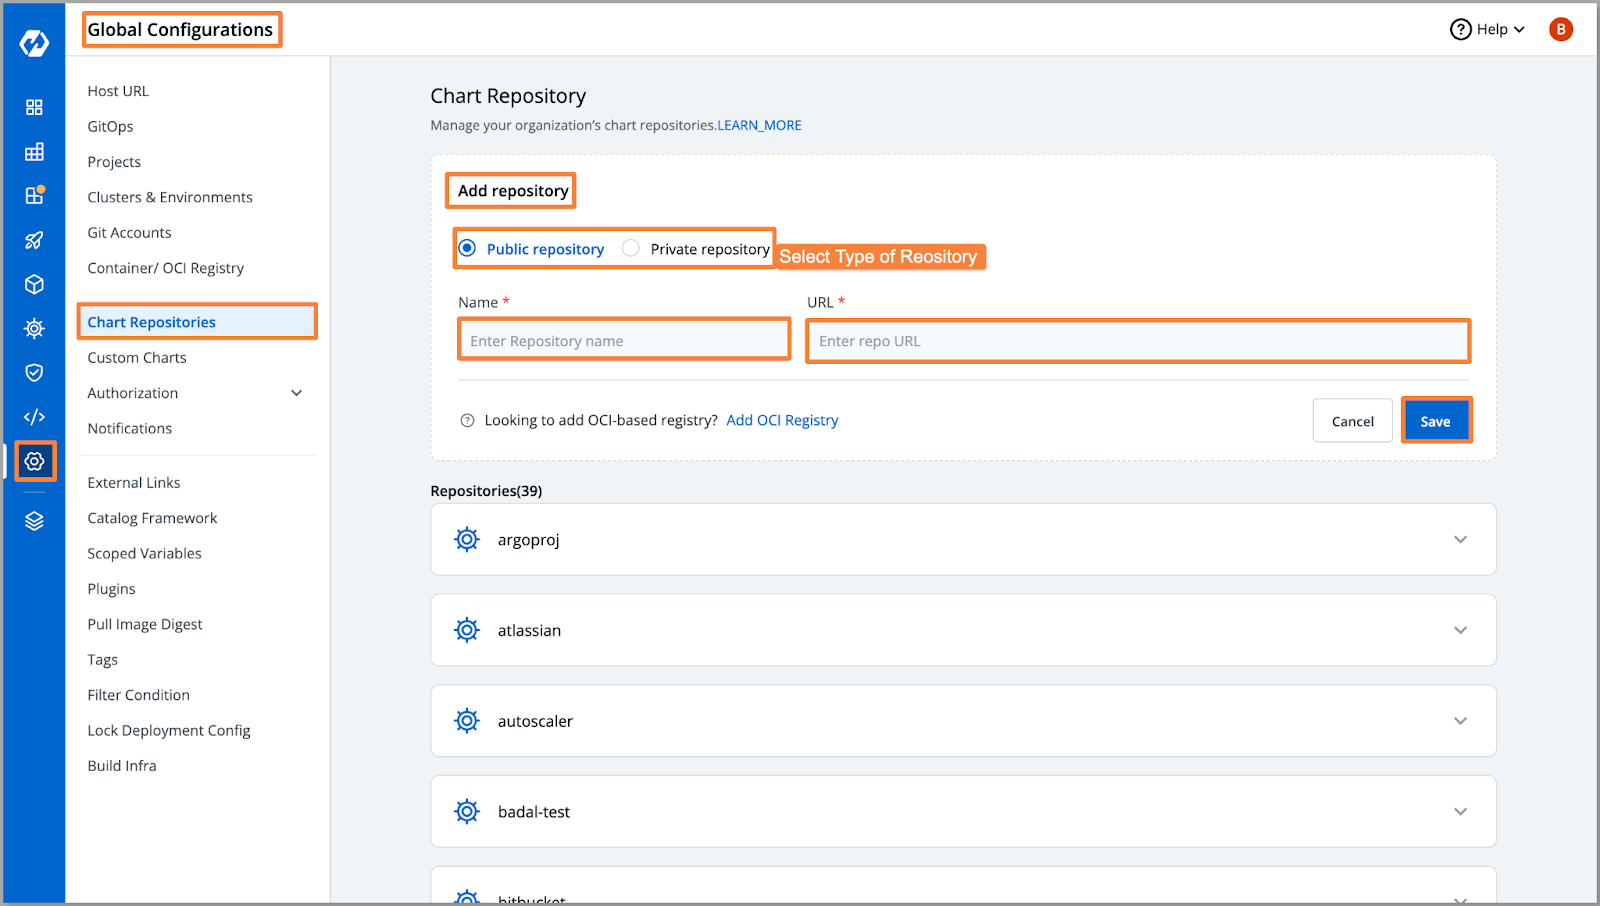
- After pushing the chart to the repository, you need to add the repository to the Devtron dashboard. To do this, follow these steps: Go to Global Configurations → Chart Repository → Click on "Add Repository" → Enter the repository details and click "Save" → Click on "Refresh Charts"
Step 2: Deploying Helm Chart
- After adding your repository to the Devtron chart store, you will be able to see the list of charts from your repository.
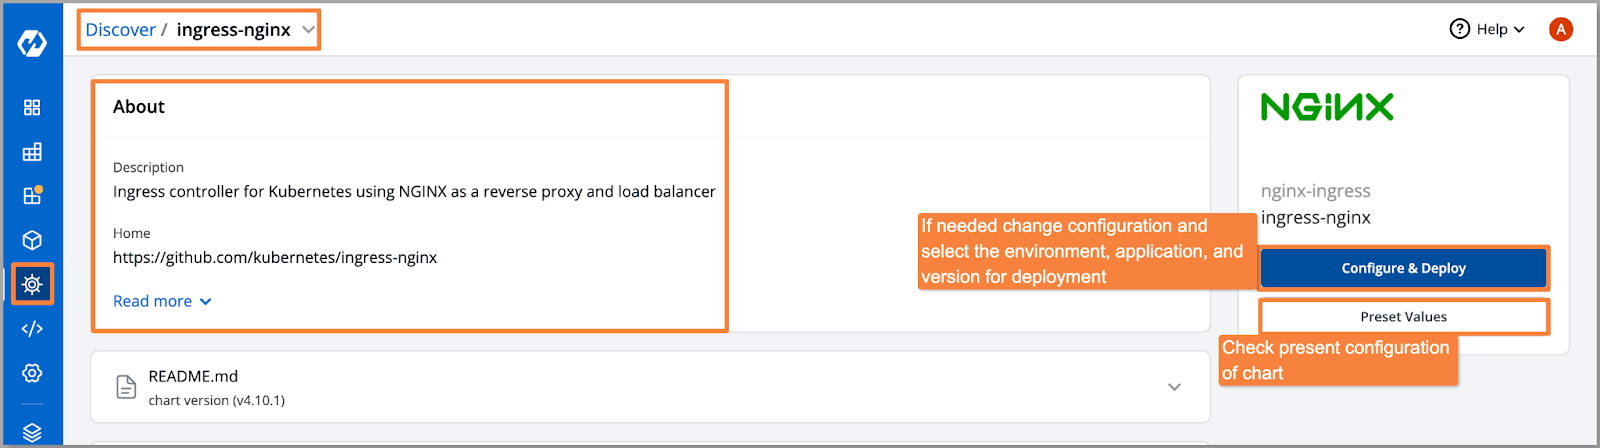
- In this case, I will be deploying the Helm chart for Nginx. Navigate to the chart store and select the chart you want to deploy.
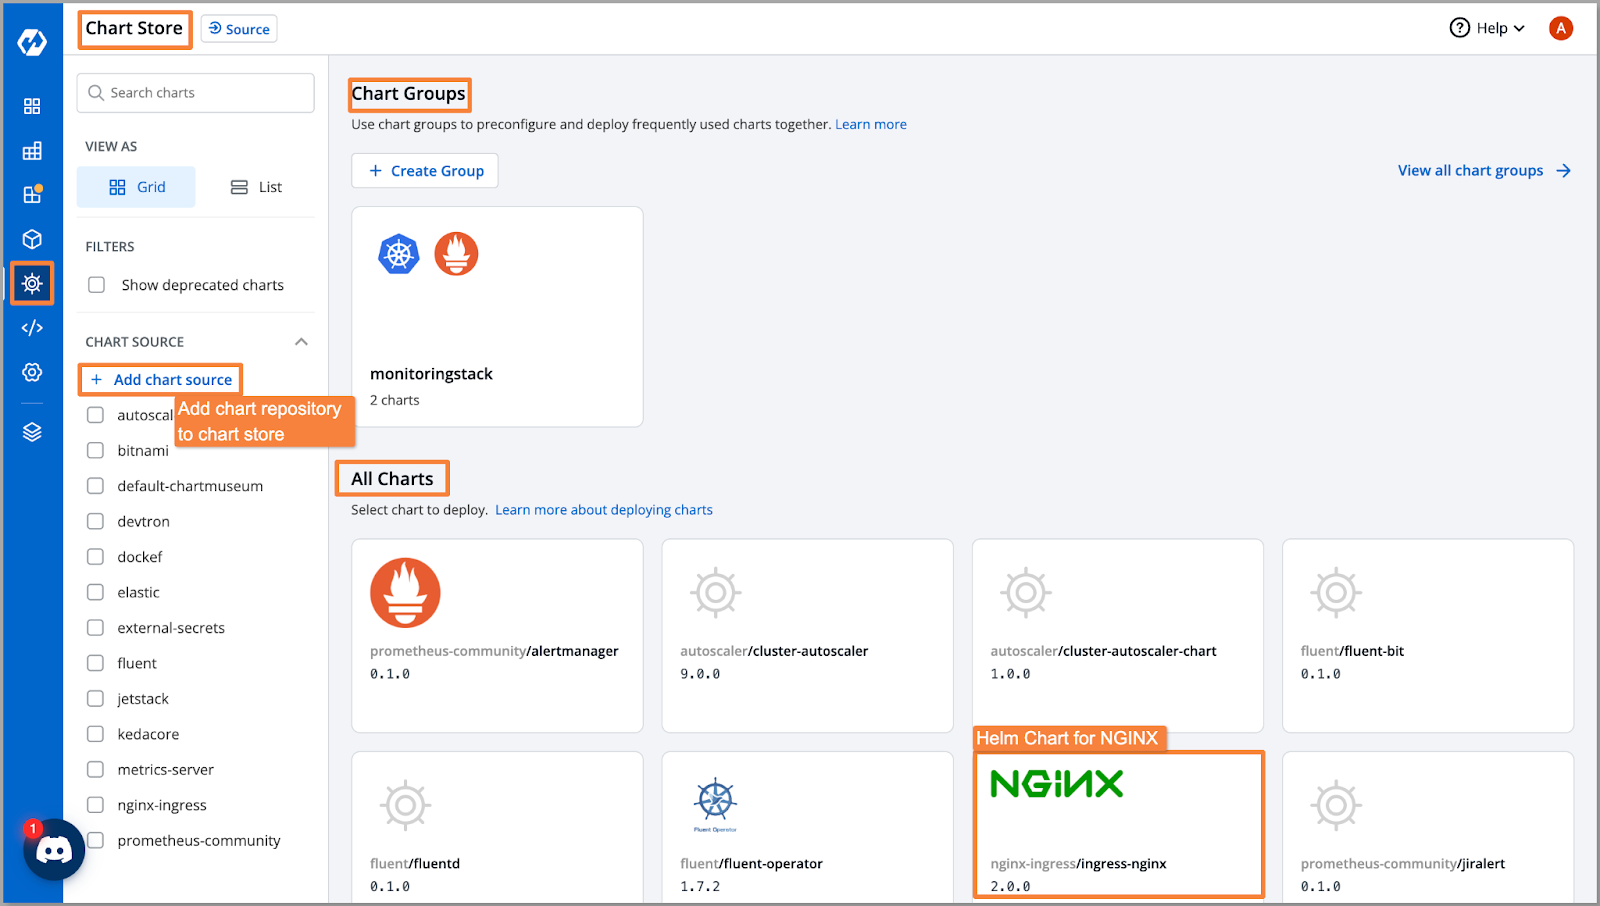
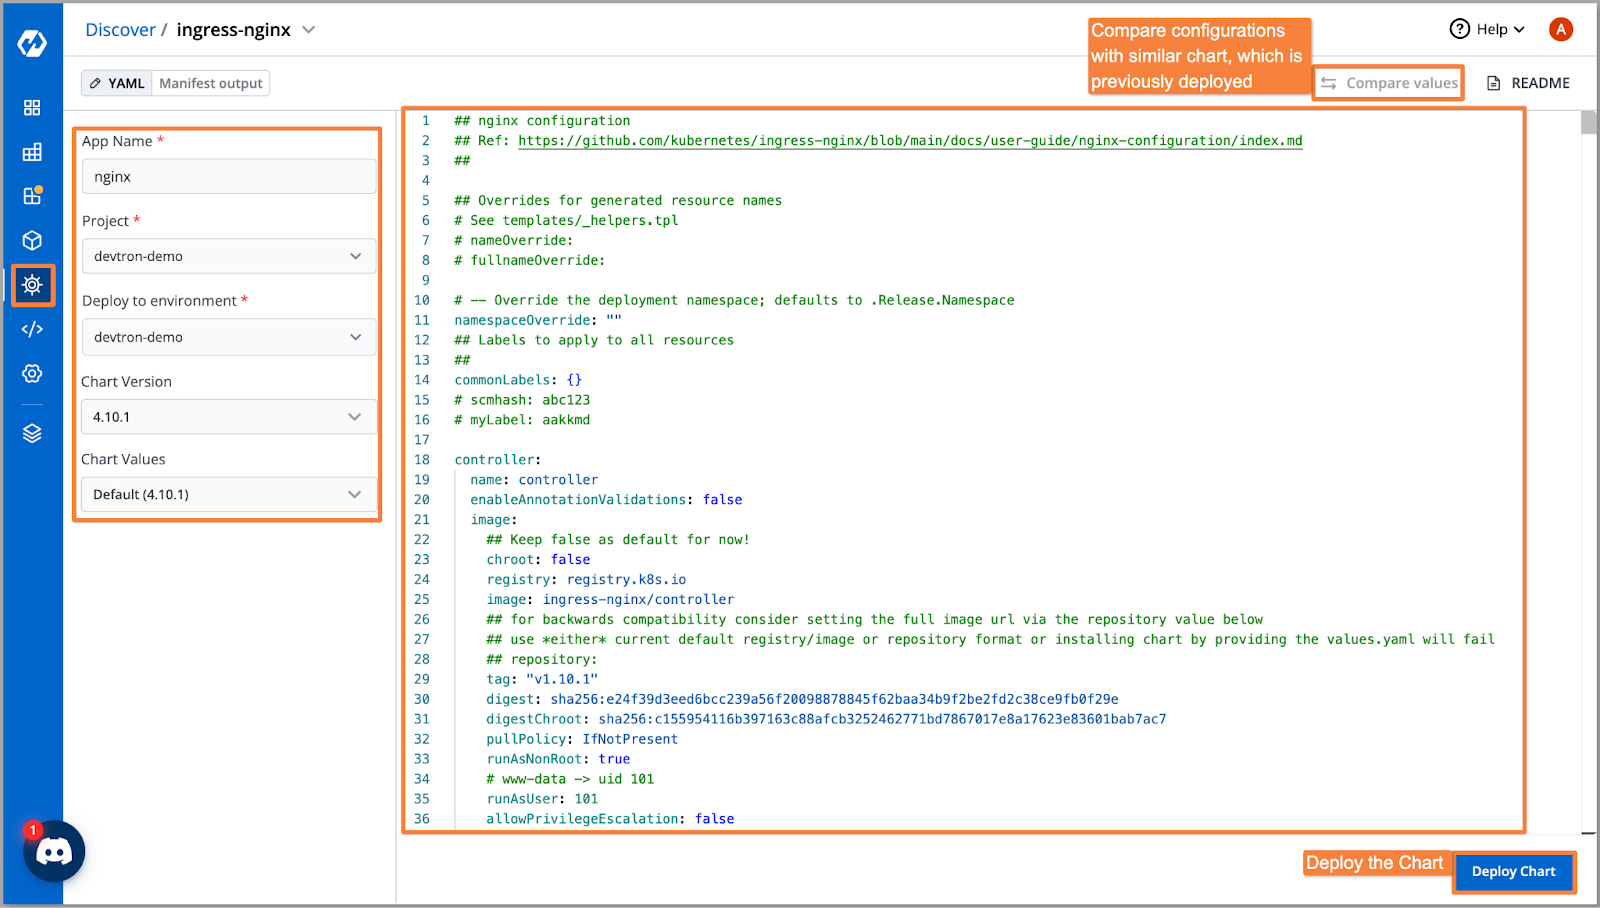
- Click on "Configure and Deploy." Here, you can modify the configuration of the chart. Along with the configuration, you can select the environment, project, and chart version before deploying the chart.
- Once all configurations are set, click "Deploy Chart" to initiate the deployment process.
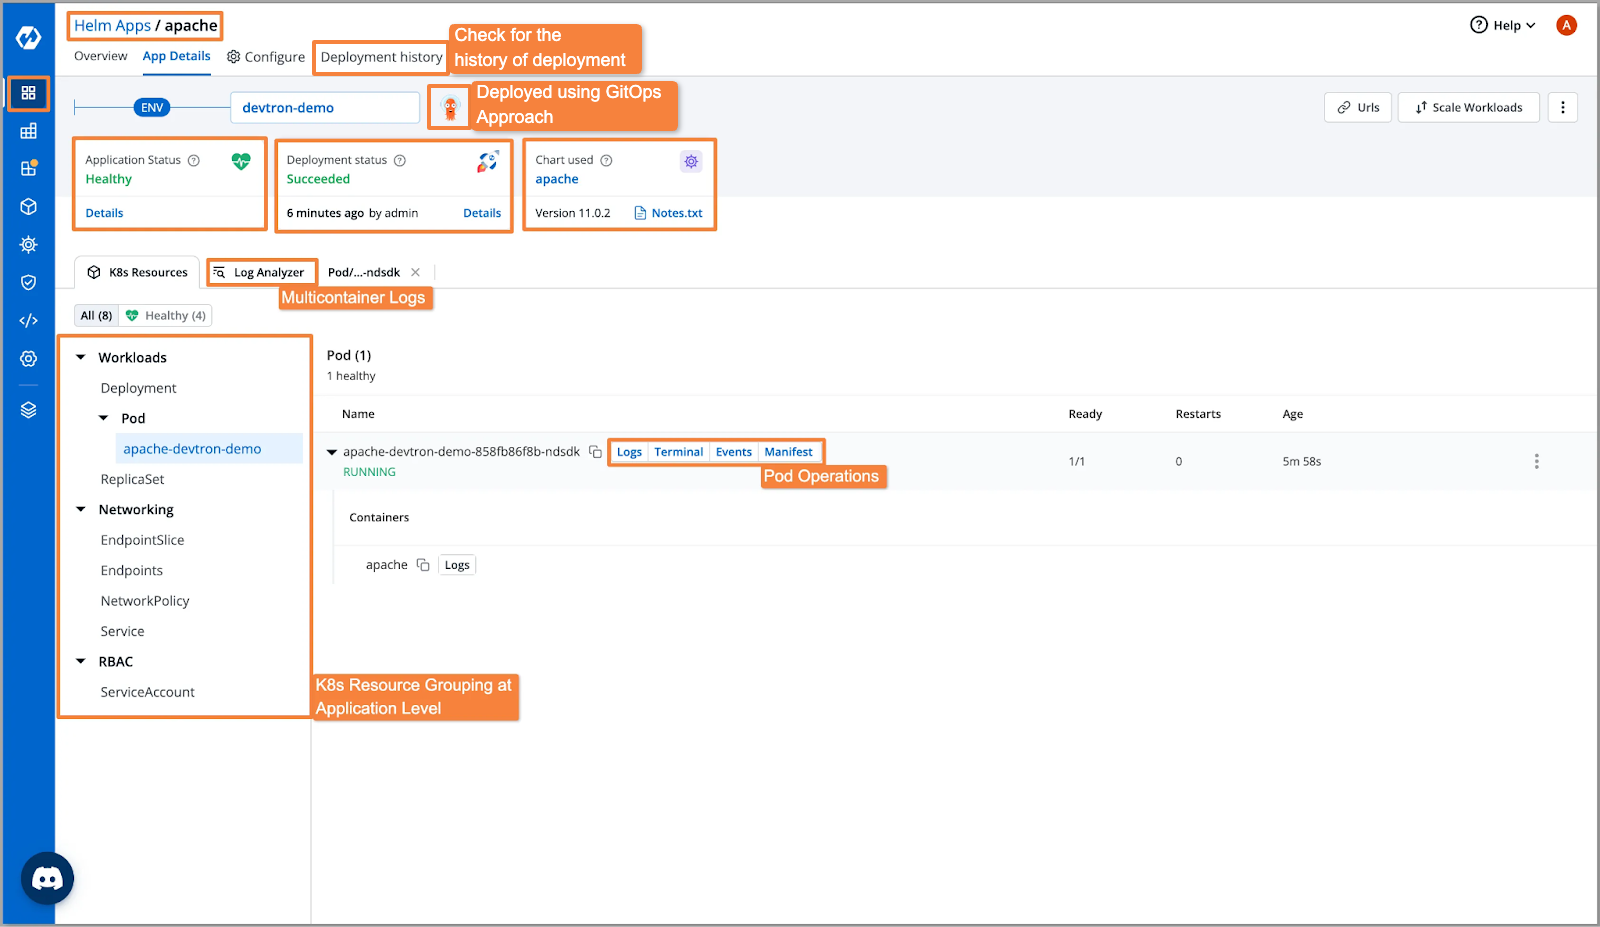
Step 3: Congratulations! You have successfully deployed the Helm chart for your application. Now, you can view the details of the deployed application within Devtron.
- Devtron provides visibility into the current status of the application, deployment status, and the specific chart used for deployment.
- Additionally, you can access the workloads associated with the application, including deployments, pods, networking, and RBAC configurations.
- If you have used the GitOps approach, Devtron integrates ArgoCD, which helps you store Kubernetes configuration files and the desired state of your applications in Git repositories.
- Devtron allows you to perform various pod operations, such as:
- Viewing logs for specific pods
- Accessing a terminal session for a specific pod
- Checking events related to a pod
- Inspecting the manifest for a specific workload
Conclusion
In summary, Helm simplifies the deployment and management of applications on Kubernetes by providing a package manager for bundling and managing all the necessary Kubernetes resources. It offers advantages like consistent deployments, configuration management, versioning, and reusability. While Helm brings its own set of challenges like a learning curve, lack of visibility, and limited GitOps integration, Devtron addresses these issues by providing a user-friendly Helm dashboard. Devtron's Helm dashboard offers a graphical interface, integrated GitOps support, simplified access control, and centralized visibility into deployed releases. By leveraging Devtron's Helm capabilities, teams can streamline the deployment and management of Helm applications, ensuring a seamless and efficient experience on Kubernetes.
For further reading on managing Helm releases through Devtron's Kubernetes dashboard, refer to these blogs: Kubernetes Dashboard: Helm Release Management, Helm Chart Kubernetes Deployments, Setting up Monitoring Stack on Kubernetes with Devtron