1. SSL Automation in Kubernetes ensures secure HTTPS connections without manual certificate management.
2. Let’s Encrypt + Cert-Manager provides a free, automated way to issue and renew SSL certificates.
3. Certificates are automatically renewed before expiry, eliminating manual overhead.
4. Ingress + Cert-Manager enables SSL automation for custom domains in Kubernetes.
5. Devtron’s intuitive dashboard simplifies SSL automation, making it easier for developers and DevOps teams.
Introduction
Kubernetes is an open-source system for automating deployment, scaling and management of containerized applications. It's being widely adopted in the industry at a much faster rate. When we deploy any web app on top of K8s (Kubernetes), we have to create an ingress object so that it can be accessible from the internet. But the problem is, to allow that ingress, url be served on https, browser needs an SSL certificate signed by a trusted authority and nowadays most of the browsers block the clients from viewing the webpage if you use a self-signed certificate.
There are some trusted authorities which offer paid ssl certificates and on the other side we have services like openssl and LetsEncrypt authority from which we can generate ssl certificates for free of cost. We are going to use letsencrypt for our use-case.
About LetsEncrypt
Let's Encrypt is a free, automated, and open certificate authority brought to you by the nonprofit Internet Security Research Group (ISRG). It uses the Automatic Certificate Management Environment (ACME) Protocol to verify that you are the rightful owner of a domain for which you are trying to generate the certificate for and then issues a certificate for the same. ACME can also be used to automate the process of verification and certificate issuance as well as certificate revocation. But don't worry if you didn't understand any of this as we won't be doing it on our own and the whole process will be automated using cert-manager.
Let's Encrypt is completely free of cost to use but the only issue is that it issues ssl certificates for a period of 3 months only and we have to renew the certificates manually after every 3 months but good news is certmanager handles the automatic renewal part pretty swiftly.
What is Cert Manager
Cert-Manager adds certificates and certificate issuers as resource types in a Kubernetes clusters, and simplifies the process of obtaining, renewing and using those certificates.
It can issue certificates from a variety of supported sources, including Let’s Encrypt, HashiCorp Vault, and Venafi as well as private PKI. You can also see the list of supported issuers here
It will ensure certificates are valid and up to date, and attempt to renew certificates at a configured time before expiry. The default time to renew certificates is 30 days before the expiry date.
How to use Certmanager with Kubernetes
To use certmanager in a Kubernetes cluster, we need to install it first and for that we will use it's helm chart. Helm is a package manager for Kubernetes. Helm is the best way to find, share, and use software built for Kubernetes. Now, to deploy using Helm, we have 2 options - either go with Helm CLI or use a GUI dashboard and we are going to do it both ways.
Setup Certmanager using Helm CLI
Make sure you have your Kubernetes cluster ready and it is accessible using kubectl. After that follow the given steps to setup cert-manager on Kubernetes cluster
- Download and Install Helm in your system/bastion.
- Add jetstack helm repository
helm repo add jetstack https://charts.jetstack.io
- Install cert-manager helm chart from the above repository in namespace
cert-manager
helm install cert-manager jetstack/cert-manager --namespace cert-manager --create-namespace --set installCRDs=true
- Certmanager setup is completed now, you can confirm the pods running in cert-manager namespace
kubectl get po -n cert-manager
Setup Certmanager using Devtron
Kubernetes itself doesn't have any advanced GUI but a very basic one. So, I will be using Devtron for it.
What is Devtron
Devtron is an opensource web based CI/CD platform that caters and supports end-to-end software delivery workflow for Kubernetes. It can be used for the deployment of your applications over Kubernetes through simple configurations with a user-intuitive dashboard. Devtron is a full-fledged solution for Kubernetes with various integrations built-in for monitoring, access-management, DevSecOps etc. Some of the most important features of devtron includes:
- End-to-end CI-CD solution for Kubernetes
- Multi Cluster / Multi Cloud Support
- Hierarchical Security Policy
- Helps to achieve GitOps at scale
- Visualization of Deployment Metrics and Application Metrics
- SSO enabled Role based Access Management
- Cost Optimization
- Centralized Caching for CI
Devtron makes your life super easy even if you are new to kubernetes space. For setup instructions and more visit devtron docs
Add Jetstack helm chart repository on Devtron
To add any helm chart repository on devtron, follow the given steps
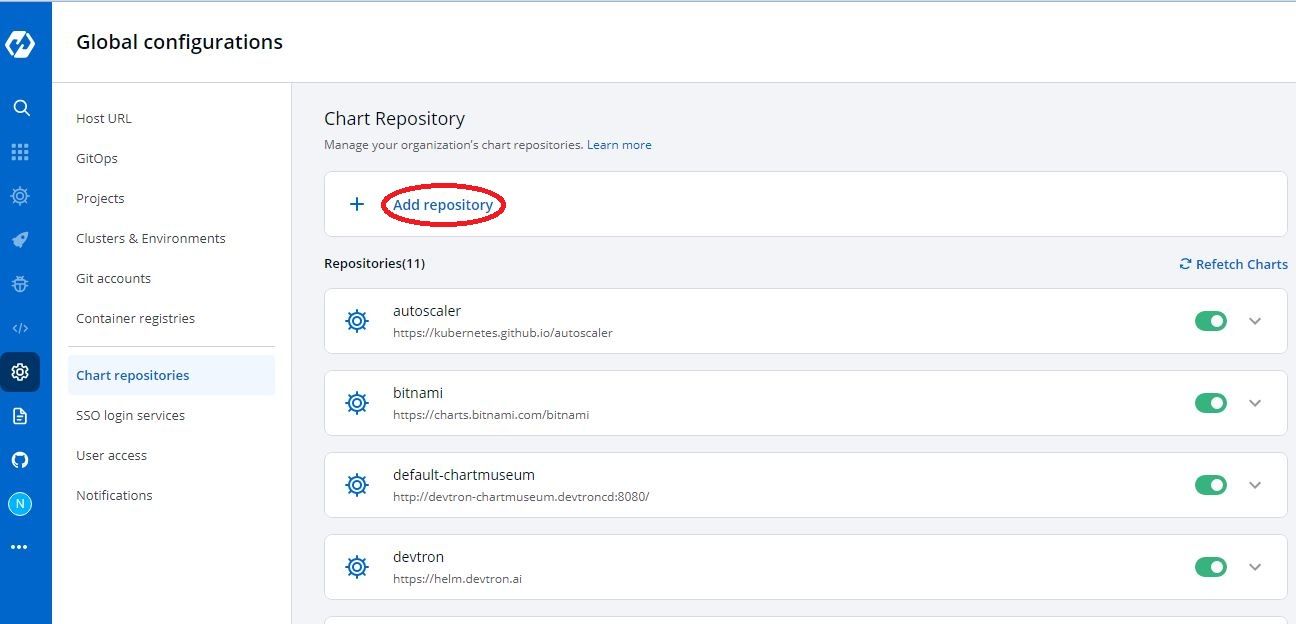
- Click on Global Configurations > Chart repositories > Add repository
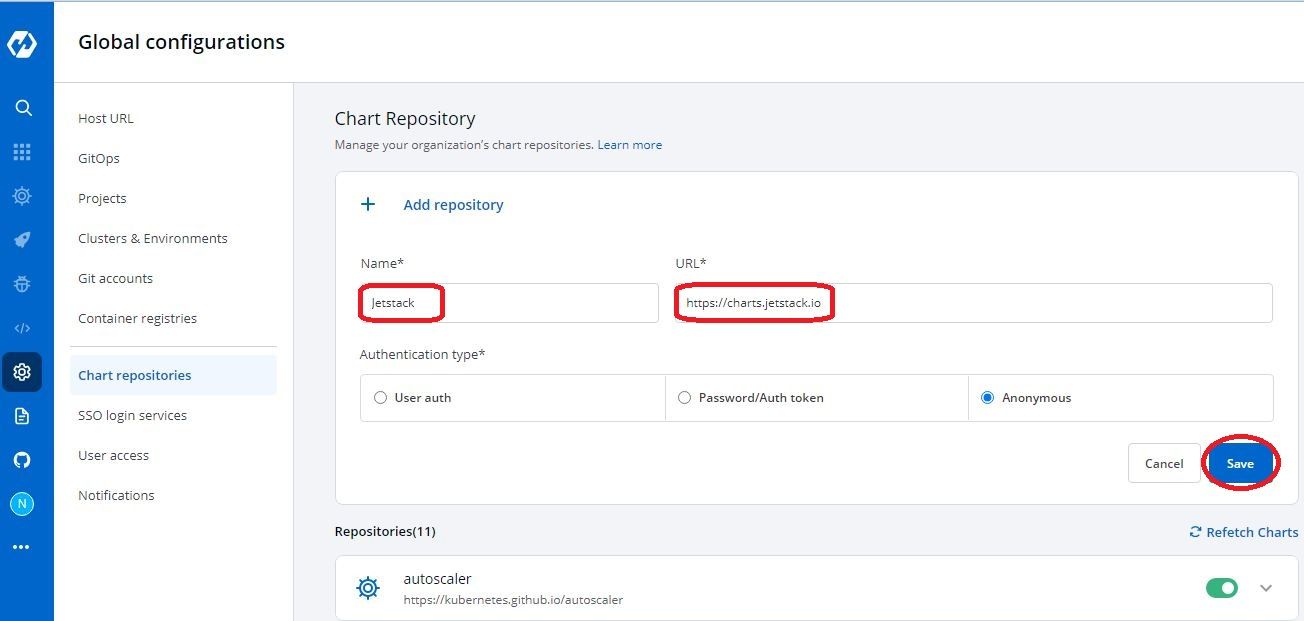
- Enter repository name - In our case it will be
jetstack - Enter repository url - In our case it will be
https://charts.jetstack.io - Click Save
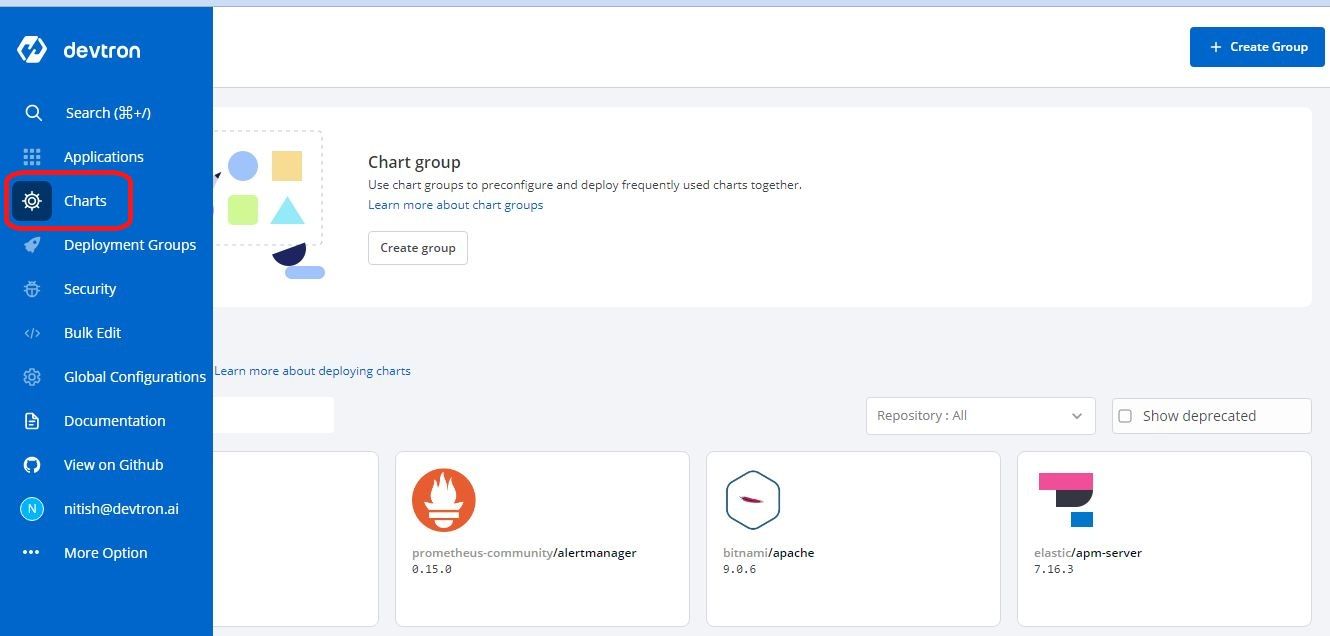
Wait for 3-4 minutes for the charts to sync depending upon the number of charts in the repository and you'll be able to see all the charts in the repository that we added in Charts section
Install certmanager chart using Devtron
To deploy a helm chart through devtron, steps are as following
- Click on Charts > Discover
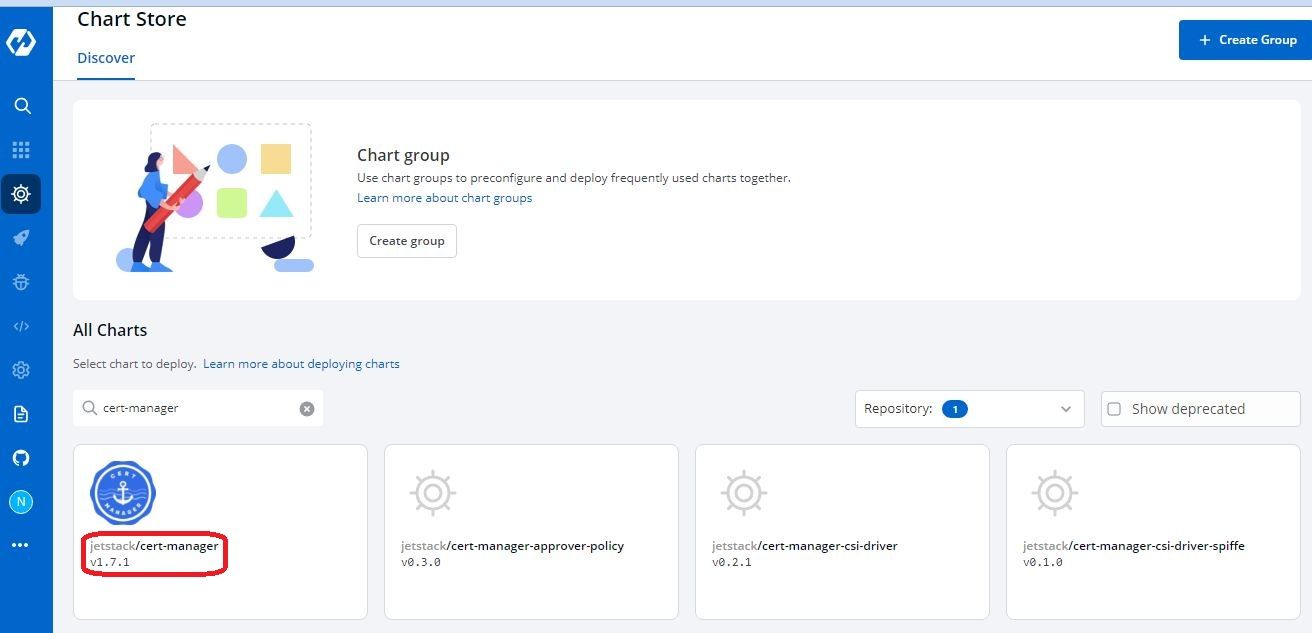
- Apply repo filter such as
jetstackto get all the charts inside this repo or directly search for the chart that you need to deploy - In our case it will becert-manager
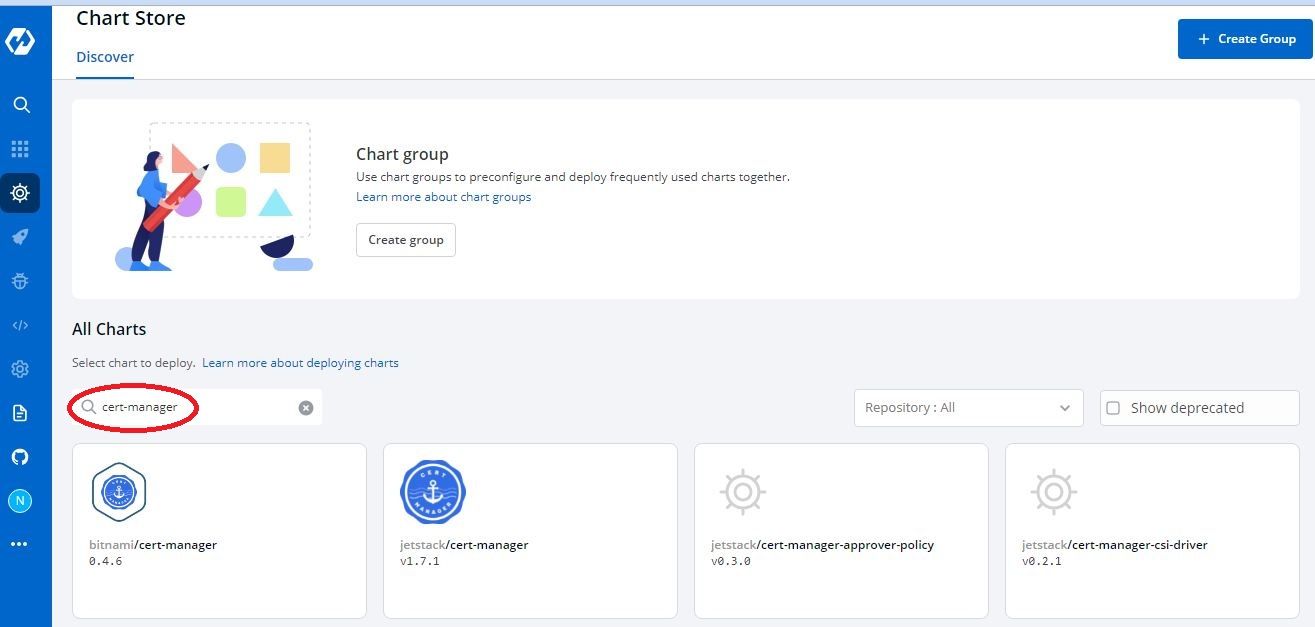
- Click on
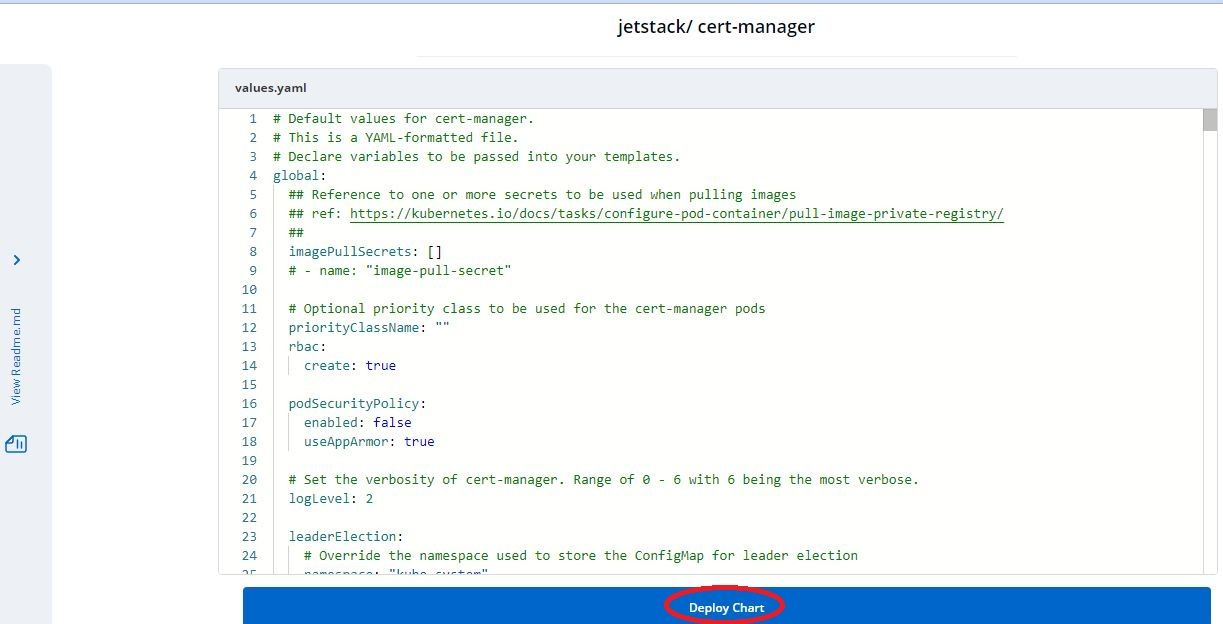
jetstack/cert-managerand then click deploy
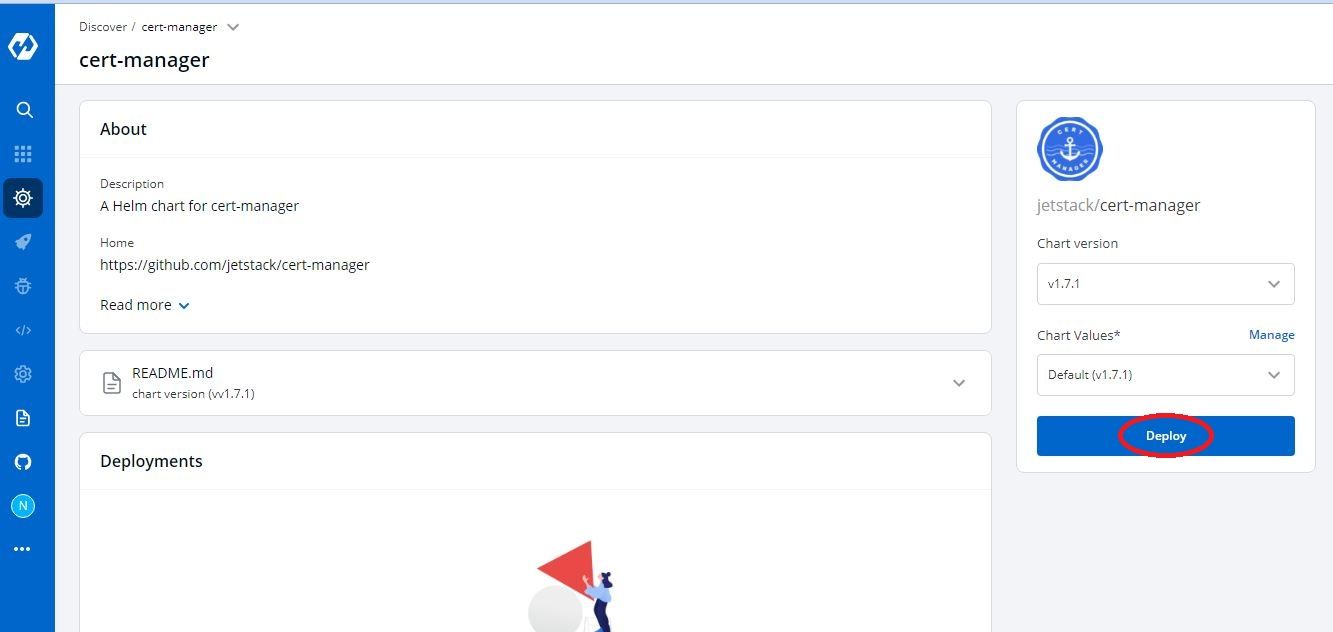
- It will open the values.yaml file directly for you to edit before deployment
- Give it a name like
certmanager - Select a Project to use for deployment - a Project is like a name of team. You can either create a new Project in Global Configurations > Projects or use the default one which is devtron-demo
- Select an environment in which you want to deploy the chart - Environment directly maps to a namespace in a Kubernetes cluster. Here also, you can either create a new env or use the default devtron-demo
- Select chart version and values from other deployments/versions if already there
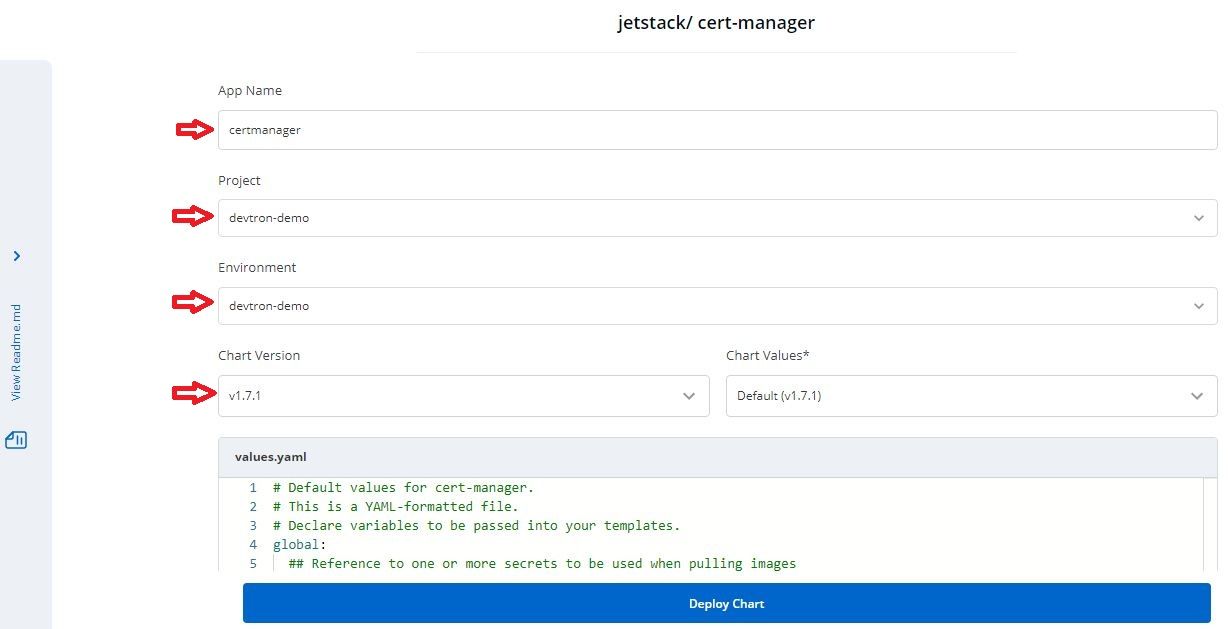
- Change in values whatever you need to as in our case we have to set
installCRDsto true and then click Deploy Chart
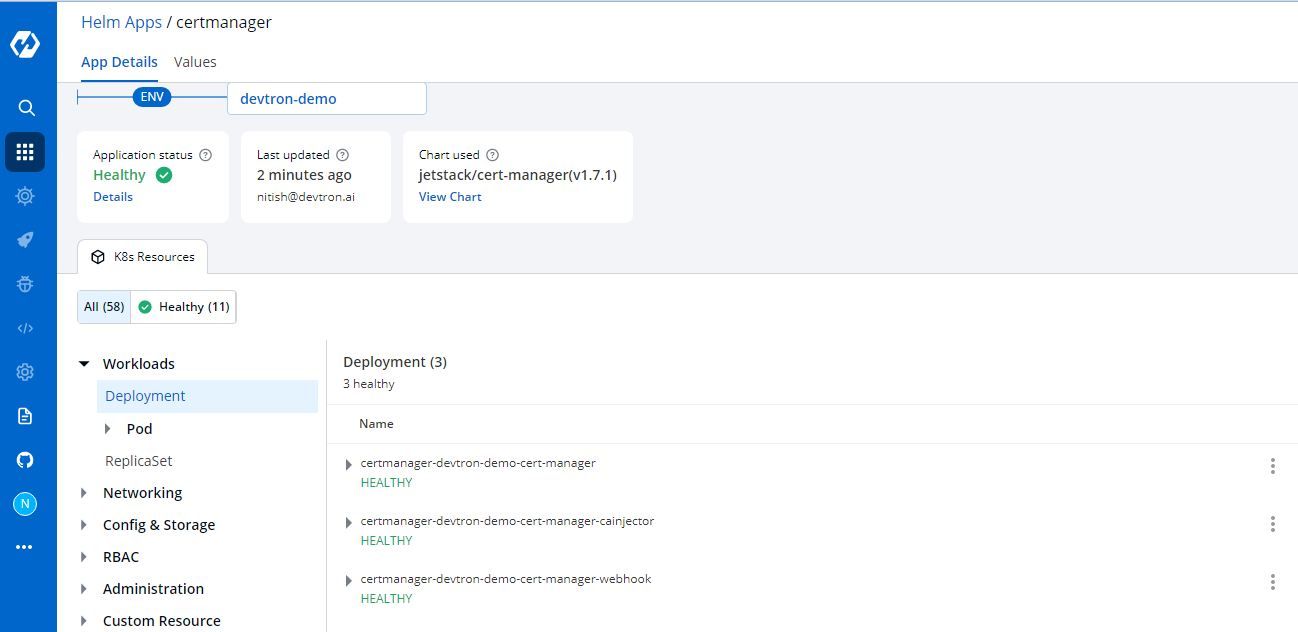
Wait for a few minutes until the status is healthy and you'll see the list of resources deployed by the chart like some pods, services, configmaps etc.
Setup Certificate Issuer
Now that we have our cert-manager successfully deployed in the cluster, we need to create a certificate issuer which will issue ssl certificates for our domain names or subdomains and then cert-manager will keep track of it which certificates are issued and up to date, which certificates needs to be renewed etc.
Issuers are of 2 types mainly - Cluster level issuers called clusterissuer or simply issuer which is restricted to a namespace in which it is created. I personally prefer to create clusterissuer which eliminates the headache to maintain multiple issuers and both the issuer types are quite customizable so, we won't face any issue with it. To know more on issuers, visit here
Create Clusterissuer using CLI
For the timing we'll create an ingress based clusterissuer which will issue certificates for subdomains specific to your host that you mention in the ingress resource. We'll update the same clusterissuer in the next part where we'll generate a wildcard certificate and it globally for all the ingress resources. So, let's begin
- Run the following command to create a clusterissuer
cat <<EOF | kubectl create -f -
apiVersion: cert-manager.io/v1
kind: ClusterIssuer
metadata:
 name: letsencrypt-staging
spec:
 acme:
   # You must replace this email address with your own.
   # Let's Encrypt will use this to contact you about expiring
   # certificates, and issues related to your account.
   email: user@example.com
   server: https://acme-staging-v02.api.letsencrypt.org/directory
   privateKeySecretRef:
     # Secret resource that will be used to store the account's private key.
     name: example-issuer-account-key
   # Add a single challenge solver, HTTP01 using nginx
   solvers:
   - http01:
       ingress:
         class: nginx
EOF
What's there:
- letsencrypt-staging - Name of clusterissuer
- http01 Solver - It will create a job which will verify that the domain is live and you are the owner using ACME
- ingress class - Class name that you have setup in your ingress controller. I have given the default class nginx in the yaml, you can change it accordingly if you have setup some other class in the controller
For more http01 options, refer to the doc
Create Clusterissuer using Devtron
In case of Devtron as you have only a GUI interface, you can't use kubectl to apply a yaml resource. For this, they have provided a generic chart where you can specify the yaml and it will be deployed in the cluster.
- Go to Charts > Discover and search for
generic
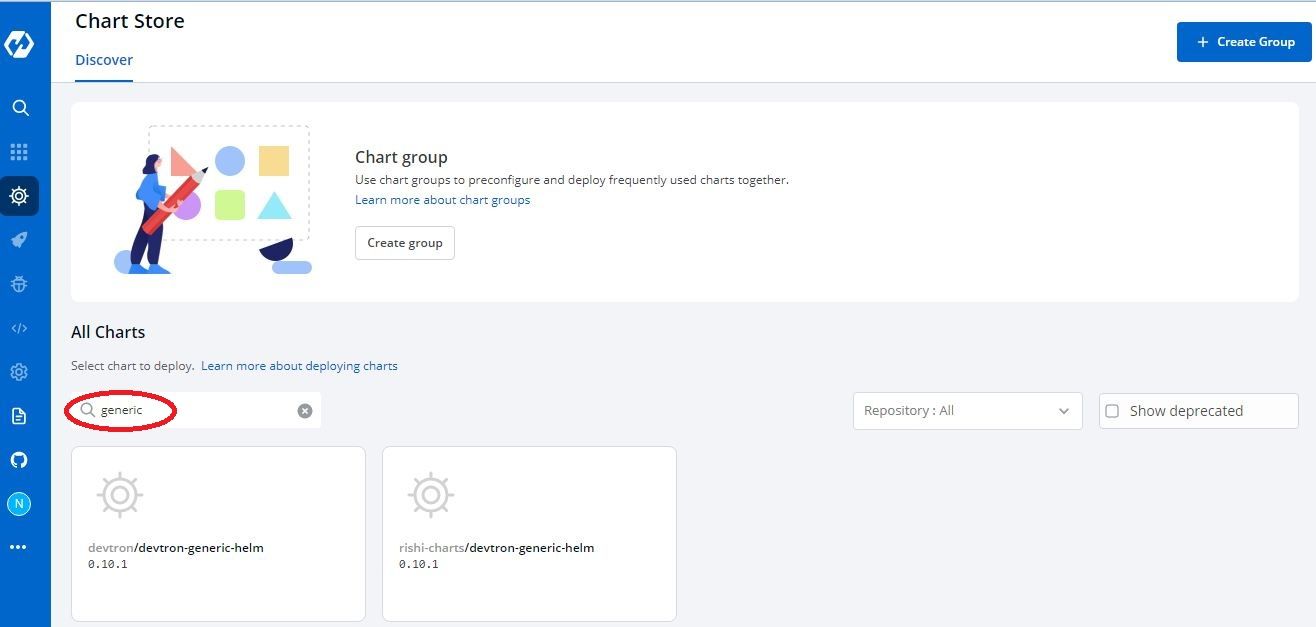
- Select
devtron-charts/devtron-generic-helmand click on Deploy

- Enter a name -
letsencrypt-staging, select a project and environment

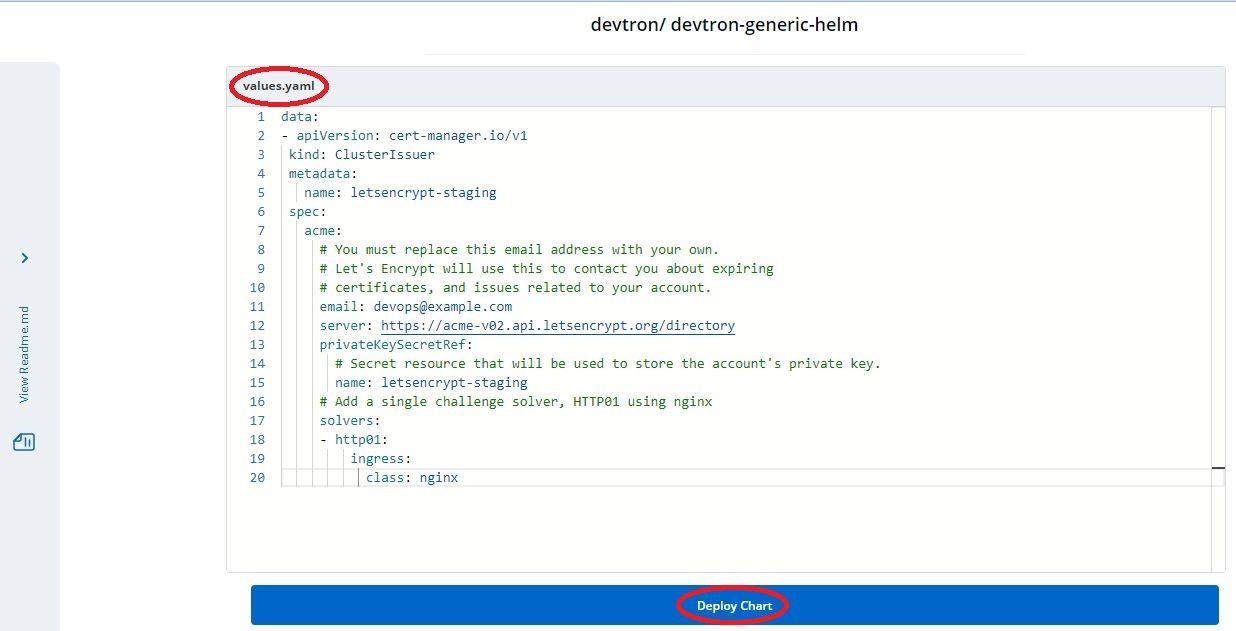
- Enter the yaml in values in the format given below
data:
- apiVersion: cert-manager.io/v1
  kind: ClusterIssuer
  metadata:
    name: letsencrypt-staging
  spec:
    acme:
      # You must replace this email address with your own.
      # Let's Encrypt will use this to contact you about expiring
      # certificates, and issues related to your account.
      email: devops@example.com
      server: https://acme-v02.api.letsencrypt.org/directory
      privateKeySecretRef:
       # Secret resource that will be used to store the account's private key.
        name: letsencrypt-staging
      # Add a single challenge solver, HTTP01 using nginx
      solvers:
      - http01:
          ingress:
            class: nginx
- Click on Deploy Chart and wait until you see the status as healthy
Our clusterissuer is successfully setup and you can verify it using the command
kubectl describe clusterissuer letsencrypt-staging | egrep "Message|Status|Type"
and it should return the following response
Status:
   Message:               The ACME account was registered with the ACME server
   Status:                True
   Type:                  Ready
Generate the SSL Certificate using Ingress
For creating an ingress resource, you need to have ingress controller setup in your kubernetes cluster. To setup ingress controller, you can use the helm chart of nginx-ingress.
Installing Ingress Controller
For installing nginx ingress controller helm chart using CLI you can follow the official documentation from nginx but it becomes really easy when you use a GUI for it. Devtron comes pre-setup with nginx helm charts repository, so you just need to search for nginx in Charts > Discover section and select nginx-ingress/ingress-nginx chart and Click on Deploy.
You just have to edit some values however you want on the spot and deploy it directly in the cluster. Make sure that https port is forwarded to https or port 443 only and not http or port 80 as we do in case of using certificate identity from AWS or other cloud providers and this annotation is set on service of controller
service.beta.kubernetes.io/aws-load-balancer-backend-protocol: (https|http|ssl|tcp)
Creating an Ingress using CLI
Make sure that the host for which you are trying to generate the certificate is already mapped to the ingress controller loadbalancer in your DNS before creating the ingress because as soon as we create the ingress resource, it will start trying to verify that the host is working and it's live.
To create an ingress with command line interface using kubectl, run the given command:
cat <<EOF | kubectl create -f -
apiVersion: networking.k8s.io/v1
kind: Ingress
metadata:
 annotations:
   cert-manager.io/cluster-issuer: letsencrypt-staging
   nginx.ingress.kubernetes.io/force-ssl-redirect: "false"
   nginx.ingress.kubernetes.io/ssl-redirect: "true"
 name: demo-ingress
 namespace: devtron-demo
spec:
 ingressClassName: nginx
 rules:
   - host: demo.example.com
     http:
       paths:
         - backend:
             service:
               name: demo-service
               port:
                 number: 80
           path: /
           pathType: ImplementationSpecific
 tls:
   - hosts:
       - demo.example.com
     secretName: demo-service-tls
EOF
What's going on:
- letsencrypt-staging - Name of clusterissuer which will issue certificate
- host - Subdomain for which you are trying to issue the certificate. This method cannot provide certificate for root domain like example.com or wildcard certificate like *.example.com
- ingressClassName - Class name that you have setup in your clusterissuer as well as ingress controller.
- secretName - After the certificate is issued, it will store the certificate and key in that secret inside kubernetes cluster which will be used whenever someone try to visit the host url to server https requests.
Creating an Ingress using GUI
Now Devtron has a pre-defined deployment template whenever you create an application for deployment in Kubernetes cluster where you just need to edit some of the values like port number on which your application works and some basic parameters like resources for the app. For detailed instructions on how to deploy an app using Devtron - You can watch this youtube video on official channel of Devtron.
In the same deployment template, you get a section for creating ingress. Edit that section as following:
ingress:
   annotations:
       cert-manager.io/cluster-issuer: letsencrypt-staging
       nginx.ingress.kubernetes.io/force-ssl-redirect: "false"
       nginx.ingress.kubernetes.io/ssl-redirect: "true"
   className: "nginx"
   enabled: true
   hosts:
       - host: demo.example.com
         pathType: ImplementationSpecific
         paths:
             - /
   tls:
   - hosts:
       - demo.example.com
     secretName: demo-service-tls
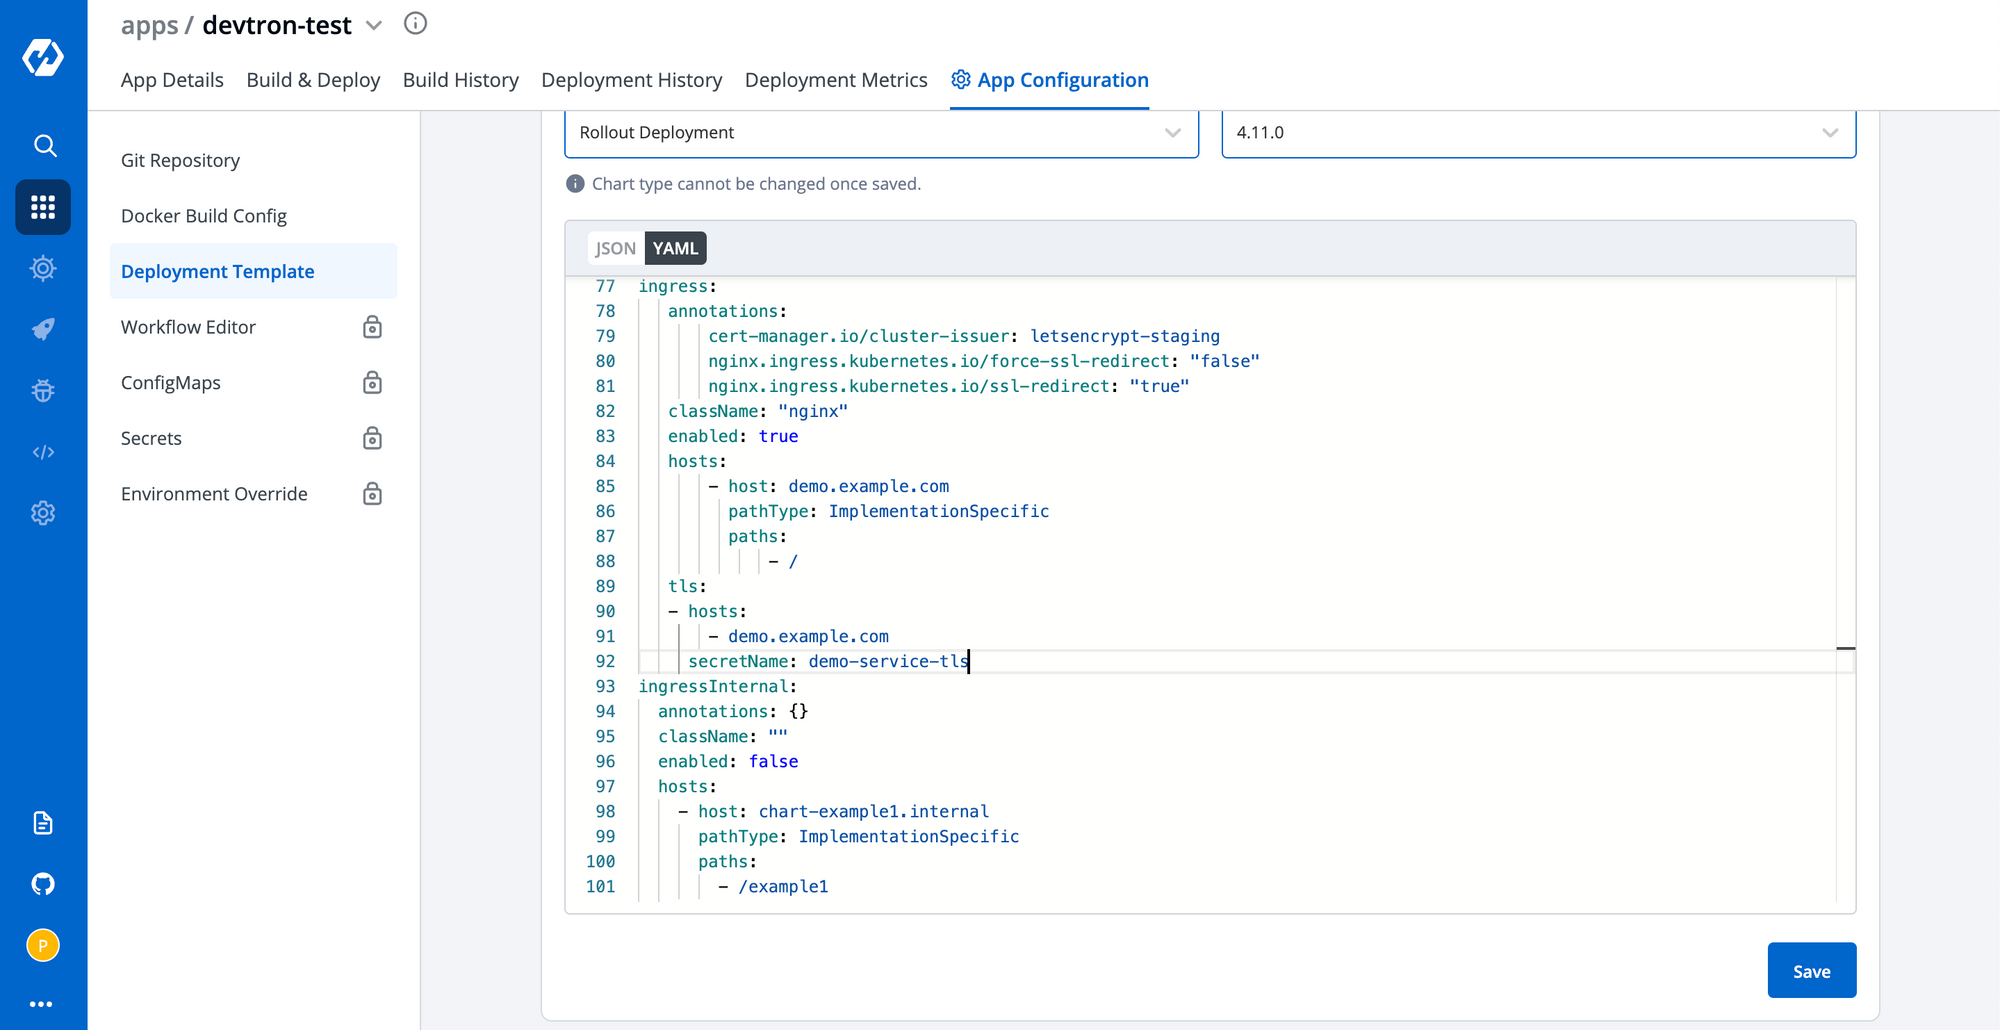
Trigger the deployment after saving the changes in deployment template.
Verify the SSL Certificate
As soon as the ingress with cert-manager annotation and tls secretName is created, letsencrypt ACME resolver will start verifying that the domain is pointing to right loadbalancer and it's live. It will create a resource named CertificateRequest which will request for certificate issuance which in turn creates an Order resource. Order resources are used by the ACME issuer to manage the lifecycle of an ACME ‘order’ for a signed TLS certificate. Order creates a Challenge resource which are used by the ACME issuer to manage the lifecycle of an ACME ‘challenge’ that must be completed in order to complete an ‘authorization’ for a single DNS name/identifier. More details on ACME orders and domain validation can be found on the Let’s Encrypt website here.
As a user, you won't have to worry about anything as everything is managed by cert-manager itself and as soon as everything is completed, you can verify the status of certificate. To verify using cli, run the command
kubectl describe certificate demo-service-tls -n devtron-demo | egrep "Message|Status|Type"
Don't forget to change the namespace with the namespace where you have deployed the ingress because certificates are stored and accessible in that particular namespace only.
The command should return the following response
Status:
   Message:               Certificate is up to date and has not expired
   Status:                True
   Type:                  Ready
To verify the status on Devtron - Just check if the resource Certificate in the app under Custom Resource is showing healthy or not. If healthy, that means Certificate is
successfully issued and stored in the secret. You can also hover on the Certificate and click on Manifest to check the status given above at the end of Certificate Manifest.
After that your host will be successfully accessible on https without any warnings using an ssl certificate from an authorized issuer and Certmanager with automatically keep a check on when to renew the certificate. It will automatically renew the certificates issued by it before 1 month of expiry so it's kind of lifetime free ssl certificate for you and you don't have to worry about anything.
Sharing the Certificate across namespaces
To share the certificate between different namespaces or multiple clusters, just export the secret from this namespace using
kubectl get secret demo-service-tls -n devtron-demo -o yaml > demo-tls-secret.yaml
and apply the same in other namespace or cluster
kubectl apply -f demo-tls-secret.yaml -n new-namespace
this new namespace can be in the same cluster or different also but it will work with the ingress of same host as you'll just have to give the reference to ingress resource in the tls section as shown in above example but don't use cert-manager annotation.
I hope you got some idea about how SSL certificate generation works in Kubernetes and how things work with cert-manager, ingress and how easily you can perform all these by using Devtron's intuitive dashboard. In the next part, we'll cover DNS based SSL certificate generation and that too a wildcard one which can be used directly in any ingress or can be directly integrated with ingess controller. You won't even need to use a LoadBalancer as it can also be used on NodePort as it will be a wildcard certificate. Till then, do share the article with your friends and colleagues so that they can also enjoy a free lifetime SSL certificate without having to worry about it's renewal.
FAQ
How can I get a free SSL certificate for Kubernetes Ingress using Let’s Encrypt?
You can get a free SSL certificate for your Kubernetes Ingress by integrating Let’s Encrypt with Cert-Manager. Cert-Manager automates the process of issuing and renewing certificates using the ACME protocol. Once set up, it handles domain verification and certificate management for HTTPS access.
What is Cert-Manager in Kubernetes and why should I use it?
Cert-Manager is a Kubernetes add-on that automates the management and renewal of TLS certificates from providers like Let’s Encrypt. It simplifies security by automatically issuing and updating certificates, making your Kubernetes applications secure with minimal manual effort.
How do I install Cert-Manager using Devtron or Helm CLI?
To install Cert-Manager using Helm CLI, add the Jetstack repo and run the Helm install command with installCRDs=true. On Devtron, add the Jetstack chart repository via the dashboard and deploy the cert-manager chart from the Charts section with the necessary configurations.
How do I create a ClusterIssuer and use it to generate SSL certificates in Kubernetes?
To create a ClusterIssuer, define an ACME-based resource using YAML and apply it via kubectl or Devtron’s generic chart. Then, annotate your Ingress resource with the issuer name, and Cert-Manager will automatically issue and renew the SSL certificate for the domain you specify.