In the modern era of software development, organizations want to deploy and scale their applications to users globally. Kubernetes has emerged as the de facto solution for deploying and scaling application containers. When an organization makes the shift to Kubernetes, there is one critical decision that has to be made. Whether to use a managed Kubernetes cluster such as EKS, or self-host and manage your own Kubernetes cluster, while using a managed cluster is the easier choice, self-hosting a Kubernetes cluster can have its benefits as you own the entire Kubernetes infrastructure. Self-hosting a Kubernetes cluster can be easy initially, but it requires deep technical expertise to manage the Kubernetes cluster and perform regular maintenance activities.
While managed Kubernetes offerings like Amazon EKS or Google GKE promise ease of use and robust SLAs, many organizations value having full control over their infrastructure. They want the flexibility to customize every layer of their tech stack, optimize costs, and maintain data sovereignty. kOps is an open-source tool for creating and managing production-grade Kubernetes clusters on various cloud providers.
In this blog, you will learn how kOps helps organizations create their own self-hosted Kubernetes cluster. You will also learn how to create your own production-grade cluster and explore some of the key considerations and challenges while creating a cluster. We'll guide you through setting up a production-grade cluster, highlighting the considerations, challenges, and benefits of using kOps for self-hosted Kubernetes.
What is kOps?
kOps, also known as Kubernetes Operations, is an open-source tool designed to simplify the creation, management, and operation of Kubernetes clusters. kOps is a powerful utility for creating production-grade Kubernetes clusters without having to perform a lot of manual and repetitive steps. It provides automation for provisioning clusters on various cloud platforms like AWS, GCP, and DigitalOcean, as well as for deploying on bare metal and your own infrastructure.
kOps is most widely used to create self-managed Kubernetes clusters on GCP and AWS. It helps you to create, destroy, upgrade, and maintain highly available clusters that are meant for production environments as well as provision the required infrastructure.
Benefits of kOps
Creating Kubernetes clusters using kOPS has several benefits as compared to managing Kubernetes clusters with other tools such as Kubeadm. Some of the advantages of using kOps for creating clusters are:
- Automate infrastructure provisioning for the Kubernetes cluster on AWS and GCP
- Easily create a highly available cluster across the same or different regions.
- Provides rolling upgrades for the Cluster to ensure zero downtime
- CLI autocompletion
- Generates configurations for Terraform and AWS CloudFormation
- Easily manage cluster add-ons such as AWS Load Balancers, Cluster Autoscalers, Cert Manager, and more. You can even create and use custom addons.
- Create instance groups for supporting heterogeneous Kubernetes clusters
- Supports state-sync model
Managed Clusters vs Self-Hosted Clusters
Before moving on to using kOps to provision and operate a production cluster, it is important to understand the key benefits and disadvantages of using a managed cluster and a self-hosted cluster. Understanding these differences will help you make the correct decision on how you wish to host your production clusters.
The choice between a managed Kubernetes cluster and a self-hosted Kubernetes cluster often hinges on an organization’s priorities for control, cost, and operational complexity. Both approaches serve the same purpose of running containerized applications at scale, but differ significantly in how they are set up and managed.
Managed Kubernetes Clusters (EKS, AKS, GKE)
In a managed Kubernetes cluster, a cloud provider such as AWS, Google Cloud, or Azure handles most of the operational responsibilities. These include provisioning the control plane, managing cluster upgrades, ensuring high availability of the cluster, and integrating with the cloud provider’s ecosystem for monitoring, scaling, storage, and networking. When using a managed Kubernetes cluster, you typically only need to worry about configuring and managing the worker nodes, workloads, and application configurations.
Managed Kubernetes clusters simplify the complexities of running Kubernetes by offloading much of the operational burden to a cloud provider or service. These services handle critical tasks like control plane provisioning, upgrades, patching, and ensuring high availability. This allows development and DevOps teams to focus more on application development rather than infrastructure management. Managed clusters also come with built-in integrations for crucial services, such as load balancers, storage, and monitoring tools, enabling faster deployments with minimal configuration. Additionally, they often include robust SLAs, ensuring high uptime and reliability for production workloads. This ease of use and reliability make managed Kubernetes ideal for organizations seeking quick time-to-market and streamlined operations without investing heavily in Kubernetes expertise.
Despite the benefits of managed Kubernetes clusters, they also have certain shortcomings. Cloud providers enforce constraints on certain configurations, which can be restrictive for specialized workloads or advanced use cases. Managed clusters also come at a premium cost, as providers charge for the operational support and convenience they offer, which may not suit cost-sensitive projects. Running a managed Kubernetes cluster can also create vendor lock-in, making it challenging to migrate workloads or adopt a multi-cloud strategy. The abstraction provided by managed clusters can obscure the underlying infrastructure, making troubleshooting and performance optimization less transparent and more dependent on the provider's tools.
Self-hosted Kubernetes clusters
In a self-hosted cluster, the organization takes full responsibility for provisioning, managing, and maintaining both the control plane and the worker nodes. Tools like kOps, kubeadm, and Kubespray are used to deploy and manage the cluster, either on-premises or in the cloud.
Self-hosted Kubernetes clusters offer a lot of flexibility and control compared to managed Kubernetes clusters. This can be ideal for organizations that want to have full control of their infrastructure and everything running on it. By managing both the control plane and worker nodes, every aspect of the cluster can be customized such as the networking plugins, security policies, storage backends, and monitoring tools. This level of customization allows for optimized configurations that can improve performance and cost efficiency, especially for large-scale or complex deployments. Additionally, self-hosted clusters avoid vendor lock-in, offering the freedom to deploy on any infrastructure, whether on-premises, in a private cloud, or across multiple public clouds. You can also create a hybrid or multi-cloud strategy by deploying a cluster on VMs across different cloud providers.
Self-hosting the Kubernetes clusters also comes with its own set of challenges. Managing the entire cluster lifecycle, including provisioning, scaling, and upgrades, requires deep Kubernetes expertise and dedicated teams and may lead to operational overhead. This operational overhead can slow down deployments and increase the risk of misconfigurations or downtime. Ensuring high availability and disaster recovery also demands careful planning and additional infrastructure, which can be resource-intensive. Self-hosted clusters place the burden of security entirely on the organization, requiring careful management of certificates, encryption, and access controls. These complexities can make self-hosted Kubernetes less appealing for smaller teams or organizations without robust DevOps capabilities.
Installing kOps
To install kOps, you can run a simple curl command to install the kOps binary. The below command will install the kOps CLI, and you will be able to use it locally.
curl -Lo kops https://github.com/kubernetes/kops/releases/download/$(curl -s https://api.github.com/repos/kubernetes/kops/releases/latest | grep tag_name | cut -d '"' -f 4)/kops-linux-amd64

chmod +x kops

sudo mv kops /usr/local/bin/kops
Once, you have the CLI installed, you can run the below command to ensure that kOps is installed and you can use it.
kops versionBasic kOps commands
Before we continue with bootstrapping the Kubernetes cluster on AWS EC2 instances, let’s first understand some of the essential kOps commands
Kops create
This command is used to create a resource. The resources that can be created are
- Cluster
- InstanceGroup
- Secret
For example, the following command can be used to create a Kubernetes cluster. There are more flags that are included in the command such as the number of nodes, cluster region, number of nodes
kops create cluster <cluster-name>
Kops update
This command is used to update the configuration of a cluster .
kops update cluster --name <cluster-name>Kops get
Used to get a particular type of resource. For example, you can get the list of all clusters created with kops using the below command
kops get clusterKops delete
This command deletes a specific cluster along with all of it’s cloud resources
kops delete cluster --name <cluster-name>Setting up a Production Kubernetes Cluster with AWS EC2 Instances
kOps can help you set up your Kubernetes cluster on AWS’s EC2 instances as well as on Google Cloud’s Compute instances. We will be setting up kOps on AWS EC2 instances.
Before getting started, please make sure that you have the following prerequisites:
- An AWS Account
- AWS CLI
- Kubectl
Step 1: Create IAM User & Roles
While creating a cluster, kOps will provision multiple EC2 instances which will act as nodes for the entire Kubernetes cluster. To allow kOps to provision the nodes, you will have to provide it with certain IAM roles.
After ensuring that you have the AWS CLI properly configured, you can run the below commands to create the IAM user for kops, and give it the required IAM Roles.
aws iam create-group --group-name kops

aws iam attach-group-policy --policy-arn arn:aws:iam::aws:policy/AmazonEC2FullAccess --group-name kops
aws iam attach-group-policy --policy-arn arn:aws:iam::aws:policy/AmazonRoute53FullAccess --group-name kops
aws iam attach-group-policy --policy-arn arn:aws:iam::aws:policy/AmazonS3FullAccess --group-name kops
aws iam attach-group-policy --policy-arn arn:aws:iam::aws:policy/IAMFullAccess --group-name kops
aws iam attach-group-policy --policy-arn arn:aws:iam::aws:policy/AmazonVPCFullAccess --group-name kops
aws iam attach-group-policy --policy-arn arn:aws:iam::aws:policy/AmazonSQSFullAccess --group-name kops
aws iam attach-group-policy --policy-arn arn:aws:iam::aws:policy/AmazonEventBridgeFullAccess --group-name kops

aws iam create-user --user-name kops

aws iam add-user-to-group --user-name kops --group-name kops

aws iam create-access-key --user-name kops
The above command will generate a new IAM account for kops, and also will generate a secret key. We want to use this secret key in future steps. You can add both values to a variable using the below command
export AWS_ACCESS_KEY_ID=$(aws configure get aws_access_key_id)
export AWS_SECRET_ACCESS_KEY=$(aws configure get aws_secret_access_key)
Step 2: Create a S3 Bucket
To store the state of the cluster and all its related configurations, we need to create an AWS S3 bucket in which kOps can store the configurations. We will call this bucket as kops-state-store. It is also recommended to version the S3 bucket in case you need to revert to a previous configuration. You can create this AWS S3 bucket using the below command.
aws s3api create-bucket \
--bucket kops-state-store \
--region us-east-1 \
--versioning-configuration Status=Enabled
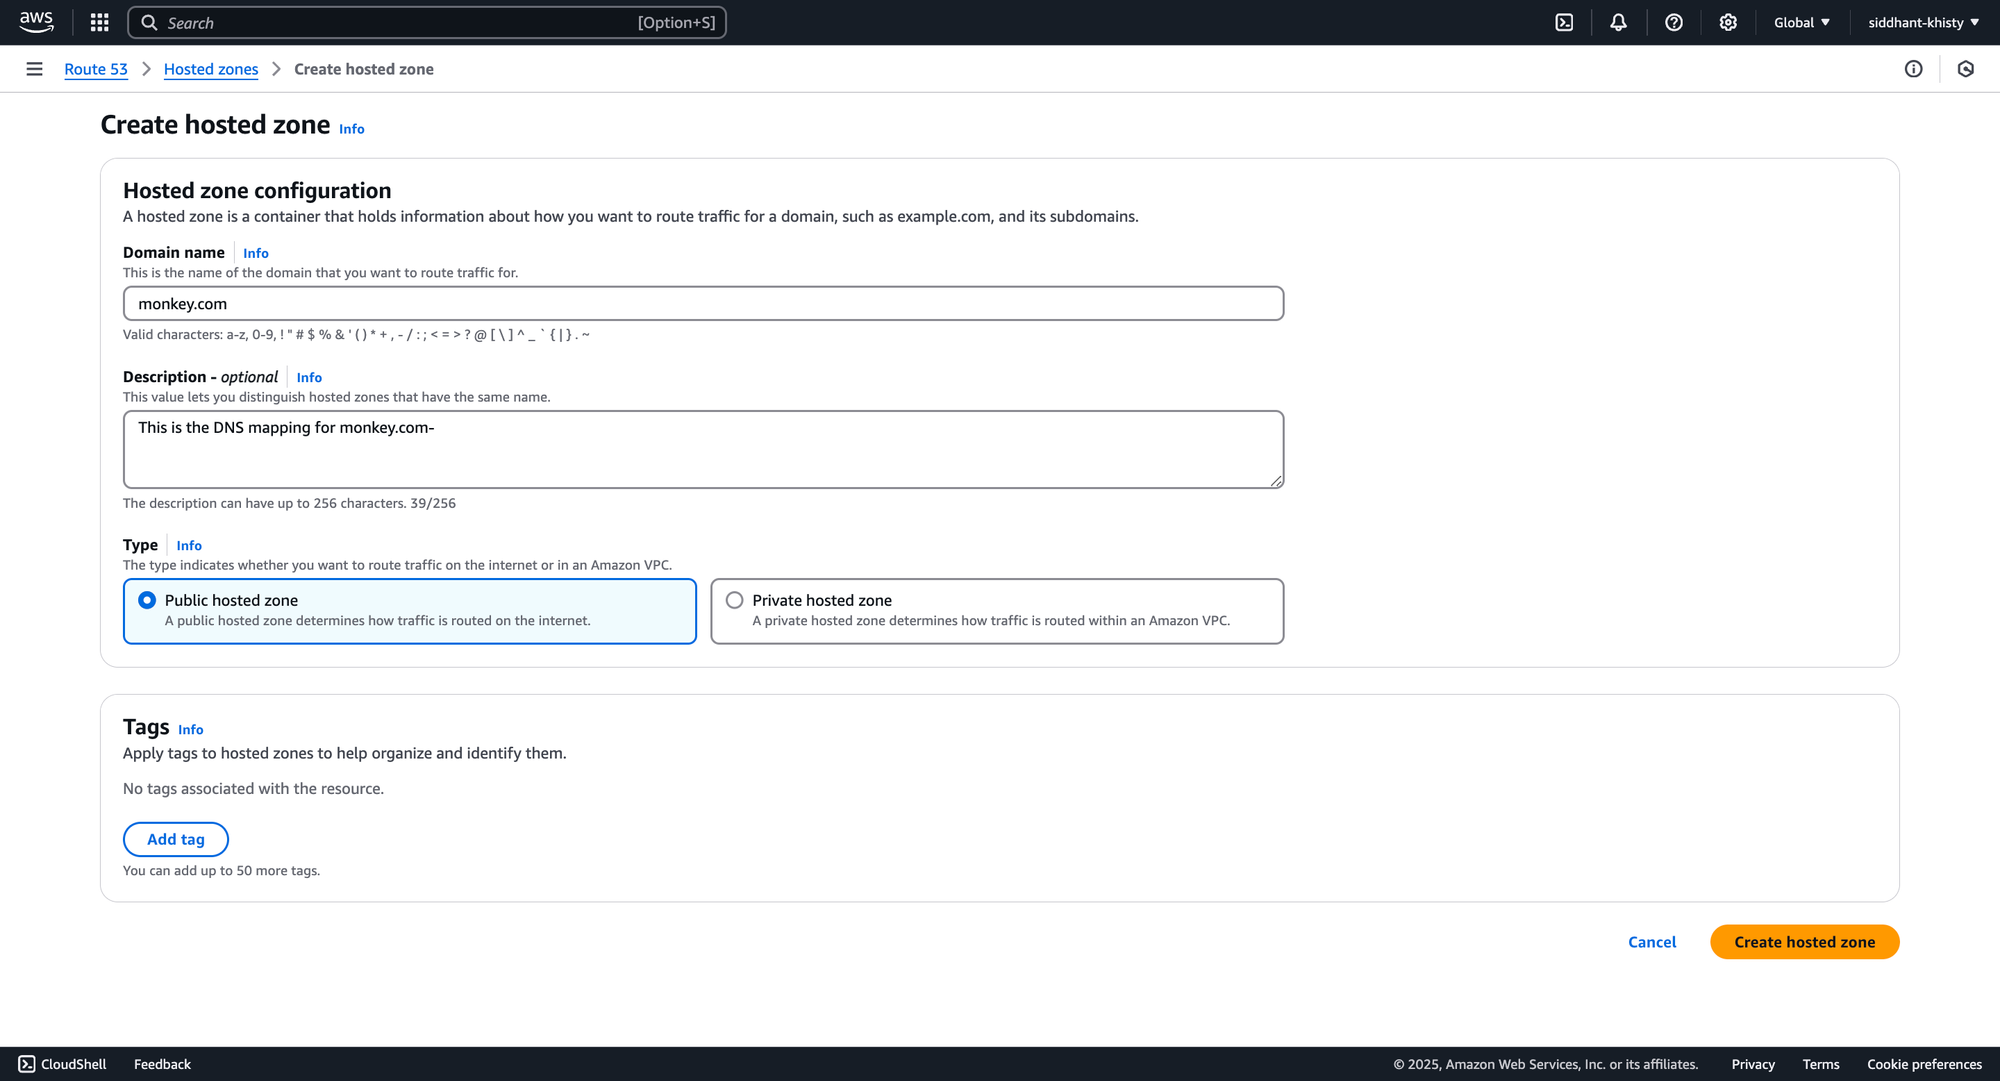
Step 4: Create the Route53 DNS Records
For running a Kubernetes cluster in production, you want to ensure that you have the DNS records configured properly. For this example, let us create a public hosted zone for Route53. We will be using the domain name as monkey.com
From the Route53 page, create a hostedzone with the type as public hosted zone for the VPC, and click on create.
Step 3: Preparing the YAML Manifests
For creating a cluster designed for production environments, it is a best practice to create declarative configurations. KOPS allows you to create and manage clusters in both imperative as well as declarative method. Let us create and configure the YAML manifest for creating the cluster.
kOps has two types of resources that can be used for configuring the Kubernetes cluster.
- Cluster: Contains the specification of the cluster itself. This is where you will set the cluster configurations.
- InstanceGroup: Represents a group of similar machines typically provisioned in the same availability zone. On AWS, instance groups map directly to an autoscaling group.
First, let us create the instance groups. Within a Kubernetes cluster, there are two types of nodes i.e the Control Plane node and the worker nodes. Let us create an instance group for both the type of nodes.
InstanceGroup for Control Plane Node
The control plane node contains the core components for running a Kubernetes cluster. To create the instance group for the Control Plane, we can use the following YAML manifest
apiVersion: kops.k8s.io/v1alpha2
kind: InstanceGroup
metadata:
  creationTimestamp: "2021-07-14T06:30:07Z"
  generation: 2
  labels:
    kops.k8s.io/cluster: monkey.com
  name: master-us-east-2a
spec:
  image: kope.io/k8s-1.17-debian-stretch-amd64-hvm-ebs-2020-11-19
  machineType: c5a.large
  maxPrice: "0.30"
  maxSize: 1
  minSize: 1
  nodeLabels:
    kops.k8s.io/instancegroup: master-us-east-1a
  role: Master
  subnets:
  - us-east-2a
Within the above Manifest, there are a couple of things that are happening
- The instanceGroup is called as
master-us-east-2a. We will be referencing this instance group in the Cluster configuration which will be created later. - The Kops image for the master node is being used
- A EC2 instance of type
c5a.largeis provisioned by this instance group. - At any given point of time, there will always be 1 Master node running. This can be defined using the
maxSizeandminSizefields. - This instanceGroup will be using the
us-east-2asubnet.
InstanceGroup for Worker Nodes
The Worker Nodes will contain the actual workloads for the Kubernetes cluster. All the application that you wish to run on Kubernetes will be deployed to the worker nodes. The instanceGroup for the worker nodes will be created using the following YAML manifest.
apiVersion: kops.k8s.io/v1alpha2
kind: InstanceGroup
metadata:
  creationTimestamp: "2021-07-14T06:30:07Z"
  generation: 2
  labels:
    kops.k8s.io/cluster: monkey.com
  name: nodes
spec:
  image: kope.io/k8s-1.17-debian-stretch-amd64-hvm-ebs-2020-11-19
  machineType: c5a.large
  maxPrice: "0.40"
  maxSize: 2
  minSize: 1
  nodeLabels:
    kops.k8s.io/instancegroup: nodes
  role: Node
  subnets:
  - us-east-2a
Within the above Manifest, there are a couple of things that are happening
- The instanceGroup is called as
nodesas we are using it for creating the worker node machines. We will be referencing this instance group in the Cluster configuration which will be created later. - The Kops image for the master node is being used
- A EC2 instance of type
c5a.largeis provisioned by this instance group. - At any given point of time, there will always be at least one worker node running. As demand is required, Kops will provision at most two worker nodes. This can be defined using the
maxSizeandminSizefields. - This instanceGroup will also be using the
us-east-2asubnet.
Cluster Configuration
Bringing the above two configurations together, we can now create the cluster resource which will be used by KOPS to create the cluster using EC2 instances. We will also be referencing the above created InstanceGroups for defining the type of machines to use for the worker node and the master node.
The below configuration can be used for creating the cluster resource. We will take a look at everything that is happening in the below manifest.
apiVersion: kops.k8s.io/v1alpha2
kind: Cluster
metadata:
  creationTimestamp: "2021-07-14T06:30:07Z"
  name: monkey.com
spec:
  api:
    loadBalancer:
      type: Public
  authorization:
    rbac: {}
  channel: stable
  cloudProvider: aws
  etcdClusters:
  - cpuRequest: 200m
    etcdMembers:
    - instanceGroup: master-us-east-2a
      name: a
    memoryRequest: 100Mi
    name: main
  - cpuRequest: 100m
    etcdMembers:
    - instanceGroup: master-us-east-2a
      name: a
    memoryRequest: 100Mi
    name: events
  iam:
    allowContainerRegistry: true
    legacy: false
  kubelet:
    anonymousAuth: false
  kubernetesApiAccess:
  - 0.0.0.0/0
  kubernetesVersion: 1.17.17
  networkCIDR: 172.20.0.0/16
  networking:
    kubenet: {}
  nonMasqueradeCIDR: 100.64.0.0/10
  sshAccess:
  - 0.0.0.0/0
  subnets:
  - cidr: 172.20.32.0/19
    name: us-east-2a
    type: Public
    zone: us-east-2a
  topology:
    dns:
      type: Public
    masters: public
    nodes: public
Let's take a look at the cluster's configuration that is defined in the above manifest file.
- A Public AWS Load Balancer is provisioned for this Kubernetes cluster.
- Using the
cloudProviderfield, we are defining that the cluster is being created on AWS. - We are defining the system resource limits for the
etcdClusterand theetcdMembersand also defining the InstanceGroup that should be used for them. As the etcd is a component of the master node, the InstanceGroup which we created for the master node is being used. - We are configuring the other required Kubernetes resources such as the kubelet, API server, and networking configurations.
We can save all the above configurations in a single file called as cluster-setup.yaml
Step 4: Create the Kubernetes Cluster with KOPS
Before creating the Kubernetes cluster with kOps you need to define the environment variables. The KOPS CLI required the name of the cluster as well as the URL of the S3 bucket which we created earlier. As the Cluster Name is already defined in the above manifest, we only need to add the environment variable for the S3 bucket. The S3 bucket which we created in the previous step was called as kops-state-store. We can go ahead and export the variables using the below command.
export KOPS_STATE_STORE=s3://kops-state-store
ssh-keygen commandTo start the cluster creation process, you can use the following command to use the above YAML manifests for creating the cluster. Please ensure that you have updated the manifest files according to your requirements before running the command.
kops apply -f cluster-setup.yamlWe also need to generate a secret key for authentication to the cluster. You can generate the required secret using the below command.
kops create secret --name monkey.com sshpublickey admin -i ~/.ssh/id_rsa.pubFinally, you can run the below command to update the cluster's configuration
kops update cluster monkey.com --yes Step 4: Validate the cluster
After waiting for a few minutes, you can run the below command to get a list of all the nodes that are a part of the Kubernetes cluster
kops get nodeskOps also provides you with a useful validation tool. This tool ensures that the kOps cluster is running successfully, and all of its components are working as expected. We can run the validation command for a certain time frame. The below command will run the validation command for 10 minutes within which the cluster should be in a healthy state.
kops validate cluster --wait 10mCluster Management with Devtron
After the cluster has been created, there are still some challenges associated with managing it. These complexities can be eliminated by using a robust Kubernetes dashboard which can provide visibility across multiple clusters and improve management efficiency.
Devtron is a dashboard that can help manage multiple Kubernetes clusters. It offers granular visibility across our multiple Kubernetes clusters and also provides complete 360-degree visibility for applications deployed into these Kubernetes clusters. Devtron solves access management issues in Kubernetes. It offers a GUI and multiple SSO solutions for quick, secure access. It also provides robust, fine-grained access control. Also, for easy troubleshooting, Devtron streams the logs of Kubernetes objects. It has an integrated terminal, so users can run commands in pods.
Let's examine some major features of Devtron and see how to manage K8s clusters and its workloads.
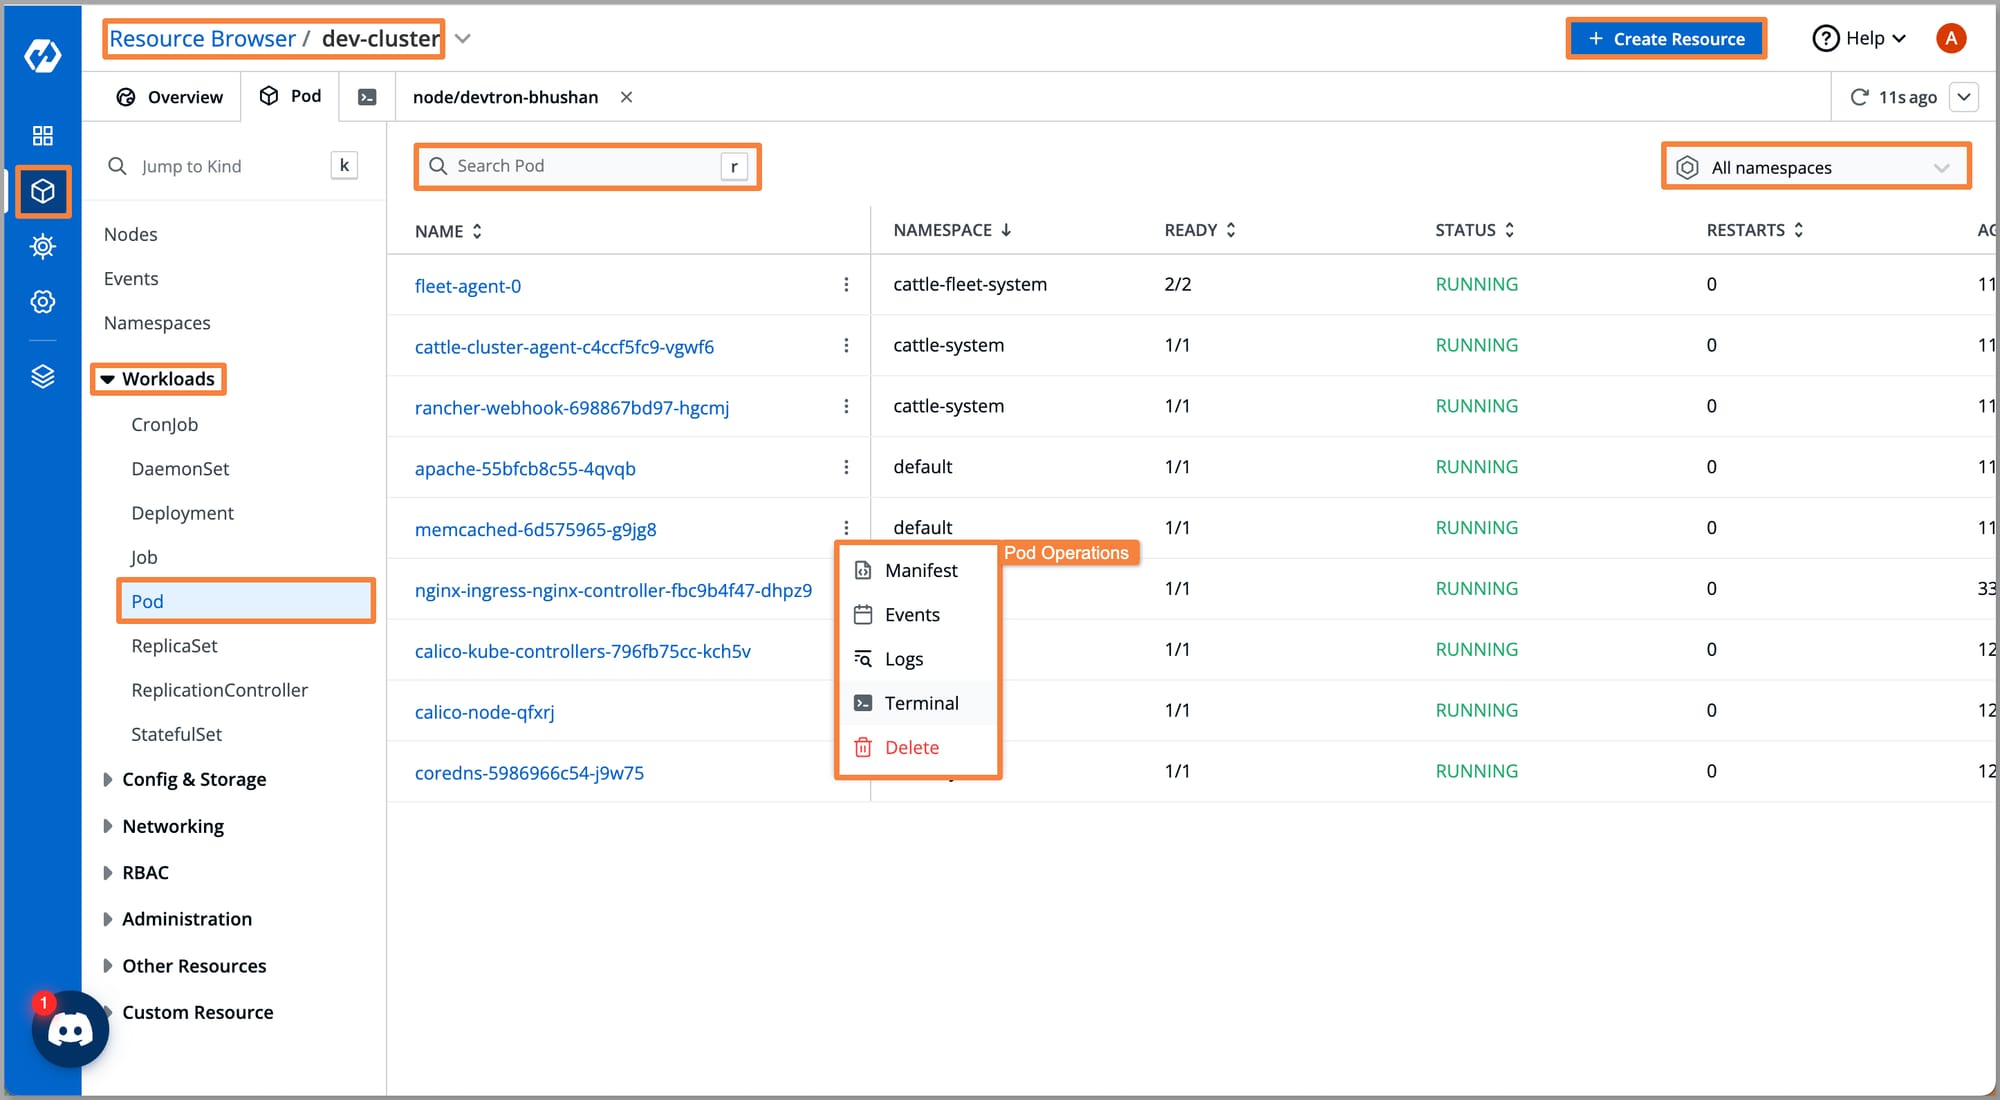
Visibility Across Clusters
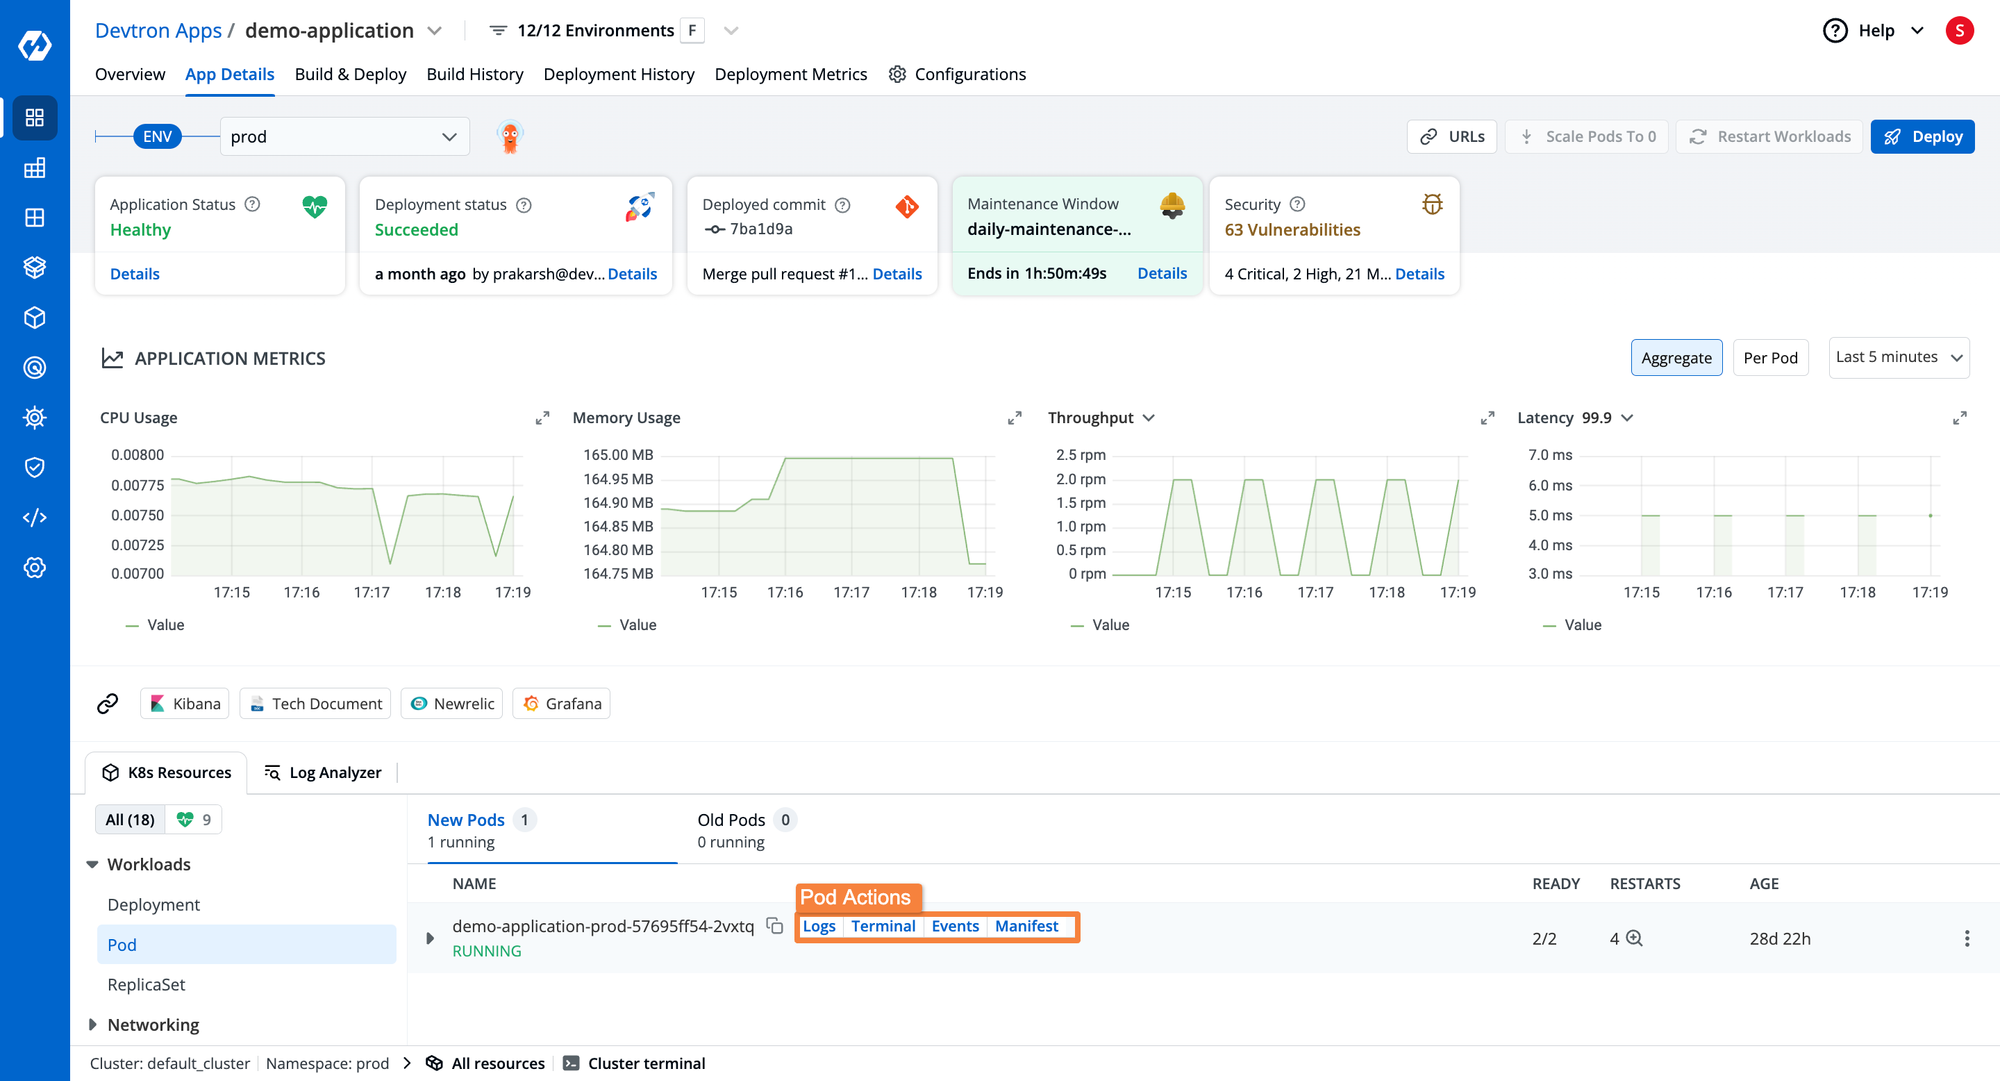
Devtron's Resource Browser provides granular visibility of all your Kubernetes clusters, and helps you visualize each node, namespace, workload, and all other resources of our cluster.
Devtron enables you to take action quickly by providing capabilities like dedicated terminal support for troubleshooting across the nodes/pod and, the capability to Cordon, Drain, Edit taints, Edit node config, and Delete. Similar types of capabilities can also be found to manage the Kubernetes workloads i.e. Pods, Deployments, Job, etc.
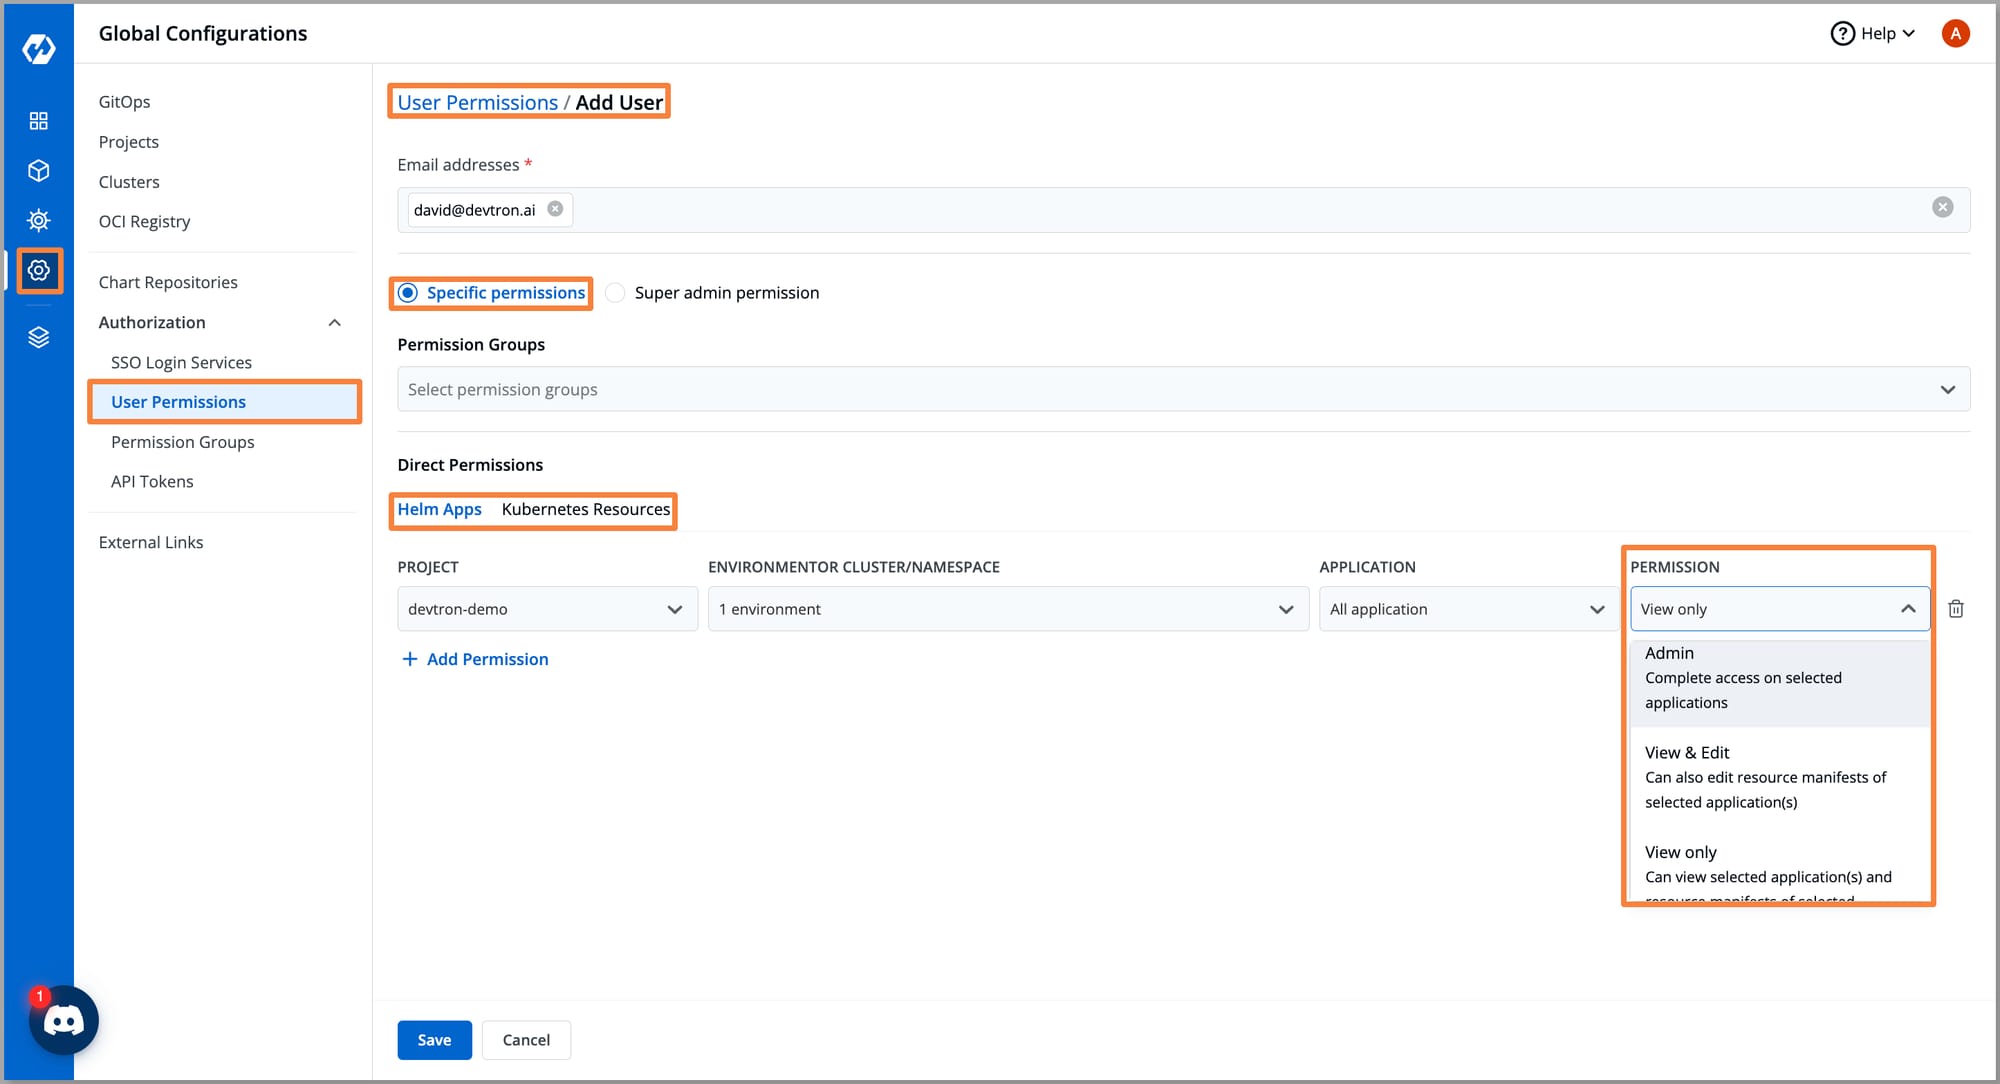
User Access Management
Devtron enables us to manage robust RBAC configuration, by allowing granular access control for Kubernetes resources. We can create Permission Groups with predefined access levels and easily assign them to new users. Devtron also provides us support for SSO integration with several different options, streamlining access management and eliminating the need for separate dashboard credentials.
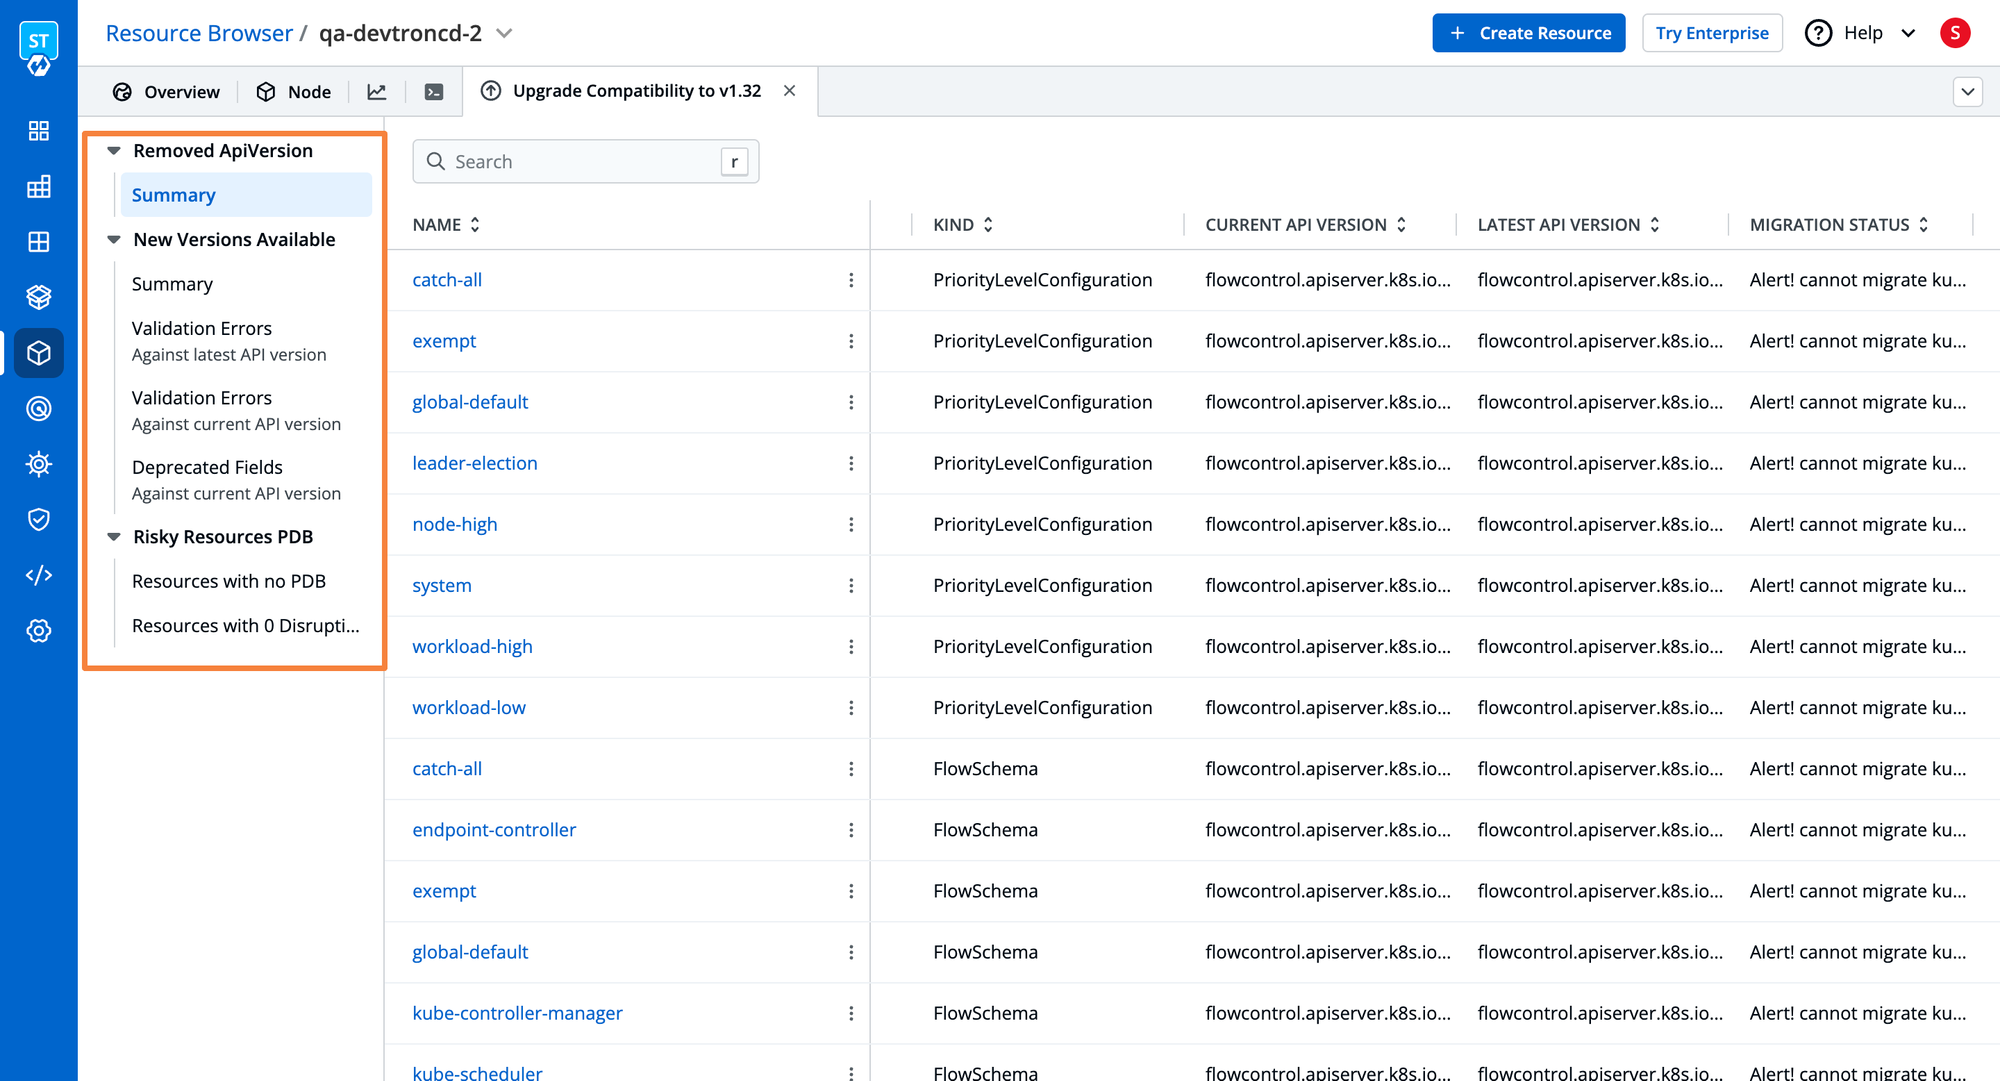
Streamline Cluster Upgrades
While upgrading Kubernetes clusters, it is crucial to ensure that there are no breaking API changes between the cluster versions. When upgrading the cluster to a new Kubernetes version, Devtron can help you scan the cluster for deprecated APIs. This helps you easily understand the breaking API changes, and ensure that your cluster does not experience downtime after upgrading. Additionally, you are also able to visualize the resources that do not have a pod disruption budget set.
Managing Applications on Kubernetes Clusters
After successfully creating your Kubernetes cluster with Kops, it comes time to deploy and manage applications on the Kubernetes cluster. When deploying applications on Kubernetes, you often have to perform a number of different steps. Some of the steps to follow when creating the cluster include
- Creating the container image
- Writing the configurations for the Kubernetes deployments
- Create and assign storage resources such as Persistent Volunes and PVCs
- Creating the secrets and configmaps
- Packaging all the components into a Helm chart
- Deploying all the Kubernetes resources
Even after creating the required configuration files and deploying the Kubernetes objects, there are significant operational challenges that can occur. For example, when running the application in production, you will need to worry about managing configuration drifts, triggering a rollback in case of errors, monitoring the application's health and taking action in case of a degraded status, troubleshooting the Kubernetes resources, and much more. Since the cluster is completely self-managed, you also have to worry about cluster management tasks such as managing Cluster upgrades or migrating the clusters.
Devtron is a Kubernetes management platform that can help simplify the entire lifecycle for deploying and managing the Kubernetes application. It can help you build the container image using either a Dockerfile or buildpacks, create the entire CI and CD pipelines, provide detailed information about the health of the application, and help manage Day 2 operations with ease.
Devtron allows you to deploy applications across multi-cluster environments with ease. Apart from application management, it also provides several features for managing your Kubernetes cluster itself.
If you would like to learn more about how Devtron can help you manage your entire Kubernetes application lifecycle, please check out this blog.
Conclusion
Kops offers a powerful and flexible way to set up and manage Kubernetes clusters on AWS EC2 instances. It integrates with AWS infrastructure and focuses on best practices to ensure that your cluster is built to handle the challenges of production workloads. Whether you're deploying microservices, running stateful applications, or experimenting with Kubernetes features, a Kops cluster provides the reliability and scalability needed for a production environment. By leveraging Kops, you're not just setting up a cluster; you're building a foundation for resilient, cloud-native applications at scale.
If you have any queries, don't hesitate to connect with us or ask your questions in our actively growing Discord Community.
FAQ
What is kOps in Kubernetes?
kOps (Kubernetes Operations) is a CLI tool that helps you create, manage, and maintain production-grade Kubernetes clusters on cloud providers like AWS.
Why use kOps for a production cluster?
kOps automates cluster provisioning, networking, and upgrades, making it ideal for managing scalable, secure, and reliable production environments.
What cloud platforms does kOps support?
kOps supports AWS natively and has alpha or beta support for other platforms like GCP, DigitalOcean, and OpenStack.
Is kOps production-ready?
Yes, kOps is widely used in production for its mature features, high availability support, and robust community backing.