Deploying your application on Kubernetes is quite a straightforward process if the right set of tools and technologies are used despite the complexities of Kubernetes. You’ve probably already done this thousands of times, and now the process has become muscle memory. The process involves creating the YAML files, setting the environment variables, and configurations, and applying the new manifest. To simplify the process a bit, you’ve probably even created and applied custom Helm Charts or have been using different Kubernetes dashboards for deploying into Kubernetes.
Imagine that you have a product that helps customers secure their codebase, and you have multiple end users. Some of them are your enterprise customers who request some specific security features. For example, one of your customers might require a feature that automates the pen-testing process and provides a security rating based on the results. You spend the entire weekend building the feature, and you ship it out only to this one user. However, you want to wait before sending it to your other customers as the feature has not yet reached maturity. Similar to the pen-testing feature, other customers might also have some feature requests for their use cases, and you wouldn’t want to ship that feature to every single customer.
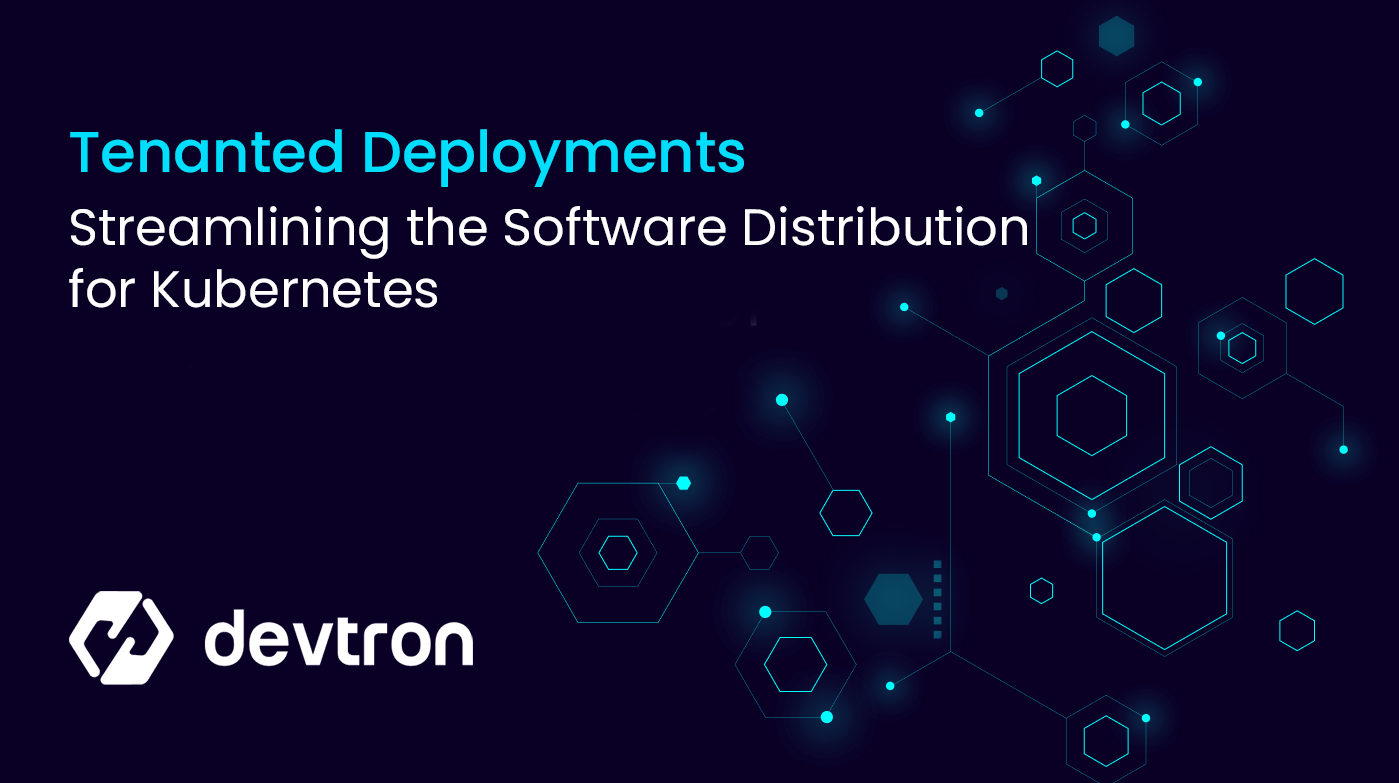
Multi-tenant deployments, software distributions, or tenanted deployments. Different names, but serving the same purpose of distributing a unique version of software for each customer. Scenarios where you need to deploy your software at the customer's infrastructure be it on-prem or cloud premises, the management of configurations, versions, releases or rollback becomes hectic. Streamlining the software distribution for Kubernetes is still one of the burning issues where a lot of manpower and manual efforts are required.
Devtron's Software Distribution Hub simplifies this process by offering automated deployments, centralized auditing, and efficient release tracking, enabling scalable and error-free multi-tenant deployments.
Challenges with Distributing Software for Multiple-Tenants
Within Kubernetes, we have the multi-tenancy concept which is essentially dividing the cluster into much smaller, isolated units for serving multiple tenants (customers). In the above example, we have one single product, which is served to multiple different customers. The customers may vary in terms of their specific feature requirements, infrastructure, capabilities, etc.
We can easily enable certain features within applications, and deploy that version within specific customer’s environments, but when we have to do this for hundreds of tenants, it can become very difficult to manage all the software releases properly. Moreover, each tenant might have multiple different environments where they want it to be deployed. For example, staging, production, or dev environments.
Simplify your multitenant Kubernetes deployments with Devtron's Software Distribution Hub
- Automated Deployments: Reduce manual interventions and errors by automating deployments into various tenant environments with the goal of providing reliability and consistency.
- Centralized Auditing: Maintain compliance and enhance security through centralized auditing and logging with a clear record of all the deployment operations.
Simplify your software distribution process with Devtron's Software Distribution Hub.
Request a Personalized Demo →Let’s try to understand some of the challenges associated with distributing software to multiple tenants:
Repetitive Process
When deploying the software to a tenant’s environment, you need to repeat the same process multiple times. This can become a very long and drawn-out process, especially if you’re dealing with hundreds of tenants.
Imagine you’re packaging the software for all of your end-users. It’s possible that your tenants have multiple different environments and you might need to create custom scripts for each one of their environments and ensure that the correct features are being enabled. Ensuring that the scripts are working correctly and are perfectly adapted to the tenant’s environment requires a lot of time and effort. Writing custom scripts might be a one-time task but maintenance of those scripts and making sure it's updated with customer's infra is another overhead.
Error Prone
As the process of packaging and distributing the software to multiple tenants is repetitive, it is also prone to human error. Imagine if you sent the wrong configurations to one customer, or you sent customer C’s configuration to customer A. What if the script that you use has a critical error that’s not very obvious and will not instantly affect the environment?
You might end up copy-pasting and editing the same script which contains the error for future tenants, and it may exist within the deployments for months.
Difficulty in Scaling
If you’re dealing with just a few tenants, it’s easy to manage deploying to their different environments. But what happens when all of a sudden you have to serve hundreds and thousands of tenants?
The simple task of copying and editing the existing script to fit the tenant environment has just become a humongous task that will take hours if not days.
This problem is further aggravated, if you have to make multiple deployments to the different tenant environments in a short time.
Handling Version Drifts
Let’s say that you decide to ship version v0.6.0 of your application which contains a new dashboard. You start rolling out the new update to your customers. However, a few days later, you get angry emails from your customers that they have not received the new dashboard on their installation. After checking the internal logs, you see that the version has been shipped to those customers.
After a few debugging calls with them, you realize that only a few services have been updated to version v0.6.0. The other services are still on the older version, and hence they are unable to see the newest dashboard.
Handling these configuration drifts becomes a challenge without having a way to monitor every individual microservice that’s been shipped to the customer. Drifts can be caused due to several different reasons such as an incomplete release cycle, errors during the upgrade process, etc.
No Audit Logs
Without having a centralized dashboard where you can track all of the version releases you’ve made to your customers, it can be very difficult to troubleshoot if something goes wrong.
For example, imagine that a new version of your platform is ready to be shipped out to your customers. You have more than 100 customers where an update needs to be rolled out. How do you keep track of which tenants has the software been shipped to? Some of your tenants may not receive the latest update of your software. Imagine if you’re shipping out a critical security update, and some of your tenants do not receive it or receive it after the damage is already done.
Sure, you can maintain spreadsheets and have DevOps engineers update them as the deployments have been made, but it often happens that the sheets are not updated, and that leads to miscommunications within teams. Manual deployments are always error-prone.
Release Stages
Microservice applications are designed in a way that multiple microservices interact with each other. Multiple microservices that are deployed within the tenant environment might be interlinked and dependent on each other.
Let’s say that you have a simple application that consists of a frontend and a backend microservice. The frontend depends on the components within the backend. If you deploy the frontend first, without deploying the backend, your application is going to run into errors since the frontend does not have the required dependencies.
Hence you want to make sure that you release the application in the correct order with all its dependent microservices. The same applies when you are trying to make version upgrades for your application.
Simplifying Multi-Tenant Software Distribution
One of the recent features that Devtron has shipped to enterprises is the Software Distribution Hub. Through this new feature, we aim to address all of the concerns with multi-customer deployments stated above.
Combining the Software Distribution Hub with the existing features of Devtron, we’ve made it very easy to create, manage, and release software within a multi-tenant Kubernetes environment making the software distribution/ tenanted deployments a breeze.
A few of the ways that Devtron makes it easier to enable multi-tenancy include:
- Easily create different tenant environments within the same cluster or the tenant environments can be on different clusters.
- Easily add a tenant with unique identifiers and map the tenant's environments
- Create and track releases for multiple tenants from a single centralized dashboard
- Define clear requirements for each tenant release.
Multiple-tenant Environment with Devtron
Let’s say you are a DevOps engineer working at a security company. You have to release instances of your scanning application to three target customers. Let’s go ahead and take a look at how you can deliver your software to your customers using Devtron.
We will go over the entire process from creating a tenant environment, mapping the environment to our 3 specific tenants, and creating and releasing the applications to the tenants in the specified release stages.
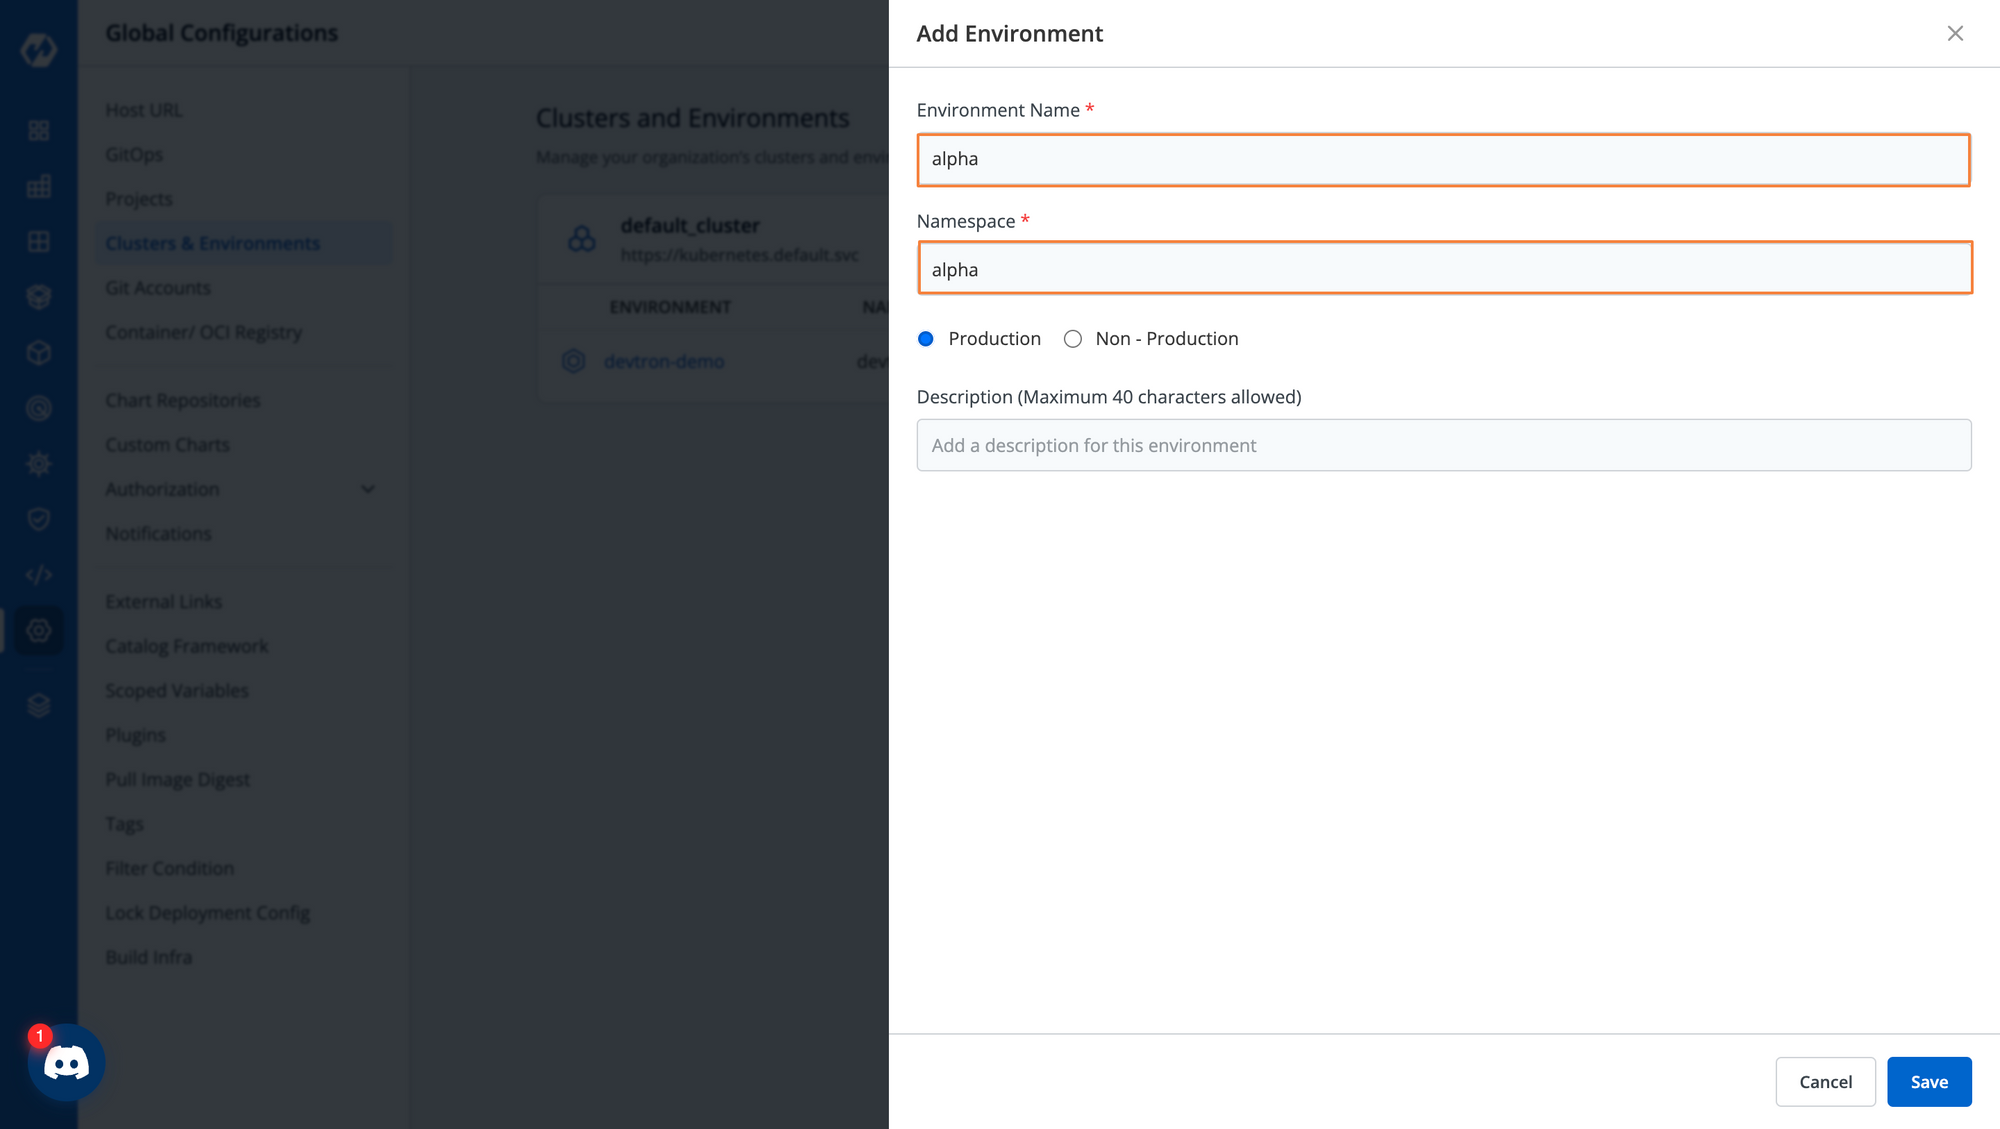
Let us first create the environments for our tenants. Let’s say that the three tenants that we have to serve are Alpha, Beta, and Gamma. We can go ahead and create specific environments for each of these tenants from Global Configuration > Clusters and Environments and click on Add Environment.
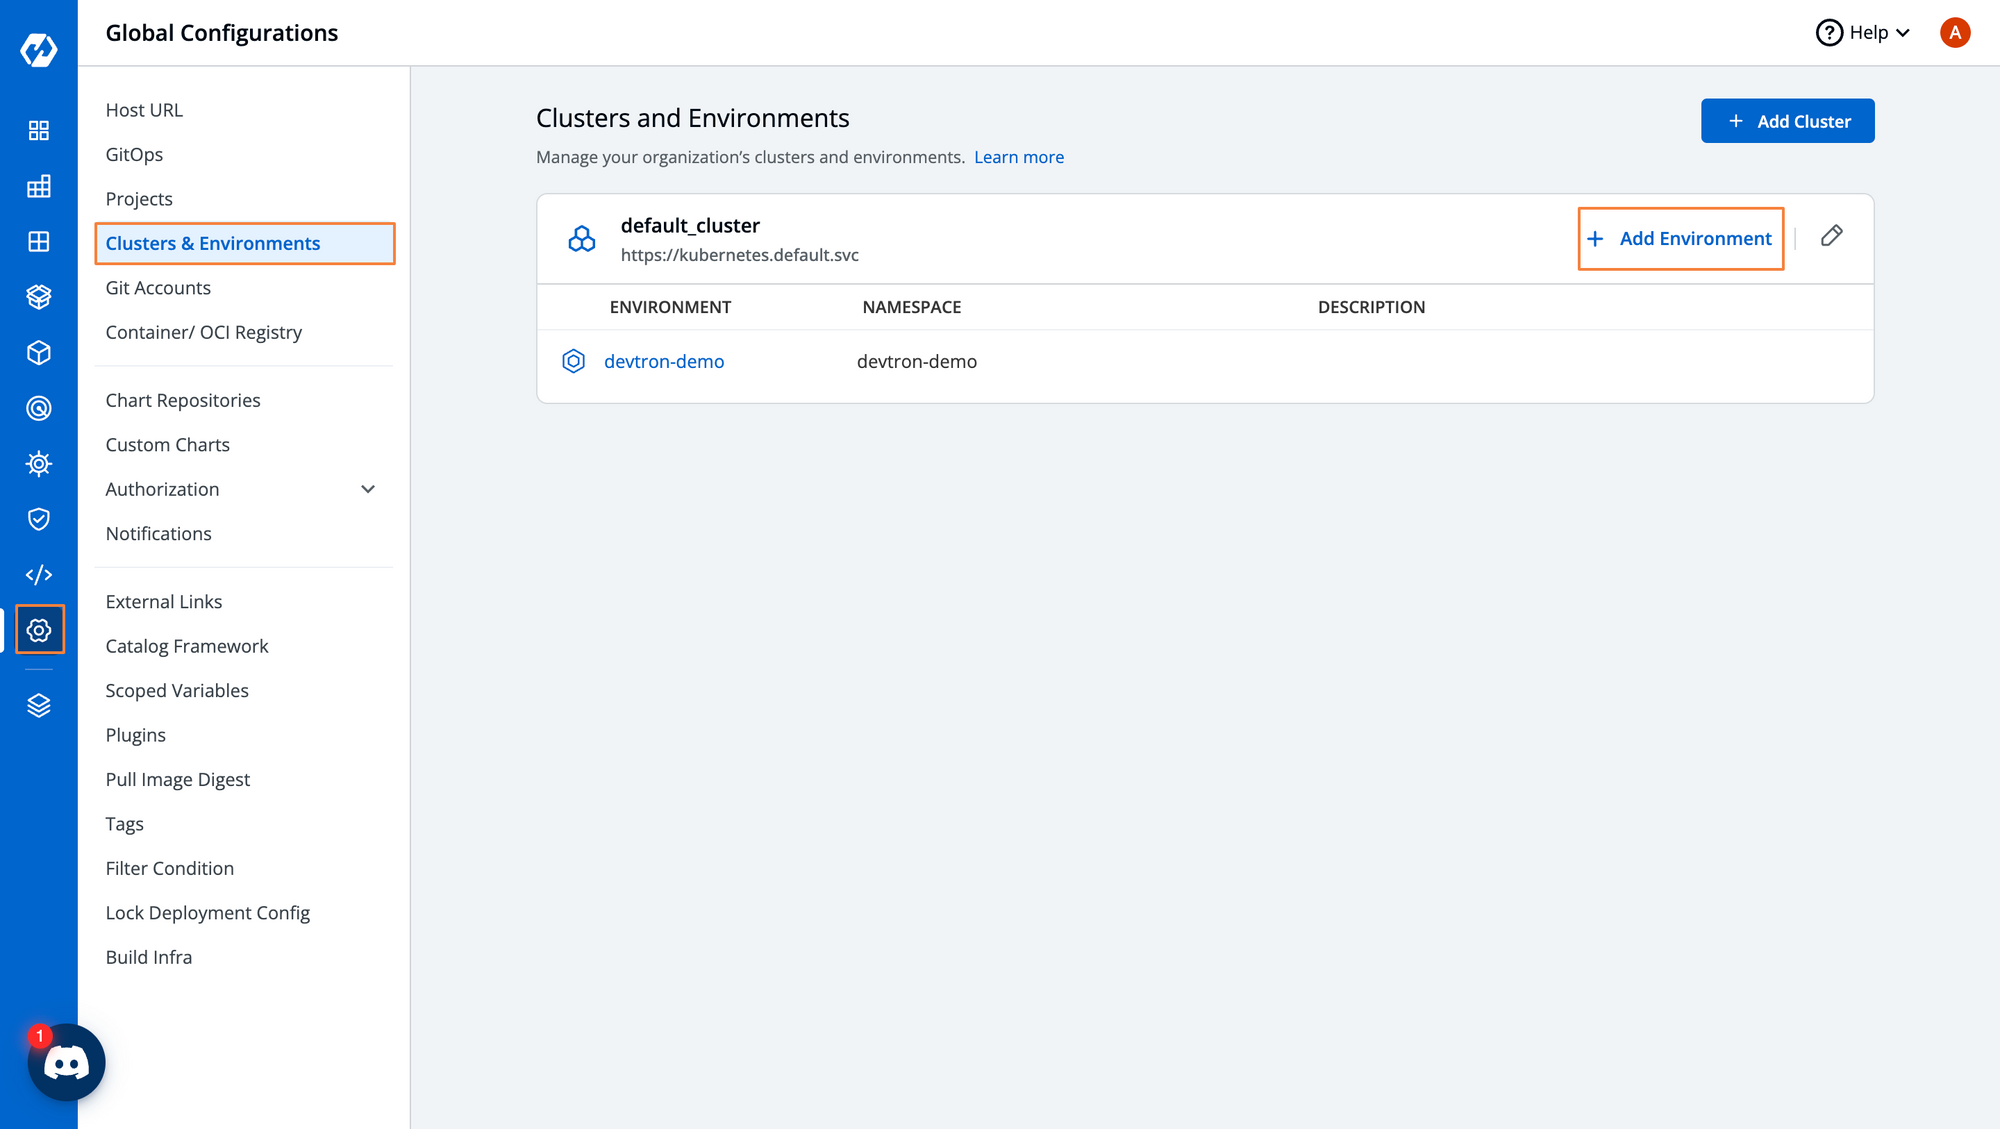
Give the environment a name and give it a specific namespace as well. The namespace will be created and will be associated with the environment.
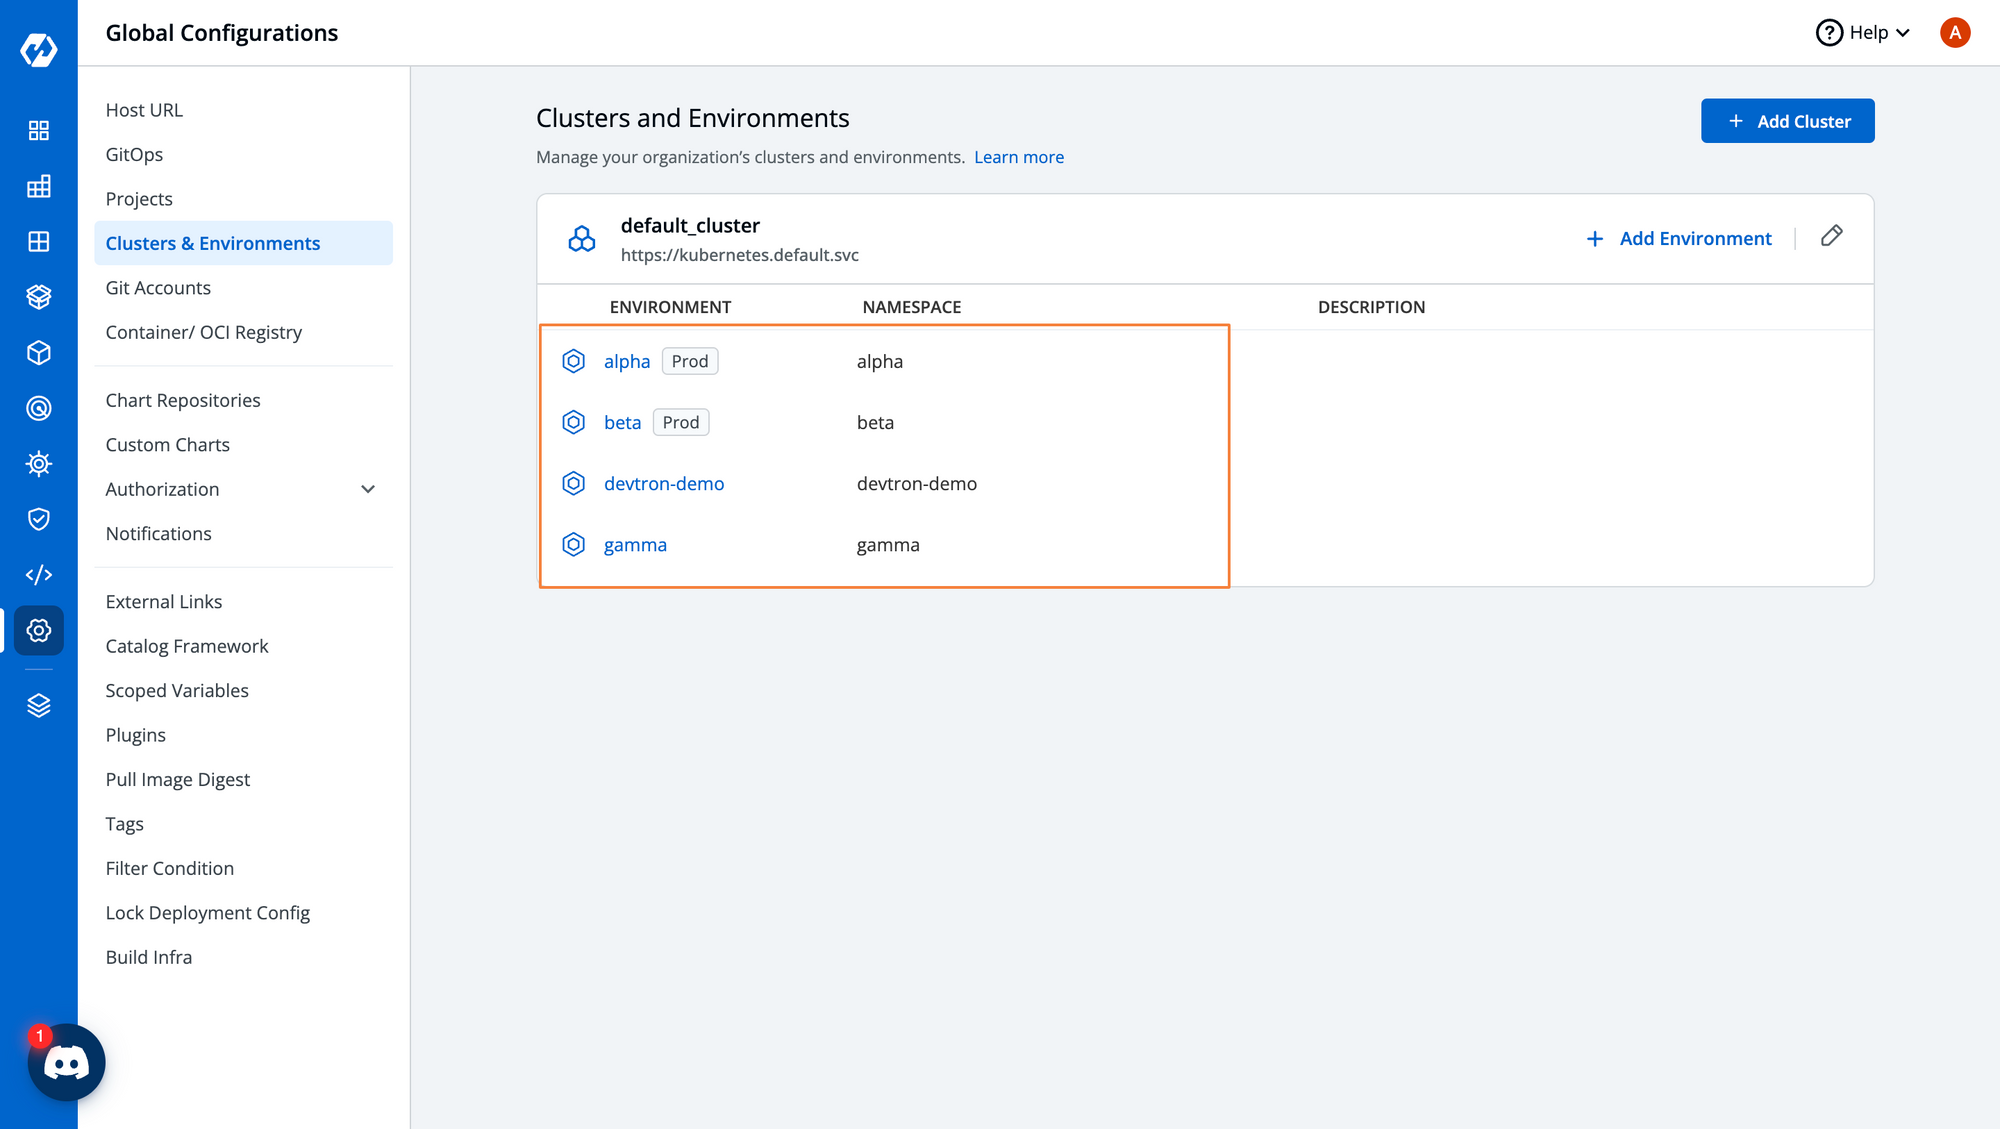
After creating all the 3 environments, we will be able to see all our environments in the Clusters & Enviornment tab from the Global Configurations. The different tenants can also be on different clusters and you can create specific environments for those tenants.
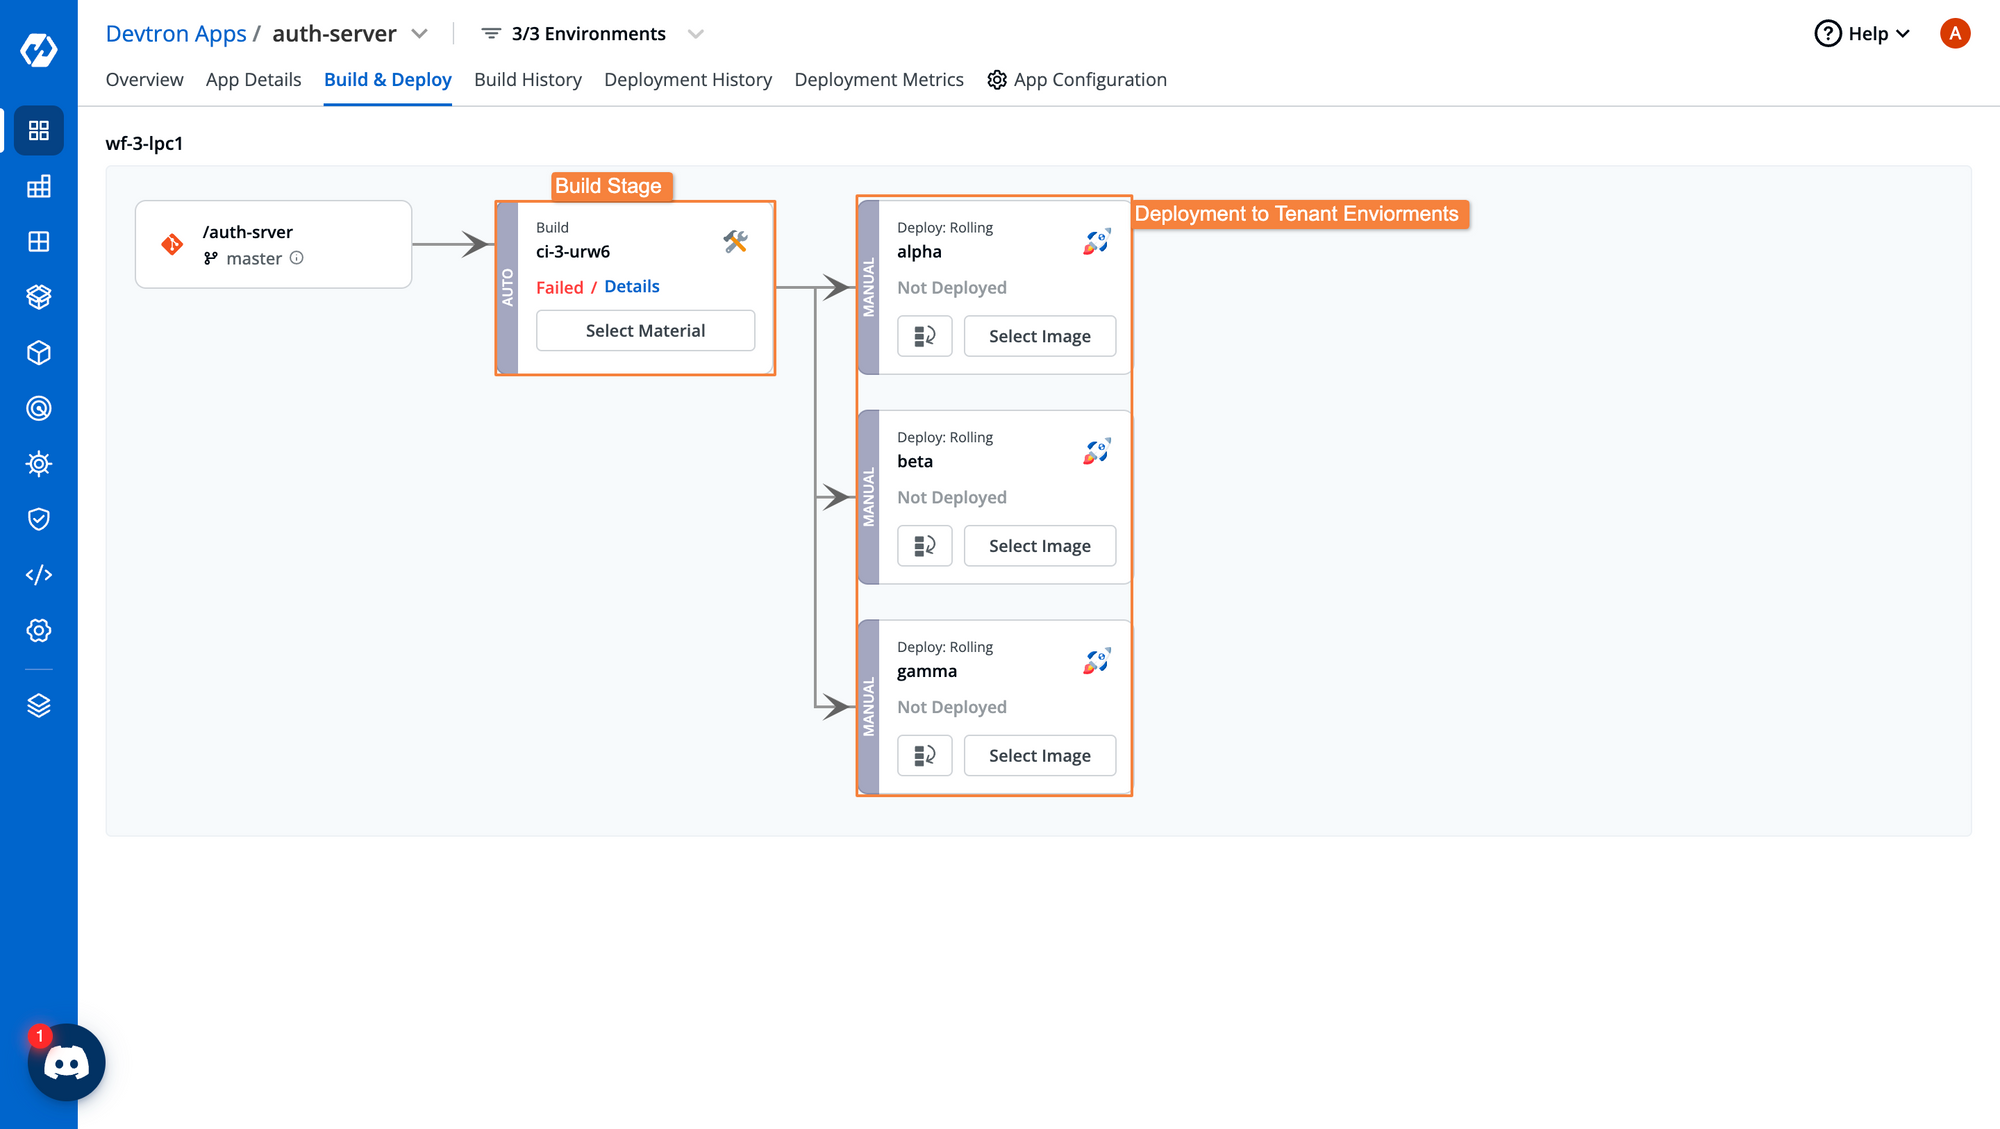
The application that we want to deploy to our tenant's environment consists of 3 components. A frontend, a backend, and an authorization server. We will create these applications and within the Build pipeline, we will configure the application to be deployed to all 3 tenant environments.
To learn more about how you can create your applications and select specific deployment environments for them, check out our blog on Kubernetes Deployments with Devtron.
We have created our pipeline so that the application gets deployed to the three tenant environments.
Now that we have our environments and applications created, It’s time to create the tenants and map their specific environments to them.
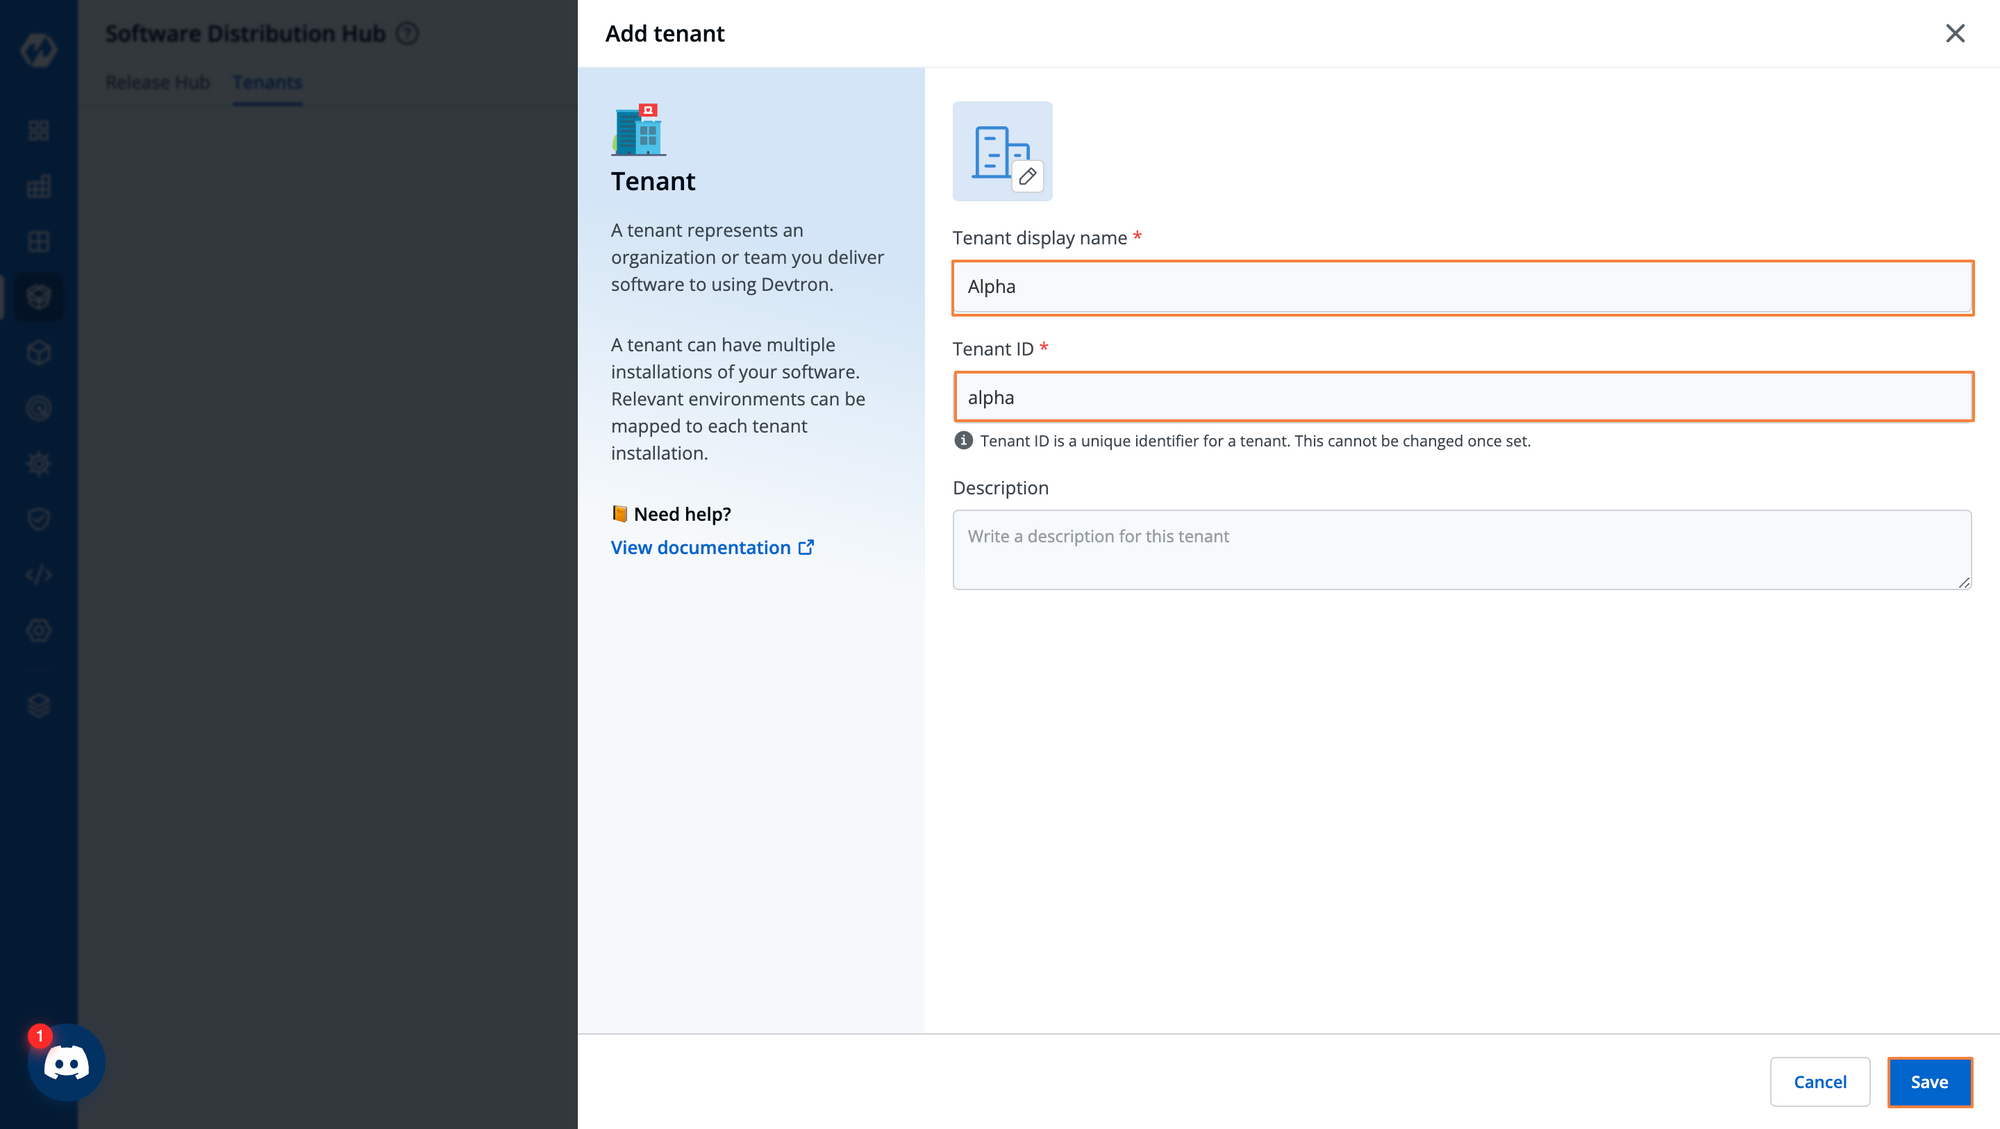
As discussed earlier, we have three tenants which are Alpha, Beta, and Gamma, and we have created their specific environments as well. We can create our tenants from the Software Distribution Hub > Tenants tab, and click on Add Tenant.
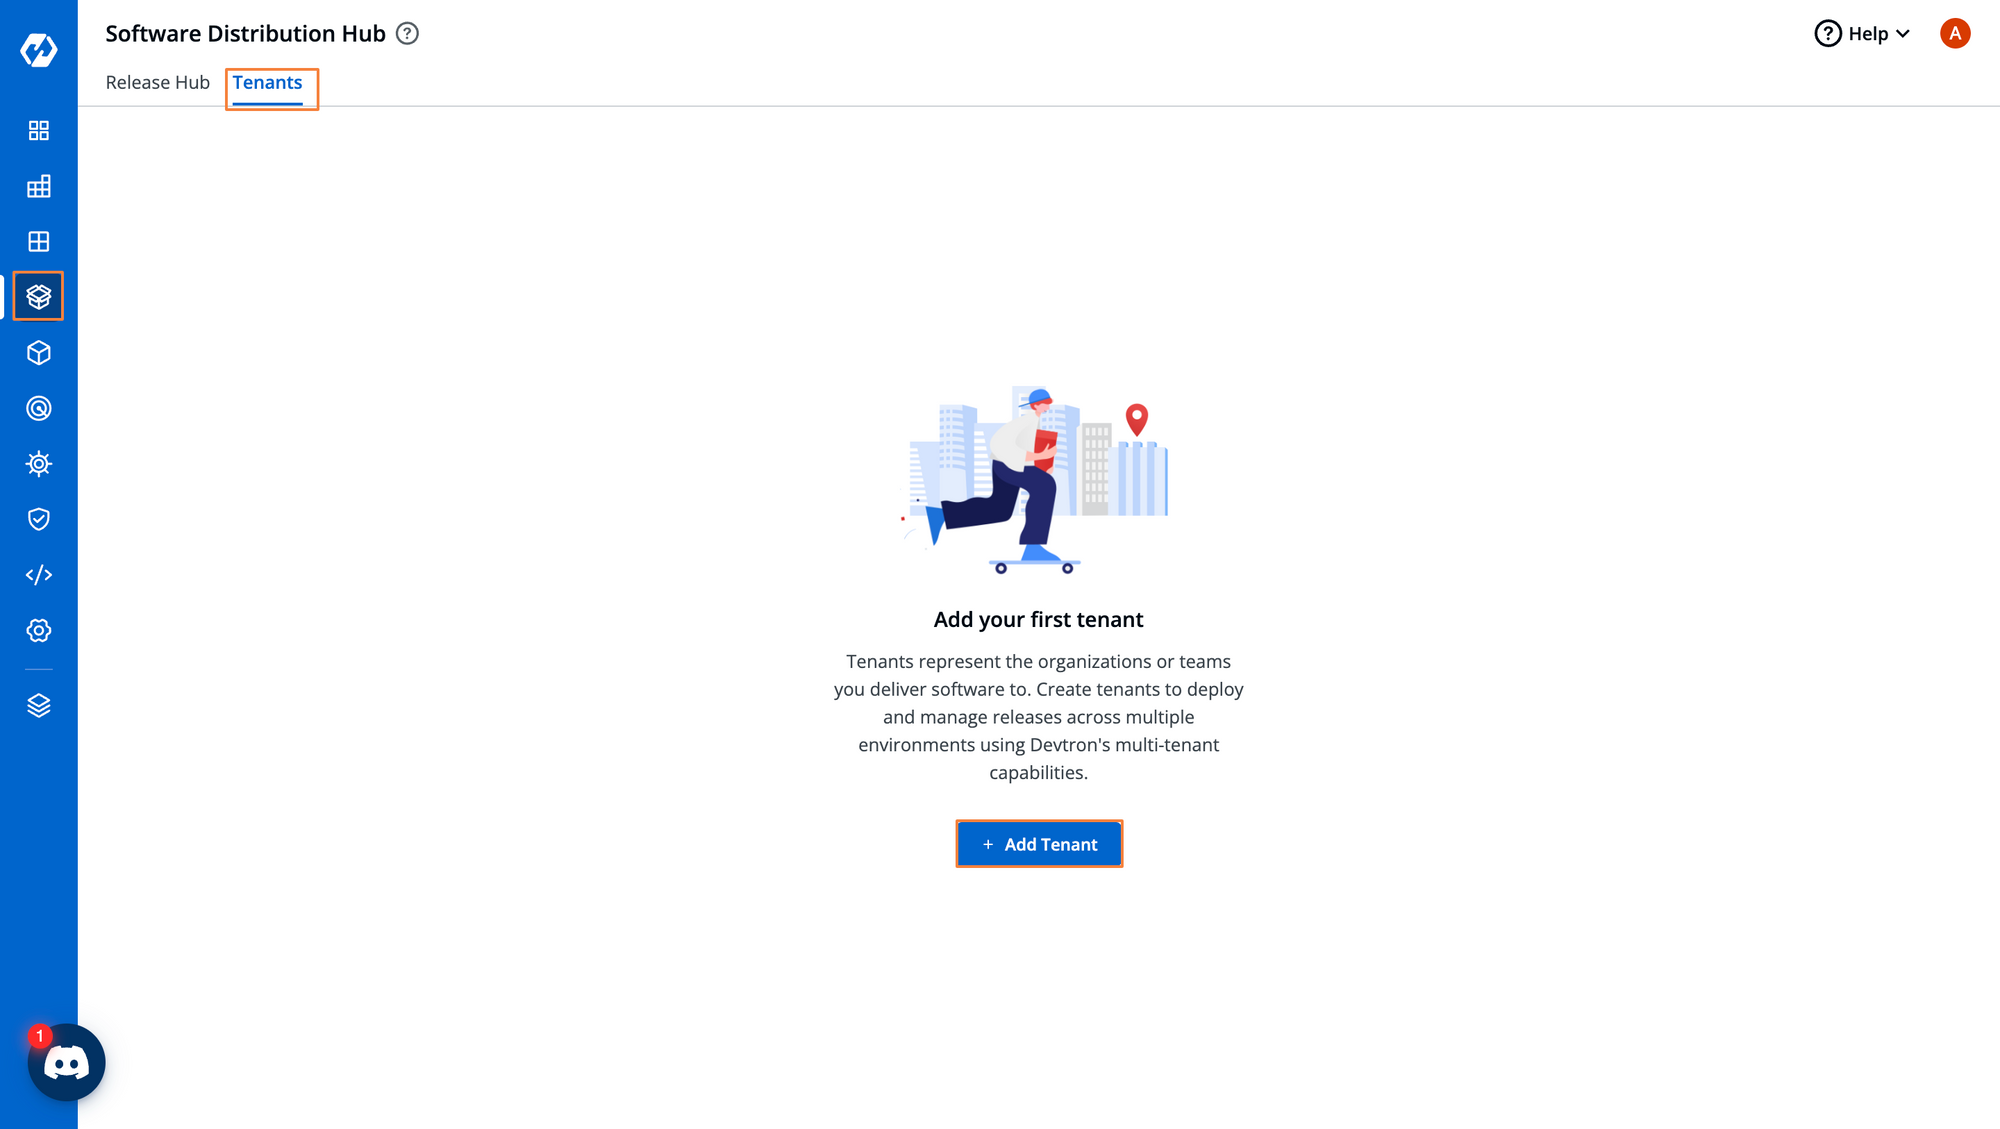
While creating tenants, we have two important configuration options.
- Tenant Display Name: This is a display name to identify the tenant. This can be changed in the future if the tenant happens to change the organization name.
- Tenant ID: The Tenant ID is a unique identifier assigned to each tenant. The ID cannot be changed once it has been set.
As a best practice, you should also give a short description of the tenant so that the teams are aware of the organization/ team where the application is deployed.
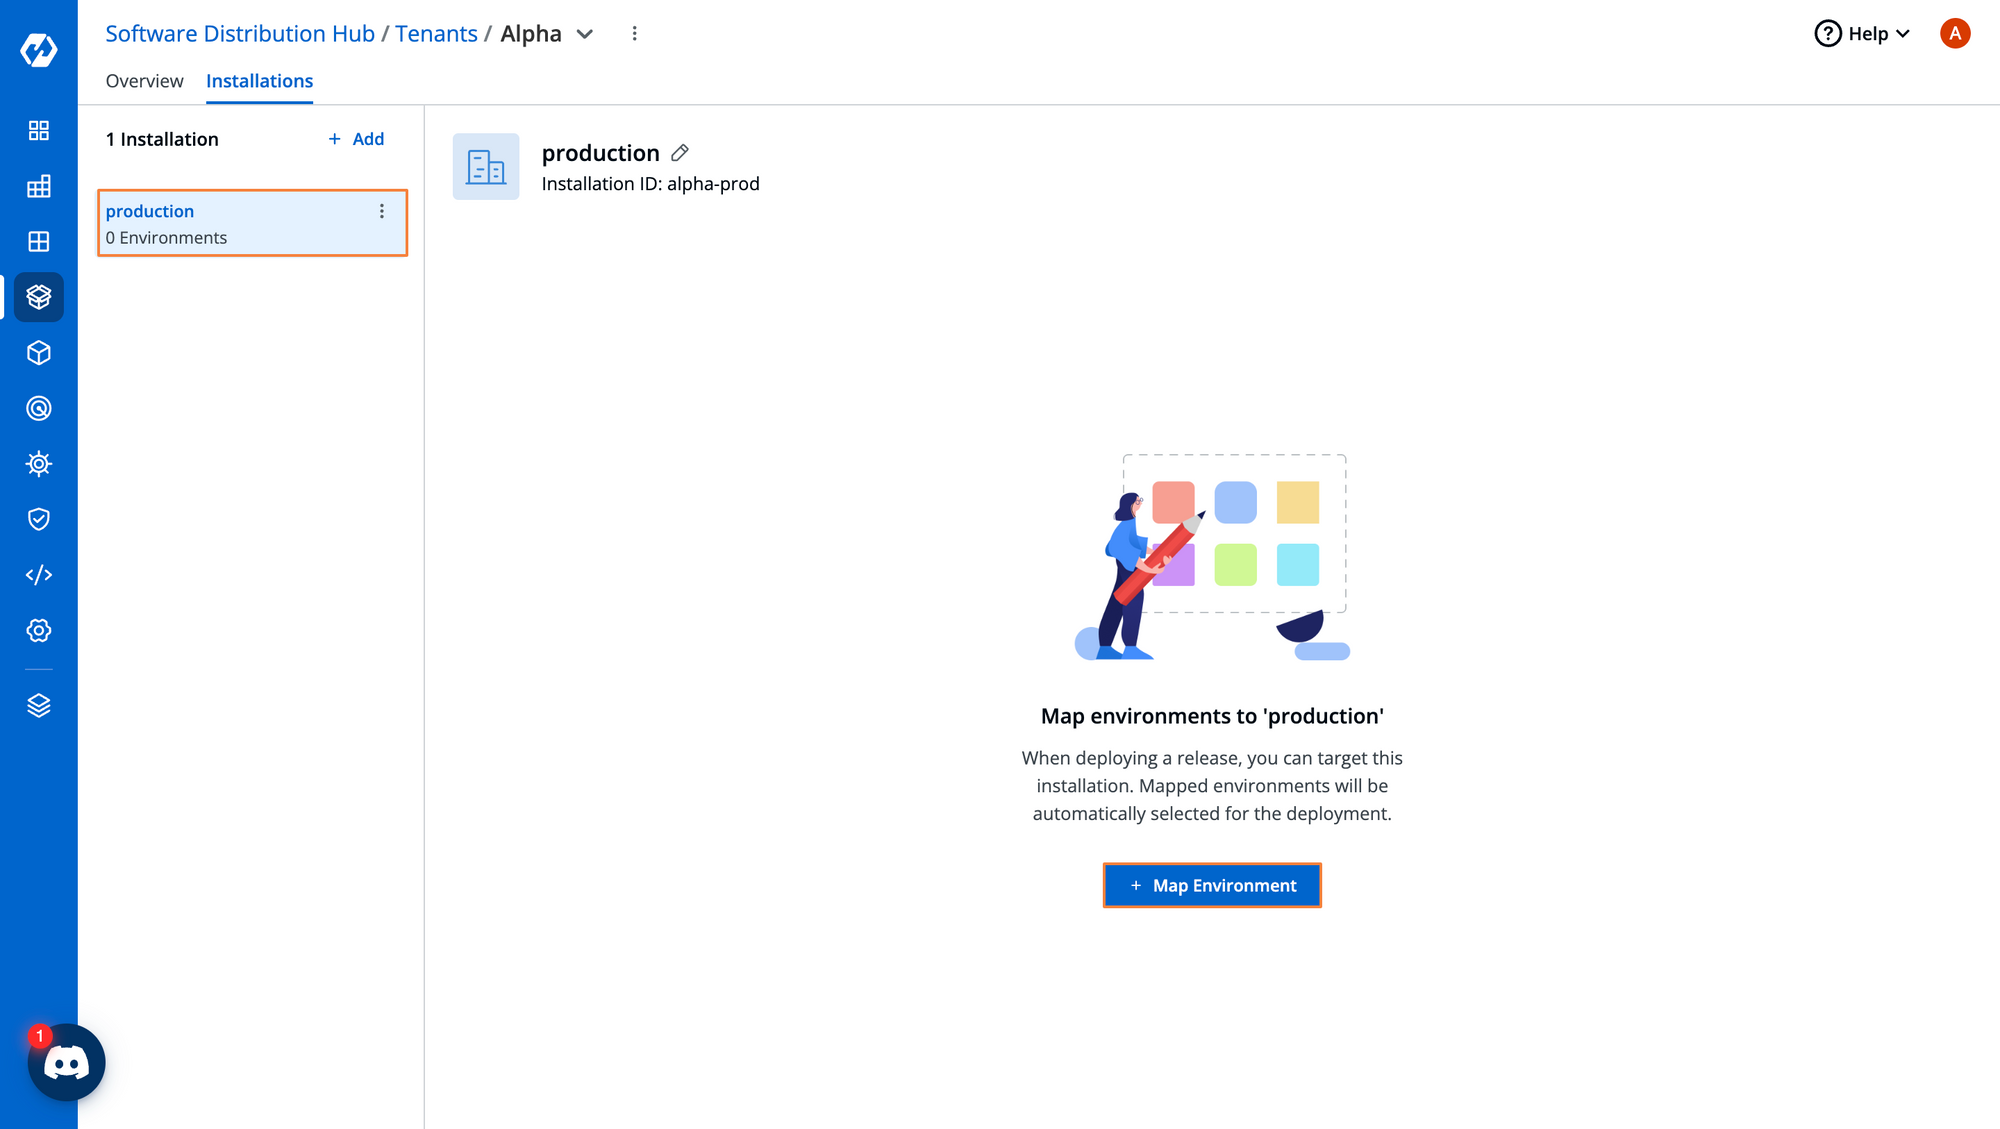
Once we have created the tenants, we need to define specific installations for the tenants. The installations simply refer to the different tenant environments where the applications have to be released. So for example, your tenants could have one installation for a production environment, another for testing, and so on.
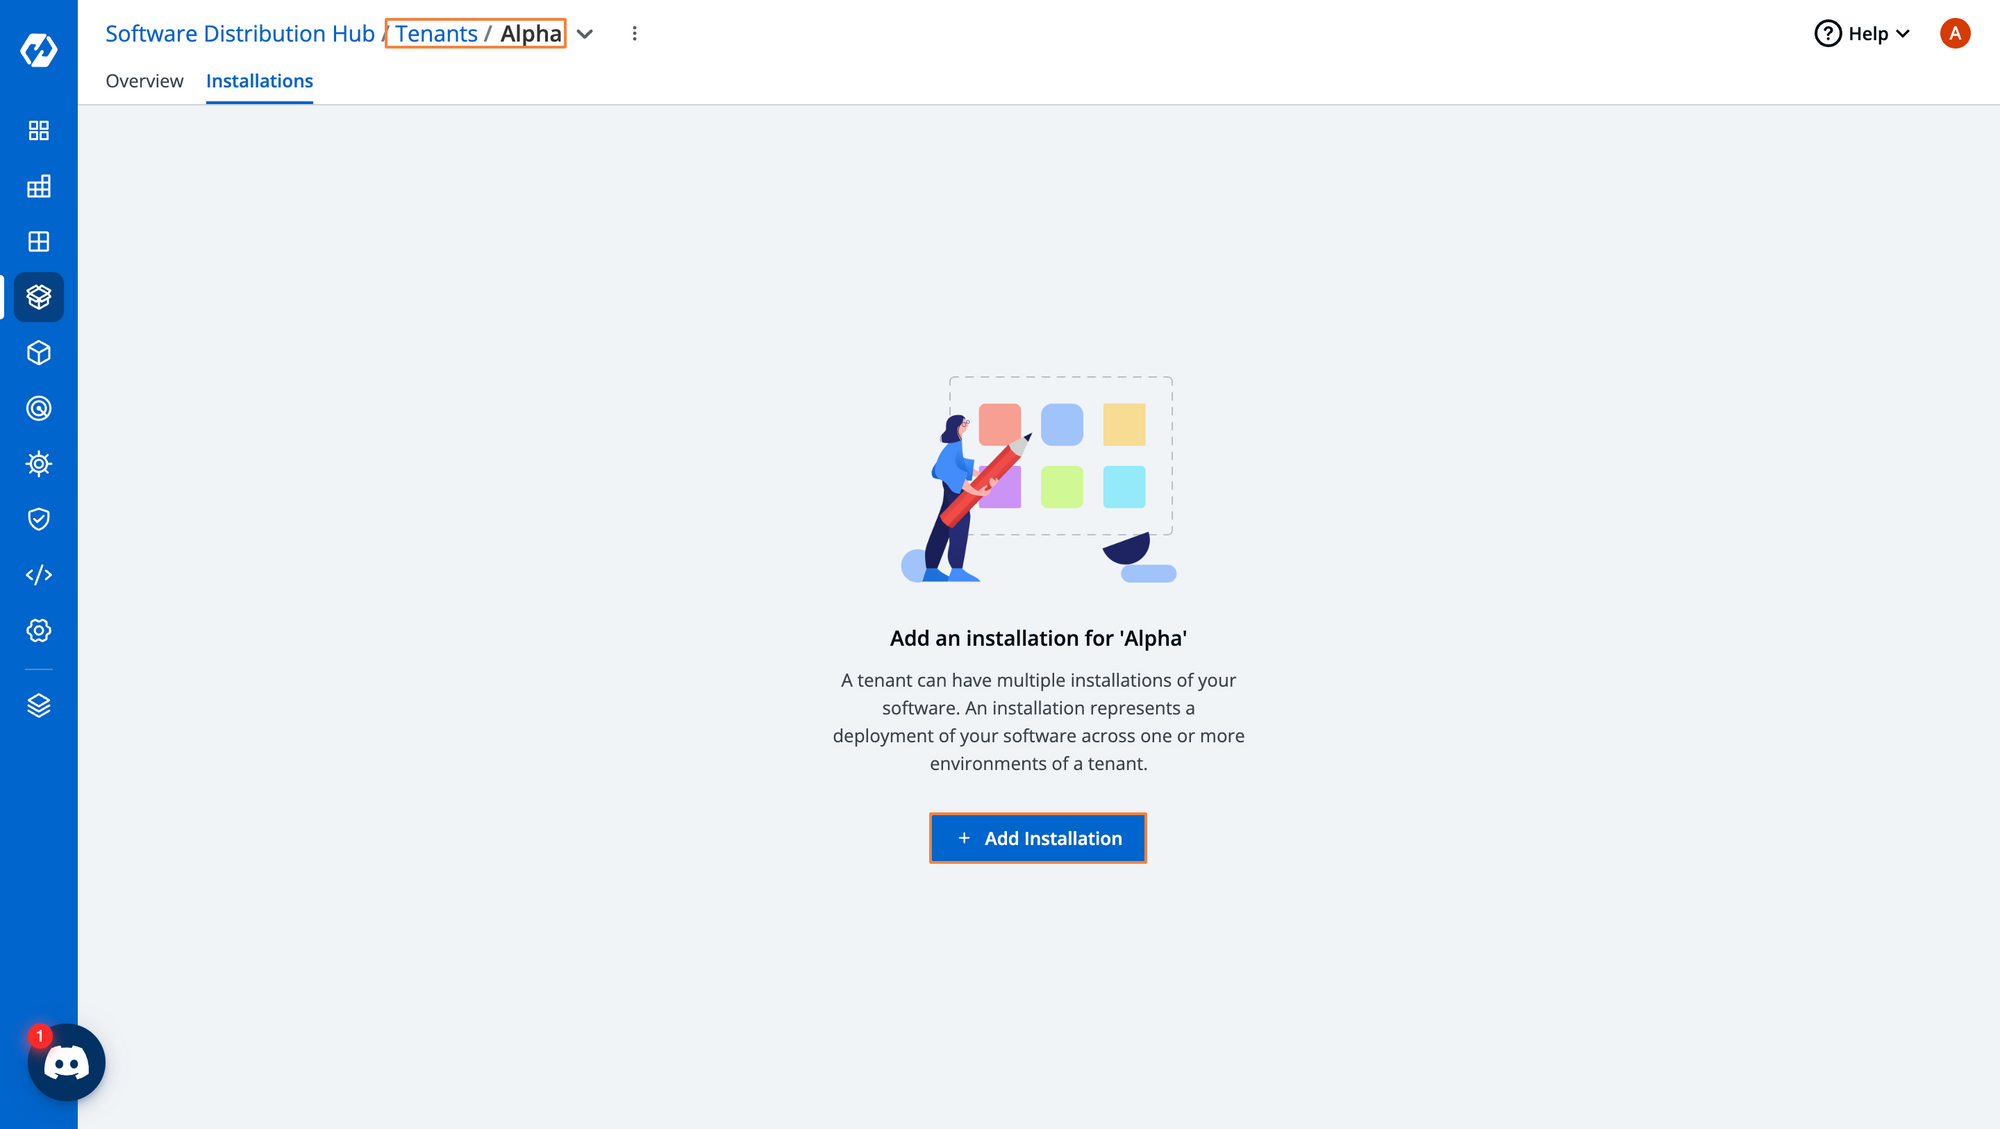
Similar to the tenant ID, each installation will have its unique ID as well.
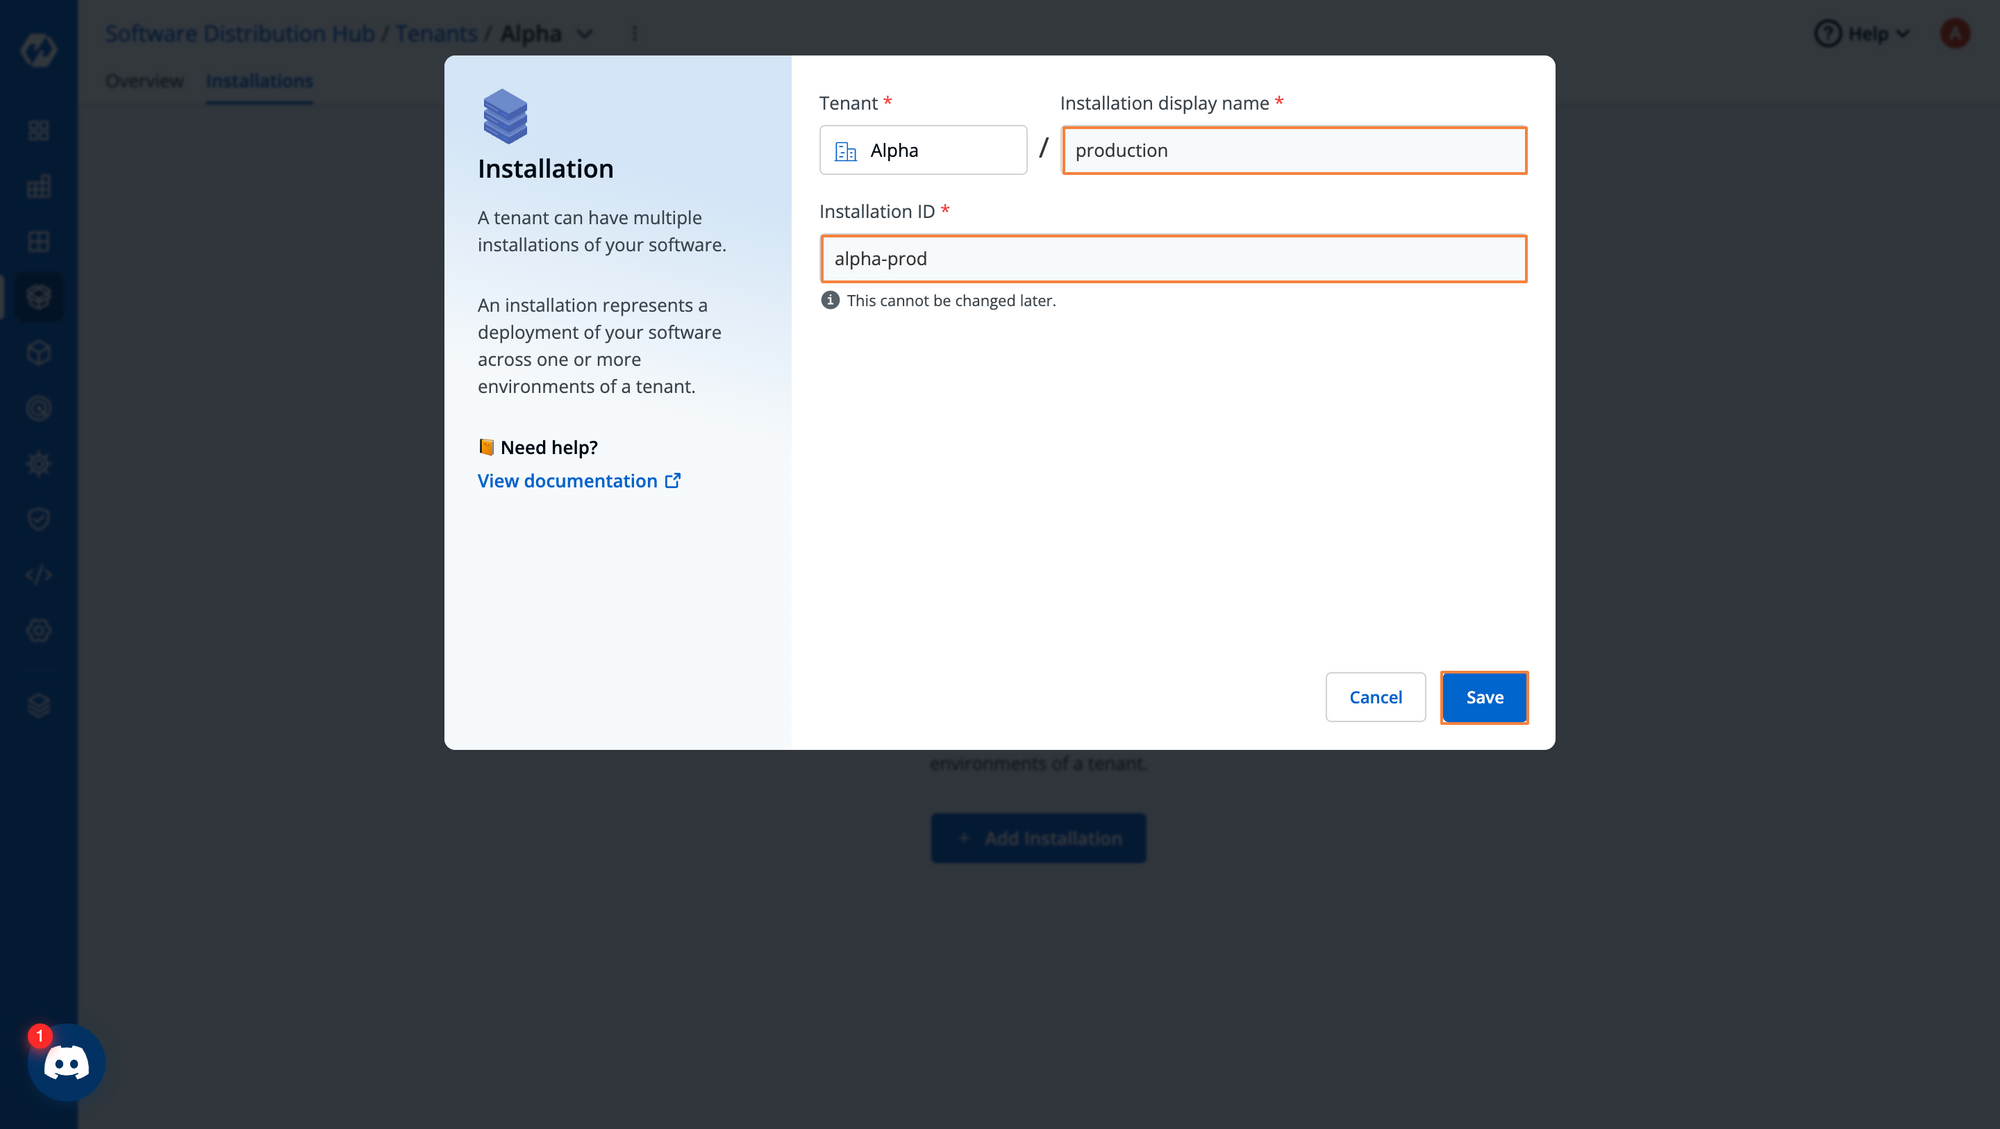
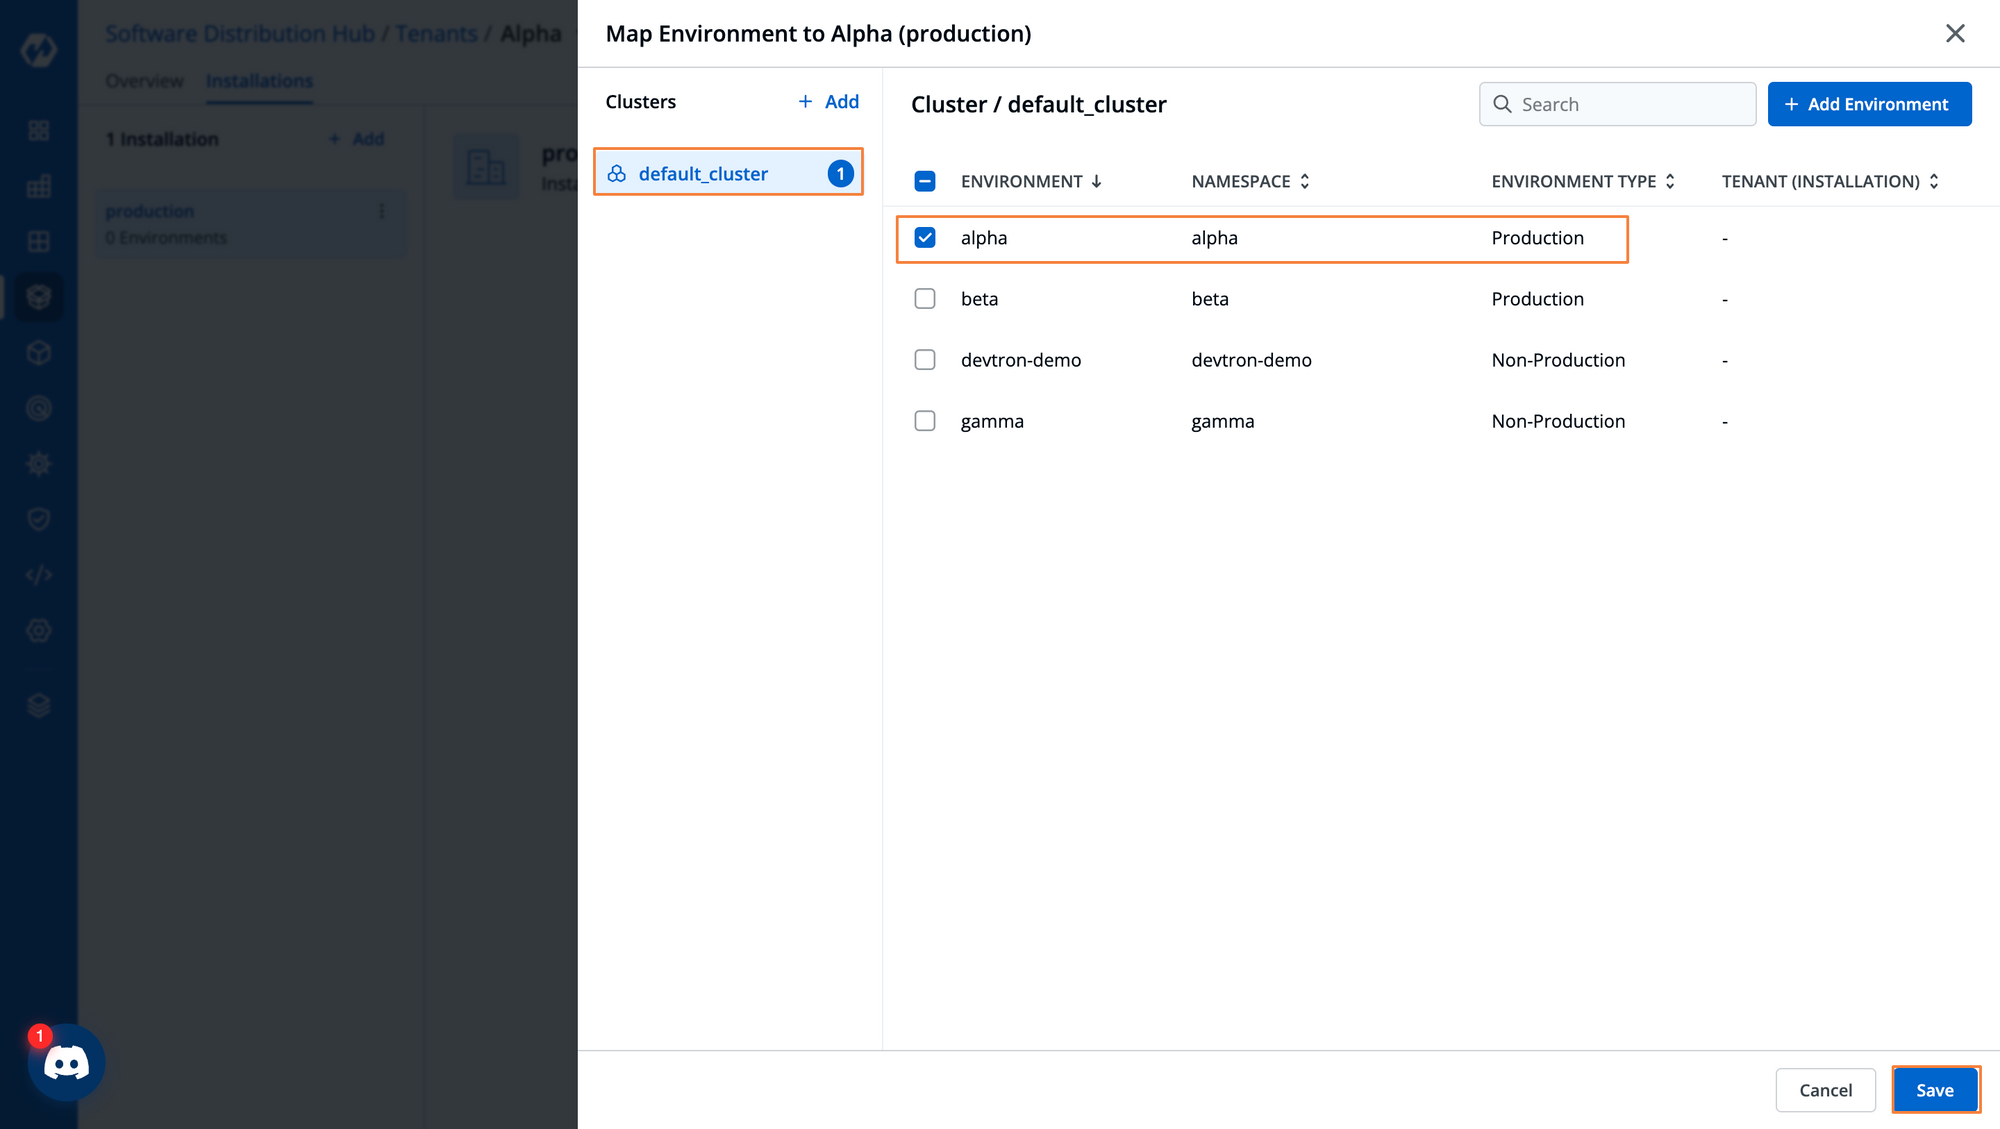
For our purposes, we will create a production installation for each one of our tenants. Within the installation, we also have to map the specific environments for the installation. Here, we will map the environment that we created previously for our three customers. Click on + Map Environment
Select the environment that is created for the Alpha Tenant.
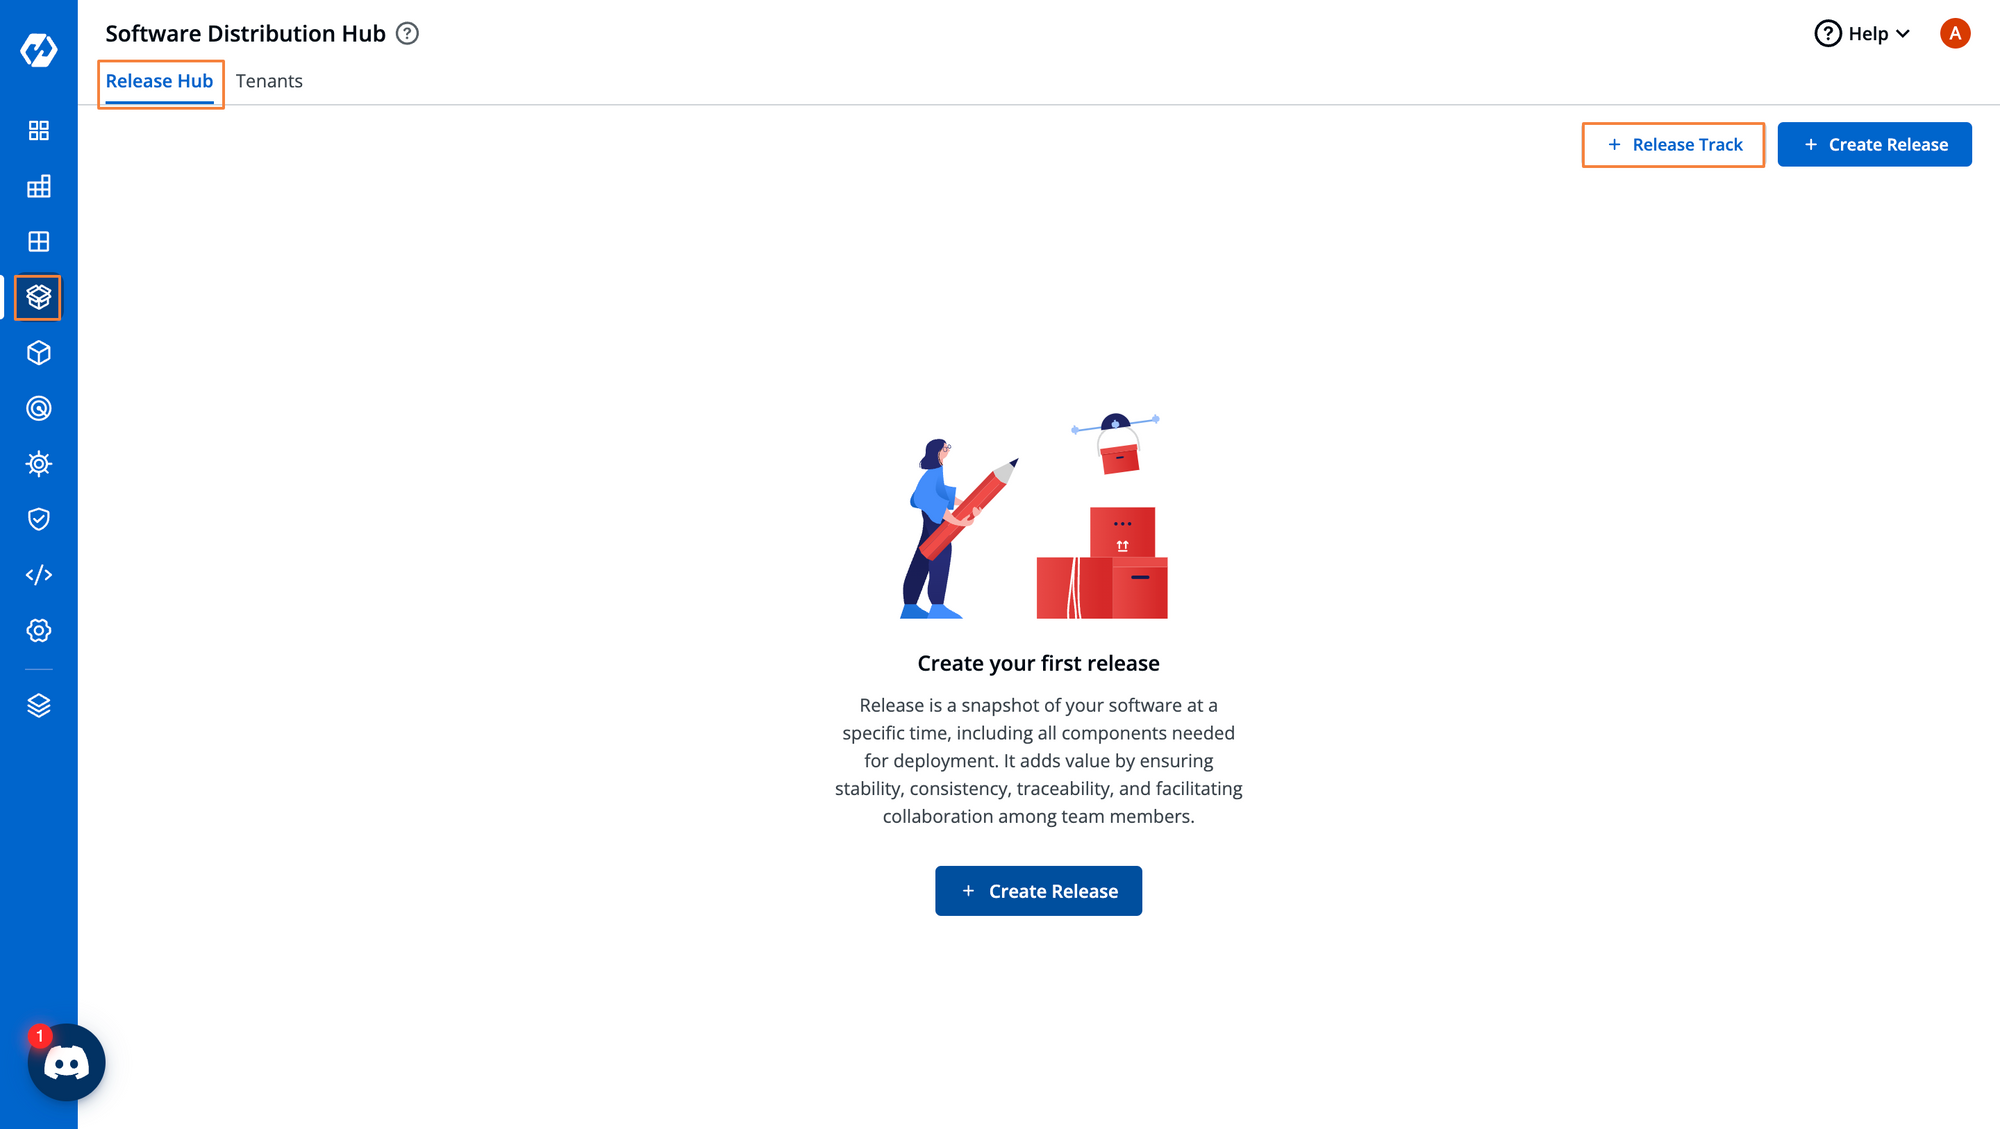
Now we have the tenants created, and the respective environments mapped to their specific releases. We are ready to go and create a release for our customers.
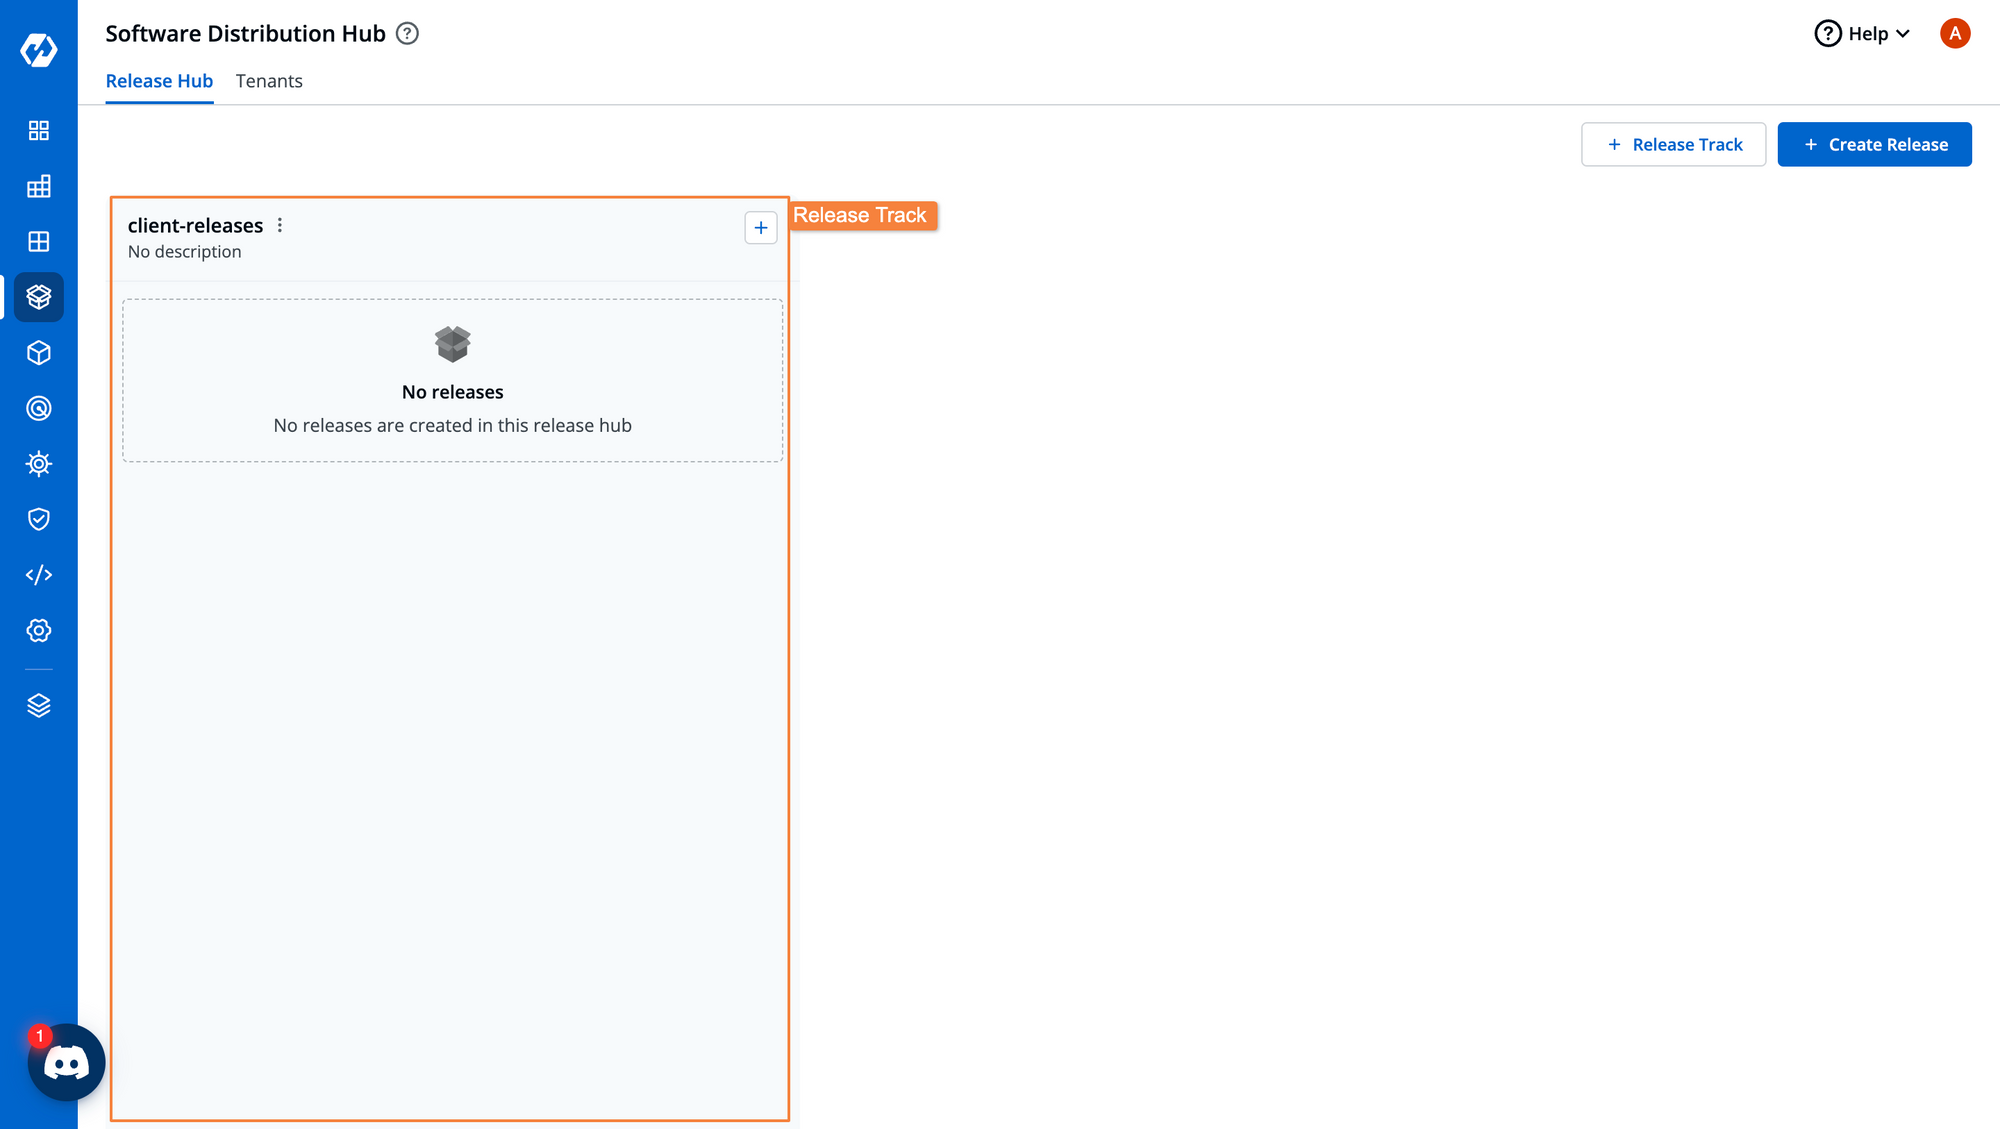
From the Release Hub tab, we will first create 3 release tracks. These release tracks will help us maintain an audit log of all the releases that have been created and the status of each release.
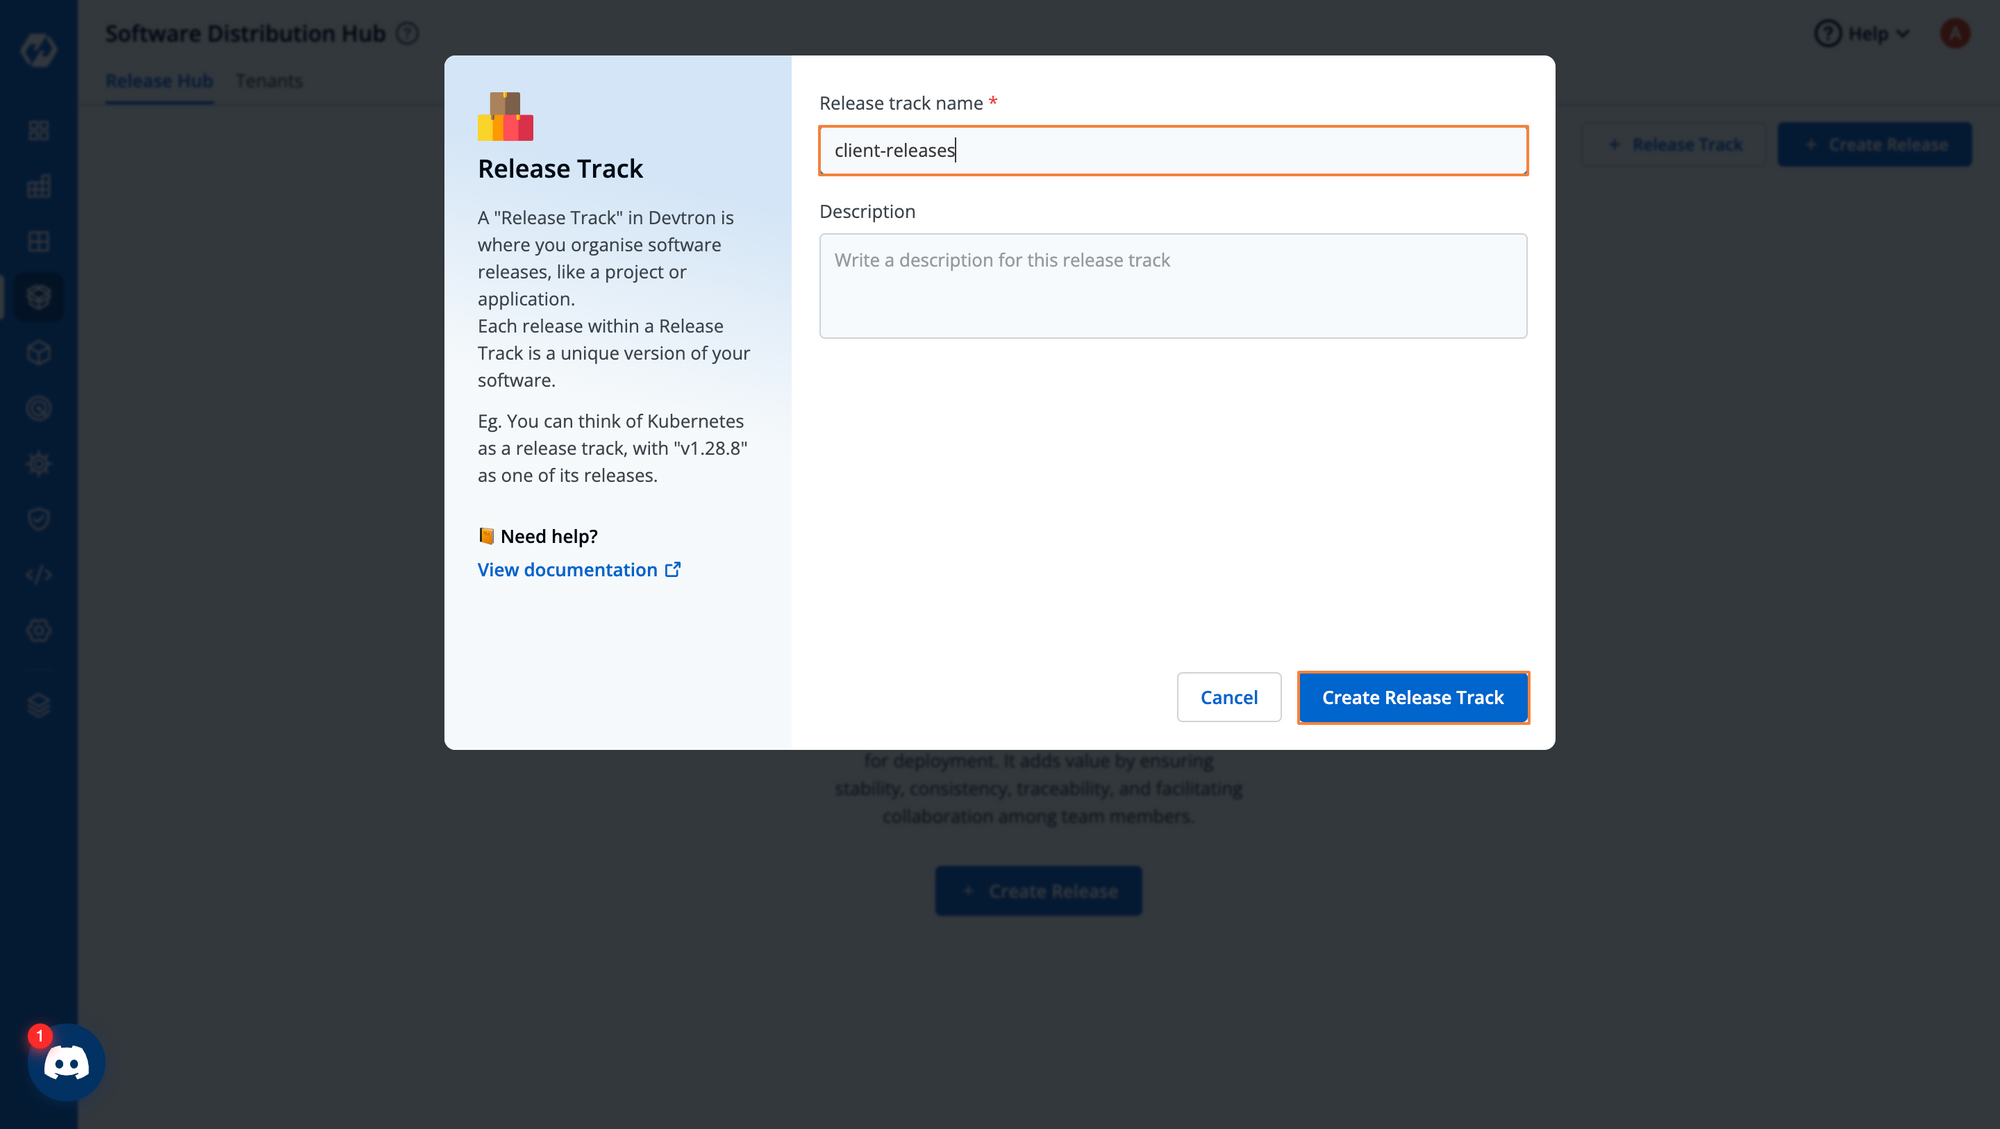
To create a release track, first click on the Release Track button from the Release Hub.
Provide a name for the track, and click on Create Release Track.
You will see the release track created. Right now it will be an empty track.
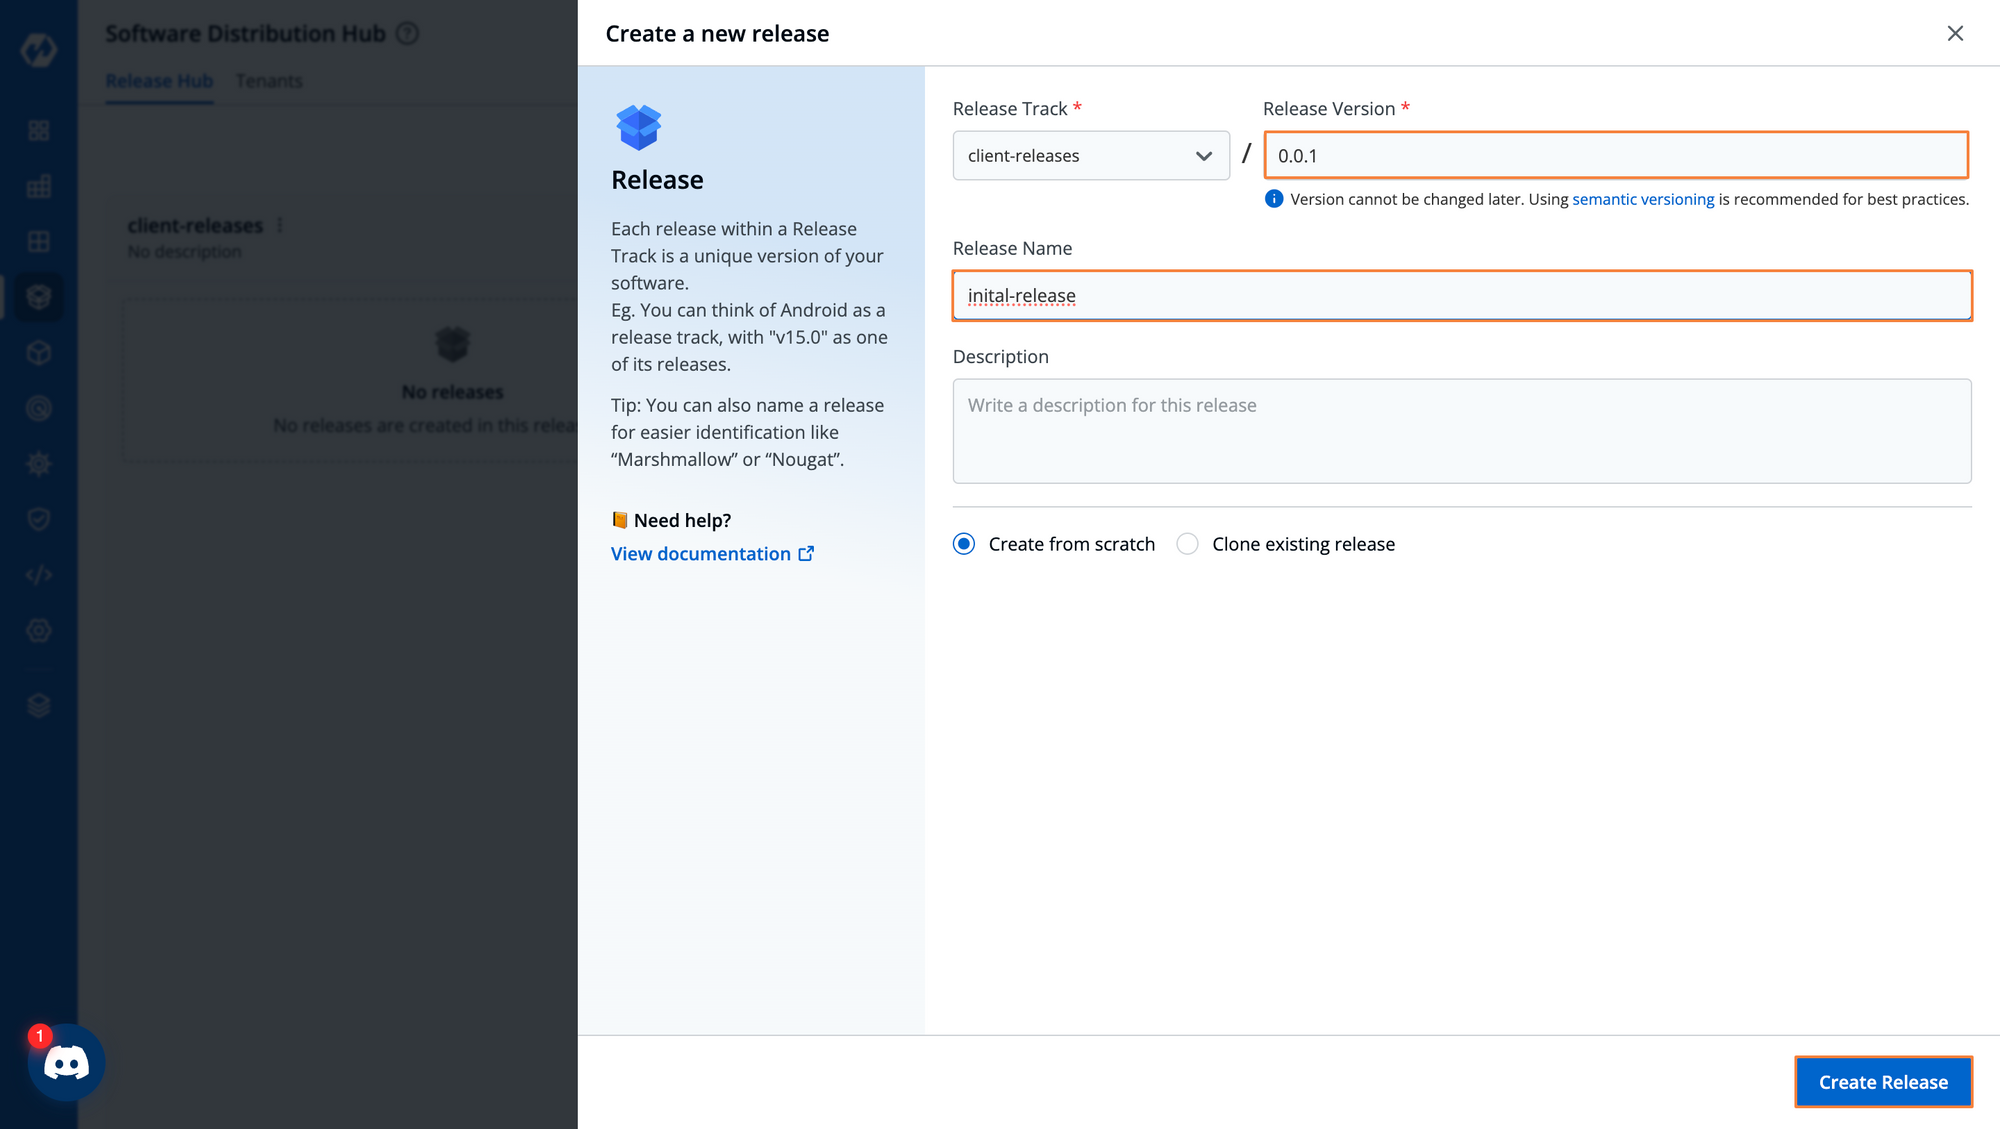
Within the release track, we will create a release. While creating a release, we need to provide the release version and a name for the release.
Since this is the very first release we are making for each of our customers, we will label this release as version 0.0.1, and name the release as initial-release
To create a release, first click on Create Release.
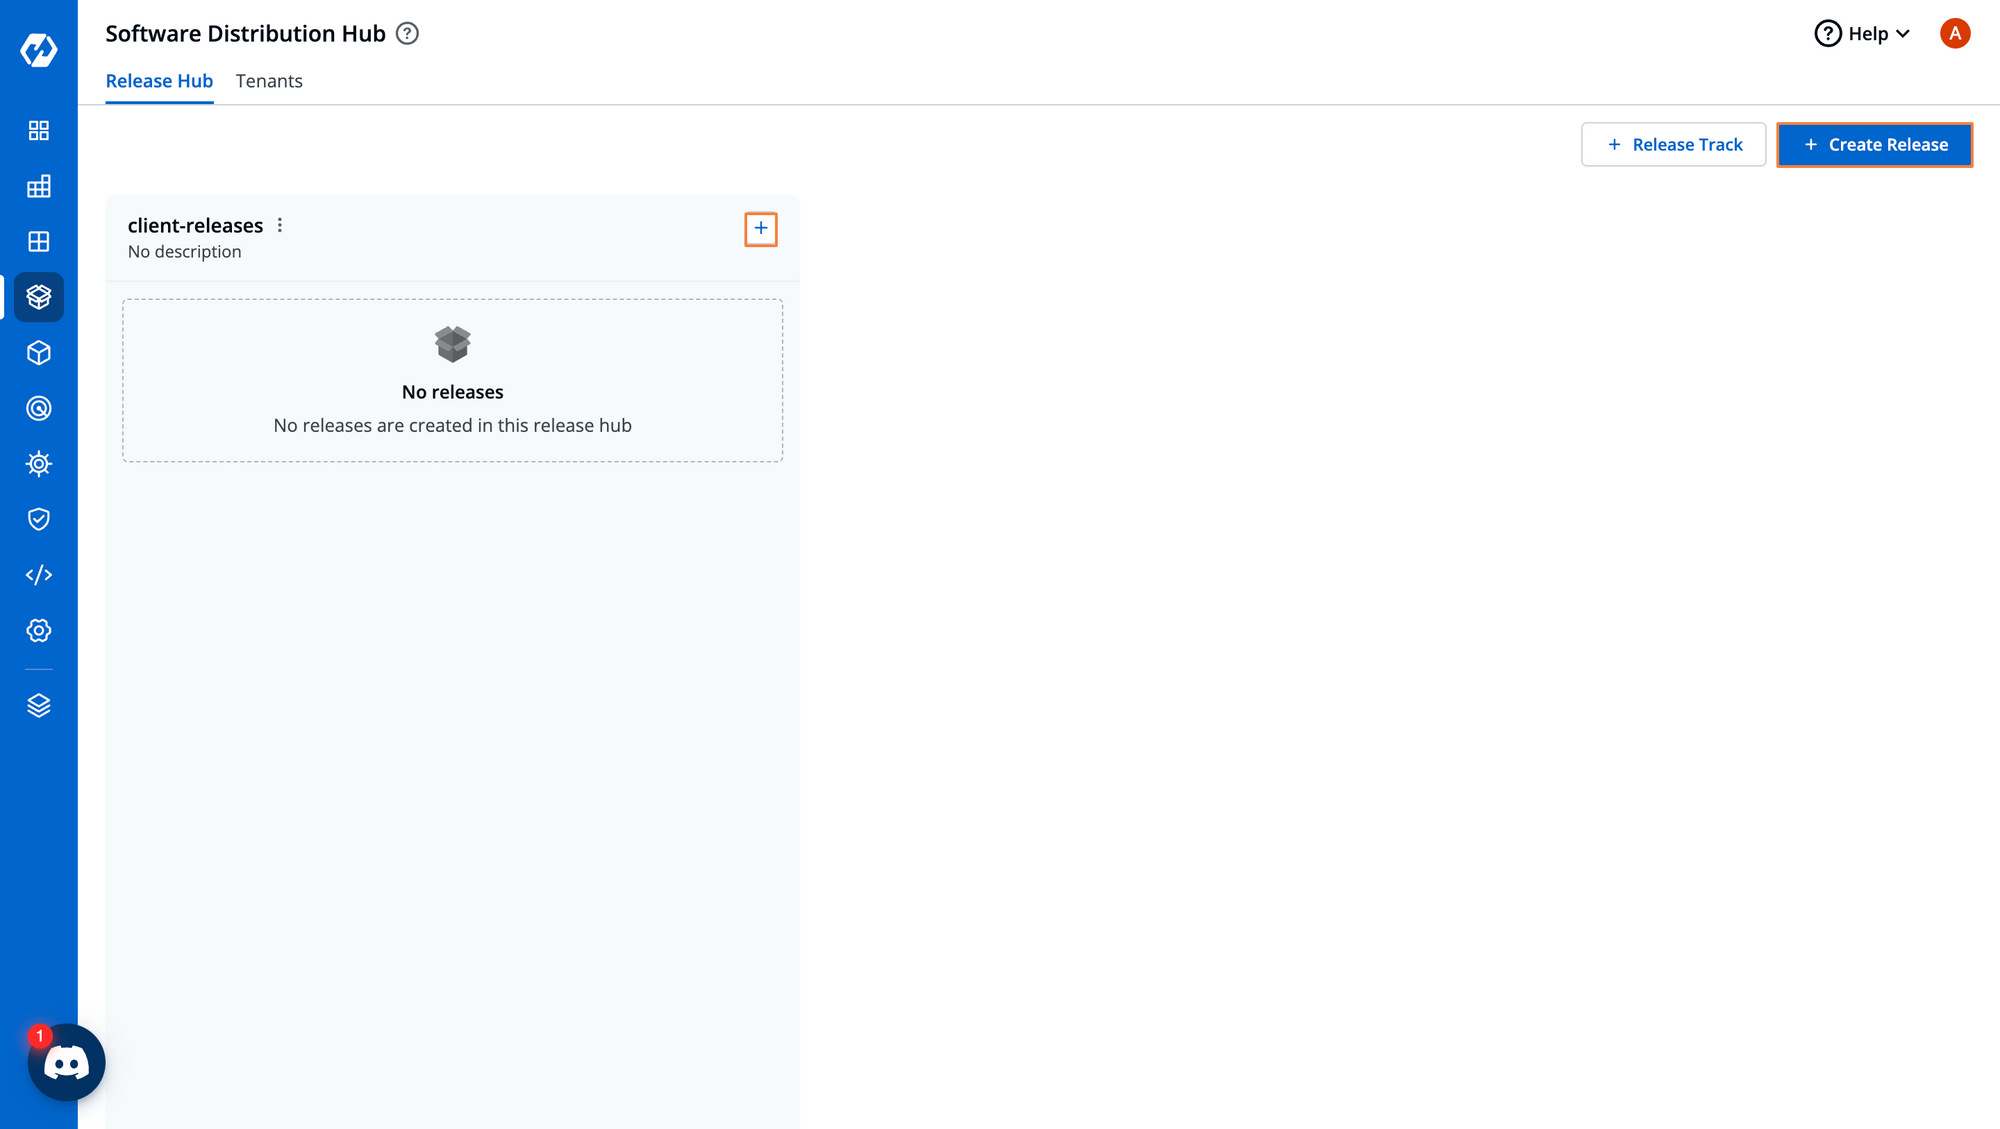
Within the release, we need to define the release version and give the release a name.
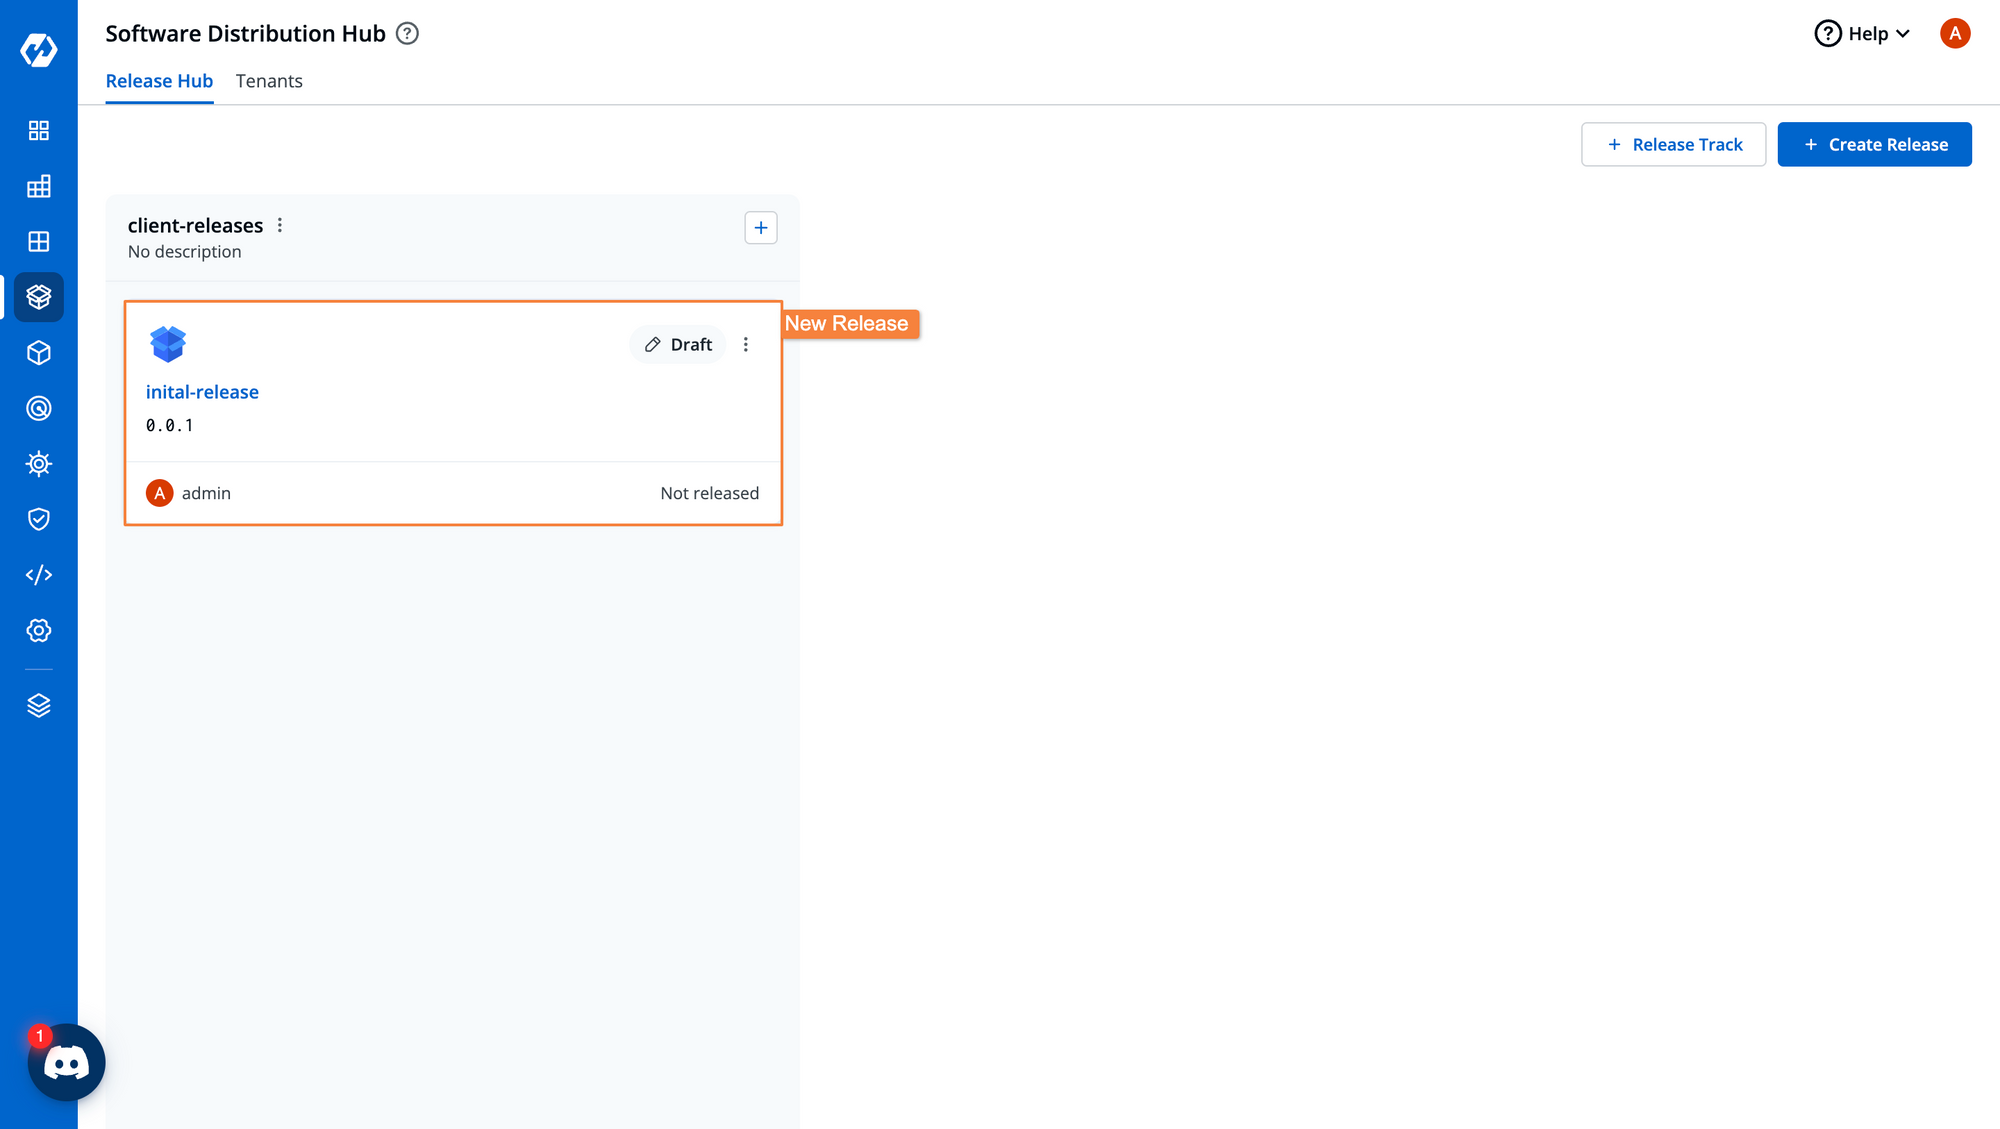
Once we create the release, it will appear within the correct release track. If a similar release needs to be replicated for different tenants, you can also clone the existing releases.
We have to define a few requirements before we can trigger the release cycle. Within the requirements, we will define the applications that we are going to release to our customers.
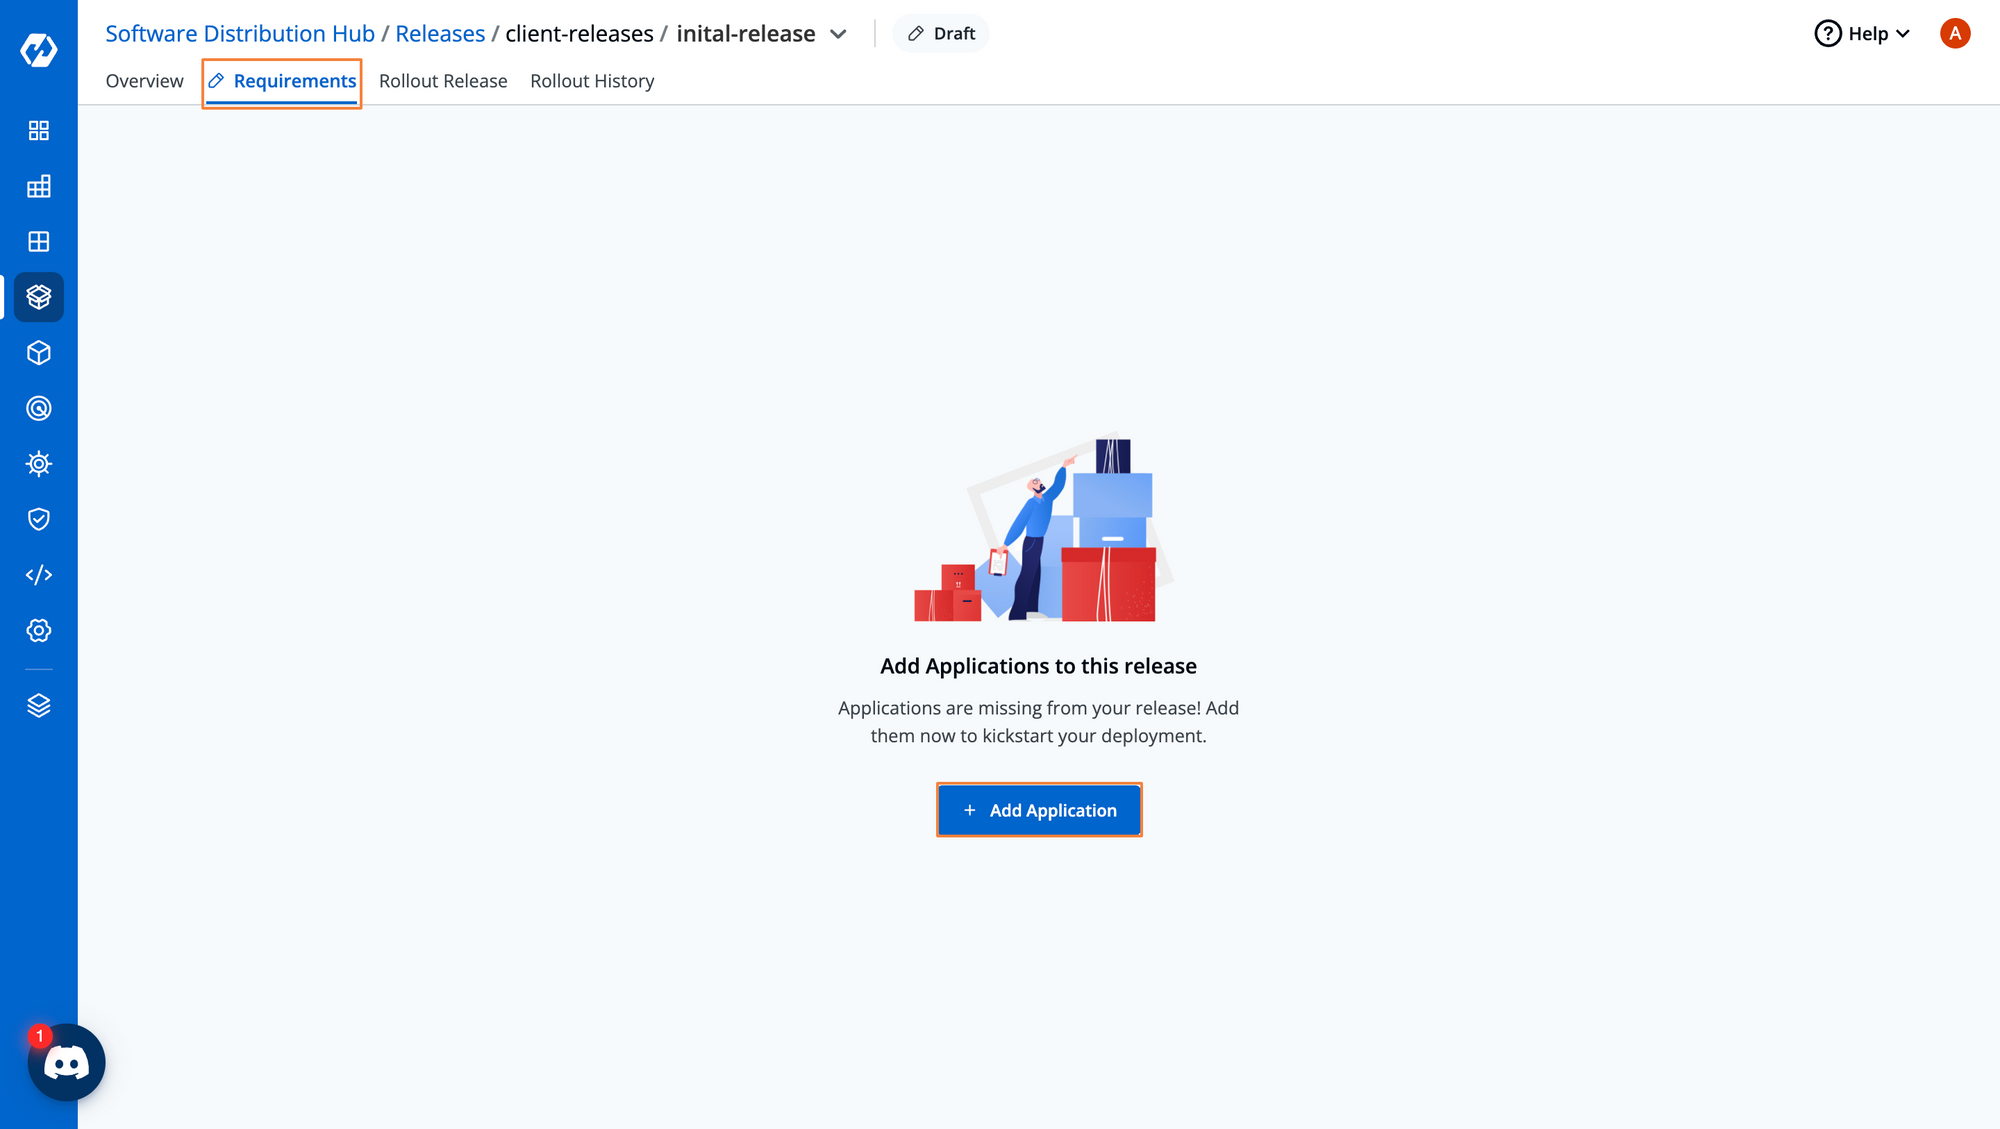
We already have created the required applications previously. When we created the pipeline for this application, we created a pipeline to deploy to the environments of all three tenants i.e. Alpha, Beta, and Gamma.
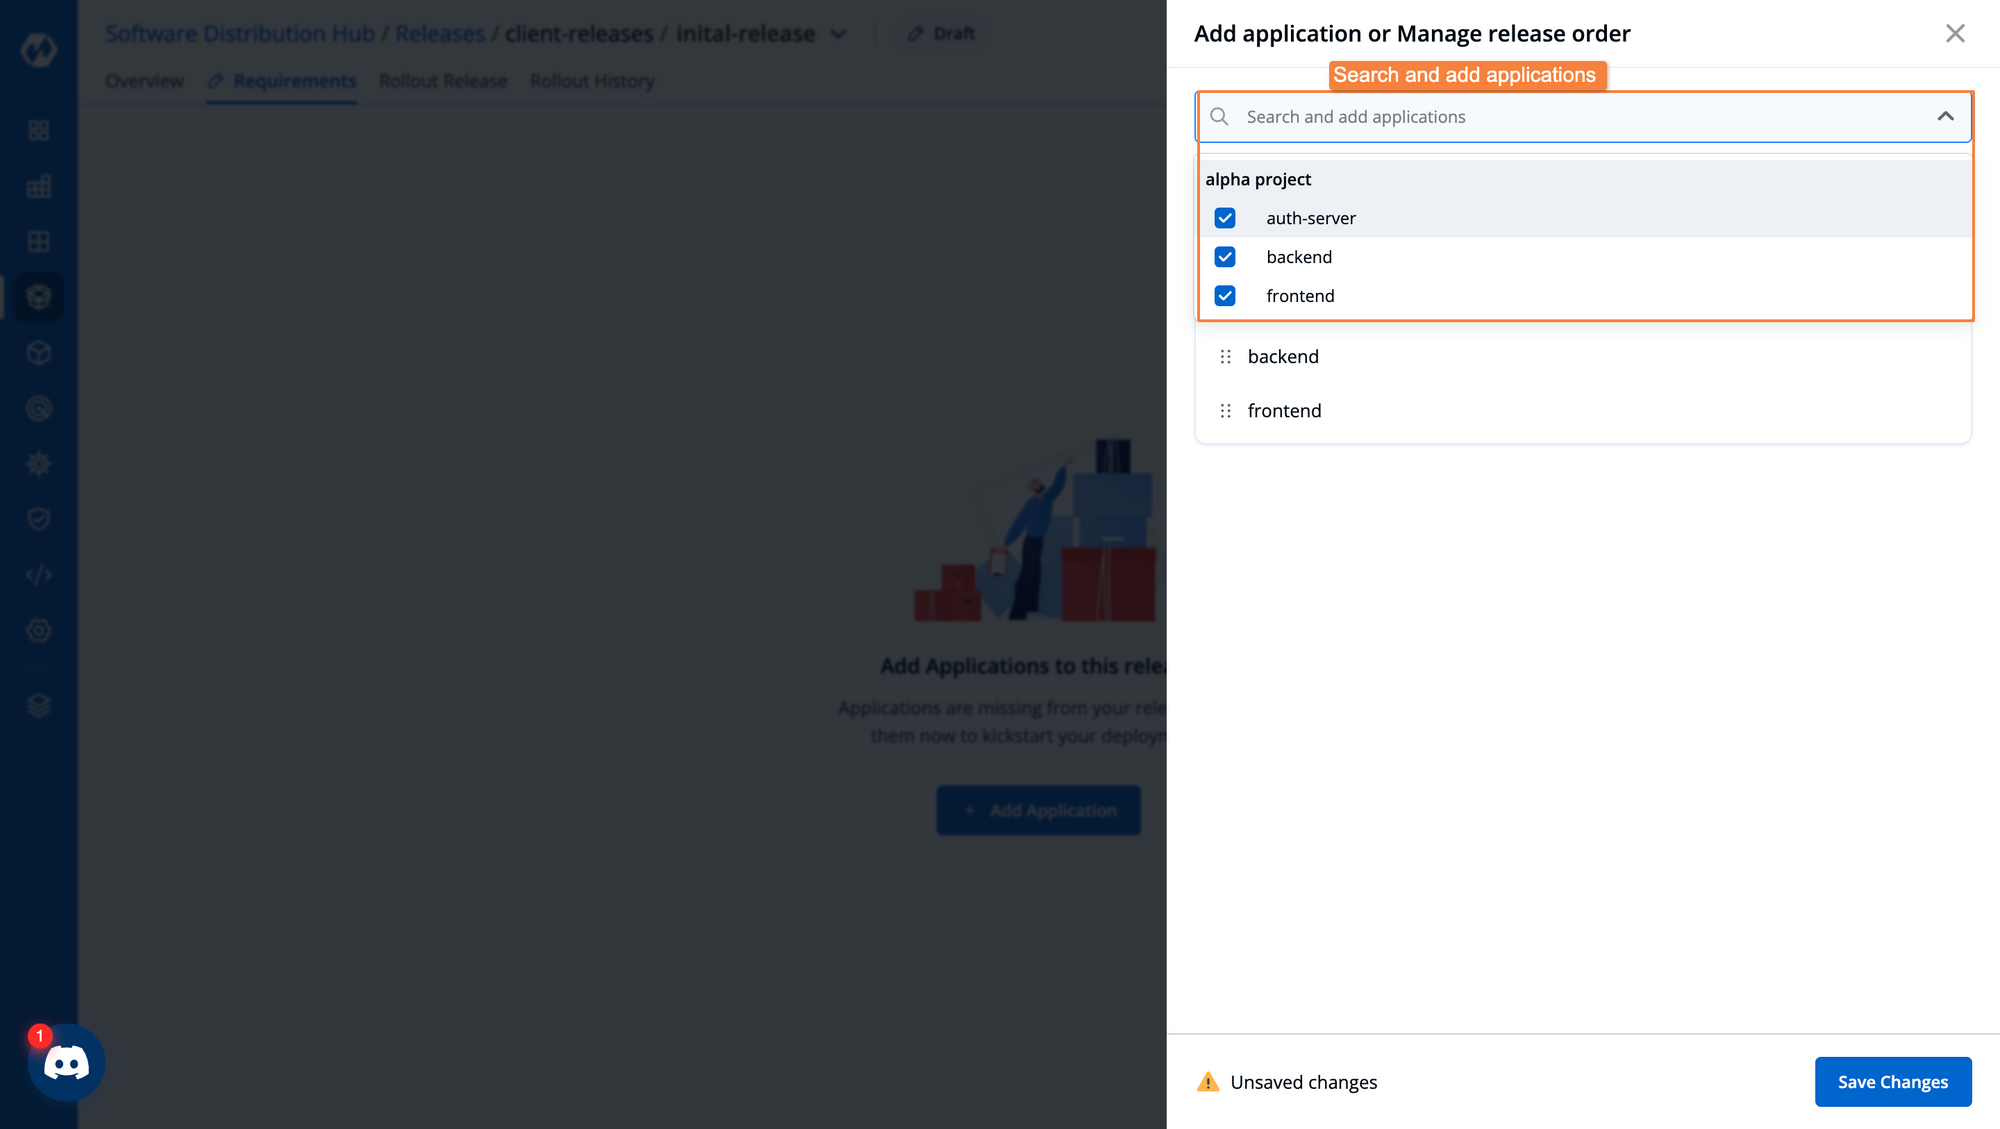
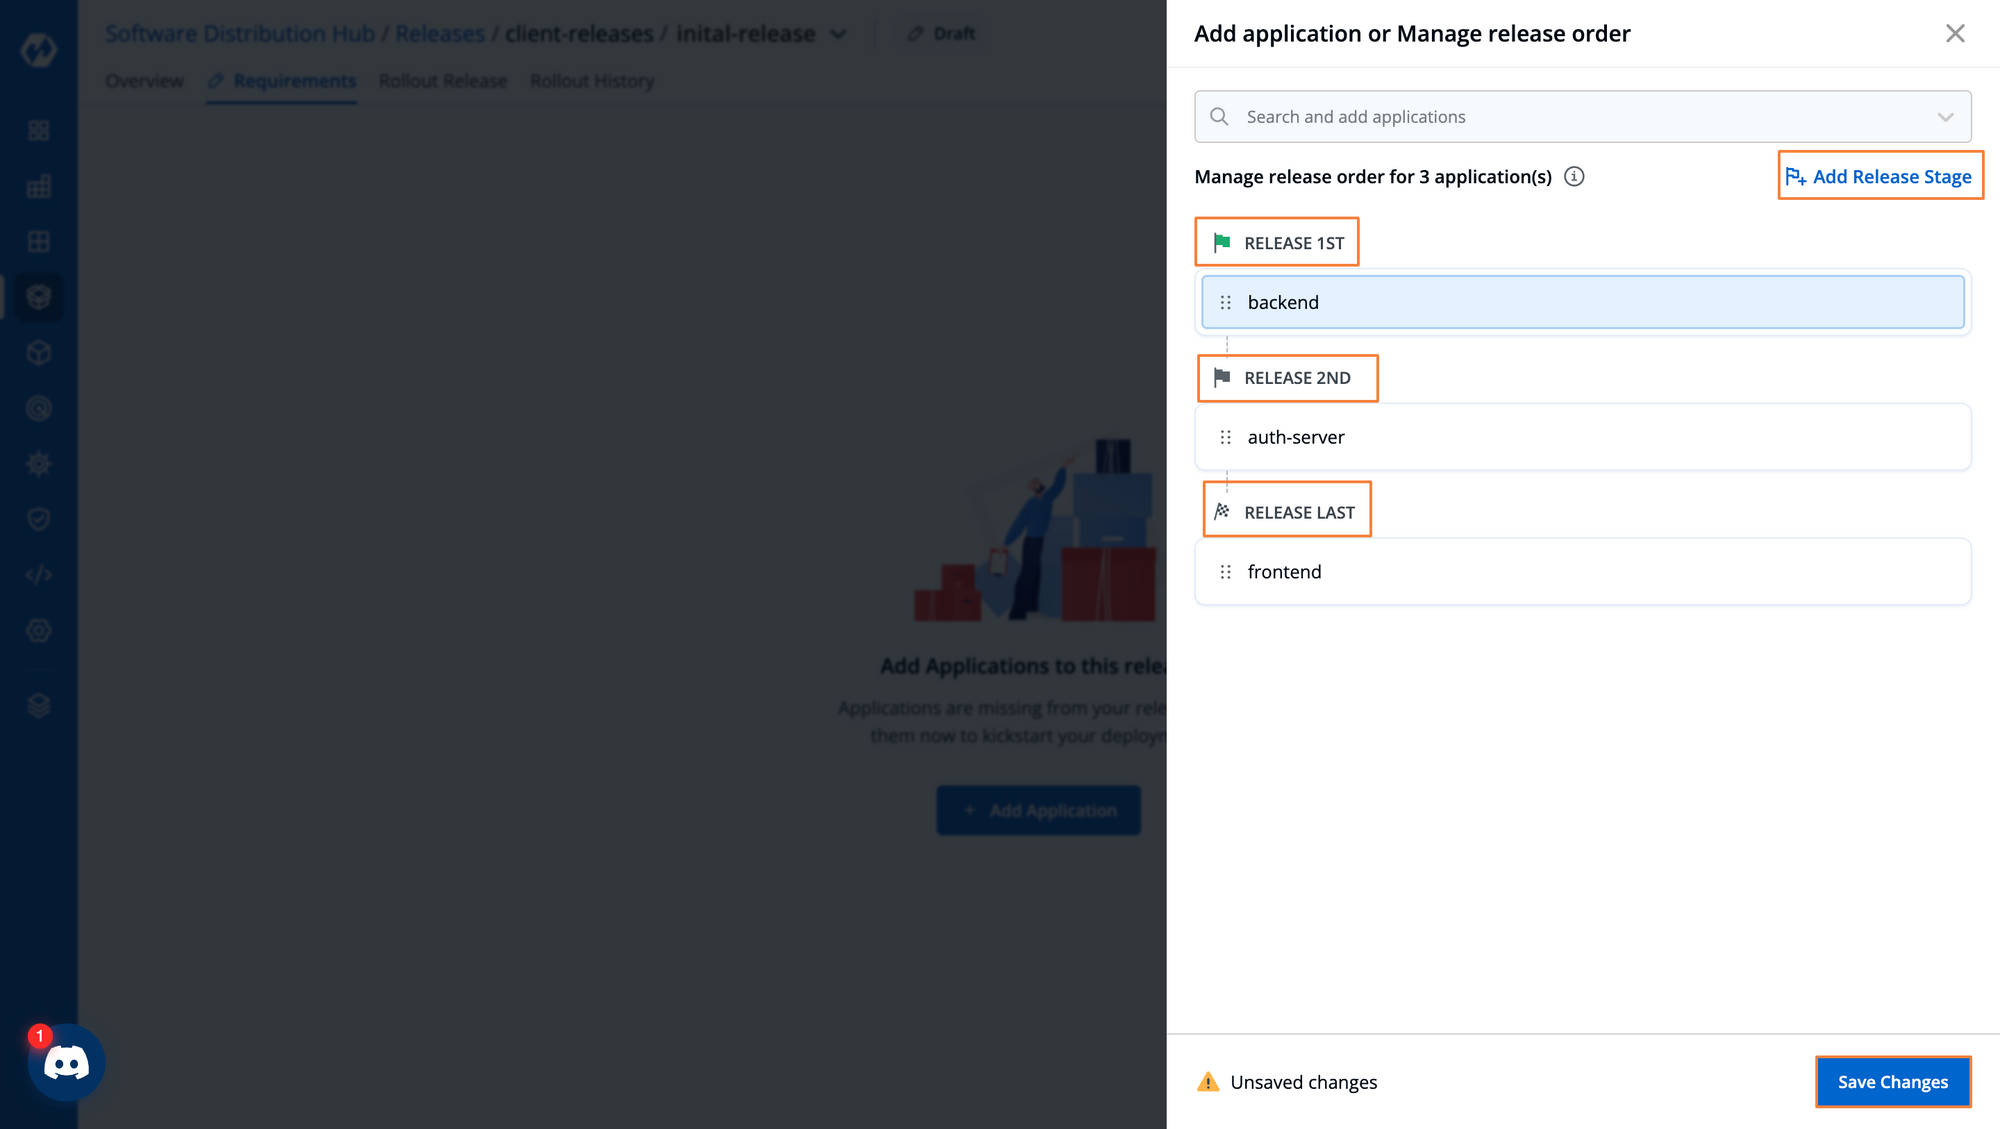
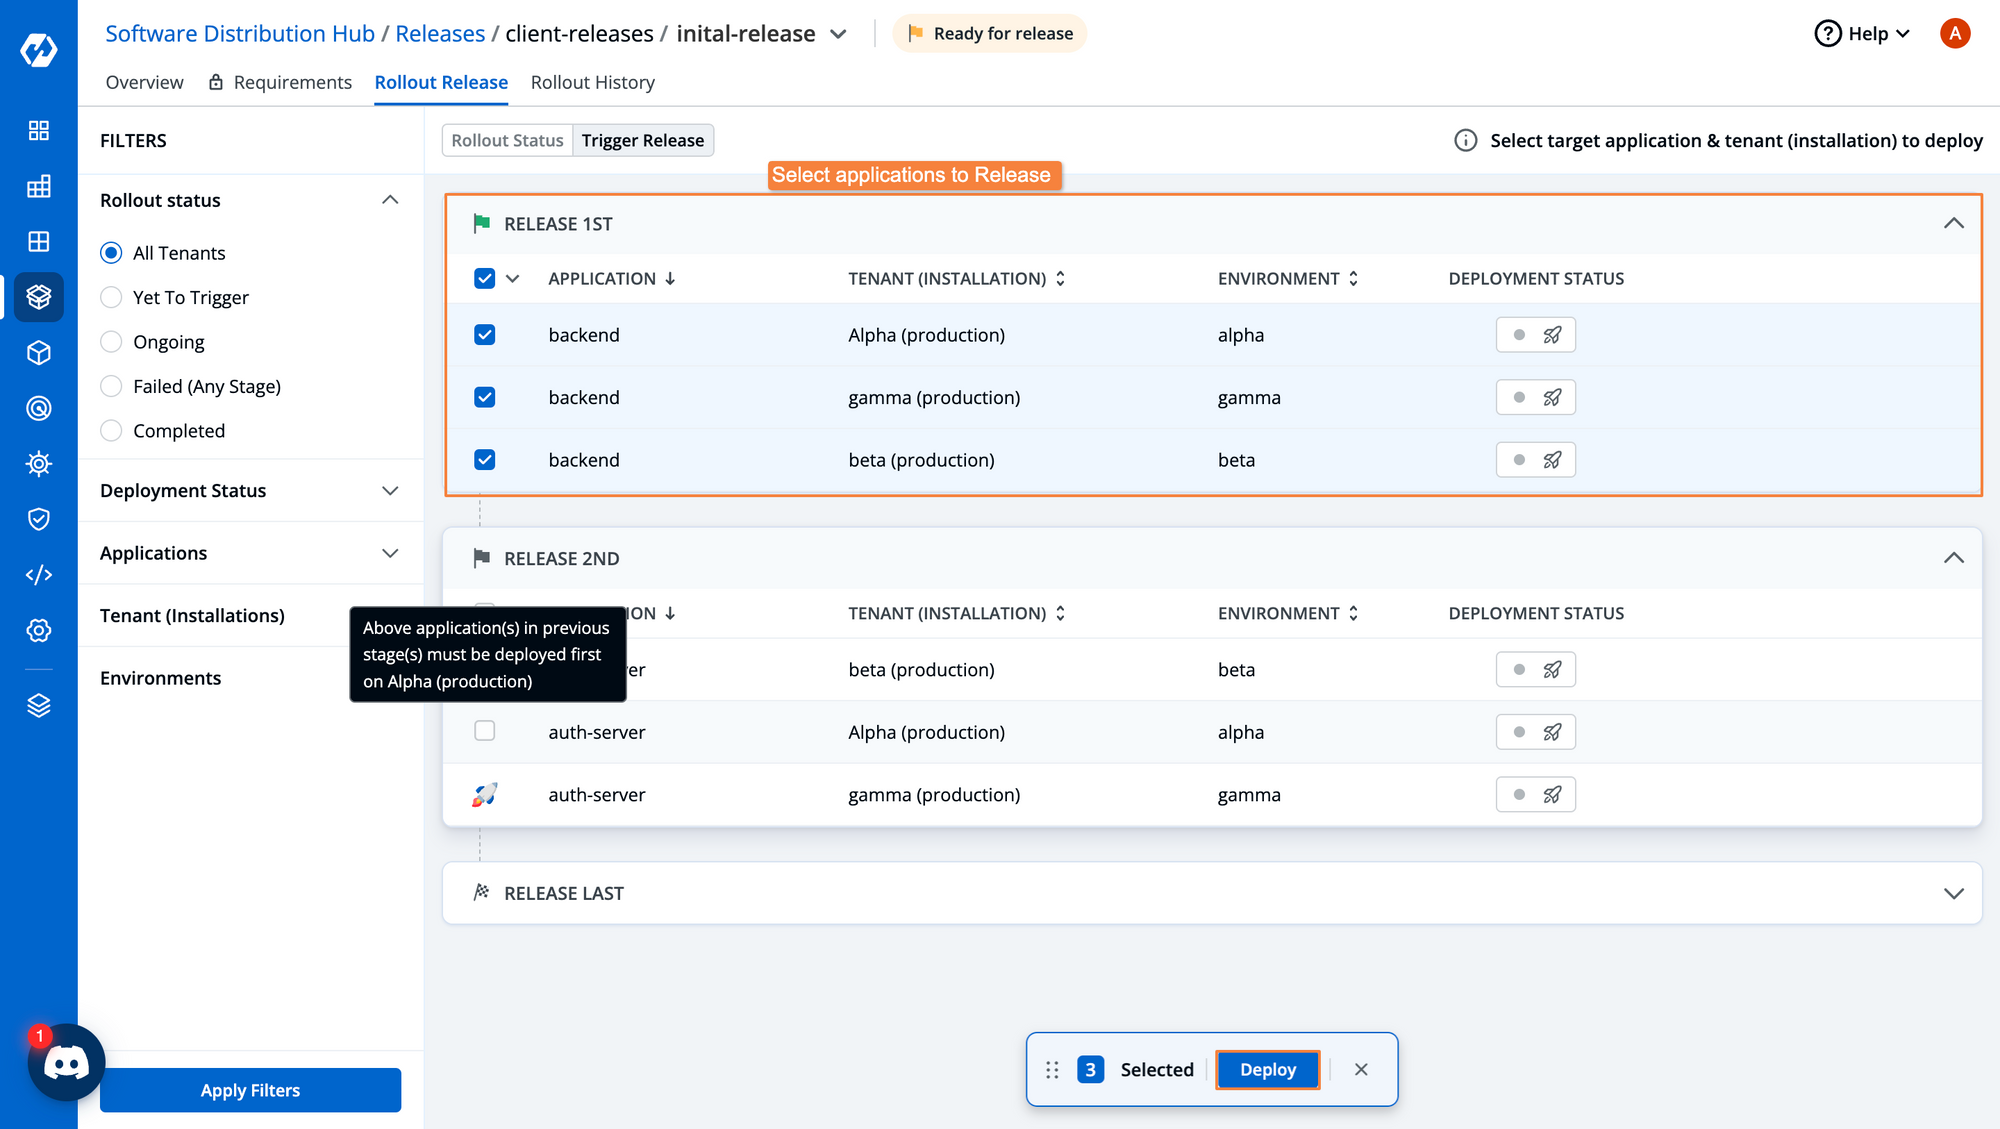
We will also define the release order. We first want to deploy the backend, then the authorization server, and finally the frontend of the application. So we will create 3 release stages, and order the applications accordingly.
Until the applications in the first release stage are deployed, we will not be able to trigger the deployment for the second stage.
After defining the applications that we want to deploy, we also need to specify the correct container images. Within the application pipeline, you would probably be building the application multiple times, depending on how often the source code is updated. So there would be multiple container images that are created.
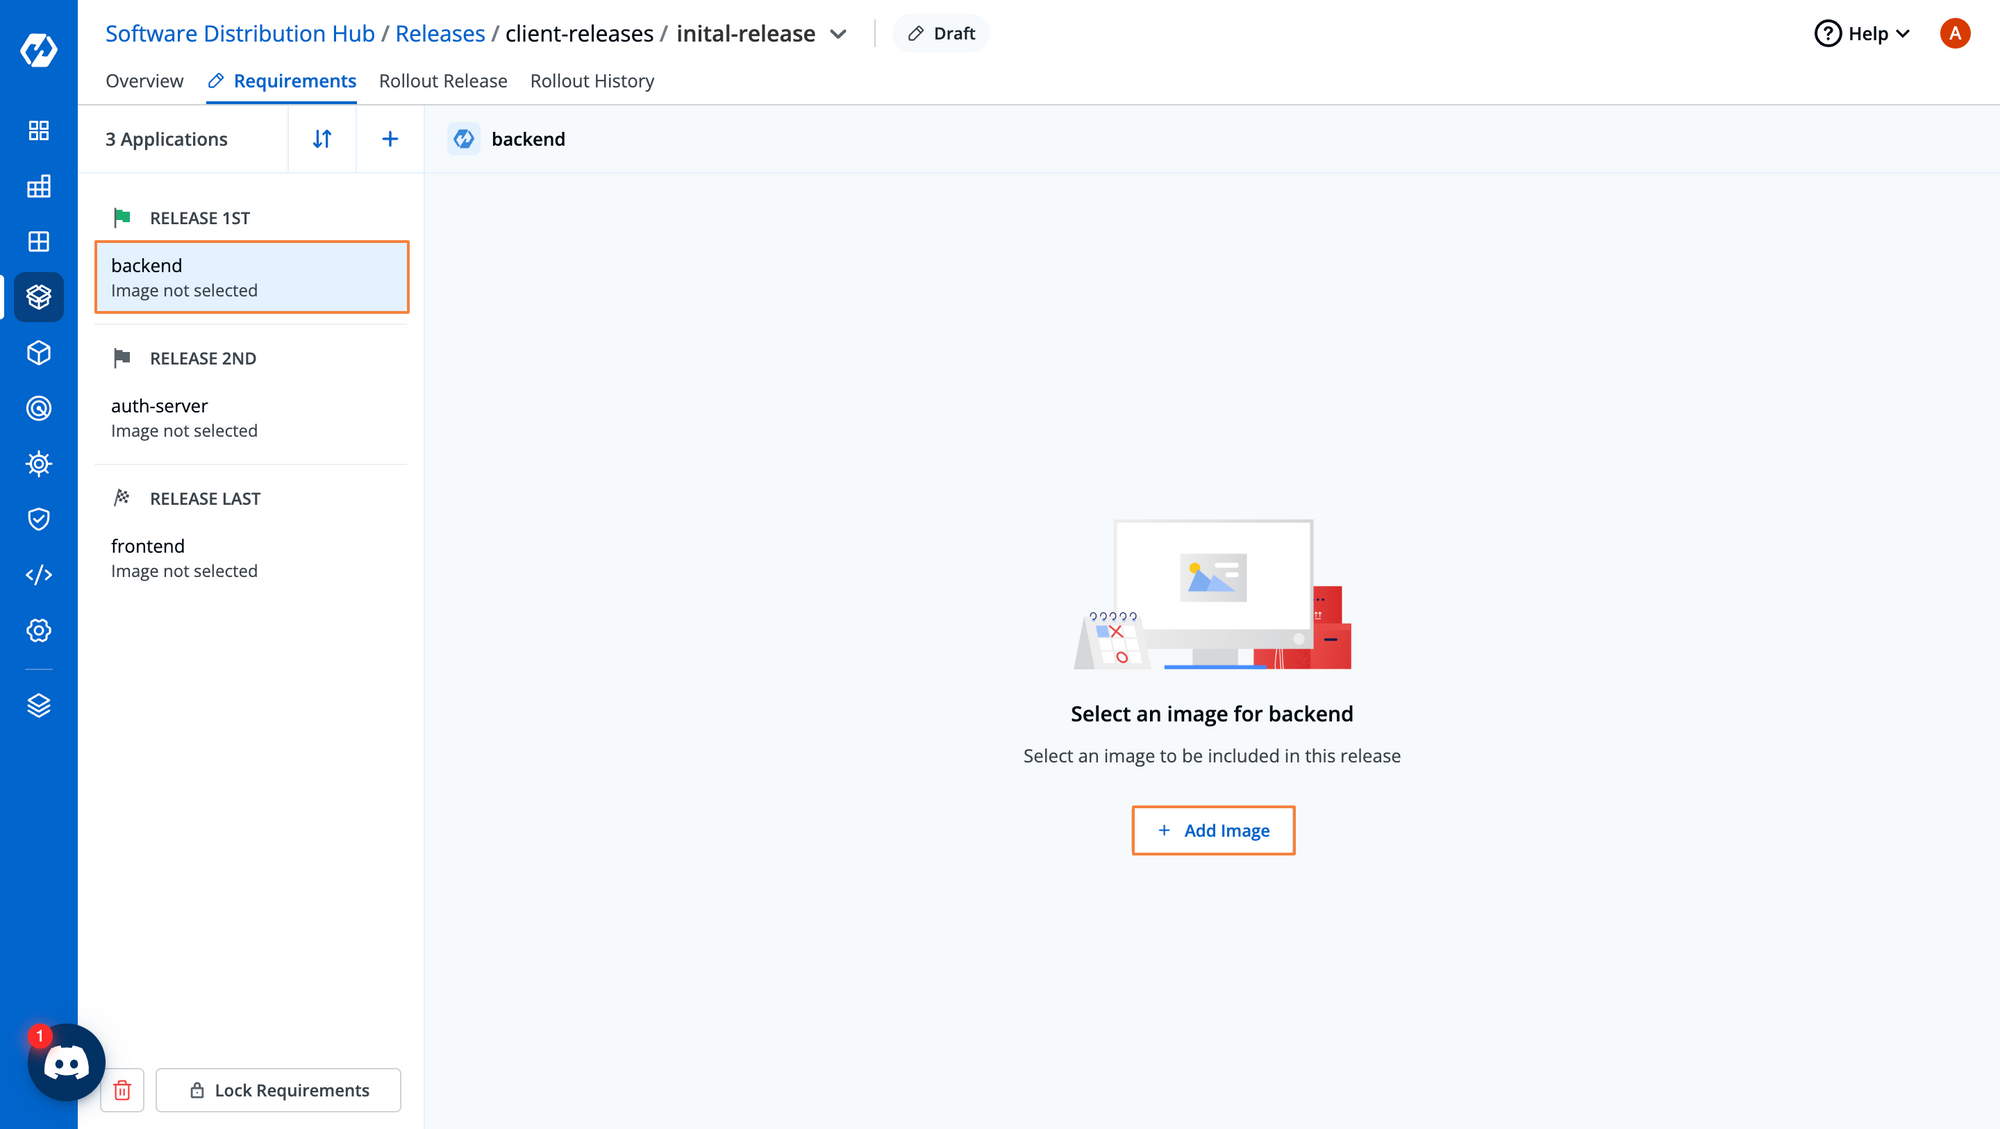
You can identify the container images based on the image tags, and select the correct image which should be used for the deployment.
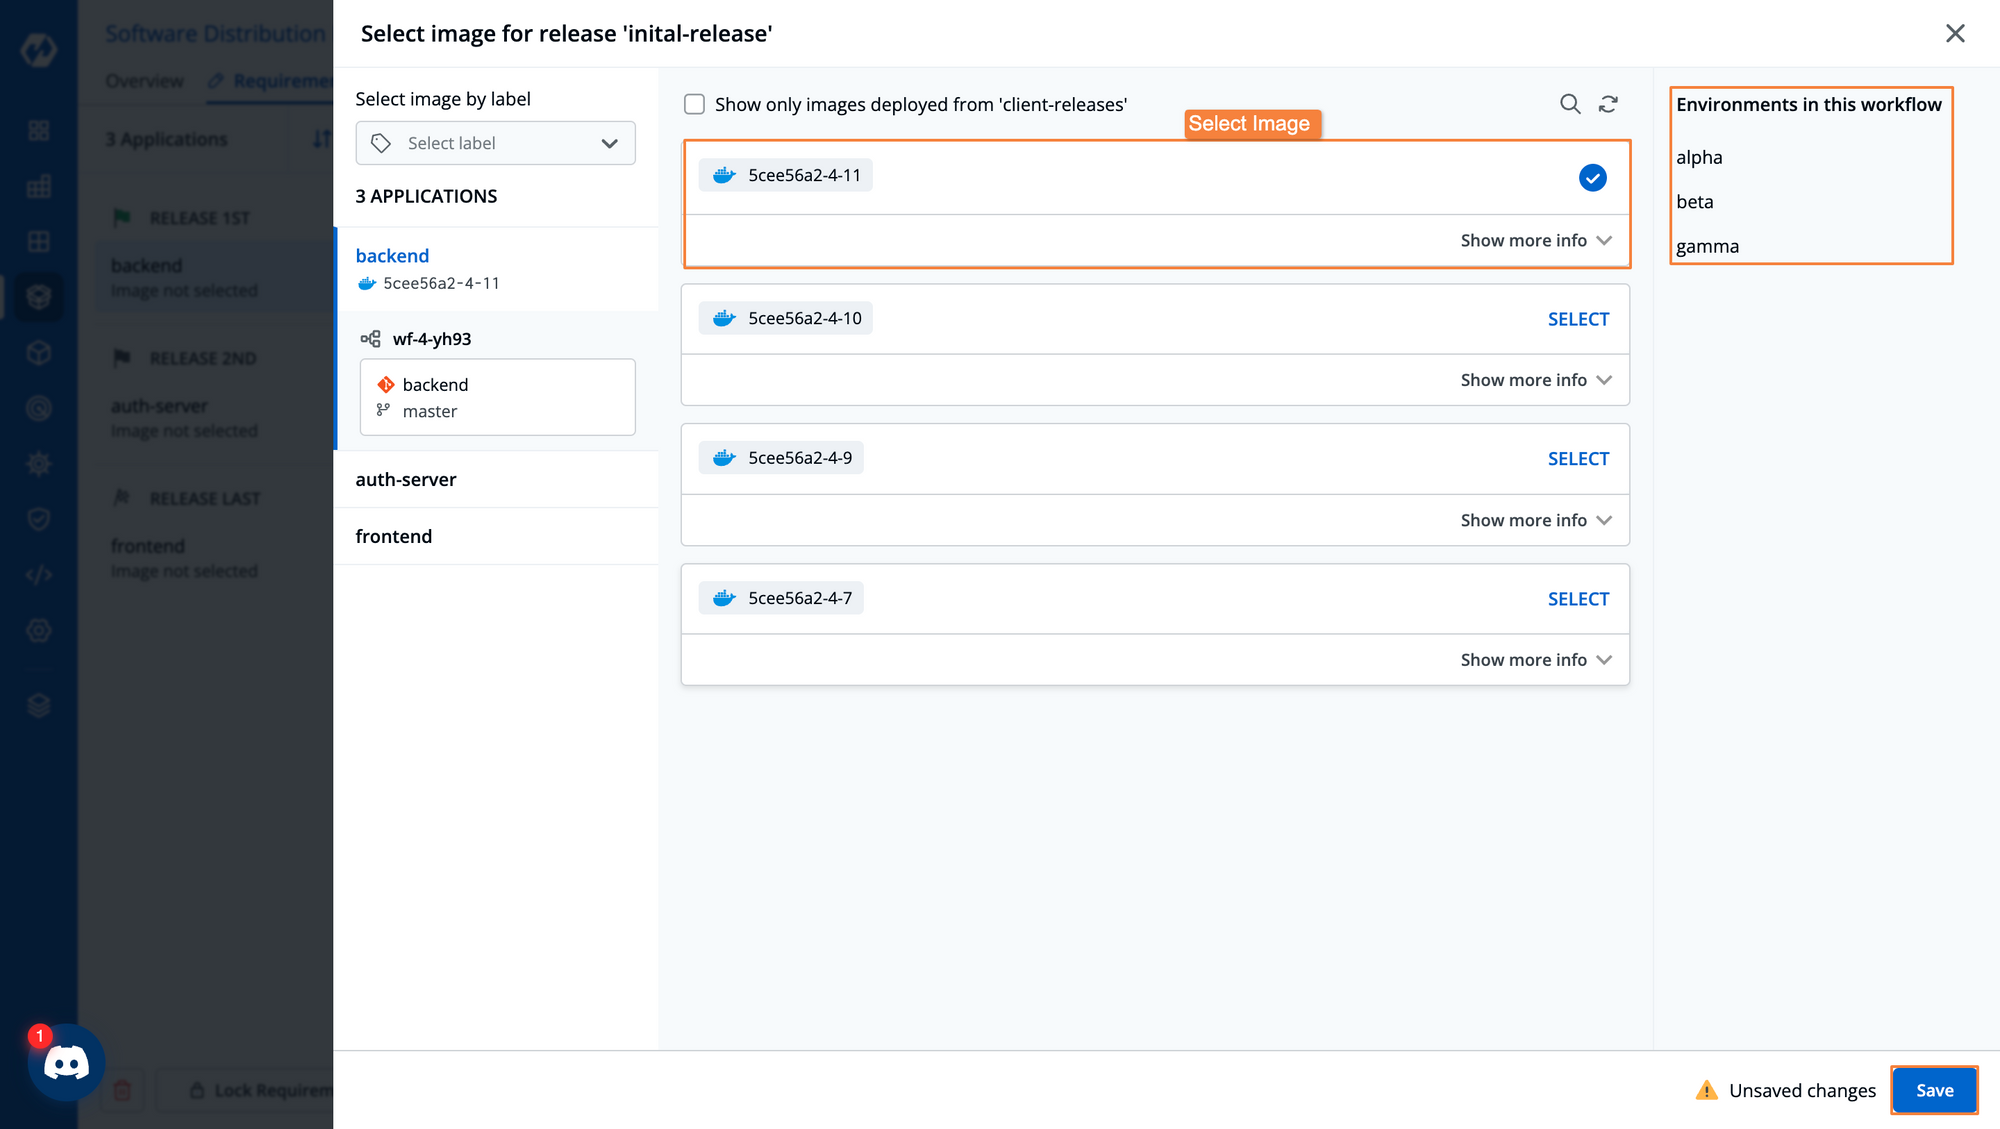
Once we have finalized the applications and their respective images, we will go ahead and lock the requirements. Locking the requirements ensures that no changes can be made to the requirements that have been defined. Only a super-admin will be able to change the requirements.
We will also mark this release as Ready for Release

We are now ready to trigger the release of the application. From the Rollout Release tab, we can Trigger the release for the first release stage.
You can also notice that we are unable to deploy the applications in the second or last release stage. We will be able to deploy the applications in those stages only after the previous stages have been completed.
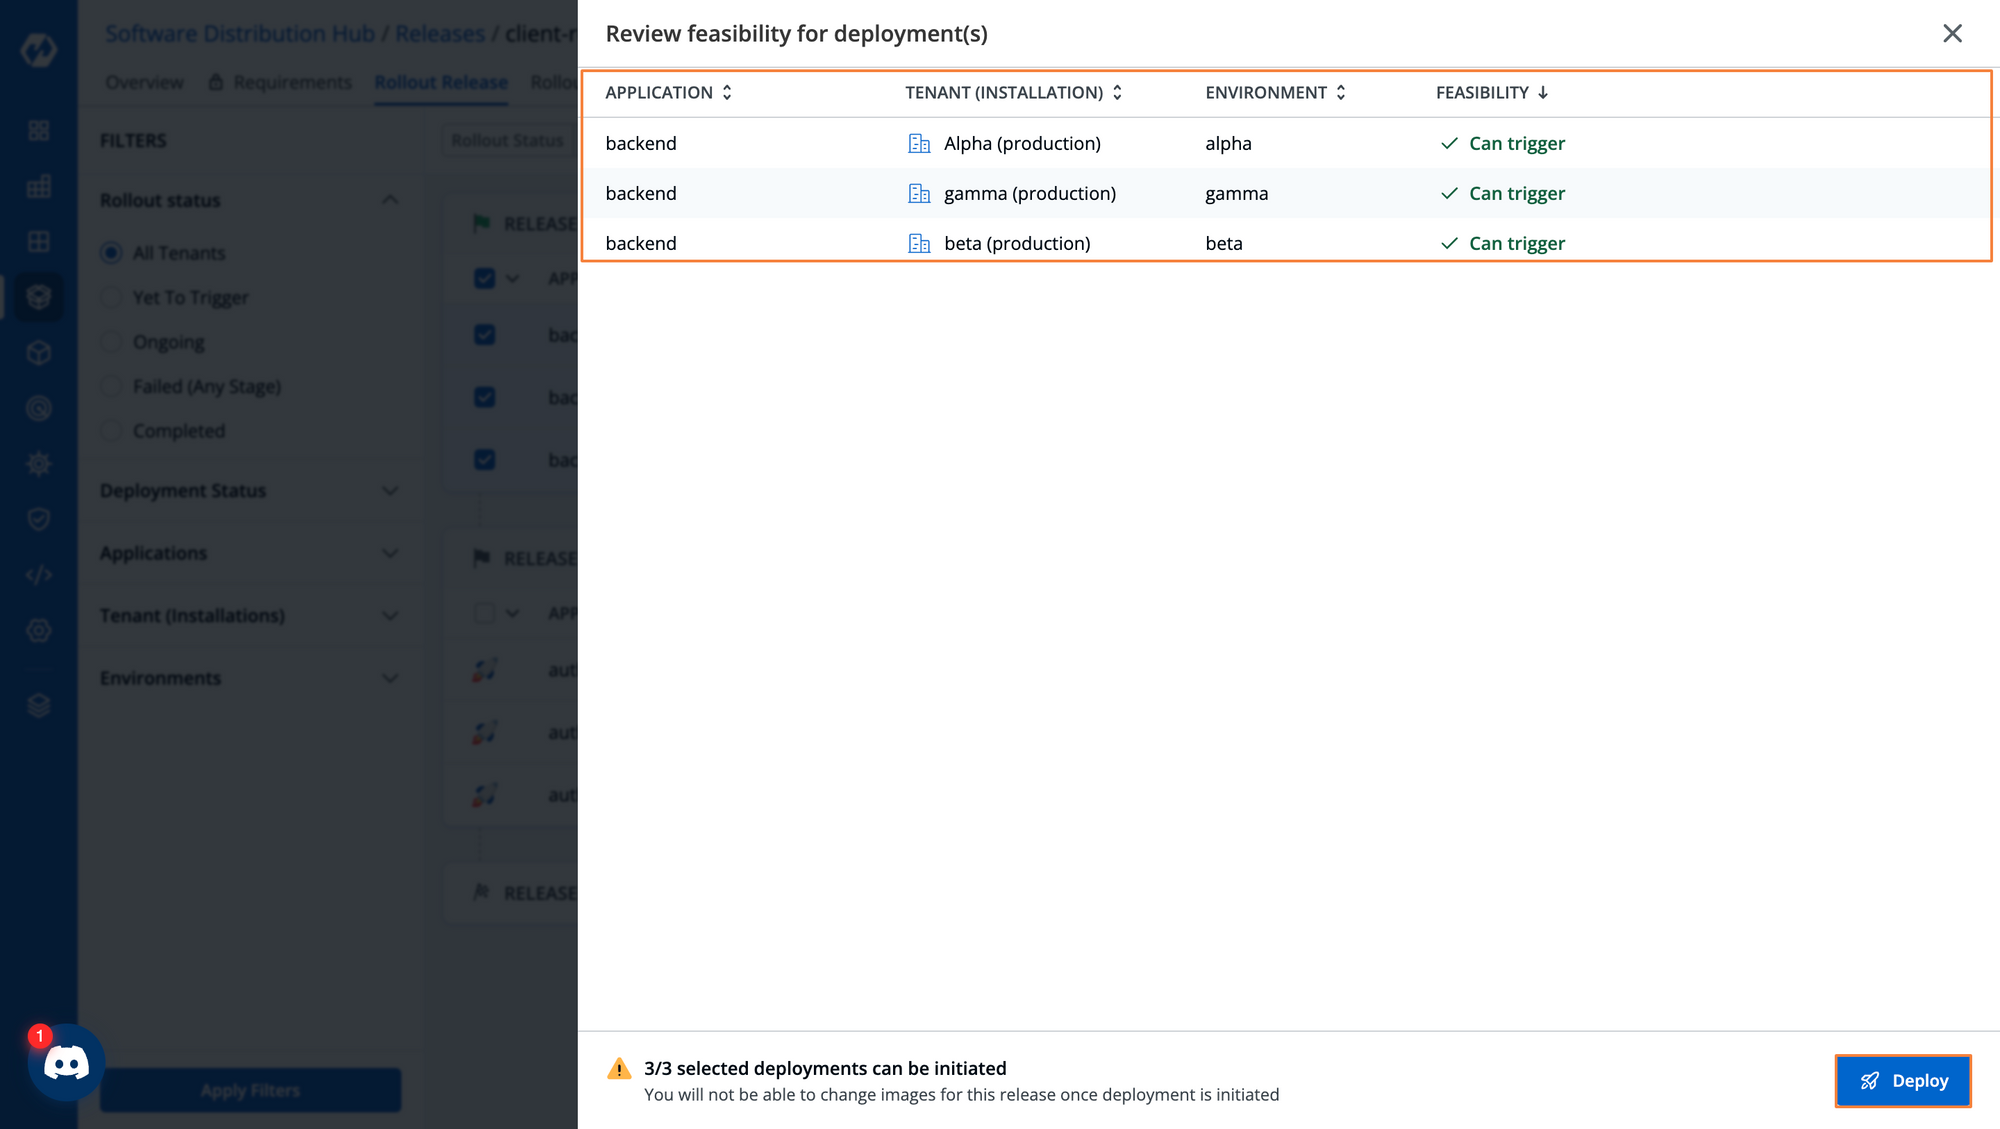
After clicking on Deploy, you will get a confirmation pop-up. In this pop-up, we can review all of the configurations for the application. Once we have confirmed that everything is as we want, we can Deploy this application.
We can see the status of the entire release from the Rollout Status page. Clicking on the individual application will take us to the app details page and show the live status of the deployment.
Once the first stage of the application is successfully deployed, we can trigger the next stages of the deployment.

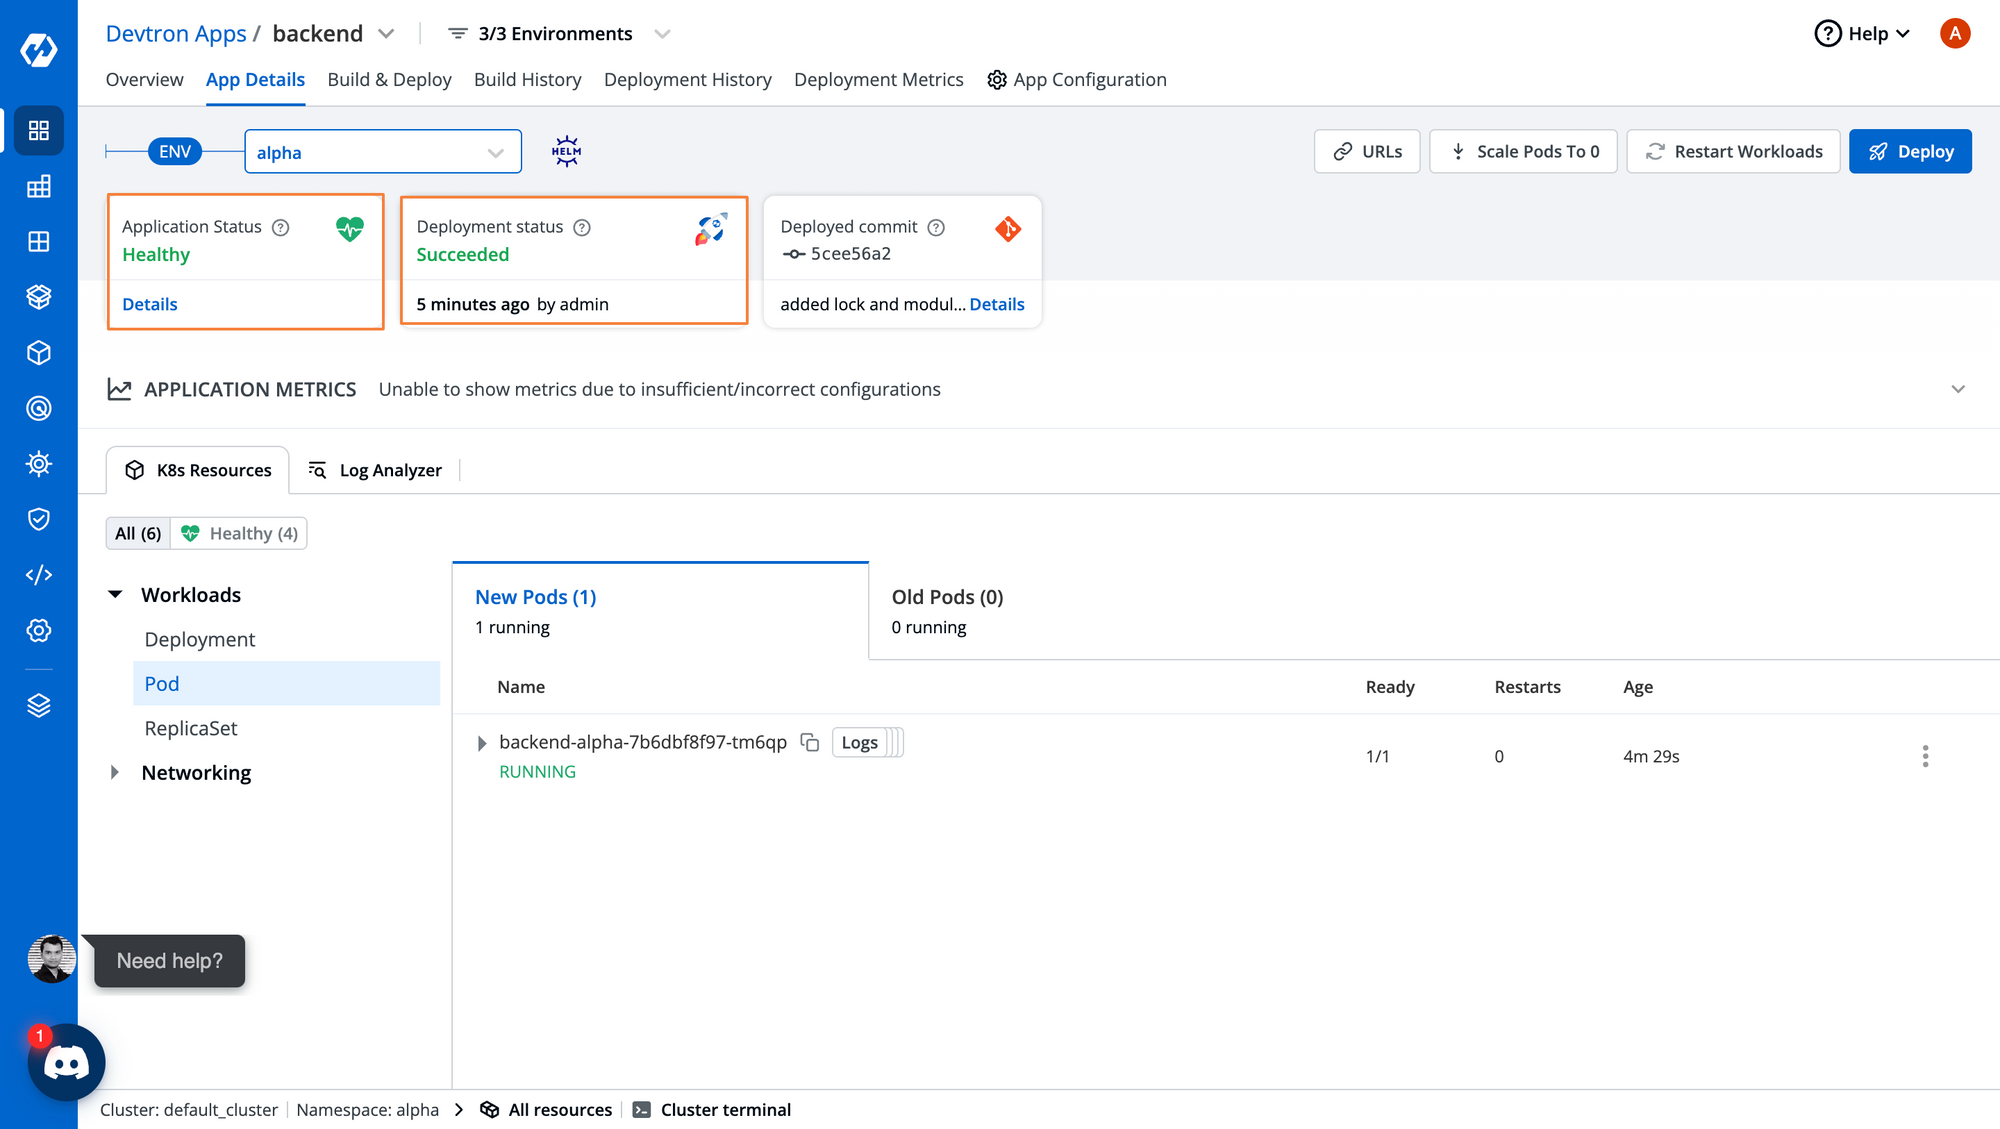
If we click on the application that is currently progressing, we will be taken to the app details page for that particular application. From here we can monitor the health and status of the application and all the resources it contains.
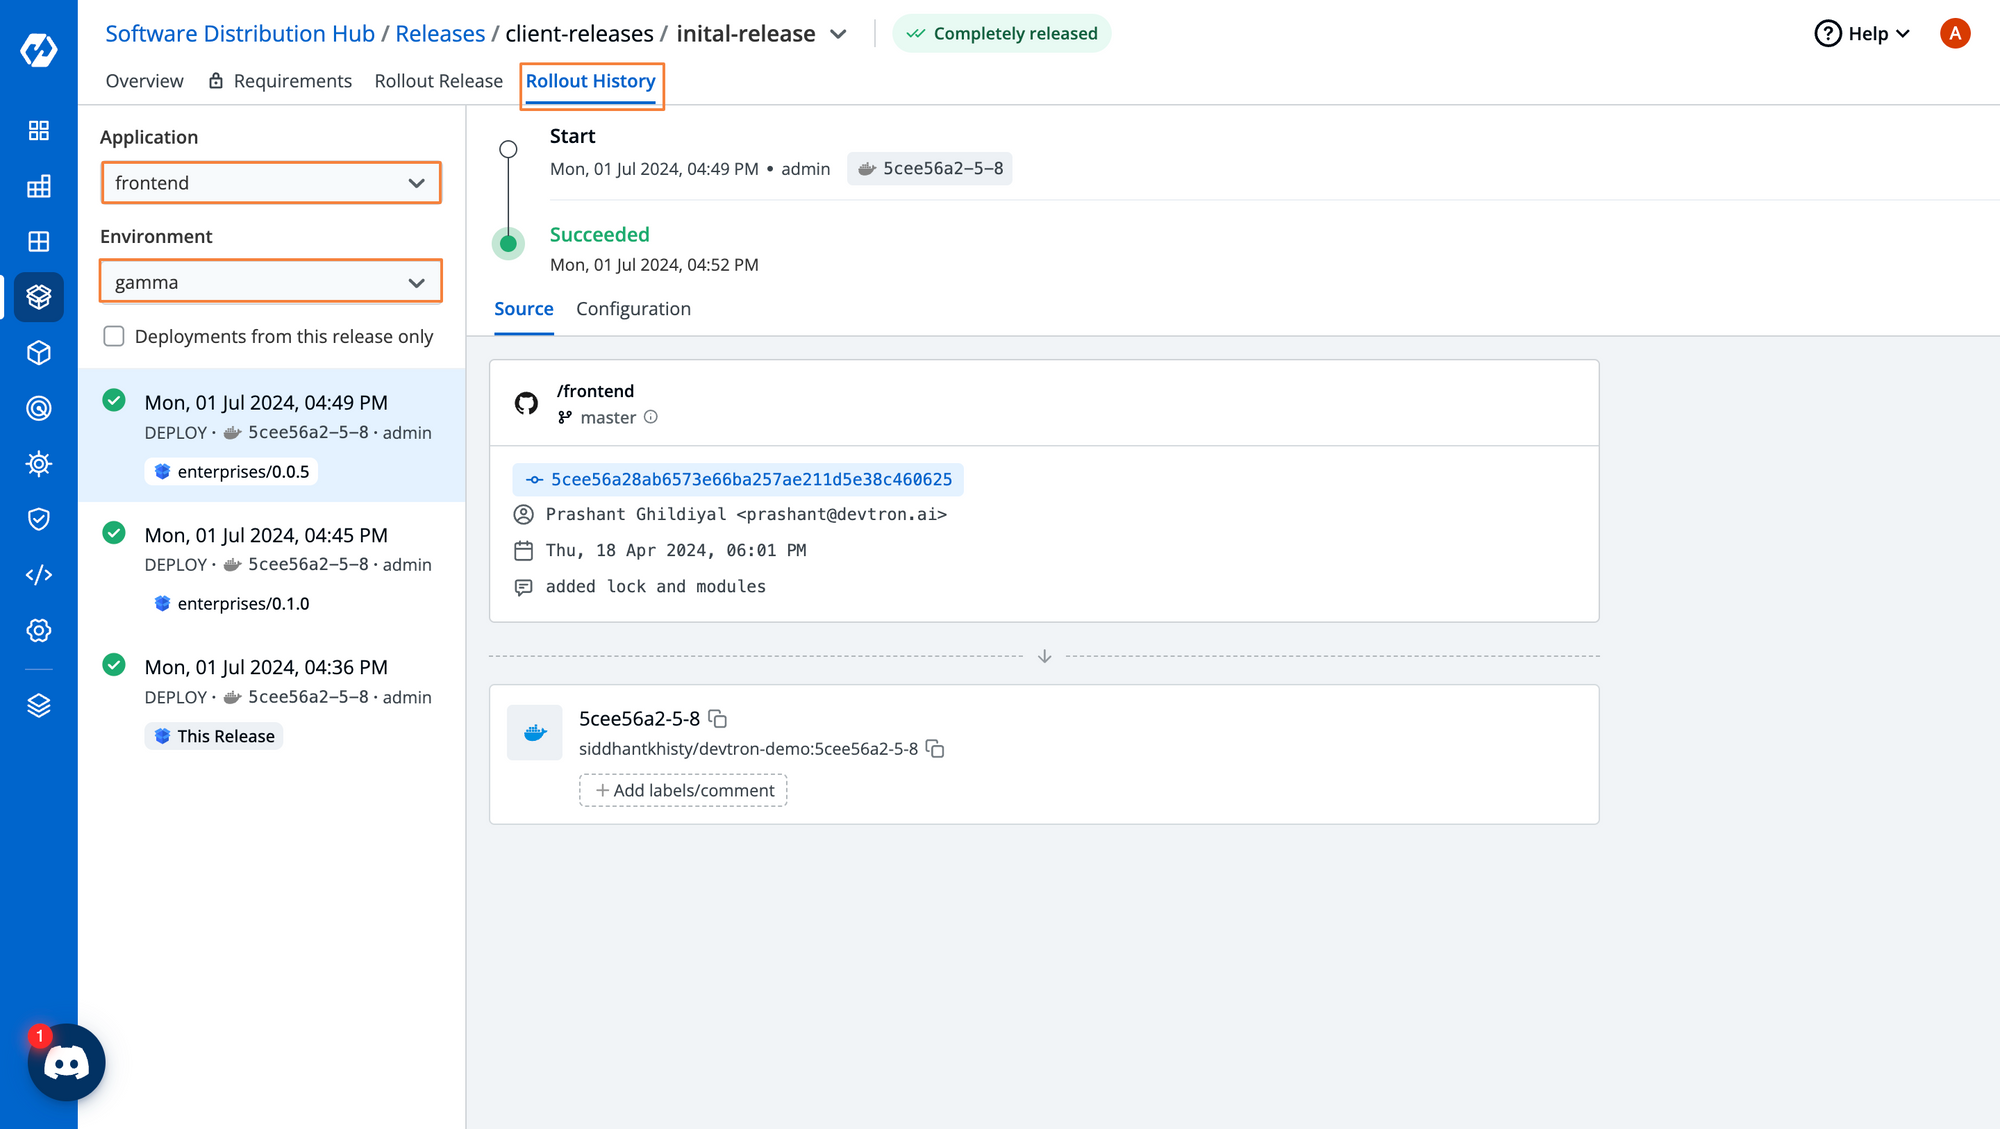
Within the Rollout History page, we can also see the individual applications that are a part of the release and their deployment status.
We can see all the deployments that have been triggered for the applications and also which environments they belong to. If you are deploying the same application in multiple releases, you can see the history of all of those deployments.
Within the Overview tab, you can create and view useful information such as Catalog and Release Notes.
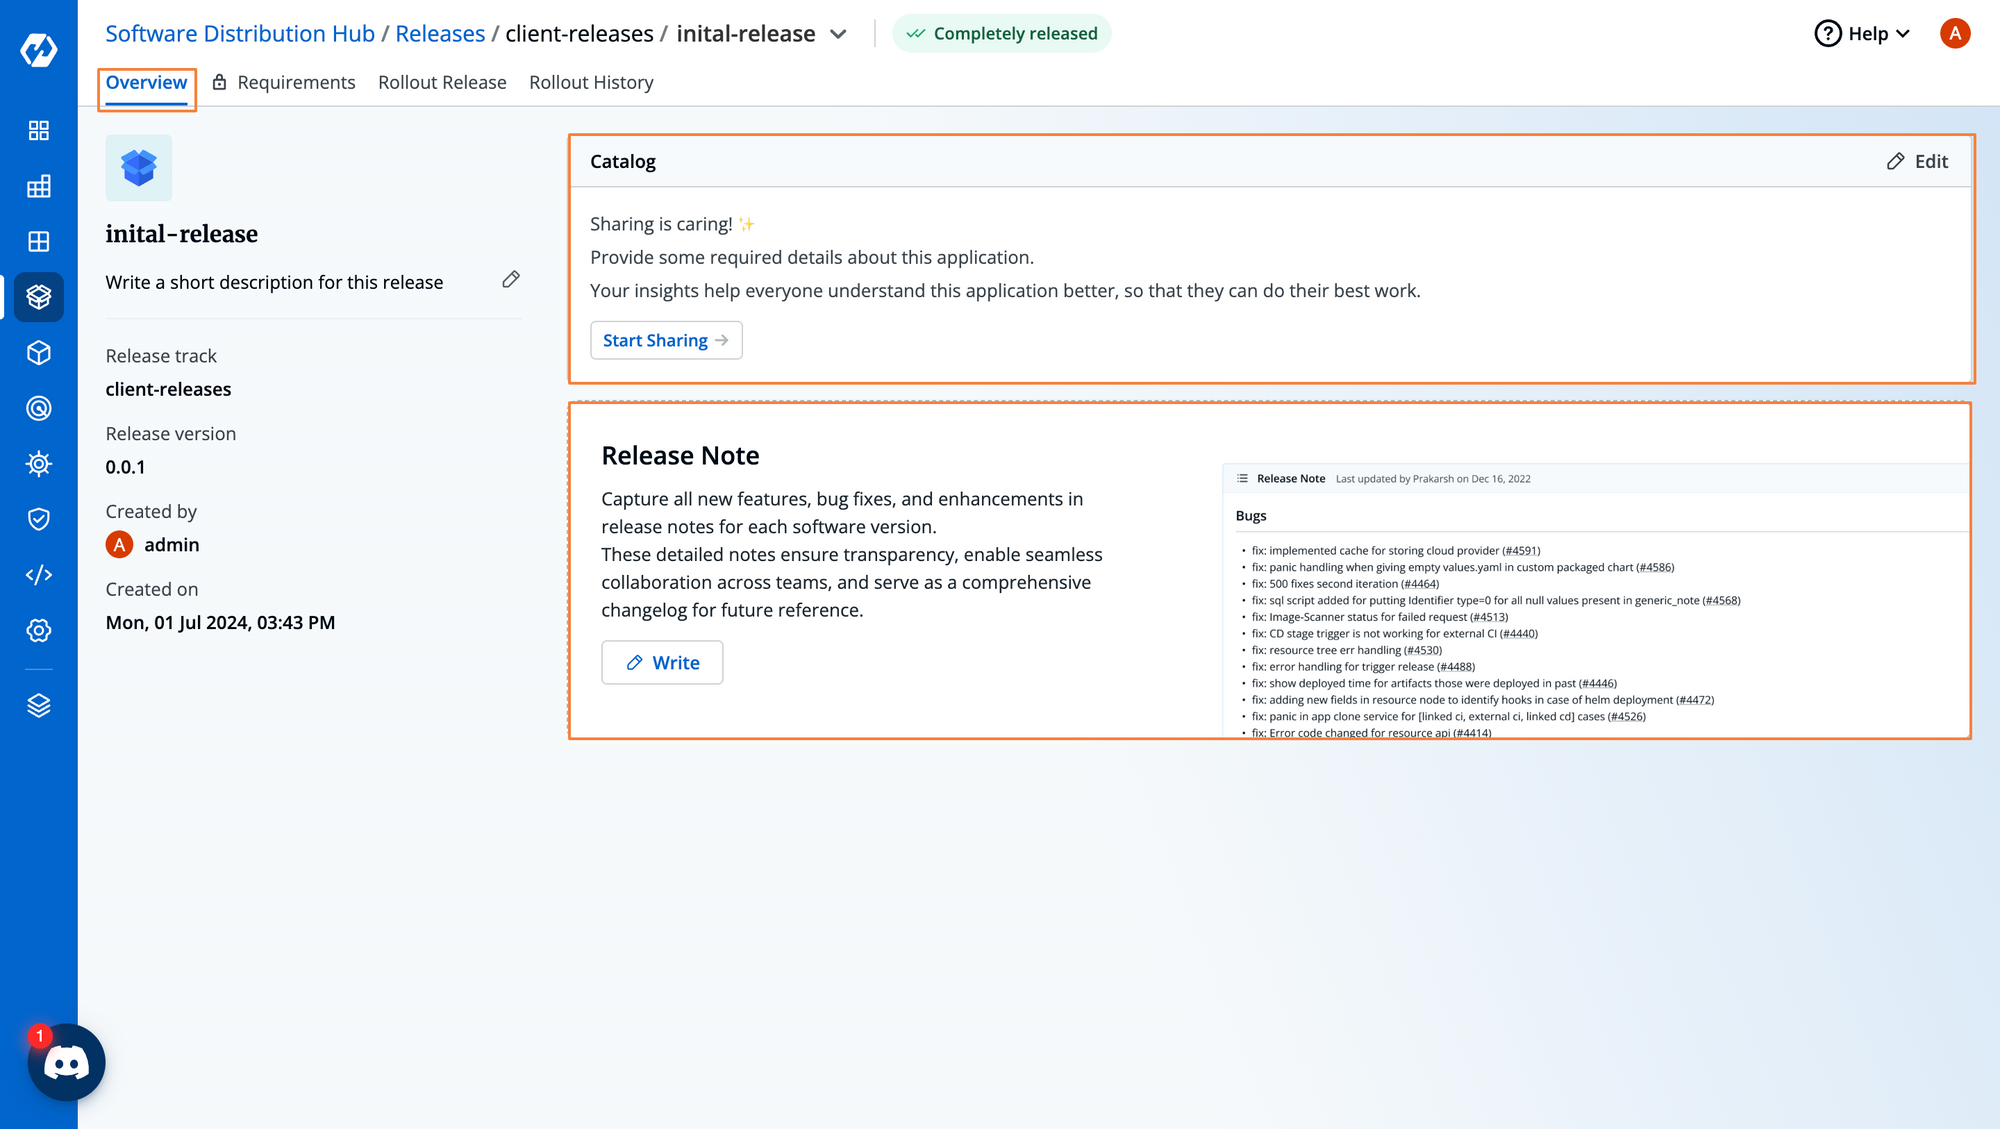
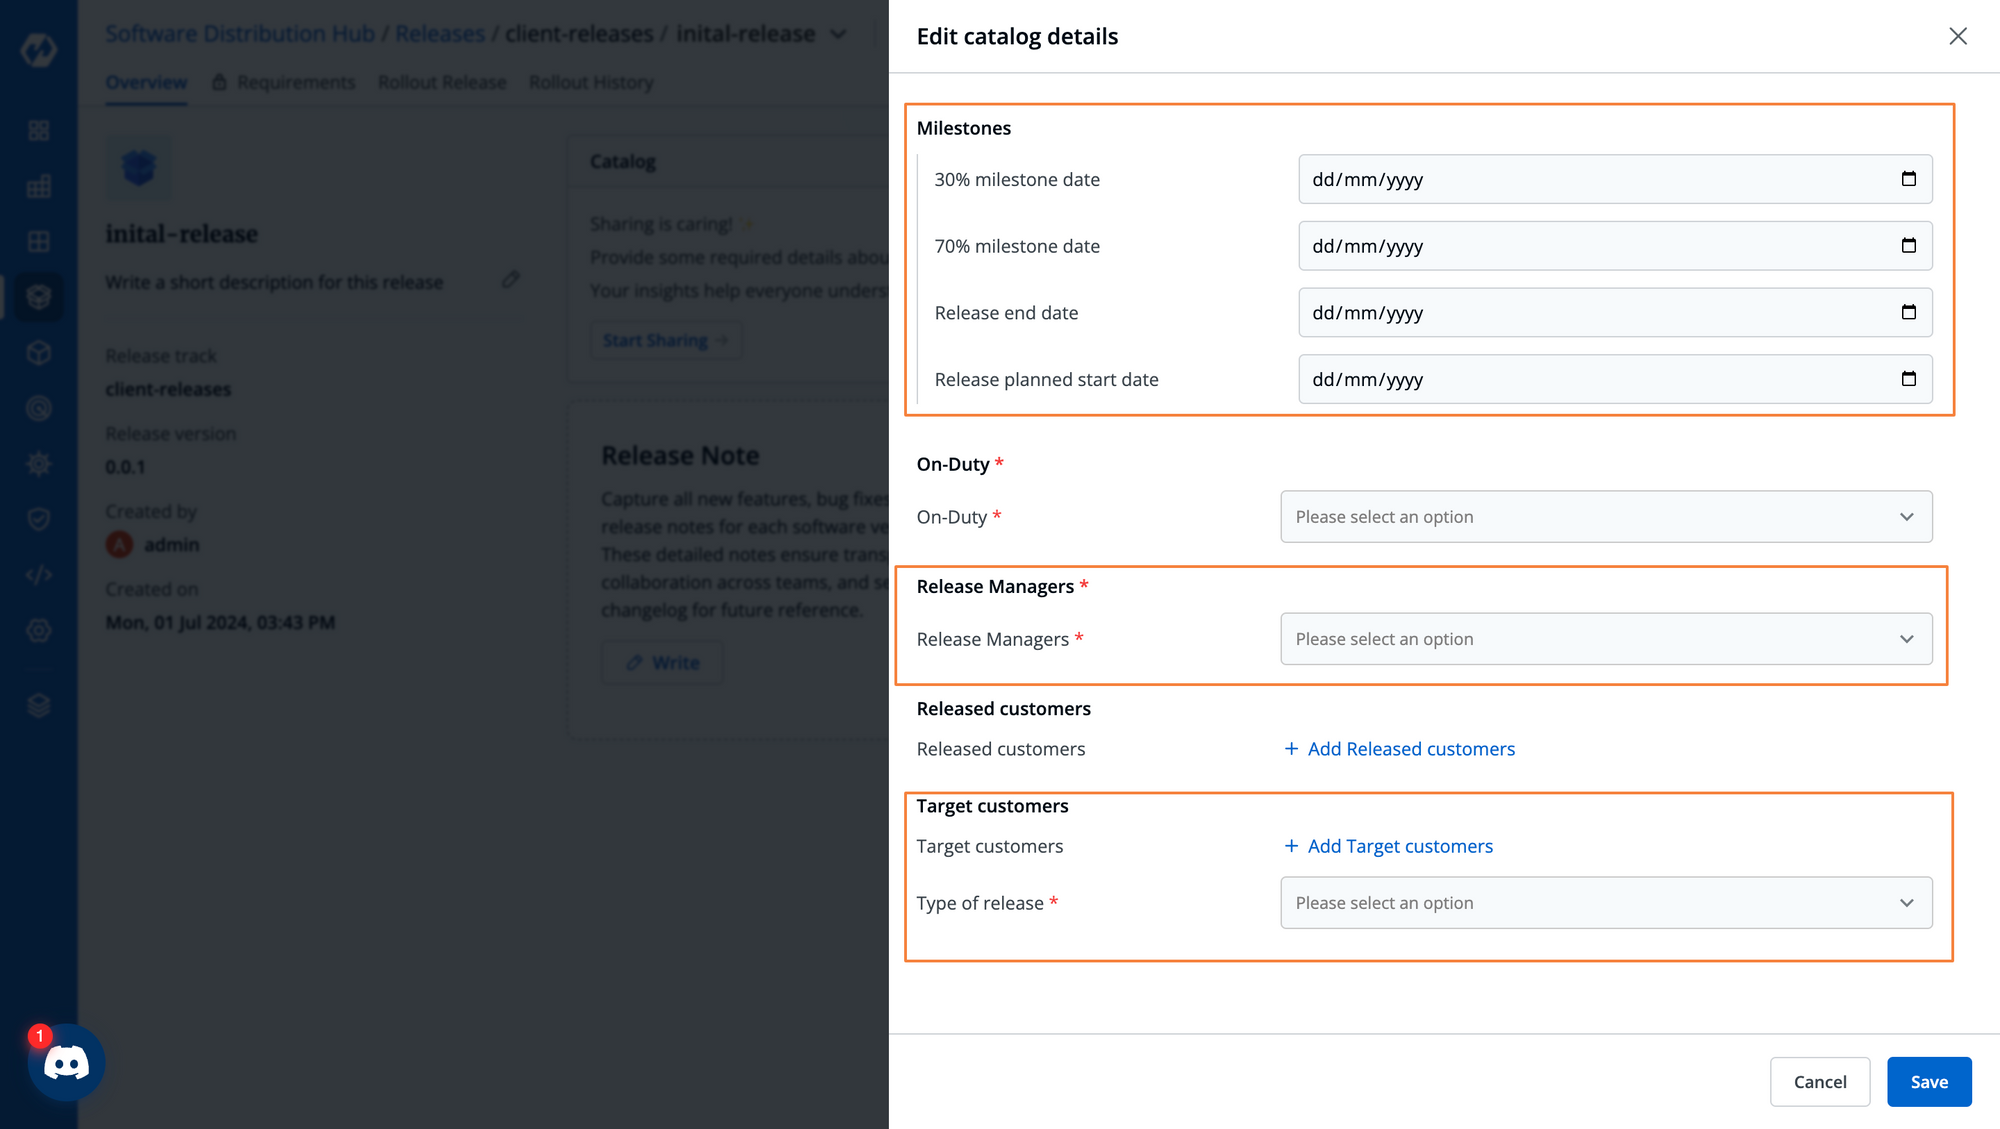
You can also add catalog details and define things such as milestones, release managers, target customers, etc.
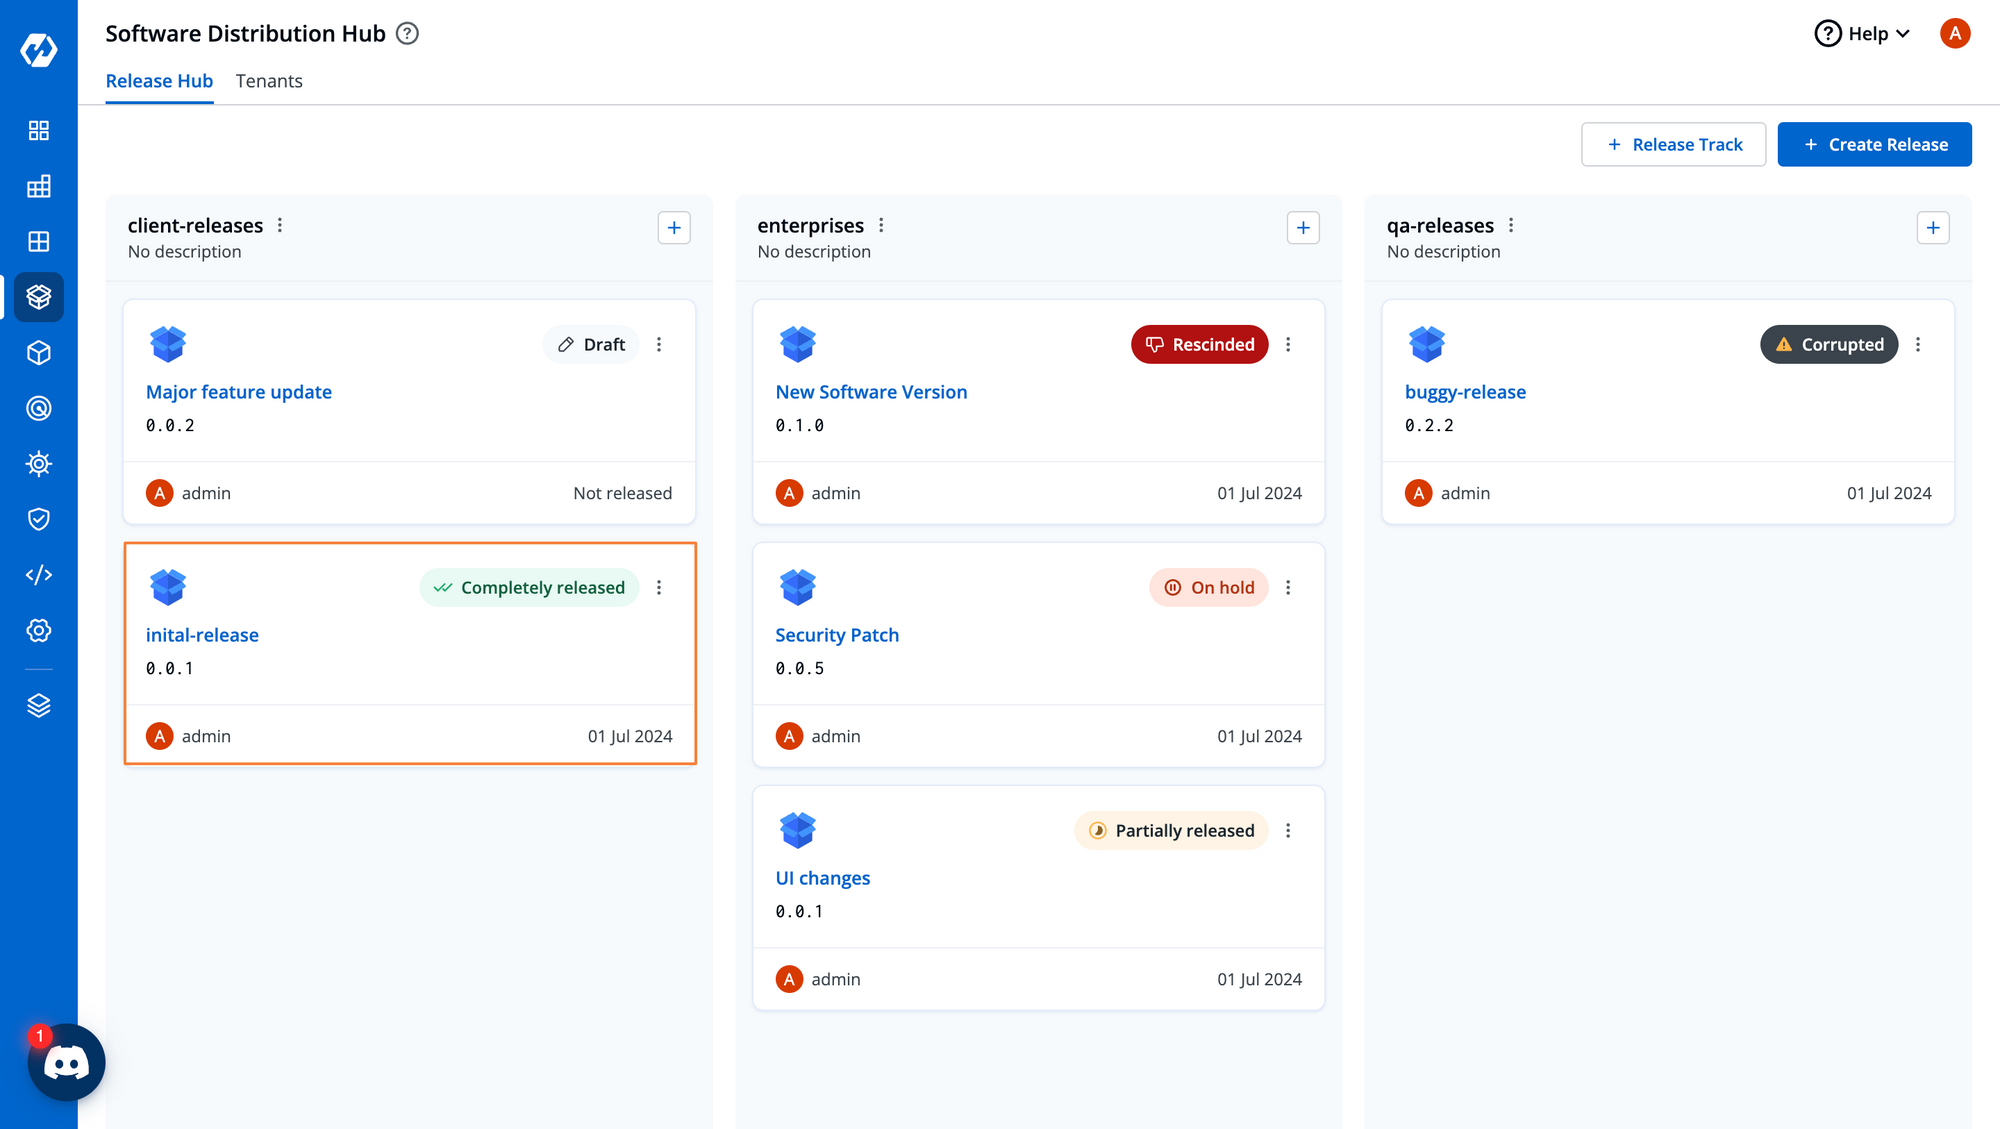
After we create more releases, we will be able to see the status of each release from the Release Hub tab. This gives us the details of every single release in a single dashboard which makes collaboration very easy, and everyone is on the same page.
Conclusion
The Software Distribution Hub significantly simplifies the process of creating releases for microservice applications and delivering them to your customers. It streamlines the entire release process and makes it much easier to maintain an audit of all the releases.
Moreover, we are addressing some of the key challenges when it comes to deploying applications to multiple tenants and helping you minimize repetitive processes and minimize any human error. This process is much easier to scale as compared to having to track each release manually and write custom scripts for each environment.
If you have any queries, don't hesitate to connect with us, and feel free to book a session if you need a live demo. Join our active Discord Community for lively discussions and shared knowledge.