Kubernetes is a highly distributed system with a lot of small components. These small components all work together to create the Kubernetes experience you are familiar with. Due to the distributed nature of Kubernetes, managing the network becomes an important aspect of managing the cluster. If you wish to learn about the core components of Kubernetes and how they work, please check out this blog about Kubernetes Architecture.
As you already know, every application deployed to Kubernetes runs inside a pod. A pod is the tiniest component of Kubernetes. Each pod gets its unique IP address assigned to it. However, a key point to note is that a pod is ephemeral, meaning it can get deleted at any moment. When the pod is recreated, the IP address on the pod also changes. Moreover, when you deploy an application, you use a deployment object that creates multiple pods of the same application. You can refer to this blog if you wish to learn about the different workloads in Kuberneetes and their function.
If you wanted to make a request to the specific pod, you would send a request to its designated IP address. However, once the pod gets recreated, you need to find out what’s the new IP address of the pod. Similarly, if there are multiple instances of the pod that are created with a deployment object, you would require each IP address and manually load balance them.
To address these concerns, Kubernetes has a service object, which helps streamline pod-to-pod networking within the cluster. In this blog, let us take a look at what exactly are services, how do they work, their different types, and understand their use cases.
What is a Kubernetes Service?
A Kubernetes service is an API object that helps expose the pods over the network. It creates a network endpoint for the different pods which is then used to communicate to a group of pods. As we discussed earlier, pods are ephemeral and their IP addresses keep changing when pods are recreated. A service remains static in nature i.e, its IP addresses do not change. When we want to expose a pod to the network, we assign a service with a static IP address, which then routes the network request to the pod.
How does a Kubernetes Service Work?
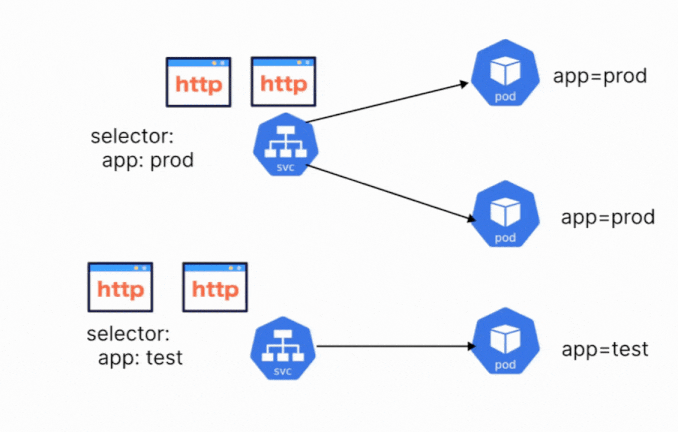
Services make use of the labels that are assigned to the pod or deployment to select the correct pod. A service object can even be configured to target a deployment, so all the pods created by a deployment will be exposed by the service object. A single service can also be used to target a group of different pods. You just need to ensure that the correct labels are being selected.
Let’s say that you have three different pods, with different labels. We want to create a single service that will expose all the different pods. You can create this service, by adding a common label to the pods. Let’s say that the common label is app=demo. The service will select and expose all the pods that have the label app=demo.
Components of Kubernetes Services
When defining a Kubernetes service, there are a few different components that you need to configure. These configurations are defined within the YAML manifest of the service. We already discussed the importance of labels and selectors, which is one of the components. A service contains the following components:
- Label Selectors: Used for selecting a single pod or a group of pods to route traffic to.
- ClusterIP: The ClusterIP is the IP address assigned to the service. This is the internal IP address that can be accessed within the cluster.
- Port: The port where their service is listening for external traffic
- Target Port: The port where the pod is listening. The traffic gets routed to the target port.
- Service Type: Defining the type of service. We will explore the types of services in the next section.
- Protocol: Define the protocol that will be used by the service to handle traffic. This can be TCP, UDP, or SCTP.
We will take a closer look at how to define and use the different components of the service in the upcoming sections.
Types of Kubernetes Services
Kubernetes has a few different types of services which all behave differently. Let’s take a look at these different service types, and understand how to create them. We will also understand the use cases for the different types of Kubernetes Services.
ClusterIP
The ClusterIP is the default service type used in Kubernetes. When a pod is exposed to a ClusterIP type of service, the pod can only communicate with other pods inside the cluster. Network requests from outside the cluster will not be able to reach the pod directly.
The service gets exposed as a static IP address which is unique in the cluster. When other pods want to talk to the exposed pod, they will send the request to the static IP address of the service. Once the request hits the service’s endpoint, it will get forwarded to the pods selected by the service.
Let’s say that we have a pod called cluster-ip-pod and it has the labels app=cluster-ip-demo. We want to expose this pod within the cluster i.e, only other pods should be able to access this pod. External traffic should not be able to reach the pod. We can create this type of network by exposing this pod using a ClusterIP service.
We can use the following YAML to create the required service. Let’s create the service and also test if the pod is accessible or not. We will call this service as cluster-ip-svc and give it the proper selector i.e. app=cluster-ip-demo. We’ll also ensure that this service is exposed on port 80.
apiVersion: v1
kind: Service
metadata:
 name: cluster-ip-svc
spec:
 selector:
   app: cluster-ip-demo
 ports:
   - protocol: TCP
     port: 80
 type: ClusterIP
Let’s understand what is being defined in the above YAML file.
- Name: The name of the service
- Selector: The selector for the label that we want to target. In this case, we are selecting every pod that has the label
app=cluster-ip-demo. - Ports: The port and protocols where the service should expose the pod.
- Type: The type of service. In this case, it’s a ClusterIP service.
We can save the above manifest in a file called service.yaml, and create it using the following command
kubectl apply -f service.yaml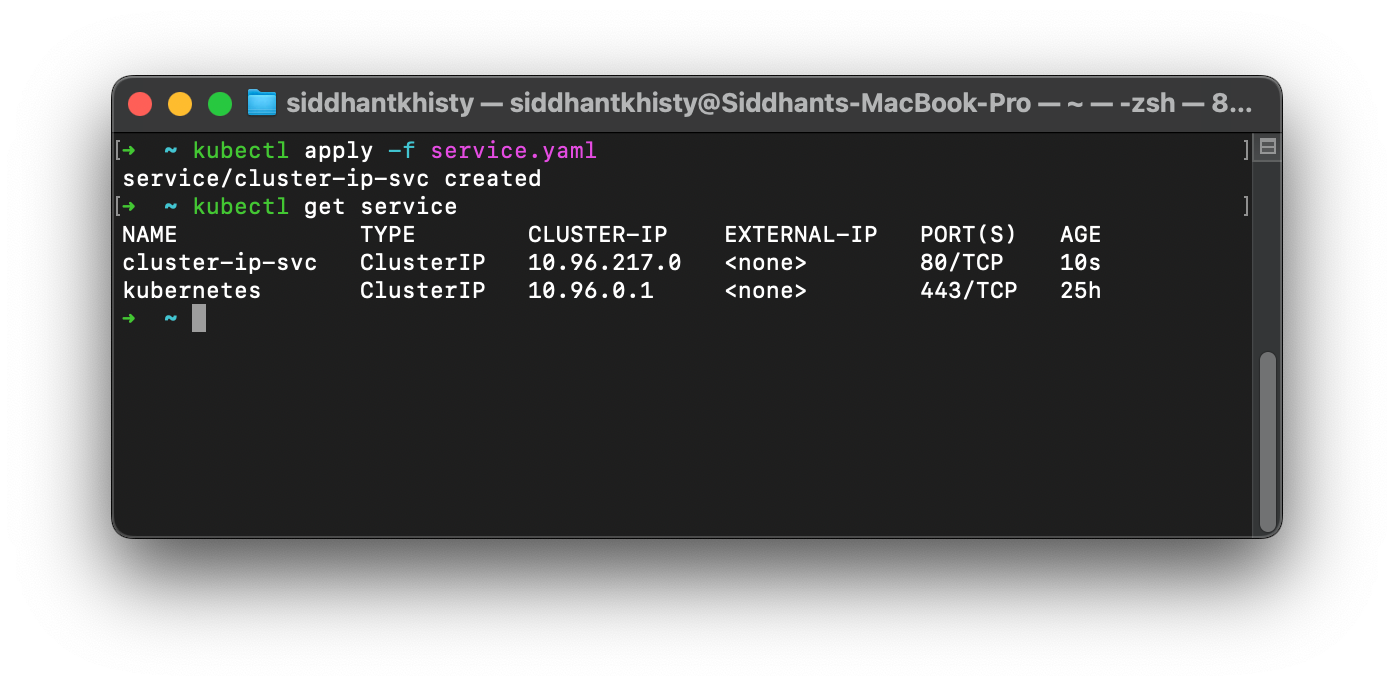
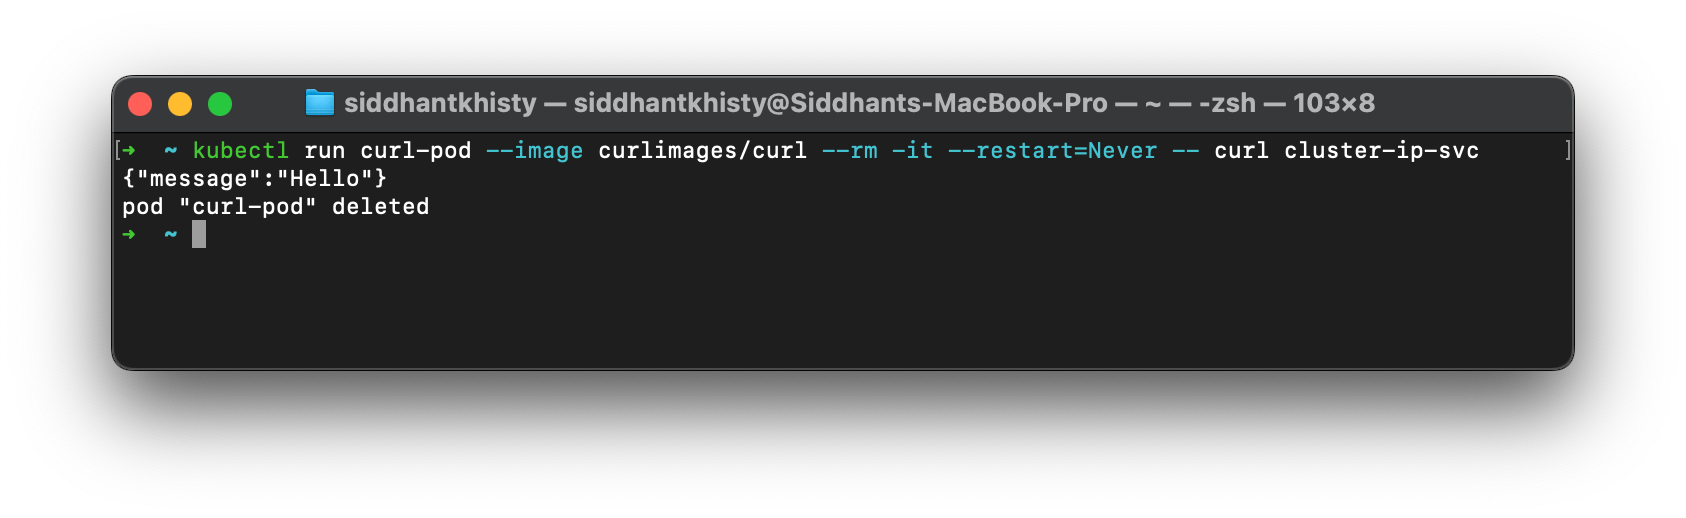
The IP service has now been created and is exposing the application on port 80. But how do we ensure that the pod is actually exposed? Earlier we discussed that the ClusterIP service only enabled pod-to-pod communication. In order to validate that this pod can actually receive requests, we will have to create a new temporary pod and run a curl command through the pod.
kubectl run curl-pod --image curlimages/curl --rm -it --restart=Never -- curl cluster-ip-svcIf the service is properly exposing the pod, you will get a response from the pod. In the below image, you can see that we are getting a response, which means that the pod is exposed successfully.
The ClusterIP service is useful when you wish to enable inter-pod connectivity. The different microservices that make up an entire application can be connected by using the ClusterIP service. Each microservice would have its own unique ClusterIP service. To communicate with a different microservice, it will have to talk with the ClusterIP service of that microservice.
NodePort
A NodePort is a type of service that lets you expose the pod to external traffic. This is one of the most basic ways to publicly expose a pod. When a NodePort service is created, it opens a port from the range of port 30,000 to 32,767 where the pod can be accessed.
Let’s try to understand how a NodePort exposes the pod by using an example. Assume that the IP address of the Kubernetes cluster is 182.231.092.121. To expose one of your pods, you create a NodePort service. Kubernetes automatically chooses port 31525 to expose the pod. Now, if you want to curl the pod, or access the application from a browser, you can simply use the Cluster’s IP address along with the NodePort number. Taking curl as an example, you can run the following curl command to access the pod.
curl 182.231.092.121:31525Similarly, you can use the same IP address 182.231.092.121:31525 to access the application from your web browser.
Similar to how we created ClusterIPs, we need to ensure that the NodePort service is selecting the correct labels. Let’s say that this time our application has the label app=node-port-demo. We can use the same YAML as before, with one key change. We will change the type of the service to a NodePort and update the values of the selector as well.
apiVersion: v1
kind: Service
metadata:
 name: nodeport-svc
spec:
 selector:
   app: node-port-demo
 ports:
   - protocol: TCP
     port: 80
 type: NodePort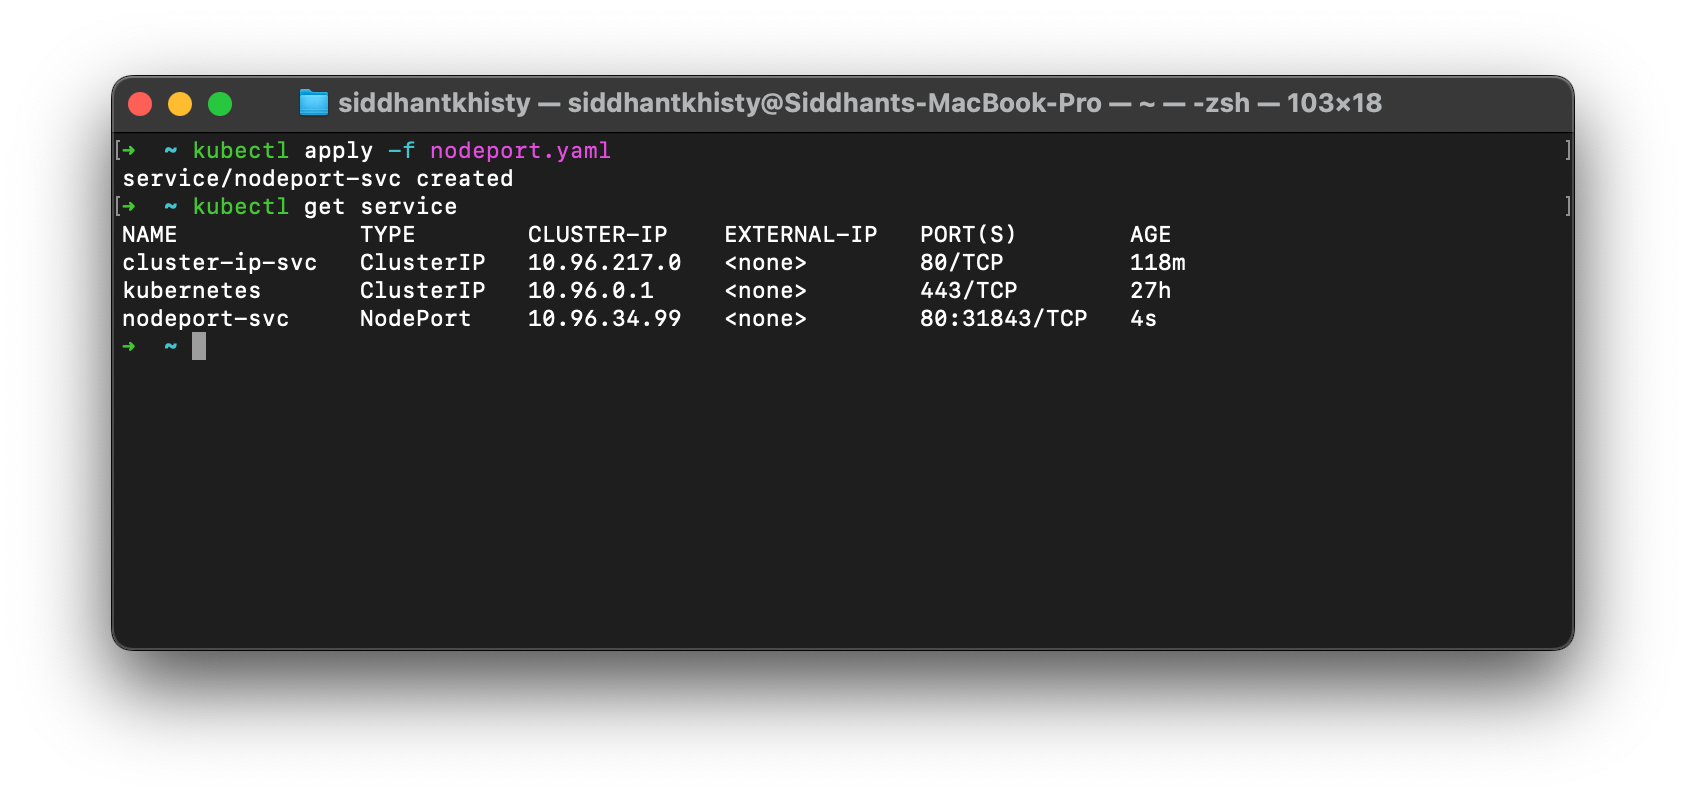
If you take a look at the Ports section in the above image, you can see that Kubernetes has automatically assigned the NodePort value of 31843 to this particular service. You can manually change this as well by editing the service manifest if you want.
When it comes to testing this service, we can directly run the curl command without creating a pod first. This is because a NodePort exposes the pod outside the cluster, whereas a ClusterIP service only exposes the pod internally.
As we discussed earlier, we only need to curl the IP address of the cluster. To find out the cluster’s IP address, you can use kubectl get nodes -o wide. Say that the IP address of your Kubernetes cluster is 36.173.11.4. You can run the below curl command to test the connection to the service.
curl 36.173.11.4:31843LoadBalancer
A LoadBalancer is also a type of service that exposes the pod to external traffic. As the name implies, a LoadBalancer service distributes the traffic between the pods that are targeted by the service. So for example, if you had 5 pods of the same application which were targetted by the load balancer service, the traffic would get distributed equally among the five pods. When you use a NodePort service, there are no such load-balancing capabilities. The traffic must be manually distributed.
Whenever we talk about a LoadBalancer, we are referring to an External Load Balancer. A LoadBalancer is usually provided by the cloud provider. It is not a Kubernetes, but rather, you can think of it as a VM that bridges the external world and the Kubernetes cluster.
If you have a Managed Kubernetes cluster that is running on a public cloud, creating a LoadBalancer is similar to how we created a NodePort and ClusterIP service. You need to ensure that the correct application labels are selected and that the type of service is set to LoadBalancer.
Let’s say that you have an application that has the label app=loadbalancer-demo. To create a LoadBalancer for this application, you can use the following manifest.
apiVersion: v1
kind: Service
metadata:
 name: loadbalancer-svc
spec:
 selector:
   app: loadbalancer-demo
 ports:
   - protocol: TCP
     port: 80
 type: LoadBalancer
ExternalName
Apart from the three services that we’ve learned about above, Kubernetes also has a special type of service called ExternalName. ExternalName is unique as it does not use labels and selectors like the other types of services. Instead, the service maps to a DNS name using a CNAME record.
Within the manifest file of the ExternalName service, we will have to define a DNS endpoint in the field called as externalName. Whenever a request is made to this service, the traffic gets routed to the DNS record that is defined in the manifest file.
The ExternalName service type is particularly useful when you wish to access a service that is hosted outside the Kubernetes cluster. It’s also helpful when you are trying to migrate your applications to Kubernetes. The ExternalName service helps maintain dependencies on external applications while you are migrating the applications to Kubernetes.
Let’s take a look at an example of how to create an ExternalName service. In the below YAML manifest, we have defined the service named as external-demo, and the service type is defined as ExternalName. We have also configured the ExternalName field so that it routes the requests to api.google.com.
Kubernetes Ingress
So far, you’ve learned about the different types of services in Kubernetes, and how to create and use them for exposing pods to the network. For enabling external traffic to access the pods, we learned that you can use either NodePort or LoadBalancer service. However, NodePorts and Load balancers both have their limitations.
We have already discussed some of the limitations with NodePorts earlier in this blog. When you use an external LoadBalancer, you will have to pay the cloud provider for each LoadBalancer that is provisioned which increases the overall cloud costs. Typically, multiple LoadBalancer services are provisioned and are attached to different services which increases the cloud costs. To reduce costs, what if you could provision a single External LoadBalancer service, and properly route traffic to the different services?
That is where the Kubernetes Ingress resource shines. Kubernetes ingress acts similar to a LoadBalancer, but it is a resource that exists within the Kubernetes cluster itself. It can act as the single entry point for external traffic and route the traffic to the appropriate services based on the path of the URL. Please check out this blog to learn more about what is Kubernetes Ingress and how to use it.
Using Kubernetes Service with Devtron
When you create a service in Kubernetes, there are a few things to keep in mind. First, you need to ensure that all the pods that you wish to expose have a common label among them. Next, you also need to ensure that the service has the correct selectors configured. Finally, it comes time to define the type of service based on the use cases. Matching the labels and selectors can get tiresome especially when you need to expose multiple different pods, or groups of pods.
Within Devtron, it becomes very easy to create services for applications and assign them to the pods. It reduces the number of steps required for creating a service, as you only need to define the service type. The task of assigning labels to the pods, and configuring the selectors will be abstracted by Devtron.
Devtron is a complete solution to managing your CI and CD pipelines for Kubernetes applications, helping you from building the container image, to configuring and deploying the Kubernetes resources. It also helps in visualizing all the cluster resources and managing Day 2 operations such as rollbacks, application upgrades, drift management, and much more. Please do try out Devtron and share your feedback with us in the Discord community.
Conclusion
Managing services in Kubernetes is a crucial part of deploying and running applications in a cluster. By default, the pod is not exposed to any traffic. It has to be exposed by using a Kubernetes service. When you want to enable inter-pod connectivity, you would want to expose both pods using a ClusterIP service.
When it comes to exposing the pod to external traffic, you can make use of the NodePort or Loadbalancer services. The NodePort service exposes the traffic on a port between 30000 and 32767. This number is automatically assigned to the service by Kubernetes. The LoadBalancer is not a Kubernetes resource but rather a cloud resource that is used to distribute the traffic within the cluster.
A Kubernetes Ingress resource is useful when you want to allow external traffic to access the pod without directly exposing the pod. The traffic first hits the ingress resource, and then it is routed to the different ClusterIP services for gaining access to the pod.