1. Ephemeral environments are temporary, on-demand setups in Kubernetes used for testing, staging, and feature validation.
2. Compared to static environments, they reduce costs by eliminating idle infrastructure.
3. Kubernetes namespaces make ephemeral environments lightweight, isolated, and scalable.
4. Automation with Helm, CI/CD, KEDA, and HPA ensures faster provisioning and teardown.
5. Devtron simplifies ephemeral environments with workflows, cost controls, autoscaling, and visibility features.
What Are Ephemeral Environments in Kubernetes?
In software development, ephemeral environments are short-lived setups created for specific tasks such as testing, QA, or staging new features. Once the task is complete, the environment is destroyed.
Unlike traditional static environments, which remain always-on and can become costly when underutilized, ephemeral environments offer flexibility and resource efficiency. They allow developers to test in isolation without impacting production.
Why Kubernetes Is Perfect for Ephemeral Environments
Kubernetes offers namespaces — lightweight, logical partitions inside a cluster that make spinning up ephemeral environments easier compared to traditional VM-based approaches. Combined with autoscaling, CI/CD pipelines, and monitoring tools, Kubernetes makes ephemeral environments highly effective.
Key benefits of Kubernetes ephemeral environments:
- Isolation: Each environment runs in its own namespace.
- Scalability: Autoscale apps up or down based on demand.
- Efficiency: Hibernate workloads when idle.
- Cost savings: Avoid idle infrastructure costs.
The Technical and Business Value of Ephemeral Environments
1. Cost Efficiency
By creating environments only when needed and tearing them down afterward, organizations avoid maintaining idle resources. For many companies, non-production environments can cost 3–5x more than production, making ephemeral environments a major cost saver.
2. Agility & Speed
Developers can spin up environments instantly without waiting for access to shared systems. This accelerates testing cycles and time-to-market.
3. Reduced Risk
Testing unstable code in isolated environments ensures production isn’t impacted.
Challenges with Traditional Ephemeral Environments
When built using scripts (Terraform, Ansible, or shell):
- Delays in releases due to heavy infrastructure setup.
- High complexity in maintaining scripts.
- Manual interventions for dependencies.
- DevOps dependency instead of developer self-service.
- Resource wastage if environments aren’t deleted.
- High infra costs in cloud-native setups.
Kubernetes Ephemeral Environments: Step-by-Step Setup
Here’s how to manually create an ephemeral environment in Kubernetes:
- Define requirements (resources, services, dependencies).
- Automate setup with CI/CD pipelines, Terraform, or Ansible.
Example: Create a namespace
kubectl create namespace your-environment-name
- Deploy applications with manifests or Helm charts.
kubectl apply -f your-app-deployment.yaml -n your-environment-name
- Configure autoscaling using HPA or KEDA for event-driven scaling.
- Set up monitoring with Prometheus + Grafana.
- Automate cleanup to avoid resource leakage:
kubectl delete namespace your-environment-name
- Train teams and document processes for consistency.
Why Manual Kubernetes Setup Can Still Be Hard
Even with Kubernetes, challenges remain:
- Managing namespaces and cleanups across multiple pipelines.
- Integrating monitoring (Prometheus, Grafana), scaling (KEDA), and GitOps tools (ArgoCD, Jenkins).
- Risk of human error in custom scripting.
- Heavy DevOps/SRE dependency for configuration.
How Devtron Simplifies Ephemeral Environments
Devtron, a Kubernetes-native software distribution platform, makes ephemeral environments seamless by:
- Namespace utilization: Run multiple isolated environments in a single cluster at no extra cost.
- Cost management: Use spot instances and right-size resources (saving up to 70–90% infra costs).
- Event-driven autoscaling: Integrated KEDA support dynamically scales workloads based on HTTP traffic.
- Simplified workflows: A single dashboard for CI/CD pipelines, deployment, monitoring, and scaling.
- Visibility: Unified view of workloads, logs, metrics, configs, and deployment health.
Setting up Ephemeral Environments With Devtron
Devtron is a Software Distribution Platform designed for Kubernetes. On its mission to democratize Kubernetes, ephemeral environments are one among the many other features, that make life easier. With Devtron’s intuitive dashboard, operations on Kubernetes become flawless, and it goes with ephemeral environments as well. To get started with ephemeral environment, follow the below steps.
Step 1: Install the keda-add-on-http from the chart’s marketplace. Navigate to the charts store, search for Keda, and as you can see in the below image, you can see all charts related to Keda. Select the appropriate helm chart and deploy it. To add any helm chart which is not listed on the charts store, free feel to check out this blog.

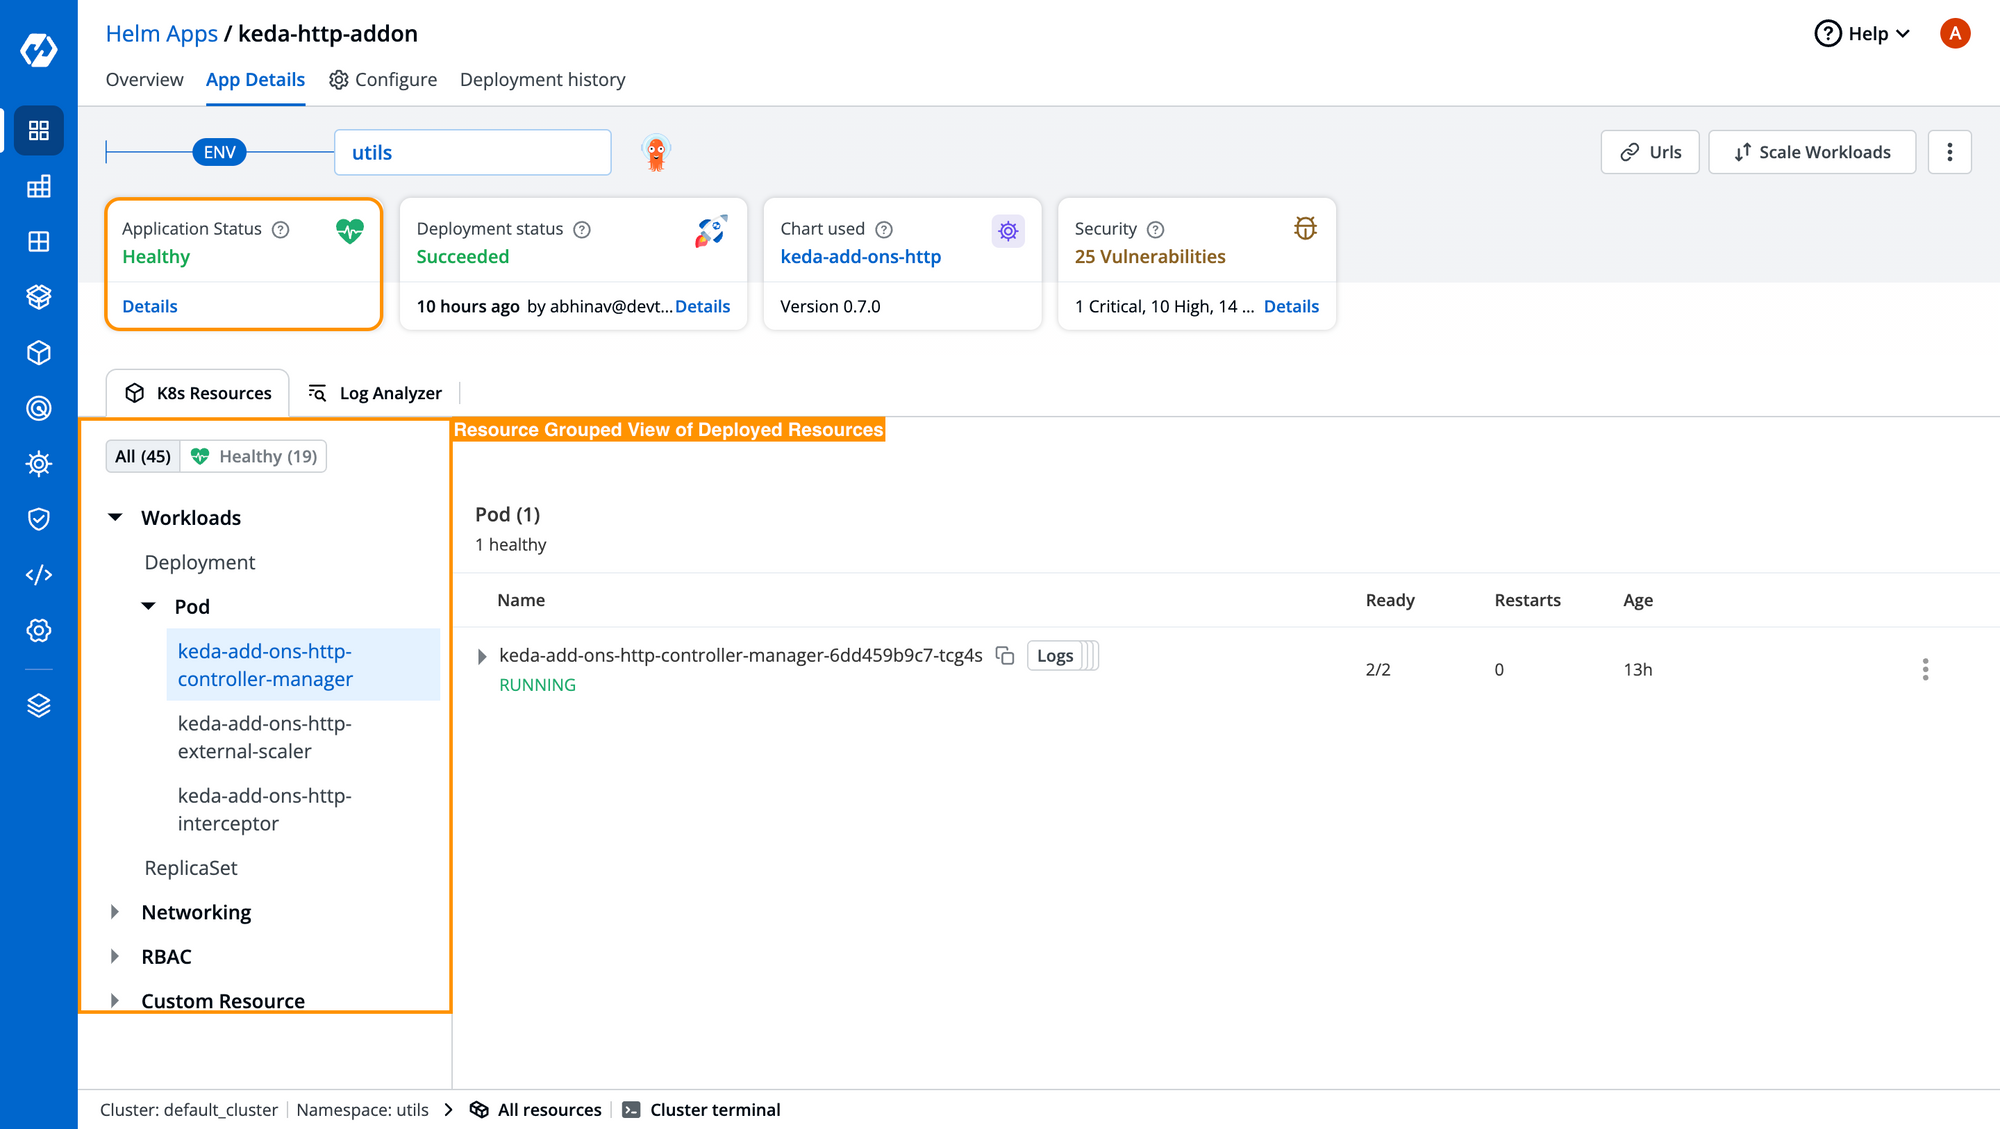
Step 2: Once the controller has been successfully installed, you can see a consolidated view of the deployed helm chart, along with its resources.
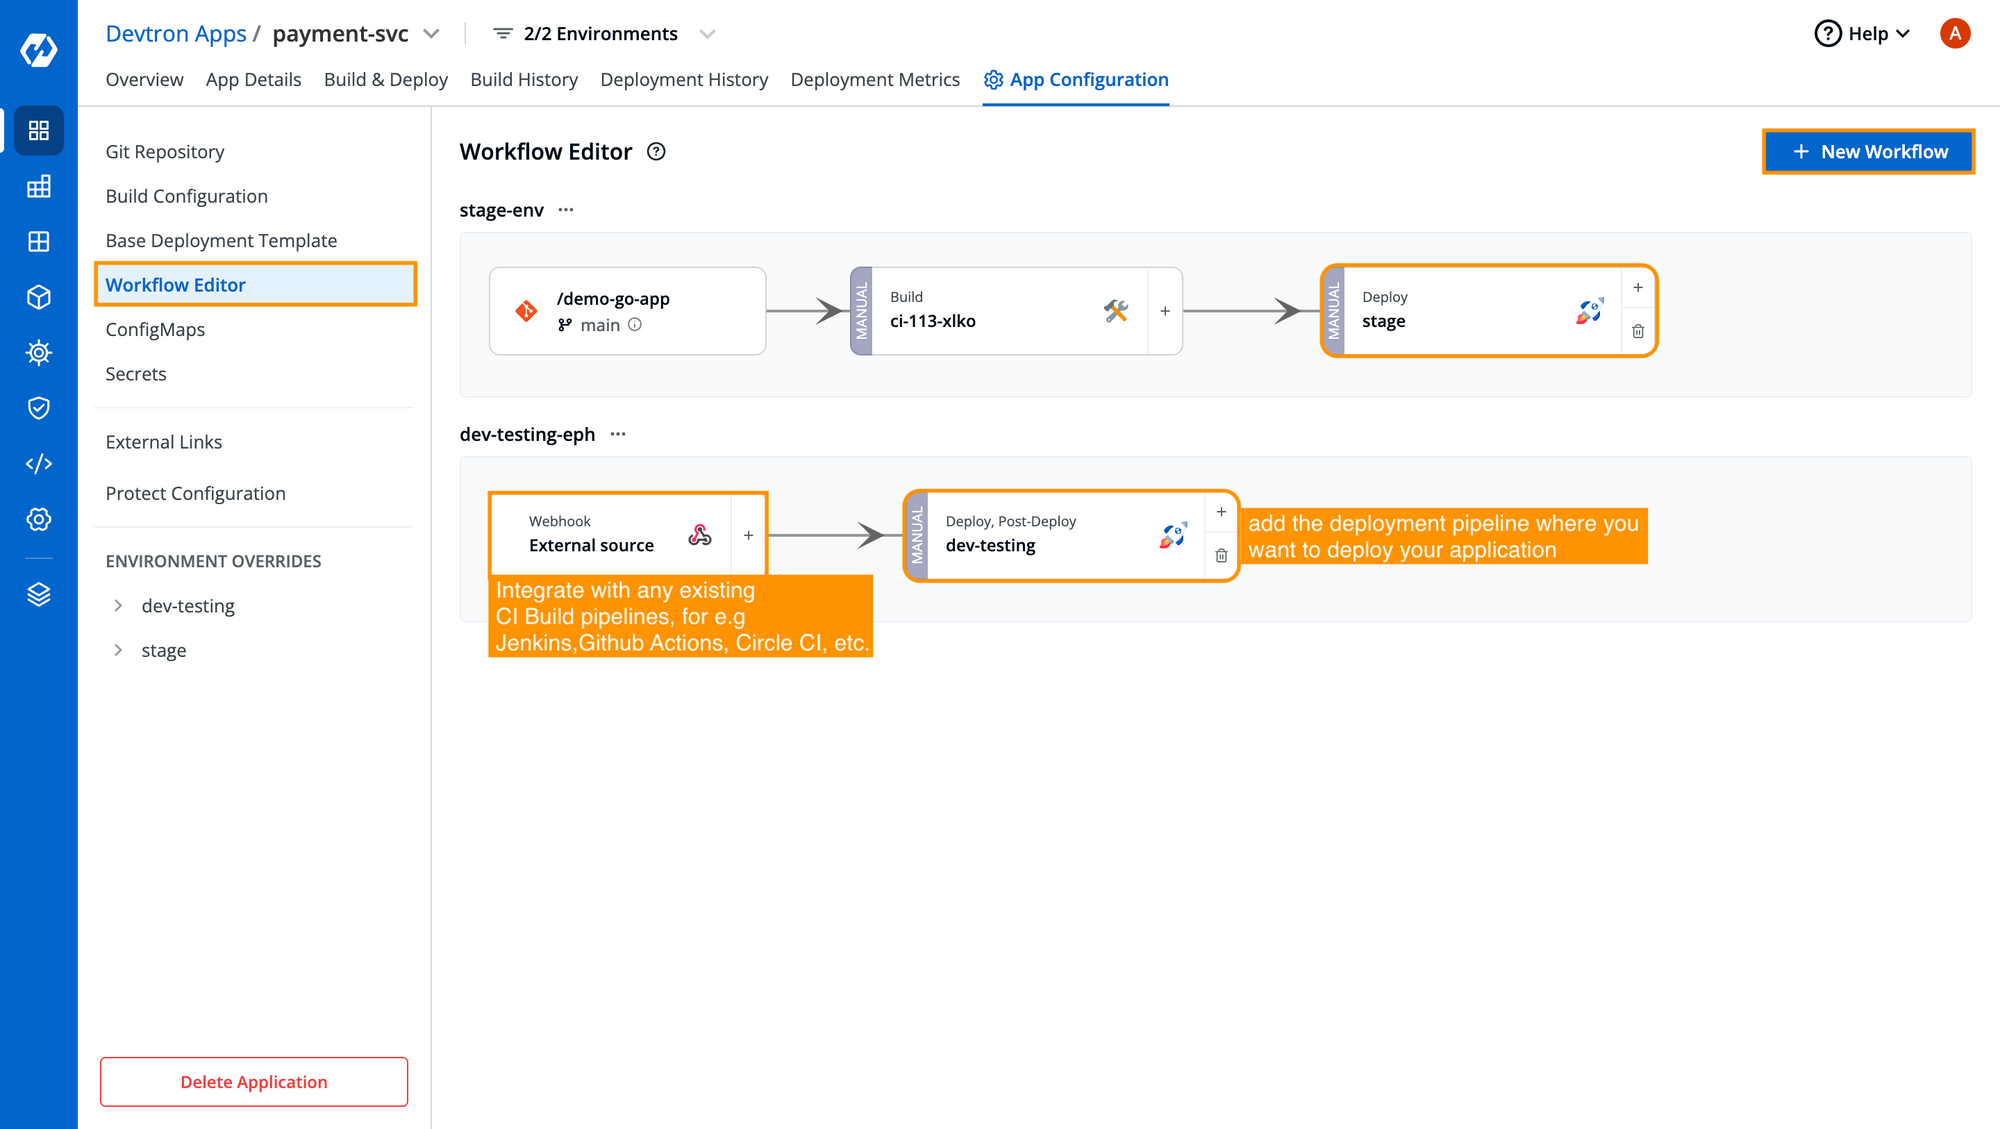
Step 3: Now, let’s move and configure the ephemeral environment for my microservice called, payment-svc. To configure the ephemeral environment for any application, the process remains the same and you should be able to configure/ clone the workflows for different applications. Navigate to Workflow Editor, add a workflow for the respective environment where you want to deploy your applications, in our case, its dev-testing environment as you can see in the below image. To understand more about workflows in Devtron, feel free to refer the official documentation of Devtron.
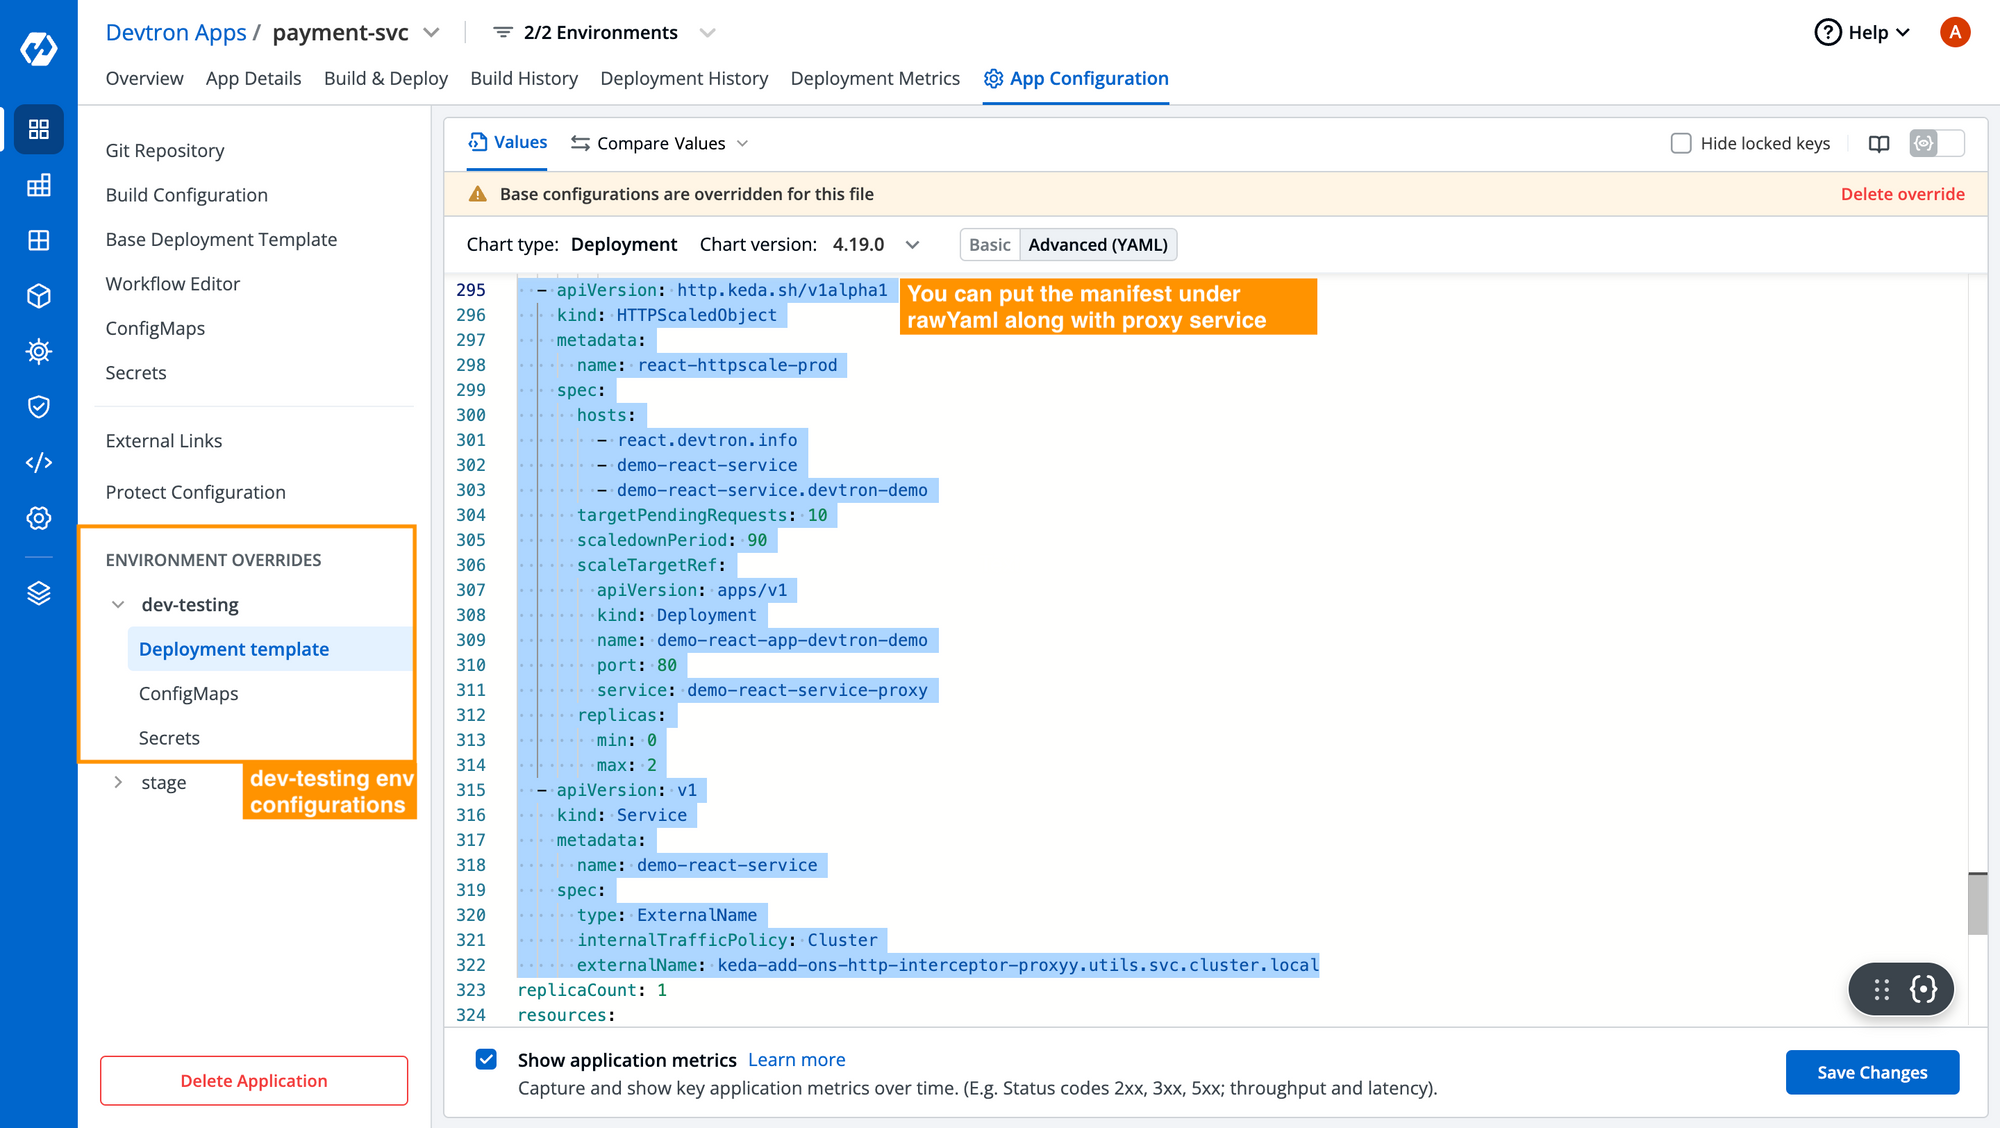
Step 4: Once the workflow has been created, Devtron automatically creates environment-overrides for the deployment environment. Environment overrides help you manage your Kubernetes configuration for the specific environment in a more efficient way. Under the environment override > dev-testing environment, we can add the relevant configurations required in the deployment template which would create the HttpScaledObject, responsible for bringing the environment up and running dynamically as it receives any HTTP request.
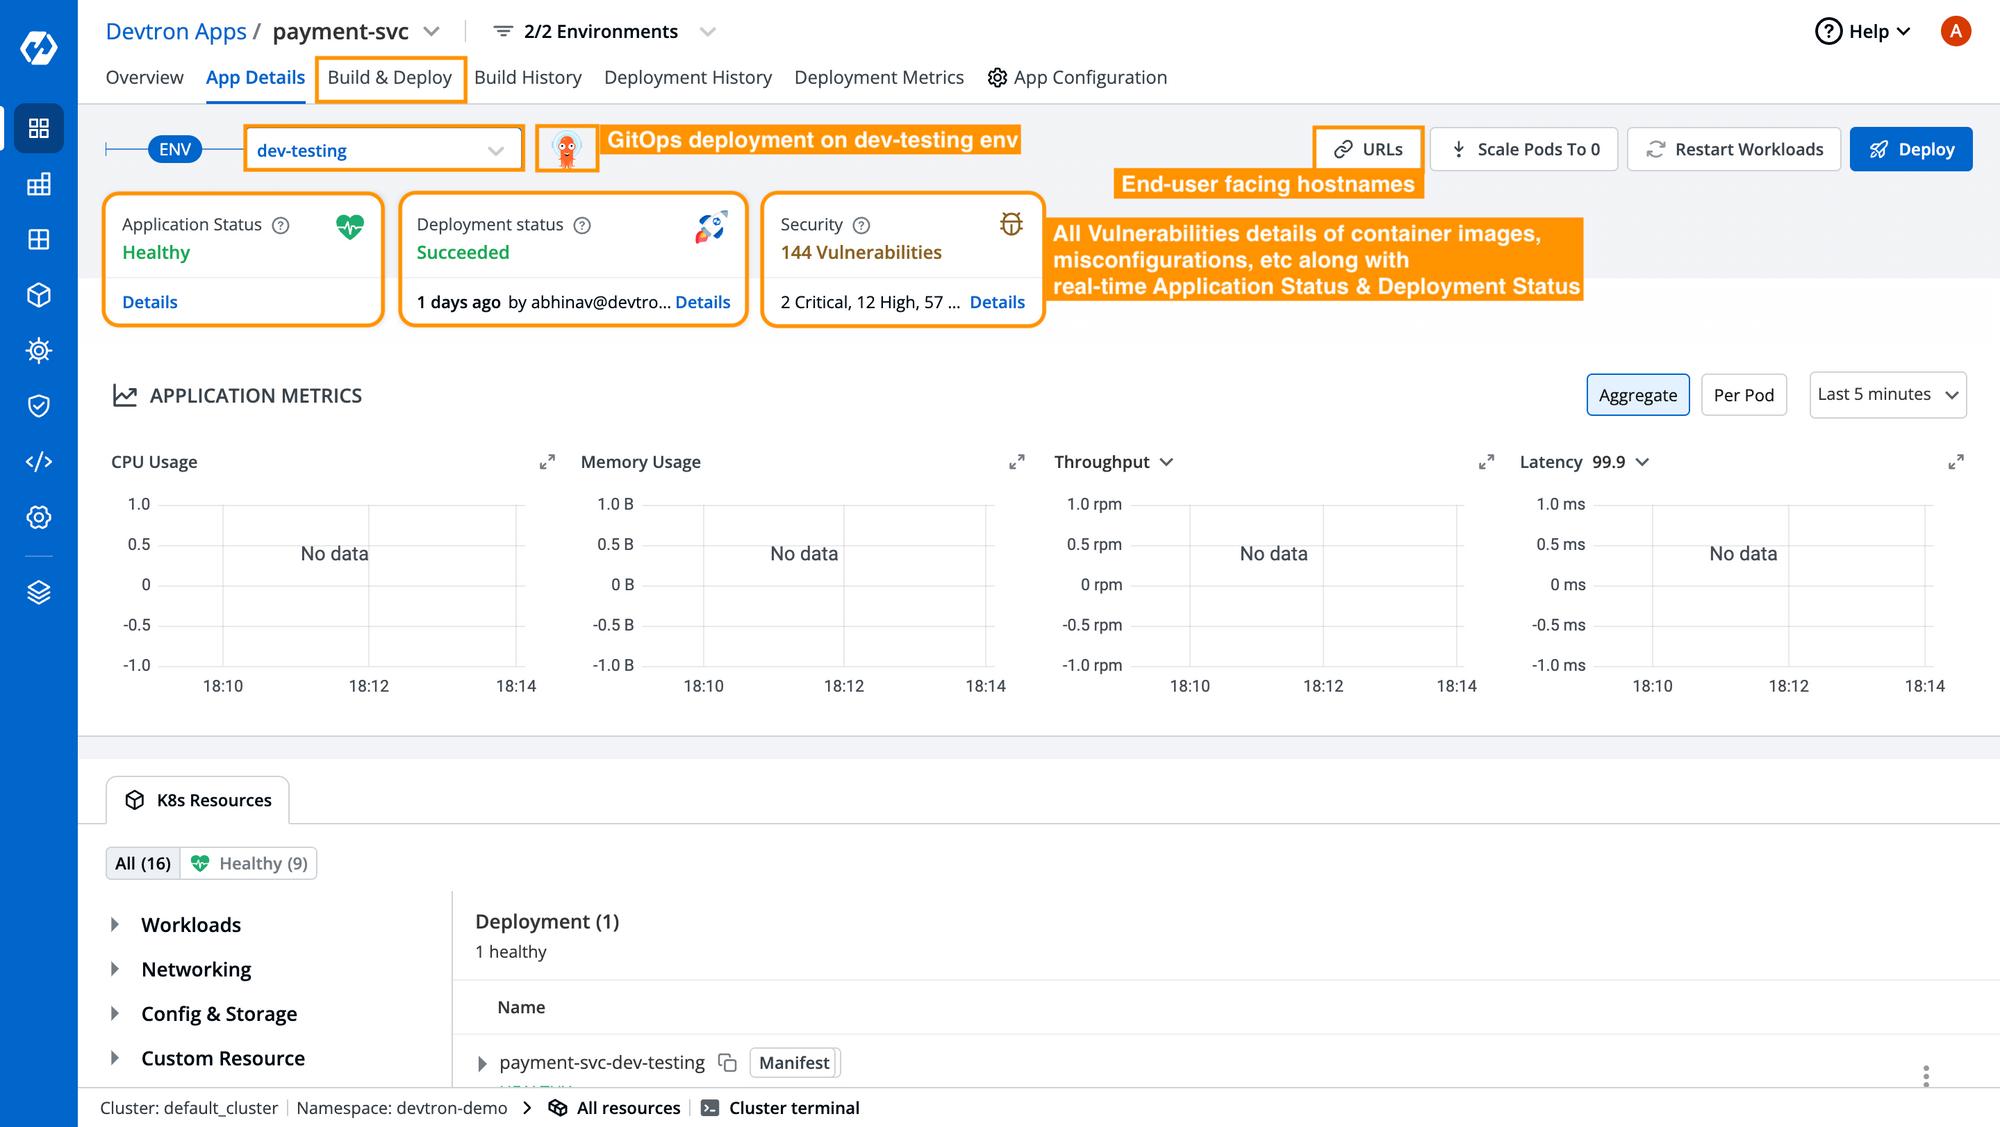
Step 5: After providing the relevant configuration, navigate to Build & Deploy section, select the relevant image, and deploy it in the dev-testing environment. Upon successful deployment, you can see the application status as Healthy, and all details about the deployment are as you can see in the below image.
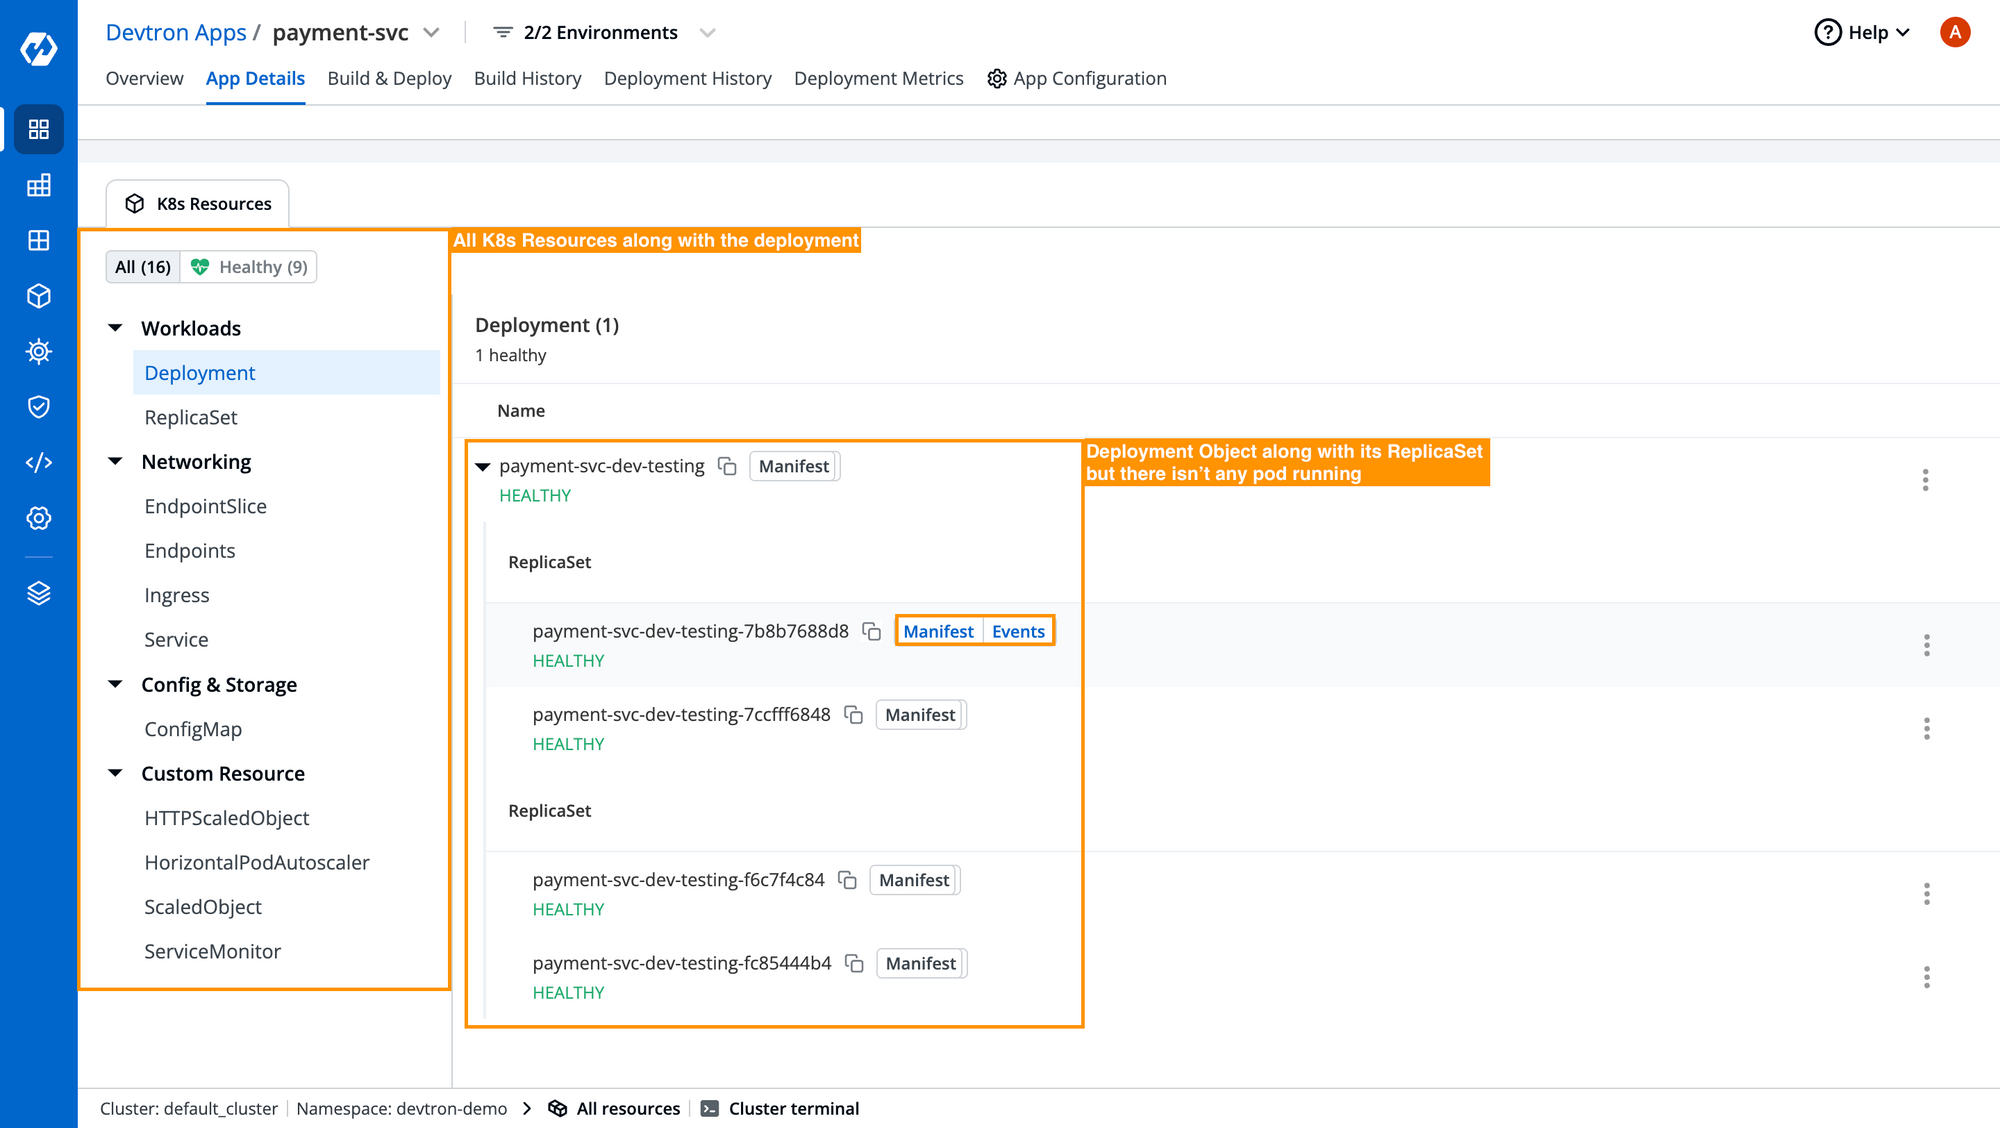
You can also see all the resources deployed along with the deployment in a resourced grouped view, and perform operations such as checking the logs, events, manifests, or exec into the terminals. You can notice in the below image that, we have a Deployment object but there isn’t any pod running as of now. This is because it automatically scaled down the workload since there is no HTTP request hitting the given hostname/ service.
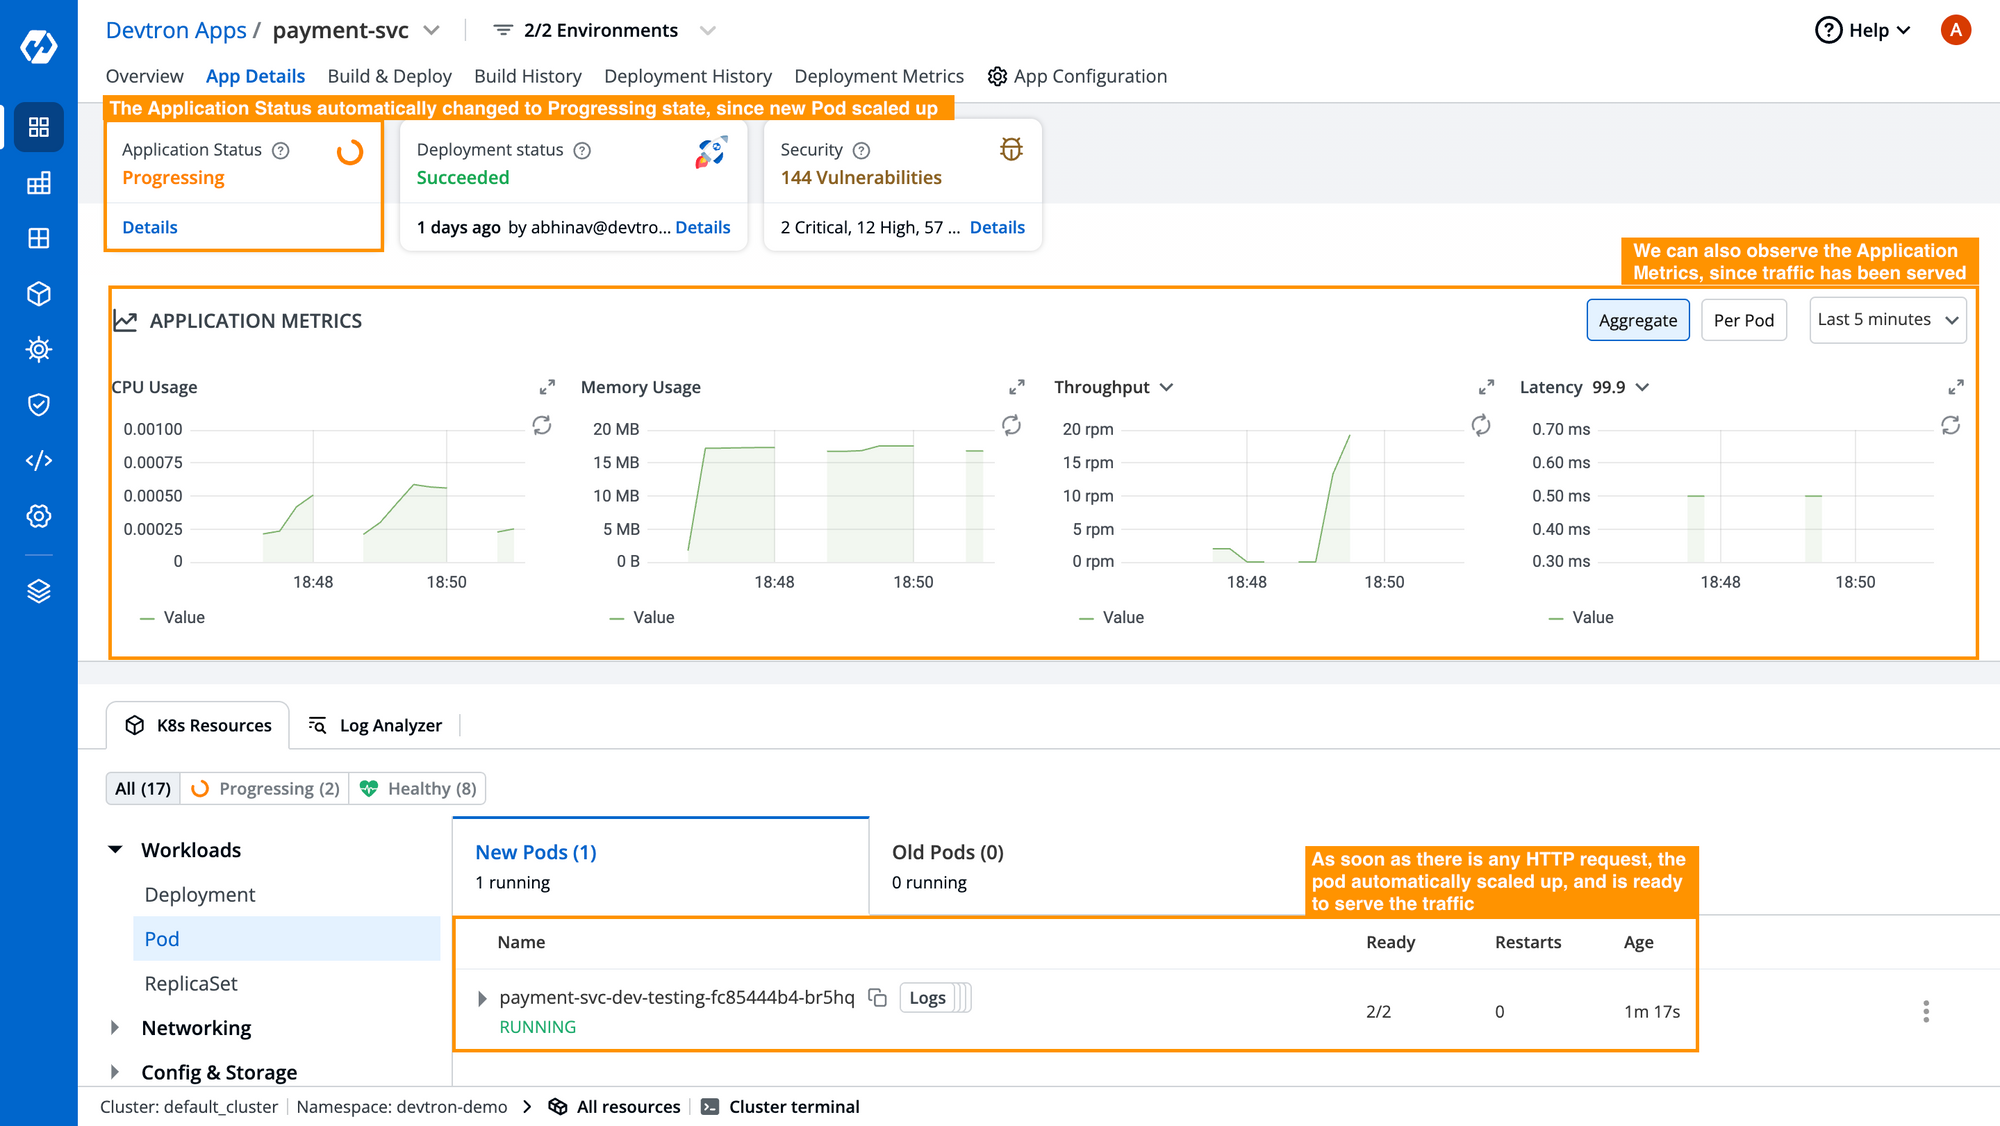
Step 6: In the Devtron dashboard, it automatically picks up the ingress host and shows it in URLs section at the top right of the dashboard as you can see in Fig. 5, and if any request has been made into the hostname, it will automatically scale up the pod and it can serve the traffic as you can see in the below image.
Conclusion
Kubernetes ephemeral environments offer flexibility, cost efficiency, and speed in modern software development. While manual setup works, it comes with complexity and DevOps dependencies.
With Devtron, ephemeral environments become simple, automated, and cost-optimized, helping teams focus on innovation instead of infrastructure.
FAQ
What are Kubernetes ephemeral environments?
Kubernetes ephemeral environments are temporary, isolated setups created using namespaces within a cluster. They allow developers to test new features, fixes, or staging workloads without impacting production.
How do ephemeral environments reduce costs?
They are spun up only when needed and destroyed after use. This avoids maintaining idle dev/test environments, which can cost 3–5x more than production in some cases.
Are ephemeral environments suitable for production workloads?
No. Ephemeral environments are best for testing, QA, and staging. Production requires stable, permanent environments.
What tools help manage ephemeral environments in Kubernetes?
Kubernetes namespaces, Helm, CI/CD pipelines, Horizontal Pod Autoscaler (HPA), and KEDA are commonly used. Platforms like Devtron simplify orchestration, scaling, and monitoring.
What’s the difference between preview environments and ephemeral environments?
Preview environments are often created for a single pull request or feature branch, whereas ephemeral environments can support broader temporary use cases like QA, bug validation, or integration testing.