Microservices-based architectures are becoming increasingly popular in today's fast-paced software development environment. A typical multi-service architecture may consist of different services implemented using different programming languages. In this blog post, we'll walk through the key steps and best practices for deploying a multi-service architecture using Java, Node.js, and Python applications on Kubernetes.
To simplify and streamline this complex deployment process, we’ll also explore how Devtron can help you manage, monitor, and scale multi-service applications effortlessly on Kubernetes.
Prerequisites:
Before diving into the deployment, ensure you have the following:
- Kubernetes Cluster: Set up a Kubernetes cluster. This can be done using any Kubernetes service (GKE, EKS, AKS) or your own on-premise Kubernetes (e.g., MicroK8s, Minikube).
- Docker: Containerize each service (Java, Node.js, Python) using Docker.
- kubectl: The command-line tool for interacting with the Kubernetes API.
Deploying a Multi-Service Architecture Application on Kubernetes
In this section, we’ll walk through how to deploy a Java, Node.js, and Python service on Kubernetes effectively, covering:
- Containerizing each service using Docker
- Creating Kubernetes Deployment files for each service
- Exposing services inside the Kubernetes cluster
- Using Ingress to route external traffic
Step 1: Containerizing Your Applications
Before deploying to Kubernetes, we need to containerize each service using Docker.
Containerizing a Java Application (Spring Boot)
A typical Spring Boot application is packaged as a JAR file. Here’s a Dockerfile to containerize it:
FROM openjdk:11-jre-slim
WORKDIR /app
COPY target/your-java-app.jar /app.jar
CMD ["java", "-jar", "/app.jar"]
Steps:
- The base image openjdk:11-jre-slim provides a lightweight Java runtime.
- The WORKDIR is set to /app.
- The application JAR is copied into the container.
- The CMD command runs the application inside the container.
Now, build and push the image:
docker build -t your-dockerhub-username/java-app .
docker push your-dockerhub-username/java-app
Containerizing a Node.js Application
For a Node.js service, the Dockerfile looks like this:
FROM node:16
WORKDIR /app
COPY package*.json ./
RUN npm install
COPY . .
CMD ["node", "app.js"]
Steps:
- Uses the official Node.js 16 image.
- Copies package.json and installs dependencies.
- Copies all source files and runs the app.js entry point.
Now, build and push the image:
docker build -t your-dockerhub-username/nodejs-app .
docker push your-dockerhub-username/nodejs-app
Containerizing a Python Application (Flask)
For a Python service using Flask, here’s a Dockerfile:
FROM python:3.9
WORKDIR /app
COPY requirements.txt .
RUN pip install -r requirements.txt
COPY . .
CMD ["python", "app.py"]
Steps:
- Uses Python 3.9 as the base image.
- Installs dependencies from requirements.txt.
- Copies the application files and starts the Flask app.
Now, build and push the image:
docker build -t your-dockerhub-username/python-app .
docker push your-dockerhub-username/python-app
Step 2: Creating Kubernetes Deployments
In order to deploy the Django application to Kubernetes, you first need to create a YAML manifest for the Kubernetes deployment and service objects. If you are unfamiliar with these concepts, please check out our blog to learn about the Kubernetes workload objects.
To keep our project structured and maintainable, we will create a dedicated folder called manifests to store all our Kubernetes YAML configuration files.
Java App Deployment
We will call this manifest java-deployment.yaml
apiVersion: apps/v1
kind: Deployment
metadata:
  name: java-app
spec:
  replicas: 3
  selector:
    matchLabels:
      app: java-app
  template:
    metadata:
      labels:
        app: java-app
    spec:
      containers:
      - name: java-app
        image: your-dockerhub-username/java-app
        ports:
        - containerPort: 8080
Let’s understand what’s happening in the above YAML manifest.
- Replicas: Runs 3 instances of the Java app.
- Selector: Ensures pods are managed by this deployment.
- Container: Pulls the Java image and exposes port 8080.
Node.js App Deployment
We will call this manifest nodejs-deployment.yaml
apiVersion: apps/v1
kind: Deployment
metadata:
  name: nodejs-app
spec:
  replicas: 3
  selector:
    matchLabels:
      app: nodejs-app
  template:
    metadata:
      labels:
        app: nodejs-app
    spec:
      containers:
      - name: nodejs-app
        image: your-dockerhub-username/nodejs-app
        ports:
        - containerPort: 3000
Let’s understand what’s happening in the above YAML manifest.
- Replicas: Runs 3 instances of the Node app.
- Selector: Ensures pods are managed by this deployment.
- Container: Pulls the Node image and exposes port 3000.
Python Deployment
We will call this manifest python-deployment.yaml
apiVersion: apps/v1
kind: Deployment
metadata:
  name: python-app
spec:
  replicas: 2
  selector:
    matchLabels:
      app: python-app
  template:
    metadata:
      labels:
        app: python-app
    spec:
      containers:
      - name: python-app
        image: your-dockerhub-username/python-app
        ports:
        - containerPort: 5000
Let’s understand what’s happening in the above YAML manifest.
- Replicas: Runs 3 instances of the Python app.
- Selector: Ensures pods are managed by this deployment.
- Container: Pulls the Python image and exposes port 5000.
Next, we need to create the service manifest. The service will be used to expose the application pods to the outside world. We will be creating a service with the type NodePort. Please check out our blog on Kubernetes services if you are unfamiliar with them and the types of services.
Step 3: Exposing Services via Kubernetes Service Objects
A Kubernetes Service is an abstraction that enables communication between different parts of an application inside a cluster.
Without a Service, the pods created by the Deployment would not have a stable IP address, making inter-service communication difficult.
Kubernetes provides three main types of services:
- ClusterIP (default) → Makes the service accessible only within the cluster.
- NodePort → Exposes the service on a static port on each node.
- LoadBalancer → Exposes the service to the internet (useful for external APIs).
Each service must be exposed internally so the microservices can communicate.
Java Service (ClusterIP)
We will save the following service manifest in a file called java-service.yaml
apiVersion: v1
kind: Service
metadata:
  name: java-app-service
spec:
  selector:
    app: java-app
  ports:
    - protocol: TCP
      port: 8080
      targetPort: 8080
  type: NodePort
Let’s break down what’s happening within this service manifest.
- Kind: The type of Kubernetes object that is being created.
- metadata.name: The name of this service object. In this case, it’s called
java-app-service - Spec.selector: The pod labels that should be exposed by this service
- Ports: Defining the protocol type and port numbers that should be exposed for the application
- Type: The type of service that is being created.
Node.js Service (ClusterIP)
We will save the following service manifest in a file called nodejs-service.yaml
apiVersion: v1
kind: Service
metadata:
  name: nodejs-app-service
spec:
  selector:
    app: nodejs-app
  ports:
    - protocol: TCP
      port: 3000
      targetPort: 3000
  type: NodePort
Let’s break down what’s happening within this service manifest.
- Kind: The type of Kubernetes object that is being created.
- metadata.name: The name of this service object. In this case, it’s called nodejs-app-service
- Spec.selector: The pod labels that should be exposed by this service
- Ports: Defining the protocol type and port numbers that should be exposed for the application
- Type: The type of service that is being created.
Python Service (ClusterIP)
We will save the following service manifest in a file called python-service.yaml
apiVersion: v1
kind: Service
metadata:
  name: python-app-service
spec:
  selector:
    app: python-app
  ports:
    - protocol: TCP
      port: 5000
      targetPort: 5000
  type: NodePort
Let’s break down what’s happening within this service manifest.
- Kind: The type of Kubernetes object that is being created.
- metadata.name: The name of this service object. In this case, it’s called python-app-service
- Spec.selector: The pod labels that should be exposed by this service
- Ports: Defining the protocol type and port numbers that should be exposed for the application
- Type: The type of service that is being created.
Now that we have deployed our applications and created a Kubernetes Service of type NodePort, the next step is to expose it externally using Ingress.
An Ingress Controller helps route traffic from the internet to the appropriate services inside the Kubernetes cluster based on domain names or paths.
If you are unfamiliar with how Ingress works, check out our blog on Kubernetes Ingress for a detailed explanation.
Step 4: Exposing Services Using Ingress
An Ingress Controller allows us to route external traffic to our services using hostnames or paths.
Example Ingress configuration:
apiVersion: networking.k8s.io/v1
kind: Ingress
metadata:
  name: multi-service-ingress
spec:
  rules:
    - host: java-app.local
      http:
        paths:
        - path: /
          pathType: Prefix
          backend:
            service:
              name: java-app-service
              port:
                number: 8080
    - host: nodejs-app.local
      http:
        paths:
        - path: /
          pathType: Prefix
          backend:
            service:
              name: nodejs-app-service
              port:
                number: 3000
    - host: python-app.local
      http:
        paths:
        - path: /
          pathType: Prefix
          backend:
            service:
              name: python-app-service
              port:
                number: 5000
This configuration enables:
- java-app.local → Routes traffic to the Java service.
- nodejs-app.local → Routes traffic to the Node.js service.
- python-app.local → Routes traffic to the Python service.
Using these manifests, you can deploy the multi-service applications to the Kubernetes cluster. Please run the below command to apply the deployment and service manifest to your Kubernetes cluster.
kubectl apply -f manifests/
With this, you have successfully deployed the multi-service applications to the Kubernetes cluster.
Deploy applications with Devtron
Devtron is a comprehensive Kubernetes management platform designed to simplify the entire DevOps lifecycle, from the initial build stages to deployments and beyond. When it comes to deploying multi-service applications, Devtron minimizes the manual processes typically involved. It automates the creation of Dockerfiles, generates Kubernetes manifests, builds the application, and manages the deployment, all while adhering to industry best practices.
Let’s go through the steps of deploying an application on Kubernetes using Devtron.
Prerequisites
Before moving forward, let’s look at all the things you’ll require to follow along:
- An Application on GitHub
Devtron is installed and configured on your machine. If you haven’t installed Devtron, feel free to check out the well-managed documentation and join the discord community for help!
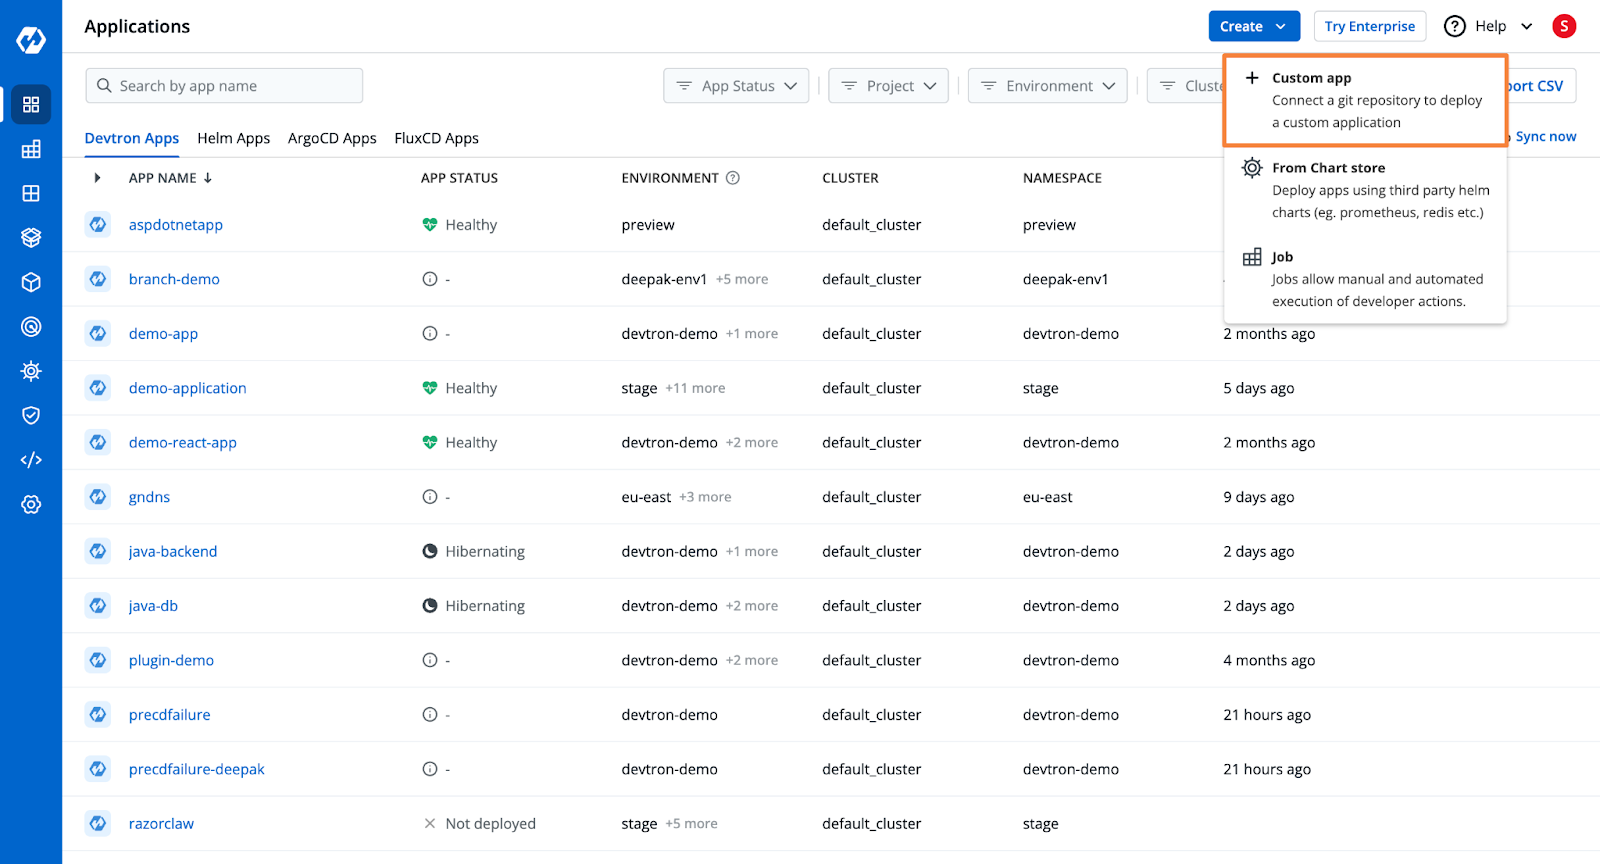
Step 1: Create a Devtron application and add the Git Repository
From Devtron’s home page, create a new Devtron application, and name it as demo-application
Devtron can build the application and create the container image. To do this, it needs the URL for the Git Repository. Check out the documentation to learn more about the application creation process.
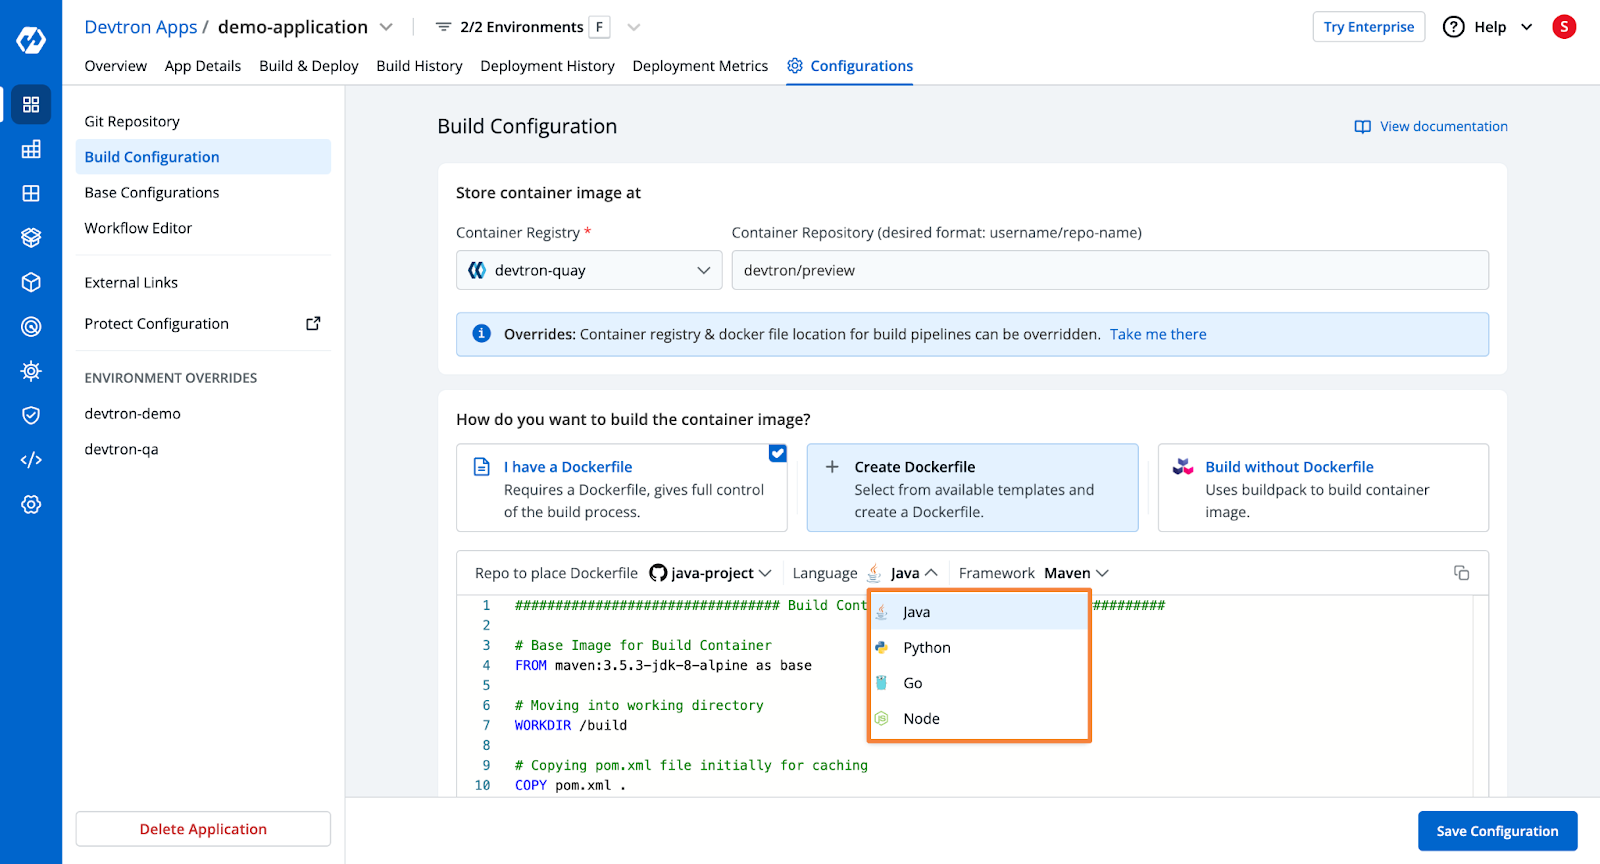
Step 2: Configure the Build
Devtron will automatically take the code from the Git repository and build the container image. For this, it requires an OCI Container Registry to push the build container image, and it requires a Dockerfile.
You can add the Container Registry from the Global Configurations.
For the build instructions, Devtron provides you with 3 options.
- Use an existing Dockerfile
- Create the Dockerfile
- Use Buildpacks
If you choose to create the Dockerfile within Devtron, you are offered several templates for popular programming languages and frameworks.
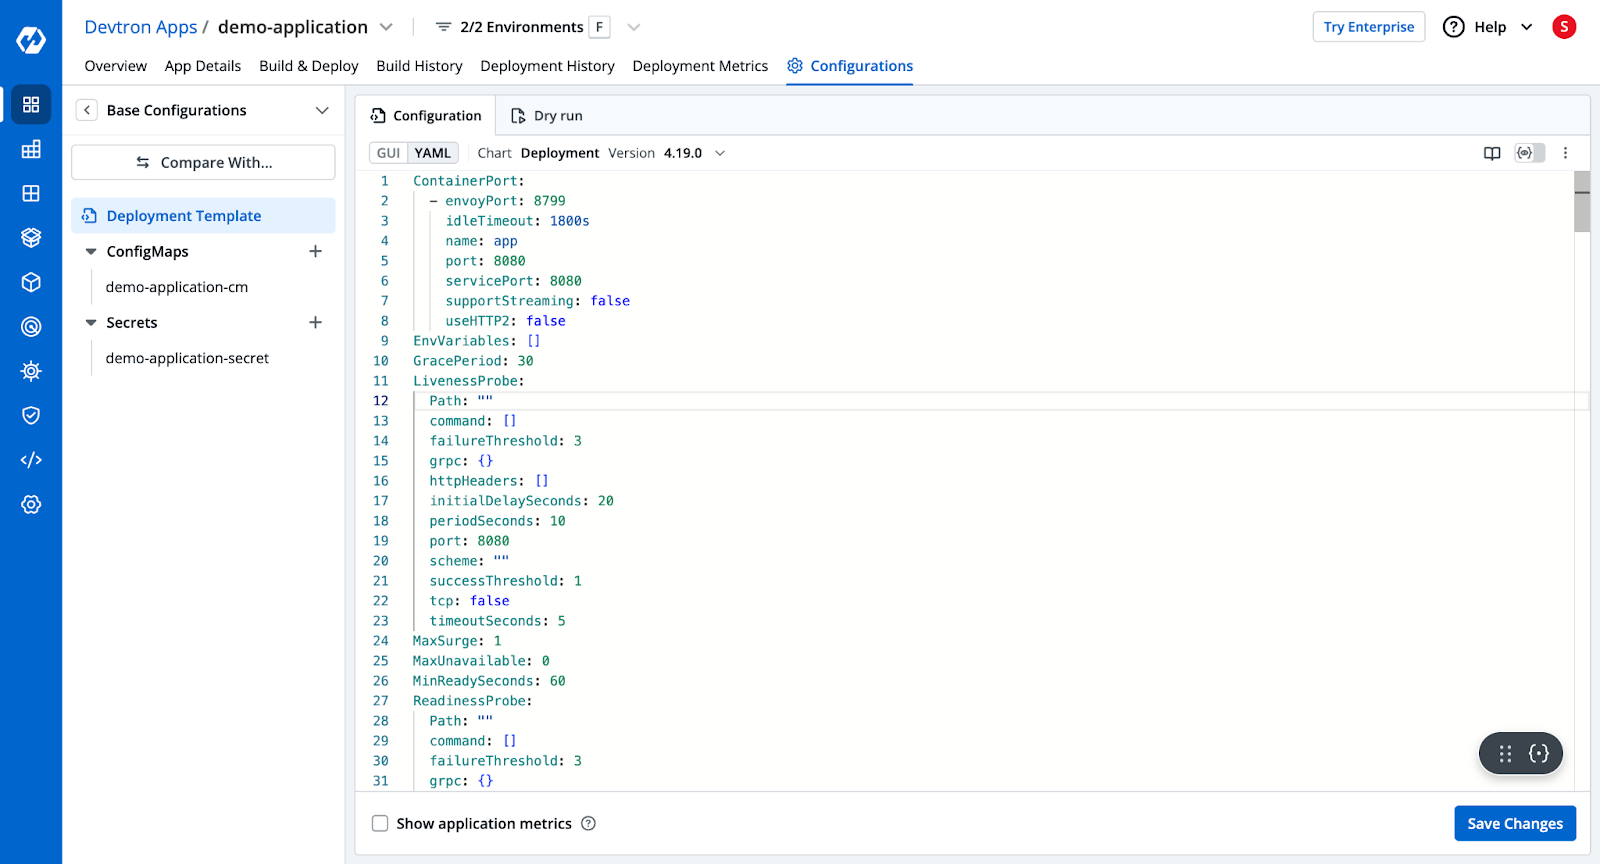
Step 3: Deployment Configurations
Next, you want to configure the actual deployment manifest that will be applied to the Kubernetes cluster. Unlike before, where you had to manually write all the YAML files, Devtron provides a YAML template where you can simply put in the configurations you want.
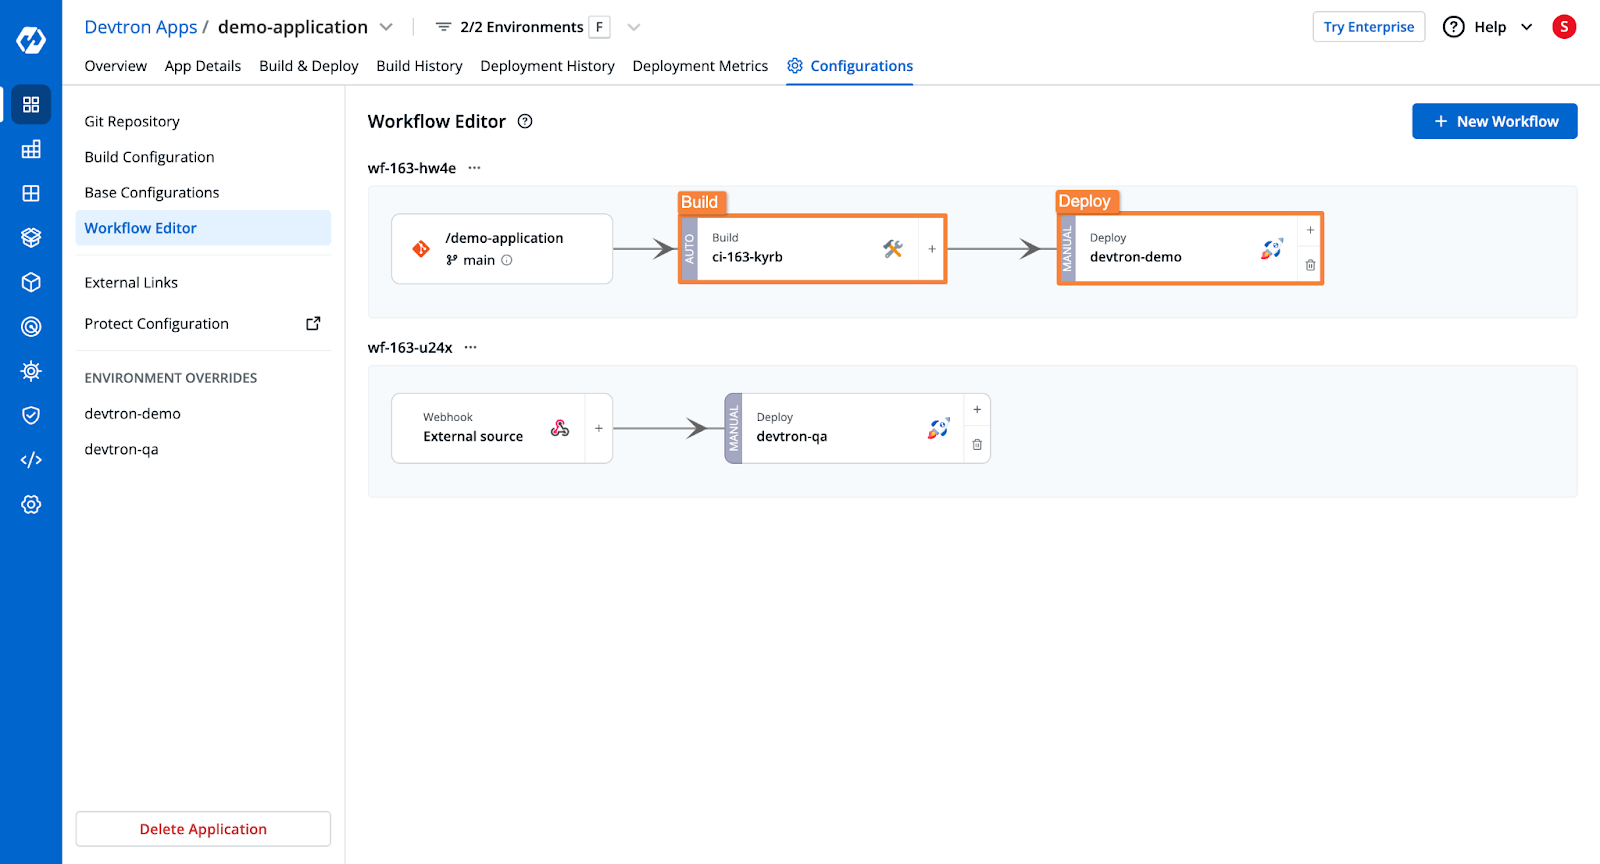
Step 4: Create the Build and Deploy Pipelines
Next, you want to create the CI (continuous integration) and CD (continuous deployment) pipelines.
The CI pipeline will take your application code from the configured Git Repository and branch and will build the Dockerfile and push it to a Docker Repository. You can also configure a security scan within the Build Pipeline.
The Deployment pipeline on the other hand will trigger the Deployment on the Kubernetes clusters in the configured environment.
In both the build and deployment pipelines, you can configure a Pre and Post stage, and configure them to take certain actions. For example, you can configure the Sonarqube plugin to scan the code for vulnerabilities in the Pre-CI stage.

Please check the documentation to learn more about the pipeline configurations.
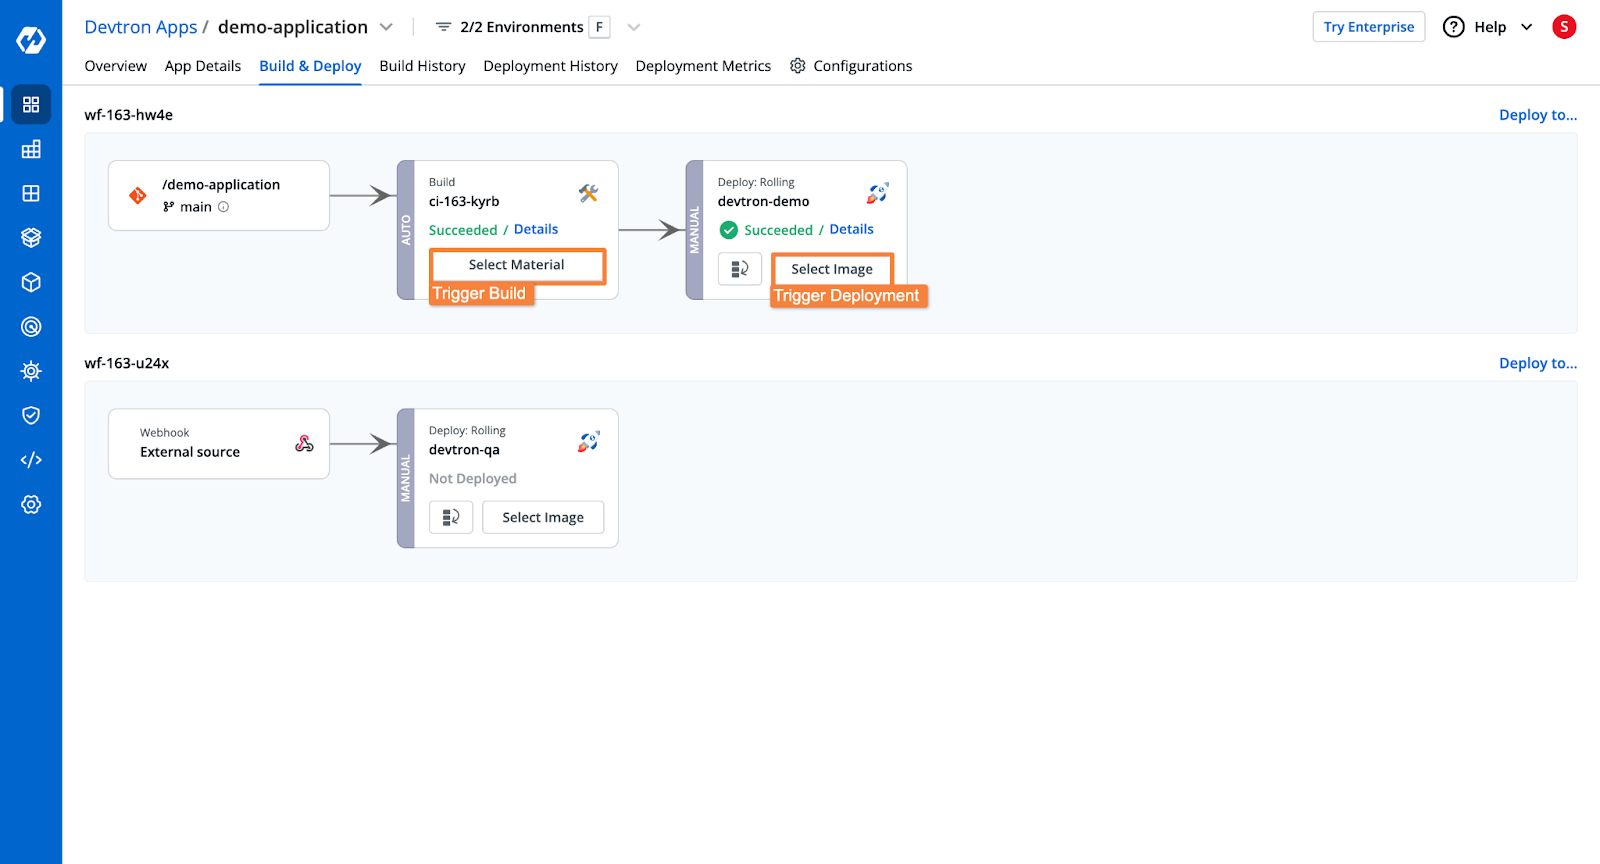
Step 5: Trigger the Build and Deployment Pipelines
Once all the configurations are complete, all that’s left is to trigger the build stage, and subsequently the deployment.
From the Build & Deploy tab, select the Git material to trigger the build stage. The pipeline will build the container image.
Once the build stage is complete, you can trigger the deployment for the built artifact.
Upon triggering the deployment, Devtron will deploy the application to your GKE cluster, with the configurations that you created earlier.
Once the application is deployed, you will be able to see the application health, deployment status, security vulnerabilities, the Kubernetes resources of the application, and more.
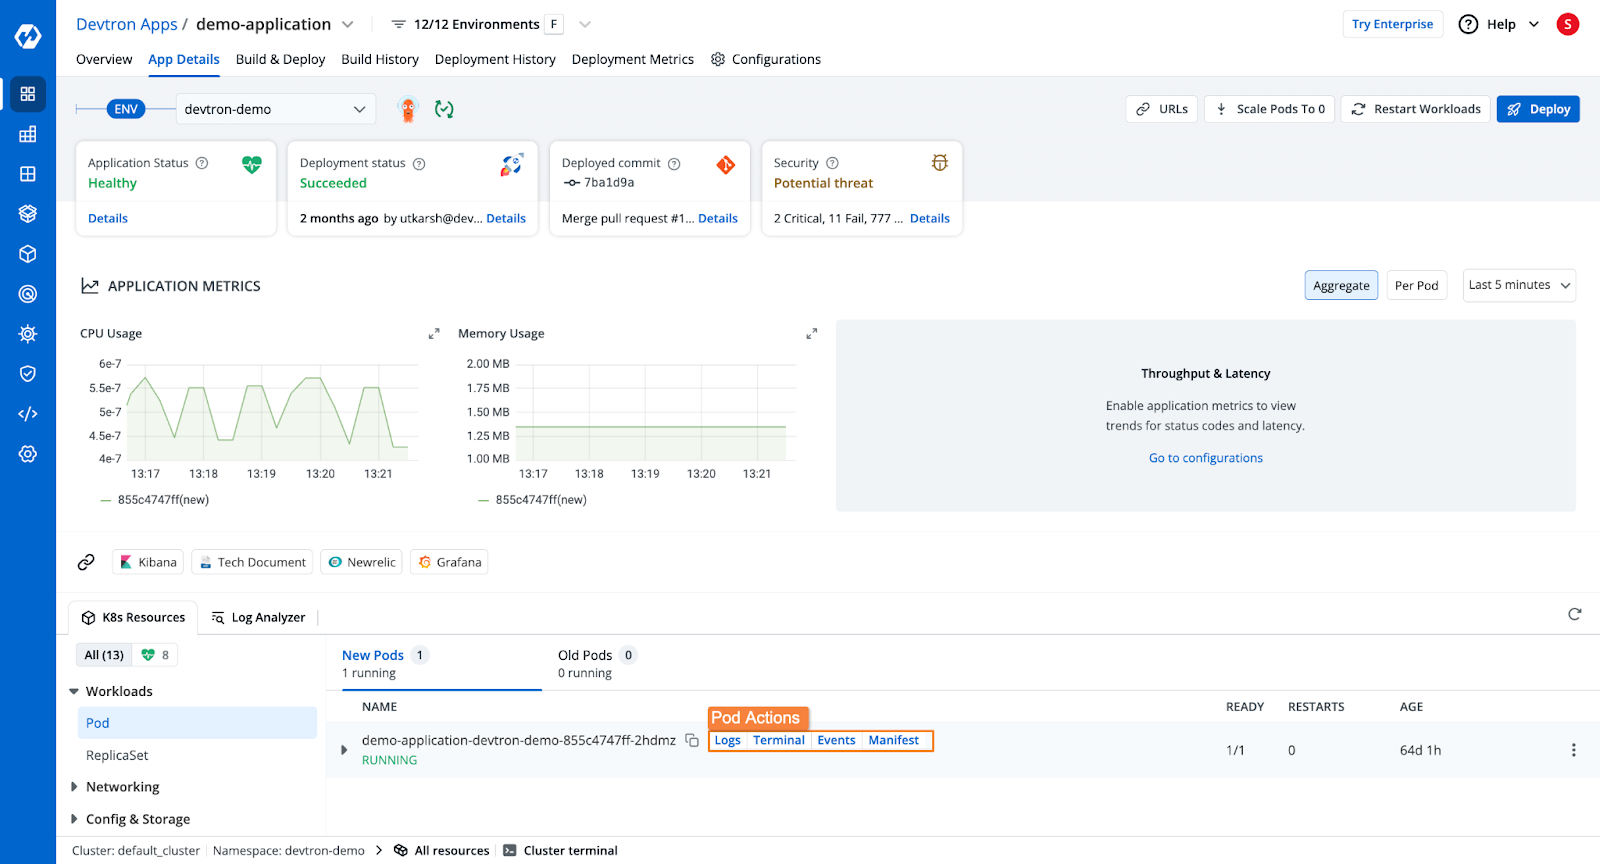
Additionally, Devtron will also show the entire Build as well as Deployment history. In case of any errors in the deployment, you can also trigger a rollback to a previous deployment version.
Conclusion
In this blog, we explored the step-by-step process of configuring and deploying an application on a GKE cluster. To summarize, we covered:
- Configuring a GKE cluster
- Creating Kubernetes manifests
- Deploying the application on GKE
- Streamlining deployments with Devtron
Devtron can help accelerate deployment velocity while also ensuring that deployments are more reliable. For working with Kubernetes, Devtron can act as the single solution you need.
Check out Devtron’s GitHub page, and start deploying applications to Kubernetes.
FAQ
What is a multi-service architecture ?
A multi-service architecture consists of multiple microservices, each responsible for a specific function, deployed independently.
How should I structure my Kubernetes manifests for multi-service applications?
Each service should have:
- Deployment (for running containers)
- Service (for networking)
- ConfigMap/Secret (for configuration)
How do I monitor Java, Node.js, and Python services in Kubernetes?
To monitor Java, Node.js, and Python services in Kubernetes use Prometheus & Grafana for metrics and ELK (Elasticsearch, Logstash, Kibana) or Loki for logging.
How do I optimize Kubernetes costs when running multi-service architectures?
You can optimize your Kubernetes costs by right-sizing your resource requests & limits, by using Cluster Autoscaler to scale nodes dynamically, and by using Spot/Preemptible nodes for cost reduction.
How do I handle persistent storage for databases in Kubernetes?
You can handle persistent storage for databases in Kubernetes by using Persistent Volume (PV) & Persistent Volume Claim (PVC) for databases.