Autoscaling is the critical aspect of containerised environment, as software companies are moving towards such environments, those who manage their platform using Kubernetes or Docker Swarm. It is important to manage the environment efficiently and autoscaling is one of the factors which helps to achieve it.
This practice offers several benefits:
1- Resource efficiency: It ensures that resources are allocated efficiently. During the period of low demand it will scale down the workloads which will lead to efficient consumption of resources and scale up workloads when there is more load for seamless user experience.
2- High Availability: By automatically adjusting the number of containers based on demand, autoscaling help to maintain desired level of application availability.
3- Elasticity: In autoscaled environments container handles the workload seamlessly and handle the sudden spikes and scale down by removing unnecessary containers. This elasticity helps to handle workload effectively.
4- Cost Saving: Autoscaling helps organisations save money by automatically adjusting resources to match demand. It leads to cost savings in terms of infrastructure and cloud resources.
5- Simplified Management: Managing containerized application manually may be little complex and also time consuming. Autoscaling reduces this issue and remove the manual intervention . It helps IT teams to focus on other critical tasks.
6- Dynamic Workload Distribution: It enables efficient distribution of workloads across all resources, ensuring all resources are used effectively.
In containerized environments where applications are broken down into smaller, manageable components, autoscaling plays the vital role in optimising performance, resource utilisation and provides a seamless experience for end users.
Foundations of Autoscaling
We can autoscale resources in many aspects which helps to ensure optimal performance, resource utilisation, and cost-efficiency. The basics for autoscaling typically involves monitoring certain metrics and use that metrics for scaling.
1- Resource Utilisation Metrics: It involves monitoring the usage of system resources like cpu, memory, and disk space. In this type when resource utilisation crosses the predefined threshold then autoscaling comes into picture.
2- Request/ThroughPut Metrics: Autoscaling can also be based on Application level metrics, such as number of requests per second, or the amount of network traffic. So when these metrics increases beyond the certain level, in such case autoscaling will scale the resources so that they can handle the load and it will also scale down when traffic goes down.
3- Custom Metrics: Depending upon the application specifics requirements some custom metrics need to monitored so it can autoscale on that basis. These metrics could be applications specific metrics or any other relevant metrics.
4- Scheduled Scaling: Depending upon the time period there can be a specific requirements and we can predefined the time period of autoscaling the workloads, such as scaling up workloads in business hours and scaling down workloads in off-peaks hours.
5- Latency or ResponseTime: If application response time or latency increases it means application is unable to handle the load so autoscaling is needed for the seamless experience for user.
Types of autoscaling
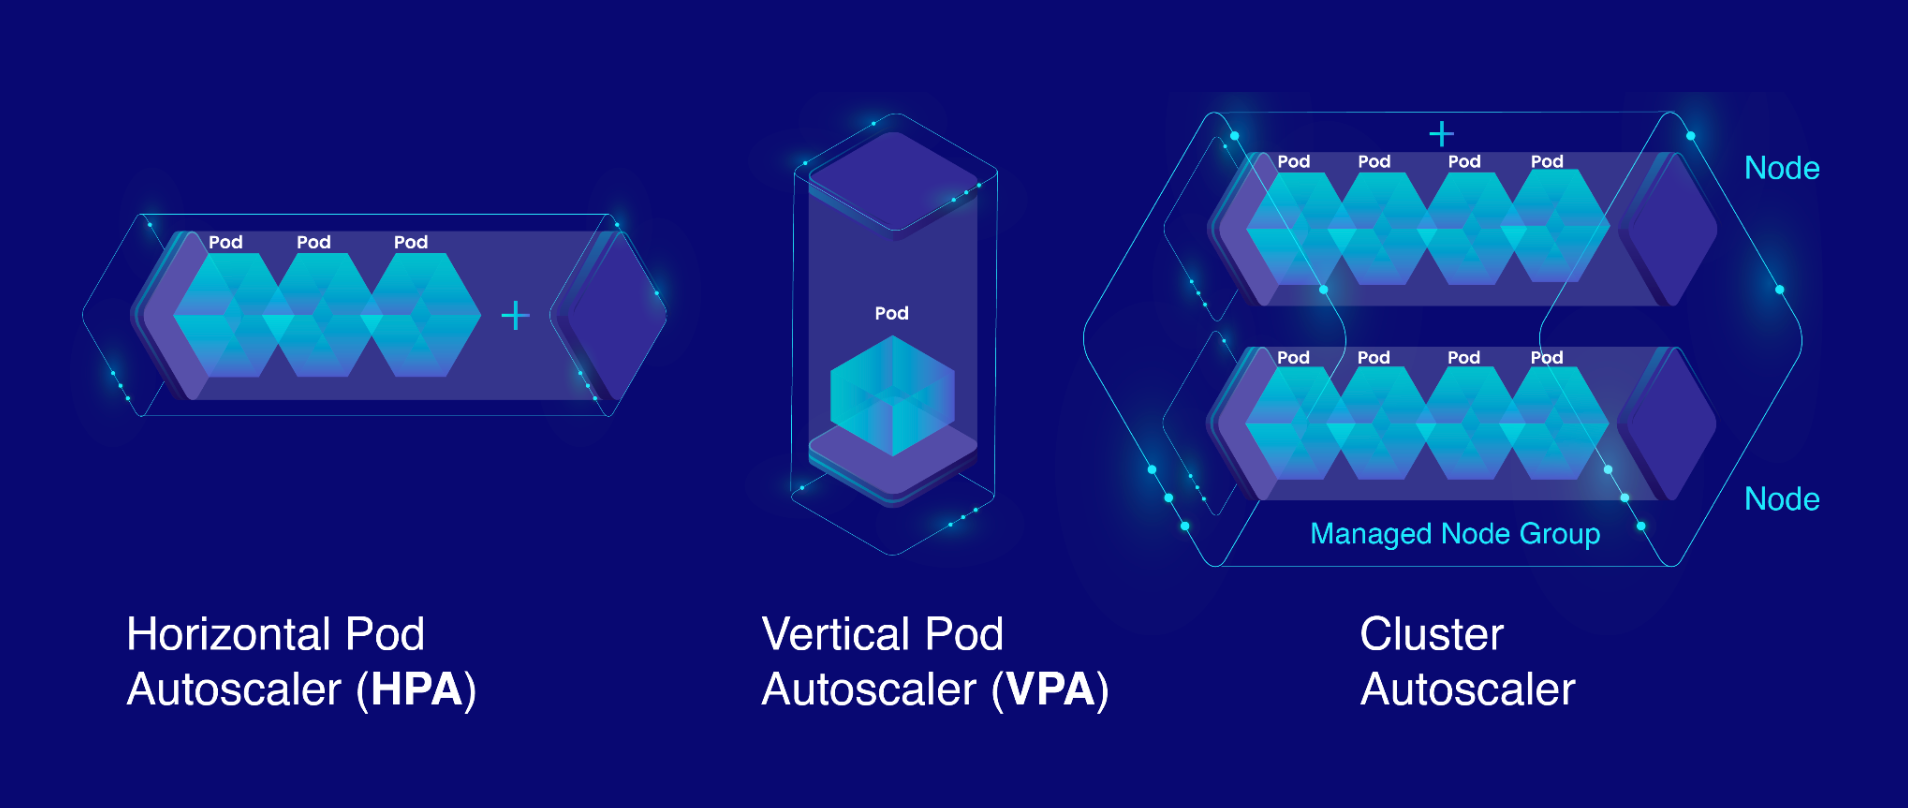
Autoscaling of workloads such as nodes or pod can we done is many ways
1-Horizontal Pod Autoscaling (HPA): HPA automatically adjusts the replicas of the pod based on cpu utilisation or some other metrics. As limit and requests resources are set Kubernetes automatically adjust number of pod and maintain the desired target.
2- Vertical Pod Autoscaling (VPA): VPA automatically adjust the resources which are set to them based on the historical resource usage. This can help to optimise resource allocation of individual pod.
3- Cluster Autoscaler: The Cluster Autoscaler adjusts the size of the node pool in response to the demands of pods that are unable to be scheduled due to resource constraints. It adds or removes nodes from the cluster to accommodate the workloads.
4- Kubernetes Custom Controllers: Advance users can develop their own Kubernetes controller which would be helpful for autoscaling workloads beyond Kubernetes standard mechanism.
Simplifying autoscaling with Devtron
To achieve any of the autoscaling, you need to do deploy controllers and then create Kubernetes manifests. In the vanilla Kubernetes we can autoscale workloads using HPA.
Imagine the case you want to autoscale an application named php-apache for managing the load seamlessly, So below is the template you can apply
Note: Make sure your cluster contains metric server deployed in it
apiVersion: autoscaling/v2
kind: HorizontalPodAutoscaler
metadata:
  name: php-apache
spec:
  scaleTargetRef:
    apiVersion: apps/v1
    kind: Deployment
    name: php-apache
  minReplicas: 1
  maxReplicas: 10
  metrics:
  - type: Resource
    resource:
      name: cpu
      target:
        type: Utilization
        averageUtilization: 50
Managing these manifests manually can be a bit hectic if you have multiple applications deployed across multiple environments.
Lets understand how Devtron helps in Autoscaling
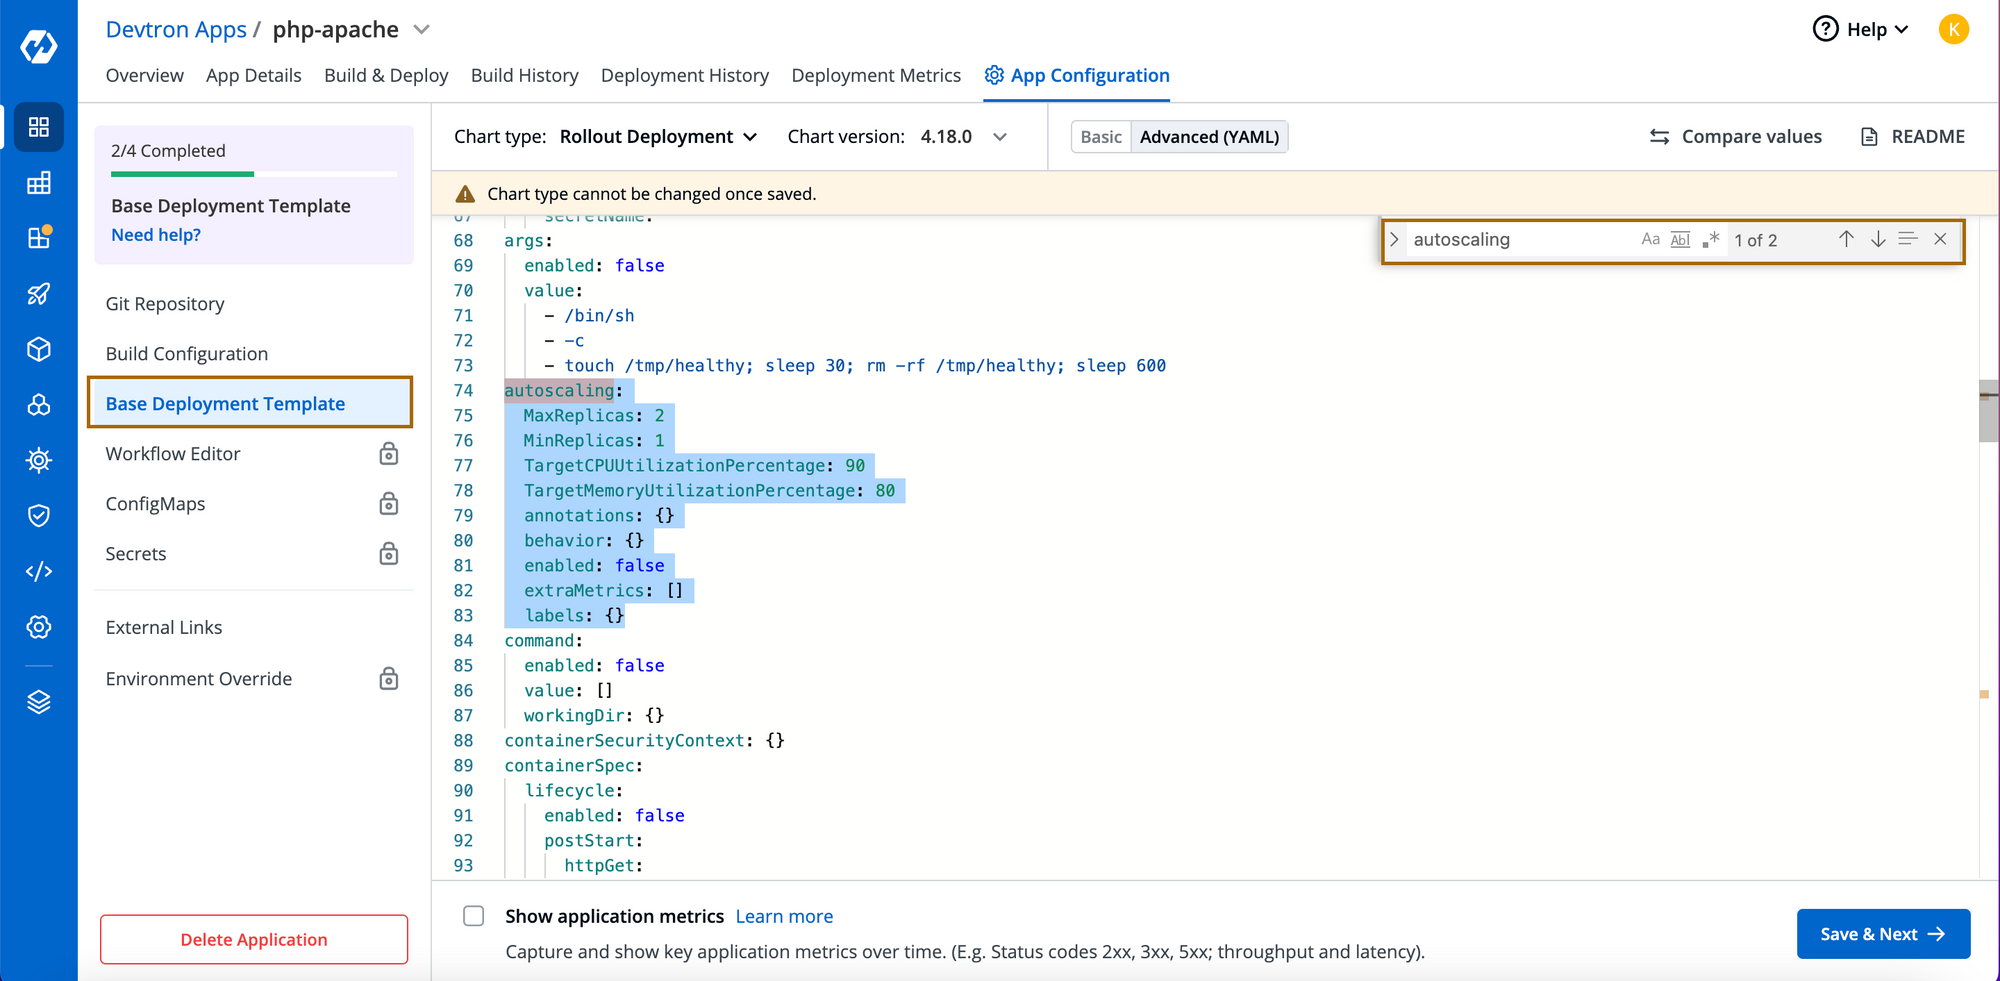
Whenever we deployed application through Devtron, Deployment Template is used where we configure all our values and configure the resources we want such as services, endpoints, ingress and other custom resources. Horizontal Pod Autoscaling (HPA) is one of them.
To deploy HPA with Devtron, you need to enable the autoscaling object from Deployment Template and simply tweak values from the UI. Using Devtron's Deployment Template brings a lot of advantages on the table. Some of them are -
- No manual intervention in creating K8s manifest files
- Don't need to worry about API deprecations of resources
- Keep in-tact with latest functionalities and compatibilities with K8s latest releases
- Less prone to Human Errors
- If you want to replicate the same resources in different application Devtron has provided the feature of cloning applications.
Lets Deep dive into practical approach
Step-1: Enable the autoscaling object in Deployment template and save the changes. You can configure how you want to autocale the apps and the min, max values of replicas.
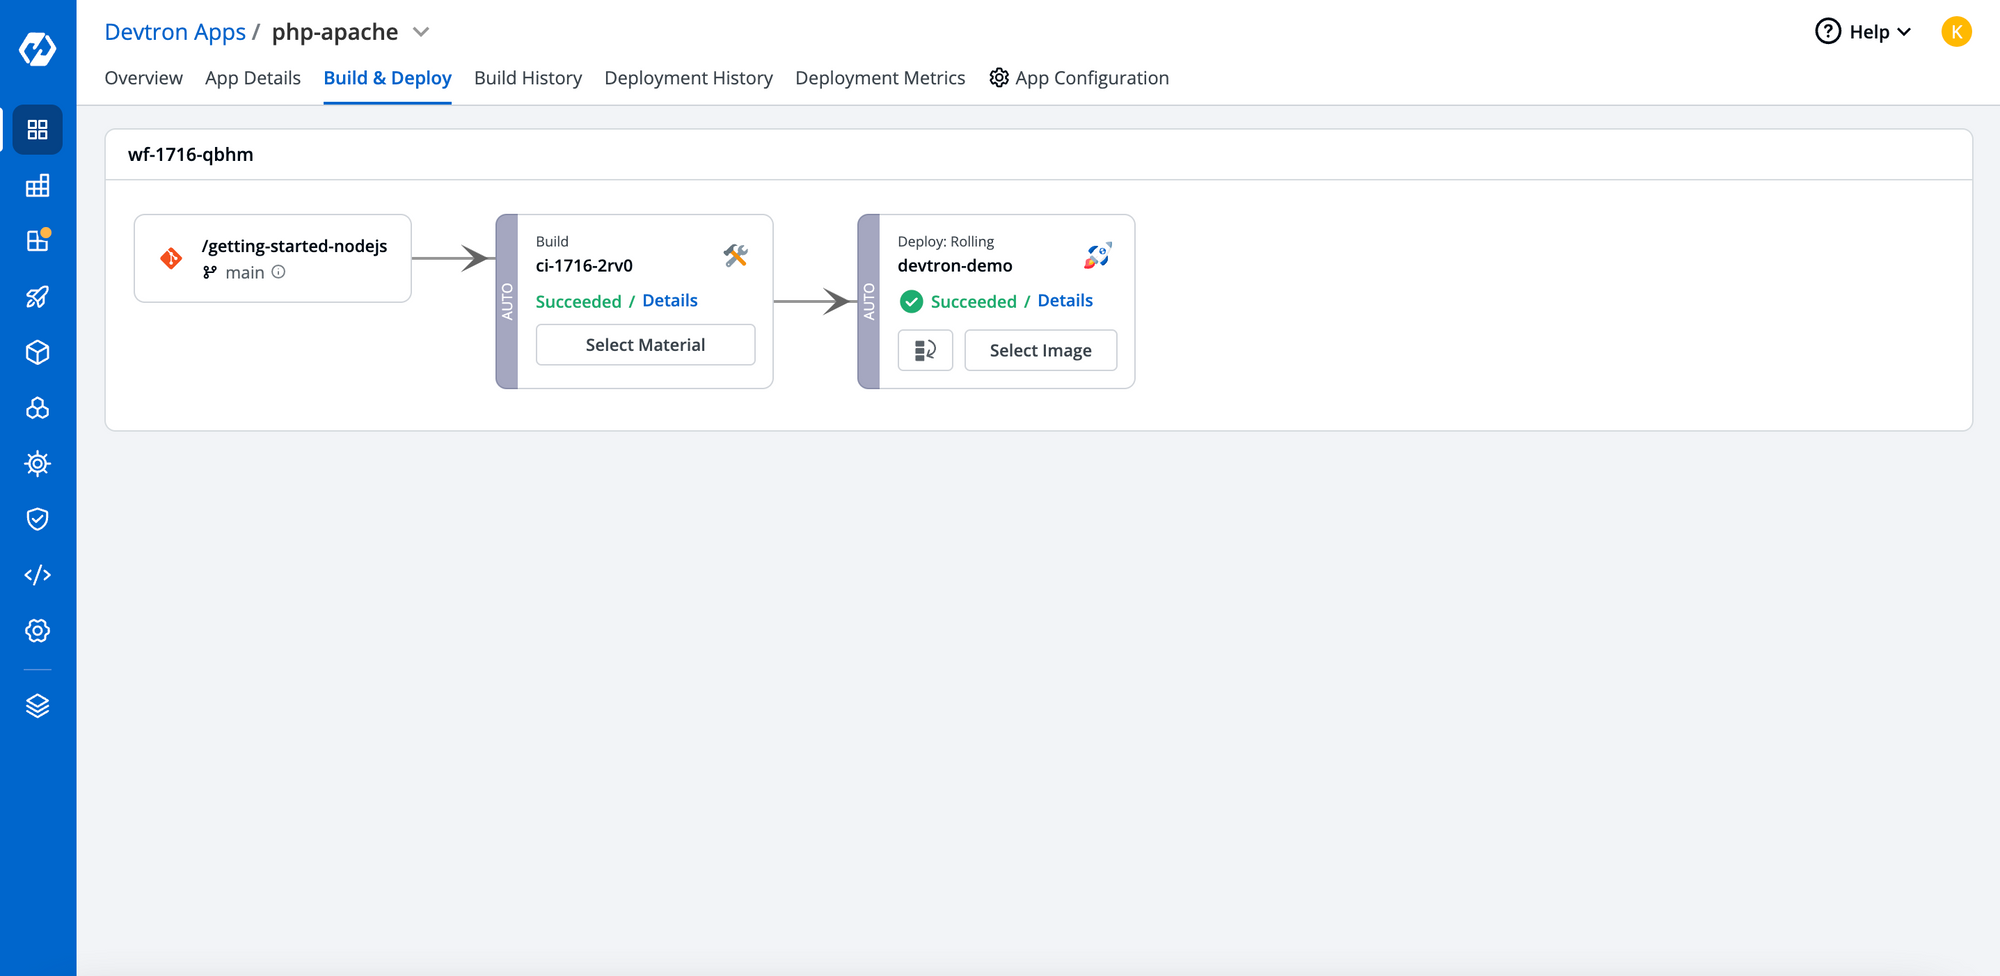
Setp-2: Once changes are made for respective environment, Deploy the changes
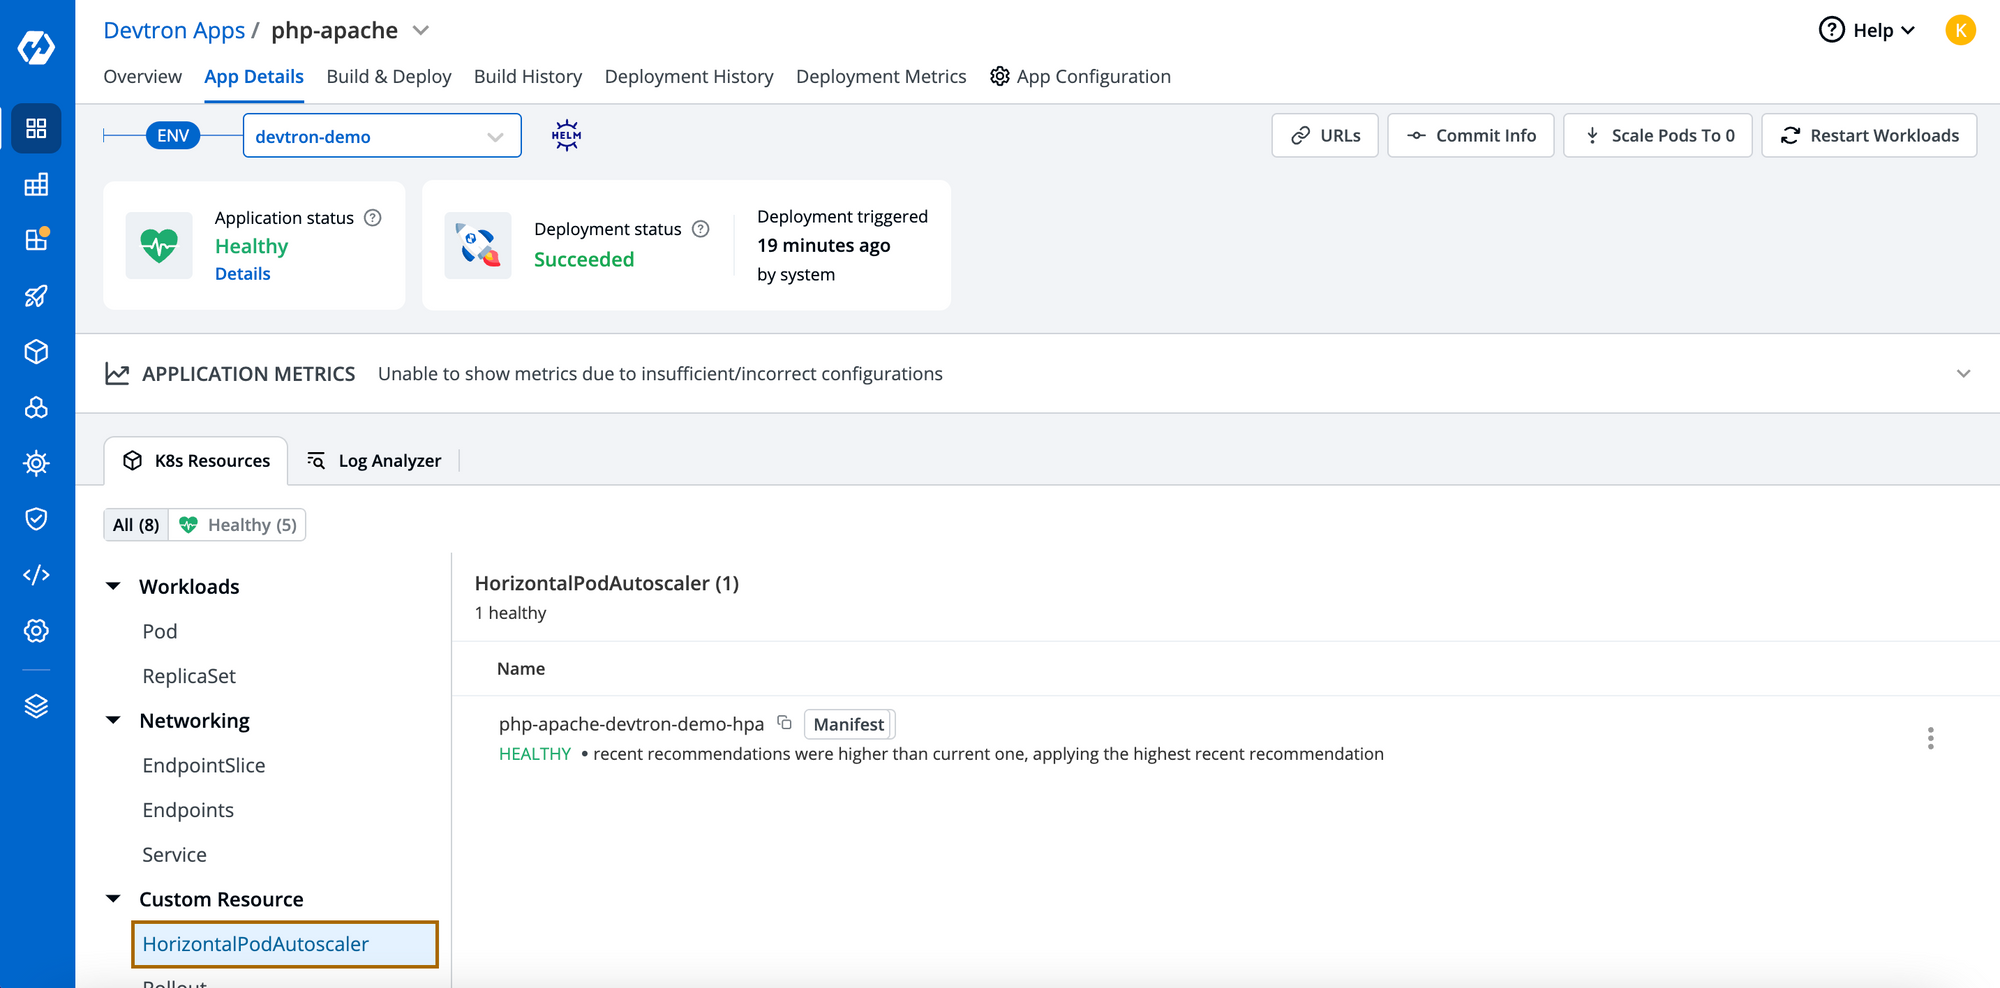
Step-3: Upon successful deployment, go to App Details page to view the resources tree. For every micro-service, Devtron creates a resourced-grouped view where you can see all deployed resources associated with the applications. As shwon in image below, you are able to view HPA under Custom Resource.
As soon the workloads reaches its threshold, it will automatically trigger the HPA and new pods will be created as you can see in the events of HPA.
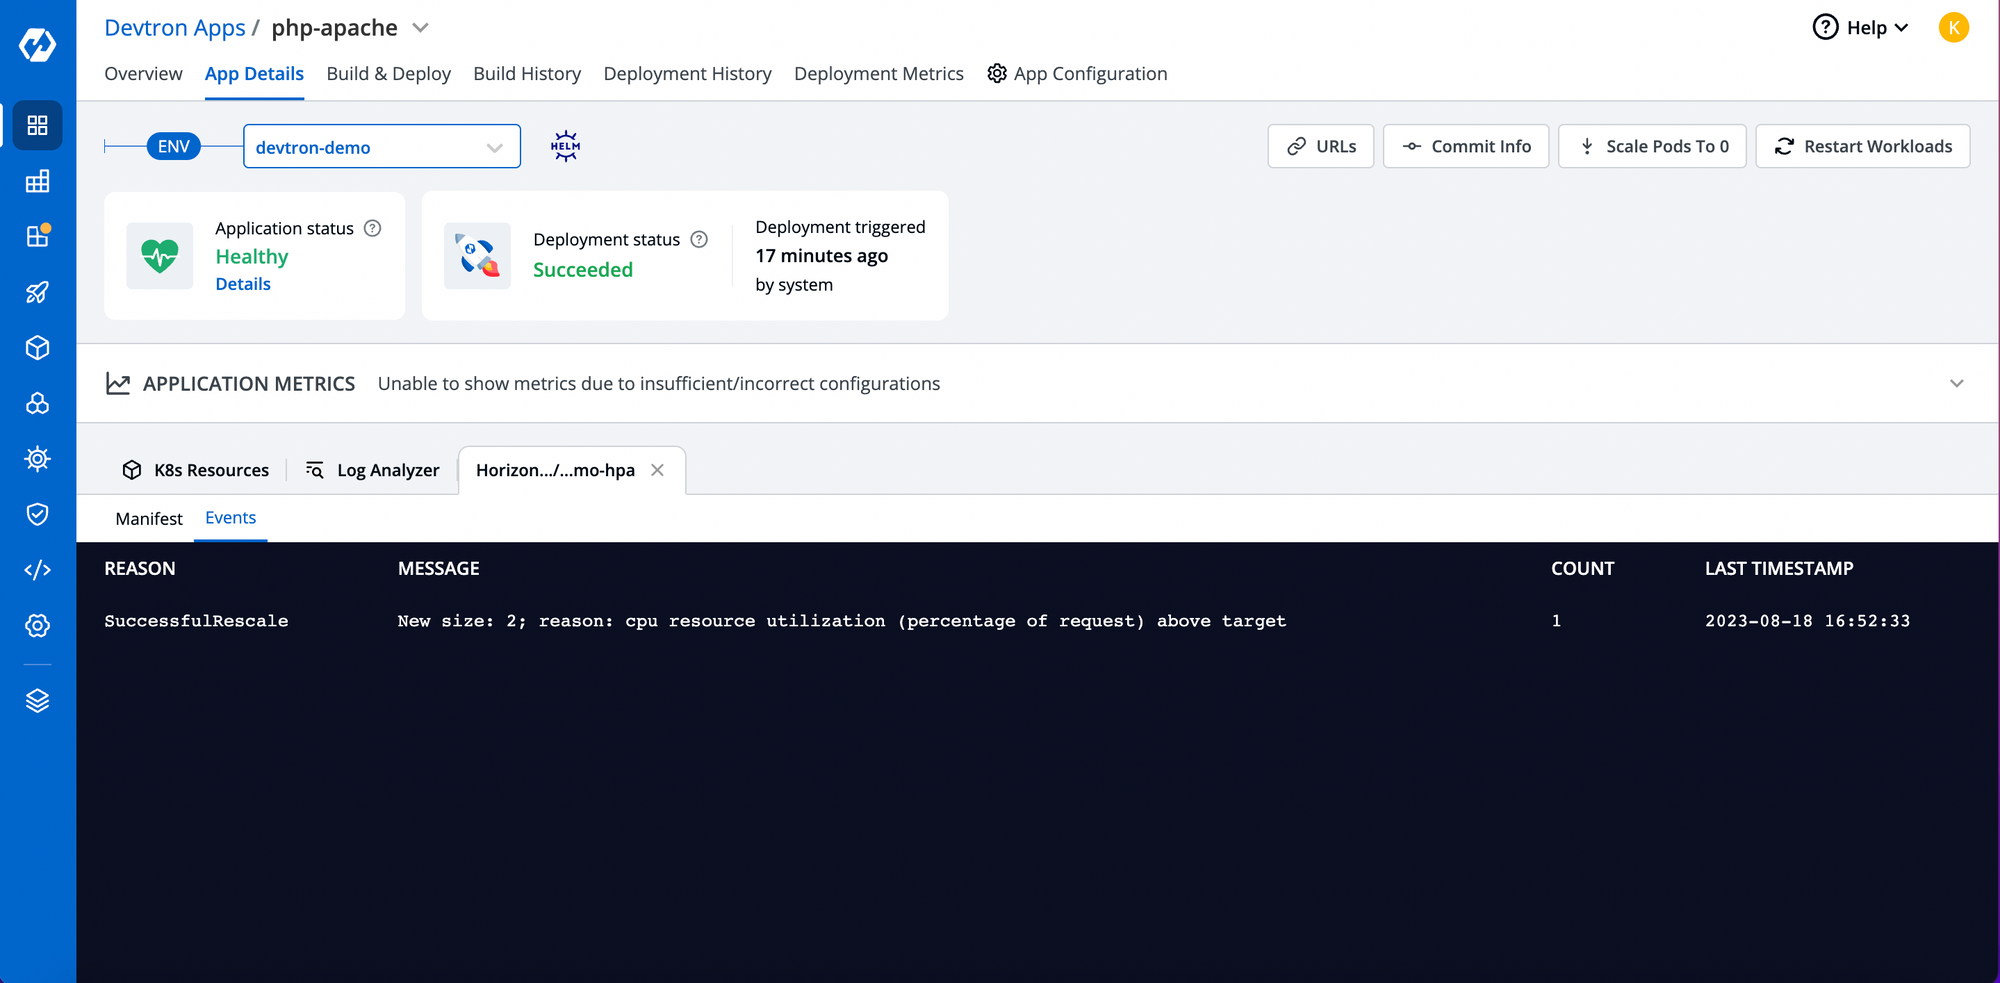
With the Devtron dashboard, you should be able to check the events, real-time logs, exec into containers and lot more. As in the below image, you can see, once the pod reaches it threshold, it automatically brought up new nodes and its visibile in the UI.
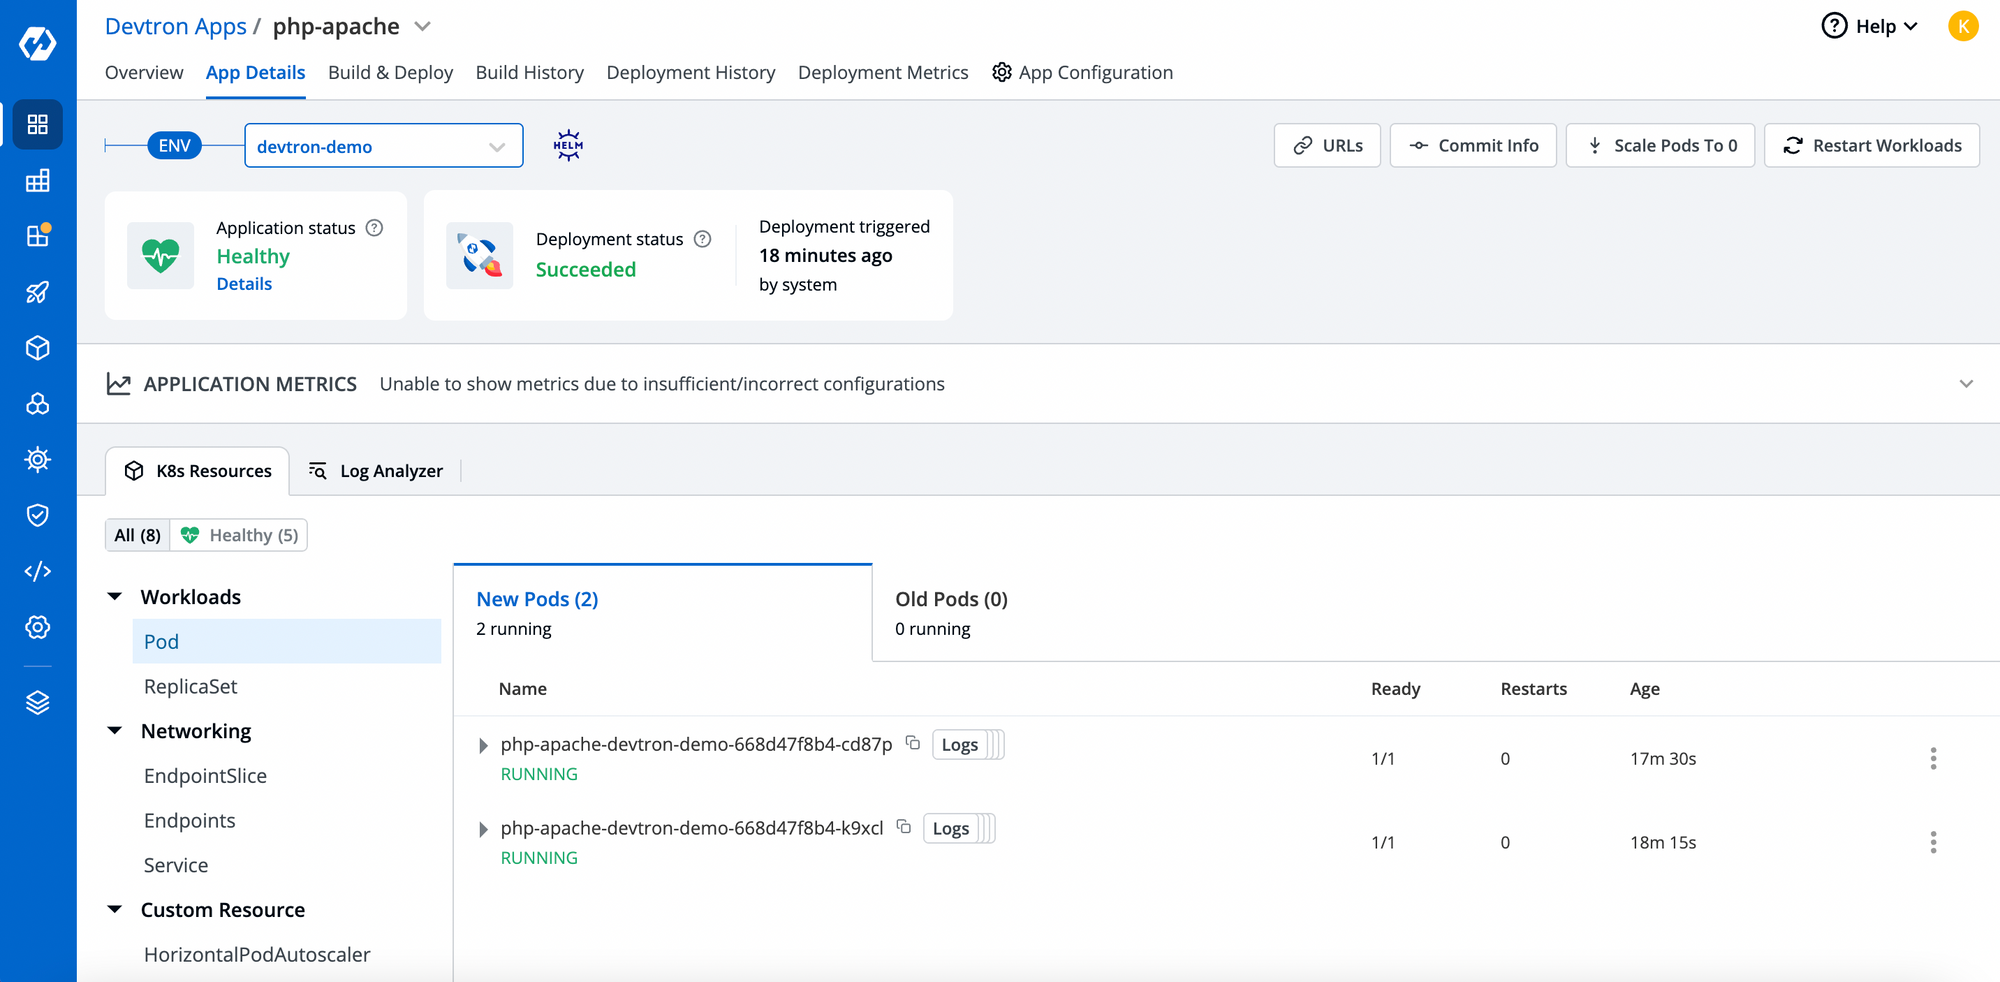
Cheers!! Autoscaling is succesfully working.
Autoscaling in such environments can be done in many other aspects such as custom metrics like AWS cloud watch metrics, prometheus metrics etc and also time based autoscaling. Devtron supports all of these, users just have to configure values in Deployment Template and eveything can be taken care by Devtron.
For more details in Autoscaling supported by Devtron, please refer to these blogs Time Based autoscaling, Keda Autoscaling.
Conclusion
Autoscaling with Devtron offers a streamlined and efficient approach for managing the dynamic resource demands of your applications. Through Devtron you can achieve all this through Deployment Template, you just have to configure values for autoscaling and you can achieve seamless autoscaling that optimizes performance and resource utilization.
If you have any questions feel free to reach out to us. Our thriving Discord Community is just a click away!

