Foundational Kubernetes Knowledge
Before we jump into the main content, it’s critical to understand some core details about Kubernetes (K8s). K8s, is an open-source platform designed to automate the deployment, scaling, and operation of application containers across clusters of hosts. At its core, Kubernetes clusters are the foundation, consisting of at least one master and multiple worker nodes. The master node hosts the Control Plane, the brain of the operation, which makes global decisions about the cluster (like scheduling), detects and responds to cluster events (like starting up a new container if one fails). The API Server in Kubernetes is a key component that serves as the front-end to the control plane. Worker nodes actually run the containers and workloads. These nodes host Pods, the smallest deployable units that can be created, scheduled, and managed. Pods encapsulate an application’s container (or, in some cases, multiple containers), storage resources, a unique network IP, and options that govern how the container(s) should run. A Pod represents a single instance of a running process in your cluster.
Kubernetes also includes several key components and concepts that enhance its functionality. DaemonSets ensure that some or all nodes run a copy of a Pod, useful for deploying system services to every node. The Horizontal Pod Autoscaler (HPA) automatically scales the number of Pods in a replication controller, deployment, or replica set based on observed CPU (compute) utilization or with custom metrics provided via the Metrics Server, which collects resource usage data from each node. Volumes in Kubernetes allow data to persist beyond the lifecycle of a Pod, supporting stateful applications. A StatefulSet is a Kubernetes workload API object used to manage stateful applications. Replicas ensure that a specified number of Pod replicas are running at any given time, enhancing the reliability and availability of the application.
The Cluster Autoscaler is a tool designed to automatically adjust the size of a Kubernetes cluster, ensuring that all pods have a place to run and that there are no unneeded cluster nodes wasting resources. It dynamically scales the number of nodes (virtual or physical machines) in a cluster up or down, based on the demands of the workloads you are running.
Note: The Cluster Autoscaler is cloud provider-aware, meaning it can interact directly with the APIs of major cloud providers like AWS, Azure, GCP, and others.
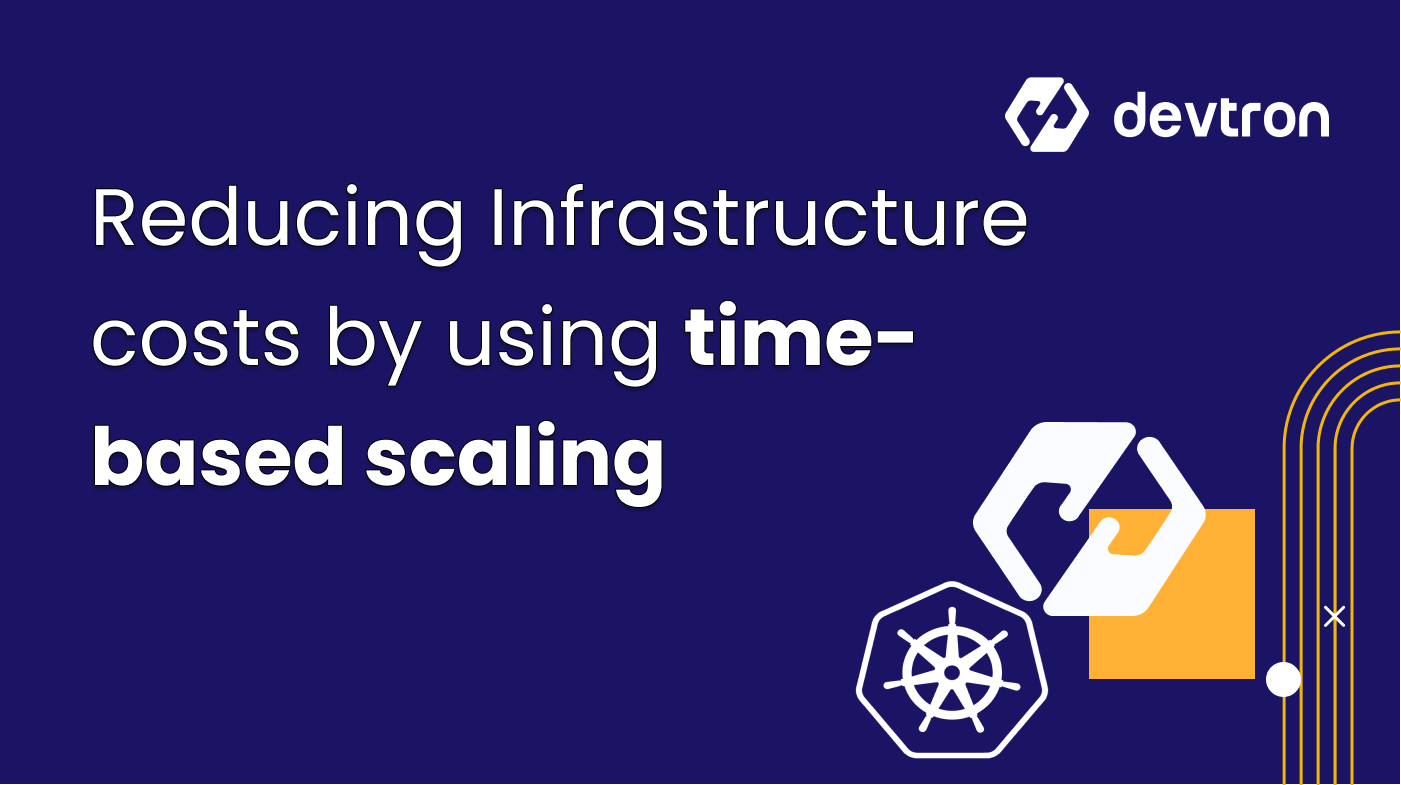
What if you could scale Kubernetes workload up only when needed and scale them down when idle? Time-based scaling offers an efficient way to optimize resource usage and reduce cloud expenses without compromising performance.
Together, these components and the underlying architecture offer a robust, scalable, and efficient platform for managing containerized applications.
Introduction to K8s Scaling
Kubernetes autoscaling is one of the most important factors for its high usage and adoption. There can be multiple ways to achieve autoscaling for your microservices, for instance, VPA (vertical pod autoscaler), HPA, integrating KEDA, and much more. Horizontal Pod Autoscaling (HPA) by far is the most commonly used, which scales the number of replicas of a Deployment or ReplicaSet based on certain factors such as CPU utilization, Memory utilization, or custom metrics. Scaling decisions are made dynamically depending upon the incoming traffic, without any user-defined time-based components.
Time-based scaling is a modern approach for scaling your applications depending on user-defined timelines. It can be useful for batch processes, resource optimization, hibernating microservices, or for specific use cases which has predictable patterns. For example, if an organization has one application that is used for the attendance of employees, in that case, the major traffic would be expected during morning hours, let’s say 8:00 AM to 11:00 AM and for the rest of the day, and on weekends we can barely expect any requests. Thus we can reduce resources accordingly or even hibernate the application completely.
Optimize your Kubernetes costs with time-based scaling
- Cost Optimization: Time-based scaling offers the capability for automatic scaling back non-production environments such as testing or development during non-peak hours, leading to major savings on infrastructure costs.
- Proactive Resource Management: With the capability for forecasting resource demand through predictable usage patterns, time-based scaling delivers your apps the resources needed during periods of high usage, enhancing performance and user satisfaction.
- Preventing Over-Provisioning: Time-based scaling avoids the provisioning of unnecessary resources and optimizes your infrastructure for actual demand, thereby avoiding wastage and reducing costs.
Implement time-based scaling strategies to reduce your Kubernetes infrastructure costs.
Request a Personalized Demo →Of course, this can be achieved using Horizontal Pod Autoscaler (HPA) but the HPA works based on the traffic it receives and it takes time to scale up and scale down the resources. HPA is useful when the traffic is dynamic in nature and difficult to predict.
Here time-based autoscaling has the upper hand as it can scale up the resources at a given time before the expected traffic is received. The request waiting time also gets reduced as we already know how much resources are required and they are already present to serve the request.
Why time-based scaling is required?
There are multiple factors in which time-based scaling plays an important role. One of the scenarios discussed above can be a classic example of time-based scaling where we have enough data to predict the incoming traffic and its behavior. Some of the other reasons why time-based scaling is required are:
Cost Optimization: In scenarios like having multiple environments for e.g.- UAT, QA, Dev, etc time-based scaling really helps to reduce the workloads by scaling down the environments to 0 at a specific time and scaling it up as per a given time. For instance, there’s no use in running a Dev environment after office hours, or there’s no need to run QA/UAT environments on weekends and likewise for Dev environments. With time-based scaling, users can configure it to automatically scale down the workloads and scale up when work starts which will drastically help to reduce the TCO of infrastructure.
Proactive Planning: Time-based auto-scaling enables you to anticipate resource needs based on historical patterns. This proactive planning allows you to provision resources in advance, reducing the risk of resource shortages during peak periods and avoiding the need for emergency scaling that may lead to higher costs.
Avoiding Over-Provisioning: Traditional autoscaling based on real-time metrics, like CPU and memory utilization, may lead to rapid scaling up and down in response to short-lived spikes. However, this frequent scaling can incur additional costs due to the time required for resource provisioning and teardown. Time-based autoscaling, on the other hand, provides a more controlled approach, aligning resource allocation with predictable demand, preventing unnecessary scaling actions, and avoiding cost spikes.
Introducing Winter Soldier
He's fast. Strong. Had a metal arm.
-> Steve Rogers
Winter-Soldier is a fast, strong open-source project, and has a metal arm that is used for:
- Deleting overlived Kubernetes resources based on conditions.
- It uses time-based scaling to scale down the workloads to zero at a specific time interval.
Winter Soldier is a Kubernetes operator which expects conditions to be defined using a CRD Hibernator; it contains three config files.
- Hibernator: It contains custom policies based on which operations are performed.
- CRD: An extension of the Kubernetes API that contains a custom definition of a hibernator.
- Winter-soldier Deployment: It contains cluster roles, role binding, service account & deployment required by the hibernator.
Check out this blog for detailed information about Winter Soldier and scaling the entire cluster.
Note: there is no time-based cluster scaling available out-of-the-box for Kubernetes. You can manually create Kubernetes CronJobs that execute at specific times to scale your deployments up or down. The CronJob would use kubectl commands or the Kubernetes API to adjust the desired number of replicas in a Deployment or StatefulSet. For instance, a CronJob could be scheduled to increase the number of replicas during expected high-traffic periods and decrease them during off-peak times.
Time-based scaling with Winter Soldier
With the latest release of Devtron’s deployment-templates, achieving time-based scaling becomes a piece of cake. Now you can easily configure scaling for your microservices from the deployment template itself.
Follow the steps below to configure and start implementing time-based scaling.
Deploy Winter-Soldier Controller
Before we configure the deployment template, we need to first deploy the winter-soldier controller and for that, we can use Devtron Helm Dashboard. Execute the following steps to deploy the controller in your Kubernetes cluster.
Step 1: Go to Chart Store
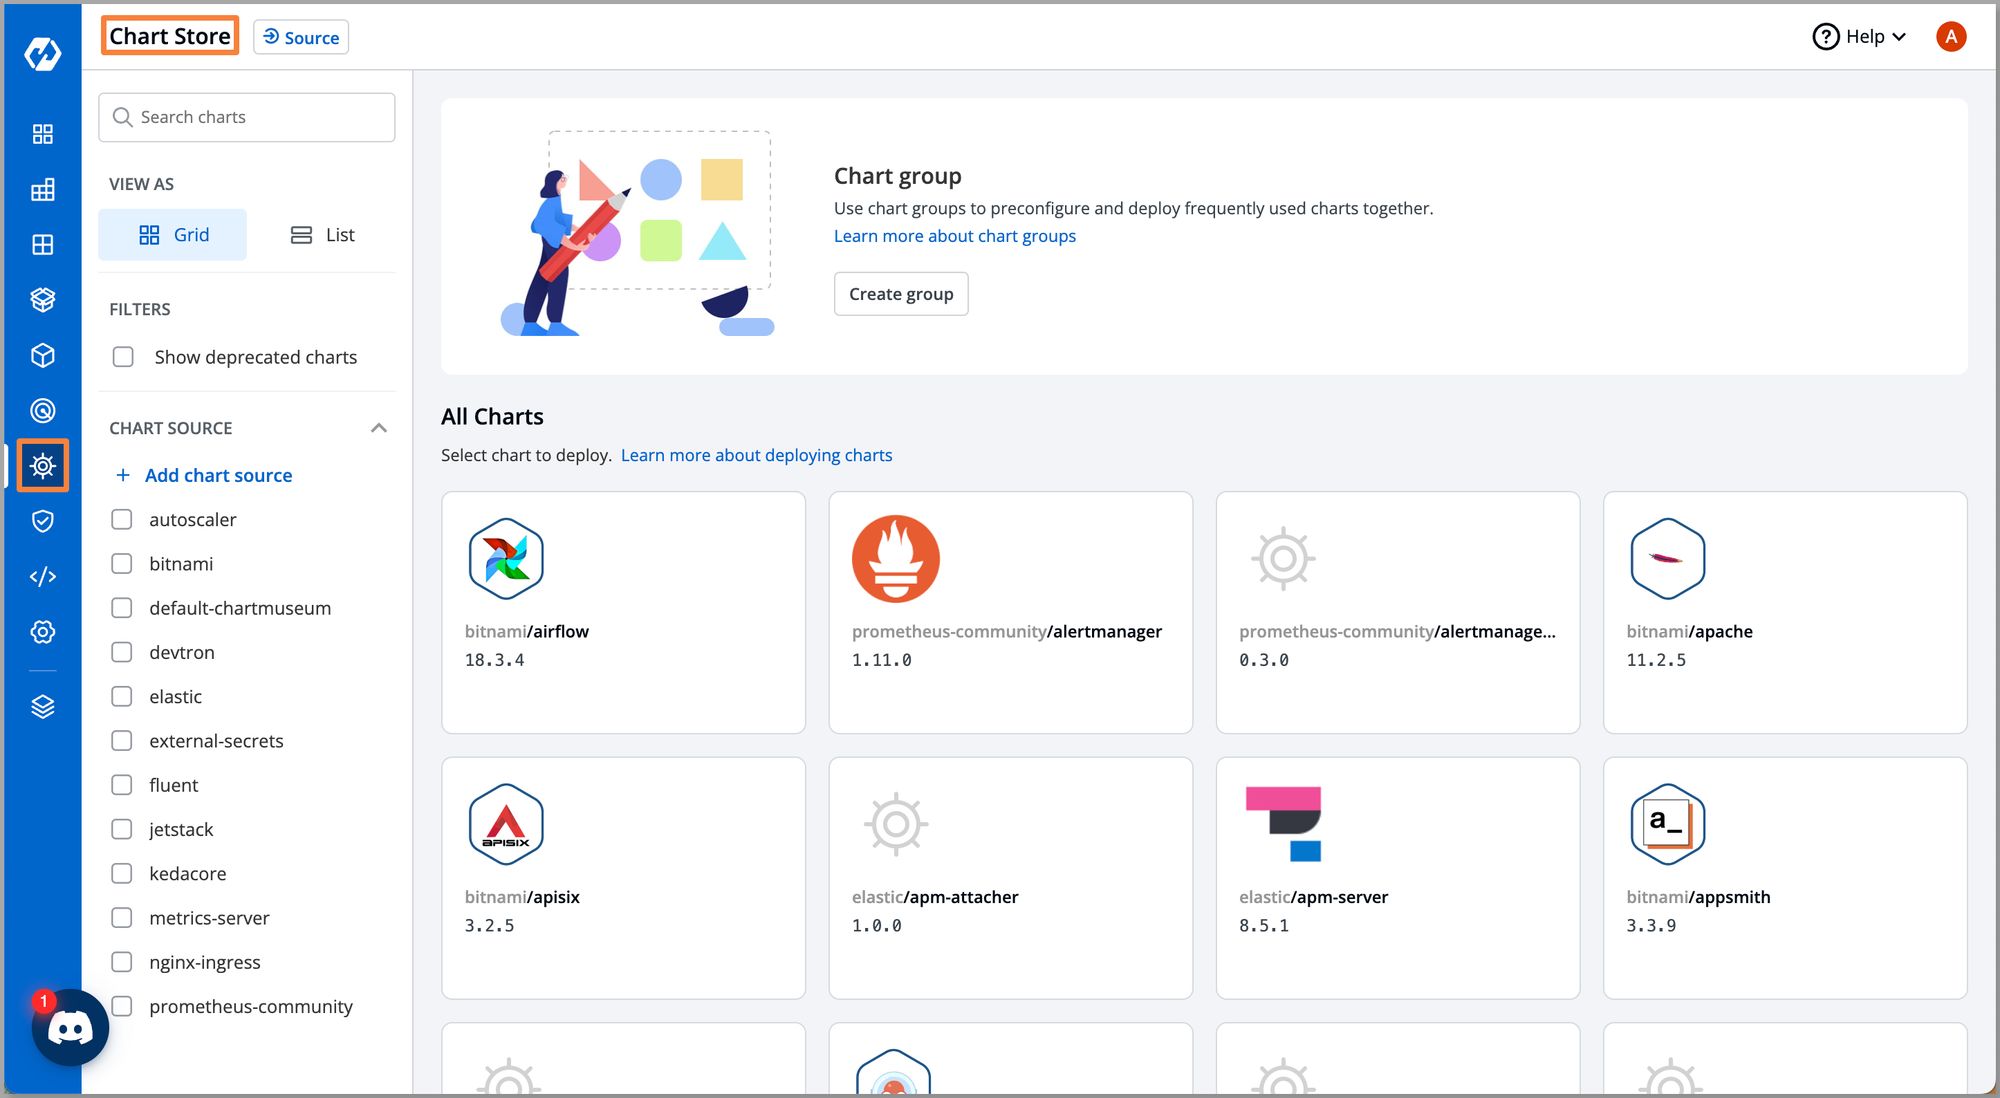
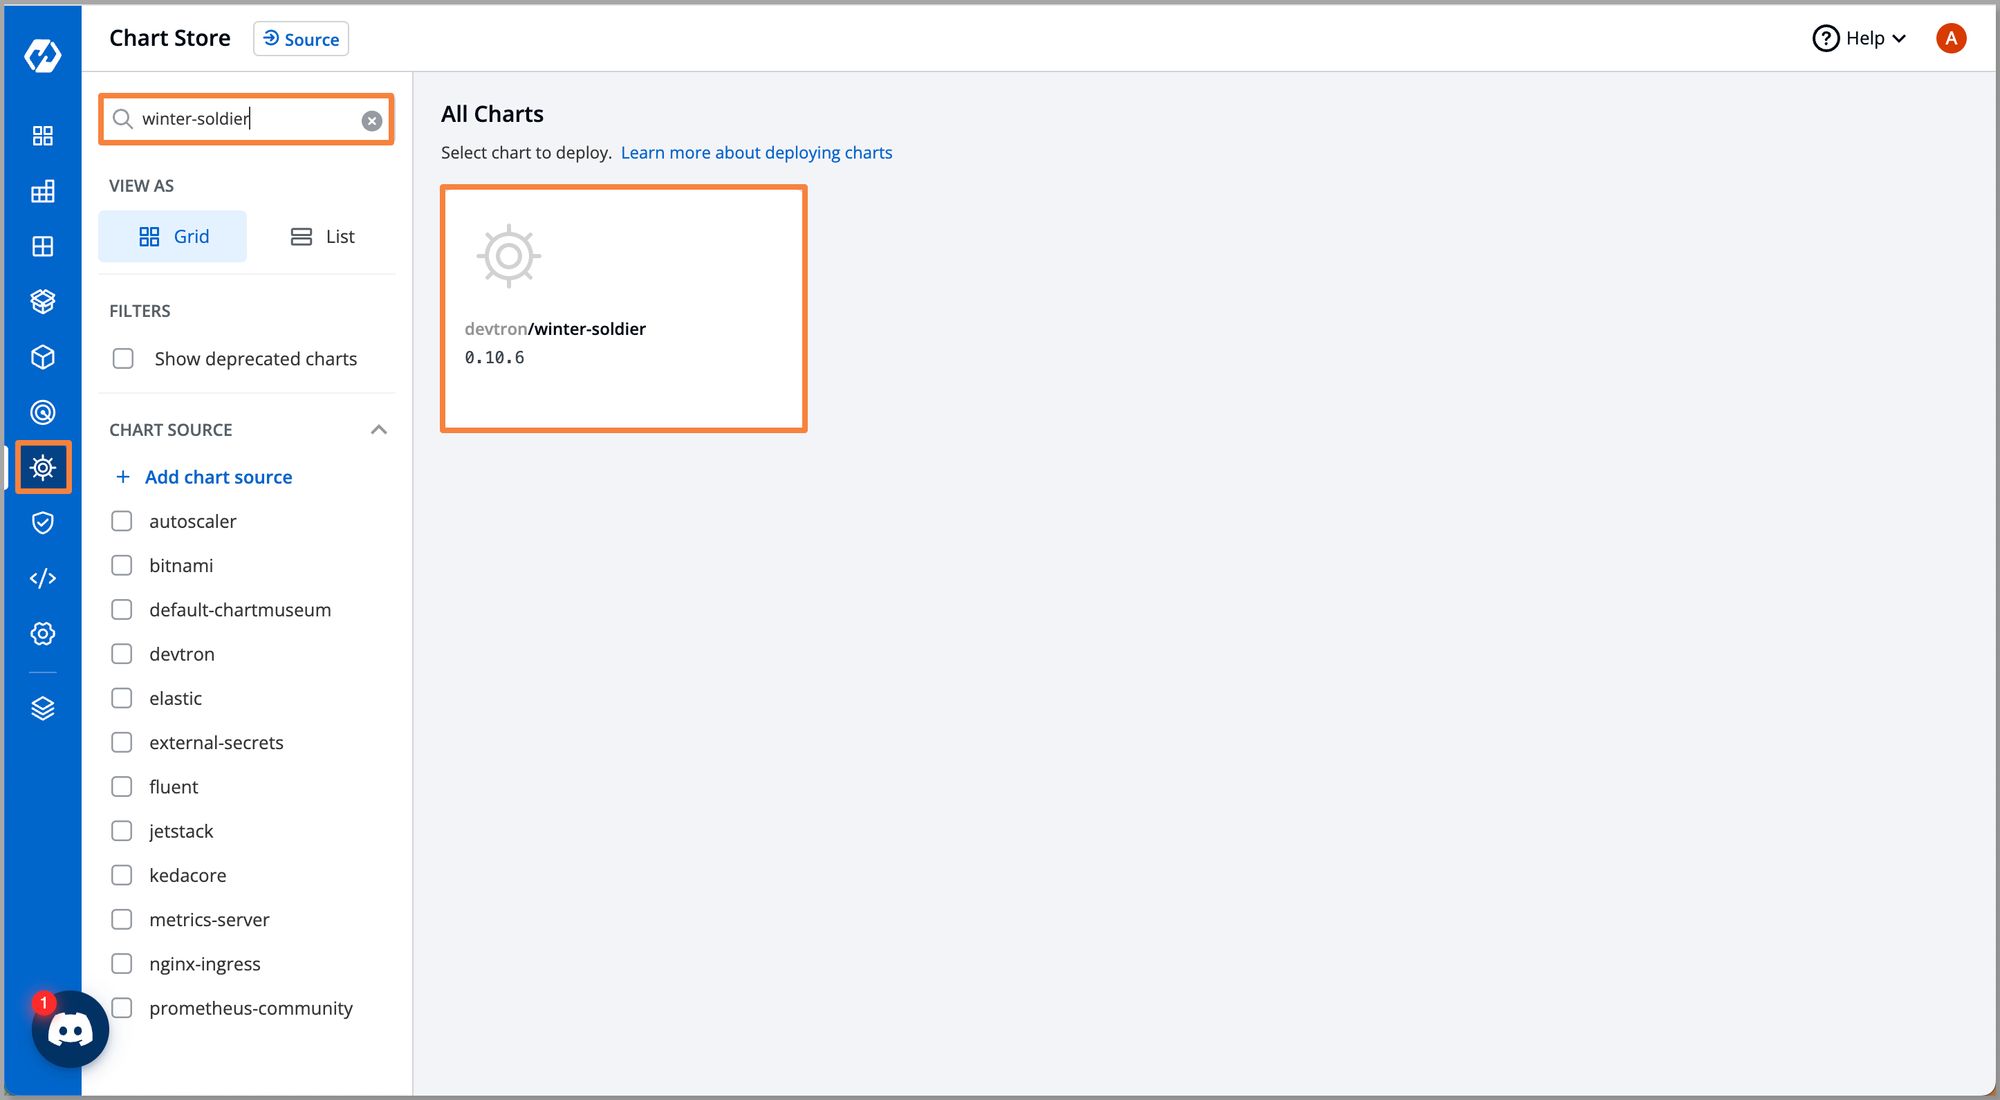
Step 2: Select devtron/winter-soldier chart as shown
Once you click the chart, you would be able to see a brief description of the chart, README, and an option to Configure & Deploy. You can also use Preset Values it where you need to give the bare minimum configuration required to deploy the chart.
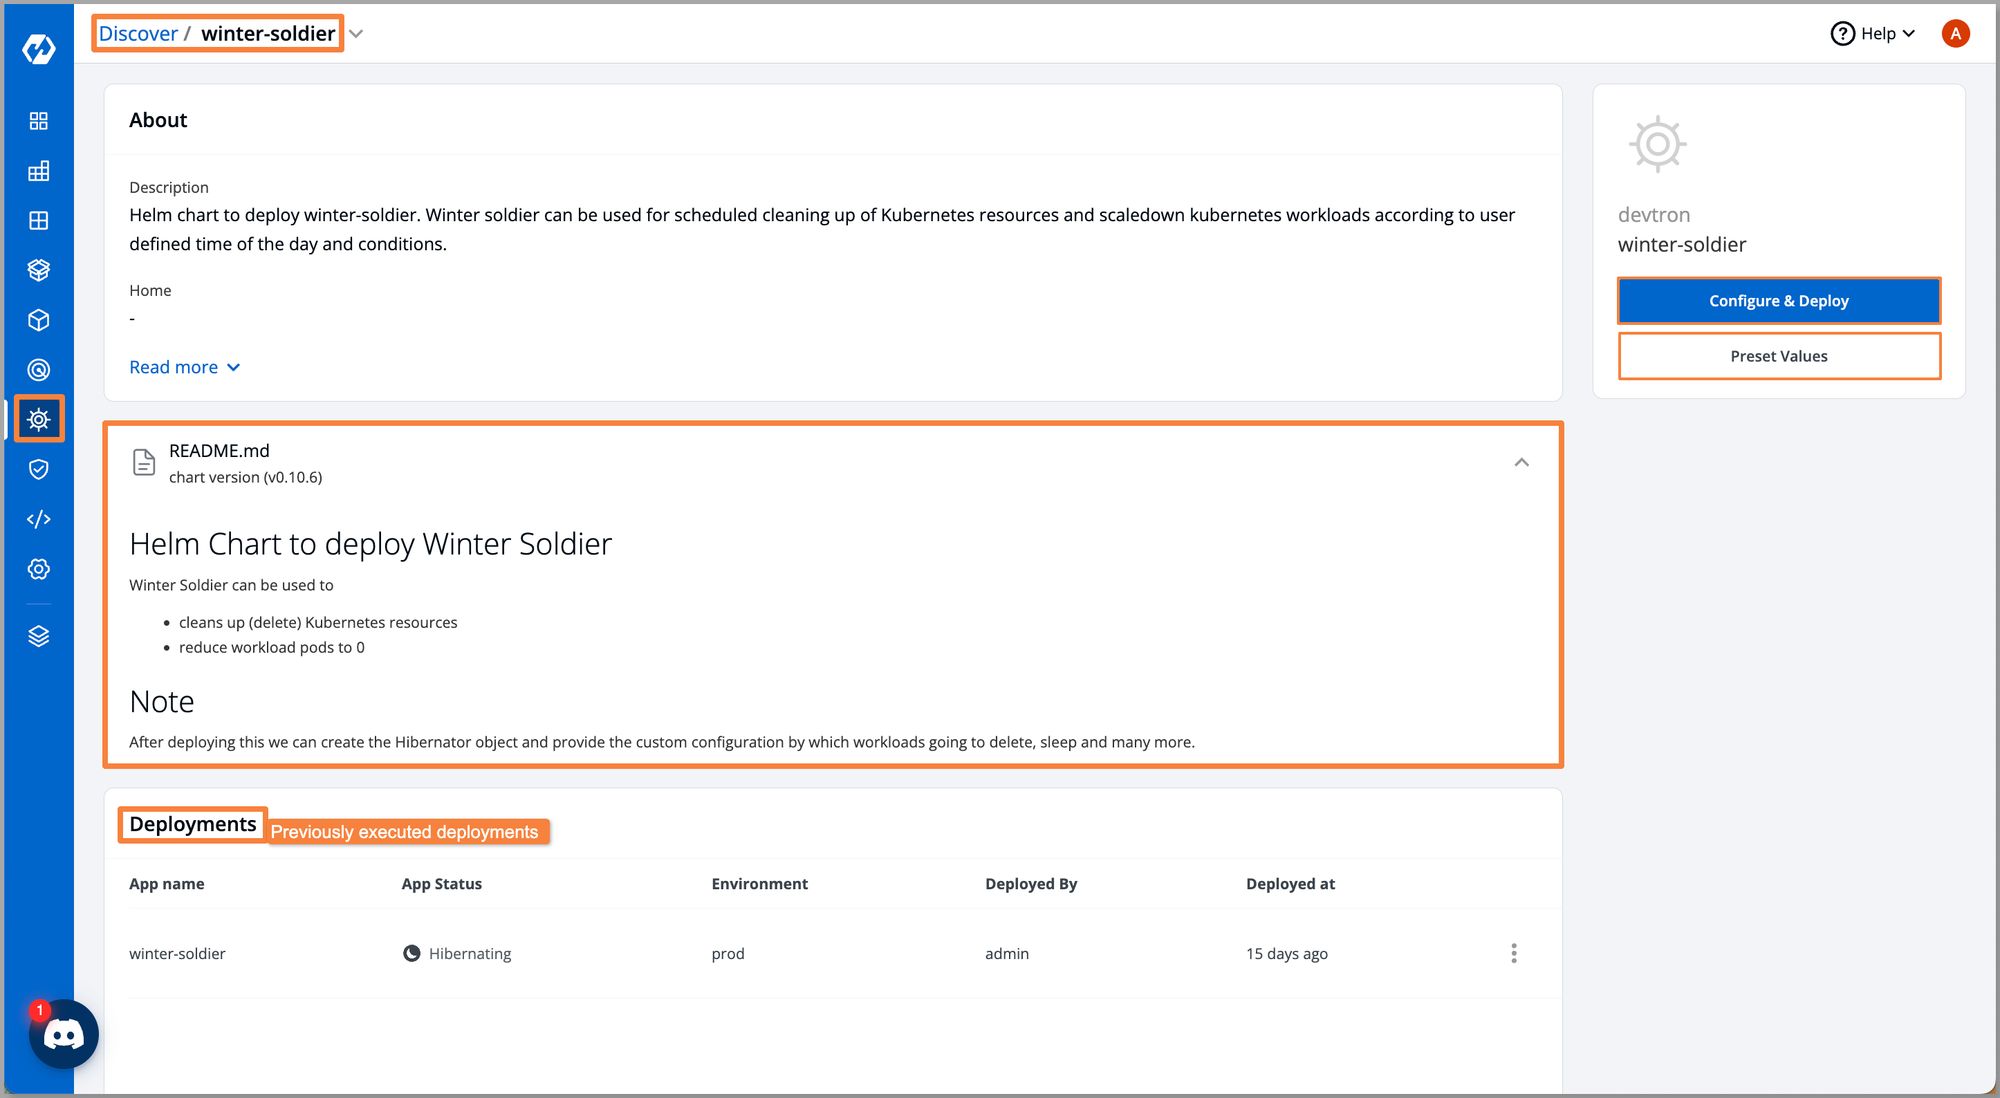
Step 3: Click on Configure & Deploy, and give App Name, Project , Environment and chooseHow do you want to deploy using Helm or GitOps where you want to deploy this chart.
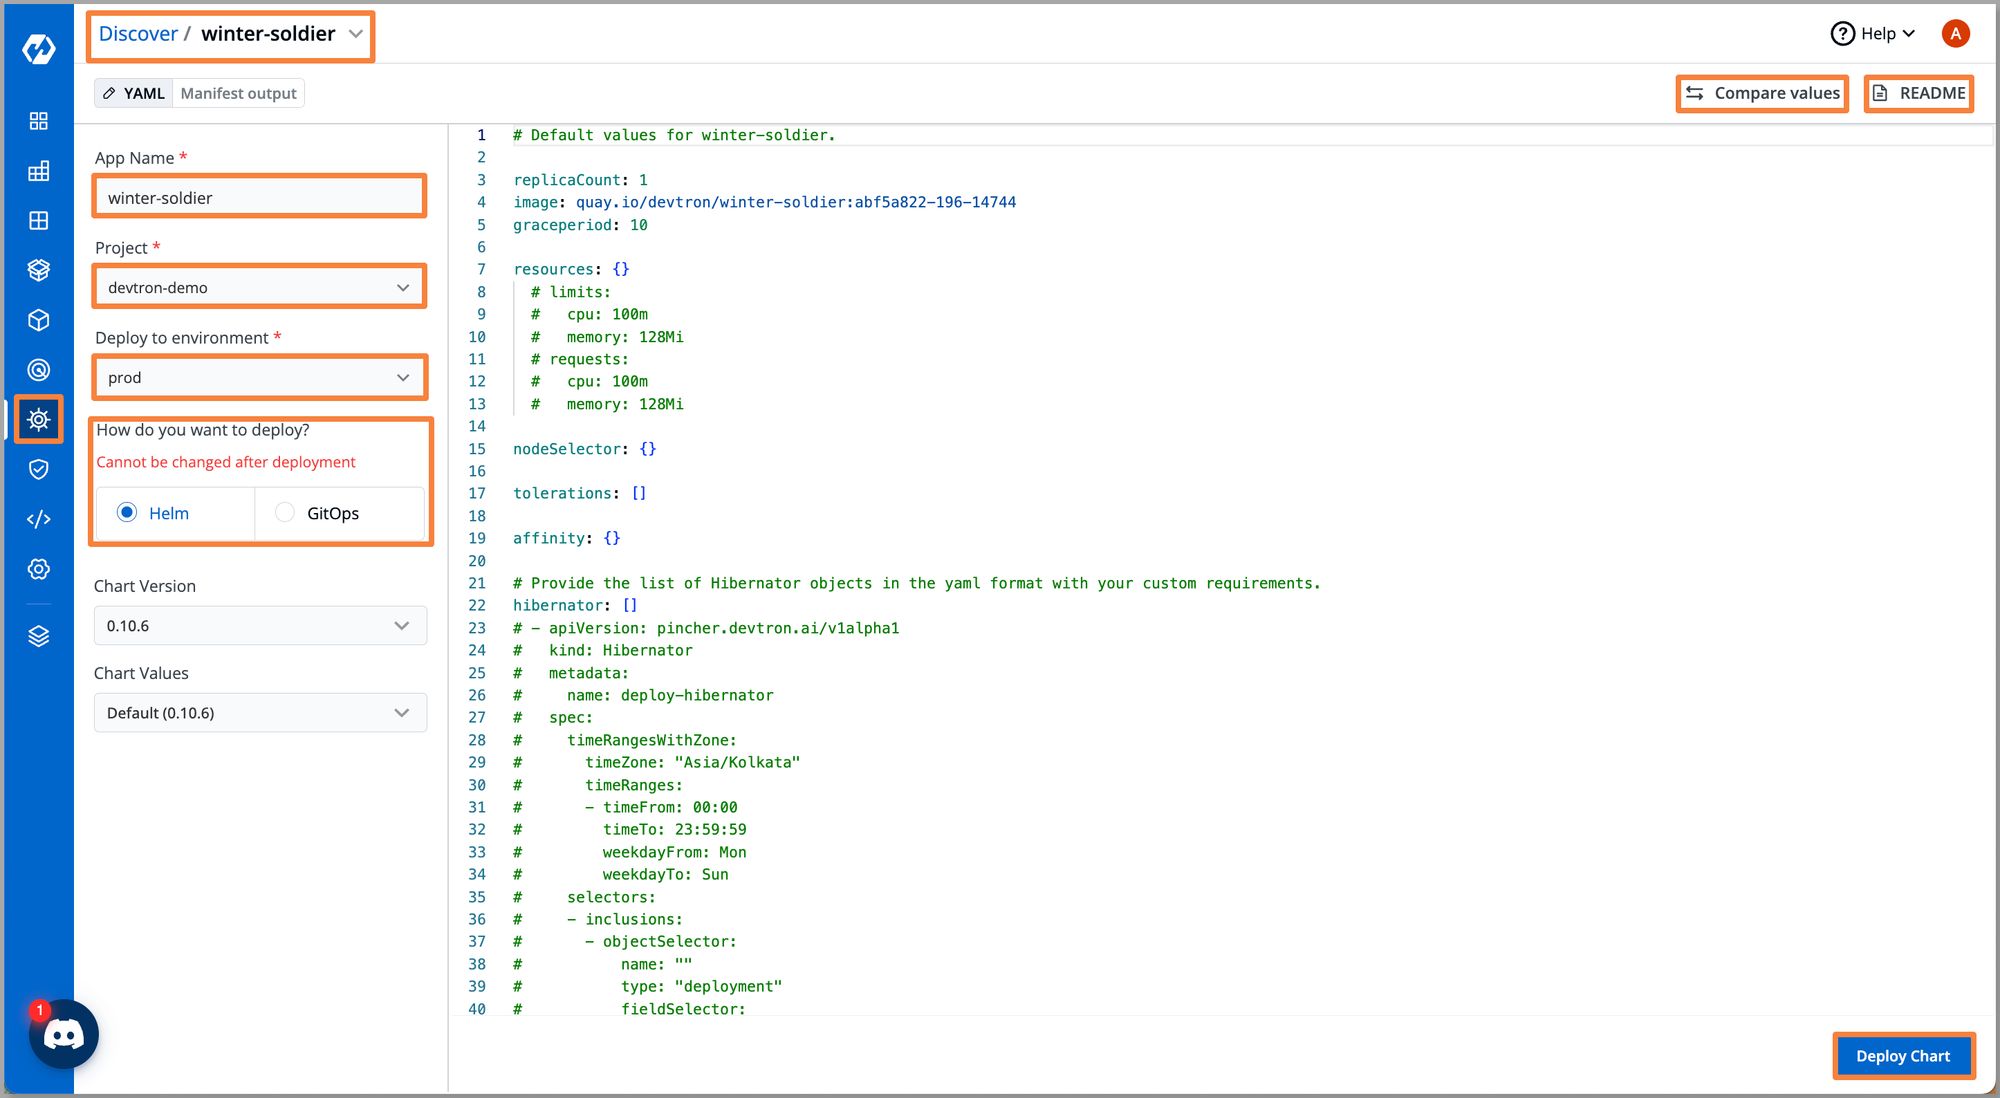
Note: You can also deploy generic hibernator objects if you want to use winter-soldier for all workloads in the target cluster. For now, we only need operators and CRD as we will be using time-based scaling for microservices.
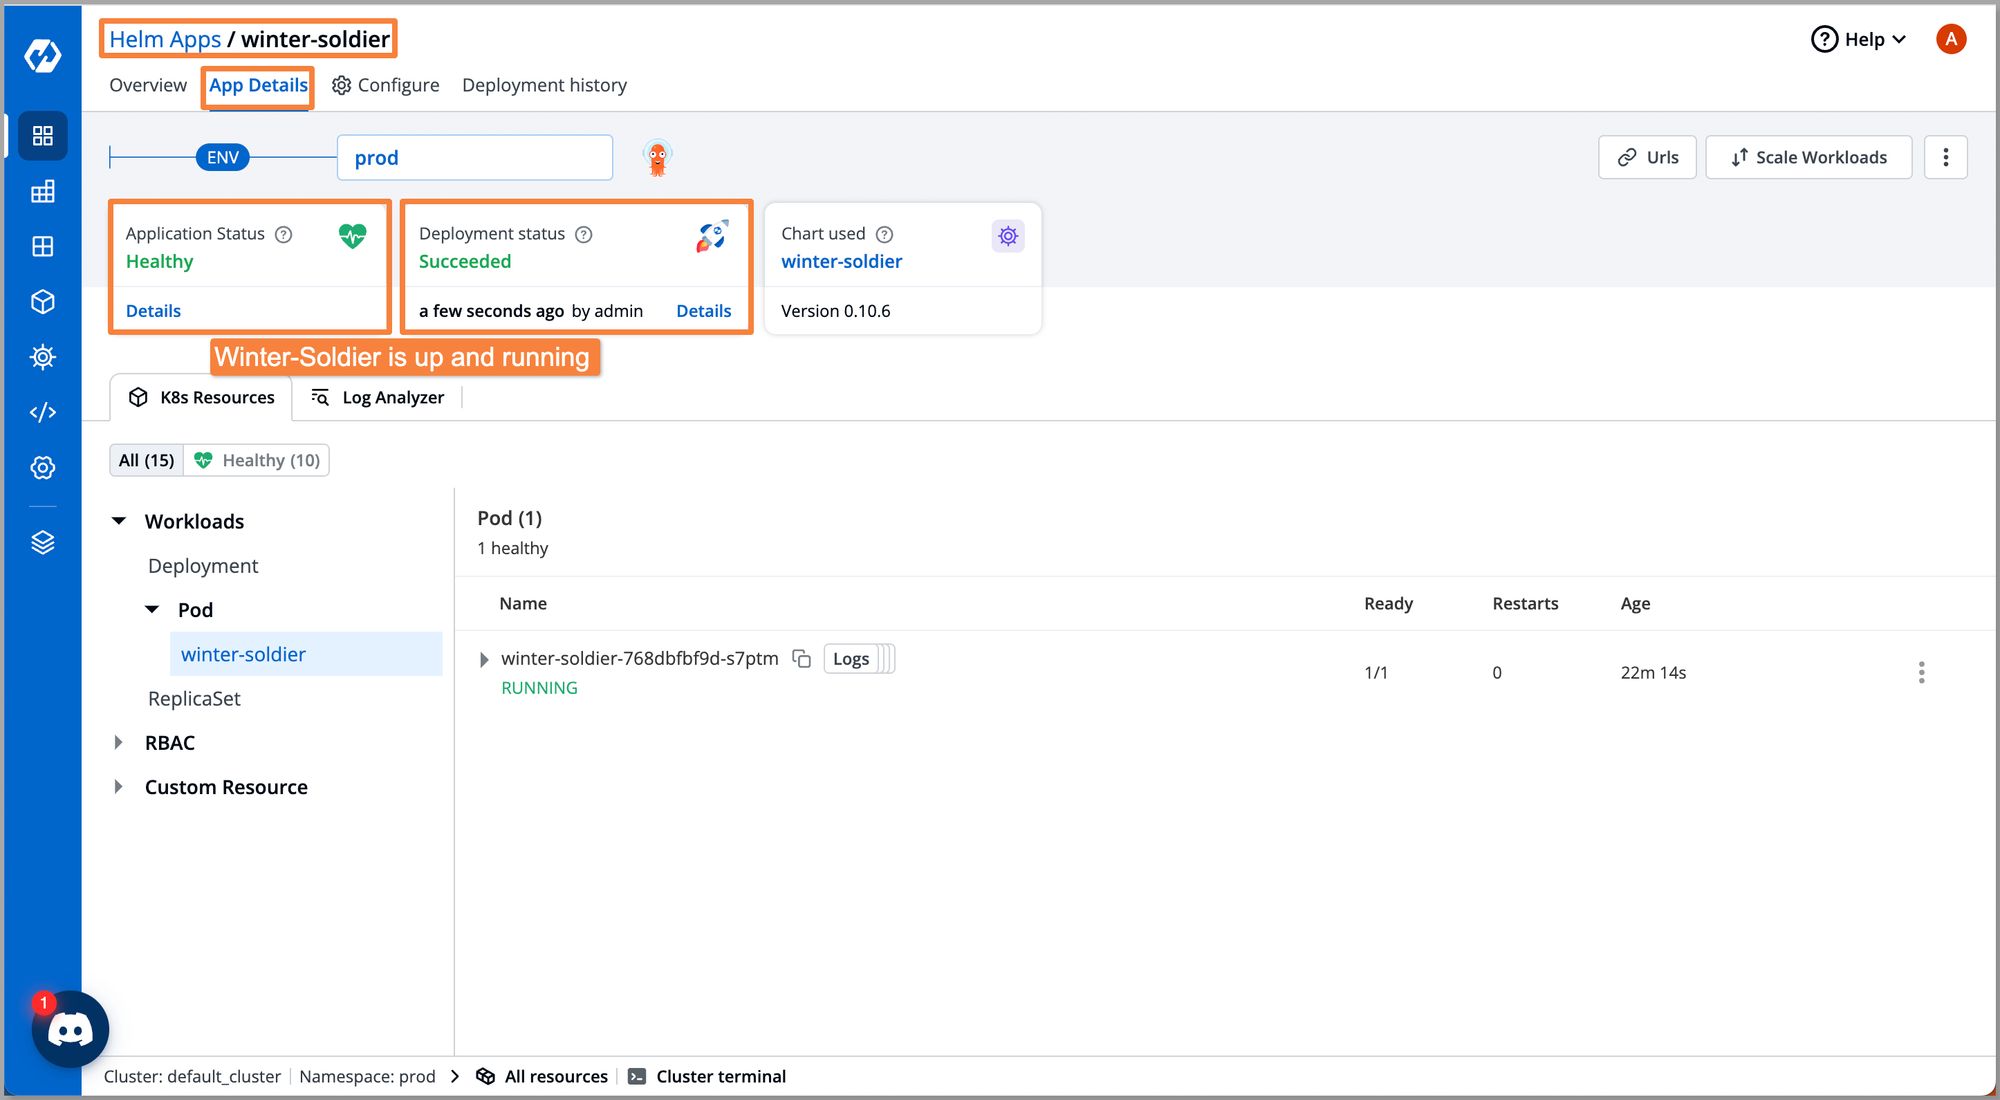
Step 4: Deploy the chart with the base configuration. Once deployed, you should be able to see the real-time application status with all workloads and Kubernetes objects deployed with this helm chart as you can see in the below screenshot.
Configure Winter-Soldier for Applications
Once the controller has been deployed, we are ready to deploy our applications and configure scaling for it. Follow the below steps to configure time-based scaling for your microservices.
Step 1: Go to Devtron App, select reference-chart 4.18.0. Here we have taken the example of Rollout Deployment.
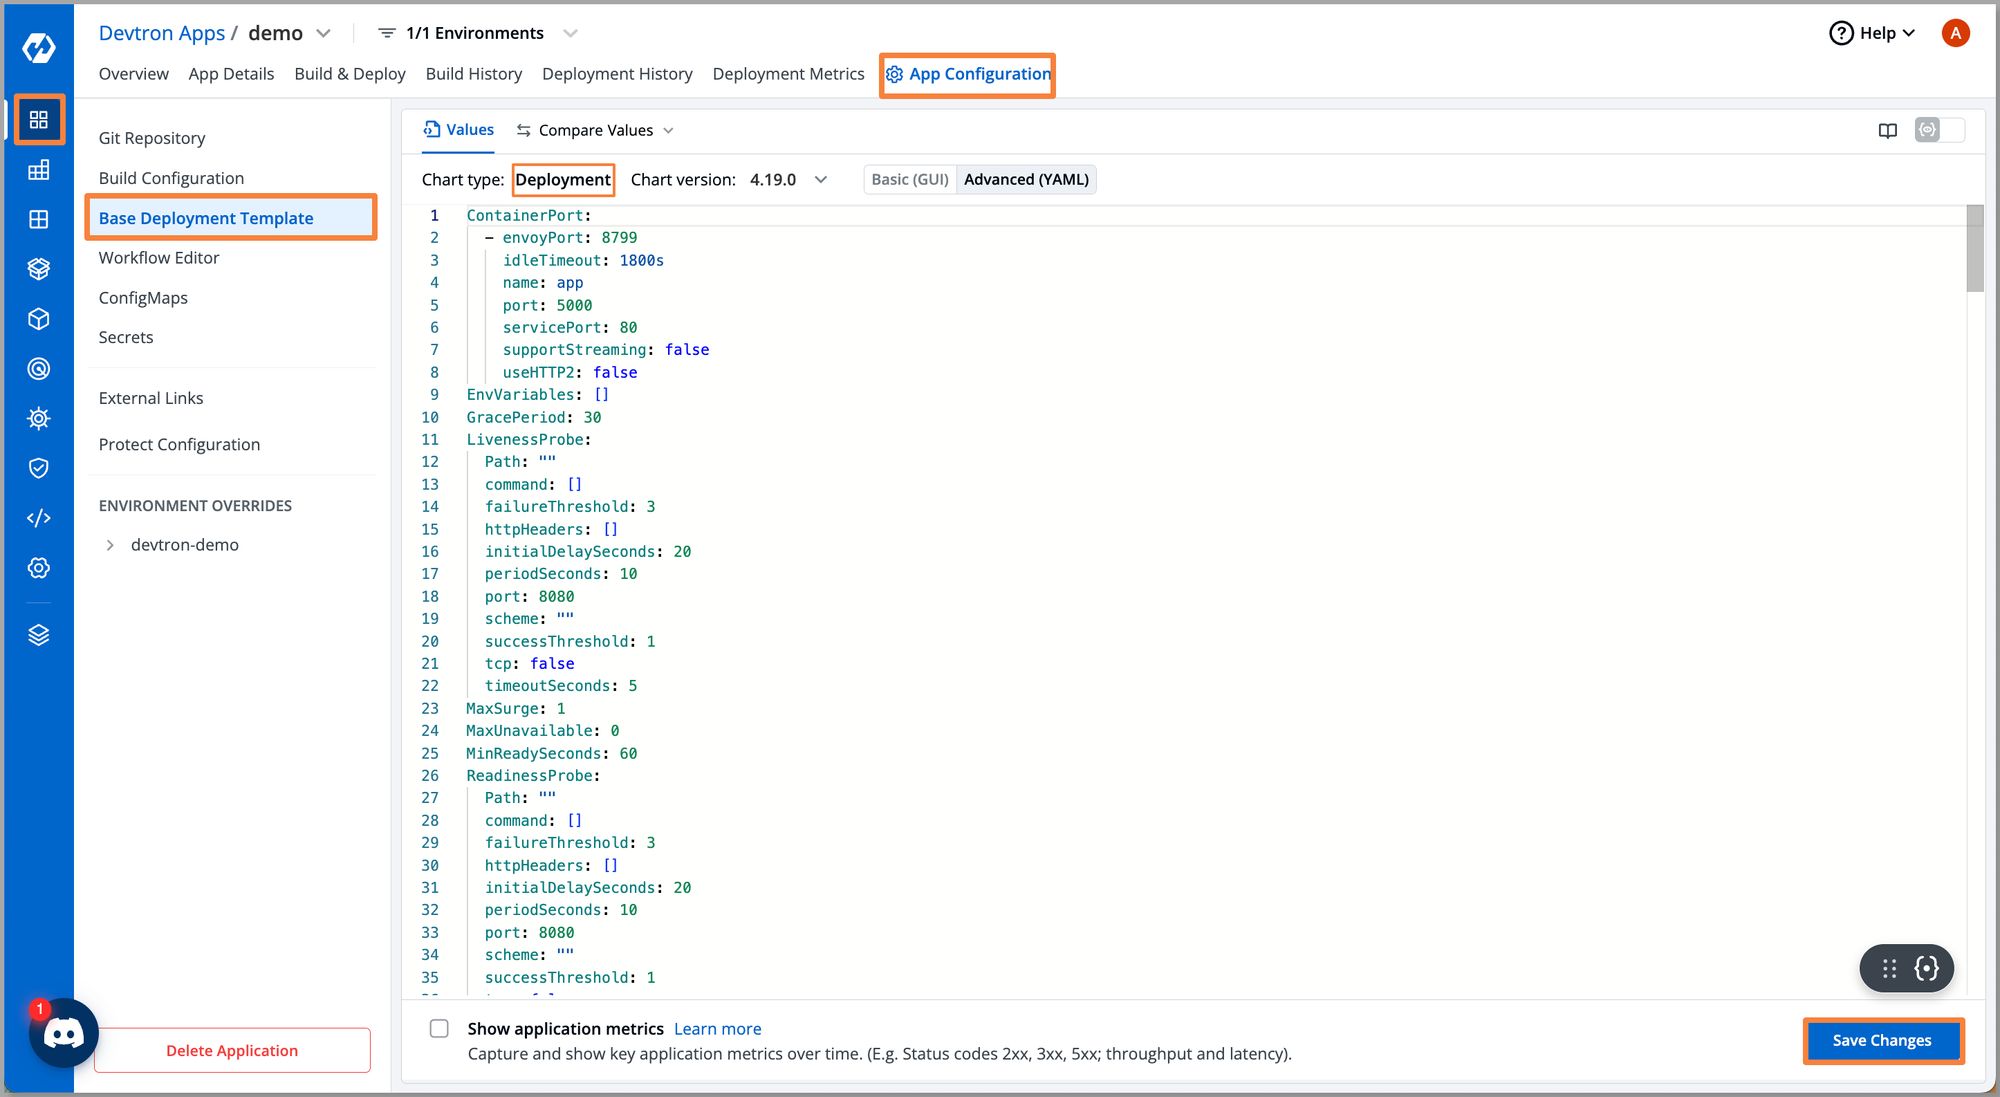
Step 2: Enable the winter-soldier section and configure it. You should be able to specify the start and end time for your timezone along with the start and end of the weekdays.
Note: We can take reference from Readme to understand parameters and how to configure them.
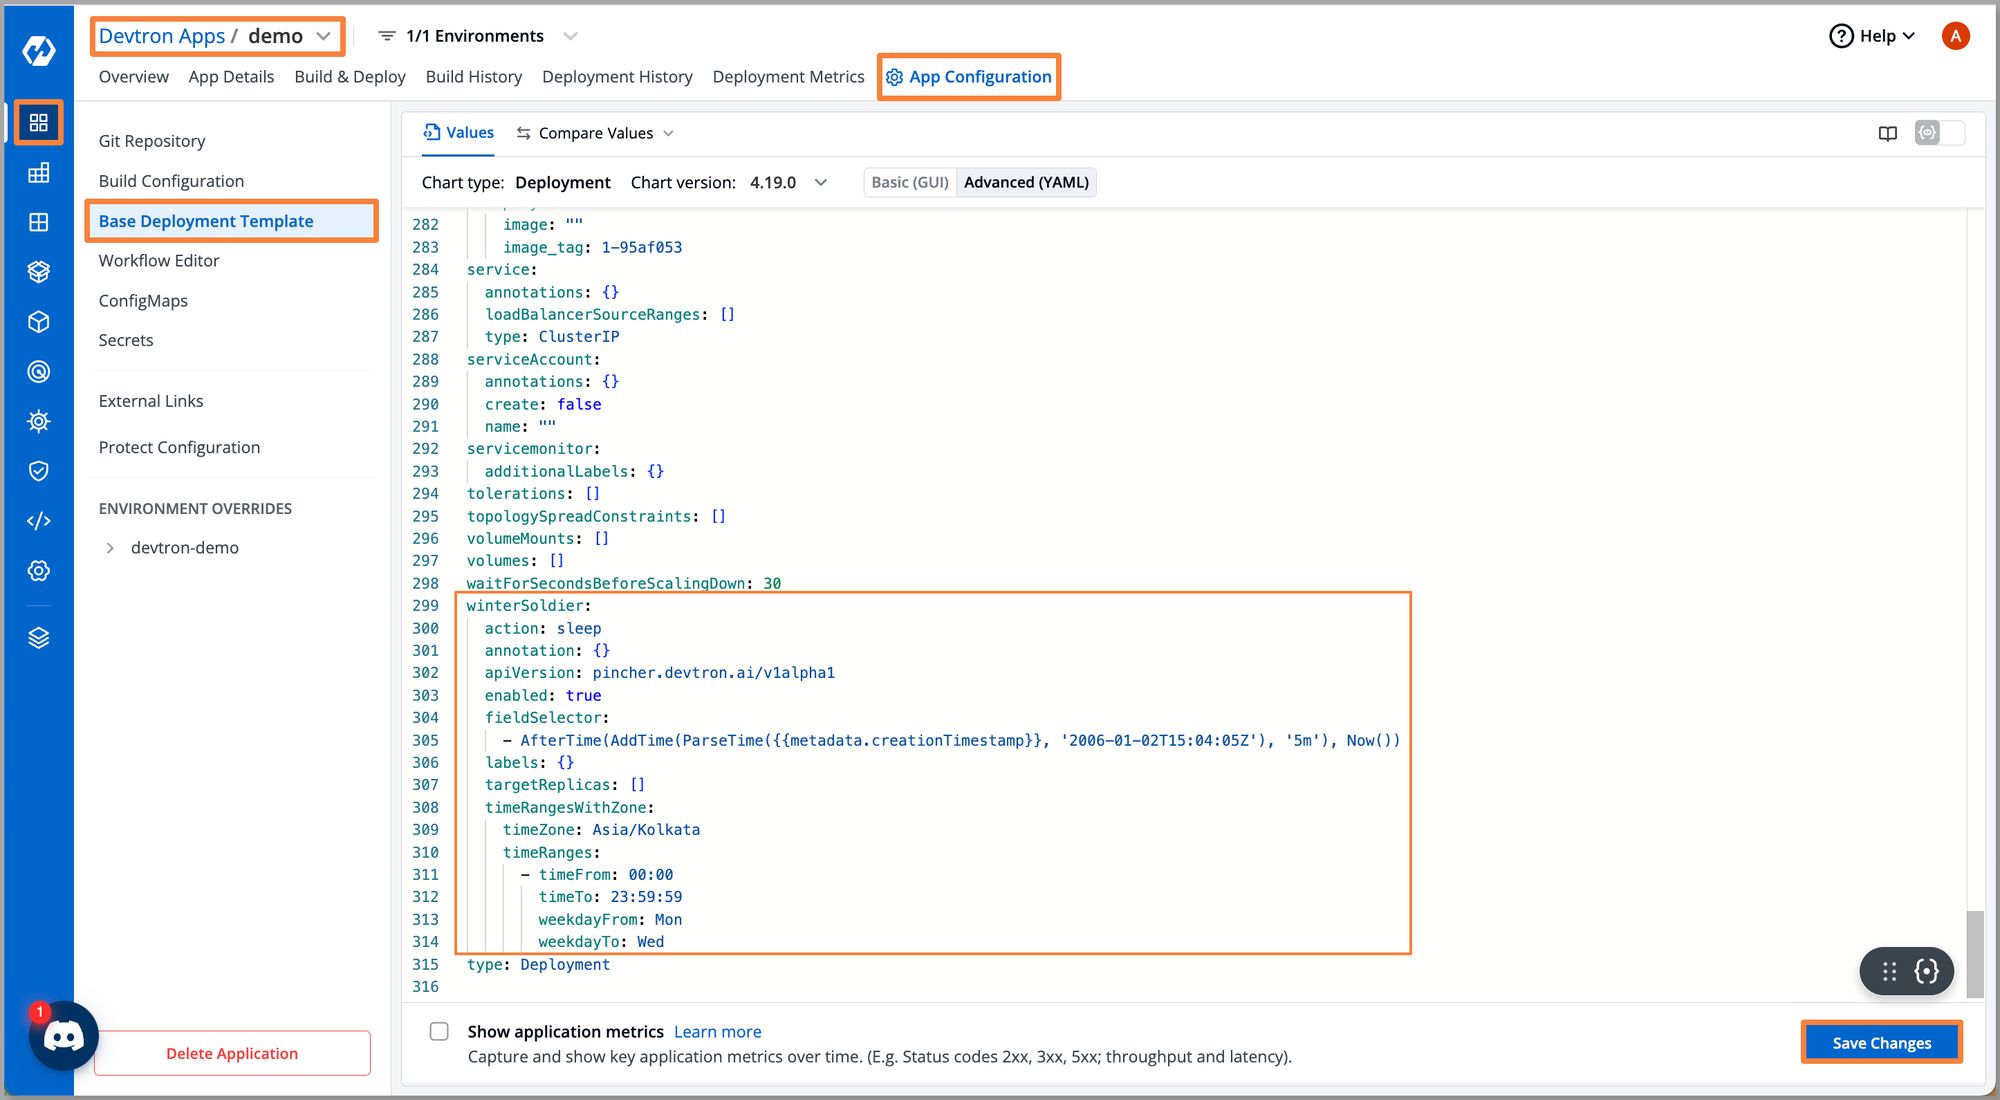
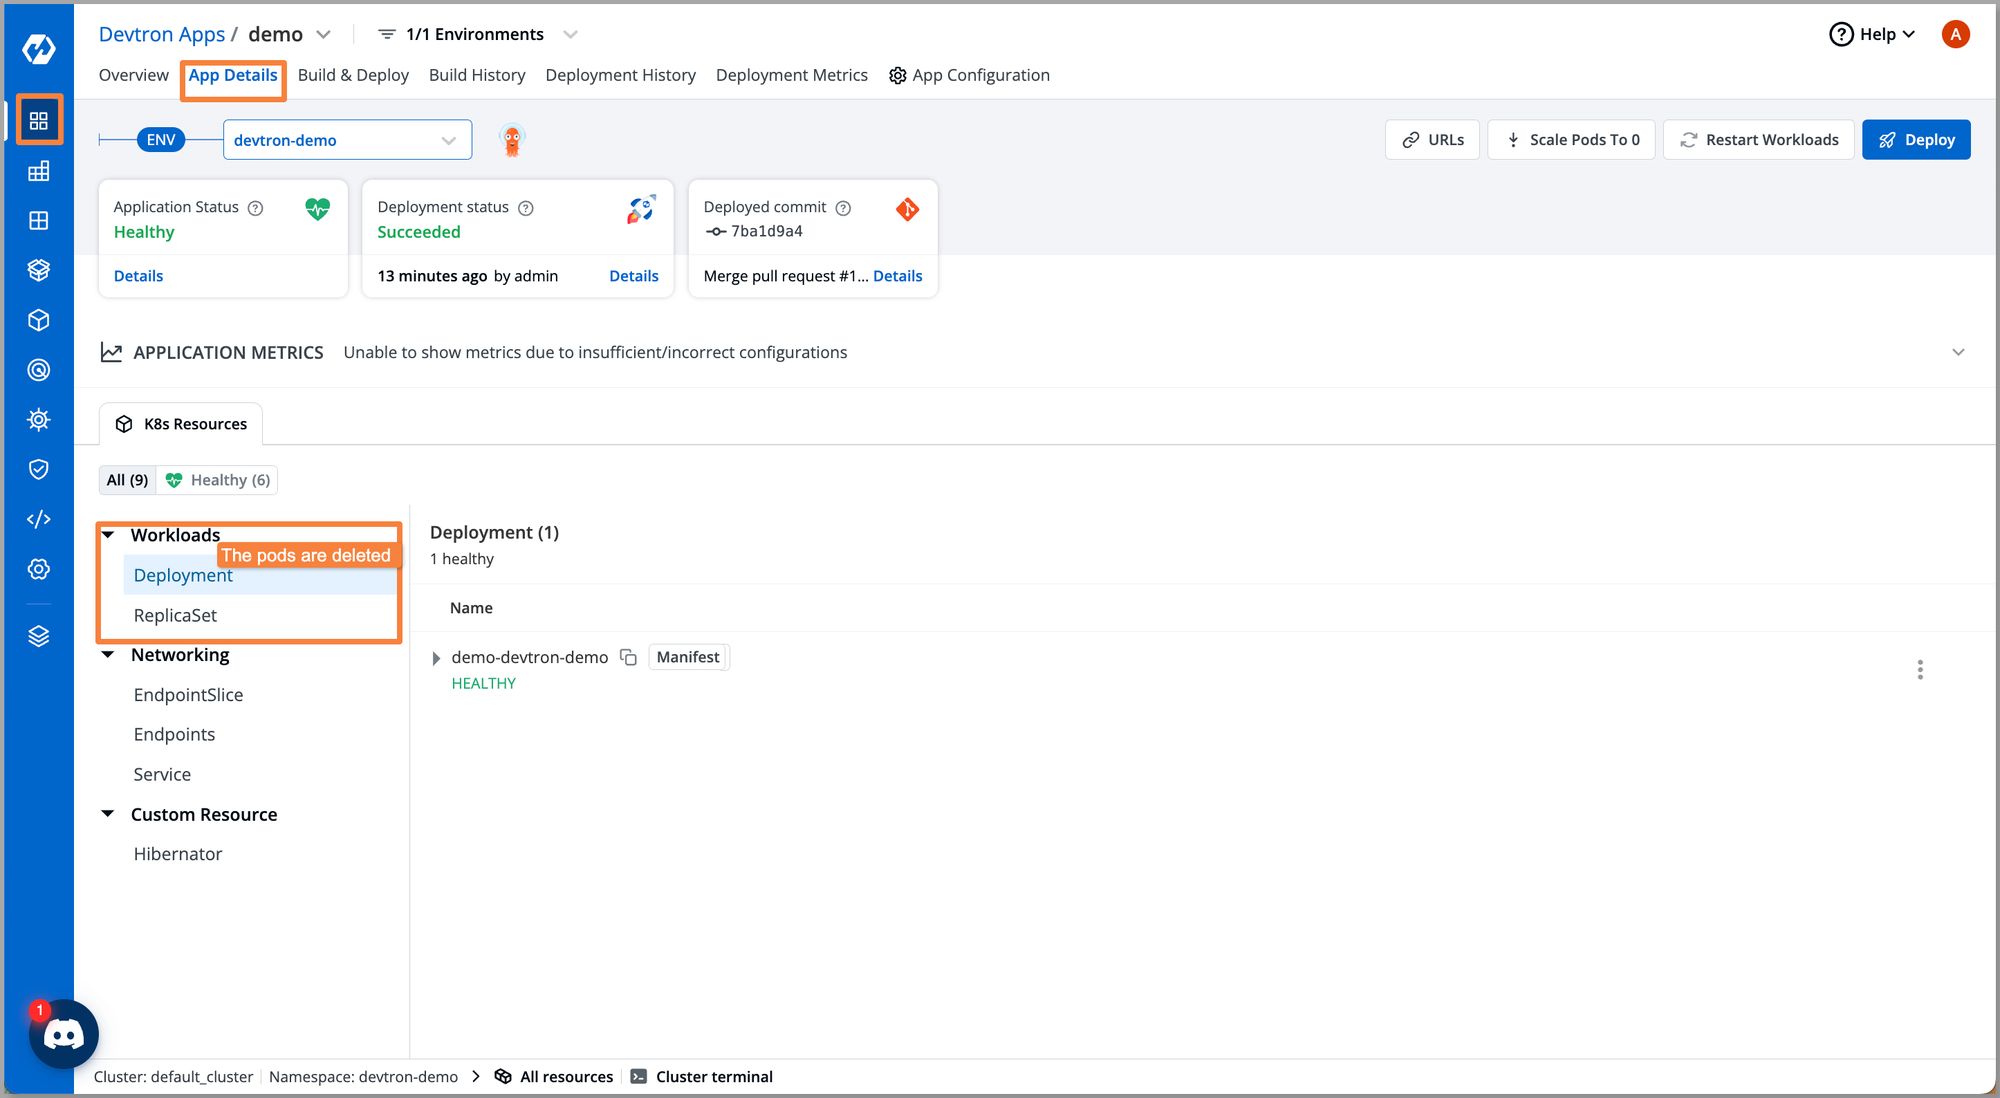
Step 3: Once configured, click on Save Changes and deploy the application. After successful deployment, you should be able to see all workloads deployed along with this application.
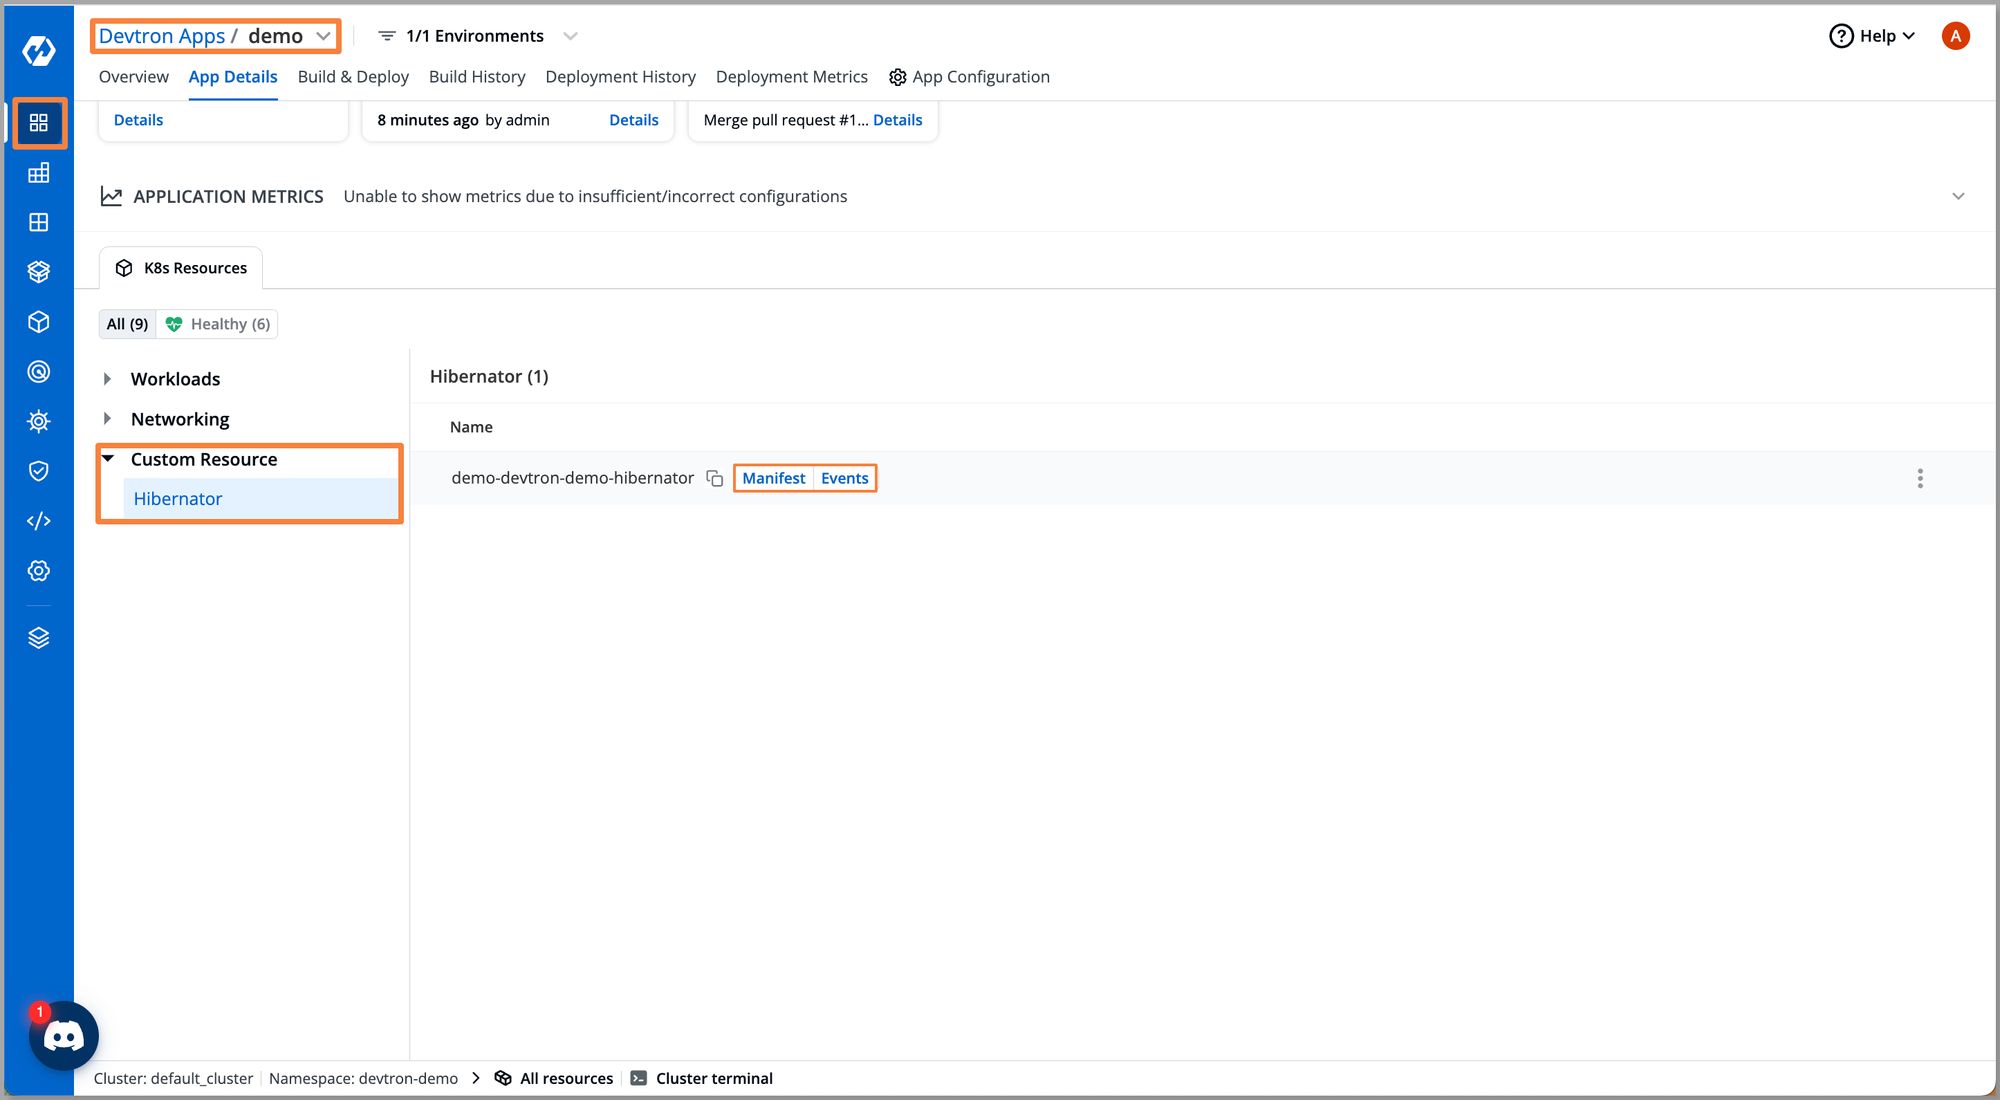
Under Custom Resource you can see our Hibernator has been deployed successfully.
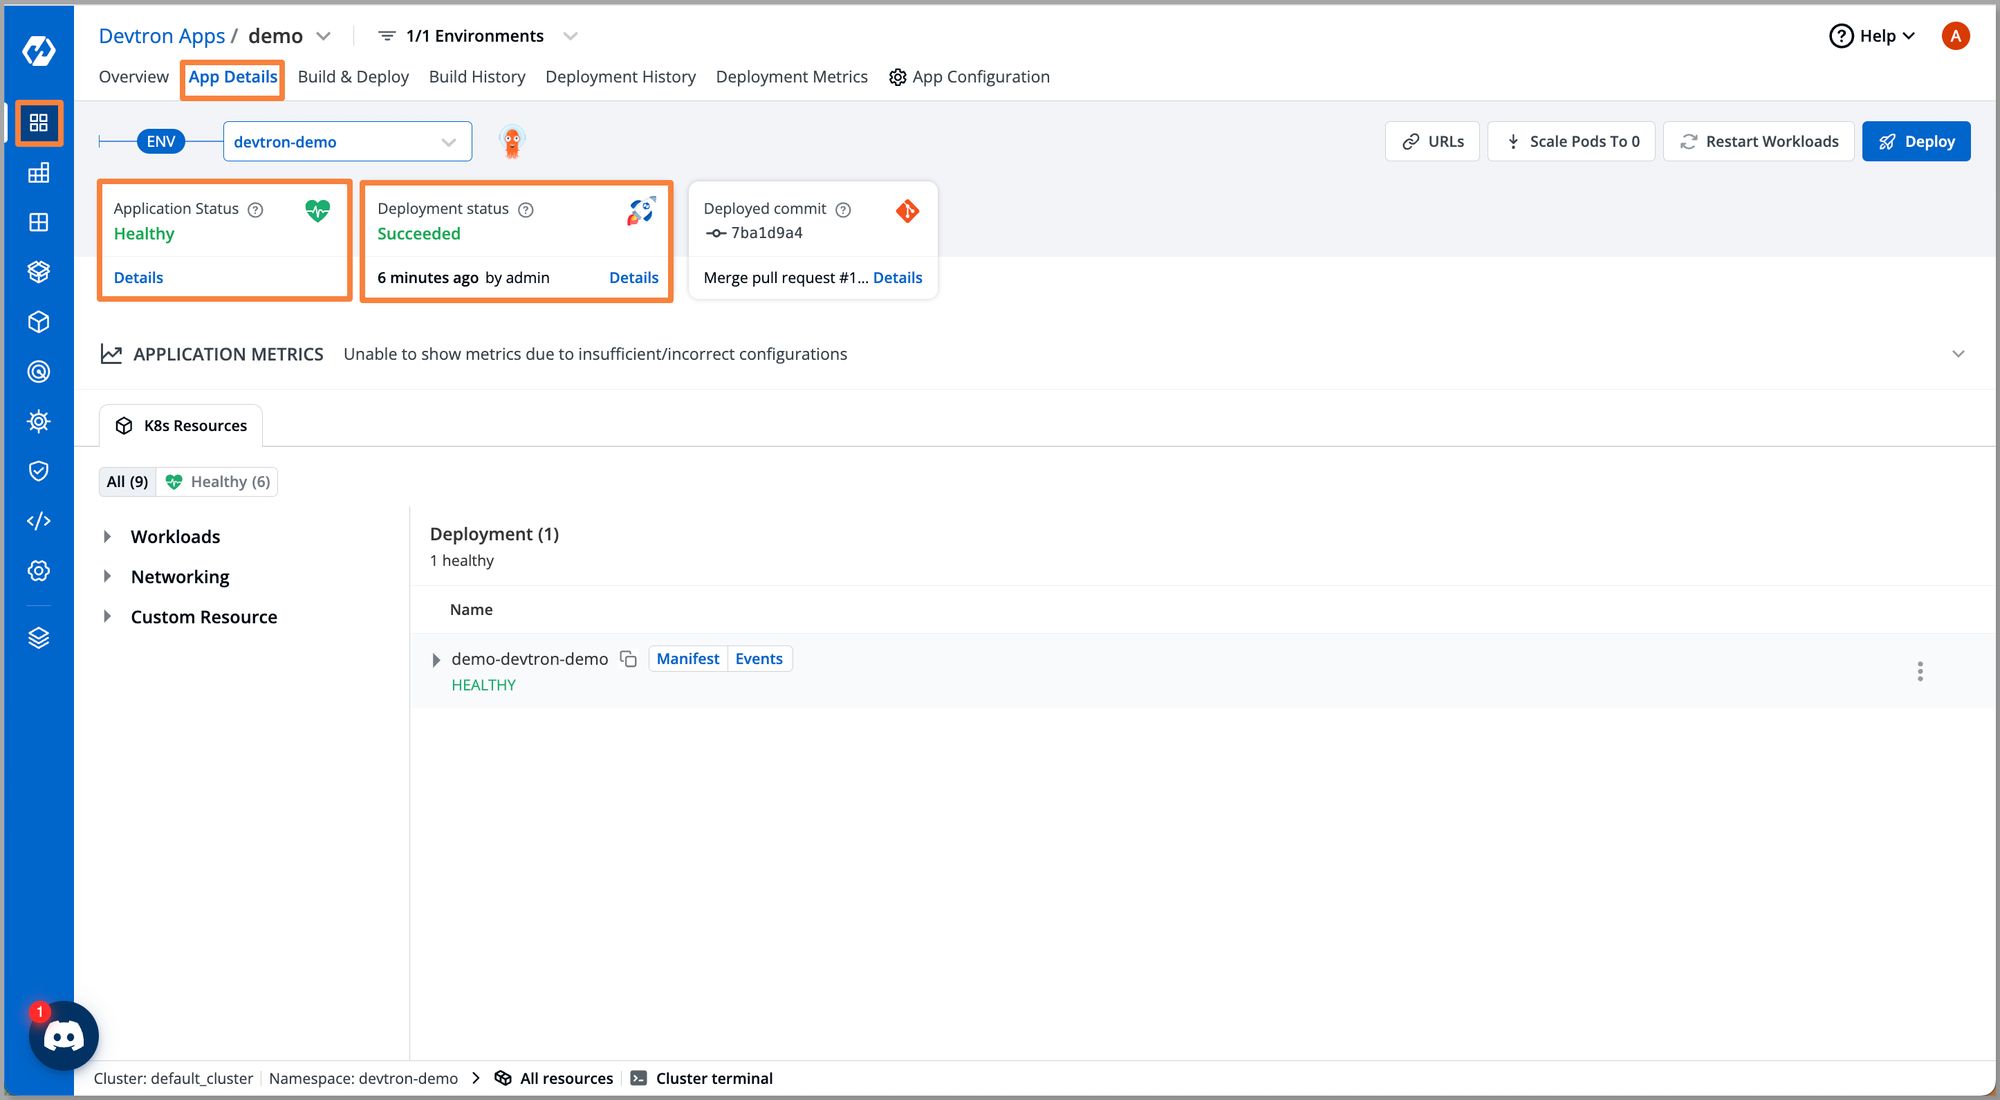
Step 4: The effects of the winter soldier get reflected based on our configuration. Here we configured the sleep operation, thus the result is all pods get deleted. And based on the end time, it will automatically scale up the workloads for the respective weekday specified in configurations.
Conclusion
Time-based scaling in Kubernetes is a concept where the number of replicas or resources allocated to a service or application is adjusted based on predictable time-based demand patterns. It contrasts with traditional autoscaling, which relies on real-time metrics for scaling decisions. Time-based scaling is particularly useful for applications with predictable traffic patterns and allows for proactive resource allocation, cost optimization, and fine-tuned performance.
Winter Soldier is the tool that helps us achieve time-based auto-scaling and reduces costs by optimizing resource utilization. It avoids paying for idle resources, improves resource allocation, enables efficient scaling, simplifies environment management, and promotes SustainabilityOps, i.e. green deployments.
If you want to learn more tools that can assist with auto-scaling, check out this blog post on KEDA.