Securing Kubernetes is of profound concern for DevOps engineers. For organizations implementing Kubernetes and those just getting ready to migrate to Kubernetes, one of the challenges they face is security. While patching helps improve security, automating Kubernetes security policies enforcement makes it easier for organizations to protect themselves against vulnerabilities and other security issues.
This blog will show how easily we can add Kyverno Policies to secure our cluster. In this blog, we will talk about -
- What are Kyverno Policies
- Need for Kyverno Policies
- The traditional approach to applying Kyverno Policies
- How to apply Kyverno Policy using Devtron
What are Kyverno Policies?
Kyverno consists of a set of rules called policies, which are applied to clusters to restrict, deny, remove, and generate resources or configurations as per the manifest file. These policies help us to make clusters secure, and however we want.
Kyverno Policies Features
- Declarative policy management: Kyverno allows you to define policies declaratively using YAML files, which makes it easy to manage and version-control policies.
- Context-aware policy enforcement: Kyverno is context-aware, which means it can enforce policies based on the current state of the Kubernetes objects. For example, you can define policies specific to a particular namespace or label.
- Dynamic policy updates: Kyverno can dynamically update policies based on changes to the Kubernetes objects. This makes it easy to adapt policies as the environment evolves.
- Policy testing: Kyverno provides a policy testing feature that allows you to test policies before enforcing them. This helps to ensure that policies are working as expected.
- Integration with CI/CD pipelines: Kyverno can integrate with CI/CD pipelines to ensure policies are enforced throughout the software development lifecycle.
- Multi-cluster management: Kyverno supports managing policies across multiple clusters, making enforcing policies consistently across different environments easy.
- Open source: Kyverno is an open-source tool which means it is free to use and easy to customize according to your cluster.
The Need for Kyverno Policies?
Kyverno is a Kubernetes policy engine that allows you to define and enforce policies for your Kubernetes cluster. Here are some examples of where you might use Kyverno policies:
- Resource validation: Kyverno can be used to validate the resources at the time of creation, or it can update the existing resources to match the cluster changes.
- Access control: Kyverno can be used to control the access of users. Some policies will define which resources can be viewed or edited.
- Pod security: Kyverno can enforce pod security policies, such as pods running as non-root users or some set of rules for pods.
- Compliance: Kyverno enforces that cluster resources will be specified with certain labels or the containers are using certain package versions.
Why Prevent Namespace Deletion using Kyverno
Namespaces are central to Kubernetes architecture. By default, Kubernetes starts with four initial namespaces essential to operate Kubernetes.
default: Kubernetes includes this namespace, so you can start deploying your resources without specifying the namespace.
kube-node-lease: This namespace contains a lease object which is associated with every node, which means it sends a heartbeat to the control plane to detect node failure.
kube-public: This namespace contains objects which are readable by anyone who is not authenticated and can still read and view objects in this namespace. This namespace is mostly reserved for cluster usage.
kube-system: This namespace is the default namespace for Kubernetes objects, such as kube-dns, kube-proxy, etc.
These are some important and initial namespaces, so we must create a Kyverno Policy to restrict their deletion for the following reasons.
- Resource isolation: Kubernetes namespaces can isolate resources and workloads within a cluster. Deleting a namespace could result in losing all resources and workloads within that namespace, which can be catastrophic.
- Security: Namespaces are also used to enforce security policies and access controls. Deleting a namespace could result in the loss of those policies and controls, leaving the cluster vulnerable to unauthorized access.
- Compliance: Many organizations have compliance requirements that mandate the retention of certain data or resources. Deleting a namespace could result in losing that data or resources, leading to compliance issues.
- Accountability: In a multi-tenant environment, namespaces can be used to attribute usage and costs to specific teams or departments. Deleting a namespace could make it difficult to track who used what resources and for what purpose.
Traditional Command line approach to Applying Kyverno Policies
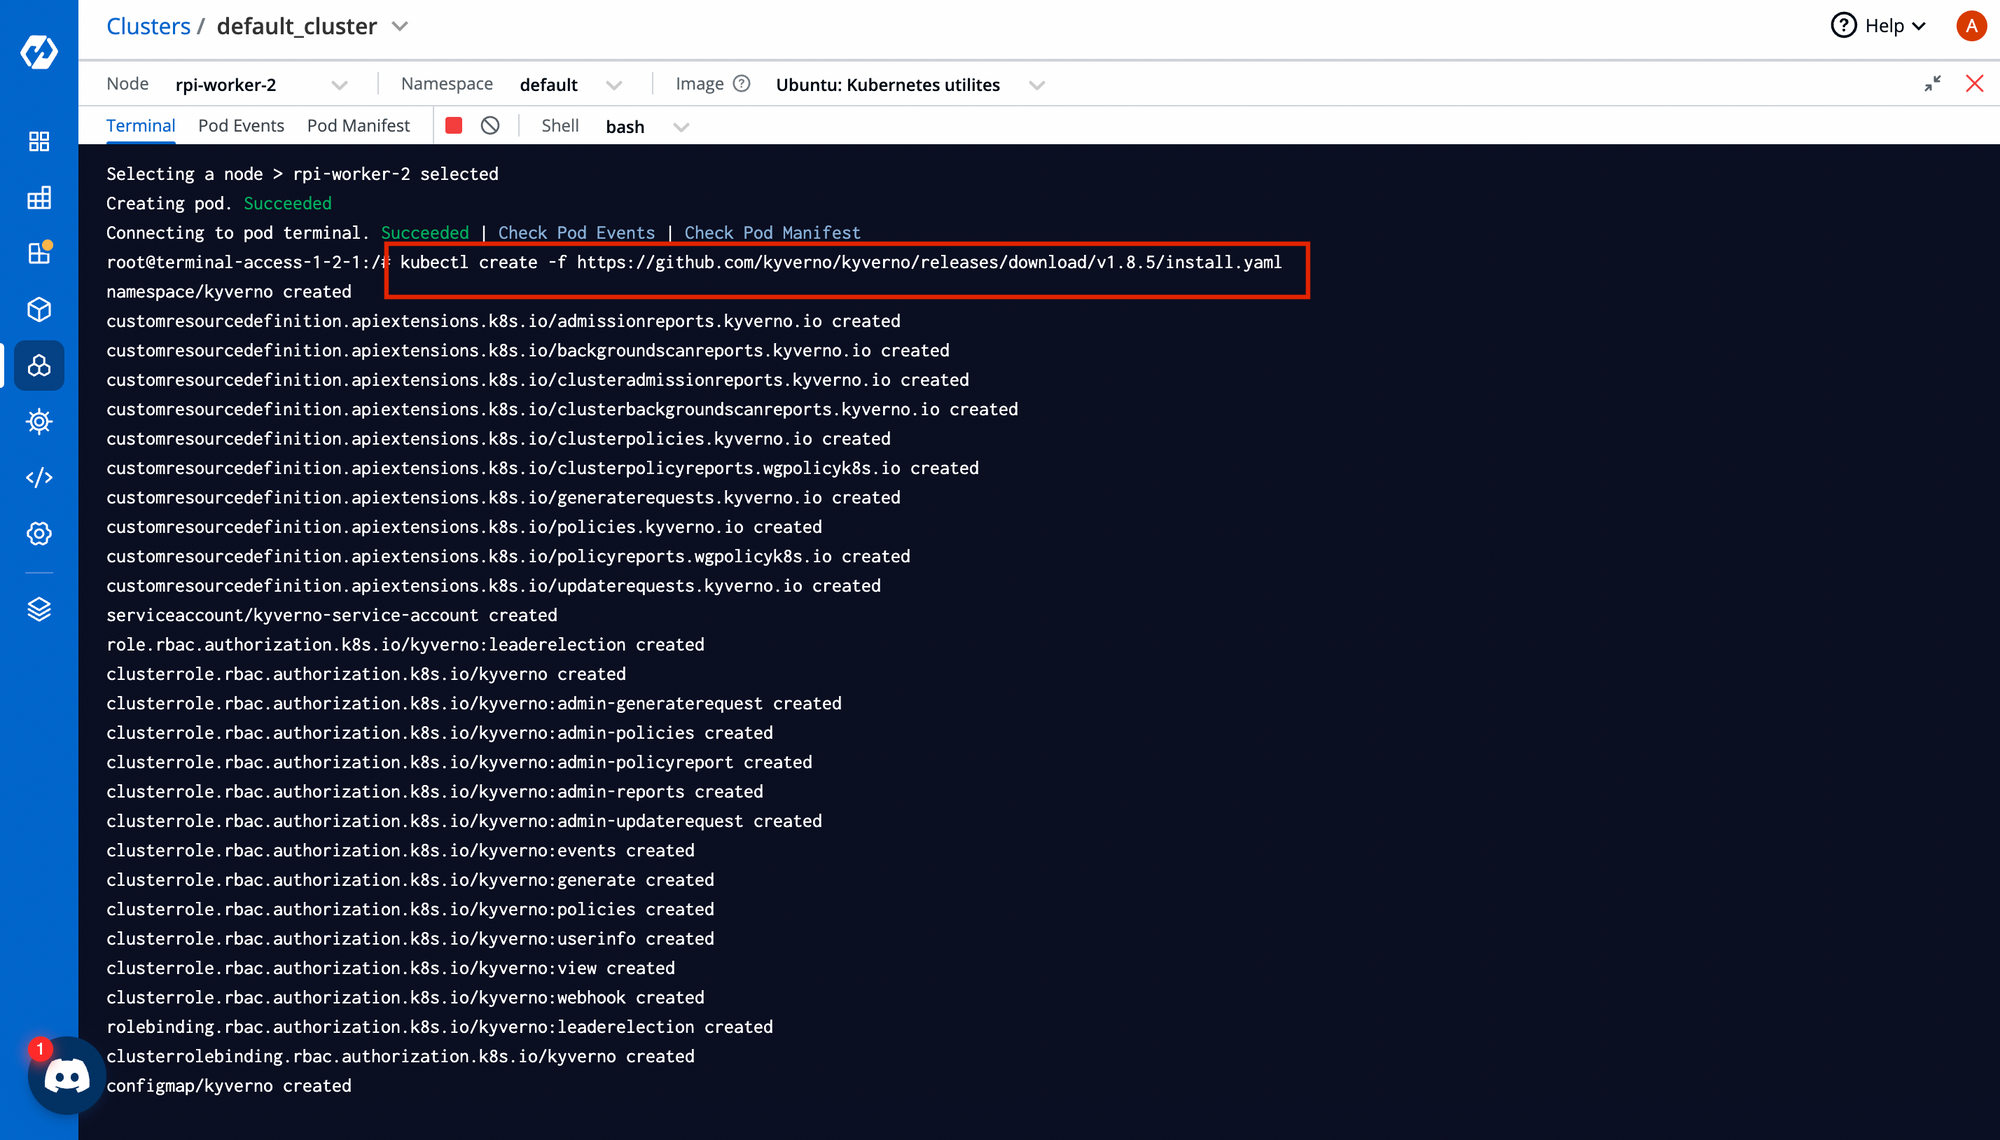
Step-1 : Install Kyverno CRDs
kubectl create -f <https://github.com/kyverno/kyverno/releases/download/v1.8.5/install.yaml>Step-2: Create a yaml file name prevent-deletion.yaml
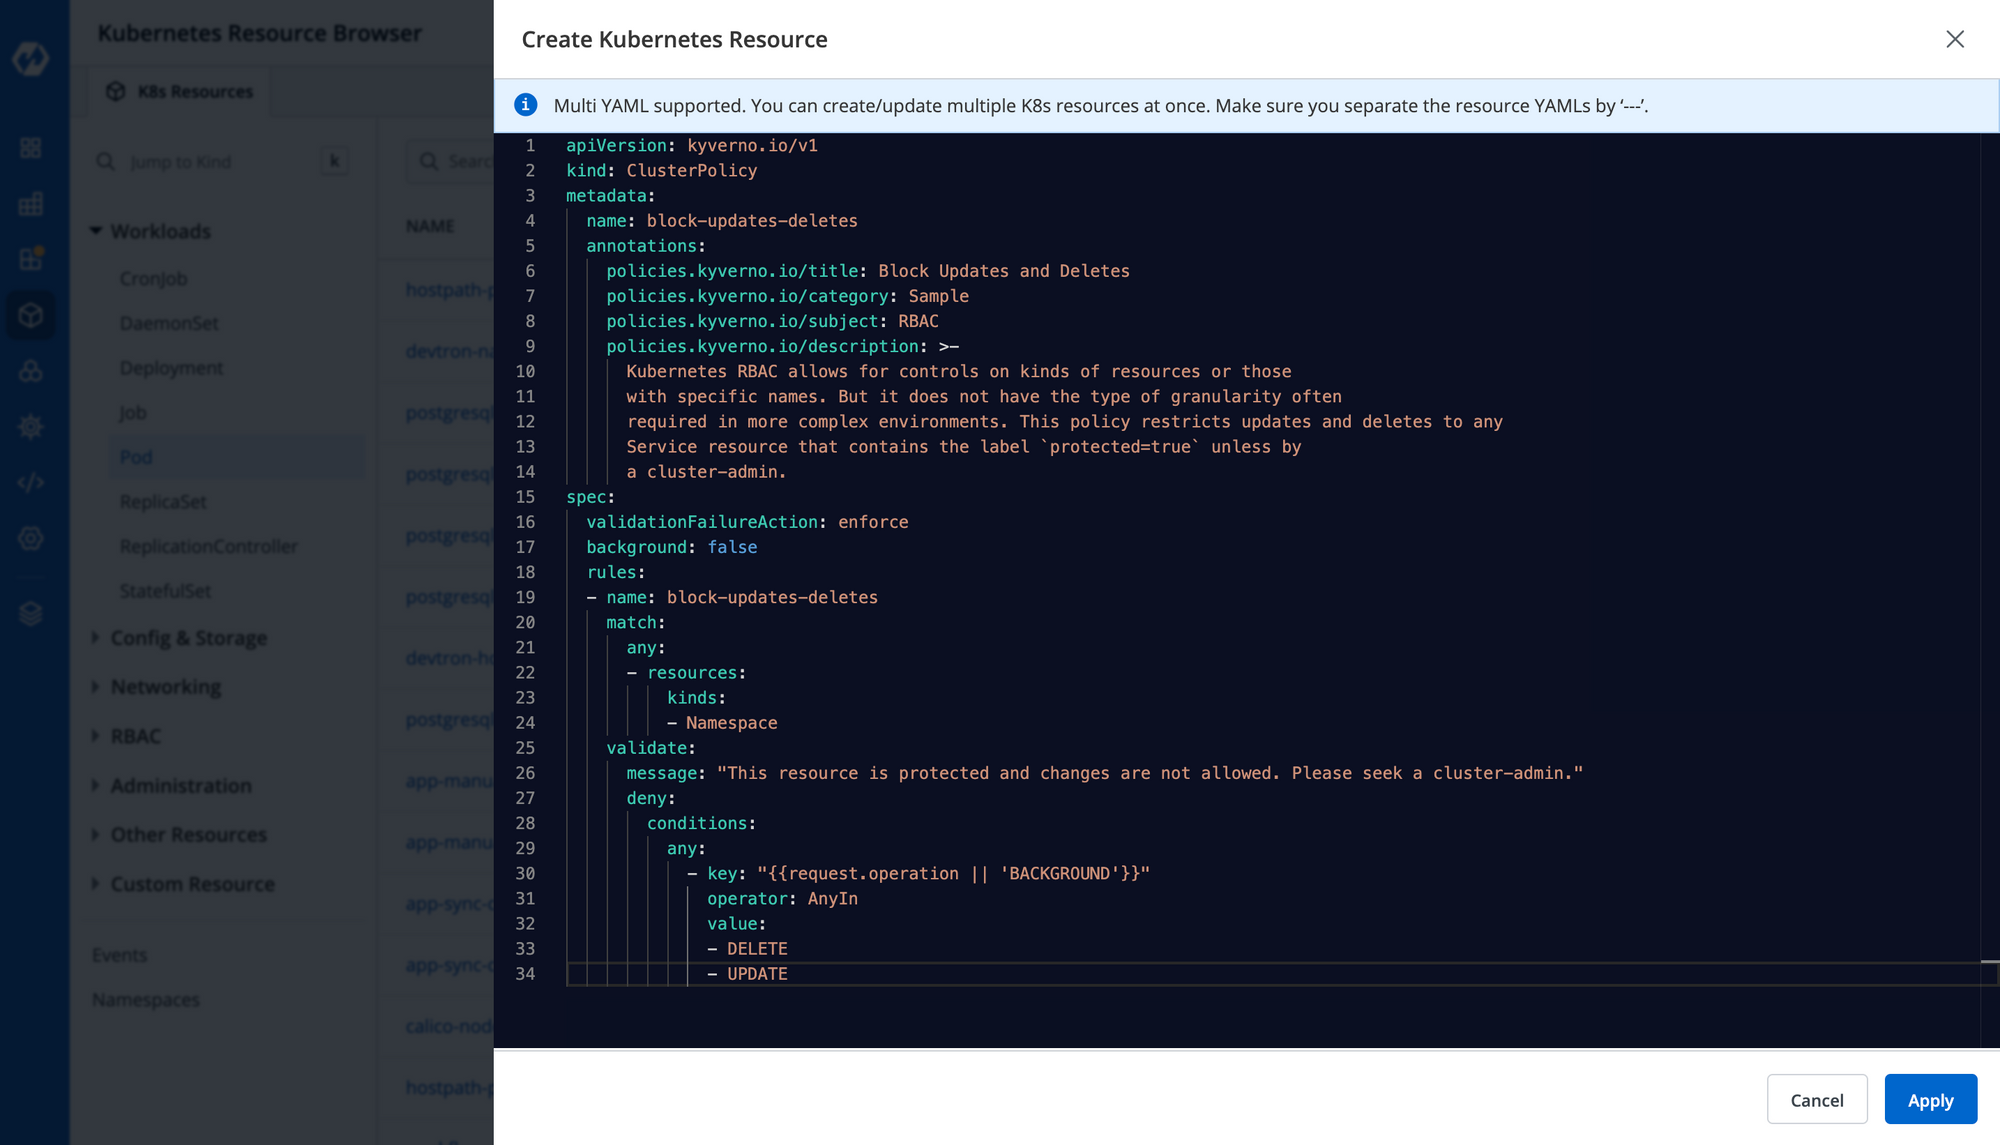
apiVersion: kyverno.io/v1
kind: ClusterPolicy
metadata:
  name: block-updates-deletes
  annotations:
    policies.kyverno.io/title: Block Updates and Deletes
    policies.kyverno.io/category: Sample
    policies.kyverno.io/subject: RBAC
    policies.kyverno.io/description: >-
      Kubernetes RBAC allows for controls on kinds of resources or those
      with specific names. But it does not have the type of granularity       often required in more complex environments. This policy restricts       updates and deletes to any Service resource that contains the           label `protected=true` unless by a cluster-admin.
spec:
  validationFailureAction: enforce
  background: false
  rules:
  - name: block-updates-deletes
    match:
      any:
      - resources:
          kinds:
          - Namespace
    validate:
      message: "This resource is protected and changes are not allowed.       Please seek a cluster-admin."
      deny:
        conditions:
          any:
            - key: "{{request.operation || 'BACKGROUND'}}"
              operator: AnyIn
              value:
              - DELETE
              - UPDATE
Step-3: Apply the above-created manifest
kubectl apply -f prevent-deletion.yaml
Step-4: Create a namespace name `demo` to test the policy
kubectl create ns demoStep-5: Try to delete the namespace
kubectl delete ns demo

Challenges in the traditional approach
- Using the CLI means following a sequence of commands, and any typo cloud leads to wrong configurations. Also, one has to remember a lot of commands.
- Multitasking is quite difficult on a CLI as the observability of resources deployed is very poor. One has to retype queries to check status reports.
- Troubleshooting and debugging are quite difficult.
Adding Kyverno policies through Devtron
Devtron provides a web-based GUI interface to easily view, edit, and debug your policies across clusters and resources. Resource browser in Devtron allows you to view configurations side by side for comparison, and managing multiple security policies is a breeze. Let us see how you can set up policies using the Devtron Platform.
If you haven’t installed Devtron yet, feel free to install it from the documentation.
Step-1: Install CRDs
CRDs can be installed from helm charts or either by using kubectl. To execute commands in the terminal while being at the Devtron dashboard, navigate to Clusters -> Select Target Cluster -> Click on Terminal. The cluster access terminal allows you to perform all your CLI activities while being at Devtron.
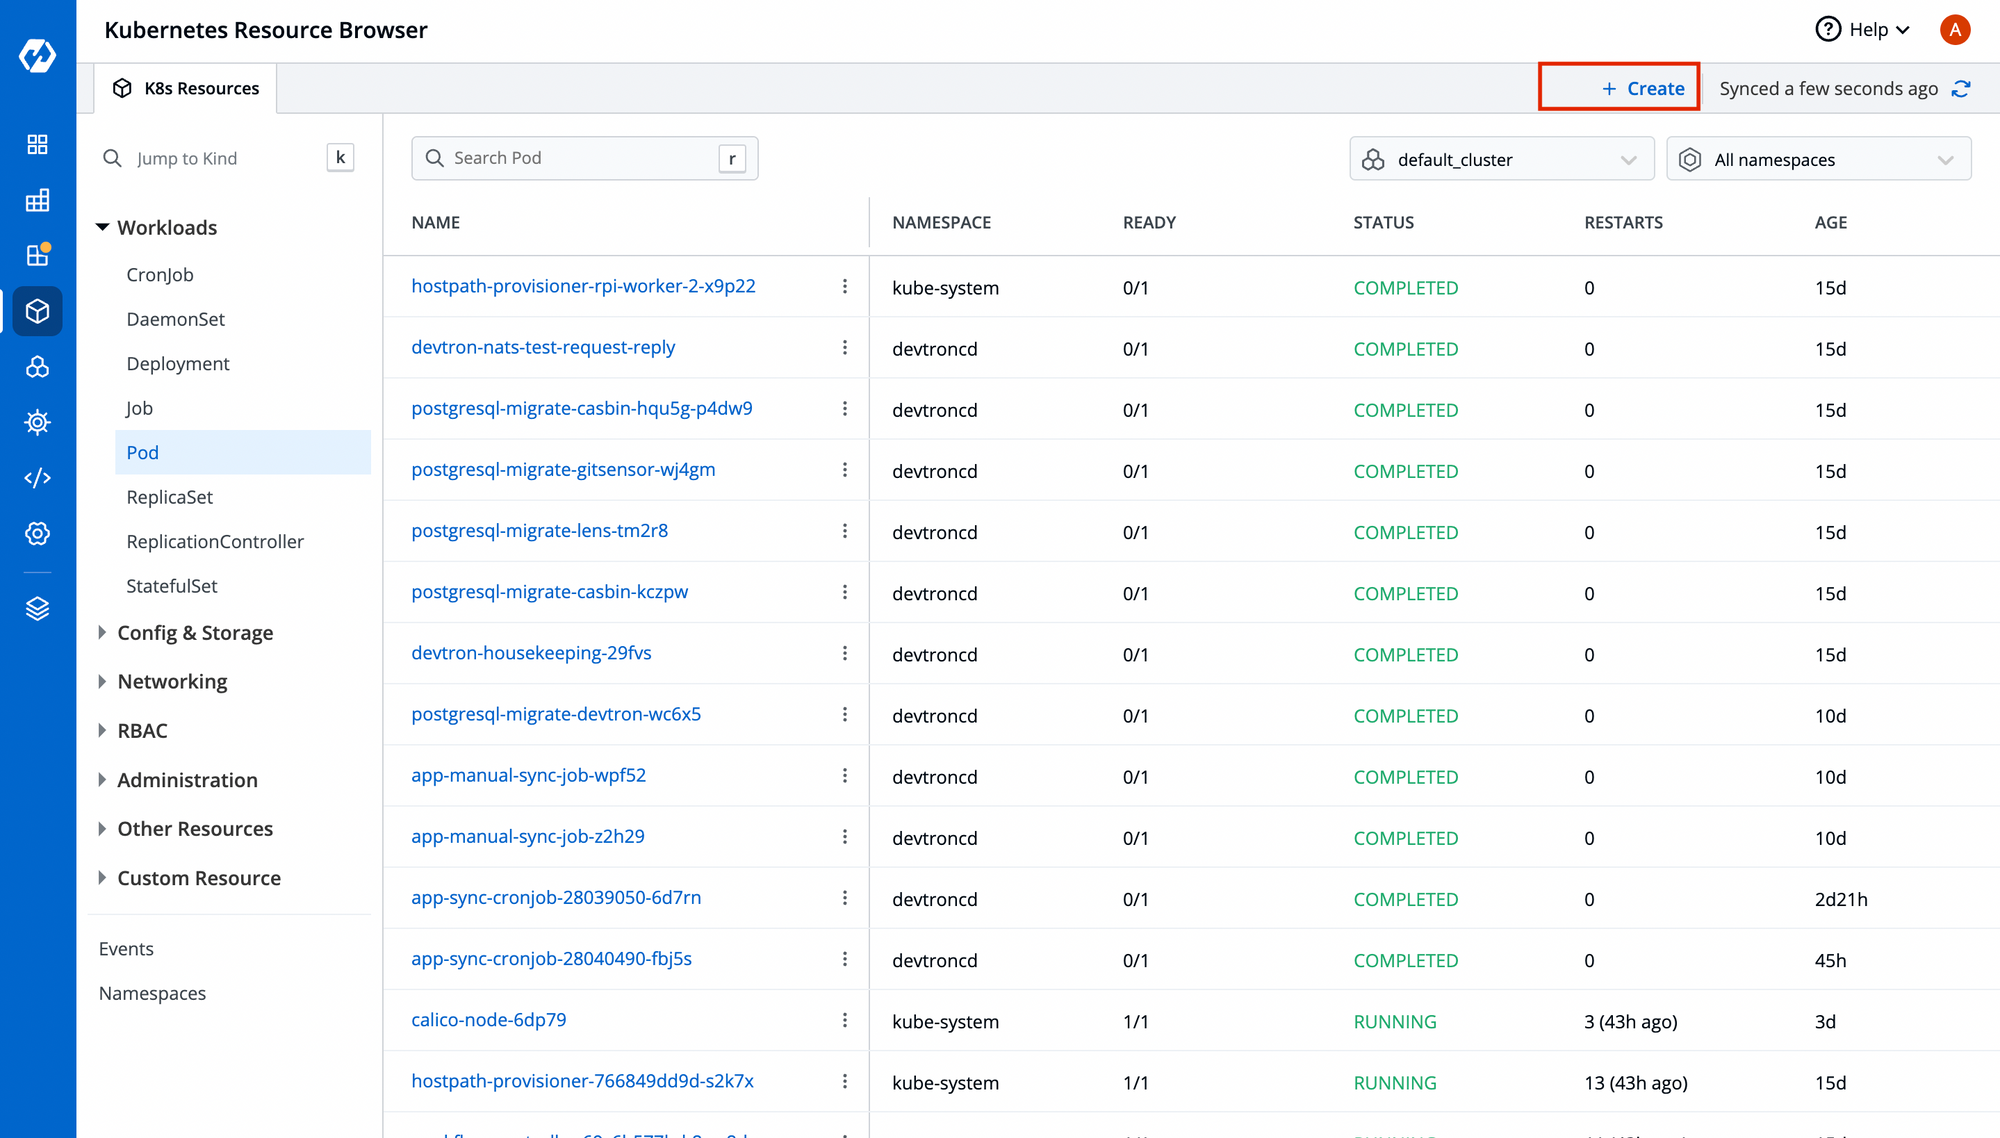
Step-2: Add Kyverno Policy
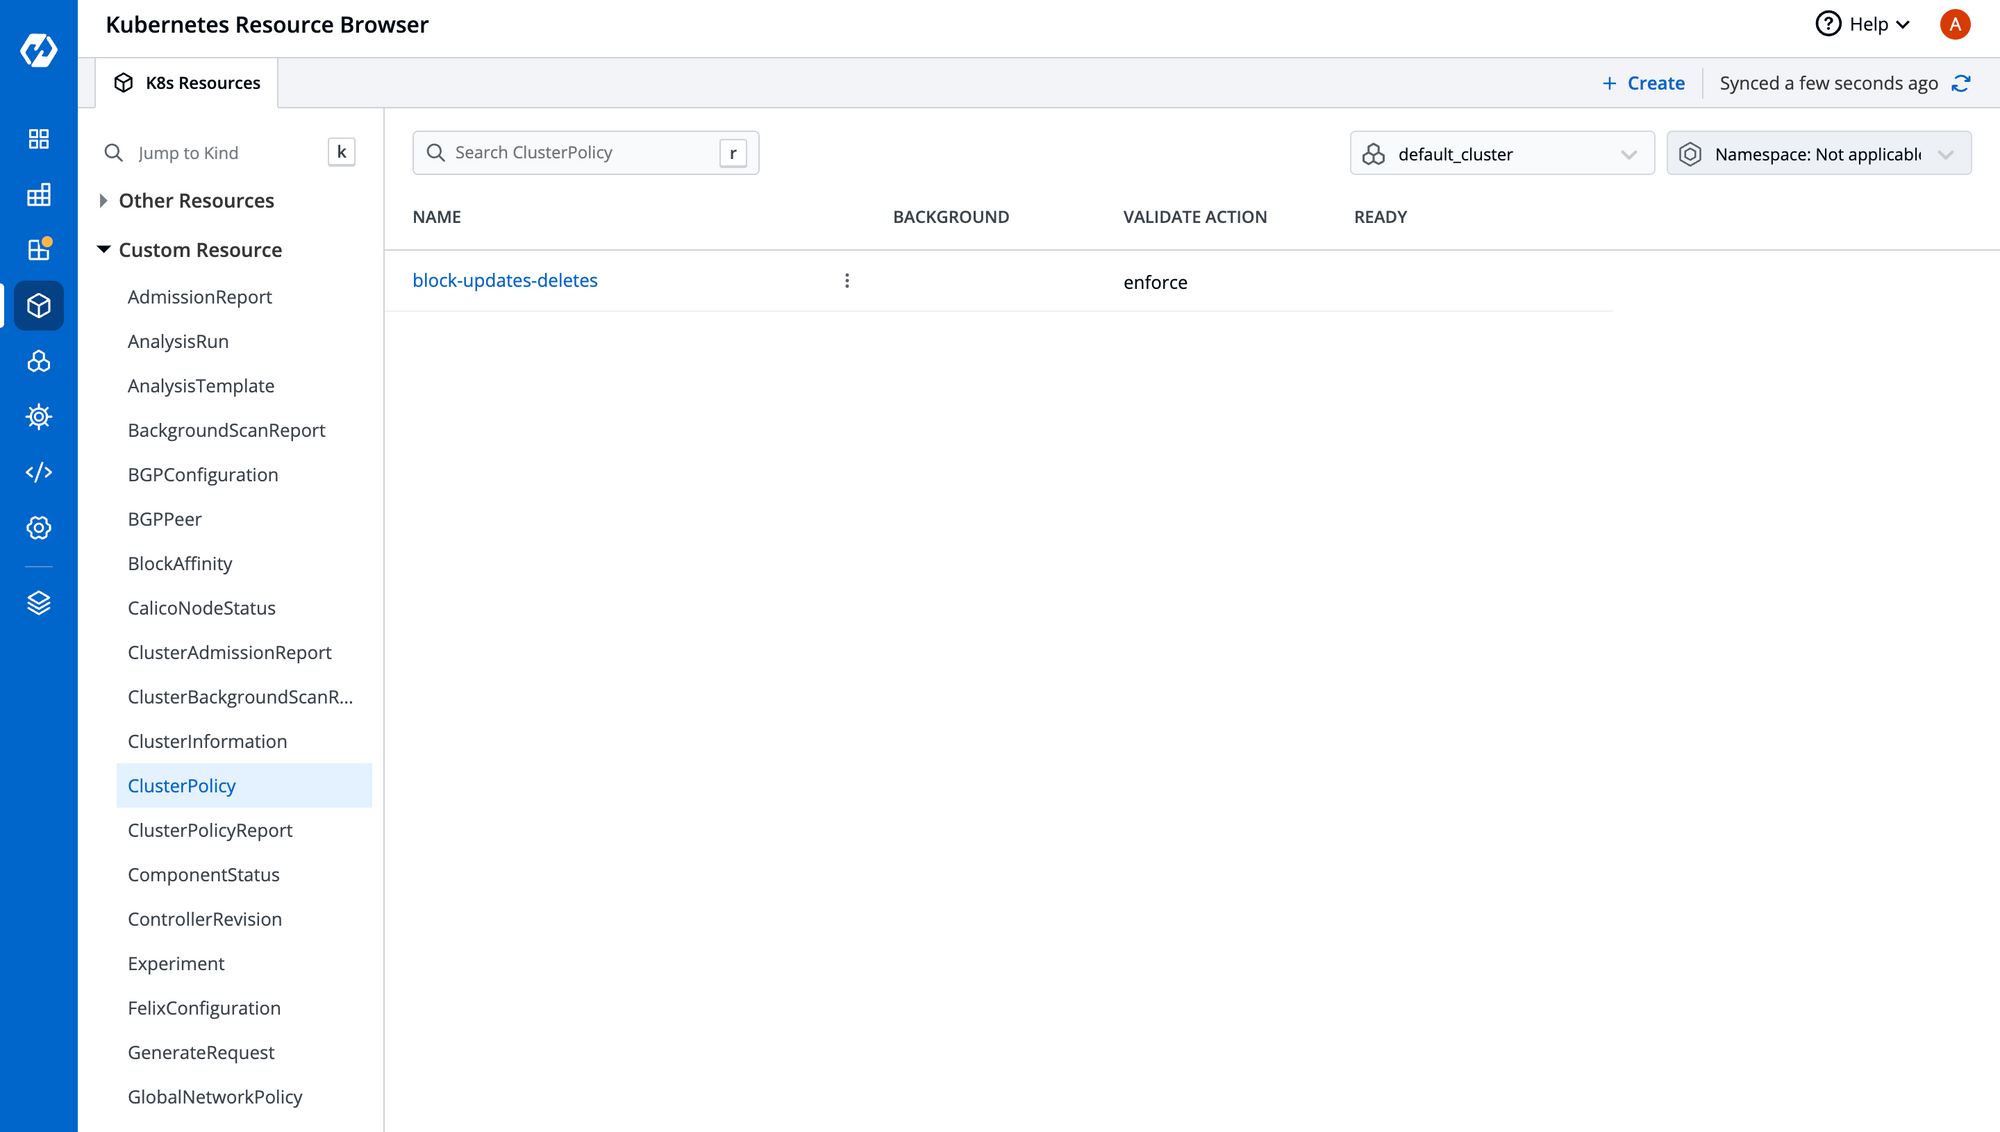
To apply any manifest, we can use the Resource Browser that comes with Devtron by-default. It helps you create any kind of Kubernetes resource and observe and manage the resources from the dashboard.
Paste your Kyverno policy and click on Apply.
Once the manifest has been deployed, you can view your policy in the Custom Resource section, as shown below.
Step-3: Test the Policy Created
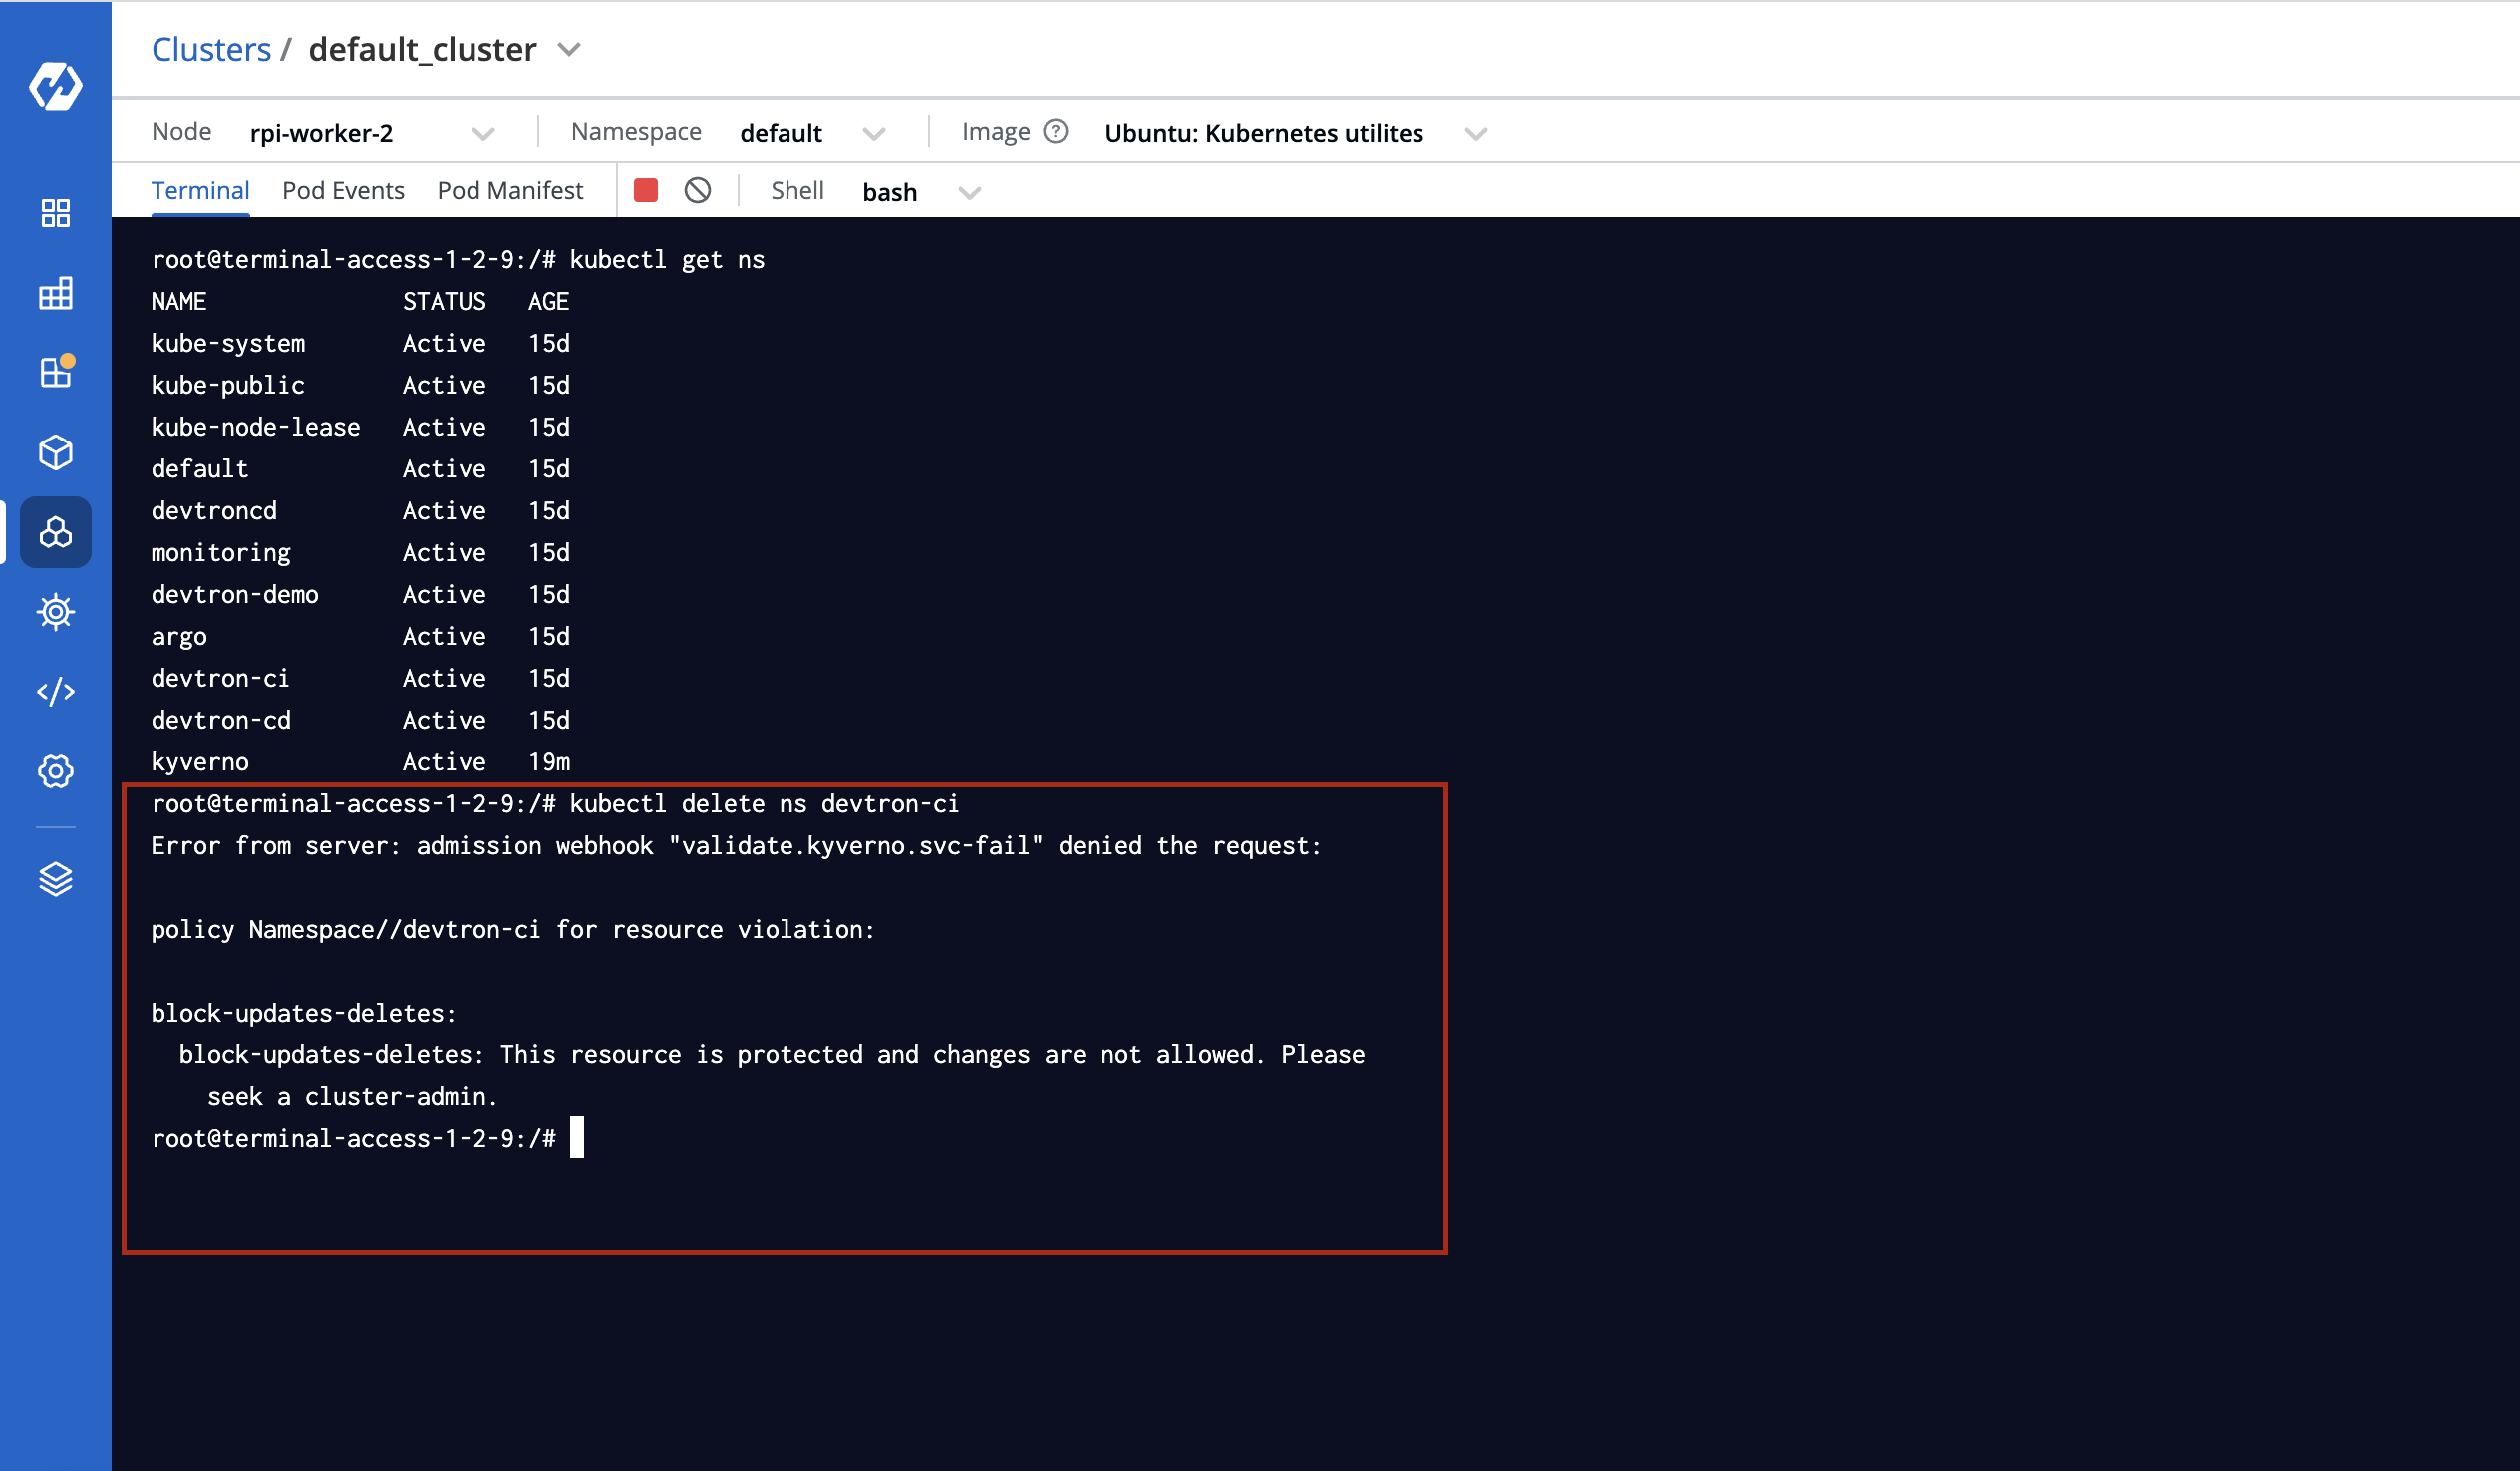
First, list out all the namespaces and try to delete one of it
To test out the created policy, let’s return to the cluster access terminal and list all the namespaces first. Now, let’s delete the `devtron-ci` namespace, as shown in the below image.
Microservices are deployed through each unique Devtron pipeline to its unique clusters. So our backend team created a Devtron CLI tool in which we can create a separate pipeline for deploying the application with multiple microservices across clusters through one TAML configuration file.
Hurray!! We have successfully implemented the Kyverno policies to restrict the deletion of namespaces using Devtron.
Conclusion
It is common knowledge that Kubernetes has become the de facto container orchestration system. But deploying and managing applications at scale remains a challenge for organizations. Securing the clusters and namespaces is the first step in improving the environment's security.
Complex architecture leads to chances for misconfigurations. But Kyverno Policies help in securing these misconfigurations and preventing namespace deletions. If you already use Devtron, do not forget to enable Kyverno integration or get started with Devtron here.