1. Kubernetes architecture is a distributed system consisting of Control Plane components (API Server, etcd, Scheduler, Controller Manager, Cloud Controller Manager) and Worker Node components (Kubelet, Kube Proxy, Container Runtime).
2. Control Plane handles decision-making, orchestration, and cluster state, while the Data Plane (Worker Nodes) runs application workloads.
3. etcd serves as the single source of truth for cluster data and supports high availability configurations.
4. Kube-scheduler and controllers automate pod placement and state management.
5. Kubernetes supports High Availability (HA) architecture with multiple control planes and replicated etcd instances.
6. Networking is managed by Container Networking Interfaces (CNIs) like Cilium, Calico, and Flannel, while CoreDNS handles service discovery.
Introduction to Kubernetes Architecture
In the modern day, millions of companies use Kubernetes to run their business applications at scale. Many operate globally, running multiple Kubernetes clusters across regions to ensure seamless user experiences worldwide.
At its core, Kubernetes is a container orchestration platform that automates the deployment, scaling, and management of containerized workloads. Containers are lightweight, portable software units that run consistently across environments—Linux, macOS, Windows—thanks to their isolated execution model.
What is Kubernetes Architecture?
Kubernetes is an open-source container orchestration system for automating software deployment, scaling workloads, and managing applications. Kubernetes itself is a distributed system, and it has several different core components that work together to create and manage the containers. In this blog, we will learn about the core Kubernetes architecture, its components, how they work, and how they enable running and scaling applications.
Kubernetes Nodes: The Building Blocks
The main resource in Kubernetes architecture is either a physical server or VM. Connecting multiple nodes forms a Kubernetes cluster.
Two Node Types:
- Control Plane Node – Hosts core Kubernetes components.
- Worker Node – Runs applications and services in pods.
For production reliability, multiple control plane nodes are used to create a high availability (HA) Kubernetes architecture.
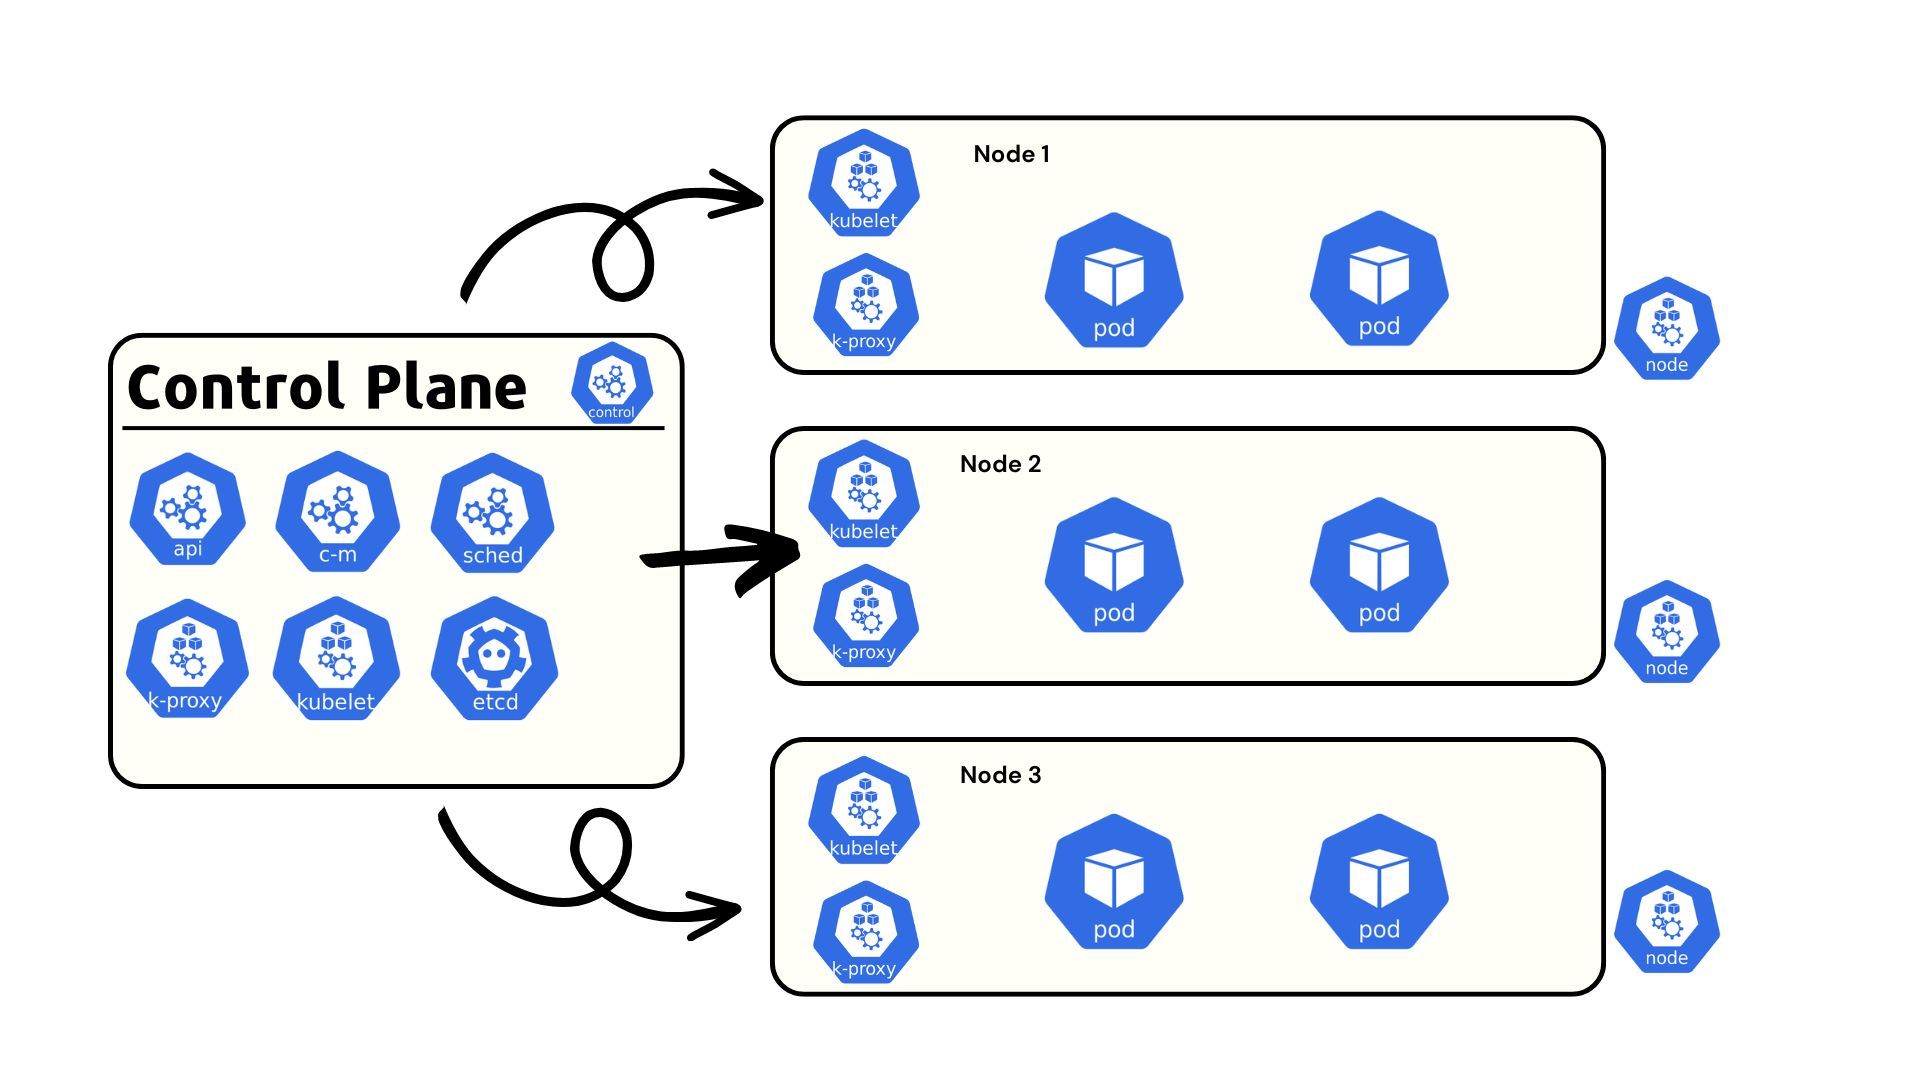
Kubernetes Control Plane Architecture Components
The Control Plane is the brain of Kubernetes. Key components include:
1. API Server (kube-apiserver)
The entry point to the cluster, handling authentication, authorization, and API requests from kubectl, controllers, or external tools.
2. etcd
A distributed key-value store holding cluster state. Only the API Server interacts with etcd directly. Supports stacked configurations, with odd-numbered instances for quorum-based leader election.
3. Scheduler (kube-scheduler)
Assigns pods to the most suitable nodes based on resource availability, affinity rules, and constraints.
4. Controller Manager (kube-controller-manager)
Runs Kubernetes’ built-in controllers—Deployment, ReplicaSet, Namespace, ServiceAccount, and more—to maintain the desired cluster state.
5. Cloud Controller Manager (CCM)
Manages cloud-provider-specific tasks such as provisioning VMs, routes, and load balancers through APIs from AWS, Azure, GCP, and others.
Kubernetes Worker Node Architecture Components
Worker Nodes execute application workloads. Core components include:
- Kubelet – Manages pods on the node, ensuring containers are healthy and match their specifications.
- Kube Proxy – Handles networking, routing service traffic to the correct pods.
- Container Runtime – Runs the actual containers (e.g., containerd, CRI-O, Docker Engine).
Kubernetes Networking Architecture
Networking in Kubernetes is abstracted via Container Networking Interfaces (CNIs). Popular options include:
- Cilium – eBPF-based, secure networking.
- Calico – Policy-based networking and routing.
- Flannel – Simple overlay networking.
Service discovery is handled by CoreDNS, mapping service names to pod IPs for easy access.
How do Kubernetes Components work?
We now know about all the different components of the Kubernetes cluster. Let us take a real-world example and see how all these different components work together behind the scenes.
Let’s say you want to create a Deployment nginx with 4 replicas in your cluster. You can create the deployment easily using the command below
kubectl create deployment --image=nginx --replicas=4Let’s try and understand step-by-step what happens behind the scenes once you run this command.
Step 1: Kubectl checks the kubeconfig to determine the cluster endpoint and authentication certificates for the API Server, and sends the request to the API Server.
Step 2: The API Server authenticates the request and authorizes the request. The information received through this request is stored in the ETCD.
Step 3: The API Server sends a message to the controller manager to create the deployment.
Step 4: The Deployment Controller observes that no pods are running, so it tells the scheduler to schedule the pods on available nodes.
Step 5: The Scheduler assigns the pods to the available nodes
Step 6: The Kubelet creates the pods, and the container runtime ensures that the containers in the pod are running.
Step 7: The Scheduler sends the pod status back to the API Server, and the API Server stores this information in the ETCD.12
High Availability Kubernetes Architecture
For production, Kubernetes is often deployed with:
- Multiple Control Plane Nodes for redundancy.
- Replicated etcd instances for quorum-based fault tolerance.
- Load balancers for distributing API requests across control planes.
Kubernetes Cluster Add-ons
- Metrics Server – Tracks CPU/memory usage.
- Kubernetes Dashboard – UI for cluster management.
- Advanced Dashboards – Tools like Devtron, Rancher, and Komodor for enhanced visibility, Helm lifecycle management, and RBAC controls.
Conclusion
Kubernetes architecture combines
“With Devtron’s upcoming agentic AI-powered Kubernetes assistant, you’ll be able to visualize your Kubernetes architecture, troubleshoot issues instantly, and optimize workloads with natural language commands.”
FAQ
What is Kubernetes architecture?
Kubernetes architecture is the design framework of Kubernetes, consisting of a Control Plane (API Server, etcd, Scheduler, Controller Manager, Cloud Controller Manager) and Worker Nodes (Kubelet, Kube Proxy, Container Runtime) that run containerized workloads.
What is the difference between Control Plane and Worker Nodes?
The Control Plane manages cluster-wide decisions, stores state, and schedules workloads.
Worker Nodes run the actual application workloads (pods) and report their status back to the Control Plane.
What is etcd in Kubernetes?
etcd is a distributed, key-value store used by Kubernetes to store all cluster state data, including pod status, configuration, and secrets. It acts as the single source of truth for the cluster.
What is a High Availability Kubernetes architecture?
A High Availability (HA) Kubernetes architecture uses multiple control plane nodes and replicated etcd instances to ensure the cluster remains operational even if one or more components fail.
How does Kubernetes schedule pods?
The kube-scheduler evaluates available nodes and assigns pods to the best possible one based on resource availability, affinity rules, and constraints.