Kubernetes Architecture: The Ultimate Guide
In the modern day, millions of companies use Kubernetes to run their business applications on a large scale. Among all the companies that utilize Kubernetes, many operate globally, running multiple Kubernetes clusters across many different locations to ensure they can provide seamless experiences to their users worldwide.
At its core, Kubernetes is a container orchestration tool that runs and manages containers at scale. If you are unfamiliar with containers, they are small software packages that can run in any environment be it Linux, MacOS, Windows, etc. A container is a lightweight virtual machine, that gives you an isolated environment for your applications to run. It makes it much easier to build and ship your applications with containers.
What is Kubernetes Architecture?
Kubernetes is an open-source container orchestration system for automating software deployment, scaling, and management. Kubernetes itself is a distributed system and it has several different core components that work together to create and manage the containers. In this blog, we will learn about these core Kubernetes components, how they work, and how they enable running and scaling applications.
What are Kubernetes Nodes?
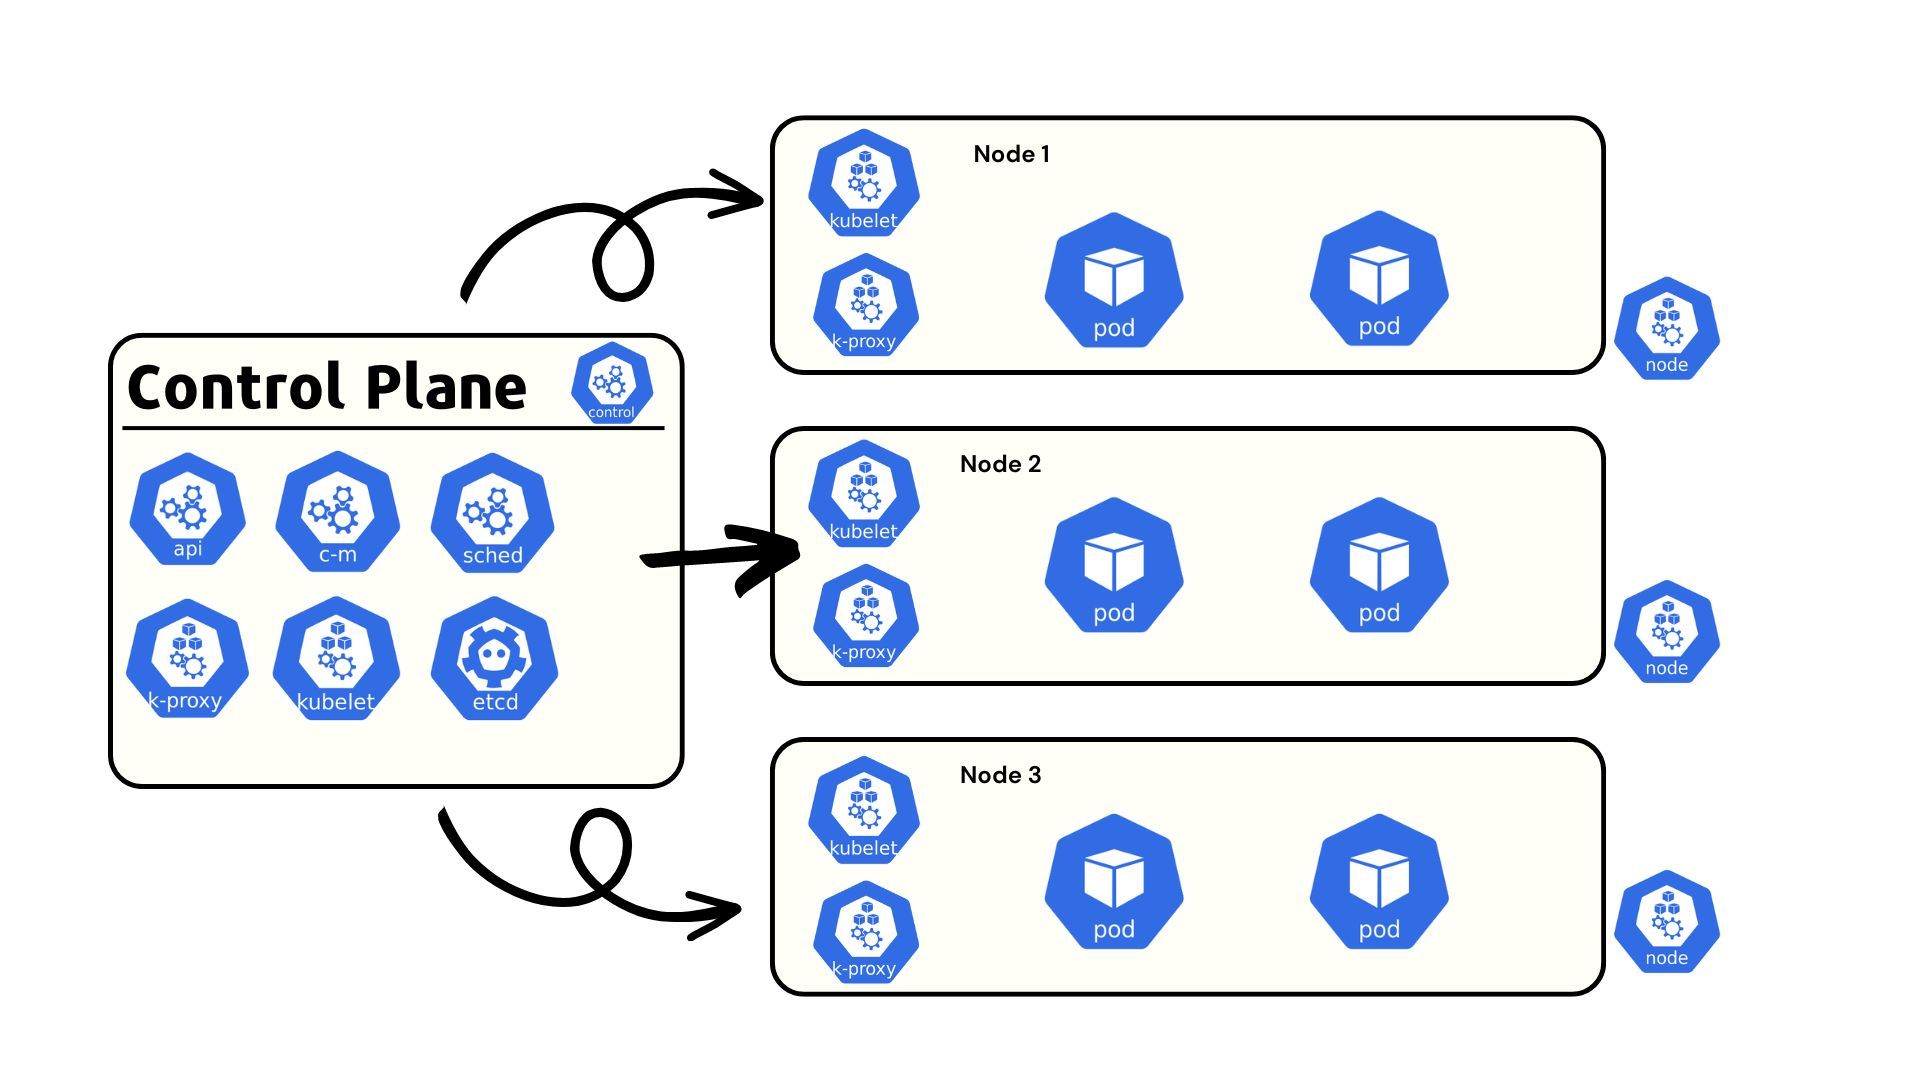
Kubernetes has a resource called Nodes. Nodes are individual computers or VMs. You will get a Kubernetes cluster for deploying workloads when these nodes are connected. Every workload that you deploy to the cluster runs on a particular node. This node is either auto-selected by one of the Kubernetes components called the kube-scheduler, or you can manually define some rules on which node the workload should run. There are two types of nodes within a Kubernetes cluster
- Control Plane Node: The Control plane houses the core components required to run a Kubernetes cluster
- Worker Node: The Worker Nodes are used for deploying application workloads
Since the control plane node houses the critical Kubernetes components, if the control plane node goes down, or runs into some issue, the entire cluster can be lost. To account for this, you often have more than one control plane in a production-ready Kubernetes cluster. This is known as a high availability setup for Kubernetes.
Kubernetes Control Plane Components
As mentioned earlier, the control plane node contains the critical components required to run the cluster. If even one of these components does not exist in the Control Plane, you will be unable to use the cluster. Let’s understand the function of each one of these components, and how they all work together to enable orchestrating containers at scale.
API Server
The Kubernetes API server acts as the entry point for the Kubernetes Cluster. Whenever any external request is made to the cluster, or by any of the other control plane components, the request first goes to the API server. The API server authenticate and authorizes the request, and then sends the request to the relevant K8s components.
When you wish to interact with a Kubernetes cluster, you have to install and use the kubectl
command line tool. This tool helps you interact with a cluster by sending a request to the endpoint where the API server is running. The cluster endpoint and security certificates are defined in a file called the kubeconfig
which is used by kubectl
to know where the cluster is located and how to authenticate with it.
Whenever a kubectl
command is issued, the request goes to the kube-api-server
. The API Server lets you query requests and interact with the different components of the cluster. For example, if you wanted to create a deployment, you would first write a YAML manifest and use kubectl apply -f
to create the object.
This request is first sent to the API server, where the request is first validated to ensure that it has the correct security certificate and permissions. If the authentication and authorization are valid, the API server forwards the request to different Kubernetes components that are responsible for creating the deployment.
ETCD
The ETCD is a distributed key-value database that is designed to specifically work with Kubernetes. It stores information about the state of the cluster such as resource utilization, creation or deletion of any Kubernetes objects, the status of the objects, etc.
The API Server is the only Kubernetes component that can directly interact with the ETCD. If any other components wants to read or update the data of the ETCD, they cannot do it directly. First, the component will have to talk to the API Server and the API server will make the necessary changes in the ETCD.
The two most common methods of deploying the ETCD in a cluster are in a stacked mode, or an external mode.
- Stacked ETCD: In a stacked ETCD configuration, the ETCD lives within the control plane itself. This is the most common ETCD configuration that you will see in a cluster
- External ETCD: In an external ETCD configuration, the ETCD lives somewhere outside the cluster such as on an external VM. The endpoint of the ETCD is defined in the API server’s configuration file so Kubernetes can still access the ETCD.
Similar to the control plane node, an ETCD can have multiple instances. This type of setup is called a High Availability ETCD cluster. When you have multiple ETCD instances for fault tolerance, you want to ensure that there is an odd number of ETCD instances. It uses the leader election algorithm to select a single ETCD instance in which data is being written. The other instances make a copy of the leader instance.
Scheduler
In Kubernetes, containers are run within a unit called a pod. A pod is simply a wrapper around one or multiple different containers. Whenever you deploy any kind of workload, the application always runs inside a pod. Earlier, you learned that every workload runs on a particular node i.e. pods run on particular nodes.
When the request is sent to the API Server to run a workload, a particular node needs to be selected where the pod should run. Filtering the available nodes, and selecting the correct node to schedule the pod to, is the job of the kube-scheduler. You can either define some rules for how the pod should be scheduled, or you can leave it up to the scheduler to select the best available node for running the pod upon.
If you want a deeper dive into Kubernetes scheduling, please check out our blog dedicated to scheduling and the different scheduling options.
Controller Manager
Kubernetes has several different control loops that are responsible for observing, managing, and taking appropriate actions when a particular event occurs. These control loops are called controllers in Kubernetes. Multiple controllers exist in Kubernetes that manage different aspects of the cluster. For example, there is a Deployment Controller, Replication Controller, Endpoint Controller, Namespace controller, and Service Account controller. Each one of these controllers is responsible for managing a different component of Kubernetes.
Take the Deployment controller for example. Kubernetes has a resource called Deployments, which creates and ensures that certain pods are running at all times. The Deployment is controlled by the Deployment controller i.e the controller observes the state of the pods, and if a pod is missing, it will instruct Kubernetes to recreate the pod with the desired configurations.
The Controller Manager is a daemon that contains all these different controllers that come shipped with Kubernetes. Apart from the default controllers that come pre-packaged in a Kubernetes setup, you can also write your custom controllers.
Cloud Controller Manager
Many people run their Kubernetes cluster on public clouds such as AWS, Azure, or Google Cloud. When running the cluster on the cloud, you will use many of the resources provided by the public cloud such as network interface, VMs (Nodes), storage, and more. Traditionally, you might have had to manually provision these resources either through the cloud dashboard or by using it’s CLI tools. Kubernetes’ design philosophy believes in having everything automated and API-driven without having tight coupling between components.
To automate a lot of the manual provisioning on the cloud, Kubernetes has the Cloud Controller Manager. It is similar to the Controller Manager with the key difference that it contains controllers with logic for various cloud providers. The CCM allows you to link to your cloud provider’s API which allows the Cluster to directly interact with the cloud provider and provision resources as required and defined. Some of the controllers that are included in the Cloud Controller Manager include Node Controllers, Service Controllers, and Route Controllers.
Let’s take an example where the CCM comes into play. Imagine you have 10 nodes connected to your cluster and there are workloads scheduled on each node. You want to create a new workload but there isn’t any capacity left on any of the existing nodes. By defining certain logic, you can configure the Cluster to provision a new node from the cloud provider and connect it to your Node. This interaction that happens between the cloud provider and the cluster is handled by the Cloud Controller Manager.
Kubernetes Worker Nodes Components
Above we have seen all of the components of the control plane node. Apart from the components mentioned above, there are a few other components that are essential to the functioning of Kubernetes, but they are not specific to the control plane node. These components exist on every single node including worker and control plane nodes. Let’s take a look at these components and what they are responsible for.
Kubelet
The kubelet is the cluster builder. Earlier in this blog we already learned that every single application in the cluster runs inside a pod. There has to be a component for building and running the pods and the containers inside the pod. The Kubelet is responsible for creating the pods with the correct configuration.
The Kubelet does not run in the same way as the different controller plane components like the API Server, Controller Manager, etc. Those components run inside pods. As the Kubelet is responsible for creating these actual pods, it needs to run outside a pod. The Kubelet runs as a system daemon in the Node. Every single Node needs to have its own unique Kubelet. Without the Kubelet, no pods can be created on the node.
If you have a self-managed cluster and want to add additional nodes to the cluster, you must ensure that the kubelet is installed, configured, and properly running in every single node.
Kube Proxy
After you set up all the other components of a cluster, there has to be a way for all of the components to communicate with each other. The kube-proxy is the component that ensures that every Kubernetes resource can communicate with the other resources. The Kube-Proxy can perform simple TCP, UDP, and SCTP stream forwarding or round-robin TCP, UDP, and SCTP forwarding across a set of backends.
Similar to the kubelet the Kube Proxy is installed in every node that is part of the cluster. It runs as a DaemonSet. A DameonSet is similar to a deployment resource, except that it ensures that the pods run on every single node. The Kube Proxy helps in maintaining a routing table that maps Service IP addresses to the IP addresses on the Pods.
Container Runtime
At the end of the day, Kubernetes is a container orchestrator tool, which means that there should be a container runtime that can create and ensure that the containers are running. The Kubelet will build the pod and assign the containers that should be run inside it. The container runtime will create and run the containers inside the pods.
Before Kubernetes v1.24, DockerShim was being used as the default container runtime for Kubernetes. However, it has now been removed and the default container runtime in Kubernetes has been updated to containerd. The versions of Kubernetes released after v1.24 require that the container runtime being used is compliant with the Container Runtime Interface (CRI).
Some of the common CRI-compliant container runtimes include
How does Kubernetes Components Works?
We now know about all the different components of the Kubernetes cluster. Let us take a real-world example, and see how all these different components work together behind the scenes.
Let’s say you want to create a Deployment for nginx
with 4 replicas in your cluster. You can create the deployment easily using the below command
kubectl create deployment --image=nginx --replicas=4
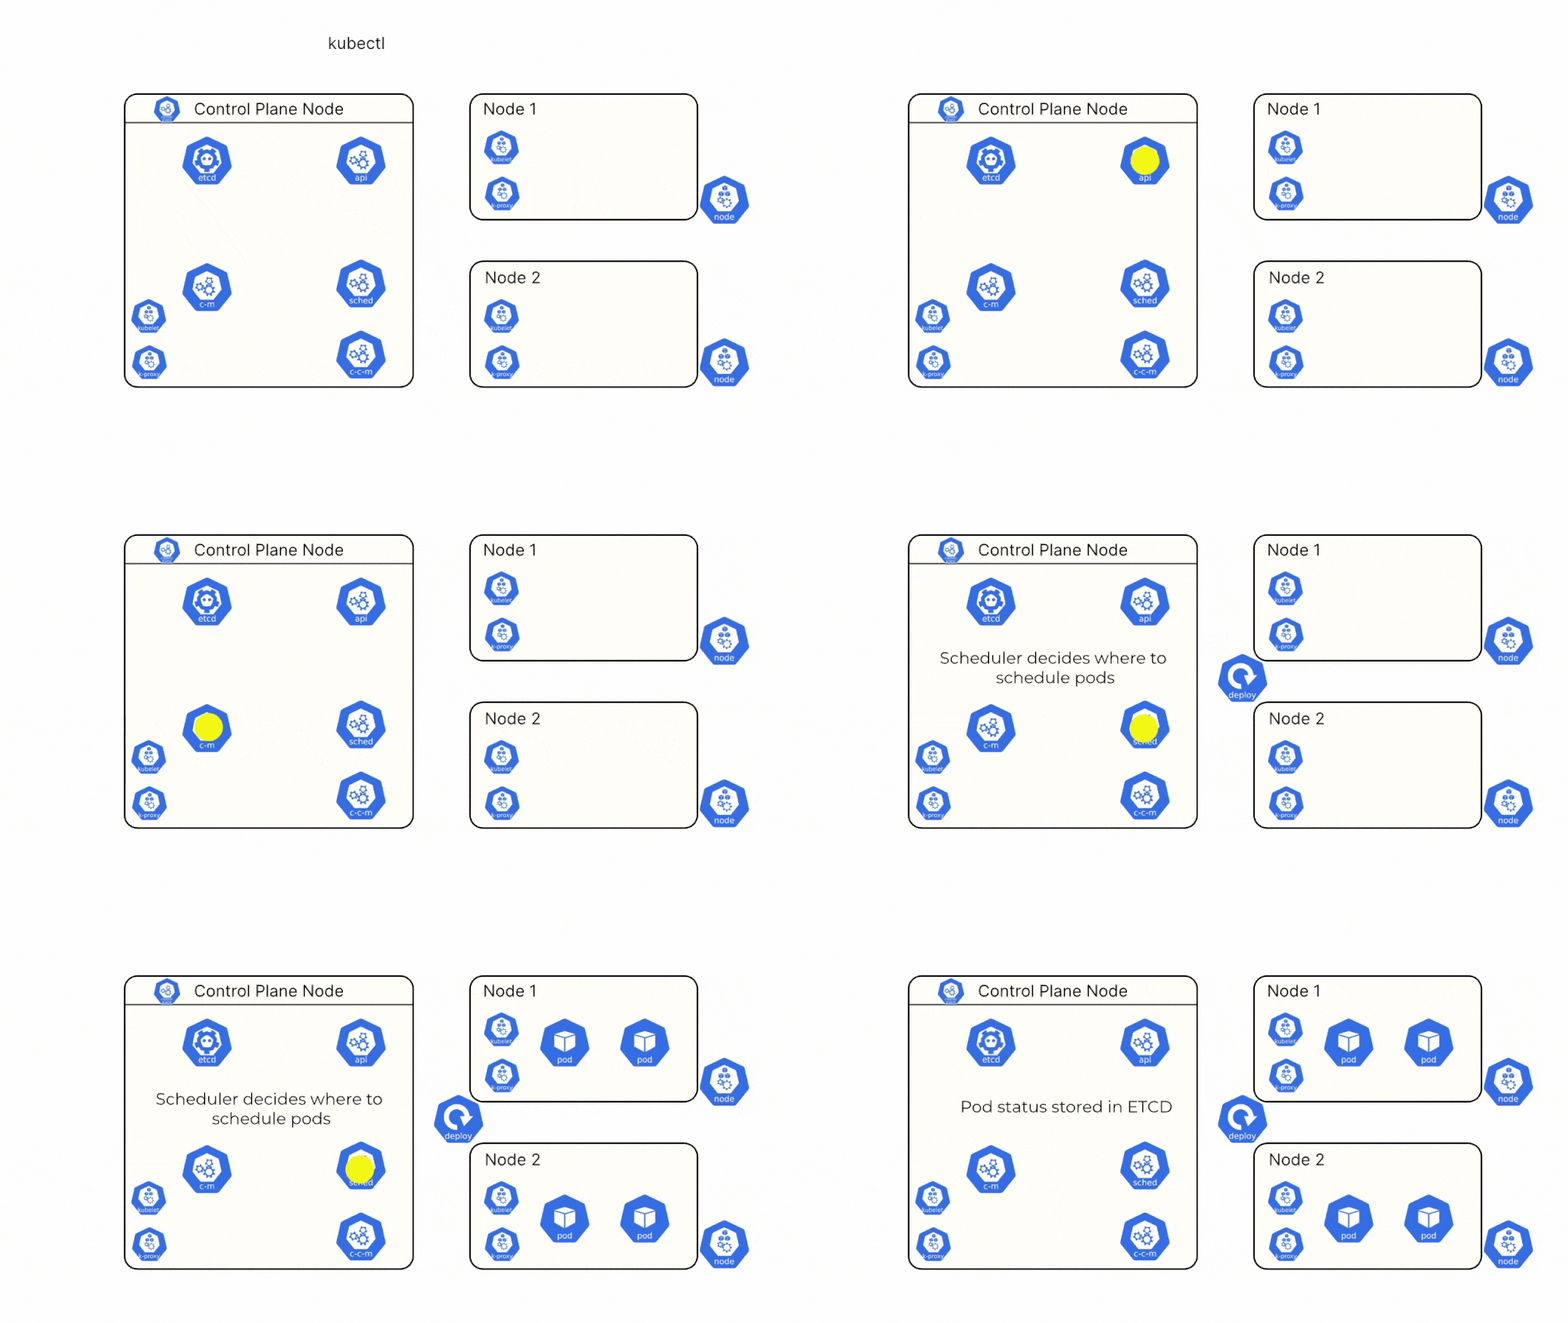
Let’s try and understand step-by-step what happens behind the scenes once you run this command.
Step 1: Kubectl checks the kubeconfig to determine the endpoint and authentication certificates for the API Server, and sends the request to the API Server.
Step 2: The API Server authenticates the request and authorizes the request. The information received through this request is stored in the ETCD.
Step 3: The API Server sends a message to the controller manager to create the deployment.
Step 4: The Deployment Controller observes that no pods are running, so it tells the scheduler to schedule the pods on available nodes.
Step 5: The Scheduler assigns the pods to the available nodes
Step 6: The Kubelet creates the pods and the container runtime ensures that the containers in the pod are running.
Step 7: The Scheduler sends the pod status back to the API Server and the API Server stores this information in the ETCD.12
Kubernetes Cluster Add-ons
Kubernetes is designed with extensibility in mind. Many different tools can integrate with Kubernetes to extend its functionality. While there are too many tools to cover within this list, let’s learn about some of the core cluster add-ons that you will see in almost every cluster, whether it is designed to be a production cluster or a playground.
CNI
A CNI or a Container Networking Interface is a networking plugin for Kubernetes. Earlier, there used to be multiple different solutions for managing the networks in Kubernetes. However, each solution had its own way of creating the networking and there was no standardization. Hence, the CNI project was created to provide a standard way for creating and managing the network in Kubernetes.
CNI’s add onto the cluster’s networking capabilities allowing for features such as network policies, load balancing, BGP, and much more. Each CNI solution offers a different set of features, so you can evaluate them and select one specific to your networking requirements. Some of the popular CNI’s include
CoreDNS
CoreDNS is a flexible and extensible DNS server that can be used as the DNS server for the Kubernetes cluster. In Kubernetes, every service and pod has an IP address. By default, if you want to access the pod or service, you will have to reference its IP address.
CoreDNS acts as Kubernetes’ Service Discovery mechanism. It can detect the services and pods based on a DNS name. For example, if you want to access a service named network-svc
that lives in the network
namespace, you can use the following DNS name to access the pod.
network-svc.network.svc.cluster.local
If there wasn’t a Service Discovery mechanism in place, you would need to find out the IP address of the service to be able to access it.
Metrics Server
Kubernetes also has a Metrics Server add-on. The metrics server is an open-source project maintained by the official Kubernetes organization. Its functionality is quite simple as it provides you with CPU and memory utilization for different resources such as pods and nodes.
For a production environment, the metrics server may fall short, and you would want to implement an entire monitoring stack in your cluster such as the Kube Prometheus Stack.
Dashboard
By default, you use the kubectl command line utility for interacting with the Kubernetes cluster. However, when you have hundreds of different resources in the cluster, it can become very difficult to gain proper visibility into your workloads with just the CLI tool.
For this, the Kubernetes project has created the Kubernetes Dashboard which acts as a general-purpose UI for Kubernetes that lets you gain visibility, manage applications, troubleshoot, as well as manage the cluster itself.
The Kubernetes Dashboard can have a few limitations. For example, Helm is a popular way to package and deploy applications, which is not supported by the Kubernetes dashboard. Moreover, if you are trying to manage a production cluster, the Kubernetes Dashboard might not be the right fit.
There are some advanced Kubernetes dashboards as well, that provide more granular visibility into application workloads, and also allow you to deploy and manage Helm applications lifecycle while ensuring a robust security posture. For instance, Devtron, Rancher, Komodor, etc. gives you a lot of advanced features to help you manage your Kubernetes clusters and workloads.
Conclusion
Kubernetes is a complex piece of machinery that is designed to scale your workloads at scale. It follows a micro-service architecture and has several different core components that work together to provide the Kubernetes experience to Developers and Operations alike. It is also highly extensible and several different tools can be integrated into it to extend what Kubernetes can do.
Having a good understanding of the architecture of Kubernetes can help you in several ways such as being able to effectively troubleshoot any issues, understand what’s happening inside your cluster, and design your applications in a way that can fully leverage the vast capabilities of Kubernetes.