Kubernetes is the go-to platform for deploying and managing containerized applications at scale, especially in microservices architectures. Whether you're using Minikube for local testing or GKE for a fully managed setup, Kubernetes offers flexibility and power.
In this tutorial, we’ll deploy a managed Kubernetes cluster on GCP and run a containerized app on it, and show how Devtron simplifies deployment, monitoring, and management across any Kubernetes environment.
What is Google Cloud Platform (GCP)
Google Cloud Platform is a collection of cloud services offered by Google, and it’s recognized as one of the top three public cloud providers globally. GCP allows businesses and developers to access Google’s powerful infrastructure, providing scalable computing resources hosted in data centers worldwide. These resources are available on an on-demand basis, with some free options as well.
Some of the major cloud services provided by GCP are:
- Compute Engine – Virtual machines and compute resources
- Cloud Storage – Scalable object storage
- VPC – Private cloud networking
- Cloud Logging & Monitoring – Centralized logs and metrics
- Cloud Build – CI/CD pipelines
- BigQuery – Serverless data warehouse
- Google Kubernetes Engine (GKE) – Managed Kubernetes clusters …and much more.
Kubernetes in GKE
Google Kubernetes Engine (GKE) is a managed Kubernetes service in Google Cloud Platform (GCP) that simplifies the deployment, scaling, and management of containerized applications on Google's infrastructure. It provides automated cluster management, built-in monitoring, security features, and seamless integration with other GCP services, making it an ideal choice for running cloud-native applications efficiently. GKE was the world’s first managed Kubernetes service. Google was the original developer of Kubernetes, which was later donated to the Cloud Native Computing Foundation (CNCF), and it has the longest track record of providing cloud-based Kubernetes services.
Types of GKE Clusters
- Autopilot: Manages the entire cluster infrastructure, including the control plane, nodes, and all system components.
- Standard: Manages the Kubernetes control plane, but users have full control over worker nodes, node pools, networking, and storage configurations.
Core Features of GKE
- Managed Kubernetes: Automated upgrades, repairs, and scaling, allowing you to focus on deploying and running your applications without worrying about the underlying infrastructure.
- Automated Scalability: Automatically adjusts the number of nodes in your cluster to match workload demands.
- Multi-Cluster Support: You can manage multiple clusters across multiple regions and even multiple clouds from a single control plane.
In addition to the managed Kubernetes service, GCP also provides the option to set up Kubernetes clusters on Google Compute Engine (GCE), where users can manually deploy and manage Kubernetes using virtual machines. This method offers more control over the cluster configuration but requires more management compared to the GKE service.
How to set up a GKE cluster
We’ll set up a Standard Kubernetes Cluster using the CLI. GCP also provides a graphical interface that allows you to create a cluster directly from the GCP Console. But before all that, you should have a GCP Cloud account to create a cluster. If you don’t have one yet, you can sign up for a free Google Cloud Platform (GCP) account and receive $300 in free credits to explore GCP services.
You can run it either in the Cloud Shell or in your local shell (if you have installed Google Cloud SDK locally in the previous step).
To create a Standard GKE Cluster using the Google Cloud CLI (gcloud), follow these steps:
Step 1: Authenticate to Google Cloud CLI
First, authenticate to the Google Cloud CLI
gcloud auth login
gcloud config set project <YOUR_PROJECT_ID>
Step 2: Enable Required APIs
Enable the necessary APIs for Kubernetes and Compute Engine:
gcloud services enable container.googleapis.com compute.googleapis.com
Step 3: Create a Standard GKE Cluster
Run the following command to create a 2-node GKE cluster in the specified region:
gcloud container clusters create my-cluster \
    --region us-central1 \
    --num-nodes 2 \
    --machine-type e2-standard-2 \
    --disk-size 30GB \
    --enable-ip-alias \
    --release-channel regular
Explanation of flags:
- region us-central1 → Deploys in us-central1 (adjust as needed)
- num-nodes 2 → Creates 2 worker nodes
- machine-type e2-standard-2 → Specifies the machine type (adjust as needed)
- disk-size 30GB → Allocates disk space to the cluster
- enable-ip-alias → Enables alias IP for VPC-native networking
- release-channel regular → Uses the standard release channel
Step 4: Connect to the Cluster
Once the cluster is created, get authentication credentials:
gcloud container clusters get-credentials my-cluster --region us-central1
Step 5: Verify the Cluster
Check if the cluster and nodes are running:
kubectl get nodes

Congratulations! You have successfully created and configured a Kubernetes cluster on Google Kubernetes Engine (GKE).
Deploying an application on GKE
Now that your GKE cluster is set up, it's time to deploy a containerized application. In this guide, we'll deploy a sample Node.js application, demonstrating how to package, push, and run your app on Kubernetes.
Step 1: Clone the GitHub Repository
Clone this Node.js application repo:
git clone https://github.com/devtron-labs/getting-started-nodejs.git
Change the directory to the project directory:
cd getting-started-nodejs
Step 2: Log in to Docker Hub
First, authenticate with Docker Hub:
docker login -u username
You will be prompted to enter your DockerHub password. Provide your Dockerhub Personal Access Token when prompted.

Step 3: Build the Docker Image
Run the following command from the project directory:
docker build -t <DOCKERHUB_USERNAME>/<DOCKERHUB_REPOSITORY>:v1 .
Replace <DOCKERHUB_USERNAME> with your actual Docker Hub username <DOCKERHUB_REPOSITORY> with your actual repository name.
Step 4: Push the Image to Docker Hub
Upload the image to your Docker Hub repository:
docker push <DOCKERHUB_USERNAME>/<DOCKERHUB_REPOSITORY>
You can verify it by checking your repository on Docker Hub.
Step 5: Deploy the Image on GKE
Create a Kubernetes deployment manifest and reference the image that you pushed to the docker hub in the previous step:
apiVersion: apps/v1
kind: Deployment
metadata:
 name: nodeapp-deployment
spec:
 replicas: 3
 selector:
   matchLabels:
     app: nodeapp
 template:
   metadata:
     labels:
       app: nodeapp
   spec:
     containers:
     - name: nodeapp-container
       image: <Dockerhub_Username>/<Dockerhub_Repository>:v1
       ports:
       - containerPort: 8080
Let’s understand what’s happening in the above YAML manifest.
- Kind: The type of Kubernetes object. In this case, it’s a deployment object.
- metadata.name: The Name of this deployment.
- spec.replicas: The number of pod replicas that this deployment should have. In this case, there will be three replicas.
- Template: The template that will be used to create the pod.
- Template.spec.containers: The containers that will be present within the pod.
Now, create a Kubernetes Service manifest:
apiVersion: v1
kind: Service
metadata:
 name: nodeapp-service
spec:
 selector:
   app: nodeapp
 ports:
   - protocol: TCP
     port: 80
     targetPort: 8080
 type: NodePort
Let’s break down what’s happening within this service manifest.
- Kind: The type of Kubernetes object that is being created.
- metadata.name: The name of this service object. In this case, it’s called nodeapp-service
- Spec.selector: The pod labels that should be exposed by this service
- Ports: Defining the protocol type and port numbers that should be exposed for the application
- Type: The type of service that is being created.
Using these manifests, you can deploy the application to the Kubernetes cluster. Please run the command below to apply the deployment and service manifest to your Kubernetes cluster.
kubectl apply -f deployment.yaml service.yaml
With this, you have successfully deployed the Node.js application to the GKE cluster.
Kubernetes Deployment with Devtron
Devtron is a comprehensive Kubernetes management platform designed to simplify the entire the lifecycle, from the initial build stages to deployments and beyond. It eliminates the complexities of Kubernetes by providing an intuitive interface for automating CI/CD pipelines, managing Helm charts, and monitoring deployments in real-time. When deploying applications on GKE, Devtron simplifies the process by handling containerization, generating Kubernetes manifests, and ensuring seamless rollouts with built-in security and scalability best practices.
Let’s go through the steps of deploying an application on GKE using Devtron:
Prerequisites
Before moving forward, let’s look at all the things you’ll require to follow along:
- An Application on GitHub
- Devtron is installed and configured on your machine. If you haven’t installed Devtron, feel free to check out the well-managed documentation and join the discord community for help!
A GKE cluster integrated with the Devtron platform. Check out the documentation for a step-by-step guide on setting it up.
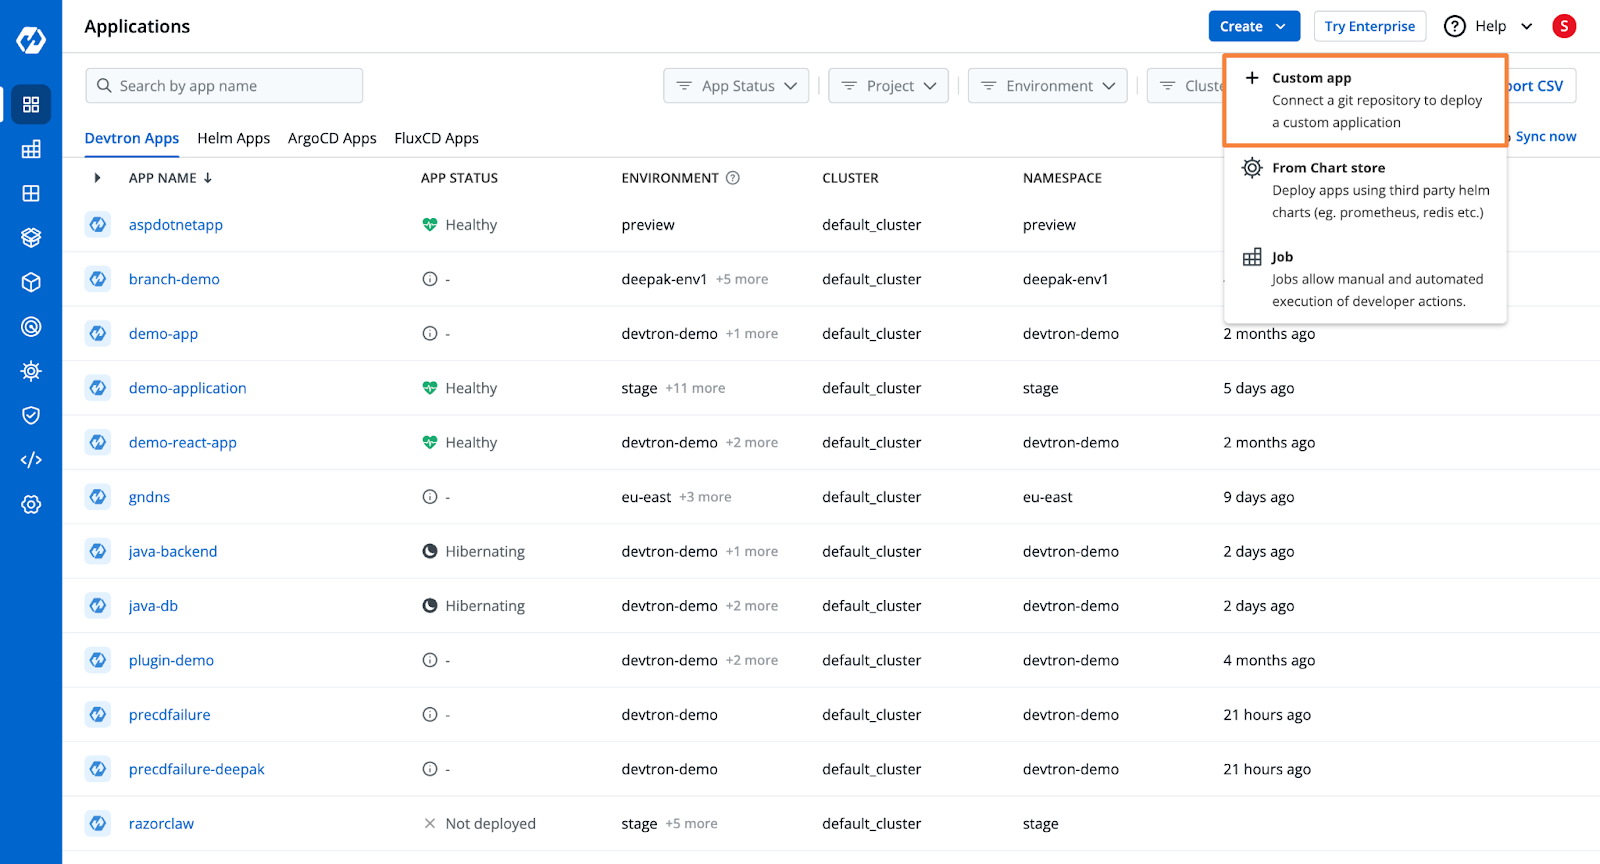
Step 1: Create a Devtron application and add the Git Repository
From Devtron’s home page, create a new Devtron application, and name it as demo-application
Devtron can build the application and create the container image. To do this, it needs the URL for the Git Repository. Check out the documentation to learn more about the application creation process.
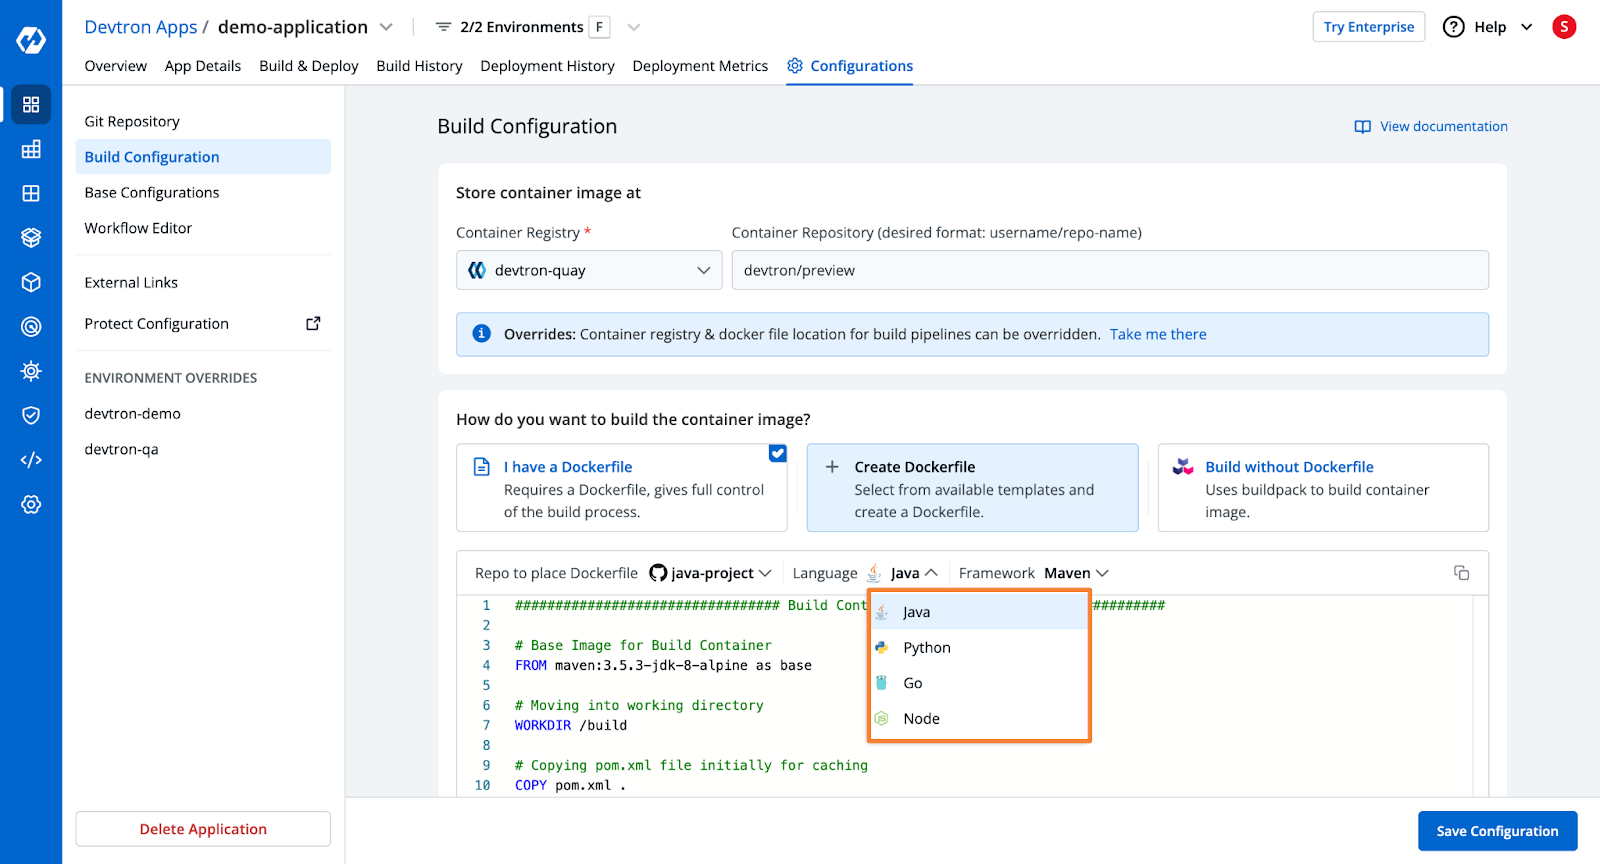
Step 2: Configure the Build
Devtron will automatically take the code from the Git repository and build the container image. For this, it requires an OCI Container Registry to push the build container image, and it requires a Dockerfile.
You can add the Container Registry from the Global Configurations.
For the build instructions, Devtron provides you with 3 options.
- Use an existing Dockerfile
- Create the Dockerfile
- Use Buildpacks
If you choose to create the Dockerfile within Devtron, you are offered several templates for popular programming languages and frameworks.
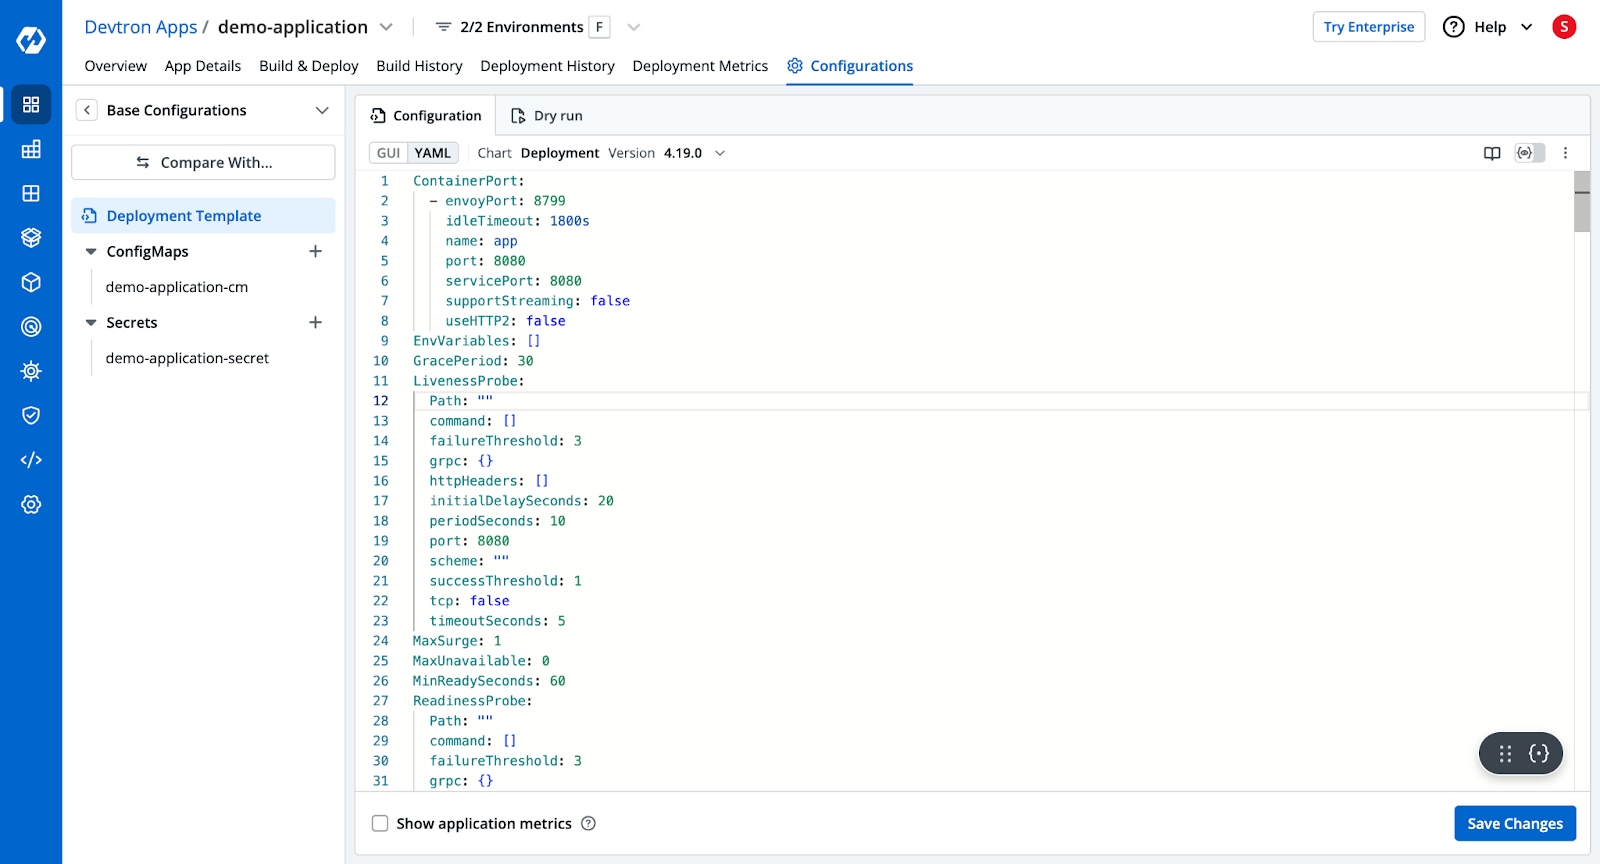
Step 3: Deployment Configurations
Next, you want to configure the actual deployment manifest that will be applied to the Kubernetes cluster. Unlike before, where you had to manually write all the YAML files, Devtron provides a YAML template where you can simply put in the configurations you want.
This template also has advanced configuration options such as ingress and autoscale. Simply configure the deployment template according to your needs, and Devtron will automatically create the configured resources.

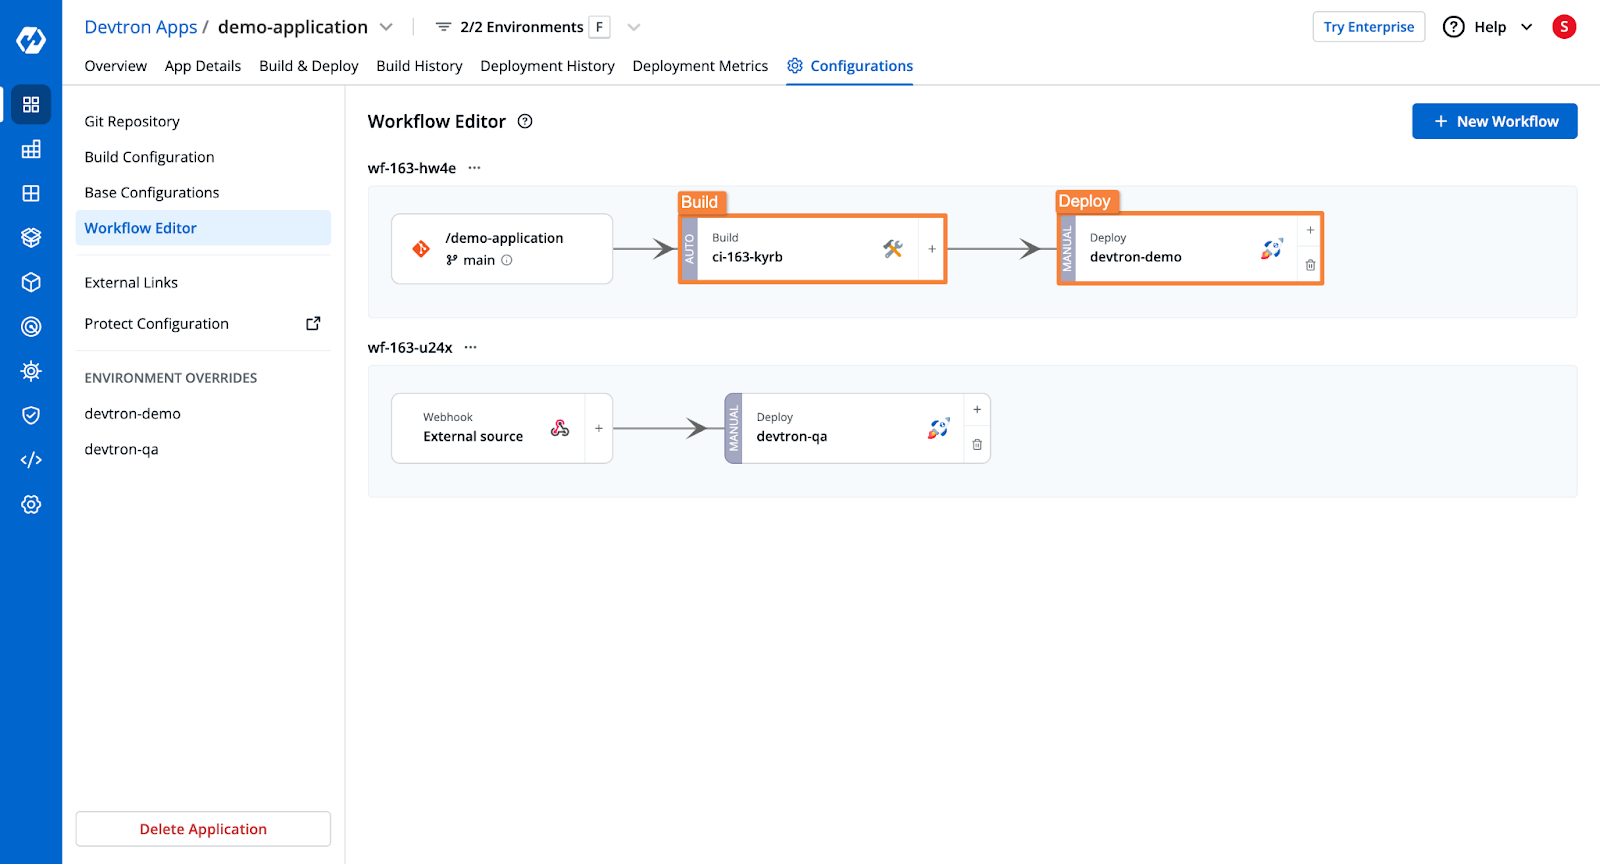
Step 4: Create the Build and Deploy Pipelines
Next, you want to create the CI (continuous integration) and CD (continuous deployment) pipelines.
The CI pipeline will take your application code from the configured Git Repository and branch and will build the Dockerfile and push it to a Docker Repository. You can also configure a security scan within the Build Pipeline.
The Deployment pipeline, on the other hand, will trigger the Deployment on the Kubernetes clusters in the configured environment.
In both the build and deployment pipelines, you can configure a Pre and Post stage, and configure them to take certain actions. For example, you can configure the Sonarqube plugin to scan the code for vulnerabilities in the Pre-CI stage.
Please check the documentation to learn more about the pipeline configurations.
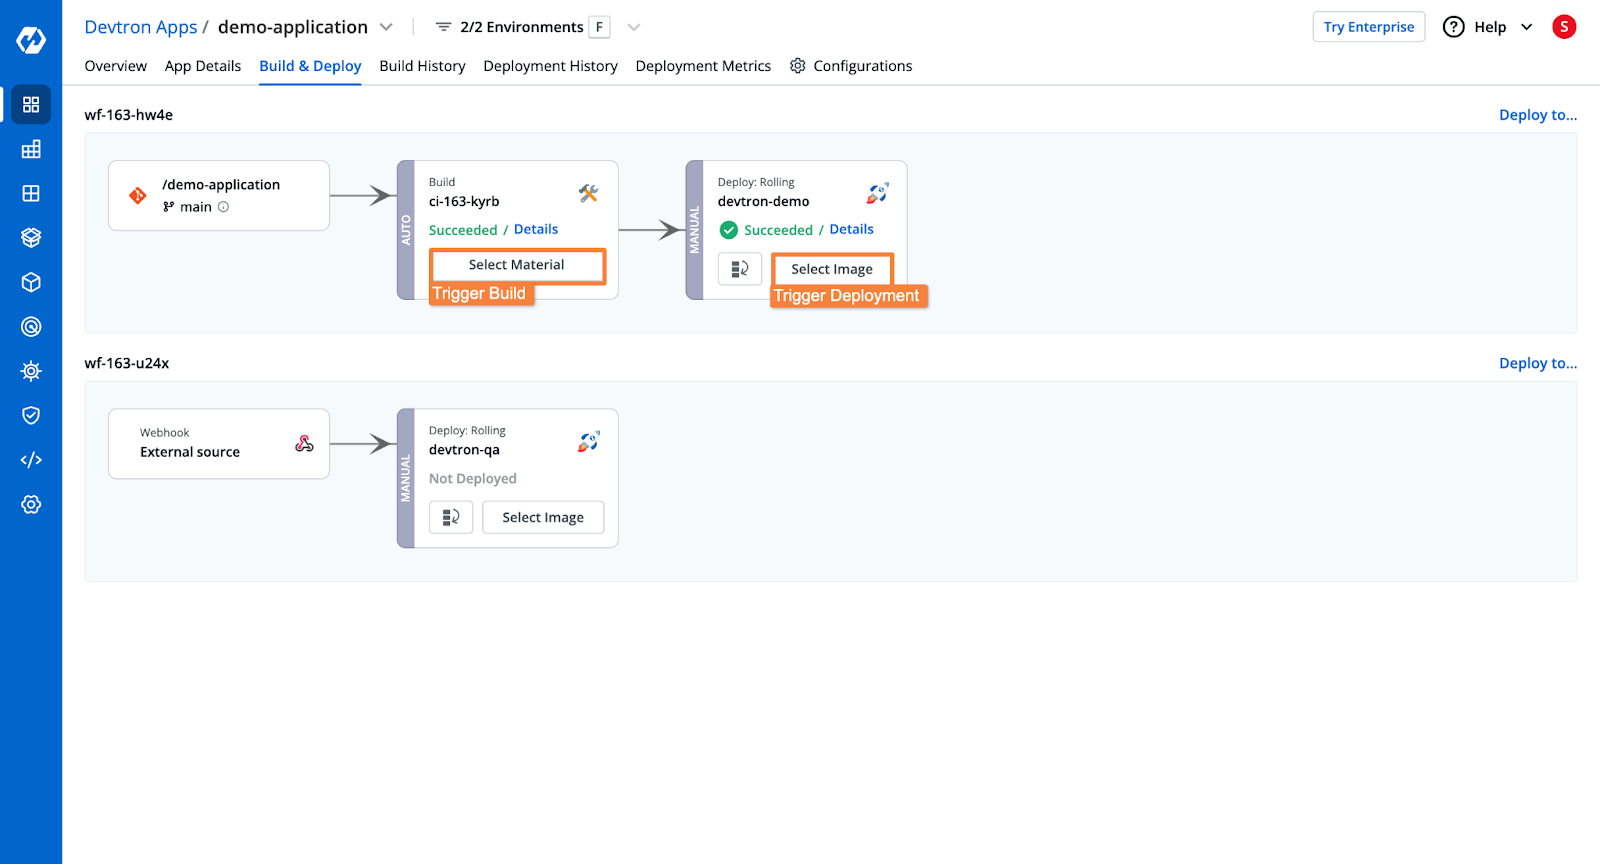
Step 5: Trigger the Build and Deployment Pipelines
Once all the configurations are complete, all that’s left is to trigger the build stage, and subsequently the deployment.
From the Build & Deploy tab, select the Git material to trigger the build stage. The pipeline will build the container image.
Once the build stage is complete, you can trigger the deployment for the built artifact.
Upon triggering the deployment, Devtron will deploy the application to your GKE cluster, with the configurations that you created earlier.
Once the application is deployed, you will be able to see the application health, deployment status, security vulnerabilities, the Kubernetes resources of the application, and more.
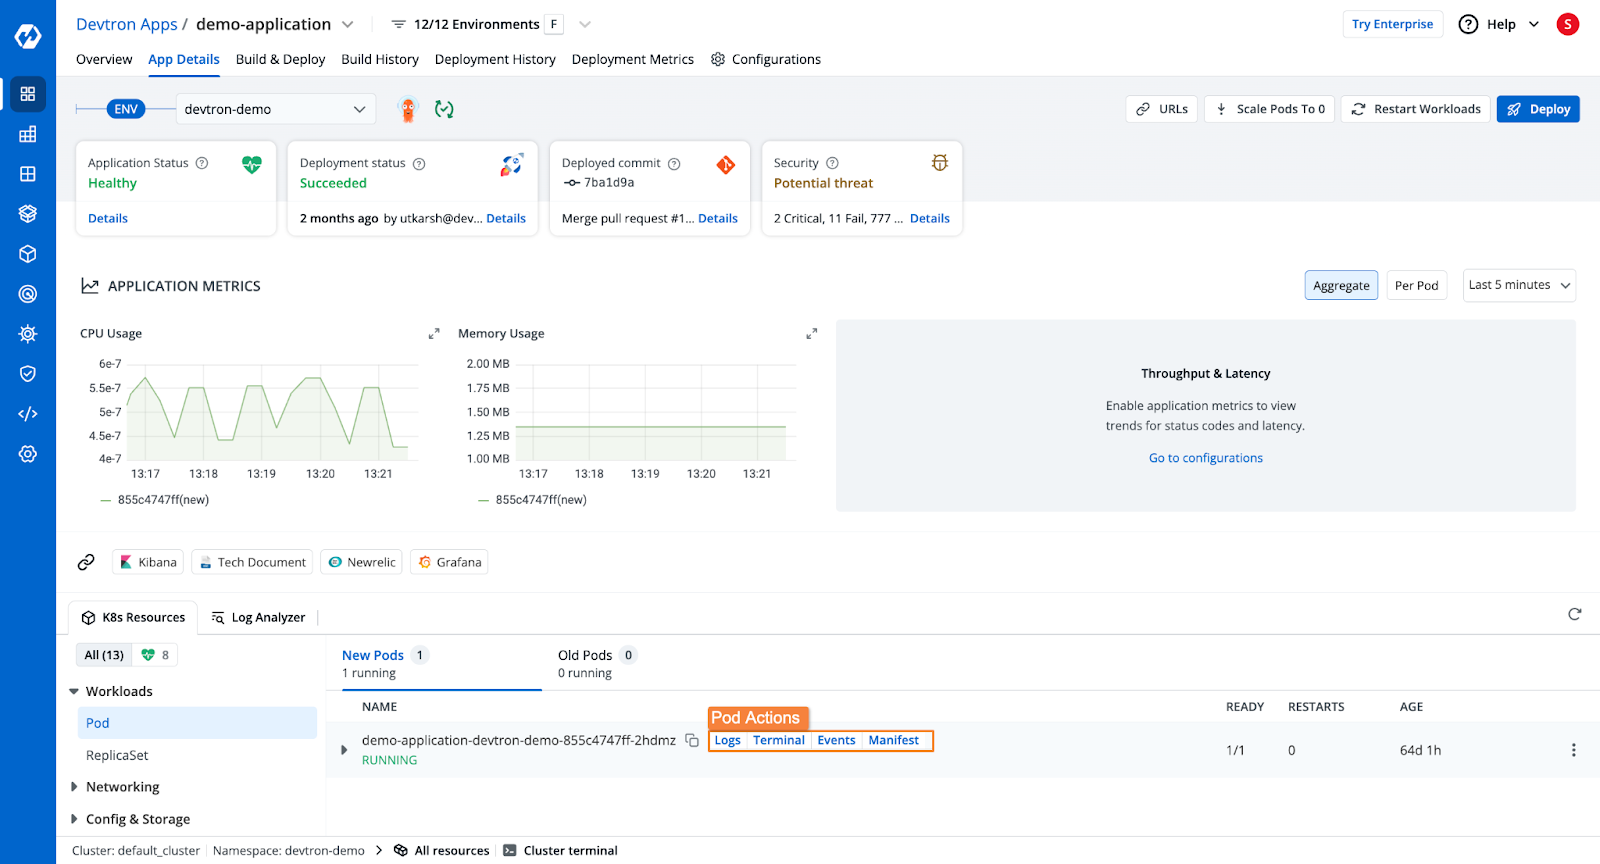
Additionally, Devtron will also show the entire Build as well as the Deployment history. In case of any errors in the deployment, you can also trigger a rollback to a previous deployment version.
Conclusion
In this blog, we explored the step-by-step process of configuring and deploying an application on a GKE cluster. To summarize, we covered:
- Configuring a GKE cluster
- Creating Kubernetes manifests
- Deploying the application on GKE
- Streamlining deployments with Devtron
Devtron can help accelerate deployment velocity while also ensuring that deployments are more reliable. For working with Kubernetes, Devtron can act as the single solution you need.
Check out Devtron’s GitHub page, and start deploying applications to Kubernetes.
FAQ
What is the best way to deploy applications to Kubernetes on Google Cloud?
The best way is to use Google Kubernetes Engine (GKE), which provides a managed Kubernetes service. You can deploy applications using kubectl, Helm, or CI/CD pipelines.
How do I create a Kubernetes cluster on GCP?
You can create a GKE cluster using the gcloud CLI or via Terraform for automation.
How much does it cost to run Kubernetes on GCP?
Costs depend on node types, usage, and network resources. GKE Autopilot is a cost-effective option since it optimizes resources automatically.
What are the best practices for deploying applications on GKE?
- Use Helm charts for easier management.
- Implement GitOps with ArgoCD or FluxCD for automated deployments.
- Use horizontal pod autoscaling to handle varying workloads.
Should I use GKE Standard or GKE Autopilot?
- Use GKE Standard if you need full control over nodes, networking, and security.
- Use GKE Autopilot if you want Google to manage everything (less ops overhead).