Kubernetes has become the backbone of modern, cloud-native application delivery. But to unlock its full potential, it's not enough to just deploy containers—you need to follow best practices that ensure performance, security, and reliability at scale.
In this blog, we’ll break down key strategies to optimize your Kubernetes deployments. And with Devtron, you can simplify and automate these best practices, making production-grade deployments easier than ever.
What is a Kubernetes Deployment
A Kubernetes Deployment is a Kubernetes object defined through YAML configurations, allowing you to specify how applications should be deployed and managed. Additionally, "deployment" in Kubernetes also refers to the process of rolling out new application versions.
If you wish to dive deeper into what the Kubernetes deployment object is and how it works, please check our detailed blog on Kubernetes Deployments.
Kubernetes Deployment Best Practices
When deploying to Kubernetes, there are a couple of best practices that should be followed to ensure that the deployments are reliable, can scale efficiently, and ensure that the application will be resilient to downtime in any production environment. Let’s have a look at the best practices that should be followed during the deployment of applications to Kubernetes.
1. Deploy Applications using Helm Charts
Helm is a CLI utility that helps simplify application deployment and management in a Kubernetes cluster. Instead of manually applying multiple YAML files, Helm bundles them into charts, allowing you to install, upgrade, and manage applications with a single command. It is essentially a package manager for deploying applications to Kubernetes.
Often, when you install any Kubernetes application, it contains a bunch of YAML files, which you need to apply manually in the Kubernetes cluster using the kubectl apply command. Helm eliminates this manual, tedious process by packaging all these YAML files into one chart called the Helm Chart, allowing deployment to the cluster with a single helm install command.
2. Use Taints and Tolerations for Pod Scheduling
In Kubernetes, taints and tolerations are used to schedule pods onto specific nodes. This helps you ensure that pods are being placed on the right nodes based on certain conditions, such as resource requirements or hardware needs.
- Taints are applied to nodes to indicate that no pod should be scheduled on them unless the pod has a matching toleration.
- Tolerations are applied to pods to allow them to be scheduled on nodes with matching taints.
This mechanism helps you to avoid unwanted pod placements and ensures optimal use of node resources. For example, taints can be applied to nodes that require special hardware, and only pods with the matching toleration will be scheduled on those nodes.
You can use taints and tolerations for the following use cases:
- Use taints to reserve nodes for specific workloads or to prevent workloads from being scheduled on nodes that cannot meet their requirements.
- Apply tolerations in your pod specs to allow them to be scheduled on tainted nodes.
3. Set Kubernetes Affinity Rules for the pods
Kubernetes Affinity is another pod scheduling mechanism that allows us to control the placement of pods based on specific criteria, such as pod or node labels.
There are two types of affinity:
- Node Affinity: It allows you to schedule pods to specific nodes based on node labels. You can use required or preferred rules to define how strictly Kubernetes should follow your node placement preferences.
- Pod Affinity/Anti-Affinity: It determines where a pod should be scheduled in relation to other pods. Affinity ensures pods are placed together, while Anti-Affinity ensures they are placed apart.
This way it ensures that pods are scheduled on the best-suited nodes, reducing resource wastage. Anti-affinity can also help avoid placing critical pods on the same node, improving high availability.
4. Set a Pod Disruption Budget (PDB) to avoid failure
Pod Disruption Budget or PDB is a mechanism in Kubernetes that ensures that a minimum number of pods, of any workload, are always available during any disruptions caused by maintenance operations such as node draining, cluster upgrade, or scaling operations. If the number of pods falls below the defined target size, Kubernetes will prevent further disruptions to the remaining pods until the target size is met.
PDBs are used to ensure that workloads are not affected by these events and can continue to run uninterrupted. When a disruption occurs, Kubernetes will attempt to gracefully evict pods from the affected node(s) to maintain the desired number of replicas specified in the PDB.
Pod Disruption Budgets can be used for the following reasons:
- Maintain Availability: Prevent applications from going offline during rolling updates or node maintenance.
- Improve Resilience: Ensures that at least a certain number of pods are always running, maintaining service continuity.
- Control Disruption Impact: PDB ensures that Kubernetes doesn’t accidentally evict too many pods at once, keeping your application highly available.
Pod Disruption Budgets are a vital part of managing high-availability applications in Kubernetes, ensuring minimal disruption during updates and scaling.
5. Topology Spread Constraint
Topology Spread Constraint is a feature in Kubernetes that ensures that your pods are evenly distributed across different topological domains, such as Nodes, Availability Zones, and Regions. If the pods of any Kubernetes workloads are grouped together in a single Node, the failure of a single node or zone could lead to major disruption in our application’s availability.
Topology Spread Constraint allows you to define how your pods should be distributed across all these topological domains, helping you to improve fault tolerance and ensuring that workloads are well-balanced across the cluster.
6. Resource Identification Using Labels
In Kubernetes, multiple resources work together to run a single application. When the application starts scaling, the resources start multiplying as well. Also, when new applications are deployed, the resources increase simultaneously. It becomes very difficult to manage so many Kubernetes resources without any way to categorize them. This is where we use Kubernetes labels to identify, group, and manage multiple resources.
Labels are key-value pairs that are attached to Kubernetes resources including pods, services, deployments, and more. They help you identify the Kubernetes resources dynamically.
They are widely used in various Kubernetes operations, such as:
- Service Discovery: Labels allow Services to find and route traffic to the right set of Pods.
- Workload Management: Deployments, ReplicaSets, and StatefulSets use labels to manage the correct Pods.
- Access Control: Policies and network rules can be applied based on labels.
- Topology & Affinity Rules: Labels help define node or pod affinity for efficient workload scheduling.
7. Set up Liveness and Readiness Probes for Complex Apps
Liveness and Readiness probes are types of health checks that ensure that applications are running smoothly and serving traffic correctly. For simple applications, basic checks like HTTP status codes or TCP connections might be enough. However, complex applications require more advanced and customized probe configurations to ensure your application is healthy, responsive, and ready to handle requests. Without these probes, there will be no way for Kubernetes to know if your application is functioning properly.
A Liveness probe is used to check if your application is running so that it can be marked healthy. This feature ensures that all the pods of your application are healthy and handle requests properly. If any pod is found to be unhealthy, then the probe failure will cause the Kubelet to relaunch that pod, which will then be tested again.
Readiness probe, on the other hand, makes sure that requests are only directed to the pod when it’s ready. Let’s assume that a pod takes 20 seconds to start once it has been deployed, the readiness probe will ensure that no requests are directed to the pod until it has started.
8. Set resource requests and limits
Resource requests and limits in Kubernetes enable you to define the minimum and maximum resources that can be used by your application. It defines the amount of CPU and memory available in millicores and mebibytes. This mechanism prevents the container from starting without the required resources assigned to it and also prevents the cluster from running out of resources.
If limits are not enabled, then pods may utilize more resources than required, which would reduce the total resources available in the cluster. This would cause problems as the pods would consume more resources than required and deprive the other applications of consuming the required resources. To prevent this from happening, you should define proper requests and limits for your applications.
9. Use the proper Kubernetes autoscaling technique
The traffic to an application is never constant. At one point in time, there could be a greater traffic demand, and at another point, there could be a lesser demand. To handle the traffic properly, your application must be able to scale automatically to handle these requests. If the application does not scale properly, then it will crash when the traffic is high and waste resources when the traffic is low. This would result in losing valuable customers and wasting resources as well.
Kubernetes autoscaling helps you tackle this situation by automatically adjusting the resources based on demand. There are four types of autoscaling in Kubernetes:
- Horizontal Pod Autoscaler (HPA): Increases or decreases the number of application instances (pods) based on CPU, memory, or custom metrics.
- Vertical Pod Autoscaler (VPA): Adjusts how much CPU and memory each pod gets.
- Cluster Autoscaler: Adds or removes nodes in the cluster.
Without autoscaling, your applications could either be overwhelmed by high traffic or waste money on unused resources.
10. Use an External Secrets Manager
Storing sensitive information like passwords, API keys, and certificates in Kubernetes can be very difficult. Hardcoding the secrets in a configuration file or storing them directly in Kubernetes ConfigMaps & Secrets might seem like a simple solution, but it usually comes with a lot of risks. Secrets might get accidentally exposed when hardcoded and if stored in Kubernetes secrets, they can be easily decoded since they’re not encrypted. This would lead to security breaches, unauthorized access, or compliance issues.
This is where an external secrets manager comes in handy; an external secrets manager securely stores and manages secrets outside the Kubernetes cluster while automatically injecting them into our applications when needed. Secrets are stored in encrypted external vaults, ensuring they remain protected and inaccessible to unauthorized users. Popular tools like HashiCorp Vault, AWS Secrets Manager, and Google Secret Manager provide secure and efficient ways to manage secrets.
11. Scan your container images for security vulnerabilities
Security is an essential aspect of running applications in Kubernetes. If any vulnerabilities are present in container images, they might expose our application to serious threats such as data breaches or potential attacks. To prevent this from happening, regular security scanning of container images is essential.
Security scanning tools like Trivy, Clair, Docker Scout, and AWS Inspector help you scan your container images for any known vulnerabilities. It helps you catch security issues early in the development stage and prevents you from unknowingly deploying a vulnerable image in your cluster.
12. Implement an Observability Stack
In a Kubernetes cluster, understanding what’s happening under the hood is very crucial for maintaining performance and stability. This is handled by the observability stack in Kubernetes, which helps you track the health of your applications, identify bottlenecks, and quickly pinpoint the root causes of issues. Without an observability stack, it’s like finding a needle in a haystack when problems arise.
A typical observability stack for Kubernetes includes three key components:
- Metrics: These are quantitative data points about the system’s performance, such as CPU usage, memory consumption, and request counts.
- Logs: Logs provide detailed information about what’s happening inside the system. Every event that occurs within your Kubernetes environment is logged, from pod crashes to user requests.
- Tracing: Tracing provides end-to-end visibility of requests as they travel through your system.
Without an observability stack, troubleshooting Kubernetes clusters becomes time-consuming and guesswork-based. However, with proper observability, you can proactively monitor the health of our services, optimize resource usage, and quickly resolve any issues that arise.
13. Deploy with GitOps Approach
Deploying your applications using GitOps is the modern, efficient way of deploying applications that use Git as the single source of truth for infrastructure and application configuration. GitOps automates the deployment process which improves collaboration and ensures consistent environments across multiple stages. With GitOps, you no longer have to manually configure the deployment process as tools like ArgoCD and FluxCD monitor your Git repository for changes and automatically sync them with your Kubernetes cluster, ensuring that the actual state of your application always matches the desired state.
This creates a fully automated, auditable, and reproducible deployment workflow.
14. Use Role-based access control (RBAC)
Without proper access control in a Kubernetes cluster, there are security risks that might arise when users gain access to admin privileges. Anyone could inadvertently access or modify sensitive data or perform actions they shouldn’t.
Using RBAC is essential to properly secure your system. RBAC is a way to define and enforce permissions for users and groups based on their roles. It ensures that each user or service has access only to the resources they need, and can perform only the actions that are required for their job. This minimizes the risks of accidental or unauthorized access, which could disrupt the system.
See SSO and RBAC: A Secure Access Strategy for your Kubernetes
15. Implement correct Kubernetes Deployment Strategies to avoid downtime
Deploying new updates in Kubernetes without a proper strategy can lead to downtime, failed releases, or broken applications. Kubernetes provides deployment strategies to ensure smooth rollouts and minimal risks.
Let’s assume you own a web application, you released a new version of your app. If you replace all the old versions at once and there’s a bug, then all users will experience issues, leading to frustration. Instead, using a well-planned deployment strategy can ensure a smooth rollout and even allow quick rollbacks if something goes wrong.
16. Set Policy enforcement at scale
When an application grows, maintaining security, compliance, and best practices across a Kubernetes cluster becomes very difficult. For a few deployments, it’s easy to enforce policies manually. But at a large scale, across hundreds and thousands of pods, manually enforcing policies is not so feasible. It becomes quite impractical, leading to inconsistencies, security gaps, and operational risks. This might lead teams to deploy insecure configurations, overconsume resources, or violate compliance policies.
To enforce policies efficiently, Kubernetes provides automated policy enforcement mechanisms:
- Admission Controllers (e.g., OPA, Kyverno) enforce policies at deployment time.
- Network Policies control pod-to-pod communication.
Automating policy enforcement ensures security, compliance, and efficient resource management, keeping large-scale Kubernetes clusters reliable and secure.
17. Scale and Manage Pods the right way
When deploying pods, we should always make sure that it is never deployed individually. They should always be a part of a Deployment, DaemonSet, ReplicaSet, or StatefulSet to minimize fault tolerance. The pods can then be deployed across nodes using Kubernetes Affinity rules, PDB, and Topology constraints to avoid all pods being run on a single node, which may cause issues if one of the pods were to go down.
18. Ensure High Availability of resources
Ensuring high availability for an application means keeping it running even if something goes wrong. In Kubernetes, the simplest way to achieve this is by running multiple instances(replicas) of our application. If a pod crashes or fails, other replicas can continue handling traffic without downtime.
For example, setting replicaCount: 3 in your Deployment ensures that three instances of your app are running. If one pod crashes, Kubernetes will replace it without affecting service availability.
19. Regularly upgrade Cluster Components
Cluster Components like the API Server, controller manager, scheduler, and kubelet are the backbone of your Kubernetes cluster. If any of these components fall behind on updates, it can lead to issues such as security vulnerabilities, compatibility problems, or degraded performance.
Keeping your Kubernetes cluster components up to date is critical for maintaining security, performance, and stability. Updating your cluster components ensures that you are leveraging the latest improvements and protecting your system from vulnerabilities.
20. Optimize storage components
Optimizing storage components is essential for maintaining high performance, cost-effectiveness, and data availability in your cluster. Without proper storage optimization, your application may face slow performance, data loss, or unnecessary costs.
There are several types of storage components in Kubernetes, such as Persistent Volumes (PVs), Persistent Volume Claims (PVCs), and Storage Classes, each offering different methods of managing storage resources. By choosing the right storage strategies, you can ensure your applications remain highly available, fast, and cost-efficient.
21. Separate Resources with Namespaces
Use Kubernetes namespaces to organize resources and create logical partitions in the cluster. Without namespaces, resources get mixed up, increasing the risk of misconfigurations and security issues. Using them keeps your cluster structured, scalable, and easier to manage.
Managing Kubernetes Deployment with Devtron
I have covered the best practices for Kubernetes deployment, but implementing them across all your clusters and applications comes with challenges: manual configurations, managing security policies, monitoring resource usage, and ensuring seamless updates. Tool sprawl makes it even harder. What if managing them could be even easier? With the Devtron Platform, it is.
Devtron is a Kubernetes-native tool integration platform that streamlines deployments using the GitOps approach. It provides an intuitive web interface to deploy, observe, manage, and debug applications across all your clusters, making Kubernetes management effortless and efficient.
With Devtron, you get the following benefits:
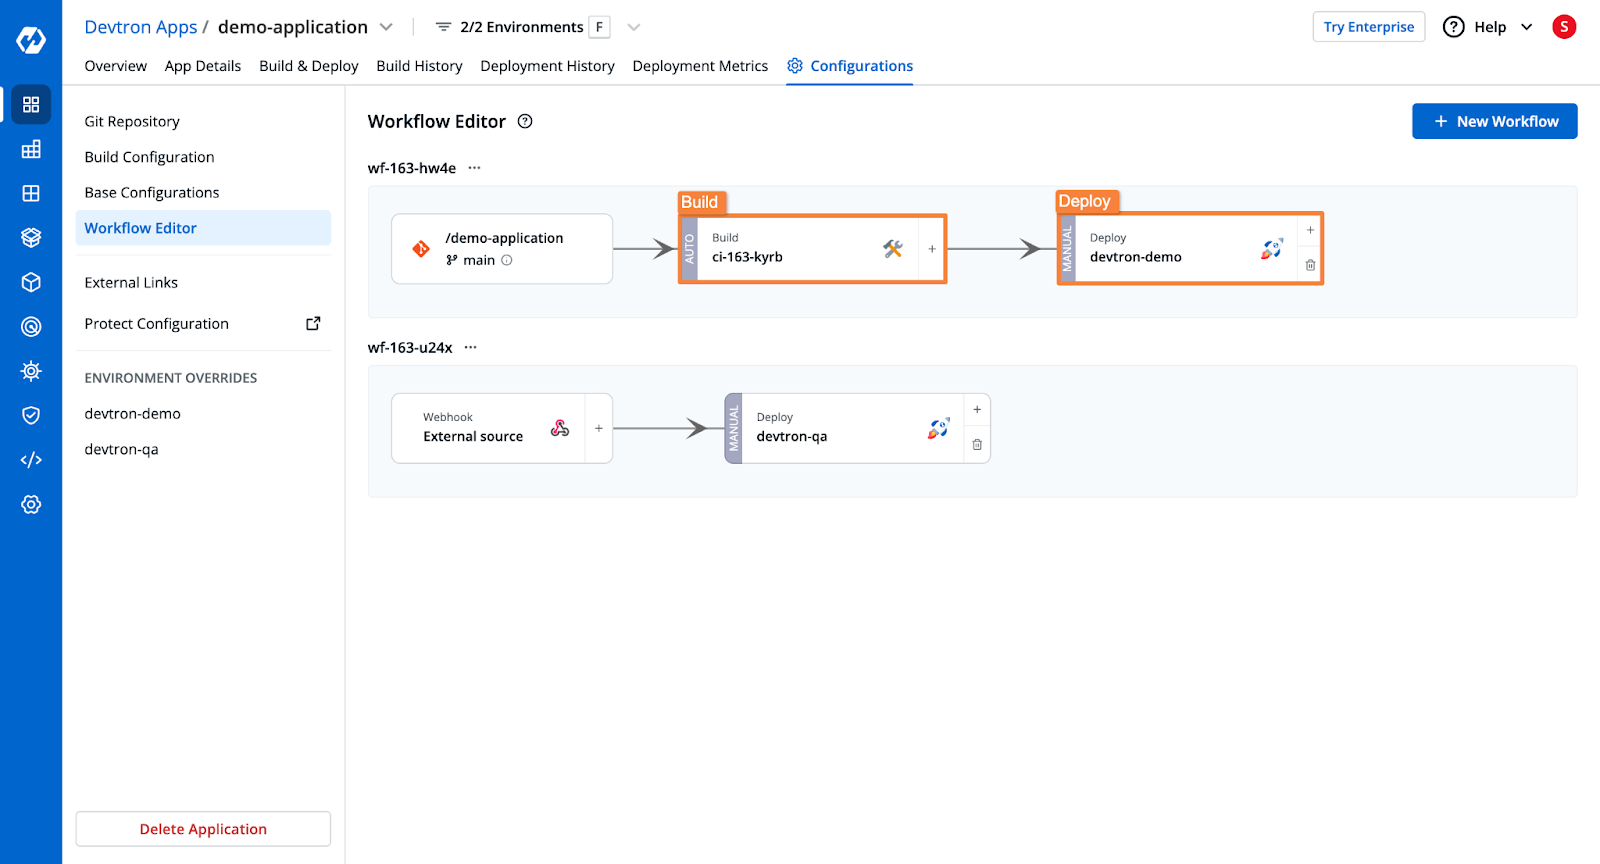
- Workflow editor to manage different stages used for continuous integration and continuous deployment of an application.
- Instead of manually writing YAML files, Devtron offers deployment templates where you simply input your configurations.
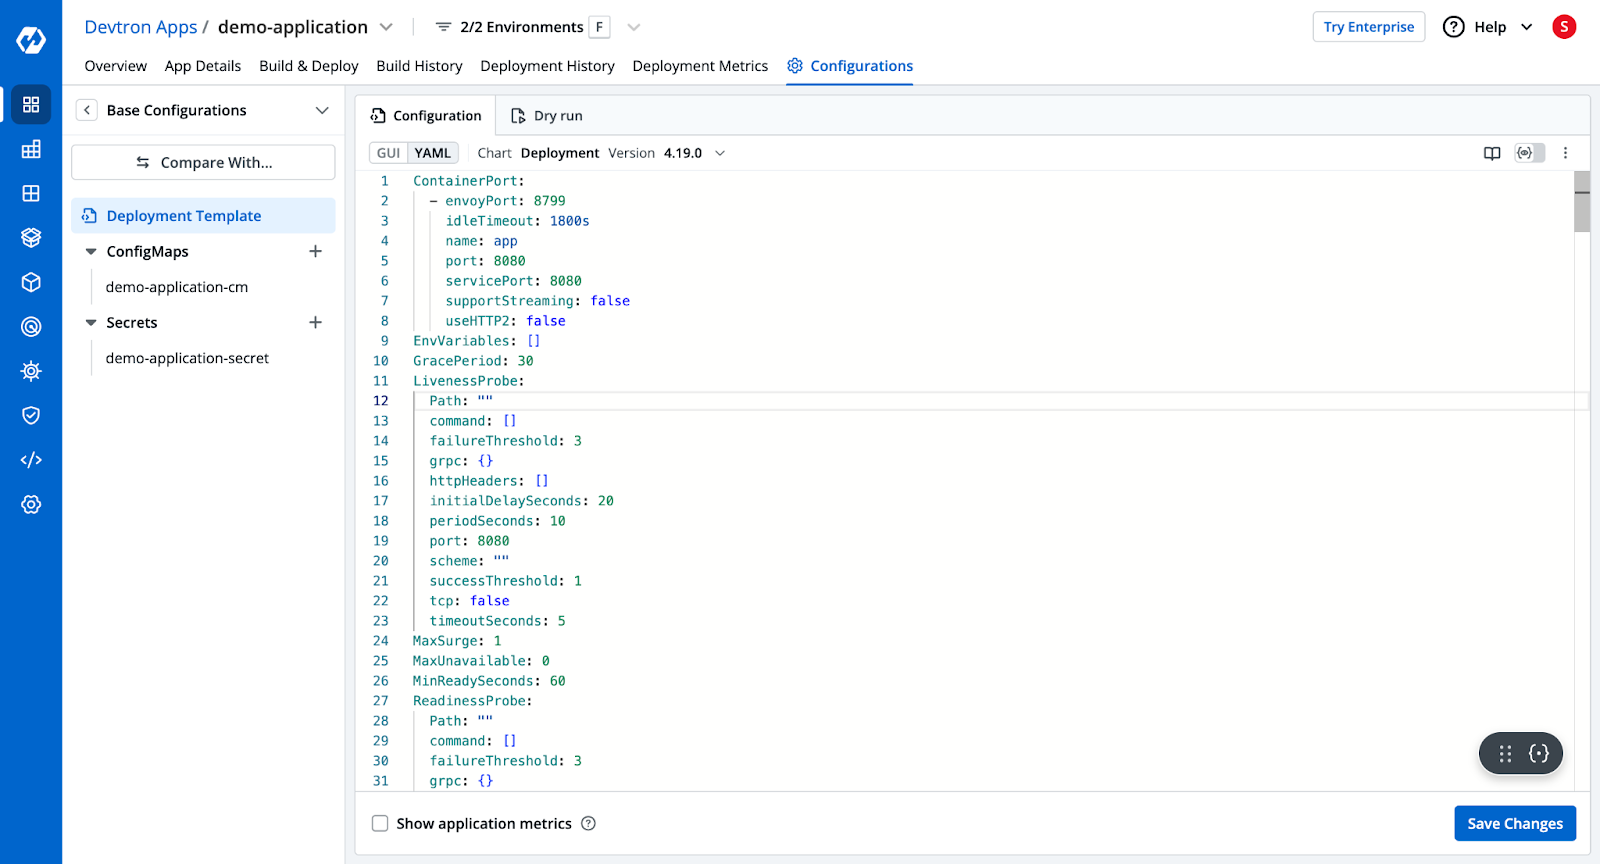
This template also has advanced configuration options such as ingress and autoscalers. Simply configure the deployment template according to your needs, and Devtron will automatically create the configured resources.
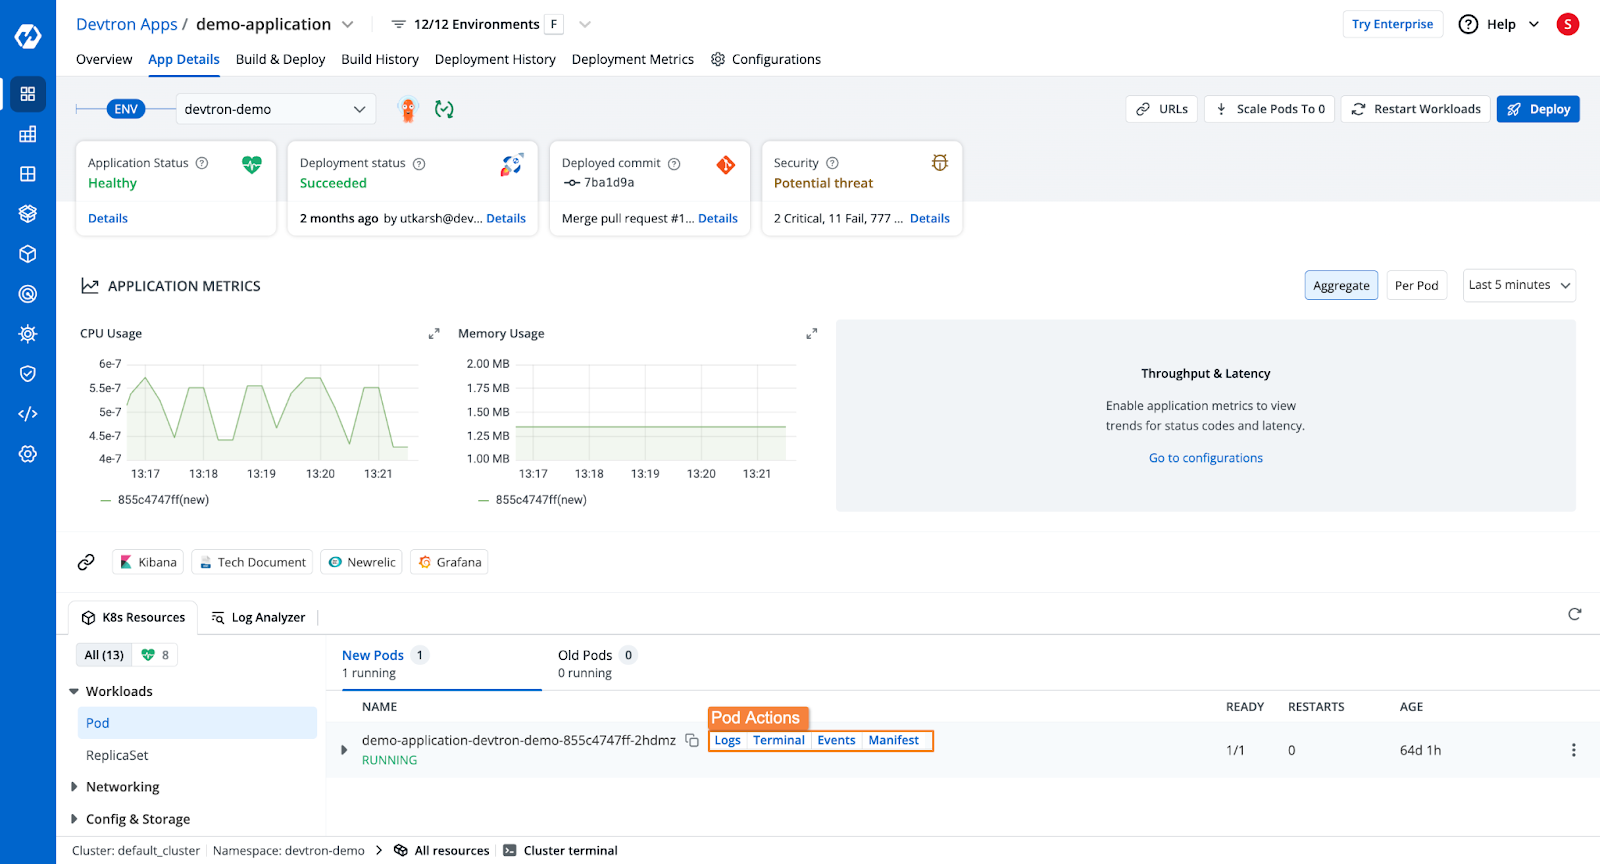
- The application dashboard gives you a comprehensive view of health, deployment status, security vulnerabilities, Kubernetes resources, and more after deployment.
Conclusion
In this blog, we explored the best practices for Kubernetes deployment and how to implement them effectively. To summarize, we covered:
- Using Kubernetes autoscaling for efficient resource management
- Setting resource requests and limits to prevent overuse
- Separating resources with namespaces for better organization
- Overcoming deployment challenges, including tool sprawl
FAQ
What are the steps for deploying in Kubernetes?
To deploy in Kubernetes:
- Set up a cluster (e.g., GKE, EKS, or Minikube).
- Containerize your app with Docker and push the image to a registry.
- Create YAML manifests (e.g., Deployment, Service).
- Apply manifests using
kubectl apply -f <file.yaml>. - Expose the app with a Service or Ingress.
- Verify pods with
kubectl get pods. - Monitor and log using tools like Prometheus or Fluentd.
How many types of Deployments are there in Kubernetes?
Kubernetes supports multiple deployment strategies. The most common ones include:
- Recreate – Stops old pods before starting new ones.
- Rolling Update – Gradually replaces old pods with new ones (default strategy).
- Blue-Green – Runs two environments (blue and green) and switches traffic to the new version.
- Canary – Releases updates to a small subset of users before a full rollout.
- A/B Testing – Similar to canary but routes traffic based on conditions.
How to scale deployment in Kubernetes?
To scale a Kubernetes deployment, use kubectl scale deployment <name> --replicas=<number> or edit the replicas field in the deployment YAML. For dynamic scaling, enable Horizontal Pod Autoscaler with kubectl autoscale.
What is a Helm Chart?
A Helm chart is a package of pre-configured Kubernetes resources that simplifies application deployment and management. It includes templates, values, and metadata, enabling reusable and consistent deployments across environments.